Set Up Maps

This section contains the following topics:

Get a Quick View in the Dashboard

The Home page displays a customizable collection of dashlets which provide an at-a-glance operational summary of the network being managed, including reachability and operational status of devices. The Dashboard is made of a series of dashlets, and each dashlet represents different types of data belonging to the same category.
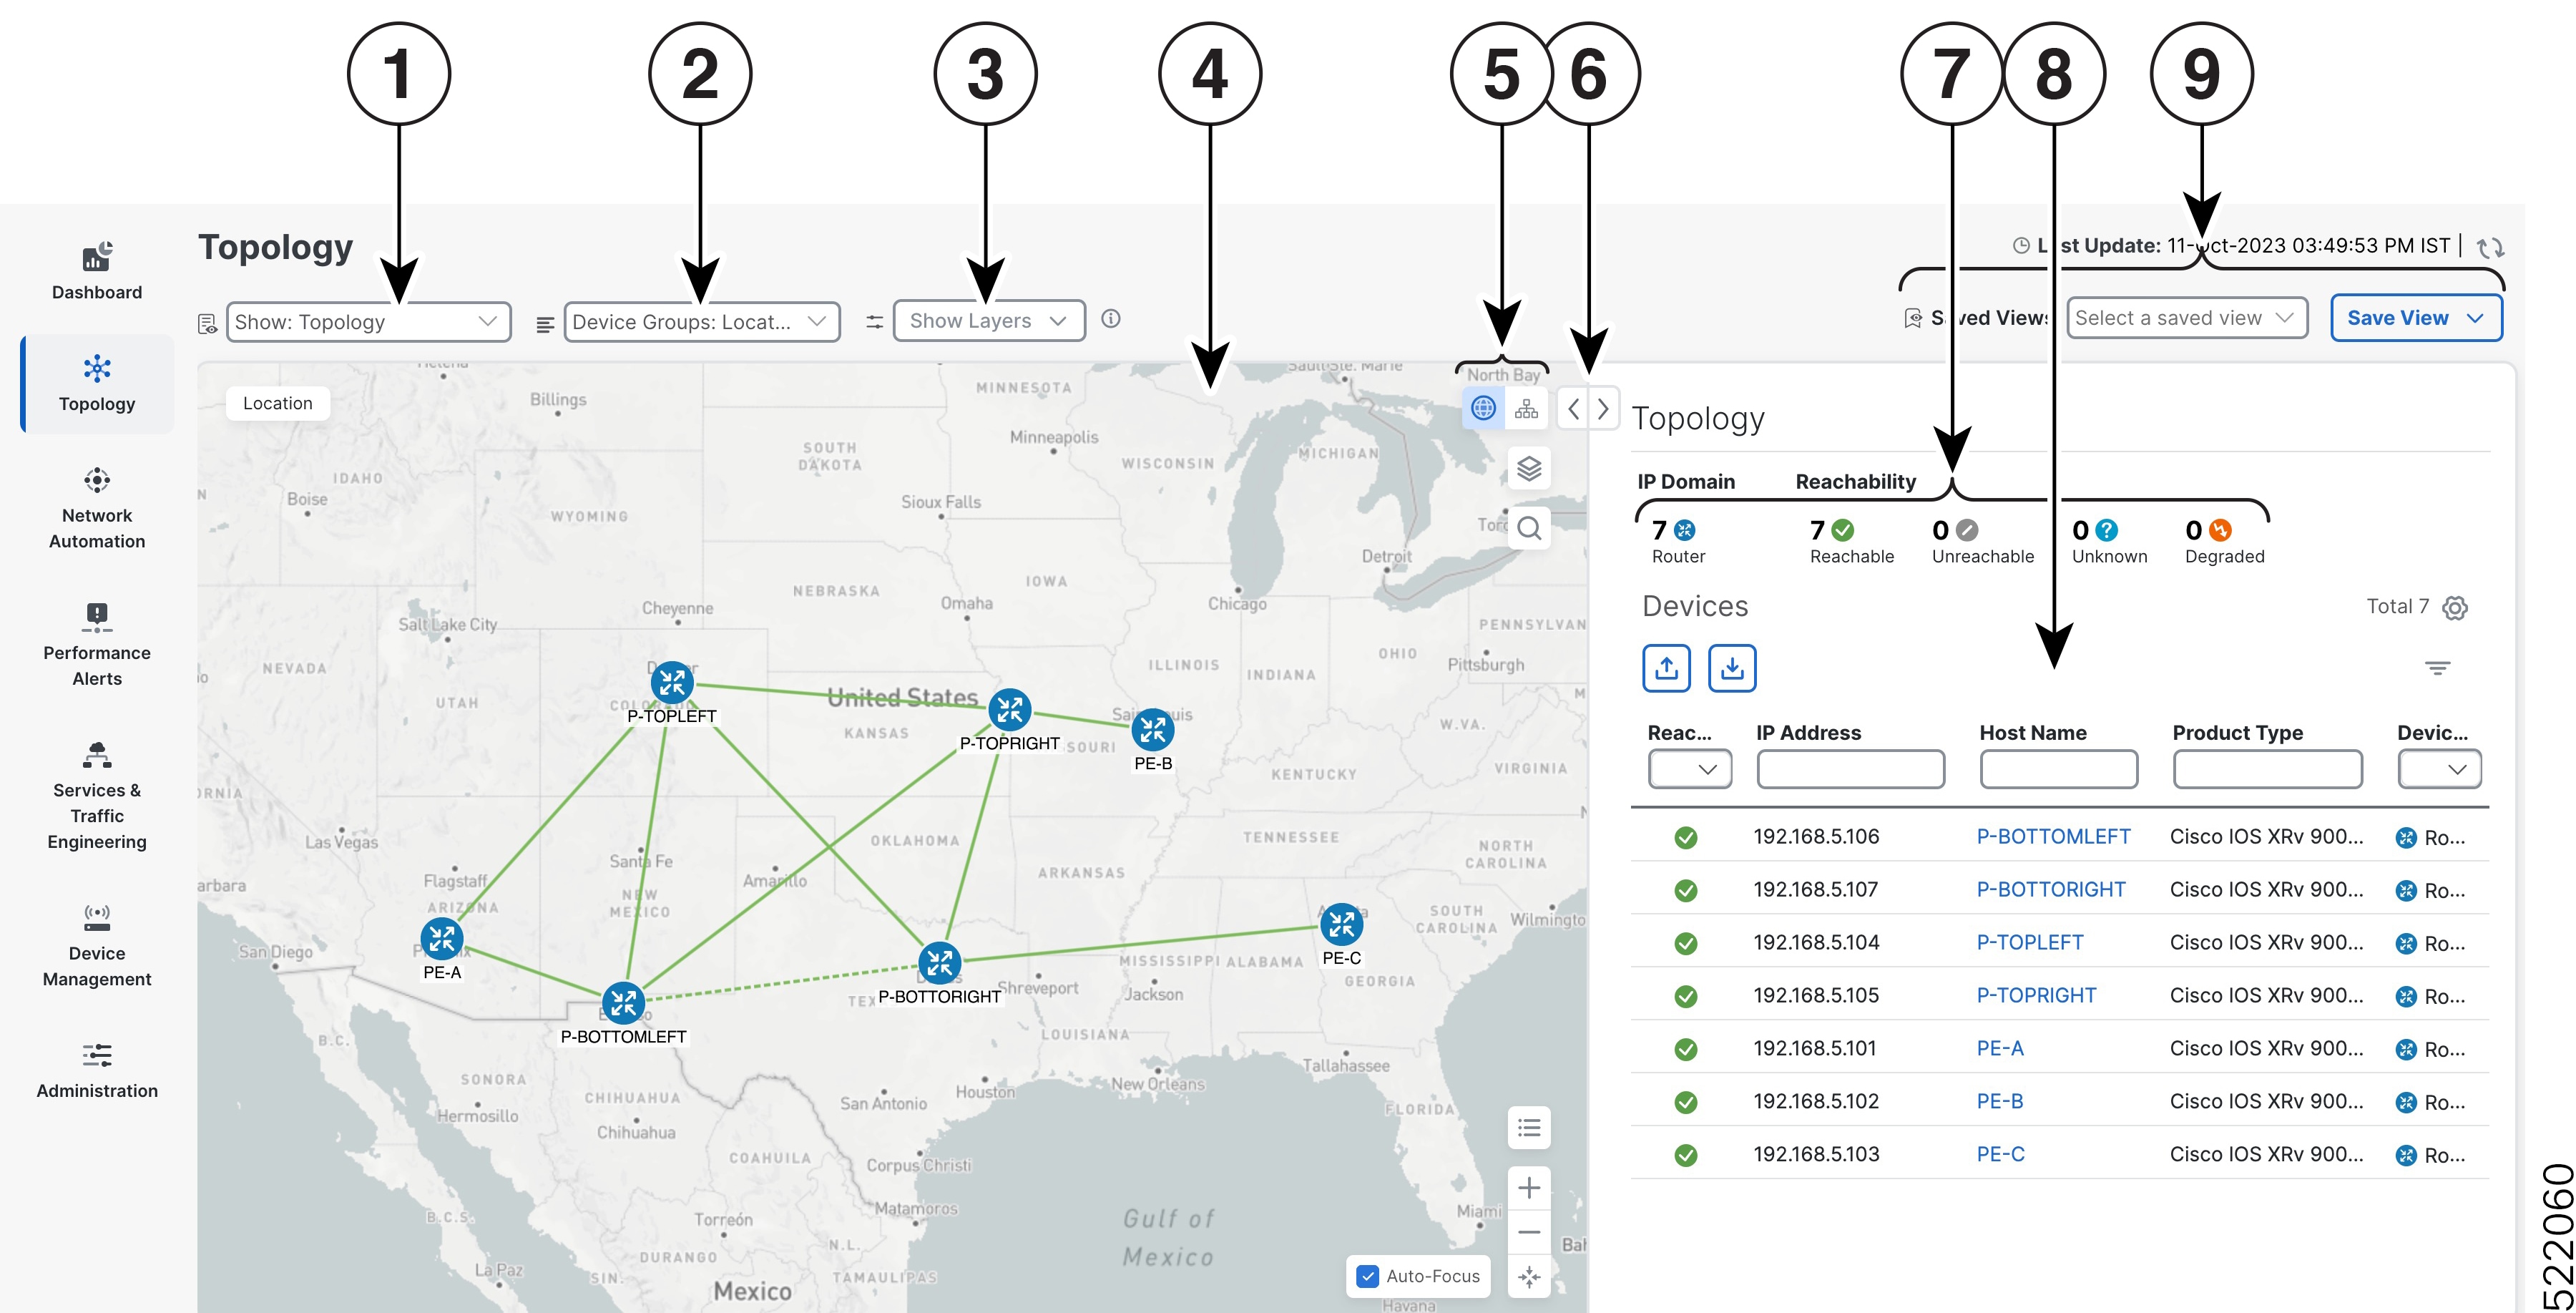
Figure 1. Crosswork Home page
Callout No. Description

1

Main Menu: The main menu allows you to navigate to installed Cisco Crosswork applications and device management and administrative tasks. Menu options may look slightly different depending on what Cisco Crosswork applications are installed.

2

Dashlets: Information varies depending on what Cisco Crosswork applications are installed.

  • To drill down for more information within a dashlet, click on a value. A window appears displaying only the filtered data you clicked on.

  • To add or change the layout of dashlets, click Customize View. Move the dashlets to your desired layout and click Save.

3

Settings icons:

Notifications icon The Alerts icon notifies you of any current error conditions related to the system operations which require attention, and provides a link to detailed information about those conditions.

Show Events icon The Events icon notifies you of new events related to system operation, and also provides access to the history of all system events.

About Crosswork iconThe About icon displays the current version of the Cisco Crosswork product.

User Account icon The User Account icon lets you view your username, change your password, and log out.

View Devices and Links on the Topology Map

To view the network topology map, from the main menu choose Topology.

For more information, see View Device and Link Details.

Figure 2. Cisco Crosswork UI and Topology Map
Cisco Crosswork UI and Topology Map
Callout No. Description

1

Topology Map View: From the Show drop-down list, click the option that displays the data that you would like to see on the map.

If Topology is selected, devices and links in the network are displayed.

2

Device Groups: From the drop-down list, click the group of devices you want displayed on the map. All other device groups will be hidden.

3

Show Hide: From the drop-down list, click the network layers you want displayed on the map. All devices and links that belong to the selected layers are then displayed. By default, all layers are displayed.

4

Topology Map: The network topology can be displayed on a logical map or a geographical map, where the devices and links are shown in their geographic context. From the map, you can drill down to get detailed information about devices and links.

Devices:

  • To view a device configuration summary, hover the mouse cursor over the device icon. A pop up window displaying the host name, state, node ID, and device type appears.

  • To view device details, click on the device icon.

  • If devices are in close physical proximity, the geographical map shows them as a cluster. The number in a blue circle (Node ID) indicates the number of devices in the cluster. Displaying devices in this manner helps prevent overlap and clutter on the map.

Links:

  • A solid line indicates a single link between two devices. If there is more than one link between two devices, or between a device and a cluster of devices, the line is shown dashed instead. A dashed line indicates an aggregated link that represents more than one link, or the use of multiple protocols (for example, IPv4 and IPv6) on the same physical link.

  • A and Z indicates headend and endpoint, respectively.

  • To view link information details, click on the link.

Note 

Although aggregated, dual stack links show as one single line.

5

Logical View icon: The logical map shows devices and their links, positioned according to an automatic layout algorithm, ignoring their geographical location. You can change the layout algorithm.

Geographical View icon: The geographical map shows single devices, device clusters, links, and tunnels, superimposed on a map of the world. Each device location on the map reflects the device's GPS coordinates (longitude and latitude) as defined in the device inventory.

Display Preferences icon: The Display Preferences window allows you to change display settings for devices, links, .

6

Expand/Collapse/Hide Side Panel: Expand or collapse the contents of the side panel. Close the side panel to get a larger view of the topology map.

7

The Mini Dashboard provides a summary of the IP Domain and device reachability status. If filters are applied, the Mini Dashboard is updated to reflect what is displayed in the Devices table.

8

The content of this window changes depending on what Show is set to for the Topology Map and if you have selected to view more information on a

9

Saved Custom Map Views: Lets you create a named custom view using the settings and layout for your current map, settings of the tables saved in the saved views, or display a custom view you have created previously.

View Device and Link Details

This example shows how you can view device and link details using the topology map.

Procedure


Step 1

From the main menu choose Topology.

Step 2

To quickly view the host name, reachability state, IP address and type of device, hover the mouse over the device icon.

Device Details
Step 3

To view more device details, click on the device icon.

  1. The following examples show the Device details from the Topology map.

    More Device Details

    In a multiple IGP setup, you can also view all the IGP, IS-IS, and OSPF processes in the Routing details. See the following examples:

    Figure 3. Multiple IGP: OSPF Processes
    Multiple IGP: OSPF Processes
    Figure 4. Multiple IGP: ISIS Processes
    Multiple IGP: ISIS Processes
    Figure 5. Multiple IGP: OSPF and ISIS Processes
    Multiple IGP: OSPF and ISIS Processes
Step 4

To view links on the device, click the Links tab and expand the right panel to see all the link details.

Links on Device
Step 5

Collapse the side panel and close the Device Details window.

Step 6

Click on a dashed line. A dashed line indicates an aggregated link that represents more than one link.

Note 

Dual stack links (although aggregate) are shown as one single line.

Aggregated Links

Define Map Display Settings

The network topology can be displayed on a logical map or a geographical map (geo map), where the devices and links are shown in their geographic context. The logical map shows devices and their links, positioned according to an automatic layout algorithm, ignoring their geographical location. The geo map shows single devices, device clusters, links, and tunnels, superimposed on a map of the world. Each device location on the map reflects the device's GPS coordinates (longitude and latitude).

The logical map is automatically rendered with no intervention required. The geographical map is rendered by default using map tiles from an external map provider (Mapbox). Internet access is required when using an external map provider. If there is no Internet access, you can download map files from Cisco.com and upload them into the system. These map files will be accessed internally in order to render the geo map. See Use Internal Maps Offline for Geographical Map Display.

When setting up maps, administrators can also define display settings, for example, colors representing changes in link bandwidth utilization.

To set up your maps and define display settings, see:

Use Internal Maps Offline for Geographical Map Display

The system is set up by default to get the geo map tiles from a specific Mapbox URL through a direct Internet connection. If you do not have an Internet connection and therefore the system cannot access an external map provider to retrieve geographical map tiles, you can upload internal map files to represent the areas of the world you require for your network. These map files must be downloaded from Cisco.com and then uploaded into the system. The name of the map file indicates the area of the world it contains, for example, africa-geomaps-1.0.0-for-Crosswork-4.1.0-signed.tar.gz. If you will be managing a network in a specific part of the world, upload only the relevant map files. You do not need to upload all available map files.


Note

If you choose to work offline with internal maps and you do not upload map files, your geographical map will display as a generic world map without details of cities, streets, and so on.

To use internal maps to display the geographical map:

Before you begin

Download the required map files from Cisco.com and place them on an accessible server. The server must support SCP protocol for file transfer.

Procedure


Step 1

From the main menu, choose Administration > Settings > System Settings.

Step 2

Under Topology, click the Map option.

Step 3

Select the Work offline with internal maps radio button and click Manage.

Step 4

In the Manage Internal Maps dialog, click Import icon to upload a new map file. Note that you can upload one file at a time.

Step 5

In the Upload Map File dialog, browse to the location of the map file you downloaded so that the system can access the file.

Step 6

Click Upload.

The system uploads the map from the specified location. The upload process might take some time and must not be interrupted by closing the browser or clicking Cancel. When the process is complete, the new map appears under Uploaded Maps in the Manage Internal Maps dialog.
Step 7

Upload additional maps, as required.


Define Color Thresholds for Link Bandwidth Utilization

Link bandwidth utilization can be visualized and monitored in the logical and geographical maps. Links are colored based on the percentage of total bandwidth currently utilized on the link. Following is the default set of bandwidth utilization thresholds (percentage ranges) and corresponding color indicators. These color thresholds can be customized by administrators.

  • Green—0–25% usage

  • Yellow—25–50% usage

  • Orange—50–75% usage

  • Red—75–100% usage

To define color thresholds for link bandwidth utilization:

Procedure


Step 1

From the main menu, choose Administration > Settings > System Settings.

Step 2

Under Topology, click the Bandwidth Utilization option.

Step 3

In the Polling Interval field, enter a whole number from 5 to 60 (minutes) to specify how often links will be polled for bandwidth utilization. By default, link bandwidth is polled every 5 minutes.

Step 4

In the Link Coloring Thresholds area, define the criteria for coloring the links. Each row defines a color and the bandwidth percentage range that the color will represent. Note that:

  • You can enter values in the "To" fields only. Each row begins automatically from the end of the previous row's range.

  • The thresholds must be sequential, meaning that each row's range must follow on from the previous row's range. For example, if the range in the first row is 0-25%, the second row's range must end with a value greater than 25.

  • You cannot use the same color for multiple thresholds. For example, you cannot choose Green for both the first and second rows.

Step 5

Click Save.


Use Device Groups to Filter Your Topology View

To help you identify, find, and group devices for a variety of purposes, you can create device groups. Device Groups allow you to visualize and zoom in on data specific to that device group. It reduces the clutter on your screen and allows you to focus on data that is most important to you. For example, as shown in the following figure, we see that the East Coast device group has been selected and is zoomed in on the Topology map. Also note that only the devices belonging to the East Coast device group are listed in the Devices table.

Figure 6. Device Group Selection on Topology Map
Device Group Selection on Topology Map

The Device Groups window (Device Management > Groups) allows you to create and manage device groups. By default, all devices initially appear in the Unassigned Devices group.

Figure 7. Device Groups Window

Create and Modify Device Groups

Device groups and assignment of devices to the groups can be done either manually (as described in this section) or automatically (as described in the next section).

Procedure


Step 1

From the main menu choose Device Management > Groups.

Step 2

To add a new sub-group, click next to All Locations.

A new sub-group gets added under All Locations.
Step 3

To edit, delete, or add a sub-group under an existing group, from the Device Groups tree, click next to a group.

Device Group SelectorDevice Group Selector
Step 4

Choose to add, delete, or edit (rename or move) a group. If you delete a group, all devices that belong to that group are moved to the Unassigned Devices group. Also, deleting a group deletes all the sub-groups under it.

Note 

Devices can belong to only one device group.

Step 5

Click Save.


Enable Dynamic Device Grouping

You can create a rule to dynamically create device groups and automatically add unassigned devices to these groups using a Regular Expression (regex) on the device hostname. Any newly added or discovered devices that match the rule will be placed in the appropriate group.


Note

Dynamic rules do not apply to devices that already belong to groups. You must move them to Unassigned Devices if you want them to be considered by the rule.


Before you begin

While you can follow examples given in the Dynamic Groups dialog, it is helpful to be familiar with Regular Expressions.

Procedure


Step 1

From the main menu choose Device Management > Groups.

Step 2

Click next to All Locations > Manage Dynamic Grouping Rule.

Step 3

Click Show more details and examples to help you fill out the required Host Name and Group Name fields.

Step 4

If there are any existing devices in the Unassigned Devices group, click Test Rule to view a sampling of what type of group names will be created.

Step 5

Turn the Enable Rule toggle ON to enable the rule. After the rule is enabled, the system checks for unassigned devices every minute and will assign them to the appropriate group based on the rule.

Step 6

Click Save.

Step 7

Groups that are created this way initially appear under Unassigned Groups (created when a rule is enabled for the first time). Move newly created groups to the desired group hierarchy.

Step 8

To move newly created Unassigned groups to the correct group, do the following:

  1. Click next to All Locations and click Add a Sub-Group.

  2. Enter the New Group details and click Create.

  3. Click on the unassigned devices from the left pane.

  4. From the right pane, select the devices you want to move and click Move to Group to move to an appropriate group.


Customize Map Display Settings

You can configure visual settings on the topology map based on your needs and preferences. You can do the following:

Customize the Display of Links and Devices

To set device and link map display preferences, choose Topology and click Display Preferences icon on the topology map.

  • Click Links to show aggregated links and how links should be colored so that you can easily see their state and utilization status. By default, aggregated links will be differentiated from single links on the map and links will be colored based on link utilization thresholds. Administrators can change the utilization thresholds and their corresponding colors.

  • Click Devices to show the device state and how the devices should be labeled. By default, the device state is shown on the map and the host name is used to label devices.

Configure Timeout Settings

To configure timeout settings for the provisioning and retrieval of data for SR-TE policies, RSVP-TE tunnels, Bandwidth on Demand and IGP paths, select Administration > System Settings > Timeout Configuration tab. Enter the timeout duration options. For more information, click Field Help icon.


Note

Timeouts change the response time of each of the actions if SR-PCE is slow in responding. You can modify the settings for a large scale topology or to address slow SR-PCE response due to latency or load.


Enable or Disable Topology Link Discovery

You can adjust the system settings to enable or disable the discovery of L2 topology links for LLDP, CDP and LAG protocols. By default, the topology discovery option is disabled. When disabled, the links of the selected protocols, including previously discovered links, will not be displayed on the maps.

To enable topology discovery:

Before you begin

  • Make sure all pods are healthy before changing the settings.

Procedure


Step 1

From the main menu, choose Administration > Settings > System Settings.

Step 2

Under Topology, click the Discovery option.

Step 3

Select the checkbox of the protocols for which you want to enable discovery.

Step 4

Click Save to save your changes.

A message "Enabling Protocol" is displayed next to the protocol that you selected. Please wait while the system completes the discovery operation.


When you enable discovery, the collection jobs will be created. The table below lists the collections jobs created for each protocol setting along with the sensor paths.

Table 1. Collection Jobs for each setting

L2 Configuration Setting

Helios collection Jobs ID

Context ID

MIBs collected

Sensor paths

None (default)

cw.topo_svc

cw.toposvc.snmp

cw.toposvc.snmptraps

IF-MIB, IP-MIB,

IF-MIB:notification

IF-MIB:IF-MIB/ifTable/ifEntry

IP-MIB:IP-MIB/ipAddressTable/ipAddressEntry

IF-MIB:notifications

CDP

cw.topo_svc

cw.toposvc.cdp

IF-MIB, CDP-MIB

IF-MIB:IF-MIB/ifTable/ifEntry

CISCO-CDP-MIB:CISCO-CDP-MIB/cdpCacheTable/cdpCacheEntry

CISCO-CDP-MIB:CISCO-CDP-MIB/cdpInterfaceTable/cdpInterfaceEntry

LLDP

cw.topo_svc

cw.toposvc.lldp

IF-MIB, LLDP-MIB

IF-MIB:IF-MIB/ifTable/ifEntry

LLDP-MIB:LLDP-MIB/lldpLocPortTable/lldpLocPortEntry

LLDP-MIB:LLDP-MIB/lldpRemTable/lldpRemEntry

LAG

cw.topo_svc

cw.toposvc.lag

IF-MIB, LAG-MIB

IF-MIB:IF-MIB/ifTable/ifEntry

IEEE8023-LAG-MIB:IEEE8023-LAG-MIB/dot3adAggTable/dot3adAggEntry

IEEE8023-LAG-MIB:IEEE8023-LAG-MIB/dot3adAggPortTable/dot3adAggPortEntry

The table below lists the common errors when enabling or disabling topology discovery:

Table 2. Common error scenarios:

Possible Error Scenario

Cause

Cause Recommended Action

After disabling, some of the disabled links are displayed in the maps.

This occurs if you try to disable a protocol quickly after enabling it. This could result in killing the collection job created for the previous enable job before the SNMP processors have completed it. Due to the timing issue, the disabled links will continue to be displayed.

Enable and disable the protocol again with sufficient wait time in between, or restart toposvc.

When you try to enable discovery, the helios job fails and settings are disabled from further editing.

This can occur if the helios pod is not healthy. This can result being stuck in the unsuccessful state since Crosswork disables users from editing while the collection job is being created.

Ensure that the pods are healthy, and then enable and disable the protocol with sufficient wait time in between, or restart toposvc.

When you change the discovery settings, the TopoUI or TopoSvc crashes resulting in an unpredictable status.

The mechanism to disable users from further editing while the collection job is being created or deleted, relies on pods communicating via ETCD. If any pod crashes during this time, the ETCD key is not set correctly.

Save Topology Views for Easy Access

When you rearrange the devices and links on a map, your changes are not normally saved. To easily access a useful map layout, you can save it as a named custom view and quickly retrieve it, without having to rearrange the map each time. This is especially useful when managing large networks with many devices.

When you save a custom view, the following settings will be saved:

  • Whether it is a geographical or logical map.

  • Device positions in the logical map layout.

  • Device and link display settings


Note

All custom views can be seen by all users. However, only users with the admin role or users that created the custom view can modify the view.


Procedure


Step 1

Customize the current map view until it contains only the information you want and until the layout meets your needs.

Step 2

When you have the view the way you want it, click Save View.

Step 3

Enter a unique name for the new custom view and click Save. You can later modify the view (click Select a saved view) and choose to edit the topology, rename, or delete the view.