Manage Certificates
What is a Certificate?
A certificate is an electronic document that identifies an individual, a server, a company, or another entity, and associates that entity with a public key. When a certificate is created with a public key, a matching private key is also generated. In TLS, the public key is used to encrypt data being sent to the entity and the private key is used to decrypt. A certificate is signed by an issuer or a "parent" certificate (Certificate Authority) - i.e. signed by the parent's private key. Certificates can also be self-signed. In a TLS exchange, a hierarchy of certificates is used to verify the validity of the certificate's issuer. This hierarchy is called a trust-chain and consists of 3 types of entities: a root CA certificate (self-signed), possibly multiple levels of intermediate CA certificates, and a server (or client) certificate (end-entity). The intermediate certificates act as a “link of trust” linking the server certificates to the CA’s root certificate and providing additional layers of security. Starting from the root certificate's private key, the private key for each certificate in the trust chain signs and issues the next certificate in the chain until finally signing an end entity certificate. The end-entity certificate is the last certificate in the chain and is used as a client or server certificate. For more details about these protocols, see X.509 Certificates and HTTPS.
How are Certificates Used in Crosswork?
Communication between Crosswork applications and devices as well as between various Crosswork components are secured using the TLS protocol. TLS uses X.509 certificates to securely authenticate devices and encrypt data to ensure its integrity from source to destination. Crosswork uses a mix of generated and client uploaded certificates. Uploaded certificates can be purchased from Certificate authorities (CA) or can be self-signed. For example, the Cisco Crosswork VM-hosted web server and the client browser-based user interface communicate with each other using Crosswork generated X.509 certificates exchanged over TLS.
The Crosswork Cert Manager is a proxy for multiple microservices and services within the distributed framework and manages all the Crosswork certificates. The Certificate Management UI () allows you to view, upload, and modify certificates. The following figure displays the default certificates provided by Cisco Crosswork.

Certificate Types and Usage
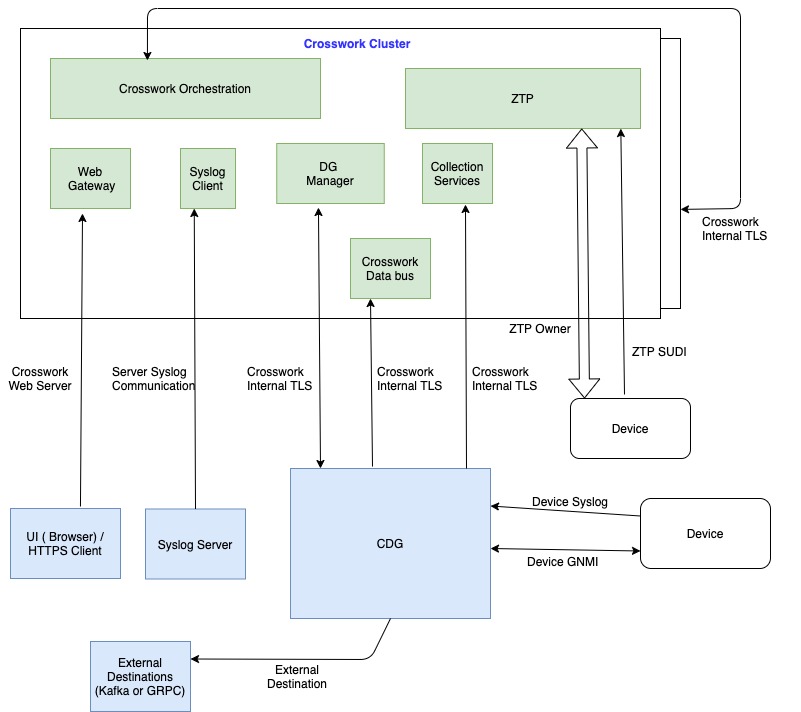
The following figure shows how Crosswork uses certificates for various communication channels.
These certificates are classified into various roles with different properties depending on their use case as shown in the following table.
|
Role |
UI Name |
Description |
Server |
Client |
Allowed operations |
Default Expiry |
Allowed Expiry |
||
|---|---|---|---|---|---|---|---|---|---|
|
Crosswork (CW) Internal TLS |
CW- Internal- Communication |
|
CW |
|
Download |
5 years |
— |
||
|
CW Web Server |
CW-Web-Certificate Server Authentication |
|
CW Web Server |
User Browser or API Client |
|
5 years |
30 day - 5 years |
||
|
ZTP SUDI |
CW-ZTP-Device-SUDI |
|
CW ZTP |
Device |
|
100 days |
30 day - User defined |
||
|
Secure ZTP Provisioning |
CW-ZTP-Owner |
|
CW ZTP |
Device |
|
5 |
30 day - User defined |
||
|
Device Syslog |
CW-Device-Syslog |
|
CDG |
Device |
Download |
5 years |
— |
||
|
Device gNMI Communication |
— |
Provides GNMI telemetry communications between devices and CDG. |
CDG |
Device |
|
Not Applicable |
30 day - User defined |
||
|
Server Syslog |
Not Applicable |
|
External Syslog Server |
Crosswork |
|
— |
30 - User defined |
||
|
External Destination |
— |
Exports telemetry data from CDG to external destinations (Kafka or GRPC). |
External Destinations (Kafka or GRPC) |
CDG |
|
— |
30 - User defined |
There are two category roles in Crosswork:
-
Roles which allow you to upload or download trust chains only
-
Roles that allow upload or download of both the the trust chain and an intermediate certificate and key
Add a New Certificate
You can add certificates for the following roles:
-
External Destination—Certificates uploaded for this role are used to secure communication between CDG and external destinations like Kafka servers. To enable mutual authentication, the user uploads a CA Certificate Trustchain that will be common to both CDG and the external server. This trust chain contains a root CA certificate and any number of optional intermediate CA certificates. The last intermediate certificate in the chain and its corresponding private key is uploaded separately in the UI using Intermediate key, Intermediate certificate, and optionally Passphrase (if one was used for generating the intermediate key). Crosswork will internally create a client certificate using this intermediate key for the CDGs that will connect to the external destination. The destination (for example: Kafka) server certificate trust needs to be derived from the same root CA certificate.
-
Syslog Server Communication—The user uploads the trust chain of the Syslog server certificate. This trust chain is used by Crosswork to authenticate the Syslog server. Once this trust chain is uploaded and propagated within Crosswork, the user can add the syslog server () and associate the certificate to enable TLS.
-
Devices gNMI communication—The user uploads a bundle of trust chains used by CDG to authenticate the devices connecting to it. This trust chain and the device gNMI certificate must also be configured on the device. The trust chain file that is uploaded can contain multiple hierarchies of trust certificates as needed to allow all the devices in the network to connect. For more information, see Configure gNMI Certificate.
 Note |
Cisco Crosswork does not receive a web certificate directly. It accepts an intermediate CA and intermediate Key to create a new web certificate, and apply it to the Web Gateway. |
If you prefer to upload your own ZTP (Zero Touch Provisioning Concepts) and web certificates (instead of using the default certificates provided within Cisco Crosswork), use the Edit function (see Edit Certificates.
Before you begin
-
For information on certificate types and usage, see Certificate Types and Usage.
-
All certificates that are uploaded must be in Privacy Enhanced Mail (PEM) format. Note where these certificates are in the system so that you can navigate to them easily.
-
Trust chain files that are uploaded may contain the entire hierarchy (root CA and intermediate certificates) in the same file. In some cases, multiple chains are also allowed in the same file.
-
Intermediate Keys need to be either PKCS1 or PKCS8 format.
-
A data destination must be configured prior to adding a new certificate for an external destination. For more information, see Add/Edit a Data Destination.
Procedure
| Step 1 |
From the main menu, choose and click |
||
| Step 2 |
Enter a unique name for the certificate. |
||
| Step 3 |
From the Certificate Role drop-down menu, select the purpose for which the certificate is to be used. For more information, see Manage Certificates. |
||
| Step 4 |
Click Browse, and navigate to the certificate trustchain. |
||
| Step 5 |
In the case of an External Destination certificate, you must select one or more destinations and provide the CA certificate trustchain, intermediate certificate and intermediate key. The passphrase field is optional and is used to create the intermediate key (if applicable). |
||
| Step 6 |
Click Save.
|
Edit Certificates
You can edit a certificate to add or remove connection destinations, upload, and replace expired or misconfigured certificates. User provided certificates and ZTP and web certificates can be edited. Other system certificates that are provided by Cisco Crosswork cannot be modified and will not be available for selection.
You can also “remove” a certificate by following this procedure to replace the certificate or by disabling security (disable Enable Secure Communication option) for any assigned destinations (see Add/Edit a Data Destination). Permanently deleting a certificate from the Cisco Crosswork system is not supported.
Note |
For information about ZTP certificates, see the following: |
Procedure
| Step 1 |
From the main menu, choose . and check the certificate that you want to modify. |
||
| Step 2 |
Click |
||
| Step 3 |
Update the necessary options.
|
||
| Step 4 |
Click Save. |
Download Certificates
To export certificates, do the following:
Procedure
| Step 1 |
From the main menu, choose . |
| Step 2 |
Click 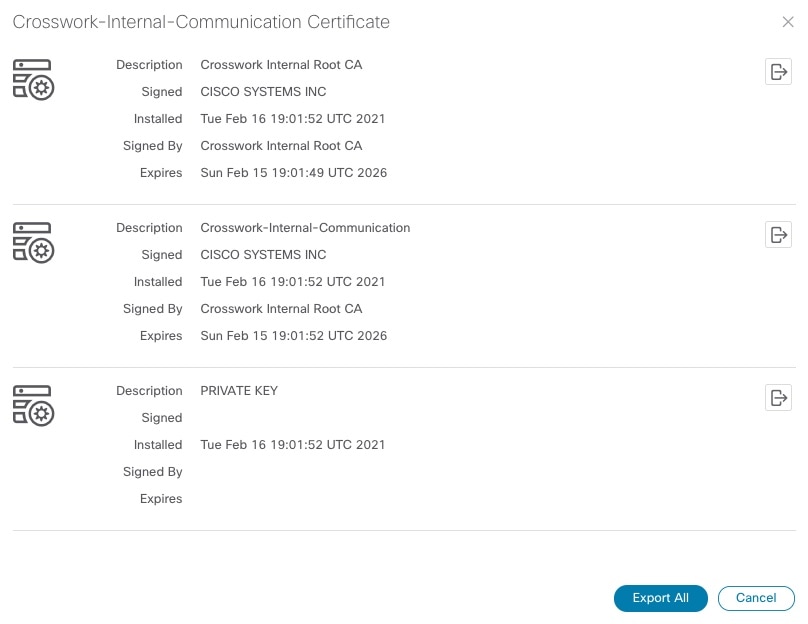
|
| Step 3 |
To separately download the root certificate, intermediate certificate, and the private key, click |
Renew Certificates
Certificates are valid for 1 year before they expire. The below procedure needs to be executed sequentially on each hybrid node in the cluster. After renewing the certificates in one node, ensure that the pods are healthy before proceeding to the next hybrid node.
Note |
When renewing certificates before expiry, it is recommended to perform this activity during a maintenance window as the cluster is in an operational state. |
To renew a certificate, perform the following:
Procedure
| Step 1 |
In the hybrid node, run command to move to root user. |
||
| Step 2 |
Verify if the certificate date has expired. |
||
| Step 3 |
Take a backup of the certificates and conf files. |
||
| Step 4 |
Run command to renew the certificate. |
||
| Step 5 |
Repeat step 2 to verify the creation of new certificates. |
||
| Step 6 |
Run command to restart the
Ensure that |
||
| Step 7 |
Verify if all the pods are healthy and running. It also verifies the running pods on the hybrid node that you have restarted. |
||
| Step 8 |
Verify if the certificate has been renewed. |
||
| Step 9 |
If the issue is still seen, change the conf file. Repeat steps 6 to 8. |


 Feedback