Overview

Cisco Data Center Network Manager (DCNM) is a management system for Cisco NXOS-based storage fabrics. In addition to provisioning, monitoring, and troubleshooting the data center network infrastructure, the Cisco DCNM provides a comprehensive feature-set that meets the routing, switching, and storage administration needs of data centers. It streamlines the provisioning for the Programmable Fabric and monitors the SAN components.

Cisco DCNM provides a high level of visibility and control through a single web-based management console for Cisco Nexus Series Switches, Cisco MDS, and Cisco Unified Computing System (UCS) products. Cisco DCNM also includes Cisco DCNM-SAN client and Device Manager functionality.

This section contains the following sections:

Introduction

Cisco DCNM provides an alternative to the command-line interface (CLI) for switch configuration commands.

In addition to complete configuration and status monitoring capabilities for Cisco MDS 9000 switches, Cisco DCNM-SAN provides powerful fiber channel troubleshooting tools. The in-depth health and configuration analysis capabilities leverage unique MDS 9000 switch capabilities: Fiber Channel Ping and Traceroute.

Beginning with Release 11.1(1), Cisco DCNM allows you to monitor Cisco UCS Blade servers also.

Cisco DCNM includes these management applications:

Cisco DCNM Server

The Cisco DCNM-SAN Server component must be started before running Cisco DCNM-SAN. Cisco DCNM-SAN server is installed as a service. This service can then be administered using the Windows Services in the control panel. Cisco DCNM-SAN Server is responsible for discovery of the physical and logical fabric and for listening for SNMP traps, syslog messages, and Performance Manager threshold events.

Cisco DCNM Web UI

Cisco DCNM Web UI allows operators to monitor and obtain reports for Cisco MDS and Nexus events, performance, and inventory from a remote location using a web browser. Licensing and discovery are part of the Cisco DCNM Web UI. You can configure the MDS9000 Fabric, also.

Cisco DCNM-SAN Client

The Cisco DCNM-SAN Client displays a map of your network fabrics, including Cisco MDS 9000 Family switches, third-party switches, hosts, and storage devices. The Cisco DCNM-SAN Client provides multiple menus for accessing the features of the Cisco DCNM SAN functionality.

Device Manager

The Device Manager is embedded with the Cisco DCNM Web UI. After the switches are discovered, navigate to Inventory > Switches > Device Manager to launch the Device Manager.

Cisco DCNM-SAN automatically installs the Device Manager. Device Manager provides two views of a single switch:

  • Device View : displays a graphic representation of the switch configuration and provides access to statistics and configuration information.

  • Summary View : displays a summary of xE ports (Inter-Switch Links), Fx ports (fabric ports), and Nx ports (attached hosts and storage) on the switch, Fibre Channels, and IP neighbor devices. You can create charts, print, or save the summary or real-time statistics to a file in tab-delimited format.

Performance Manager

Performance Manager presents detailed traffic analysis by capturing data with SNMP. This data is compiled into various graphs and charts that can be viewed on the Cisco DCNM Web UI.

Installation Options

Cisco DCNM software images are packaged with the Cisco DCNM installer, signature certificate, and signature verification script. Unzip the desired Cisco DCNM installer image ZIP file to a directory. Verify the image signature by following the steps in the README file. The installer from this package installs the Cisco DCNM software.

DCNM Open Virtual Appliance (OVA) Installer

This installer is available as an Open Virtual Appliance file (.ova). The installer contains a pre-installed OS, DCNM, and other applications needed for programmable fabric.

DCNM ISO Virtual Appliance (ISO) Installer

This installer is available as an ISO image file (.iso). The installer is a bundle of OS, DCNM, and other applications needed for dynamic fabric automation.


Note


If you are installing Cisco DCNM on SE, install the DCNM ISO Virtual Appliance (.iso) installer.


DCNM Windows Installer

This installer is available as an executable (.exe) file.

DCNM Linux Installer

This installer is available as a binary (.bin) file.

Deployment Options

You can deploy the Cisco DCNM installer in one of the following modes:

Standalone Server

All types of installers are packaged along with PostgreSQL database. The default installation steps for the respective installers result in this mode of deployment.

Standalone with external Oracle

If you have more switches in your setup or you expect your setup to grow over time, we recommend that you use an external Oracle server. This mode of deployment requires the default installation setup, followed by steps to configure DCNM to use the external Oracle. For more information about Scalability, see Verified Scalability Guide for Cisco DCNM.

DCNM Federation

Cisco DCNM federation is the HA mechanism for SAN devices. Every node in the DCNM federated setup can manage many groups of SAN devices. A single client interface can manage all devices. Federation mode is used for resilience and scalability. It allows you to monitor 20,000 FC ports. DCNM Windows and Linux Installers can be deployed in Federation mode to have resilience in case of application or OS failures. For Cisco DCNM-SAN federation, the database URL (properties) must remain the same for all Cisco DCNM-SAN nodes in the federation.

root and sysadmin User Privileges

The following table summarizes the user privileges differences between DCNM 11.5 and previous releases.


Note


This is applicable to Cisco DCNM OVA/ISO deployments only.


Description

Functionality in DCNM 11.5 Release

Functionality in DCNM 11.4(1) and 11.3(1) Releases

Remarks

su command

Requires local root password.

sysadmin user can’t run sudo su command

Requires sysadmin password

su is an alias for sudo su

The su command requires the local password even when the remote authentication is configured.

appmgr change_pwd ssh root command

Only root user can run this command.

sysadmin can also run this command.

-

appmgr root-access {permit|deny|…} command

Only root user can run this command

sysadmin user can also run this command

-

appmgr remote-auth command

Only root user can run this command

Not available

-

Other appmgr commands

root or sysadmin user can run these commands

root or sysadmin user can run these commands

-

Upgrading to Cisco DCNM Release 11.5(1)

Before Cisco DCNM Release 11.0(1), DCNM OVA, and ISO supported SAN functionality. From Cisco DCNM Release 11.3(1), you can install Cisco DCNM for SAN Deployment on both OVA and ISO virtual appliances.

The following table summarizes the type of upgrade that you must follow to upgrade to Release 11.5(1).

Table 1. Type of Upgrade for Cisco DCNM SAN deployments

Current Release Number

Upgrade type to upgrade to Release 11.5(1)

11.4(1)

To Windows—Inline Upgrade

To Linux—Inline Upgrade

To OVA\ISO—Inline Upgrade

11.3(1)

To Windows—Inline Upgrade

To Linux—Inline Upgrade

To OVA\ISO—Inline Upgrade

11.2(1)

To Windows—Inline Upgrade

To Linux—Inline Upgrade

To OVA\ISO—

  1. Fresh 11.3(1) SAN Only Installation.

  2. Migrate Performance Manager Collections to 11.3(1)

    Note


    The old Performance Manager data will replace any existing Performance Manager data on 11.3(1).

  3. Inline upgrade to 11.5(1)

11.1(1)

To Windows— 11.1(1) → 11.4(1) → 11.5(1)

To Linux— 11.1(1) → 11.4(1) → 11.5(1)

To OVA\ISO—

  1. Fresh 11.3(1) SAN Only Installation.

  2. Migrate Performance Manager Collections to 11.3(1).

    Note


    The old Performance Manager data will replace any existing Performance Manager data on 11.3(1).

  3. Inline upgrade to 11.5(1)

System Requirements

This section describes the various system requirements for proper functioning of your Cisco DCNM Release 11.5(1).


Note


We recommend that you do not upgrade any underlying third-party software separately. All the necessary software components will be updated during the inline upgrade procedure. Upgrading the components outside of DCNM upgrade causes performance issues.


Java Requirements

The Cisco DCNM server is distributed with JRE 11.0.8 into the following directory:

DCNM_root_directory/java/jdk11

Server Requirements

Cisco DCNM Release 11.5(1), supports the Cisco DCNM server on these 64-bit operating systems:

  • SAN Deployments:

    • Microsoft Windows 2016

    • Microsoft Windows 2012 R2 update 2919355

    • Red Hat Enterprise Linux Release 7.8, 8.1, and 8.2

    • Open Virtual Appliance (OVA) with an integrated CentOS Linux release 7.8

    • ISO Virtual Appliance (ISO) with an integrated CentOS Linux release 7.8

Database Requirements

Cisco DCNM Release 11.5(1) supports the following databases:

  • Oracle11g Express (XE), Standard, and Enterprise Editions, and Oracle 11g Real Application Clusters (RAC)

  • Oracle 12c Enterprise Edition (Conventional)—(Nonpluggable installation)


    Note


    Oracle 12c pluggable database version installation is not supported.
  • Oracle 12c RAC (nonpluggable installation)

  • PostgreSQL 10.15 - For Linux/OVA/ISO deployments

  • PostgreSQL 10.15 - For Windows deployments


Note


The database size increases according to the number of nodes and ports that the DCNM manages, with Performance Manager Collections enabled. You cannot restrict the database size. If you choose an Oracle database, we recommend that you use Oracle SE or Enterprise edition, instead of Oracle XE due to table space limitations.


Note


You are responsible for all the support that is associated with the Oracle databases, including maintenance, troubleshooting, and recovery. We recommend that you take regular backup of the database; either daily or weekly, to ensure that all the data is preserved.

Note


The ISO and OVA installations support only the embedded PostgreSQL database.

Hypervisors

Cisco DCNM supports the ISO installation on a bare-metal server, no hypervisor, on the following server platforms:

Server

Product ID (PID)

Recommended minimum memory, drive capacity, and CPU count

Cisco UCS C240M4

UCSC-C240-M4S

32G / 500G 16 vCPUs

Cisco UCS C240M4

UCSC-C240-M4L

32G / 500G 16 vCPUs

Cisco UCS C240 M5S

UCSC-C240-M5SX

32G / 500G 16 vCPUs

Cisco UCS C220 M5L

UCSC-C220-M5L

32G / 500G 16 vCPUs


Note


Cisco DCNM can work on an alternative computing hardware with appropriate specifications, despite Cisco is only testing on Cisco UCS.


Server Resource (CPU/Memory) Requirements


Note


If you install Cisco DCNM on a virtual machine, you must reserve resources equal to the server resource requirements to ensure a baseline with the physical machines.


Table 2. System Requirements for Cisco DCNM SAN Deployment

Deployment Type

Small (Lab or POC)

Large (Production)

Huge (Production with SAN Insights)

Windows

CPU: 8 vCPUs

RAM: 24 GB

DISK: 500 GB

CPU: 16 vCPUs

RAM: 32 GB

DISK: 500 GB

Not supported

Linux (RHEL)

CPU: 8 vCPUs

RAM: 24 GB

DISK: 500 GB

CPU: 16 vCPUs

RAM: 32 GB

DISK: 500 GB

CPU: 32 vCPUs

RAM: 128 GB

DISK: 2 TB

OVA/ISO Standalone

CPU: 8 vCPUs

RAM: 24 GB

DISK: 500 GB

CPU: 16 vCPUs

RAM: 32 GB

DISK: 500 GB

CPU: 32 vCPUs

RAM: 128 GB

DISK: 2 TB

If the existing Elasticsearch database is more than 250GB, Cisco DCNM Server requires more than 500GB HDD space to complete reindexing.


Note


For Huge and Compute deployments, you can add extra disk. The size of the disk can range from a minimum of 32GB to a maximum of 1.5TB.


If the existing Elasticsearch database is more than 250GB, Cisco DCNM Server requires more than 500GB HDD space to complete reindexing.

Ensure that there is enough disk space to the root partition or mount another disk where the /tmp directory can be mounted during the installation or upgrade.

Allocate sufficient disk space to the root partition to complete DCNM installation and for stable continuous operation of the DCNM applications. Refer to the applications’ User guides for disk space requirements. You can mount another disk where the /tmp directory can be mounted during the installation or upgrade. You can also add additional disk space and the disk file system using appmgr system scan-disks-and-extend-fs command.


Note


  • From Release 11.3(1), Cisco DCNM Windows deployments does not support the SAN Insights feature.

  • Cisco SAN Insights feature is only supported with the Huge deployment.

  • Every federation deployment consists of three large configuration nodes.

  • From Cisco DCNM Release 11.2(1), synchronize the Federation nodes from the Primary node only.


Client Hardware Requirements

Cisco DCNM SAN desktop client and Cisco Device Manager support Microsoft Windows 10, Microsoft Windows 2012, Microsoft Windows 2016, and Red Hat Linux. The following table lists the minimum hardware requirements for these client systems.

Hardware

Minimum Requirements

RAM (free)

6 GB or more

CPU speed

3 GHz or faster

Disk space (free)

20 GB

If you install Cisco DCNM on a virtual machine, reserve resources equal to the server resource requirements to ensure a baseline with the physical machines.

Some Cisco DCNM features require a license. Before using the licensed features, install a Cisco DCNM license for each Nexus-managed or MDS-managed platform. For information about Licensing in DCNM, see https://www.cisco.com/c/en/us/td/docs/switches/datacenter/sw/11_x/licensing/cisco_dcnm_licensing_guide_11_x.html.

VMware Snapshot Support for Cisco DCNM

VMware vSphere Hypervisor (ESXi)

6.0

6.5

6.7

6.7 P01

7.0

VMware vCenter Server

6.0

6.5

6.7

6.7 P01

7.0


Note


You need VMware vCenter server to deploy Cisco DCNM OVA Installer. However, to install DCNM directly on VMware ESXi without vCenter, you can choose DCNM ISO deployment. Ensure that correct CPU, Memory, Disk, and NIC resources are allocated to that VM.


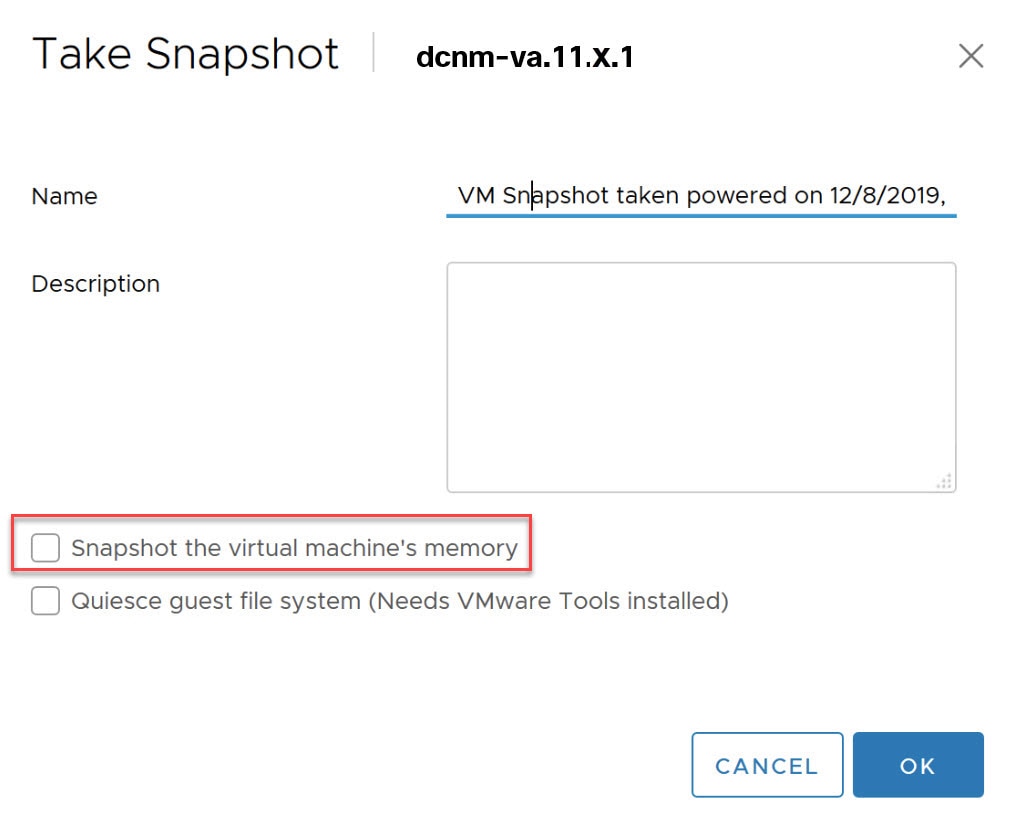
To take a snapshot on the VM, perform the following steps:

  1. Right-click the virtual machine the inventory and select Snapshots > Take Snapshot.

  2. In the Take Snapshot dialog box, enter a name and description for the snapshot.

  3. Click OK to save the snapshot.

The following snapshots are available for VMs.

  • When VM is powered off.

  • When VM is powered on, and active.


Note


Cisco DCNM supports snapshots when VM is either powered on or powered off. DCNM doesn’t support snapshots when the Virtual Machine memory option is selected.


Ensure that Snapshot the Virtual Machine's memory check box must not be selected, as shown in the following figure. However, it is grayed out when the VM is powered off.

You can restore VM to the state in a Snapshot.

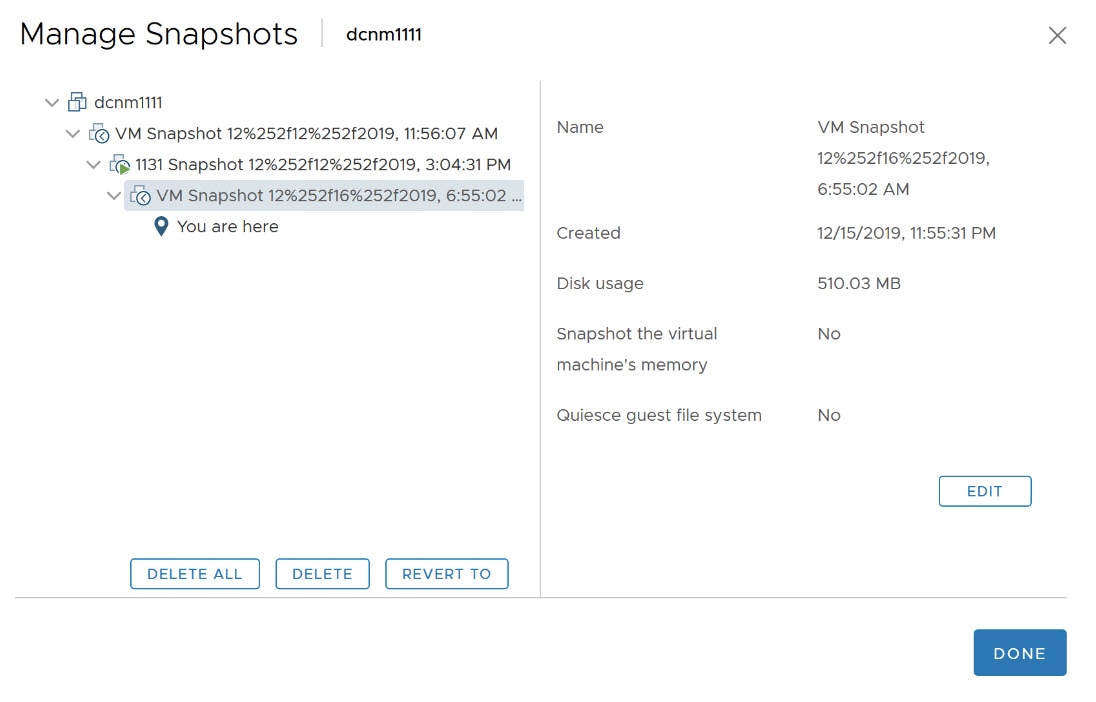
Right-click on the Virtual Machine and select Manage Snapshot. Select the snapshot to restore, and click Done.

Supported Web Browsers

Cisco DCNM supports the following web browsers:

  • Google Chrome version: 86.0.4240.198

  • Mozilla Firefox version: 82.0.3 (64-bit)

  • Microsoft Edge version: 86.0.622.63

Other Supported Software

The following table lists the other software that is supported by Cisco DCNM Release 11.5(1).

Table 3. Other Supported Software

Component

Features

Security

  • ACS versions 4.0, 5.1, 5.5, and 5.8

  • ISE version 2.6

  • ISE version 3.0

  • Telnet Disabled: SSH Version 1, SSH Version 2, Global Enforce SNMP Privacy Encryption.

  • Web Client and Cisco DCNM-SAN Server Encryption: HTTPS with TLS 1, 1.1 and 1.2

  • TLS 1.3

OVA\ISO Installers

CentOS 7.8/Linux Kernel 3.10.x

Also, Cisco DCNM supports call-home events, fabric change events, and events that are forwarded by traps and email.

Clearing Browser Cache

While upgrading, Cisco DCNM allows you to use the same IP Addresses for Release 11.0(1) that were used for Release 10.4(2). To optimize loading times, DCNM 11 stores scripts and other assets in a browser’s offline storage. Therefore, you must clear the browser cache before you launch the Cisco DCNM 11.0(1) Web UI using the Management Network IP address.

Cisco DCNM supports the following web browsers:

  • Mozilla Firefox

  • Microsoft Internet Explorer

  • Google Chrome version

Based on your browser, you can perform the following task to clear the browser cache.

Mozilla Firefox

To clear cache on the Mozilla Firefox browser, perform the following task:

  1. From the History menu, select Clear Recent History.

    If the menu bar is hidden, press Alt to make it visible.

  2. From the Time range to clear: drop-down list, select the desired range. To clear your entire cache, select all options.

  3. Click the down arrow next to Details to choose which elements of the history to clear. To clear the entire cache, select all items.

    Click Clear Now.

  4. Restart browser.

Google Chrome

To clear cache on the Google Chrome browser, perform the following task:

  1. In the browser bar, enter chrome://settings/clearBrowserData , and press Enter.

  2. On the Advanced tab, select the following:

    • Cookies and other site data

    • Cached images and files

  3. From the Time range drop-down list, you can choose the period of time for which you want to clear cached information. To clear your entire cache, select All time.

  4. Click Clear Data.

  5. Restart browser.

Internet Explorer

To clear cache on the Internet Explorer browser, perform the following task:

  1. Select Tools > Safety > Delete browsing history....

    If the menu bar is hidden, press Alt to make it visible.

  2. Deselect Preserve Favorites website data, and select Cookies or Cookies and website data.

  3. Click Delete. You will see a confirmation at the bottom of the window when the process is complete.

  4. Restart browser.