- Finding Feature Information
- Prerequisites for Using IPHC Profiles
- Restrictions for Using IPHC Profiles
- Information About Using IPHC Profiles
- How to Configure Header Compression Using IPHC Profiles
- Configuration Examples for Using IPHC Profiles
- Additional References
- Feature Information for Configuring Header Compression Using IPHC Profiles
Configuring Header Compression Using IPHC Profiles
Header compression is a mechanism that compresses the IP header in a packet before the packet is transmitted. Header compression reduces network overhead and speeds up the transmission of either Real-Time Transport Protocol (RTP) or Transmission Control Protocol (TCP) packets.
One method of configuring header compression on your network is to use an IP header compression (IPHC) profile. An IPHC profile is a kind of template within which you can configure the type of header compression that you want to use, set all of the optional features and parameters for header compression, and then apply the profile to an interface, subinterface, or Frame Relay permanent virtual circuit (PVC).
This module describes the concepts and tasks for configuring header compression using IPHC profiles.
- Finding Feature Information
- Prerequisites for Using IPHC Profiles
- Restrictions for Using IPHC Profiles
- Information About Using IPHC Profiles
- How to Configure Header Compression Using IPHC Profiles
- Configuration Examples for Using IPHC Profiles
- Additional References
- Feature Information for Configuring Header Compression Using IPHC Profiles
Finding Feature Information
Your software release may not support all the features documented in this module. For the latest feature information and caveats, see the release notes for your platform and software release. To find information about the features documented in this module, and to see a list of the releases in which each feature is supported, see the Feature Information Table at the end of this document.
Use Cisco Feature Navigator to find information about platform support and Cisco software image support. To access Cisco Feature Navigator, go to www.cisco.com/go/cfn. An account on Cisco.com is not required.
Prerequisites for Using IPHC Profiles
Before using IPHC profiles to configure header compression, read the information in the "Header Compression" module.
Restrictions for Using IPHC Profiles
IPHC profiles are not supported on L2TP networks.
Information About Using IPHC Profiles
- Benefits of Using IPHC Profiles
- IPHC Profile Types
- Configurable Header Compression Features and Settings
- Tasks for Using IPHC Profiles
Benefits of Using IPHC Profiles
An IPHC profile provides a flexible means of enabling header compression and the options associated with header compression. For example, header compression (and the header compression options) can be enabled once in an IPHC profile, and then the IPHC profile can be applied to one or more of the following:
- An interface
- A subinterface
- A Frame Relay PVC
IPHC Profile Types
You use the iphc-profile command to create the IPHC profile. When you create an IPHC profile, you must specify the IPHC profile type. The IPHC profile choices are Internet Engineering Task Force (IETF) or van-jacobson. You specify the IPHC profile type with the ietf keyword or the van-jacobson keyword of the iphc-profile command.
The ietf profile type conforms with and supports the standards established with RFC 2507, RFC 2508, RFC 3544, and RFC 3545 and is typically associated with non-TCP header compression (for example, RTP header compression). The van-jacobson profile type conforms with and supports the standards established with RFC 1144 and is typically associated with TCP header compression.
Considerations When Specifying the IPHC Profile Type
When specifying the IPHC profile type, consider whether you are compressing TCP traffic or non-TCP (that is, RTP) traffic. Also consider the header compression format capabilities of the remote network link to which you will be sending traffic.
The IPHC profile type that you specify directly affects the header compression format used on the remote network links to which the IPHC profile is applied. Only TCP traffic is compressed on remote network links using a van-jacobson IPHC profile, whereas both TCP and non-TCP (for example, RTP) traffic is compressed on remote network links using an ietf IPHC profile.
 Note |
The header compression format in use on the router that you are configuring and the header compression format in use on the remote network link must match. |
Configurable Header Compression Features and Settings
The specific header compression features and settings that you can configure (that is, enable or modify) are determined by the IPHC profile type that you select (either van-jacobson or ietf) when you create the IPHC profile. There is one set of features and options for the van-jacobson IPHC profile type and another set for the ietf IPHC profile type. Both sets are listed below.
Features and Settings for van-jacobson IPHC Profile Type Header Compression
If you specify van-jacobson as the IPHC profile type, you can enable TCP header compression and set the number of TCP contexts. The table below lists the van-jacobson IPHC profile type header compression features and settings that are available and the command used to enable that feature or setting.
| Table 1 | van-jacobson IPHC Profile Type Header Compression Features and Settings |
| Feature or Setting |
Command |
|---|---|
| TCP header compression |
tcp |
| Number of contexts available for TCP header compression |
tcp contexts |
Features and Settings for ietf IPHC Profile Type Header Compression
If you specify ietf as the IPHC profile type, you can enable non-TCP header compression (that is, RTP header compression), along with a number of additional features and settings. The table below lists the ietf IPHC profile type header compression features and settings that are available and the command used to enable that feature or setting.
| Table 2 | ietf IPHC Profile Type Header Compression Features and Settings |
| Feature or Setting |
Command |
|---|---|
| Non-TCP header compression |
non-tcp |
| Number of contexts available for non-TCP header compression |
non-tcp contexts |
| RTP header compression |
rtp |
| Enhanced Compressed Real-Time Transport Protocol (ECRTP) on an interface |
recoverable-loss |
| Context refresh (full-header refresh) options, such as the amount of time to wait before a full-header is refreshed |
refresh max-time refresh max-period refresh rtp |
| Context-status feedback messages from the interface or link |
feedback |
| Maximum size of the compressed IP header |
maximum header |
| TCP header compression |
tcp |
| Number of contexts available for TCP header compression |
tcp contexts |
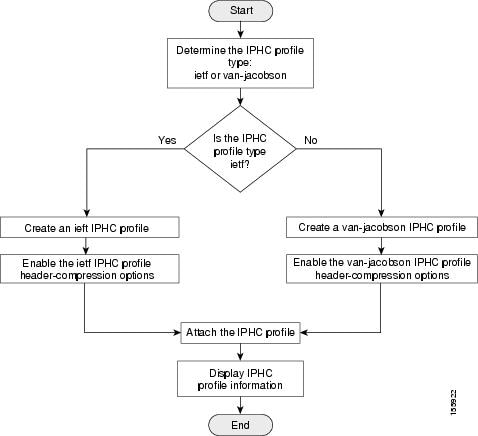
Tasks for Using IPHC Profiles
The tasks for configuring header compression using an IPHC profile are described below.
- Create the IPHC profile and specify the IPHC profile type (ietf or van-jacobson) that you want to use.
- Enable or set the header compression features available for the IPHC profile type that you specified when you created the IPHC profile. The header compression features vary by IPHC profile type.
- Attach the IPHC profile to an interface, subinterface, or Frame Relay PVC.
- Display information about the IPHC profiles that you have created.
The figure below illustrates the high-level processes for configuring header compression using IPHC profiles.
| Figure 1 | Flowchart for Configuring Header Compression Using IPHC Profiles |
How to Configure Header Compression Using IPHC Profiles
- Creating an IPHC Profile
- Enabling the Options for van-jacobson IPHC Profile Type Header Compression
- Enabling the Options for ietf IPHC Profile Type Header Compression
- Attaching the IPHC Profile
- Displaying the IPHC Profile Statistics
Creating an IPHC Profile
The first task is to create an IPHC profile. When you create an IPHC profile, you can create either an ietf IPHC profile or a van-jacobson IPHC profile, by using the corresponding keyword of the iphc-profile command.
To create either an ietf IPHC profile or a van-jacobson IPHC profile, complete the following steps.
Before completing the steps listed below, determine the type of IPHC profile that you want to create: ietf or van-jacobson. The IPHC profile type that you create directly affects the header compression options available for you.
For more information about IPHC profile types and considerations for selecting one or the other, see the IPHC Profile Types.
Note |
The IPHC profile name must be unique and cannot be longer than 32 characters. IPHC profile names exceeding this maximum are truncated to 32 characters. > |
DETAILED STEPS
What to Do Next
So far you have created either an ietf IPHC profile or a van-jacobson IPHC profile.
The next step is to enable or set any additional header compression features or options available for the type of IPHC profile that you created.
Choose one of the following:
- To enable or set any of the header compression features available for a van-jacobson IPHC profile, complete the steps in the Enabling the Options for van-jacobson IPHC Profile Type Header Compression section below.
- To enable or set any of the header compression features available for an ietf IPHC profile, complete the steps in the Enabling the Options for ietf IPHC Profile Type Header Compression.
Enabling the Options for van-jacobson IPHC Profile Type Header Compression
If you created a van-jacobson IPHC profile, you can enable TCP header compression and set the number of TCP contexts.
Note |
If you created an ietf IPHC profile, the header compression options available to you are documented in the Enabling the Options for ietf IPHC Profile Type Header Compression. |
To enable TCP header compression set the number of TCP contexts, complete the following steps.
The IPHC profile must exist.
DETAILED STEPS
What to Do Next
The next step is to attach the IPHC profile to an interface, a subinterface, or a Frame Relay PVC. For the instructions to follow, see the Attaching the IPHC Profile.
Enabling the Options for ietf IPHC Profile Type Header Compression
Note |
If you created a van-jacobson IPHC profile, complete the tasks in the Enabling the Options for van-jacobson IPHC Profile Type Header Compression. |
If you created an ietf IPHC profile, you can enable or set a variety of header compression options. These options include enabling non-TCP header compression, enabling RTP header compression, and enabling ECRTP. For a list of the additional header compression features or settings available with an ietf IPHC profile, see the Enabling the Options for ietf IPHC Profile Type Header Compression.
The IPHC profile must exist.
DETAILED STEPS
Attaching the IPHC Profile
You can attach the IPHC profile (either an ietf IPHC profile or a van-jacobson IPHC profile) to an interface, a subinterface, or a Frame Relay PVC.
Choose one of the following:
Attaching an IPHC Profile to an Interface
To attach an IPHC profile to an interface or subinterface, complete the following steps.
- The IPHC profile must exist.
- IP must be enabled on the interface or subinterface.
- The type of encapsulation in use on the interface or subinterface must support header compression. Two types of encapsulation that typically support header compression are PPP and HDLC encapsulation.
- Header compression must not already be enabled.
- The interface or subinterface must have sufficient memory.
DETAILED STEPS
| Command or Action | Purpose | |
|---|---|---|
|
|
Example: Router> enable |
Enables privileged EXEC mode.
|
|
|
Example: Router# configure terminal |
Enters global configuration mode. |
|
|
Example: Router(config)# interface fastethernet0 |
Configures an interface type and enters interface configuration mode.
|
|
|
Example: Router(config-if)# iphc-profile profile1 |
Attaches the IPHC profile to the interface.
|
|
|
Example: Router(config-if)# end |
(Optional) Exits IPHC-profile configuration mode. |
Attaching an IPHC Profile to a Frame Relay PVC
To attach an IPHC profile to a Frame Relay PVC, complete the following steps.
- The IPHC profile must exist.
- On a network that is using Frame Relay encapsulation, IPHC profiles are supported only in the Frame Relay map-class infrastructure.
DETAILED STEPS
| Command or Action | Purpose | |
|---|---|---|
|
|
Example: Router> enable |
Enables privileged EXEC mode.
|
|
|
Example: Router# configure terminal |
Enters global configuration mode. |
|
|
Example: Router(config)# map-class frame-relay mapclass1 |
Creates a map class and enters static map class configuration mode.
|
|
|
Example: Router(config-map-class)# frame-relay iphc-profile profile2 |
Attaches the IPHC profile to the Frame Relay map class.
|
|
|
Example: Router(config-map-class)# exit |
Exits static map class configuration mode. |
|
|
Example: Router(config)# interface serial2/0 |
Configures an interface type and enters interface configuration mode.
|
|
|
Example: Router(config-if)# encapsulation frame-relay |
Enables Frame Relay encapsulation on the interface. |
|
|
Example: Router(config-if)# ip address 209.165.200.225 255.255.255.224 |
Sets a primary IP address for an interface.
|
|
|
Example: Router(config-if)# frame-relay interface-dlci 100 |
Assigns a data-link connection identifier (DLCI) to a specified Frame Relay interface on the router or access server and enters Frame Relay DLCI configuration mode.
|
|
|
Example: Router(config-fr-dlci)# class mapclass1 |
Associates a map class with a specified DLCI.
|
|
|
Example: Router(config-fr-dlci)# end |
(Optional) Exits Frame Relay DLCI configuration mode. |
Displaying the IPHC Profile Statistics
In this task, you can display statistical information about the IPHC profiles that you have created and configured. Displaying the IPHC profile statistics allows you to confirm that the IPHC profile is configured as you intended.
Information reported includes the IPHC profile name and profile type, the type of header compression enabled, whether any optional header compression features (such as the number of contexts) are enabled, and the name of the interface to which the IPHC profile is attached (if applicable).
To display the IPHC profile statistics, complete the following steps.
The IPHC profile must exist.
DETAILED STEPS
| Command or Action | Purpose | |
|---|---|---|
|
|
Example: Router> enable |
Enables privileged EXEC mode.
|
|
|
Example: Router# show iphc-profile profile1 |
Displays configuration information for one or more IPHC profiles.
|
|
|
Example: Router# end |
(Optional) Exits privileged EXEC mode. |
Configuration Examples for Using IPHC Profiles
- Example Creating an IPHC Profile
- Example Enabling TCP Header Compression
- Example Enabling Non-TCP Header Compression
- Example Attaching the IPHC Profile
- Example Reporting IPHC Profile Statistics
Example Creating an IPHC Profile
In the following example, a van-jacobson IPHC profile called profile1 has been created.
Router> enable
Router# configure terminal
Router(config)# iphc-profile profile1 van-jacobson
Router(config-iphcp)# end
In the following example, an ietf IPHC profile called profile2 has been created.
Router> enable
Router# configure terminal
Router(config)# iphc-profile profile2 ietf
Router(config-iphcp)# end
Example Enabling TCP Header Compression
In the following example, TCP header compression has been enabled in a van-jacobson IPHC profile called profile1. Additionally, the number of TCP contexts has been set to 25.
Router> enable
Router# configure terminal
Router(config)# iphc-profile profile1
Router(config-iphcp)# tcp
Router(config-iphcp)# tcp contexts absolute 25
Router(config-iphcp)# end
Example Enabling Non-TCP Header Compression
In the following example, RTP header compression has been enabled in an ietf IPHC profile called profile2. Additionally, ECRTP has been enabled with the recoverable-loss command, and the size of the compressed IP header has been set to 75 bytes.
Router> enable
Router# configure terminal
Router(config)# iphc-profile profile2
Router(config-iphcp)# rtp
Router(config-iphcp)# recoverable-loss 5
Router(config-iphcp)# maximum header 75
Router(config-iphcp)# end
Example Attaching the IPHC Profile
In the following example, an IPHC profile called profile1 is attached to serial interface 0.
Router> enable
Router# configure terminal
Router(config)# interface serial0
Router(config-if)# iphc-profile profile1
Router(config-if)# end
In the following example, an IPHC profile called profile2 is attached to a Frame Relay map class called mapclass1.
Router> enable
Router# configure terminal
Router(config)# map-class frame-relay mapclass1
Router(config-map-class)# frame-relay iphc-profile profile2
Router(config-map-class)# exit
Router(config)# interface serial2/0
Router(config-if)# encapsulation frame-relay
Router(config-if)# ip address 209.165.200.225 255.255.255.224
Router(config-if)# frame-relay interface-dlci 100
Router(config-fr-dlci)# class mapclass1
Router(config-fr-dlci)# end
Example Reporting IPHC Profile Statistics
The following is sample output from the show iphc-profile command. In this output, information about two IPHC profiles, profile21 and 20, is displayed.
Router# show iphc-profile
IPHC Profile "profile21"
Type: VJ
  Compressing: TCP
  Contexts   : TCP fixed at 150
  Controlled interfaces: (1)
    Se3/1
IPHC Profile "profile20"
Type: IETF
  Compressing: TCP NON-TCP (RTP)
  Contexts   : TCP 1 for each 0 kbits NON-TCP 1 for each 0 kbits
  Refresh    : NON-TCP and RTP every 5 seconds or 256 packets
  Controlled interfaces: (1)
    Se3/0
Additional References
The following sections provide references related to IPHC profiles.
Related Documents
| Related Topic |
Document Title |
|---|---|
| Cisco IOS commands |
|
| QoS commands: complete command syntax, command modes, command history, defaults, usage guidelines, and examples |
Cisco IOS Quality of Service Solutions Command Reference |
| QoS functionality overview |
"Quality of Service Overview" module |
| Header compression overview |
"Header Compression" module |
| RTP header compression |
"Configuring RTP Header Compression" module |
| TCP header compression |
"Configuring TCP Header Compression" module |
| Class-based RTP and TCP header compression |
"Configuring Class-Based RTP and TCP Header Compression" module |
Standards
| Standard |
Title |
|---|---|
| No new or modified standards are supported, and support for existing standards has not been modified. |
-- |
MIBs
| MIB |
MIBs Link |
|---|---|
| No new or modified MIBs are supported, and support for existing MIBs has not been modified. |
To locate and download MIBs for selected platforms, Cisco IOS releases, and feature sets, use Cisco MIB Locator found at the following URL: |
RFCs
| RFC |
Title |
|---|---|
| RFC 1144 |
Compressing TCP/IP Headers for Low-Speed Serial Links |
| RFC 2507 |
IP Header Compression |
| RFC 2508 |
Compressing IP/UDP/RTP Headers for Low-Speed Serial Links |
| RFC 3544 |
IP Header Compression over PPP |
| RFC 3545 |
Enhanced Compressed RTP (CRTP) for Links with High Delay, Packet Loss and Reordering |
Technical Assistance
| Description |
Link |
|---|---|
| The Cisco Support and Documentation website provides online resources to download documentation, software, and tools. Use these resources to install and configure the software and to troubleshoot and resolve technical issues with Cisco products and technologies. Access to most tools on the Cisco Support and Documentation website requires a Cisco.com user ID and password. |
Feature Information for Configuring Header Compression Using IPHC Profiles
The following table provides release information about the feature or features described in this module. This table lists only the software release that introduced support for a given feature in a given software release train. Unless noted otherwise, subsequent releases of that software release train also support that feature.
Use Cisco Feature Navigator to find information about platform support and Cisco software image support. To access Cisco Feature Navigator, go to www.cisco.com/go/cfn. An account on Cisco.com is not required.
| Table 3 | Feature Information for Configuring Header Compression Using IPHC Profiles |
| Feature Name |
Releases |
Feature Information |
|---|---|---|
| IPHC Profiles
|
12.4(9)T
|
The IPHC Profiles feature allows you to configure header compression in a kind of template ("profile") and to apply the profile to interfaces, subinterfaces, or Frame Relay PVCs. The following commands were introduced by this feature: feedback, iphc-profile, maximum header, non-tcp, non-tcp contexts, recoverable-loss, refresh max-period, refresh max-time, refresh rtp, rtp, show iphc-profile, tcp, tcp contexts. |
Cisco and the Cisco logo are trademarks or registered trademarks of Cisco and/or its affiliates in the U.S. and other countries. To view a list of Cisco trademarks, go to this URL: www.cisco.com/go/trademarks. Third-party trademarks mentioned are the property of their respective owners. The use of the word partner does not imply a partnership relationship between Cisco and any other company. (1110R)
Any Internet Protocol (IP) addresses and phone numbers used in this document are not intended to be actual addresses and phone numbers. Any examples, command display output, network topology diagrams, and other figures included in the document are shown for illustrative purposes only. Any use of actual IP addresses or phone numbers in illustrative content is unintentional and coincidental.
 Feedback