Cisco Prime Service Catalog 12.0 Integration Guide
Bias-Free Language
The documentation set for this product strives to use bias-free language. For the purposes of this documentation set, bias-free is defined as language that does not imply discrimination based on age, disability, gender, racial identity, ethnic identity, sexual orientation, socioeconomic status, and intersectionality. Exceptions may be present in the documentation due to language that is hardcoded in the user interfaces of the product software, language used based on RFP documentation, or language that is used by a referenced third-party product. Learn more about how Cisco is using Inclusive Language.
- Updated:
- March 2, 2016
Chapter: Integrating with External Directories
Overview
Service Catalog Directory Integration simplifies security administration and enhances user convenience and productivity by implementing centralized user authentication and synchronization with an enterprise directory.
Service Catalog enables customers to integrate with an external directory (typically using the LDAP protocol) for user information synchronization. This synchronization is invoked whenever a user is selected for Order-on-behalf (OOB) or during Person Lookup.
Single Sign-On (SSO) integration enables centralized user authentication, eliminating the need for a separate login mechanism. When the SSO event is enabled, users who are already logged in to an enterprise portal with which Service Catalog has been integrated do not have to login again. Service Catalog relies on the SSO tool to protect all Service Catalog URLs and to perform authentication. Service Catalog requires that the SSO tool provide person identification information for each successful authentication to a Service Catalog URL via the HTTP header or cgi header. Once a person has been authenticated, their information can be synchronized to the application database.
If SSO is not enabled, then the Service Catalog login screen is presented to all users so they can provide a valid username and password combination. By default, these credentials are authenticated against the internal database. Alternatively, Directory Integration could be configured to authenticate to an external system (generally an LDAP directory). Users who wish to access Service Catalog must be present in this source for successful authentication.
The Directory Integration Framework provides the above capabilities for many frequently deployed SSO and directory server products through configuration options available in the Administration module. The framework also includes an application programming interface (API) which can supplement predefined configuration capabilities. The API allows programmers to access additional SSO portals and directory servers, as well as to alter or supplement default behavior for synchronizing user information between Service Catalog and the external directory.
This chapter describes how to configure directory integration for Service Catalog using the Administration module. It also describes the set of public APIs and interfaces available for customizing the integration options available, best practices for compiling and deploying custom code, and steps to configure the custom code using the Administration module.
Prerequisites
Configuring directory integration requires the following:
- A working Service Catalog installation.
- Directory server installed and directories populated with corporate data. Directory entries for all potential users must contain non-null values for all attributes that are mapped to fields required for integration operation, as explained in the Defining Mappings.
- An SSO system that is responsible for the authenticating and authorizing access to Service Catalog, if Single Sign-On (SSO) is to be used.
- A user login with a role that includes the capability to “Manage Global Settings”. This capability is automatically included in the “Site Administrator” role and assigned to the “admin” user, but may be assigned to other roles or users as appropriate, using the Roles option in the Administration module.

Note Access to an LDAP browser is strongly recommended.
Prerequisites for Configuring Directory Integration
To configure directory integration, you need to have handy information about the current implementation of SSO (if used) and directory servers at your company, and to document the requirements for integrating these systems with Service Catalog. This section provides a set of worksheets for collecting this information.
These worksheets should help you collect the information required to configure directory/SSO integration, and to identify issues which need to be resolved before the integration can be implemented. This, in turn, can help in estimating the amount of development and testing time required for the directory integration.
Defining Datasources
Service Catalog defines a “datasource” for each directory which stores personnel and organization data to be accessed. The datasource definition includes all information required to connect to the external directory and extracting information from that directory.
You will need to define one datasource for each external directory. For example, different development and production directories may be used. In addition, Service Catalog supports LDAP directory referrals—a datasource needs to be defined for each directory in the referral chain.
The name of the datasource. Do not use spaces or special characters. |
||
LDAP is the only supported protocol at this time. If directory information is stored using another protocol, you need to create custom code to access this information. |
||
Choose the directory server product you are using. If the server is not currently supported, you will need to create custom code to access the server and extract directory information. |
||
Simple means plain text user/password. SASL (Simple Authentication and Security Layer) is also available, but SASL only works with Sun ONE Directory Server. |
||
Only needed if you choose Simple or SASL as the authentication method. |
||
Bind distinguished name field. BindDN is used to connect to the LDAP server when Service Catalog performs a directory operation. You may want to create a service account for this purpose. When this datasource is used in an External Authentication step, you will provide an EUA Bind DN in the Options area to override this value. For more details, see the External User Authentication (EUA) Operation. |
||
Required if you choose Simple or SASL authentication; the password for the user specified as the Bind DN. If the account uses password aging, you will need to update this password periodically. |
||
Fully qualified domain name or IP address of the LDAP directory server. |
||
Port number to connect to the directory server. Port Number 389 is typically used for non-SSL access. |
||
The directory from which to start searching for persons in the directory; since corporate directories may include many branches, specifying a base DN for the user data will optimize directory searches. |
||
This filter are added to other search filters you use, and it can be used to effectively change the search results. The filter expression must be enclosed in parentheses; for example, the filter: (&(!(msExchHide=true)(ISC-GID=*))) will return only those entries for which the msExchHide attribute is true and for which an ISC-GID attribute is defined. |
||
Required if you choose SSL as the connection mechanism. Do not use spaces or special characters in the certificate alias name. |
||
You can add one or more datasources as a referral. When a datasource search does not return results, the system searches the referral datasources as well. Referrals are supported for searches only, not binding. You cannot set up cyclic referrals. Cyclic referrals are those where one datasource has another datasource as a referral, while that datasource has the original as a referral. For example, datasource A has datasource B as a referral, while datasource B has datasource A as a referral. |
Defining Mappings
A “mapping” is a set of rules that gives instructions for how data is to be transferred from the external directory to Service Catalog. It maps between source attributes in the directory and target fields in the Service Catalog database. The rules are used to transfer data from the directory to the designated target field when the Service Catalog database is synchronized with the directory.

The same mapping can be applied to multiple directories (datasources).
A mapping includes the user/person’s profile along with all related entities: addresses, contacts, locations, one or more group associations, one or more organizational unit (OU) associations, and one or more RBAC (role-based access control) role associations.
A person profile includes seven mandatory fields, listed in the “Mandatory” section of the Mapping Worksheet below. Directory records which do not provide a value for any of these fields cannot be imported. Other fields which are part of the person profile can also be mapped. For more information, see People section, in Organization Designer chapter of Cisco Prime Service Catalog Administration and Operations Guide .
Most of the fields on the person profile are used to drive the Service Catalog functionality, and the mapping should ensure that mapped attributes provide a source value appropriate for the field; that is, do not try to overload these fields with more information than would be suggested by the field name, or with information that does not match the field name.
Service Catalog also includes fields which provide an extension to the standard personnel data. These fields are denoted as “Extension” on the following table and appear on the Extensions page of the Person information in Organization Designer. Some of the most frequently required extended fields have been assigned meaningful names (such as Company Code and Division), but others have the names Custom 1 through Custom 10, and are intended to be freely used, with no preconceived semantics. If you have additional personnel information in the LDAP directory that needs to be exposed in Service Catalog, map the attributes containing that information to one of the personnel extended fields.
The “Directory Attribute” column in the worksheet below should be filled in for all Person profile fields for which the directory must supply data. The Attribute should be one of the following:
- The directory attribute name or names, if two or more attributes can be concatenated (with optional literals) to form the value for the field.
- “Custom mapping”, following by a number or description. All custom mappings should be explained in detail in the Custom Mappings or noted briefly in the “Comments” column. Custom mappings may assign the result of a regular expression to the attribute, or may be implemented via a module of custom Java code. Details for implementing these mappings are given in the Configuring Mappings.
Mandatory Mappings
Optional Mappings
The return type of the LDAP attribute being mapped must return a long. Service Catalog does not support other formats. |
|
The return type of the LDAP attribute being mapped must return a long. Service Catalog does not support other formats. |
|
The mapped attribute must return a value in one of the following formats: As of the March 2008, the familiar three-letter time zone designations (for example, “EST” for Eastern Standard Time) should not be used. For a list of supported values for the above formats, see the Supported Time Zones. If the return value does not match one of the valid formats, Service Catalog uses PST as the default time zone. |
|
The mapped attribute must return a value in the form: where language is a two-letter language code and the country is a two-letter country code. |
|
This field represents the identification of manager. For more details, see the Import Manager Operation. |
|
This should return a number. When used with the Import Manager event, Management Level is expected to be in increasing order according to the hierarchy. For example, if there are two designations, Junior Engineer and Senior Engineer, Management Level returned for Junior Engineer should be less than the Management Level of Senior Engineer. |
|
Use this mapping to associate the person with one or more Organizational Units. The mapping may return multiple values. For this field Service Catalog uses all values returned by multivalued LDAP attributes. Input for this field should be in one of the following formats:
|
|
Similar to Organizational Unit List. The returned roles may be either system- or user-defined. For system-defined roles, the names must be exactly as they appear in a browser with language US English. Other languages are not supported. For example, “My Services Executive” should be returned to associate a user with this role. For user-defined roles, the name must exactly match the user input in user language while creating the role. |
Defining Integration Events, Operations and Steps
Integration events are the interfaces between Service Catalog and an external directory or SSO program—the only times in the use of Service Catalog that the external program or directory is accessed. These events consist of a series of operations which are executed in sequence.
Events
Service Catalog supports four directory integration events:
- The “ Login ” event occurs when a user's credentials are validated and the user connects to Service Catalog. This event occurs when a user initially starts a Service Catalog session. It also occurs if a session times out (the administrator-specified time-out period expires) and the user must reconnect.
- A “ Person Lookup ” event occurs every time user information must be retrieved. There are actually three types of Person Lookup events:
– Person Lookup for Order on Behalf : A user requests a service on behalf of another person, and must choose the person who is the customer for the service.
– Person Lookup for Service Form : A service form includes a Person field, which allows the user to designate another person as part of the service data.
– Person Lookup for Authorization Delegate : A user responsible for reviewing or authorizing service requests modifies his/her profile to designate another person as a temporary authorization delegate.
Operations
You can configure events to perform various types of operations. The operations are specified for each event in a series of steps, which determines the sequence in which each operation in invoked.
The directory framework includes the following operations:
- Single Sign-On (SSO) is always the first step in the Login event. The SSO operation identifies the login name of the user.
- External Authentication can occur after the SSO operation or, if an SSO operation is not used, after the default Login screen. External Authentication uses the login name and password of the user and authenticates them against an external datasource.
- Person Search is triggered when the user invokes a search on a datasource. Person Search uses the First Name and Last Name of the user to provide a list of matched items.
- Import Person can occur after External Authentication or after SSO, or after a person is chosen in the Person Search dialog box. Import Person uses the login name of the person searched or logging in to query a datasource and import the person into the database.
- Import Manager can only occur after Import Person. The Import Manager operation will use the imported person information to import the managers of this person.
Each operation can be customized via implementation of custom code interfaces.
Trigger Order below shows the sequence in which operations are triggered.

Login Event
If a directory integration login event is not configured, the default behavior is to present the login screen and validate the credentials entered (user name and password) against the contents of the application database.
If the directory integration event is enabled, the Login event may be configured with either one of the following operations as its first step:
- Single Sign-On: In a corporate environment where all users are preauthenticated using SSO vendors, automatically extract the login id of the user from request headers or CGI headers and allow transparent login, bypassing the application login screen.
- External User Authentication: Present the application login screen and validate the credentials entered against the specified external directory. External User Authentication may also follow an SSO operation.
- Mixed Mode Authentication: Avoids NTLM authentication via application server port. When DB Credentials(both Username and Password) are passed via the Application server Port and NTLM Authentication is enabled on the web Server, Database Authentication triggers and database user owns the session.
If EUA is enabled and both Username and Password is passed , an LDAP authentication is triggered. The Password provided must be the LDAP Password and LDAP user owns the session..
Once the user credentials have been validated, the Login event may include additional operations to synchronize user data between the external datasource and Service Catalog:
- The “Import Person” operation may be the next step. This operation imports the profile of the authenticated person selected to Service Catalog, synchronizing the data.
- The “Import Manager” operation may follow the “Import Person” step. This operation retrieves information on the managers of the selected person from the external directory and updates the Service Catalog database with that information.
Single Sign-On Operation
Integration with Single Sign-On (SSO) solutions can use one of the following two mechanisms/protocols:
1. Active Directory Services (ADS)/NT LAN Manager (NTLM)-based authenticated user
– The third-party IM/AM/SSO product is not needed to log into Service Catalog.
– The logged in user credentials from any POSIX-compliant OS are returned by the browser to Service Catalog.
– This is also called integration through CGI Headers for SSO.
– This is for non-ADS/NTLM integration.
– It requires the third-party IM/AM/SSO product to log into Service Catalog using RequestHeaders in the http protocol.
For customers who plan to use SSO for both Portlet and Directory Integration, only HTTP Header SSO is supported. Custom SSO plug-ins within the Directory Integration framework are not supported.
Administrative Bypass of SSO
It is sometimes necessary to allow some users to bypass the Single Sign-On and login directly to Service Catalog. This capability is typically required for:
- System administrators who need to investigate problems with Single Sign-On
- Testers who need to emulate the performance of multiple users in order to validate a service design and task plan
Service Catalog provides a mechanism for allowing users to access the login screen and enter a user name and password. The newscale.properties file (located within the RequestCenter.war) specifies a value for the “BackDoorURLParam”; for example:
The URL used to access Service Catalog via the login screen must include a parameter. For the above value of the backDoorURLParam; for example, a sample URL might be:
<app_server_port> is the port number of application server.
It is the responsibility of the administrator to establish policies for aging out the value of the BackDoorURLParam according to corporate guidelines and for controlling administrative access to Service Catalog. Access via the administrative URL can be restricted to only those users who have the “Site Administrator” role via the corresponding Administration Setting:
Figure 8-2 Administration Setting
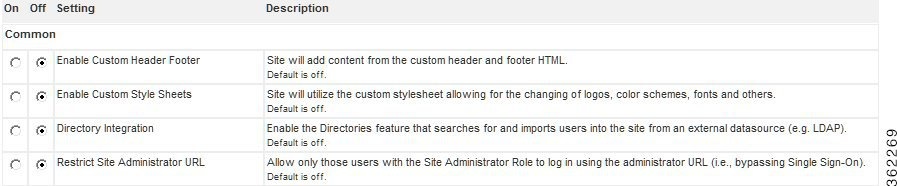
The administrator must also ensure that the URL is directly accessible to users—access to the Service Catalog application may have previously been restricted to the SSO software via web server or network configuration parameters.
The Service Catalog service must be restarted for a change to this parameter to take effect.
External User Authentication (EUA) Operation
Use External Authentication to authenticate all Service Catalog users with a corporate directory. This way you do not have to worry about synchronizing user passwords.
External User Authentication must follow a login attempt—either via a configured Single Sign-On operation or through the application login screen. The LoginId retrieved from the previous operation is available to the EUA operation. However, validating this user in the external directory requires additional information, so that the BindDN can be located.
The EUABindDN setting allows the application to automatically extrapolate the bind DN of the user trying to sign on.
Person Lookup Events
All Person Lookup events (Order on Behalf, Service Form, and Authorization Delegate) share the same behavior and configuration options.
If the directory integration event is not enabled, the Person Search window searches personnel information in the Service Catalog database. If a person is selected, their information is used. Personnel information is not updated.
If the directory integration event is enabled, the Person Lookup event may be configured with the following operations:
- The “Person Search” operation must be the first step. This operation retrieves personnel information from the external directory and displays it in the Person Search window. If the user selects a person, additional information on that person is retrieved, according to the mapping specified for the event, and supplied to the calling context.
- The “Import Person” operation may be the next step. This operation imports the profile of the person selected from the external directory to Service Catalog, synchronizing the data.
- The “Import Manager” operation may follow the “Import Person” step. This operation retrieves information on the managers of the selected person from the external directory and updates the Service Catalog database with that information.
Person Search Operation
Settings for the Person Search operation determine the appearance and behavior of the window that displays people meeting the search criteria.
In order for a person to be imported into Service Catalog, all mandatory fields must have a valid attribute mapping, which returns in a nonblank value. If any required values are missing, the default behavior is to exclude that person from the Search Results. The alternative is to include such people in the Search Results, and flag them as having incomplete information.
People with incomplete information cannot be chosen.
The * (Asterisk) Wildcard Character and Person Search
When configuring and testing a Person Search, you need to be aware of the use of the asterisk (*) as a wildcard character.
Transparent to the user, the system always appends an * to the end of the search string. Therefore, if a user enters john in the Last Name field, and clicks Search , the system returns all persons in the directory whose last name begins with the word john, such as “John”, “Johnson”, and “Johnston”.
A user may also explicitly enter the * character in the search string of the Search Person dialog box. Some examples of the usage for wildcard search are:
- Enter * in the Last Name field, and click Search . The system returns all persons in the directory.
- Enter john* in the Last Name field, and click Search . This is essentially the same as typing just john in the Last Name field. The system returns all persons in the directory whose last name begins with the word “john”.
- Enter *john in the Last Name field, and click Search . The system returns all persons whose last name contains the word “john,” including “John”, “McJohn”, and “Johnson”.
- Enter *john*son in the Last Name field, and click Search . The system returns all persons whose last name contains the word “john,” followed (not necessarily immediately) by the word “son.” These include “Johnson”, “Mcjohnson”, and “Upjohningson”.
Note The * is always treated as a wildcard character in the search string. Therefore, the user is NOT able to search for a value in the directory that contains the character *. Any other special characters may be used in the search string.
Configuring the Search Results Window
By default, the Search Results window in the Select Person Popup displays the person's first name followed by the last name. Additional fields can be added to the display by changing the Setting for the Person Popup available in the Administration module.
Import Person Operation
Import Person settings govern whether person information in the application is refreshed from current information about the selected person (when Import Person is used in a Person Search event) or the person who has logged in (when Import Person is used in a Login event).
Import Manager Operation
Service Catalog allows authorizations and reviews to be dynamically assigned. For example, a request with a dollar value greater than a specified threshold might need approval by the director of a particular department. Another request might need to be reviewed by the requestor's immediate superior.
To implement business rules like these, the managers of an employee who can request a service must also be present in the Service Catalog database. The Import Manager operation supports this requirement, importing manager (supervisor) data in conjunction with the employee's data.
To govern the behavior of the Import Manager operation:
- Identify the attribute in the employee's directory entry that is to designate his/her manager.
- For all employees, ensure that the designated attribute is populated with a value that uniquely identifies their manager. This is typically the login id or email address.
- In the mapping for the Supervisor field (listed in the Optional Person Data Mappings) specify the attribute in the employee data that holds the manager information. In the sample below, the managerEmail attribute is used.

- In the Import Manager settings, specify as the “Key Field for Manager ID” the field in the manager’s directory record whose value corresponds to the Supervisor attribute specified for the original person.
In one possible scenario, a single attribute exists in each person's directory record which uniquely identifies the person's supervisor. Assume, for example, that the person's directory record contains the manager’s email ID within the attribute manager_email . No other manager information is present.
An alternative scenario may be that the directory record contains an attribute that is exactly the DN of the person's supervisor. Assume the name of this attribute is manager .
Supervisory hierarchies may also need to be accommodated.
For example, consider this organizational chart:
Figure 8-4 Organizational Chart

If requests were subject to an immediate supervisor’s approval, a “relative” search is needed, going up the tree one level.
Alternatively, if certain requests were subject to, for example, a Director’s approval, an “absolute” search is needed. People (managers) would be imported until the position of the current person was “Director”. In the example above, in the case of S. Person, two additional people would be needed—her immediate manager, A. Name, and his manager, J. Doe, who is their Director. For T. Tom, only one import would be required.
If you are using an absolute search (import all managers with successively higher levels of authority until you find one with the specified position), you must assign numeric equivalents to the positions:
- Analyze the corporate hierarchy, assigning numeric equivalents to all management positions.
- Identify the attribute in the employee’s directory entry that is to designate his/her management level. For example, perhaps an attribute named “paygrade” could be used.
- For all employees, ensure that the designated attribute is populated.
- In the mapping for the Management Level field (listed in the Optional Person Data Mappings) specify the attribute that holds this information.
- Enter the highest level of manager to be imported as the “Maximum Level” in the Import Manager settings.
You may configure a search terminator if you do not want to synchronize supervisors beyond a known value. You can specify multiple values in the format: #value1#, #value2# and so on.
For example, you may not want to import any supervisors who rank above a person with uid as “scarter.” His Supervisor attribute is mapped to his email (scarter@email.com). In this case set the Search Terminator to #scarter@email.com#. The directory integration will stop supervisor synchronization as soon as a record is found with scarter@email.com as the supervisor.
Supervisor synchronization stops as soon as either limiting condition is met—Maximum Level or Search Terminator.
Configuring SSO With ADS
Create a file jboss-web.xml with the following contents in the directory ServiceCatalogServer/RequestCenter.war/'WEB-INF'.
Note You must add this after </context-param>, and before the filters.
Modify standalone-full.xml, add a security domain:
Note You must search for security–domains and add the following contents below it.
Note For Cluster, you should create jboss-web.xml and should modify the web.xml in the directory C:\Install_dir\dist\RequestCenter.war, for more information see Cisco Prime Service Catalog 11.1.1, section Applying Patch or Customizations to the WildFly Cluster Setup.
Configuring Directory LDAP Integration
Configuring directory integration involves using the Directories options of the Administration module. The basic process is to:
- Enable directory integration . Click the Directory Integration on the Administration module’s Settings tab to enable directory integration.
- Configure datasource information . Use the Datasources area of the Administration module’s Directories tab to configure datasources that connect to directory servers. Information such as the datasource name, description, protocol, server product, and authentication method is required.
- Configure mapping . Use the Mappings area of the Administration module’s Directories tab to map application data to the directory server data. Mappings update the entire user/person’s profile along with all related entities: addresses, contacts, locations, one or more group associations, one or more organizational unit (OU) associations, and one or more role associations.
- Configure events . Use the Events area of the Administration module’s Directories tab to configure directory integration behavior. The Login and Person Lookup events can be configured to include operations such as Single Sign-On (SSO), End User Authentication (EUA), Import Person, Import Manager, and Person Search.
- If required, configure custom code interfaces for client customizations, including directory java class attribute mapping, directory server API, and Import Person, with its related entities.
Enabling Directory Integration
To enable directory integration:
Step 1 Log in using an account with administrative privileges and choose the Administration module.
Step 2 Click the Settings tab.
Step 3 Next to Directory Integration, click On .
Step 4 On the bottom of the Customizations screen, click Update .
You have now enabled directory integration. (See Enabling Directory Integration.)
Figure 8-5 Enabling Directory Integration

Configuring Directory Integration Settings
You use the Directories tab of the Administration module to configure many of the directory integration settings.
Figure 8-6 The Directory Integration Area

To configure directory integration settings:
Step 1 Log in using an account with administrative privileges.
Step 2 From the drop-down menu, choose Administration .
Step 3 Click the Directories tab.
The Directory Integration page appears. These settings will be in effect once directory integration has been enabled.
Configuring Datasource Information
The following sections guide you through configuring datasource specific information. The tasks include:
- Adding or editing a datasource – You need to add a datasource to a new installation that does not yet have any datasources. If datasources exist, you may edit them.
- Adding a server certificate for SSL connections – You only need to do this if you choose SSL as the connection mechanism.
- Adding referral datasources – Only if desired.
- Testing the connection – You should always test the connection to prove connectivity.
Adding or Editing a Datasource
At least one datasource must be defined. To add a new datasource:
Figure 8-7 Adding or Editing a Datasource

Step 1 Navigate to the Directory Integration page by choosing the Administration module and then clicking the Directories tab.
Step 2 In the page navigator, click the Datasources option, if not already selected.
Step 3 Click Add . To edit an existing datasource instead of adding a new datasource, click Edit next to the desired datasource in the list.
The Datasource Configuration area expands.
Step 4 Enter the Datasource Name, Datasource Description, and the desired settings. Click  to access all of the settings in the adjacent area. See the Datasource Worksheet for more information about these settings, or see the following sections.
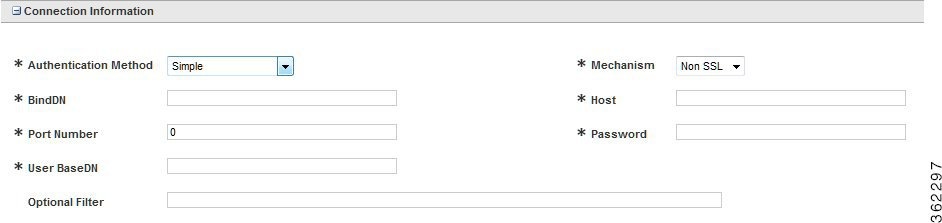
Configuring Connection Information
Specify the connection protocol and user credentials used to connect to the datasource.
Figure 8-8 Configuring Connection Information
Configuring Certificates
If you chose SSL as the connection mechanism, you need to specify the certificates for the directory integration system.
Figure 8-9 Configuring Security Certificates

Step 1 Navigate to the Directory Integration page by choosing the Administration module and then clicking the Directories tab.
Step 2 In the page navigator, click the Datasources option, if not already selected.
Step 3 Next to the datasource to which you wish to add a certificate, click Edit .
Step 4 Click Add Certificate .
Step 5 Name the certificate. Do not use spaces or special characters in the certificate alias name.
Step 6 From the Certificate Type drop-down menu, choose the certificate type.
Step 7 Paste the certificate value (obtained from a vendor like VeriSign) into the certificate field.
Configuring Referral Datasources
If you have multiple datasources configured, you can designate datasources as referral systems to a selected datasource. This way, whenever the system performs a search against the selected datasources, it will also search all referral datasources.
The referral datasources are searched in the order in which they are specified until a match is found.
A match is said to be found when the search criteria returns one or more records.
Referral datasources are typically used when directory information is divided among multiple directories. For example, different company divisions may each maintain their own directory.
Figure 8-10 Configuring Referral Datasources

To configure referral datasources:
Step 1 Navigate to the Directory Integration page of the Administration module.
Step 2 In the page navigator, click the Datasources option, if not already selected.
Step 3 Next to the datasource for which to configure a referral datasource, click Edit .
Step 5 The Referral Datasource area appears. From the Datasource Name drop-down menu choose a datasource name, and then from the Mapping Name drop-down menu choose a mapping name.
Testing the Connection
If you have completed all the necessary configuration steps, then you are ready to test the directory integration connection.
Figure 8-11 Testing the Connection

Step 1 Navigate to the Directory Integration page in the Administration module.
Step 2 In the page navigator, click the Datasources option, if not already selected.
Step 3 Choose the datasource to test by checking the check box to the left of the datasource name.
Step 4 Click Test Connection .
The Test Status column displays OK if the connection is successful, and  if it is unsuccessful.
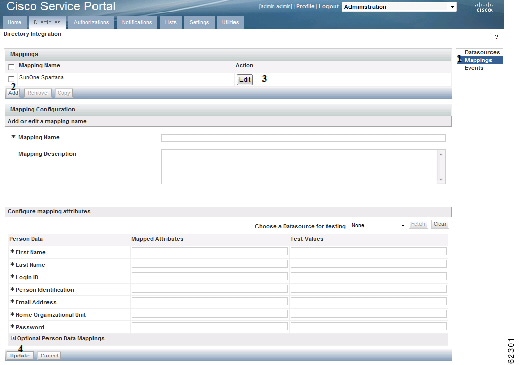
Configuring Mappings
You use the Mappings area of the Administration module’s Directories tab to map Service Catalog data to directory server data.
To configure mapping, see Configuring Mapping and follow the procedure below.
Figure 8-12 Configuring Mapping
Step 1 Navigate to the Directory Integration page of the Administration module.
Step 2 In the page navigator, click the Mappings option.
Step 3 Click Add to add a new mapping, or click Edit next to the desired mapping in the list to edit an existing mapping.
The Mapping Configuration area expands.
Step 4 Configure the mapping name, description, and attributes, based on the requirements documented in the Mapping Worksheet. The mappings prefixed with an asterisk (*), shown in the Person Data section, are mandatory. You may also configure optional mappings by clicking the  button, to expand the Optional Person Data Mappings section.
The mapping fields accept simple, composite, expression, and Java mapping types, as described below.
Mapping Types
This section describes accepted mapping types, illustrates a valid sample mapping, and explains with examples expression mapping. The following table describes the supported mapping types.
One directory attribute maps to the field. This is simple one-to-one mapping. For example: |
|
A combination of attributes maps to the field. # delimits each attribute name. The mapping may include literals. For example: |
|
An expression uses regular expressions and pattern matching to derive the mapping. For more details see the Expression Mapping. |
|
Use Java mapping when simple, composite, or expression mapping does not offer the desired functionality. This involves writing a Java class and placing the compiled class file on the appropriate directory on the application server. For more details see the Java Class Mapping. |
Simple and Composite Mappings
The following table illustrates sample simple and composite mappings for the mandatory fields.
Expression Mapping
Expression mapping allows you to conditionally assign a value to an attribute, based on which pattern (regular expression) the expression matches. The system expression mapping uses the Perl5 Regular Expression Language, to specify patterns to be matched, combined with syntax similar to that of the Java conditional operator. Syntax :
If <expression> matches <pattern1>, then return <value1>.
If <expression> matches <pattern2>, then return <value2>.
If <expression> does not match any pattern, then return <default>.
Each element (expression, pattern, or value) can contain a directory attribute name, delimited by the # symbol. For example, a pattern can be specified as “#givenName#_#sn#”, where both #givenName# and #sn# are attribute names:
In addition, parentheses can be used to group a series of pattern elements to a single element. When you match a pattern within parentheses, you can use back-references, in the form of $1, $2, and so on, to refer to the previously matched pattern.
Examples of Expression Data Mapping
A simple use of an expression applied to directory integration may be to translate one or more coded values in the directory to more user friendly descriptions or broader categories. For example, some services may need to differentiate between employees and contractors. The costCenter attribute is known to be “000000” for contractors. Therefore, the following expression could be applied to the “Employee Type” field:
Another suse of an expression is to supply a default value for a field when the source attribute is blank. This may frequently be a “stop gap” measure, until directory data can be standardized. Or it could be standard; for example, if outside contractors are not assigned a department. The following expression could be applied to the “Home OU” field (a mandatory field for the mapping):
This expression uses the DeptLevel2 attribute if available, or defaults to the “Unknown” Business Unit for the user’s Home OU.
Similarly, the expression can be used to translate from a set of input values to a different set of return values. This is the equivalent of a case statement, or nested if/then construct. For example, the following expression could be applied to the “Locale ID” field, to assign a language for the user, based on his/her location:
If the user’s country is the United States, set the language to American English; if it is Germany, set the language to German. For any other country, set the language to American English.
Regular expressions can check the length of a source attribute and whether it is composed of alphabetic or numeric characters. For example, sometimes zip codes are stored as numeric data types, truncating leading zeroes. To restore a leading zero, an expression such as the following could be applied to the “Company Postal Code” field:
If the postalCode attribute consists of precisely four digits, add a leading zero to the value of the attribute. This converts zip code 1701 to 01701 , and leaves any source values which do not match the specified pattern unchanged.
A similar use of regular expressions might check that the format of an attribute value matches an expected pattern. Consider a use case in which a valid manager's user ID needs to consist of two letters followed by a series of numbers. Valid IDs would be, for example, fd1024 and ID3839. The following expression could be used:
Attributes can be used in the expression, pattern, or return value:
The last name and first name from directory records are combined into a string such as “Doe, Jane” before any attempt is made to match the patterns.
Embedded parentheses and back-references are useful for extracting a portion of the pattern. For example, the organization to which a person belongs is frequently embedded within a distinguished name (dn) attribute:
The expression mapped to the “Home Organizational Unit” field might have the format:
The returned value, “Corporate” is a back-reference value $1, which equals the pattern matched by the expression within the first set of parentheses, ([a-zA-Z]+).
Usage of back-referenced variables may be required to parse overloaded attributes which include the values for more than one field. For example, an attribute can include the business address of a person, including the building name, floor (level), and office.
The same pattern could be used to match the three elements in the expression, by using different back-referenced variables as the value:
Java Class Mapping
You will need to be familiar with Java programming and have a Java development environment set up in order to implement a custom Java class to map directory data to fields.
Any custom mapping class must follow the guidelines given in “Using Custom Code in Directory Integration” section. The mapping class must implement an IEUIAttributeMapping interface.
The developer must follow the guidelines below to test and install the custom code module.
1. Install a Java IDE of choice, and set up a project for developing custom mapping code.
2. Edit the custom code file to fulfill your requirements.
4. The custom Java class must be installed on the Service Catalog web archive (war), to be accessible to the Service Catalog service. Create a directory in RequestCenter.war/WEB-INF/classes to correspond to the package. Such directories are typically named:
com/newscale/client/<clientname>, for example, com/newscale/client/aib.
5. Copy the CustomMapping.class file to the directory created in the previous step.
6. Restart the Service Catalog service.
7. Specify the fully qualified name of the class file as the Mapped Attribute for the field to be populated.
8. Test the custom code by using the Directories Test feature.
Testing Mappings
You can use the Mapping Test feature to test that your data mapping settings are configured correctly and pulling the correct values from the directory server.
Enabling the Directory Map Testing Feature
To enable the directory map testing feature, see Enabling Mapping Testing and follow the procedure below.
Figure 8-13 Enabling Mapping Testing
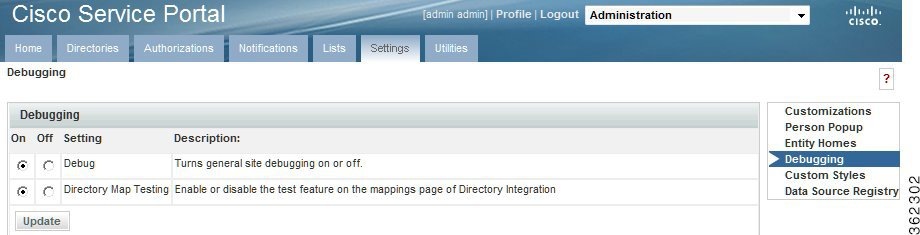
Step 1 Click the Settings tab of the Administration module to display the Settings page.
Step 2 In the page navigator, click the Debugging option.
The Debug Settings page appears.
Step 3 Next to the Directory Map Testing setting, click On .
The system enables the Data Mapping Test feature. Now when you access the Data Mapping tab, the following additional features appear as shown in Mapping Test Controls:
Using the Data Mapping Test Controls
Figure 8-14 Mapping Test Controls

To use the Data Mapping test controls:
Step 1 Click Mappings , if you are not already on the Mapping page.
Step 2 Next to the mapping you wish to test, click Edit .
Step 3 From the “ Choose a Datasource for testing” drop-down menu, choose the desired datasource.
Step 4 In the Test Values column, enter test values. You can use simple, composite, Java, or expression mapping.
Step 6 The test values appear in the Test Values column and a summary of the results appears at the bottom of the page.
Note Fetch returns values from only one datasource and does not search referrals. This is for convenience because it becomes difficult to debug with referrals search integrated.
Step 7 To the right of the Fetch button, click Clear and retry new values until you have configured the desired mappings.
Configuring Directory Integration Events
You use the Events area of the Administration module’s Directories tab to configure directory integration behavior for the following events:
- Login
- Person Lookup for Order on Behalf
- Person Lookup for Service Form
- Person Lookup for Authorization Delegate
To configure events, see Configuring Events and follow the procedure below.
Step 1 Navigate to the Directory Integration page of the Administration module.
Step 2 In the Page Navigator, click Events to display the Events page.
Step 3 Next to the type of event to configure, click Edit .
The Event Configuration area appears.
Step 4 From the Event Status drop-down menu, choose Enabled to enable the event.
Step 5 Click Add step to add a step for the system to initiate when the selected event occurs.
Step 6 Choose an operation associated with the step you just added.
- All operations are available in this menu even though some operations, such as SSO and EUA, are not applicable for all event types.
Step 7 Click Options to configure the options associated with the operation you just chose. The Options area appears. The Options area will differ according to which operation is chosen. Details on the available operations and their options are given in the next section.
Step 8 Configure the associated options. See the relevant sections in this chapter on directory Events for a description of the operations available and options for configuring them.
Step 9 Click Update and repeat these steps for each step and operation you wish to add.
Figure 8-15 Configuring Events

Using Custom Code in Directory Integration
The directory integration framework is designed for flexibility and customization of the “Login” and “Person Lookup” events.
Standard operations for all events are available on the Administration module’s Directories tab. These include: SSO, External User Authentication, Import Person, Import Manager, and Person Search.
In cases where these standard operations do not fully satisfy a business scenario, the Directories tab also provides interfaces to execute custom Java code. This custom code should adhere to the interfaces described in this chapter, and you should develop any customized solutions using Service Catalog exposed APIs.
The following are valid use cases for scenarios in which you may wish to customize an event operation:
The directory integration custom code framework also defines interfaces that can be implemented to provide complex retrieval logic for a specific field in the person/user profile from a record in an external datasource.
Public APIs and interfaces for directory integration include the:
- Custom Code Operation Interfaces , which are used to customize directory integration operations.
- Custom Java Class Mapping Interface , which is used to provide customized retrieval of a specific attribute in an external datasource from its record.
- Directory Server API , used to query/authenticate against an external datasource and retrieve records.
- Import/Refresh Person API , used to update person attributes in the Service Catalog database.
A typical custom code project will involve following types of activities:
- Identify the need for custom code.
- Configure the Directories tab in the Administration module to include the Datasource to be used by your custom code and, if relevant, the Mappings which your custom code will use.
- Develop the custom code. You will need to understand the public APIs and interfaces provided by Cisco for directory integration tasks.
- Build and deploy the custom code.
- Configure the Directories tab in the Administration module to use your custom code.
Directory Integration Operations below summarizes the directory integration operations in more detail.
Mixing and matching, or replacing, standard operations with custom code operations is also supported by the directory integration framework. Service Catalog supports various combinations of operations per event, as described in the table below, using your own customized code and Service Catalog public APIs, designed to help implement these interfaces.
It is important that custom code design and development engineers understand the directory integration framework, public APIs, and custom code interfaces, which are discussed in detail in this chapter.
Table 8-16 below portrays the relationship between methods, events, and operation types for custom code operations. Combinations not listed in Table 8-16 below are not supported.
Custom Code Operation Interfaces
If you are providing a custom implementation of an operation configured within an event, you will need to implement a “custom code operation interface”.
Custom code operation interfaces define callback methods that are invoked when a particular operation is triggered. Exactly which method is invoked depends on the operation type chosen in the operation. For more details see the Method, Event, and Operation Type for Custom code Operations table. All methods defined in the custom code operation interfaces follow the same pattern:
Parameters
In the following list, “**” must be replaced by the operation type, which is one of:
1. **OperationDTO: This object contains the information on how you have set the operation on the Directories tab of the Administration module. It includes mapping and datasource information.
2. **OperationContext: The Context object is used to share information across method invocations. The directory Integration framework makes information stored in one context object available to other context objects during the same HttpServletRequest invocation.
a. Use setLocalContextObject and getLocalContextObject to set any custom information that does not fall as a part of results.
b. Use get**Result to get a result object. Result objects contain all the information about what happened throughout the event request. Results contain information that is supported in a productized import. The LocalContext object is used to store objects that were unforeseen during the implementation of productized operations.
3. Request: This is the HttpServletRequest.
4. **ImportAPI: This object is used to import a person. More details can be found in the Javadocs.
5. **LDAPAPI: This API is used to make LDAP queries. More details can be found in the Javadocs.
Return
**Result. After performing the custom task the API must return a valid return type with results populated. Return the same result object retrieved from OperationContext after updating relevant properties. There may be unexpected behavior if a new instance of the result object is returned.
Table 8-17 below maps the expected input/return to the objects in the parameters of each of these callback methods:
You must implement all methods to compile your implementation class. If you customize only limited operation types, you must provide an empty implementation of methods not relevant to the operation types.
For example, if you are only interested in a customized SSO, then provide a complete implementation of the getCredentials method. For all other methods, return null.
The system may pool an instance of an interface and may be concurrently accessed from multiple threads. Thus, it is recommended to keep the instance stateless.
Custom Code Interface for Login Event – ISignOn
This is the interface that custom code should implement in order to customize login events: SSO, EUA, Import Person, Import Manager and custom code operations.
Customizing the SSO Operation
The primary purpose of an SSO custom code operation is to retrieve and return the Login Name from HttpHeader based Sign-On or from CGI Header (CGI variable REMOTE_USER) in the case of Remote NTML/IWA type of Sign-On.
As outlined in Table 8-16 , you must provide a Java class that implements the ISignOn interface. Please provide a complete implementation of the getCredentials method in this interface, and read the documentation for the ISignOn interface for detailed specifications.
The following are some guidelines for implementing the getCredentials method. It is not required that all of these guidelines are implemented; There may be additional requirements, dependent on the customization, which are not covered by what is outlined below.
- Get IEUISignOnOperationResult from IEUISignOnOperationContext. This is the object that must be returned from this interface.
- Use the parameter request and process it to derive the login name of the person.
- Return LoginId back by calling IEUISignOnOperationResult.setSsoLoginId(<login id>), if using the in-product directory lookup functionality.
- Call IEUISignOnOperationResult.setSsoRedirectUrl("<any url or error page>"), which are used for redirecting the user on SSO failure.
SSO Operation Options received through IEUIEventSSOOperationDTO.getEventSsoDTO() may be null as SSO options are not accepted in the Administration module for custom code operations.
Customizing the EUA Operation for Login Event
The primary purpose of an EUA custom code operation is to authenticate a user against an external system.
As outlined in Table 8-16 , you must provide a Java class that implements the ISignOn interface. Please provide a complete implementation of the authenticate method in this interface, and read the documentation for the ISignOn interface for detailed specifications.
The following are some guidelines for implementing an EUA operation. It is not required that all of these guidelines are implemented; There may be additional requirements, depending on the customization, that are not covered below.
- Get IEUISignOnOperationResult from IEUISignOnOperationContext. This is the object that must be returned from this interface.
- The EUIDatasourceDTO object from the IEUIEventEUAOperationDTO object contains the interface to the Datasource configured in the Administration module for this operation.
- Populate the LDAPConfigInfo object from the EUIUtil and pass EUIDatasourceDTO. This is needed to call LDAP API with the connection information to LDAP Server.
- Get the Login Name by calling IEUISignOnOperationResult.getSsoLoginId().
- Form a BindDN and set it into LDAPConfigInfo by calling setBindDN().
- Get the Password entered by the user in the Login page by calling IEUISignOnOperationResult.getEuaPassword().This function returns BASE64 encoded password. To convert this string into a plain password, perform the following steps programmatically:
– Remove the prefix “!@^_” and suffix “_^@!” from the string.
– Use Java’s Base64 decode method on the above resultant string.
- Set it into LDAPConfigInfo by calling setBindPassword().
- Authenticate the user against the Directory Server by passing the LDAPConfigInfo object ILDAPApi.authenticate() API.
- If the user has been authenticated, then call IEUISignOnOperationResult.setEuaAuthenticated(true).
- If the user authentication failed or any exception occurred, then call IEUISignOnOperationResult.setEuaAuthenticated(false).
EUA Operation Options received through IEUIEventEUAOperationDTO.getEventEuaDTO() will be empty as EUA options are not accepted in the Administration module for custom code operations.
Customizing the Import Person Operation for the Login Event
The primary purpose of the Import Person operation is to import/refresh a user from an external system, like a directory server or an external database, into the Service Catalog application.
As outlined in Table 8-16 , you must provide a Java class that implements the ISignOn interface. Please provide a complete implementation of the importPerson method in this interface, and read the documentation for the ISignOn interface for detailed specifications.
The following are some guidelines for implementing an Import Person operation. It is not required that all of these guidelines are implemented; There may be additional requirements, dependent on the customization, which are not covered below.
- Get IEUISignOnOperationResult from IEUISignOnOperationContext. This is the object that must be returned from this interface.
- The EUIDatasourceDTO object from the IEUIEventImportPersonOperationDTO object contains the interface to the datasource configured in the Administration module for this operation.
- The EUIDataMappingDTO object from the IEUIEventImportPersonOperationDTO object contains the interface to the mapping configured in the Administration module for this operation.
- Using the Login Name retrieved from the IEUISignOnOperationResult.getSsoLoginId() method, query for the user on the external system either from an LDAP server or an external database and collect all information related to the Person profile, including organizational units, groups, and roles.
- Check to see if the user already exists in the Service Catalog database by calling ISignOnImportPersonAPI.getPersonByLoginName(<Login Id>). If the person already exists, this method returns the IPersonDTO object. If the person does not exist, the method throws a signOnImportPersonAPIException.
- If the person is not found, create an IPersonDTO object through the PersonFactory.createPersonDTO() method in preparation for importing the person.
- From the data fetched from the external system, create these DTOs using PersonFactory and populate them as well: IPersonDTO, ILoginInfo, IContactDTO, IAddressDTO, and IPersonExtensionDTO.
- Begin the database transaction by calling ISignOnImportPersonAPI.beginTransaction().
- Check to see if an organizational unit (OU) exists by calling ISignOnImportPersonAPI.getOrgUnitByName(<OU Name>). If it does, this method returns an IOrganizationalUnitDTO object. If the organizational unit does not exist, the method throws a signOnImportPersonAPIException.
- If an OU does not exist, it may be created by calling ISignOnImportPersonAPI.createOrgUnit(<IOrganizationalUnitDTO>).
- If the user already exists, call ISignOnImportPersonAPI.updatePerson(<IPersonDTO>). This updates a person’s basic profile, login information, preferences, Home OU and extensions.
- If the user already exists, link/update addresses/location and contacts by calling ISignOnImportPersonAPI.linkAddresses(<IAddressDTO collection>) and ISignOnImportPersonAPI.linkContact(<IContactDTO>.
- If the person is associated with one or more groups in the external system, first try getting all the existing groups by calling ISignOnImportPersonAPI.getGroupByName (<ou name>). If not, create all the new groups by calling ISignOnImportPersonAPI.createGroup(<IOrganizationalUnitDTO>).
- If the person is new, link all the lists of OUs and groups to the user by calling ISignOnImportPersonAPI.linkPersonToOrgUnit() and ISignOnImportPersonAPI.linkPersonToGroup().
- If the person already exists, any OUs and groups may be unlinked from the user by calling ISignOnImportPersonAPI.unlinkPersonToOrgUnit() and ISignOnImportPersonAPI.unlinkPersonToGroup().
- To find out the existing associations of OUs, including the home OU, and groups for a person, call the ISignOnImportPersonAPI.getOrgUnitsForPerson() and ISignOnImportPersonAPI.getGroupsForPerson() methods.
- To find out the existing associations to roles, call the ISignOnImportPersonAPI.getRolesForPerson() method.
- If the imported person needs to be associated with a role, first get the role using ISignOnImportPersonAPI.getRBACRoleByLogicName(<roleLogicName>).
- Link/unlink roles to a person by calling ISignOnImportPersonAPI.linkPersonToRole() or ISignOnImportPersonAPI.unlinkPersonToRole().
- If the person was imported/refreshed successfully, set the flag ImportPersonDone = true into IEUISignOnOperationResult.
- After successful import/refresh, also create an object of IExtUserDTO through PersonFactory.createExtUserDTO() and set IPersonDTO and HomeOUDTO (IOrganizationalUnitDTO) into IExtUserDTO, then return the IExtUserDTO of the imported person by calling IEUISignOnOperationResult.setImportedPersonExtDTO(<IExtUserDTO>).
- If the import/refresh operation failed, set the flag ImportPersonDone = false into IEUISignOnOperationResult.
- End/commit the database transaction by calling ISignOnImportPersonAPI.commitTransaction().
- If the transaction failed, roll back the transaction in the exception block by calling ISignOnImportPersonAPI.rollbackTransaction() and releasing the transaction in the finally block by calling ISignOnImportPersonAPI.releaseTransaction().
Import Person operation options through the IEUIEventImportPersonOperationDTO.getImportPersonDTO() method will be empty as Import Person options are not accepted in the Administration module for custom code operations.
Customizing the Import Manager Operation for the Login Event
The primary purpose of the Import Manager operation is to import/refresh the Supervisor chain of the person from an external system, like a directory server, into Service Catalog.
As outlined in Table 8-16 , you must provide a java class that implements the ISignOn interface. Please provide a complete implementation of the importPerson method in this interface, and read the documentation for the ISignOn interface for detailed specifications.
The following are some guidelines for the Import Manager operation:
- Get IEUISignOnOperationResult from IEUISignOnOperationContext. This is the object that must be returned from this interface.
- Get the user imported/refreshed user ImportedPersonExtDTO from IEUISignOnOperationResult.
- Get the Person who was imported through the IEUISignOnOperationResult.getImportedPersonExtDTO() method. This will return a IExtUserDTO object, from this get IPersonDTO object.
- Import all managers as needed from the external system, create/update each manager in the same way as explained in Import Person example above.
- Link a manager to a person, assuming personDTO is a reference to IPersonDTO for the imported manager and managerDTO is a reference to the IPersonDTO returned after the manager is imported.
- Use personDTO.setManagerId(managerDTO.getId() to set the manager association for personDTO.
- Save the association by saving personDTO using one of the mechanisms explained in the Import Person Operation.
It is recommended that when importing the manager chain, you import the top level managers before persons. This avoids unnecessary updates for personDTO to update the link with the person’s manager.
Import Manager Operation Options received through IEUIEventImportManagerOperationDTO. getImportManagerDTO() will be empty as Import Manager Options are not accepted in the Administration module for custom code operations.
Customizing Custom Operations for the Login Event
The primary purpose of the custom code operation is to perform any custom operation that is needed and not represented elsewhere in the application.
The following are some guidelines for the Custom Code operation:
- Get IEUISignOnOperationResult from IEUISignOnOperationContext. This is the object that must be returned from this interface.
- Get EUIDatasourceDTO from IEUIEventCustomOperationDTO. This object contains the datasource configured in the Administration module for this operation.
- Get EUIDataMappingDTO from IEUIEventCustomOperationDTO. This object contains the mapping configured in the Administration module for this operation.
- Perform any custom operation as needed.
- IEUISignOnOperationResult should be populated appropriately based on previous examples.
Custom Code Interface for Person Lookup – IPersonSearch
This is the interface that a custom code should implement in order to customize Person Search events: Person Search, Import Person, Import Manager and custom code operations.
The implementation class is configured in the Administration module > Directories tab > Events, and can be configured for searching a for person in the following places within the Service Catalog application:
Customizing the Person Search Operation
The primary purpose of the Person Search operation is to search for users from an external system, like a directory server.
As outlined in Custom Code Operations table, you must provide a Java class that implements the IPersonSearch interface. Please provide a complete implementation of the search method in this interface, and read the documentation for the ISignOn interface for detailed specifications.
The following are some guidelines for the Person Search operation:
- Get IEUISignOnOperationResult from IEUISignOnOperationContext. This is the object that must be returned from this interface.
- Since a custom Person Search operation can be configured using Person Search, we can add to, or manipulate, the search results from the previous operation in the Search Event by getting the list of persons already in the Search result by calling IEUISignOnOperationResult.getSearchPersonList().
- Search the users on an external system, either a directory server using the API methods in the interface ILDAPApi, or in an external database using the API in ISignOnImportPersonAPI for connecting to SQL datasources.
- For every person found on the external system, create IExtUserDTO.
- Populate IExtUserDTO with IPersonDTO, IOrganizationalUnitDTO (for Home OU) and ILoginInfoDTO.
- Optional – based on the person popup global setting, also populate collection IContactDTO, collection of IAddressDTO, IPersonExtensionDTO.
- Get the flag “All Users For Order On Behalf” using ISignOnImportPersonAPI getCustomParam(“ShowAllUsersForOrderOnBehalf”).
- To make the custom code consistent with the standard platform behavior, if the flag is Off, and any mandatory attributes are missing for the person, remove the entry. This will prevent any incomplete persons from being shown in the popup.
- To make the custom code consistent with the standard platform behavior, if the flag is On and the Person is missing any mandatory attributes, call IExtUserDTO.setResultHasError(true). This includes the incomplete person in the popup, but displays a red asterisk “ * ” instead of the radio button. The starred user cannot be chosen by the end user or imported.
- Return the list of all persons searched by calling IEUISignOnOperationResult. setSearchPersonList(<List of all IExtUserDTO>).
Person Search Operation Options received through the IEUIEventPersonSearchOperationDTO.getPersonSearchOperationDTO() method will be empty as Person Search Options are not accepted in the Administration module for custom code operations.
Customizing the Import Person Operation for Person Search Event
As outlined in Custom Code Operations table, you must provide a Java class that implements the IPersonSearch interface. Please provide a complete implementation of the importPerson method in this interface, and read the documentation for the IPersonSearch interface for detailed specifications.
Steps to customize this are similar to the Customizing the Import Person Operation for the Login Event.
Customizing the Import Manager Operation for Person Search Event
As outlined in Custom Code Operations , you must provide a Java class that implements the IPersonSearch interface. Please provide a complete implementation of the search method in this interface, and read the documentation for the IPersonSearch interface for detailed specifications.
Steps to customize this are similar to the Customizing the Import Manager Operation for the Login Event.
Customizing the Custom Operation for Person Search Event
As outlined in Custom Code Operations , you must provide a Java class that implements the IPersonSearch interface. Please provide a complete implementation of the performCustom method in this interface, and read the documentation for the IPersonSearch interface for detailed specifications.
Steps to customize this are similar to the Customizing Custom Operations for the Login Event.
Custom Java Class Mapping Interface
When simple, composite, or regular expression attribute mappings do not suffice, a custom Java class can be used in a directory integration attribute mapping.
Custom Java Class for Attribute Mapping – IEUIAttributeMapping
This is the interface that a custom code should implement in order to customize directory attribute mappings. The primary purpose of custom mapping class is to customize the attribute value fetched from the directory server.
The implementation class has to be configured in the Administration module > Directories tab > Mappings , and can be configured for any attribute in the mapping.
Figure 8-16 Custom Java Class for Attribute Mapping

The following are some guidelines for using a custom Java class mapping class:
- The mapping class should only be used for simple logic to be applied to the value retrieved from the directory.
- For performance reasons, the mapping class should not be used to perform a call to a directory server using the Directory Server API or to execute any database operations. The Person Search or Login interfaces should be used for these use cases.
- Implement IEUIAttributeMapping.getAttributeValue() for returning a single value for the mapped attribute. This method should not be implemented for the OU List, Group List, or Role List mapping fields.
- Implement IEUIAttributeMapping.getAttributeValueArray() for returning multiple values for the mapped attribute. This method should only be implemented for the OU List, Group List, and Role List mapping fields.
Directory Server API
This is an API wrapper that Cisco provides for integrating with the directory server (LDAP) connection facility built into the product.
Authentication to, and querying, the directory server are the only features this API provides. This API supports all directory servers supported by Service Catalog.
Typically, the Directory Server API works from the directory integration datasource and mapping configurations, and eliminates the need for hand-coding connection information, filters, and the attributes for querying.
Generally, to use the LDAP API, you also need the LDAPConfigInfo object. Use EUIUtil.get LDAPConfigInfo() from any datasource and mapping for this purpose.
The javadoc for LDAP API can be located in the javadocs folder of the product package.
Getting an Instance of ILDAPApi – API Implementation
An instance of ILDAPApi does not need to be created. It is available in all method arguments of both custom code API interfaces (ISignOn and IPersonSearch).
Directory Integration Utility (EUIUtil) Class
The directory integration utility class (EUIUtil) converts the datasource and mapping configured in the Administration module into a format that the Directory Server API can use as input for authentication, search, and query functions.
LDAP Configuration Info (LDAPConfigInfo) Class
An object of LDAPConfigInfo class encapsulates all the following configuration options that must be passed to the directory server API:
For more advanced users, if there is a need to override any configuration, LDAPConfigInfo provides getters and setters for all configurations. For further details on these methods, see the Javadoc for this class.
Main interface of the API – ILDAPApi
The ILDAPApi is the main interface that provides two basic operations on the directory server:
The ILDAPApi interface provides methods to interact with LDAP consistently throughout Service Catalog.
LDAPEntryBean
After querying/searching the directory server using the ILDAPApi.query(…) method, the results are returned as a collection of LDAPEntryBean.
Import/Refresh Person API
This API can be used to import/refresh Person profile, create OUs or groups and also to link or unlink a person to an OU, group, or role. This API also supports transaction management for importing a person, and connectivity to SQL datasources. This API includes a method to read from the CnfParams table.
Import/Refresh Person API Interface – ISignOnImportPersonAPI
The Import/Refresh Person API interface provides methods for the following:
- Get a Person object by PersonID or LoginName. This returns the Person with login information, preferences, home OU, address, contact, location, and extensions.
- Create a Person with login information, preferences, home OU, address, contact, location, and extensions.
- Update a Person with login, preferences, home OU, and extensions.
- Get OU by OrganizationalUnitID, Name. This does not return the members of the OU.
- Get all the OUs for a given Person. This does not return the members of the OU.
- Create an OU.
- Link/unlink a Person with an OU.
- Get Group by GroupID, Name. This does not return all the members of the Group.
- Get all the groups for a given person.
- Create a group.
- Link/unlink a person with a group.
- Get a user-defined role by name.
- Get LogicName object for a system-defined role.
- Get system-defined role by LogicName object.
- Get all the roles for a given person.
- Link/unlink a person with a role.
- Link/update address or location for a person.
- Add/update/delete a contact for a person.
- Begin transaction, commit transaction and release transaction resources for Import Person.
- Get a connection to a SQL datasource.
- Rollback the transaction on the SQL datasource connection.
- Return the connection to the SQL datasource back to the connection pool.
- Get parameter values from the CnfParams table.
Customizing Java Class to Connect to a SQL Datasource
To customize the Java class to connect to a SQL datasource:
Step 1 Get a connection to a SQL datasource database from ISignOnImportPersonAPI by passing the DatasourceName. The DatasourceName should be prefixed with the JNDI prefix, as defined by the “DatasourceJNDIPrefix” property in newscale.properties file.
Step 2 Use the above connection to execute any query using a JDBC statement.
Step 3 Commit the connection object directly at the end of the try block.
Step 4 Call ISignOnImportPersonAPI to roll back the connection when there are any failures/exceptions.
Step 5 In the final block, close the statement directly and call ISignOnImportPersonAPI to release the connection and return it to the connection pool.
Best Practices
Compiling Custom Code Java Files
The following are steps to compile and deploy custom code:
Step 1 Copy the build.xml file given in the Sample build.xml File and paste it to any folder; for example, C:\CustomCode.
Step 2 Edit the build.xml file to change the property “rcwar.dir” to point to the full path where the RequestCenter.war is available.
Step 3 Edit the build.xml to change the property “javax.servlet.dir” to point to the full path where the servlet-api.jar is available. This is specific to the application server.
Step 4 Create a subfolder for the custom code java files; for example, C:\CustomCode\src.
Step 5 Create a custom code with a package name like “com.newscale.SignOnCustomCode” and place the SignOnCustomCode.java file in the following directory: C:\CustomCode\src\com\newscale\SignOnCustomCode.java
Step 6 Run “ant” from a command line in the C:\CusomCode folder.
Step 7 The ant build file will compile all the java files under the “src” subfolder and place the class files in the “out” subfolder.
Step 8 The ant build file will also deploy the class files to the “RequestCenter.war\WEB-INF\classes” folder.
Step 9 Restart the application server.
Configuring Custom Code in the Administration Module
After you have developed, compiled, and deployed the custom code, the Administration module must be configured to use the code. Configuration involves specifying when (in which event), in which operation and in what sequence (step) to invoke the custom code.
Step 1: Configure Global Settings
Ensure that the Directory Integration has been enabled by turning on this setting in the Administration module’s Settings tab. Instructions for turning on Directory Integration are given in the Enabling Directory Integration.
Step 2: Configure Datasources
Most operations, customized or not, require a datasource and mapping, so these two areas of the Directory Administration must be configured first.
Datasources are the external servers, such as LDAP, where your data is currently stored, and which Service Catalog must access. The only custom operation which does not require a datasource is SSO.
See the Defining Datasources and the Configuring Datasource Information for more information on configuring datasources.
Step 3: Configure Attribute Mappings
Once you have set up the external datasource, you must map the person-related data available in Service Catalog to the data in the LDAP directory (or other external datasource). These mappings tell Service Catalog where to look and what to get during an event and sequence of operations.
To configure a mapping follow the guidelines and instructions in the Defining Mappings and the Configuring Mappings.
Step 4: Configure Events/Customized Events
Customizing the Single Sign-On (SSO) and authentication operations for any event other than Login is considered an illegal action. There is no other time when these operations are necessary. Once a user is signed into and authenticated in the application from the external LDAP server, the process does not need to be replicated.
All events requiring connection to external datasources are configured here. When invoking the Custom Code APIs described in this guide, it is important to think through the sequence of operations for each event so that the custom operation does not occur out of order and fail.
Step 1 From the Navigation Pane, click Events .
Step 2 For the event you wish to customize, click Edit .
Step 3 If the event is disabled, use the drop-down menu to choose Enabled .
Step 4 Click Add step to add an operation. You can add as many steps are as necessary now, or complete the details of each step before adding and configuring the next.
Step 5 Choose the Operation from the drop-down menu.
- To simply invoke the code for SSO; for example, you can choose SSO from the menu. To customize the code for SSO, choose Custom Code, and then, in the next step, choose which operation you want to customize.
- To configure a customized operation, choose Custom Code .
Step 6 Choose your mapping and datasource from the drop-down menus.
Step 7 Under the “Additional Options” heading, click Options .
Step 8 Configure the options for that step:
- For Custom Code Operation Type, use the drop-down menu to choose the operation you wish to customize.
- For Java Class, enter the entire package name for that operation, followed by the class name; for example, com.newscale.bfw.eui.api.samples.operations. CustomCodeTester .
- In the above example, the Java class name is in italics . Both of these may be found in and copied from the code itself.
Step 9 Click Close to close the additional options for the step.
Step 10 Continue adding and configuring steps, as necessary.
Step 11 Click Update to save all steps for that event.
Using Custom Code as an Operation Type
In the steps above, if you choose Custom Code as the operation and Custom Code again for the operation type, you are then calling an undefined Custom Code, which you must design.
In the Custom Code test example provided by Cisco, you can use the Java Class “performCustom” to define your own custom code.
Deploying Custom Code
All custom code must be packaged as a customization to the Service Catalog installer. This allows the customizations to be reapplied if the installation needs to be upgraded or to install a new site.
Instructions for packaging and deploying custom code are dependent on the application server which hosts Service Catalog. See the Cisco Prime Service Catalog 12.0 Adapter Integration Guide and Cisco Prime Service Catalog Administration and Operations Guide for further information about configuring custom code.
Sample View/Usage of the API
The solution here satisfies these use cases:
- Create an event class that searches for a person using data collected from a container-managed SQL datasource.
- Create an event class that imports a person using data collected from a container-managed SQL datasource.
- Create an event class that modifies a person using data collected from a container-managed SQL datasource.
- Create an event class that can receive configuration parameters from the UI. The mappings interface is used in this example to pass the configuration parameters to the class.
It also creates the home OU for the person as a business unit, if it doesn’t already exist in Service Catalog.
Note The solution requires a datasource to be configured on the application server. The following sections illustrate configuration and usage of the EUIPersonSearchSQL class.
SQL Datasource
Any SQL table or tables that contain data for the mandatory fields in a Person profile (or from which values for those fields can be derived) could be used as a datasource. Here is the table definition used in this example:
The following is some sample data to go with the above table definition:
Datasource Definition
To use the Directory Integration interface you have to have an LDAP datasource configured. LDAP is the only UI supported datasource. You can create maps without a datasource, but you cannot test them without an LDAP datasource.
Figure 8-17 Sample Datasource Configuration

Configuring a container-managed datasource depends on the container. Detailed instructions on configuring datasources are given in the Cisco Prime Service Catalog Installation and Upgrade Guide .
Sample Mapping
A mapping must be created for the EUIPersonSearchSQL class.
Figure 8-18 Sample Mapping Configuration

This mapping includes references to the JNDI as Custom 9 and the table name for Custom 10. Using a mapping like this, it is possible to do a simple query such as “select * from tablename” and use the metadata functionality in JDBC to select the column based on the mapping.
Sample Event Configuration
The “Person Lookup for Order on Behalf” event has two steps: The first must perform a “Person Search” operation. The name of the class is given as the mapping. The complete package specification is given as the Java class.
Figure 8-19 Custom Person Search Operation
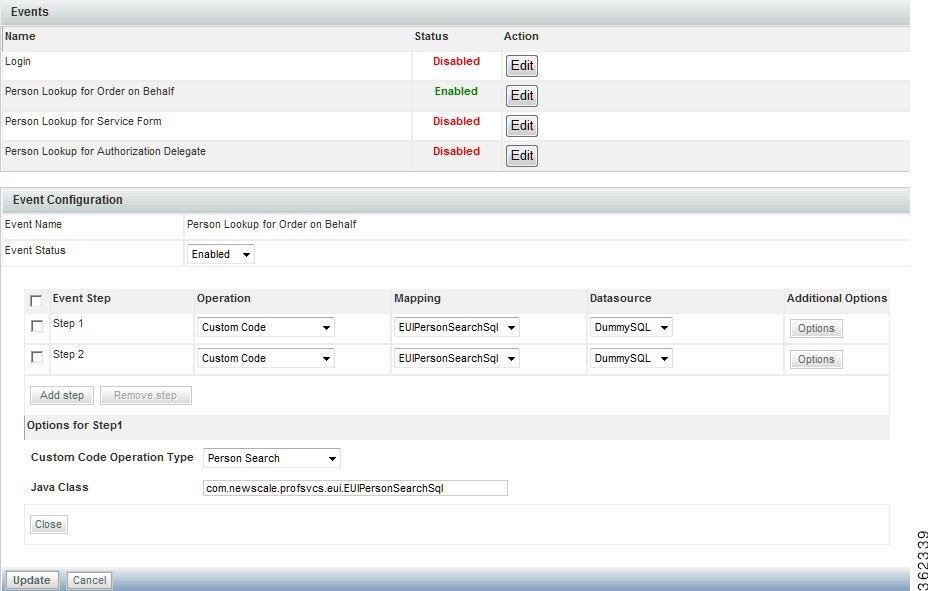
The second step in the “Person Lookup for Order on Behalf” event is to import the selected person (“Import Person”). This configuration uses the same Java class, but a different Custom Code Operation Type. The Custom Code Operation Types in the drop-down menu correspond to the methods that are called in the interface class.
Figure 8-20 Event Step 2 – Custom Import Person Operation

Sample Code for SQL-Based Person Lookup
The following is the source for the custom class:
// and the result is what's returned in the personDTO
 Feedback