Implementing Secure Shell

Secure Shell (SSH) is an application and a protocol that provides a secure replacement to the Berkeley r-tools. The protocol secures sessions using standard cryptographic mechanisms, and the application can be used similarly to the Berkeley rexec and rsh tools.

Two versions of the SSH server are available: SSH Version 1 (SSHv1) and SSH Version 2 (SSHv2). SSHv1 uses Rivest, Shamir, and Adelman (RSA) keys and SSHv2 uses either Digital Signature Algorithm (DSA) keys or Rivest, Shamir, and Adelman (RSA) keys, or Elliptic Curve Digital Signature Algorithm (ECDSA) keys. Cisco IOS XR software supports both SSHv1 and SSHv2.


Note


Cisco IOS XR does not support X11 forwarding through an SSH connection.


This module describes how to implement Secure Shell on the the Cisco ASR 9000 Series Router.


Note


For a complete description of the Secure Shell commands used in this module , see the Secure Shell Commands module in System Security Command Reference for Cisco ASR 9000 Series Routers.


Feature History for Implementing Secure Shell

Release

Modification

Release 3.7.2

This feature was introduced.

Release 3.9.0

Support was added for the following enhancements:

  • RSA based authentication on the SSH server

  • SFTP client in interactive mode

  • SFTP server implementation

Release 5.3.0

Support was added for Netconf Subsystem suppport on ssh server using a dedicated port.

For more details see chapter Implementing Network Configuration Protocol in the System Management Configuration Guide.

Release 6.4.1

Support was added for ECDSA algorithm on IOS-XR SSHv2.

Release 7.0.1

Support was added for SSH configuration option to restrict CIPHER public key and HMAC.

Release 7.0.1

Support was added for automatic host key generation for SSH algorithms.

Release 7.0.1

SSH and SFTP in baseline Cisco IOS XR Software image.

Release 7.0.1

Support was added for enabling CBC mode ciphers 3DES-CBC and AES-CBC for SSHv2 server and client connections.

Release 7.3.1

Support was added for these features:

  • Ed25519 Public-Key Algorithm Support for SSH

  • User Configurable Maximum Authentication Attempts for SSH

  • X.509v3 Certificate-based Authentication for SSH

Prerequisites for Implementing Secure Shell

The following prerequisites are required to implement Secure Shell:

  • You must be in a user group associated with a task group that includes the proper task IDs. The command reference guides include the task IDs required for each command. If you suspect user group assignment is preventing you from using a command, contact your AAA administrator for assistance.

  • Download the required image on your router. The SSH server and SSH client require you to have a a crypto package (data encryption standard [DES], 3DES and AES) from Cisco downloaded on your router.


    Note


    From Cisco IOS XR Software Release 7.0.1 and later, the SSH and SFTP components are available in the baseline Cisco IOS XR software image itself. For details, see, SSH and SFTP in Baseline Cisco IOS XR Software Image.


  • To run an SSHv2 server, you must have a VRF. This may be the default VRF or a specific VRF. VRF changes are applicable only to the SSH v2 server.

  • Configure user authentication for local or remote access. You can configure authentication with or without authentication, authorization, and accounting (AAA). For more information, see the Authentication, Authorization, and Accounting Commands on Cisco IOS XR Software module in the System Security Command Reference for Cisco ASR 9000 Series Routers publication and Configuring AAA Services on Cisco IOS XR Software module in the System Security Configuration Guide for Cisco ASR 9000 Series Routers publication.

  • AAA authentication and authorization must be configured correctly for Secure Shell File Transfer Protocol (SFTP) to work.

SSH and SFTP in Baseline Cisco IOS XR Software Image

From Cisco IOS XR Software Release 7.0.1 and later, the management plane and control plane components that were part of the Cisco IOS XR security package (k9sec package) are moved to the base Cisco IOS XR software image. These include SSH, SCP, SFTP and IPSec control plane. However, 802.1X protocol (Port-Based Network Access Control) and data plane components like MACsec and IPsec remain as a part of the security package as per the export compliance regulations. This segreg ation of package components makes the software more modular. It also gives you the flexibility of including or excluding the security package as per your requirements. The new segregation of package components is applicable for both 32 bit and 64 bit IOS XR images.

The base package and the security package allow FIPS, so that the control plane can negotiate FIPS-approved algorithms.

See SSH and SFTP in Baseline Cisco IOS XR Software Image.

Restrictions for Implementing Secure Shell

The following are some basic SSH restrictions and limitations of the SFTP feature:

  • A VRF is not accepted as inband if that VRF is already set as an out-of-band VRF. SSH v1 continues to bind only to the default VRF.

  • In order for an outside client to connect to the router, the router needs to have an RSA (for SSHv1 or SSHv2) or DSA (for SSHv2) or ECDSA (for SSHv2) key pair configured. ECDSA, DSA and RSA keys are not required if you are initiating an SSH client connection from the router to an outside routing device. The same is true for SFTP: ECDSA, DSA and RSA keys are not required because SFTP operates only in client mode.

  • In order for SFTP to work properly, the remote SSH server must enable the SFTP server functionality. For example, the SSHv2 server is configured to handle the SFTP subsystem with a line such as /etc/ssh2/sshd2_config:

  • subsystem-sftp /usr/local/sbin/sftp-server

  • The SFTP server is usually included as part of SSH packages from public domain and is turned on by default configuration.

  • SFTP is compatible with sftp server version OpenSSH_2.9.9p2 or higher.

  • RSA-based user authentication is supported in the SSH and SFTP servers. The support however, is not extended to the SSH client.

  • Execution shell and SFTP are the only applications supported.

  • The AES encryption algorithm is supported on the SSHv2 server and client, but not on the SSHv1 server and client. Any requests for an AES cipher sent by an SSHv2 client to an SSHv1 server are ignored, with the server using 3DES instead.

  • The SFTP client does not support remote filenames containing wildcards (*, ?, []). The user must issue the sftp command multiple times or list all of the source files from the remote host to download them on to the router. For uploading, the router SFTP client can support multiple files specified using a wildcard provided that the issues mentioned in the first through third bullets in this section are resolved.

  • The cipher preference for the SSH server follows the order AES128, AES192, AES256, and, finally, 3DES. The server rejects any requests by the client for an unsupported cipher, and the SSH session does not proceed.

  • Use of a terminal type other than vt100 is unsupported, and the software generates a warning message in this case.

  • Password messages of “none” are unsupported on the SSH client.

  • Because the router infrastructure does not provide support for UNIX-like file permissions, files created on the local device lose the original permission information. For files created on the remote file system, the file permission adheres to the umask on the destination host and the modification and last access times are the time of the copy.

Information About Implementing Secure Shell

To implement SSH, you should understand the following concepts:

SSH Server

The SSH server feature enables an SSH client to make a secure, encrypted connection to a Cisco router. This connection provides functionality that is similar to that of an inbound Telnet connection. Before SSH, security was limited to Telnet security. SSH allows a strong encryption to be used with the Cisco IOS XR software authentication. The SSH server in Cisco IOS XR software works with publicly and commercially available SSH clients.

SSH Client

The SSH client feature is an application running over the SSH protocol to provide device authentication and encryption. The SSH client enables a Cisco router to make a secure, encrypted connection to another Cisco router or to any other device running the SSH server. This connection provides functionality that is similar to that of an outbound Telnet connection except that the connection is encrypted. With authentication and encryption, the SSH client allows for a secure communication over an insecure network.

The SSH client in the Cisco IOS XR software worked with publicly and commercially available SSH servers. The SSH client supported the ciphers of AES, 3DES, message digest algorithm 5 (MD5), SHA1, and password authentication. User authentication was performed in the Telnet session to the router. The user authentication mechanisms supported for SSH were RADIUS, TACACS+, and the use of locally stored usernames and passwords.

The SSH client supports setting DSCP value in the outgoing packets.

ssh client dscp <value from 0 – 63>

If not configured, the default DSCP value set in packets is 16 (for both client and server).

The SSH client supports the following options:

  • DSCP—DSCP value for SSH client sessions.
    RP/0/5/CPU0:router#configure 
    RP/0/5/CPU0:router(config)#ssh ?
      client   Provide SSH client service
      server   Provide SSH server service
      timeout  Set timeout value for SSH
    RP/0/5/CPU0:router(config)#ssh client ?
    
  • Knownhost—Enable the host pubkey check by local database.
  • Source-interface—Source interface for SSH client sessions.
    RP/0/5/CPU0:router(config)#ssh client source-interface ?
      ATM                  ATM Network Interface(s)
      BVI                  Bridge-Group Virtual Interface
      Bundle-Ether         Aggregated Ethernet interface(s)
      Bundle-POS           Aggregated POS interface(s)
      CEM                  Circuit Emulation interface(s)
      GigabitEthernet      GigabitEthernet/IEEE 802.3 interface(s)
      IMA                  ATM Network Interface(s)
      IMtestmain           IM Test Interface
      Loopback             Loopback interface(s)
      MgmtEth              Ethernet/IEEE 802.3 interface(s)
      Multilink            Multilink network interface(s)
      Null                 Null interface
      PFItestmain          PFI Test Interface
      PFItestnothw         PFI Test Not-HW Interface
      POS                  Packet over SONET/SDH network interface(s)
      PW-Ether             PWHE Ethernet Interface
      PW-IW                PWHE VC11 IP Interworking Interface
      Serial               Serial network interface(s)
      VASILeft             VASI Left interface(s)
      VASIRight            VASI Right interface(s)
      test-bundle-channel  Aggregated Test Bundle interface(s)
      tunnel-ipsec         IPSec Tunnel interface(s)
      tunnel-mte           MPLS Traffic Engineering P2MP Tunnel interface(s)
      tunnel-te            MPLS Traffic Engineering Tunnel interface(s)
      tunnel-tp            MPLS Transport Protocol Tunnel interface
    RP/0/5/CPU0:router(config)#ssh client source-interface 
    RP/0/5/CPU0:router(config)#
    
  • VRF—Source interface VRF for SSH client sessions:
    RP/0/5/CPU0:router(config)#ssh client vrf ?
      WORD  VRF name (max:32 chars)
    RP/0/5/CPU0:router(config)#ssh client vrf shan ?
      <cr>  
    RP/0/5/CPU0:router(config)#ssh client vrf shan
    
SSH also supports remote command execution as follows:
RP/0/5/CPU0:router#ssh ?
  A.B.C.D  IPv4 (A.B.C.D) address
  WORD     Hostname of the remote node
  X:X::X   IPv6 (A:B:C:D...:D) address
  vrf      vrf table for the route lookup
RP/0/5/CPU0:router#ssh 10.1.1.1 ?
  cipher            Accept cipher type
  command           Specify remote command (non-interactive)
  source-interface  Specify source interface
  username          Accept userid for authentication
  <cr>              
RP/0/5/CPU0:router#ssh 192.68.46.6 username admin command "show redundancy sum" 
Password: 


Wed Jan  9 07:05:27.997 PST
    Active Node    Standby Node
    -----------    ------------
       0/4/CPU0        0/5/CPU0 (Node Ready, NSR: Not Configured)

RP/0/5/CPU0:router#

SFTP Feature Overview

SSH includes support for standard file transfer protocol (SFTP) , a new standard file transfer protocol introduced in SSHv2. This feature provides a secure and authenticated method for copying router configuration or router image files.

The SFTP client functionality is provided as part of the SSH component and is always enabled on the router. Therefore, a user with the appropriate level can copy files to and from the router. Like the copy command, the sftp command can be used only in EXEC mode.

The SFTP client is VRF-aware, and you may configure the secure FTP client to use the VRF associated with a particular source interface during connections attempts. The SFTP client also supports interactive mode, where the user can log on to the server to perform specific tasks via the Unix server.

The SFTP Server is a sub-system of the SSH server. In other words, when an SSH server receives an SFTP server request, the SFTP API creates the SFTP server as a child process to the SSH server. A new SFTP server instance is created with each new request.

The SFTP requests for a new SFTP server in the following steps:

  • The user runs the sftp command with the required arguments

  • The SFTP API internally creates a child session that interacts with the SSH server

  • The SSH server creates the SFTP server child process

  • The SFTP server and client interact with each other in an encrypted format

  • The SFTP transfer is subject to LPTS policer "SSH-Known". Low policer values will affect SFTP transfer speeds


Note


In IOS-XR SW release 4.3.1 onwards the default policer value for SSH-Known has been reset from 2500pps to 300pps. Slower transfers are expected due to this change. You can adjust the lpts policer value for this punt cause to higher values that will allow faster transfers


When the SSH server establishes a new connection with the SSH client, the server daemon creates a new SSH server child process. The child server process builds a secure communications channel between the SSH client and server via key exchange and user authentication processes. If the SSH server receives a request for the sub-system to be an SFTP server, the SSH server daemon creates the SFTP server child process. For each incoming SFTP server subsystem request, a new SSH server child and a SFTP server instance is created. The SFTP server authenticates the user session and initiates a connection. It sets the environment for the client and the default directory for the user.

Once the initialization occurs, the SFTP server waits for the SSH_FXP_INIT message from the client, which is essential to start the file communication session. This message may then be followed by any message based on the client request. Here, the protocol adopts a 'request-response' model, where the client sends a request to the server; the server processes this request and sends a response.

The SFTP server displays the following responses:

  • Status Response

  • Handle Response

  • Data Response

  • Name Response


Note


The server must be running in order to accept incoming SFTP connections.


RSA Based Host Authentication

Verifying the authenticity of a server is the first step to a secure SSH connection. This process is called the host authentication, and is conducted to ensure that a client connects to a valid server.

The host authentication is performed using the public key of a server. The server, during the key-exchange phase, provides its public key to the client. The client checks its database for known hosts of this server and the corresponding public-key. If the client fails to find the server's IP address, it displays a warning message to the user, offering an option to either save the public key or discard it. If the server’s IP address is found, but the public-key does not match, the client closes the connection. If the public key is valid, the server is verified and a secure SSH connection is established.

The IOS XR SSH server and client had support for DSA based host authentication. But for compatibility with other products, like IOS, RSA based host authentication support is also added.

RSA Based User Authentication

One of the method for authenticating the user in SSH protocol is RSA public-key based user authentication. The possession of a private key serves as the authentication of the user. This method works by sending a signature created with a private key of the user. Each user has a RSA keypair on the client machine. The private key of the RSA keypair remains on the client machine.

The user generates an RSA public-private key pair on a unix client using a standard key generation mechanism such as ssh-keygen. The max length of the keys supported is 4096 bits, and the minimum length is 512 bits. The following example displays a typical key generation activity:


bash-2.05b$ ssh-keygen –b 1024 –t rsa
Generating RSA private key, 1024 bit long modulus

The public key must be in base64 encoded (binary) format for it to be imported correctly into the box. You can use third party tools available on the Internet to convert the key to the binary format.

Once the public key is imported to the router, the SSH client can choose to use the public key authentication method by specifying the request using the “-o” option in the SSH client. For example:


client$ ssh -o PreferredAuthentications=publickey 1.2.3.4

If a public key is not imported to a router using the RSA method, the SSH server initiates the password based authentication. If a public key is imported, the server proposes the use of both the methods. The SSH client then chooses to use either method to establish the connection. The system allows only 10 outgoing SSH client connections.

Currently, only SSH version 2 and SFTP server support the RSA based authentication. For more information on how to import the public key to the router, see the Implementing Certification Authority Interoperability on the Cisco ASR 9000 Series Router chapter in this guide.


Note


The preferred method of authentication would be as stated in the SSH RFC. The RSA based authentication support is only for local authentication, and not for TACACS/RADIUS servers.


Authentication, Authorization, and Accounting (AAA) is a suite of network security services that provide the primary framework through which access control can be set up on your Cisco router or access server. For more information on AAA, see the Authentication, Authorization, and Accounting Commands on the Cisco ASR 9000 Series RouterSoftware module in the System Security Command Reference for Cisco ASR 9000 Series Routers publication and the Configuring AAA Services on the Cisco ASR 9000 Series Router module in the System Security Configuration Guide for Cisco ASR 9000 Series Routers publication.

SSHv2 Client Keyboard-Interactive Authentication

An authentication method in which the authentication information is entered using a keyboard is known as keyboard-interactive authentication. This method is an interactive authentication method in the SSH protocol. This type of authentication allows the SSH client to support different methods of authentication without having to be aware of their underlying mechanisms.

Currently, the SSHv2 client supports the keyboard-interactive authentication. This type of authentication works only for interactive applications.


Note


The password authentication is the default authentication method. The keyboard-interactive authentication method is selected if the server is configured to support only the keyboard-interactive authentication.


How to Implement Secure Shell

To configure SSH, perform the tasks described in the following sections:

Configuring SSH


Note


For SSHv1 configuration, Step 1 to Step 4 are required. For SSHv2 configuration, Step 1 to Step 4 are optional.

Note


From Cisco IOS XR Software Release 7.0.1 and later, the SSH host-key pairs are auto-generated at the time of router boot up. Hence you need not perform steps 5 to 7 to generate the host keys explicitly. See, Automatic Generation of SSH Host-Key Pairs for details.


SSH server supports setting DSCP value in the outgoing packets.
ssh server dscp <value from 0 – 63>
If not configured, the default DSCP value set in packets is 16 (for both client and server).
This is the syntax for setting DSCP value:
RP/0/5/CPU0:router(config)#ssh server dscp ?
  <0-63>  DSCP value range

RP/0/5/CPU0:router(config)#ssh server dscp 63 ?
  <cr>  
RP/0/5/CPU0:router(config)#ssh server dscp 63 
RP/0/5/CPU0:router(config)#

RP/0/5/CPU0:router(config)#ssh client dscp ? 
  <0-63>  DSCP value range

RP/0/5/CPU0:router(config)#ssh client dscp 0 ?
  <cr>  
RP/0/5/CPU0:router(config)#ssh client dscp 0 
RP/0/5/CPU0:router(config)#

Perform this task to configure SSH.

SUMMARY STEPS

  1. configure
  2. hostname hostname
  3. domain name domain-name
  4. Use the commit or end command.
  5. crypto key generate rsa [usage keys | general-keys] [keypair-label]
  6. crypto key generate dsa
  7. crypto key generate ecdsa [nistp256 | nistp384 | nistp521]
  8. crypto key generate ed25519
  9. configure
  10. ssh timeout seconds
  11. Do one of the following:
    • ssh server [vrf vrf-name [ipv4 access-list IPv4 access-list name] [ipv6 access-list IPv6 access-list name]]
    • ssh server v2
  12. Use the commit or end command.
  13. show ssh
  14. show ssh session details
  15. show ssh history
  16. show ssh history details
  17. show tech-support ssh

DETAILED STEPS

  Command or Action Purpose

Step 1

configure

Example:


RP/0/RSP0/CPU0:router# configure

Enters global configuration mode.

Step 2

hostname hostname

Example:


RP/0/RSP0/CPU0:router(config)# hostname router1

Configures a hostname for your router.

Step 3

domain name domain-name

Example:


RP/0/RSP0/CPU0:router(config)# domain name cisco.com

Defines a default domain name that the software uses to complete unqualified host names.

Step 4

Use the commit or end command.

commit —Saves the configuration changes and remains within the configuration session.

end —Prompts user to take one of these actions:
  • Yes — Saves configuration changes and exits the configuration session.

  • No —Exits the configuration session without committing the configuration changes.

  • Cancel —Remains in the configuration session, without committing the configuration changes.

Step 5

crypto key generate rsa [usage keys | general-keys] [keypair-label]

Example:


RP/0/RSP0/CPU0:router# crypto key generate rsa general-keys

Generates an RSA key pair. The RSA key modulus can be in the range of 512 to 4096 bits.

  • To delete the RSA key pair, use the crypto key zeroize rsa command.

  • This command is used for SSHv1 only.

Step 6

crypto key generate dsa

Example:


RP/0/RSP0/CPU0:router# crypto key generate dsa

Enables the SSH server for local and remote authentication on the router. The supported key sizes are: 512, 768 and 1024 bits.

  • The recommended minimum modulus size is 1024 bits.

  • Generates a DSA key pair.

    To delete the DSA key pair, use the crypto key zeroize dsa command.

  • This command is used only for SSHv2.

Step 7

crypto key generate ecdsa [nistp256 | nistp384 | nistp521]

Example:


RP/0/RSP0/CPU0:router# crypto key generate ecdsa nistp256

Generates an ECDSA key pair. The supported ECDSA curve types are: Nistp256, Nistp384 and Nistp521.

  • To delete the ECDSA key pair, use the crypto key zeroize ecdsa [ nistp256 | nistp384 | nistp521] command.

  • This command is used for SSHv2 only.

Step 8

crypto key generate ed25519

Example:


RP/0/RSP0/CPU0:router# crypto key generate ed25519

Generates a Ed25519 key pair.

To delete the Ed25519 key pair, use the crypto key zeroize ed25519 command.

The support for Ed25519 is available only from Cisco IOS XR Software Release 7.3.1 and later.

Step 9

configure

Example:


RP/0/RSP0/CPU0:router# configure

Enters global configuration mode.

Step 10

ssh timeout seconds

Example:


RP/0/RSP0/CPU0:router(config)# ssh timeout 60

(Optional) Configures the timeout value for user authentication to AAA.

  • If the user fails to authenticate itself to AAA within the configured time, the connection is terminated.

  • If no value is configured, the default value of 30 seconds is used. The range is from 5 to 120.

Step 11

Do one of the following:

  • ssh server [vrf vrf-name [ipv4 access-list IPv4 access-list name] [ipv6 access-list IPv6 access-list name]]
  • ssh server v2

Example:


RP/0/RSP0/CPU0:router(config)# ssh 

or


RP/0/RSP0/CPU0:router(config)# ssh server v2
  • (Optional) Brings up an SSH server using a specified VRF of up to 32 characters. If no VRF is specified, the default VRF is used. To stop the SSH server from receiving any further connections for the specified VRF, use the no form of this command. If no VRF is specified, the default is assumed.Optionally ACLs for IPv4 and IPv6 can be used to restrict access to the server before the port is opened. To stop the SSH server from receiving any further connections for the specified VRF, use the no form of this command. If no VRF is specified, the default is assumed.

Note

 
The SSH server can be configured for multiple VRF usage.
  • (Optional) Forces the SSH server to accept only SSHv2 clients if you configure the SSHv2 option by using the ssh server v2 command. If you choose the ssh server v2 command, only the SSH v2 client connections are accepted.

Step 12

Use the commit or end command.

commit —Saves the configuration changes and remains within the configuration session.

end —Prompts user to take one of these actions:
  • Yes — Saves configuration changes and exits the configuration session.

  • No —Exits the configuration session without committing the configuration changes.

  • Cancel —Remains in the configuration session, without committing the configuration changes.

Step 13

show ssh

Example:


RP/0/RSP0/CPU0:router# show ssh

(Optional) Displays all of the incoming and outgoing SSHv1 and SSHv2 connections to the router.

Step 14

show ssh session details

Example:


RP/0/RSP0/CPU0:router# show ssh session details

(Optional) Displays a detailed report of the SSHv2 connections to and from the router.

Step 15

show ssh history

Example:


RP/0/RSP0/CPU0:router# show ssh history

(Optional) Displays the last hundred SSH connections that were terminated.

Step 16

show ssh history details

Example:


RP/0/RSP0/CPU0:router# show ssh history details

(Optional) Displays the last hundred SSH connections that were terminated with additional details. This command is similar to show ssh session details command but also mentions the start and end time of the session.

Step 17

show tech-support ssh

Example:


RP/0/RSP0/CPU0:router# show tech-support ssh

(Optional) Automatically runs the show commands that display system information.


Note


The order of priority while doing negotiation for a SSH connection is as follows:

  1. ecdsa-nistp-521

  2. ecdsa-nistp-384

  3. ecdsa-nistp-256

  4. rsa

  5. dsa


Automatic Generation of SSH Host-Key Pairs

This feature brings in the functionality of automatically generating the SSH host-key pairs for the DSA, ECDSA (such as ecdsa-nistp256 , ecdsa-nistp384 , and ecdsa-nistp521 ), ED25519 and RSA algorithms. This in turn eliminates the need for explicitly generating each SSH host-key pair after the router boots up. Because the keys are already present in the system, the SSH client can establish connection with the SSH server soon after the router boots up with the basic SSH configuration. This is useful especially during zero touch provisioning (ZTP) and Golden ISO boot up scenarios.

Before the introduction of this feature, you had to execute the crypto key generate command in EXEC mode to generate the required SSH host-key pairs.

Although the host-key pairs are auto-generated with the introduction of this feature, you still have the flexibility to select only the required algorithms on the SSH server. You can use the ssh server algorithms host-key command in Global Configuration mode to achieve the same. Alternatively, you can also use the existing crypto key zeroize command in EXEC mode to remove the algorithms that are not required.


Note


In a system upgrade scenario from version 1 to version 2, the system does not generate the SSH host-key pairs automatically if they were already generated in version 1. The host-key pairs are generated automatically only if they were not generated in version 1.


Configure the Allowed SSH Host-Key Pair Algorithms

When the SSH client attempts a connection with the SSH server, it sends a list of SSH host-key pair algorithms (in the order of preference) internally in the connection request. The SSH server, in turn, picks the first matching algorithm from this request list. The server establishes a connection only if that host-key pair is already generated in the system, and if it is configured (using the ssh server algorithms host-key command) as the allowed algorithm.


Note


If this configuration of allowed host-key pairs is not present in the SSH server, then you can consider that the SSH server allows all host-key pairs. In that case, the SSH client can connect with any one of the host-key pairs. Not having this configuration also ensures backward compatibility in system upgrade scenarios.


Configuration Example

You may perform this (optional) task to specify the allowed SSH host-key pair algorithm (in this example, ecdsa ) from the list of auto-generated host-key pairs on the SSH server:


/* Example to select the ecdsa algorithm */
Router(config)#ssh server algorithms host-key ecdsa-nistp521

Similarly, you may configure other algorithms.

Running Configuration

ssh server algorithms host-key ecdsa-nistp521
!
Verify the SSH Host-Key Pair Algorithms

Note


With the introduction of the automatic generation of SSH host-key pairs, the output of the show crypto key mypubkey command displays key information of all the keys that are auto-generated. Before its introduction, the output of this show command displayed key information of only those keys that you explicitly generated using the crypto key generate command.


Router#show crypto key mypubkey ecdsa
Mon Nov 19 12:22:51.762 UTC
Key label: the_default
Type     : ECDSA General Curve Nistp256
Degree   : 256
Created  : 10:59:08 UTC Mon Nov 19 2018
Data     :
04AC7533 3ABE7874 43F024C1 9C24CC66 490E83BE 76CEF4E2 51BBEF11 170CDB26
14289D03 6625FC4F 3E7F8F45 0DA730C3 31E960FE CF511A05 2B0AA63E 9C022482
6E

Key label: the_default
Type     : ECDSA General Curve Nistp384
Degree   : 384
Created  : 10:59:08 UTC Mon Nov 19 2018
Data     :
04B70BAF C096E2CA D848EE72 6562F3CC 9F12FA40 BE09BFE6 AF0CA179 F29F6407
FEE24A43 84C5A5DE D7912208 CB67EE41 58CB9640 05E9421F 2DCDC41C EED31288
6CACC8DD 861DC887 98E535C4 893CB19F 5ED3F6BC 2C90C39B 10EAED57 87E96F78
B6

Key label: the_default
Type     : ECDSA General Curve Nistp521
Degree   : 521
Created  : 10:59:09 UTC Mon Nov 19 2018
Data     :
0400BA39 E3B35E13 810D8AE5 260B8047 84E8087B 5137319A C2865629 8455928F
D3D9CE39 00E097FF 6CA369C3 EE63BA57 A4C49C02 B408F682 C2153B7F AAE53EF8
A2926001 EF113896 5F1DA056 2D62F292 B860FDFB 0314CE72 F87AA2C9 D5DD29F4
DA85AE4D 1CA453AC 412E911A 419E9B43 0A13DAD3 7B7E88E4 7D96794B 369D6247
E3DA7B8A 5E

The following example shows the output for ed25519 :


Router#show crypto key mypubkey ed25519
Wed Dec 16 16:12:21.464 IST
Key label: the_default
Type     : ED25519
Size     : 256
Created  : 15:08:28 IST Tue Oct 13 2020
Data     : 
 649CC355 40F85479 AE9BE26F B5B59153 78D171B6 F40AA53D B2E48382 BA30E5A9

Router#

Related Topics
Automatic Generation of SSH Host-Key Pairs
Associated Commands
  • ssh server algorithms host-key

  • show crypto key mypubkey

Ed25519 Public-Key Signature Algorithm Support for SSH

Table 1. Feature History Table

Feature Name

Release Information

Feature Description

Ed25519 Public-Key Algorithm Support for SSH

Release 7.3.1

This algorithm is now supported on Cisco IOS XR 64-bit platforms when establishing SSH sessions. It is a modern and secure public-key signature algorithm that provides several benefits, particularly resistance against several side-channel attacks. Prior to this release, DSA, ECDSA, and RSA public-key algorithms were supported.

This command is modified for this feature: 

ssh server algorithms host-key

This feature introduces the support for Ed25519 public-key algorithm, when establishing SSH sessions, on Cisco IOS XR 64-bit platforms. This algorithm offers better security with faster performance when compared to DSA or ECDSA signature algorithms.

The order of priority of public-key algorithms during SSH negotiation between the client and the server is:

  • ecdsa-sha2-nistp256

  • ecdsa-sha2-nistp384

  • ecdsa-sha2-nistp521

  • ssh-ed25519

  • ssh-rsa

  • ssh-dsa

Restrictions for ED25519 Public Key for SSH

The Ed25519 public key algorithm is not FIPS-certified. That is, if FIPS mode is enabled on the router, the list of public-key algorithms sent during the SSH key negotiation phase does not contain the Ed25519 key. This behavior is applicable only for new SSH connections. Any existing SSH session that has already negotiated Ed25519 public-key algorithm remains intact and continues to execute until the session is disconnected.

Further, if you have configured the router to negotiate only the Ed25519 public-key algorithm (using the ssh server algorithms host-key command), and if FIPS mode is also enabled, then the SSH connection to the router fails.

Configuring the SSH Client

Perform this task to configure an SSH client.

SUMMARY STEPS

  1. configure
  2. ssh client knownhost device : /filename
  3. Use the commit or end command.
  4. ssh {ipv4-address | hostname} [ username user- id | cipher des | source-interface type instance]

DETAILED STEPS

  Command or Action Purpose

Step 1

configure

Example:


RP/0/RSP0/CPU0:router# configure

Enters global configuration mode.

Step 2

ssh client knownhost device : /filename

Example:


RP/0/RSP0/CPU0:router(config)# ssh client knownhost slot1:/server_pubkey

(Optional) Enables the feature to authenticate and check the server public key (pubkey) at the client end.

Note

 
The complete path of the filename is required. The colon (:) and slash mark (/) are also required.

Step 3

Use the commit or end command.

commit —Saves the configuration changes and remains within the configuration session.

end —Prompts user to take one of these actions:
  • Yes — Saves configuration changes and exits the configuration session.

  • No —Exits the configuration session without committing the configuration changes.

  • Cancel —Remains in the configuration session, without committing the configuration changes.

Step 4

ssh {ipv4-address | hostname} [ username user- id | cipher des | source-interface type instance]

Example:


RP/0/RSP0/CPU0:router# ssh remotehost username user1234

Enables an outbound SSH connection.

  • To run an SSHv2 server, you must have a VRF. This may be the default or a specific VRF. VRF changes are applicable only to the SSH v2 server.

  • The SSH client tries to make an SSHv2 connection to the remote peer. If the remote peer supports only the SSHv1 server, the peer internally spawns an SSHv1 connection to the remote server.

  • The cipher des option can be used only with an SSHv1 client.

  • The SSHv1 client supports only the 3DES encryption algorithm option, which is still available by default for those SSH clients only.

  • If the hostname argument is used and the host has both IPv4 and IPv6 addresses, the IPv6 address is used.

  • If you are using SSHv1 and your SSH connection is being rejected, the reason could be that the RSA key pair might have been zeroed out. Another reason could be that the SSH server to which the user is connecting to using SSHv1 client does not accept SSHv1 connections. Make sure that you have specified a hostname and domain. Then use the crypto key generate rsa command to generate an RSA host-key pair, and then enable the SSH server.

  • If you are using SSHv2 and your SSH connection is being rejected, the reason could be that the DSA, RSA or ECDSA host-key pair might have been zeroed out. Make sure you follow similar steps as mentioned above to generate the required host-key pairs, and then enable the SSH server.

  • When configuring the ECDSA, RSA or DSA key pair, you might encounter the following error messages:
    • No hostname specified

    You must configure a hostname for the router using the hostname command.

    • No domain specified

    You must configure a host domain for the router using the domain-name command.

  • The number of allowable SSH connections is limited to the maximum number of virtual terminal lines configured for the router. Each SSH connection uses a vty resource.

  • From Cisco IOS XR Release 6.3.1 onwards, the ssh client enable cipher command is added for backward compatibility with the older Cisco IOS XR versions.

    For FIPS compliance, in Cisco IOS XR Releases later than 6.2.1, support for weaker ciphers like 3DES and AES CBC was removed and only AES-CTR cipher is supported.

  • SSH uses either local security or the security protocol that is configured through AAA on your router for user authentication. When configuring AAA, you must ensure that the console is not running under AAA by applying a keyword in the global configuration mode to disable AAA on the console.


    Note


    If you are using Putty version 0.63 or higher to connect to the SSH client, set the 'Chokes on PuTTYs SSH2 winadj request' option under SSH > Bugs in your Putty configuration to 'On.' This helps avoid a possible breakdown of the session whenever some long output is sent from IOS XR to the Putty client.

Order of SSH Client Authentication Methods

The default order of authentication methods for SSH clients on Cisco IOS XR routers is as follows:

  • On routers running Cisco IOS XR SSH:

    • public-key , password and keyboard-interactive

  • On routers running CiscoSSH (open source-based SSH):

    • public-key , keyboard-interactive and password

How to Set the Order of Authentication Methods for SSH Clients

To set the preferred order of authentication methods for SSH clients on Cisco IOS XR routers, use the ssh client auth-method command in the Global Configuration mode. This command is available from Cisco IOS XR Software Release 7.9.2/Release 7.10.1and later.

Configuration Example

In this example, we set the order of SSH client authentication methods in such a way that public key authentication is negotiated first, followed by keyboard-interactive, and then password-based authentication.


Router#configure
Router(config)#ssh client auth-method public-key keyboard-interactive password
Router(config-ssh)#commit
Running Configuration

Router#show run ssh client auth-methods 
Tue Nov 21 17:55:44.688 IST
ssh client auth-methods public-key keyboard-interactive password
Router#

Configuring CBC Mode Ciphers

In release 7.0(1), you can enable CBC mode ciphers 3DES-CBC and AES-CBC for SSHv2 server and client connections. The ciphers are disabled by default.

Procedure


Step 1

configure

Example:


RP/0/RSP0/CPU0:router# configure

Enters global configuration mode.

Step 2

ssh server enable cipher aes-cbc 3des-cbc

Example:

Router(config)# ssh server enable cipher aes-cbc 3des-cbc

Step 3

ssh client enable cipher aes-cbc 3des-cbc

Example:

Router(config)# ssh client enable cipher aes-cbc 3des-cbc

Step 4

Use the commit or end command.

commit —Saves the configuration changes and remains within the configuration session.

end —Prompts user to take one of these actions:
  • Yes — Saves configuration changes and exits the configuration session.

  • No —Exits the configuration session without committing the configuration changes.

  • Cancel —Remains in the configuration session, without committing the configuration changes.

Step 5

show ssh session details

Example:

Router# show ssh session details

Configuring CBC Mode Ciphers

/*Enable CBC mode ciphers 3DES-CBC and AES-CBC */
Router# configure 
Router(config)# ssh server enable cipher aes-cbc 3des-cbc 
Router(config)# ssh client enable cipher aes-cbc 3des-cbc 
Router(config)# commit

Verify CBC Mode Cipher Configuration.

Router# show ssh session details 

Thu Sep  6 10:16:26.346 UTC
SSH version : Cisco-2.0

id  key-exchange        pubkey    incipher    outcipher   inmac         outmac   
------------------------------------------------------------------------------
Incoming Session
2   ecdh-sha2-nistp256  ssh-rsa   aes128-cbc  aes128-cbc  hmac-sha2-256 hmac-sha2-256

Configuration Examples for Implementing Secure Shell

This section provides the following configuration example:

Configuring Secure Shell: Example

This example shows how to configure SSHv2 by creating a hostname, defining a domain name, enabling the SSH server for local and remote authentication on the router by generating a DSA key pair, bringing up the SSH server, and saving the configuration commands to the running configuration file.

From Cisco IOS XR Software Release 7.0.1 and later, the crypto keys are auto-generated at the time of router boot up. Hence, you need to explicitly generate the host-key pair only if it is not present in the router under some scenarios.

After SSH has been configured, the SFTP feature is available on the router.


configure
hostname router1
domain name cisco.com
exit
crypto key generate dsa
configure
ssh server
end

Multi-channeling in SSH

The multi-channeling (also called multiplexing) feature on the Cisco IOS XR software server allows you to establish multiple channels over the same TCP connection. Thus, rather than opening a new TCP socket for each SSH connection, all the SSH connections are multiplexed into one TCP connection. For example, with multiplexing support on your XR software server, on a single SSH connection you can simultaneously open a pseudo terminal, remotely execute a command and transfer a file using any file transfer protocol. Multiplexing offers the following benefits:
  • You are required to authenticate only once at the time of creating the session. After that, all the SSH clients associated with a particular session use the same TCP socket to communicate to the server.
  • Saves time consumed otherwise wasted in creating a new connection each time.

Multiplexing is enabled by default in the Cisco IOS XR software server. If your client supports multiplexing, you must explicitly set up multiplexing on the client for it to be able to send multi-channel requests to the server. You can use OpenSSH, Putty, Perl, WinSCP, Putty, FileZilla, TTSSH, Cygwin or any other SSH-based tool to set up multiplexing on the client. Configure Client for Multiplexing provides an example of how you can configure the client for multiplexing using OpenSSH.

For more information on Multichannel feature, see the Cisco ASR 9000 Series Aggregation Services Router System Security Configuration Guide, Release 5.1.1.

Restrictions for Multi-channeling Over SSH

  • Do not use client multiplexing for heavy transfer of data as the data transfer speed is limited by the TCP speed limit. Hence, for a heavy data transfer it is advised that you run multiple SSH sessions, as the TCP speed limit is per connection.
  • Client multiplexing must not be used for more than 15 concurrent channels per session simultaneously.
  • You must ensure that the first channel created at the time of establishing the session is always kept alive in order for other channels to remain open.
  • The line template default session-limit command is not supported for SSH.

Client and Server Interaction Over Multichannel Connection

The figure below provides an illustration of a client-server interaction over a SSH multichannel connection.

As depicted in the illustration,

  • The client multiplexes the collection of channels into a single connection. This allows different operations to be performed on different channels simultaneously. The dotted lines indicate the different channels that are open for a single session.
  • After receiving a request from the client to open up a channel, the server processes the request. Each request to open up a channel represents the processing of a single service.

Note


The Cisco IOX software supports server-side multiplexing only.

Configure Client for Multiplexing

The SSH client opens up one TCP socket for all the connections. In order to do so, the client multiplexes all the connections into one TCP connection. Authentication happens only once at the time of creating the session. After that, all the SSH clients associated with the particular session uses the same TCP socket to communicate to the server. Use the following steps to configure client multiplexing using OpenSSH:

SUMMARY STEPS

  1. Edit the ssh_config file.
  2. Add entries ControlMaster auto and ControlPath
  3. Create a temporary folder.

DETAILED STEPS

  Command or Action Purpose

Step 1

Edit the ssh_config file.

Open the ssh_config file with your favorite text editor to configure values for session multiplexing. The system-wide SSH configuration file is located under /etc/ssh/ssh_config. The user configuration file is located under ~/.ssh/config or $HOME/.ssh/config.

Step 2

Add entries ControlMaster auto and ControlPath

Example:

Host *
ControlMaster auto
ControlPath ~/.ssh/tmp/%r@%h:%p
Add the entry ControlMaster auto and ControlPath to the ssh_config file, save it and exit.
  • ControlMaster determines whether SSH will listen for control connections and what to do about them. Setting the ControlMaster to 'auto' creates a primary session automatically but if there is a primary session already available, subsequent sessions are automatically multiplexed.
  • ControlPath is the location for the control socket used by the multiplexed sessions. Specifying the ControlPath ensures that any time a connection to a particular server uses the same specified primary connection.

Step 3

Create a temporary folder.

Create a temporary directory inside the /.ssh folder for storing the control sockets.

SSH Configuration Option to Restrict Cipher Public Key and HMAC Algorithm

The Cisco IOS XR software provides a new configuration option to control the key algorithms to be negotiated with the peer while establishing an SSH connection with the router. With this feature, you can enable the insecure SSH algorithms on the SSH server, which are otherwise disabled by default. A new configuration option is also available to restrict the SSH client from choosing the HMAC, or hash-based message authentication codes algorithm while connecting to the SSH server on the router. You can also configure a list of ciphers as the default cipher list, thereby having the flexibility to enable or disable any particular cipher.

Commands introduced:


Caution


Use caution in enabling the insecure SSH algorithms to avoid any possible security attack.


To disable the HMAC algorithm, use the ssh client disable hmac command or ssh server disable hmac command in Global Configuration mode.

To enable the required cipher, use the ssh server enable cipher command in Global Configuration mode.

The supported encryption algorithms (in the order of preference) are:

  1. aes128-ctr

  2. aes192-ctr

  3. aes256-ctr

  4. aes128-gcm@openssh.com

  5. aes256-gcm@openssh.com

  6. aes128-cbc

  7. aes192-cbc

  8. aes256-cbc

  9. 3des-cbc

In SSH, the CBC-based ciphers are disabled by default. To enable these, you can use the ssh client enable cipher command or ssh server enable cipher command with the respective CBC options (aes-cbc or 3des-cbc). All CTR-based and GCM-based ciphers are enabled by default.

Disable HMAC Algorithm

Configuration Example to Disable HMAC Algorithm


Router(config)# ssh server disable hmac hmac-sha1
Router(config)#commit

Router(config)# ssh client disable hmac hmac-sha1
Router(config)#commit

Running Configuration


ssh server disable hmac hmac-sha1
!

ssh client disable hmac hmac-sha1
!

Related Topics

SSH Configuration Option to Restrict Cipher Public Key and HMAC Algorithm

Associated Commands

  • ssh client disable hmac

  • ssh server disable hmac

Enable Cipher Public Key

Configuration Example to Enable Cipher Public Key

To enable all ciphers on the client and the server:

Router 1:


Router(config)# ssh client algorithms cipher aes256-cbc aes256-ctr aes192-ctr aes192-cbc aes128-ctr aes128-cbc aes128-gcm@openssh.com aes256-gcm@openssh.com 3des-cbc

Router 2:


Router(config)# ssh server algorithms cipher aes256-cbc aes256-ctr aes192-ctr aes192-cbc aes128-ctr aes128-cbc aes128-gcm@openssh.com aes256-gcm@openssh.com 3des-cbc

To enable the CTR cipher on the client and the CBC cipher on the server:

Router 1:


Router(config)# ssh client algorithms cipher aes128-ctr aes192-ctr aes256-ctr

Router 2:


Router(config)# ssh server algorithms cipher aes128-cbc aes256-cbc aes192-cbc 3des-cbc

Without any cipher on the client and the server:

Router 1:


Router(config)# no ssh client  algorithms  cipher

Router 2:


Router(config)# no ssh server  algorithms  cipher

Enable only the deprecated algorithms on the client and the server:

Router 1:


Router(config)# ssh client algorithms cipher aes128-cbc aes192-cbc aes256-cbc 3des-cbc

Router 2:


Router(config)# ssh server algorithms cipher aes128-cbc aes192-cbc aes256-cbc 3des-cbc

Enable the deprecated algorithm (using enable cipher command) and enable the CTR cipher (using algorithms cipher command) on the client and the server:

Router 1:


Router(config)# ssh client enable cipher aes-cbc 3des-cbc
Router(config)# ssh client algorithms cipher aes128-ctr aes192-ctr aes256-ctr

Router 2:


Router(config)# ssh server enable cipher aes-cbc 3des-cbc
Router(config)# ssh server algorithms cipher aes128-ctr aes192-ctr aes256-ctr

Running Configuration

All ciphers enabled on the client and the server:

Router 1:


ssh client algorithms cipher aes256-cbc aes256-ctr aes192-ctr aes192-cbc aes128-ctr aes128-cbc aes128-gcm@openssh.com aes256-gcm@openssh.com 3des-cbc
!

Router 2:


ssh client algorithms cipher aes256-cbc aes256-ctr aes192-ctr aes192-cbc aes128-ctr aes128-cbc aes128-gcm@openssh.com aes256-gcm@openssh.com 3des-cbc
!

Related Topics

SSH Configuration Option to Restrict Cipher Public Key and HMAC Algorithm

Associated Commands

  • ssh client enable cipher

  • ssh server enable cipher

  • ssh client algorithms cipher

  • ssh server algorithms cipher

User Configurable Maximum Authentication Attempts for SSH

Table 2. Feature History Table

Feature Name

Release Information

Feature Description

User Configurable Maximum Authentication Attempts for SSH

Release 7.3.1

This feature allows you to set a limit on the number of user authentication attempts allowed for SSH connection, using the three authentication methods that are supported by Cisco IOS XR. The limit that you set is an overall limit that covers all the authentication methods together. If the user fails to enter the correct login credentials within the configured number of attempts, the connection is denied and the session is terminated.

This command is introduced for this feature:

ssh server max-auth-limit

The three SSH authentication methods that are supported by Cisco IOS XR are public-key (which includes certificate-based authentication), keyboard-interactive, and password authentication. The limit count that you set as part of this feature comes into effect whichever combination of authentication methods you use. The limit ranges from 3 to 20; default being 20 (prior to Cisco IOS XR Software Release 7.3.2, the limit range was from 4 to 20).

Restrictions for Configuring Maximum Authentication Attempts for SSH

These restrictions apply to configuring maximum authentication attempts for SSH:

  • This feature is available only for Cisco IOS XR routers functioning as SSH server; not for the ones functioning as SSH clients.

  • This configuration is not specific to individual user; the limit remains same for all the users.

  • Due to security reasons, the SSH server limits the number of authentication attempts that explicitly uses the password authentication method to a maximum of 3. You cannot change this particular limit of 3 by configuring the maximum authentication attempts limit for SSH.

    For example, even if you configure the maximum authentication attempts limit as 5, the number of authentication attempts allowed using the password authentication method still remain as 3.

Configure Maximum Authentication Attempts for SSH

You can use the ssh server max-auth-limit command to specify the maximum number of authentication attempts allowed for SSH connection.

Configuration Example


Router#configure
Router(config)#ssh server max-auth-limit 5
Router(config)#commit

Running Configuration


Router#show running-configuration ssh
ssh server max-auth-limit 5
ssh server v2
!

Verification

The system displays the following SYSLOG on the router console when maximum authentication attempts is reached:


RP/0/RP0/CPU0:Oct 6 10:03:58.029 UTC: SSHD_[68125]: %SECURITY-SSHD-3-ERR_GENERAL : Max authentication tries reached-exiting

Associated Commands

  • ssh server max-auth-limit

X.509v3 Certificate-based Authentication for SSH

Table 3. Feature History Table

Feature Name

Release Information

Feature Description

X.509v3 Certificate-based Authentication for SSH

Release 7.3.1

This feature adds new public-key algorithms that use X.509v3 digital certificates for SSH authentication. These certificates use a chain of signatures by a trusted certification authority to bind a public key to the digital identity of the user who is authenticating with the SSH server. These certificates are difficult to falsify and therefore used for identity management and access control across many applications and networks.

Commands introduced for this feature are:

ssh server certificate

ssh server trustpoint

This command is modified for this feature:

ssh server algorithms host-key

This feature adds new public-key algorithms that use X.509v3 digital certificates for SSH authentication. This feature support is available for the SSH server for server and user authentication.

The X.509v3 certificate-based authentication for SSH feature supports the following public-key algorithms:

  • x509v3-ssh-dss

  • x509v3-ssh-rsa

  • x509v3-ecdsa-sha2-nistp256

  • x509v3-ecdsa-sha2-nistp384

  • x509v3-ecdsa-sha2-nistp521


Note


While user authentication by using X.509v3 certificate-based authentication for the SSH server is supported using all algorithms listed above, server authentication is supported only with the x509v3-ssh-rsa algorithm.


There are two SSH protocols that use public-key cryptography for authentication:

  • Transport Layer Protocol (TLP) described in RFC4253—this protocol mandates that you use a digital signature algorithm (called the public-key algorithm) to authenticate the server to the client.

  • User Authentication Protocol (UAP) described in RFC4252—this protocol allows the use of a digital signature to authenticate the client to the server (public-key authentication).

For TLP, the Cisco IOS XR SSH server provides its server certificate to the client, and the client verifies the certificate. Similarly, for UAP, the client provides an X.509 certificate to the server. The peer checks the validity and revocation status of the certificate. Based on the result, access is allowed or denied.

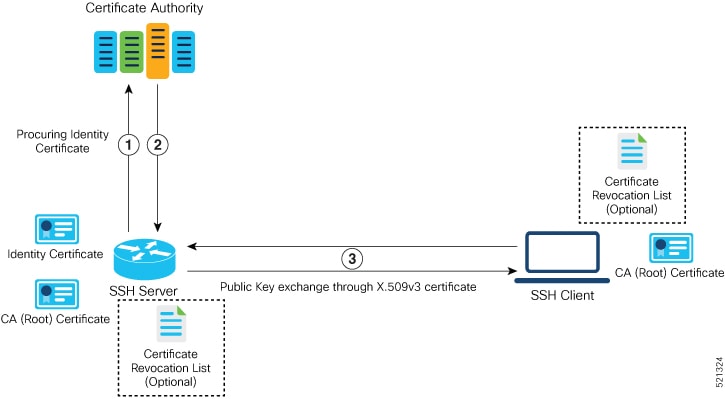
Server Authentication using X.509v3 Certificate

The server authentication process involves these steps:

  1. The SSH server procures a valid identity certificate from a well-known certificate authority. This certificate can be obtained manually (through cut-and-paste mechanism) or through protocol implementations such as Simple Certificate Enrollment Protocol (SCEP).

  2. The certificate authority provides valid identity certificates and associated root certificates. The requesting device stores these certificates locally.

  3. The SSH server presents the certificate to the SSH client for verification.

  4. The SSH client validates the certificate and starts the next phase of the SSH connection.

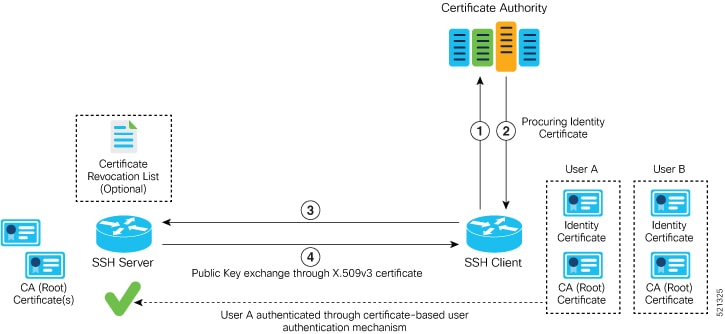
User Authentication using X.509v3 Certificate

The user authentication phase starts after the SSH transport layer is established. At the beginning of this phase, the client sends the user authentication request to the SSH server with required parameters. The user authentication process involves these steps:

  1. The SSH client requests a valid identity certificate from a well-known certificate authority.

  2. The certificate authority provides valid identity certificates and associated root certificates. The requesting device stores these certificates locally.

  3. The SSH client presents the certificate to the SSH server for verification.

  4. The SSH server validates the certificate and starts the next phase of the SSH connection.

The certificate-based authentication uses public key as the authentication method. The certificate validation process by the SSH server involves these steps:

  • The SSH server retrieves the user authentication parameters, verifies the certificate, and also checks for the certificate revocation list (CRL).

  • The SSH server extracts the username from the certificate attributes, such as subject name or subject alternate name (SAN) and presents them to the AAA server for authorization.

  • The SSH server then takes the extracted username and validates it against the incoming username string present in the SSH connection parameter list.

Restrictions for X.509v3 Certificate-based Authentication for SSH

These restrictions apply to the X.509v3 certificate-based authentication feature for SSH:

  • Supported only for Cisco IOS XR devices acting as the SSH server; not for the Cisco IOS XR devices acting as the SSH client.

  • Supported only for local users because TACACS and RADIUS server do not support public-key authentication. As a result, you must include the local option for AAA authentication configuration.


    Note


    Although this feature supports only local authentication, you can enforce remote authorization and accounting using the TACACS server.


  • Certificate verification using the Online Certificate Status Protocol (OCSP) is currently not supported. The revocation status of certificates is checked using a certificate revocation list (CRL).

  • To avoid user authentication failure, the chain length of the user certificate must not exceed the maximum limit of 9.

Configure X.509v3 Certificate-based Authentication for SSH

To enable X.509v3 certificate-based authentication for SSH, these tasks for server and user authentication:

Server Authentication:

  • Configure the list of host key algorithms—With this configuration, the SSH server decides the list of host keys to be offered to the client. In the absence of this configuration, the SSH server sends all available algorithms to the user as host key algorithms. The SSH server sends these algorithms based on the availability of the key or the certificate.

  • Configure the SSH trust point for server authentication—With this configuration, the SSH server uses the given trust point certificate for server authentication. In the absence of this configuration, the SSH server does not send x509v3-ssh-rsa as a method for server verification. This configuration is not VRF-specific; it is applicable to SSH running in all VRFs.

    The above two tasks are for server authentication and the following ones are for user authentication.

User Authentication:

  • Configure the trust points for user authentication—With this configuration, the SSH server uses the given trust point for user authentication. This configuration is not user-specific; the configured trust points are used for all users. In the absence of this configuration, the SSH server does not authenticate using certificates. This configuration is not specific to a VRF; it is applicable to SSH running in all VRFs.

    You can configure up to ten user trust points.

  • Specify the username to be picked up from the certificate—This configuration specifies which field in the certificate is to be considered as the username . The common-name from the subject name or the user-principle-name(othername) from the subject alternate name , or both can be configured.

  • Specify the maximum number of authentication attempts allowed by the SSH server—The value ranges from 4 to 20. The default value is 20. The server closes the connection if the number of user attempts exceed the configured value.

  • AAA authentication configuration—The AAA configuration for public key is the same as that for the regular or keyboard-interactive authentication, except that it mandates local method in the authentication method list.

Configuration Example

In this example, the x509v3-ssh-rsa is specified as the allowed host key algorithm to be sent to the client. Similarly, you can configure other algorithms, such as ecdsa-sha2-nistp521, ecdsa-sha2-nistp384, ecdsa-sha2-nistp256, ssh-rsa , and ssh-dsa .


/* Configure the lits of host key algorithms */
Router#configure
Router(config)#ssh server algorithms host-key x509v3-ssh-rsa
Router(config)#commit

/* Configure the SSH trustpoint for server authentication */
Router#configure
Router(config)#ssh server certificate trustpoint host tp1
Router(config)#commit

/* Configure the trustpoints to be used for user authentication */
Router#configure
Router(config)#ssh server trustpoint user tp1
Router(config)#ssh server trustpoint user tp2
Router(config)#commit

/* Specifies the username to be picked up from the certificate. 
In this example, it specifies the user common name to be picked up from the subject name field */
Router#configure
Router(config)#ssh server certificate username common-name
Router(config)#commit

/* Specifies the maximum authentication limit for the SSH server */
Router#configure
Router(config)#ssh server max-auth-limit 5
Router(config)#commit

/* AAA configuration for local authentication with certificate and 
remote authorization with TACACS+ or RADIUS */
Router#configure
Router(config)#aaa authentication login default group tacacs+ local
Router(config)#aaa authorization exec default group radius group tacacs+
Router(config)#commit

Running Configuration


ssh server algorithms host-key x509v3-ssh-rsa
!
ssh server certificate trustpoint host tp1
!
ssh server trustpoint user tp1
ssh server trustpoint user tp2
!
ssh server certificate username common-name
!
ssh server max-auth-limit 5
!

Verification of Certificate-based Authentication for SSH

You can use the show ssh server command to see various parameters of the SSH server. For certificate-based authentication for SSH, the Certificate Based field displays Yes . Also, the two new fields, Host Trustpoint and User Trustpoints , display the respective trust point names.


Router#show ssh server
Wed Feb 19 15:23:38.752 IST
---------------------
SSH Server Parameters
---------------------

Current supported versions := v2
                  SSH port := 22
                  SSH vrfs := vrfname:=default(v4-acl:=, v6-acl:=)  
              Netconf Port := 830
              Netconf Vrfs := vrfname:=default(v4-acl:=, v6-acl:=)  
 
 Algorithms 
---------------
        Hostkey Algorithms := x509v3-ssh-rsa, ecdsa-sha2-nistp521,ecdsa-sha2-nistp384,ecdsa-sha2-nistp256,ssh-rsa,ssh-dsa
   Key-Exchange Algorithms := ecdh-sha2-nistp521,ecdh-sha2-nistp384,ecdh-sha2-nistp256,diffie-hellman-group14-sha1
     Encryption Algorithms := aes128-ctr,aes192-ctr,aes256-ctr,aes128-gcm@openssh.com,aes256-gcm@openssh.com
            Mac Algorithms := hmac-sha2-512,hmac-sha2-256,hmac-sha1
 
 Authetication Method Supported 
------------------------------------
                 PublicKey := Yes
                  Password := Yes
      Keyboard-Interactive := Yes
         Certificate Based := Yes
 
 Others  
------------
                     DSCP  := 16
                Ratelimit  := 60
             Sessionlimit  := 100
                Rekeytime  := 60
       Server rekeyvolume  := 1024
  TCP window scale factor  := 1
            Backup Server  := Enabled, vrf:=default, port:=11000
Host Trustpoint            := tp1
User Trustpoints           := tp1 tp2

You can use the show ssh session details command to see the chosen algorithm for an SSH session:


Router#show ssh session details
Wed Feb 19 15:33:00.405 IST
SSH version : Cisco-2.0 

id      key-exchange           pubkey               incipher    outcipher   inmac         outmac   
---------------------------------------------------------------------------------------------------- 
Incoming Sessions 
1       ecdh-sha2-nistp256     x509v3-ssh-rsa       aes128-ctr  aes128-ctr  hmac-sha2-256 hmac-sha2-256 

Similarly, you can use the show ssh command to verify the authentication method used. In this example, it shows as x509-rsa-pubkey :


Router#show ssh
Sun Sep 20 18:14:04.122 UTC
SSH version : Cisco-2.0

id  chan pty  location   state         userid    host           ver authentication connection type
----------------------------------------------------------------------------------------------------------------------------
Incoming sessions
4   1    vty0 0/RP0/CPU0 SESSION_OPEN  9chainuser 10.105.230.198 v2  x509-rsa-pubkey Command-Line-Interface

Outgoing sessions

SYSLOGS

You can observe relevant SYSLOGS on the router console in various scenarios listed here:

  • On successful verification of peer certificate:

    
    RP/0/RP0/CPU0:Aug 10 15:01:34.793 UTC: locald_DLRSC[133]: %SECURITY-PKI-6-LOG_INFO : Peer certificate verified successfully
    
  • When user certificate CA is not found in the trust point:

    
    RP/0/RP0/CPU0:Aug  9 22:06:43.714 UTC: locald_DLRSC[260]: %SECURITY-PKI-3-ERR_GENERAL : issuer not found in trustpoints configured
    RP/0/RP0/CPU0:Aug  9 22:06:43.714 UTC: locald_DLRSC[260]: %SECURITY-PKI-3-ERR_ERRNO : Error:='Crypto Engine' detected the 'warning' condition 'Invalid trustpoint or trustpoint not exist'(0x4214c000), cert verificationn failed
    
    
  • When there is no CA certificate or host certificate in the trust point:

    
    RP/0/RP1/CPU0:Aug 10 00:23:28.053 IST: SSHD_[69552]: %SECURITY-SSHD-4-WARNING_X509 : could not get the host cert chain, 'sysdb' detected the 'warning' condition 'A SysDB client tried to access a nonexistent item or list an empty directory', x509 host auth will not be used
    RP/0/RP1/CPU0:Aug 10 00:23:30.442 IST: locald_DLRSC[326]: %SECURITY-PKI-3-ERR_ERRNO : Error:='Crypto Engine' detected the 'warning' condition 'Invalid trustpoint or trustpoint not exist'(0x4214c000), Failed to get trustpoint name from   


How to Disable X.509v3 Certificate-based Authentication for SSH

  • Server Authentication — You can disable X.509v3 certificate-based server authentication for SSH by using the ssh server algorithms host-key command. From the list of auto-generated host-key pairs algorithms on the SSH server, this command configures allowed SSH host-key pair algorithms. Hence, if you have this configuration without specifying the x509-ssh-rsa option in the preceding command, it is equivalent to disabling the X.509v3 certificate-based server authentication for the SSH server.

  • User Authentication — You can remove the user trust point configuration (ssh server trustpoint user ) so that the SSH server does not allow the X.509v3 certificate-based authentication.

Failure Modes for X.509v3 Certificate-based Authentication for SSH

If the ssh server certificate trustpoint host configuration is missing, or if the configuration is present, but the router certificate is not present under the trust point, then the SSH server does not add x509-ssh-rsa to the list of supported host key methods during key exchange.

Also, the user authentication fails with an error message if:

  • User certificate is in an incorrect format.

  • The chain length of the user certificate is more than the maximum limit of 9.

  • Certificate verification fails due to any reason.

Related Topics

Associated Commands

  • ssh server algorithms hostkey

  • ssh server certificate username

  • ssh server max-auth-limit

  • ssh server trustpoint host

  • ssh server trustpoint user

  • show ssh server

  • show ssh session details

OpenSSH Certificate based Authentication for Router

Table 4. Feature History Table

Feature Name

Release Information

Feature Description

OpenSSH Certificate based Authentication for Router

Release 7.5.3

You can now use OpenSSH certificates to authenticate to the remote routers from a client machine. This feature uses the ssh-keygen utility, a standard SSH component to generate and manage authentication keys, available in OpenSSH to create a CA (Certificate Authority) like infrastructure for logging into the router.

In this feature, the certificates that are used to authenticate router and client are both signed by the same CA. This automatically establishes trust between router and client, and eliminates the need to establish trust, while using the client for remote logging to router for the first time.

OpenSSH is the open-source implementation of the SSH Protocol. In OpenSSH certificate-based authentication, you can use the ssh-keygen utility to create a certificate signing infrastructure. A digital certificate with public and private key pair, created using the ssh-keygen utility, authenticates the host and the user certificates. The user certificate authenticates the client machine to the router. The client machine is a system that the user utilizes to establish remote access to the router. When a user attempts to log in to the router using the client machine, the client machine presents its certificate to the router. The router checks for the identity and validity of the certificate to decide whether to allow or deny the connection request. The host certificate in the router authenticates the router to the client. Overall, the host and user certificates together establish a two-way secure communication channel.

The OpenSSH based authentication for the router has the following major phases:

Establishing the trustpoints: In the router, you must create a trustpoint and configure the router to use this trustpoint for the host and user authentication. You can have a same or different trustpoints for these entities. While the router can have only one trustpoint, the user can have up to ten trustpoints.

Creating the CA: Any system with the OpenSSH feature acts like the CA. The ssh-keygen creates the CA certificate and utilizes it to sign the router and user certificate.

Router authentication: You must copy the CA public key in the CA server to the router and ensure to create a CSR (Certificate Signing Request) in the router. The CSR file is further copied to the CA server and signed using the CA certificate. The CA signed certificate is copied back to the router to complete its authentication with CA.

User authentication: You must create a digital certificate for the user using the ssh-keygen utility and sign the public key using the CA certificate. The CA signed user certificate must be copied to the client system using which you would log into the router using the specified user.

Remote access to the router: After the host and user authentication, you can access the router using SSH in the client system that is used to authenticate the user.

Feature Highlights

  • OpenSSH certificates use the Certificate Authority (CA) infrastructure to act as a trusted entity while signing the host or user certificates.

  • OpenSSH certificates contain a public and private key pair, including identity and validity information. These are signed using a standard SSH public key using the ssh-keygen utility.

  • The router certificate includes information such as the host public key, public key of the signing CA, type (host), certificate validity, Key ID, serial number of the certificate, and so on.

  • The user certificate contains the user's public key, the public key of the signing CA, Key ID, type (user), serial number, certificate validity, principals matched against the login username, and so forth.

  • The CA is just another SSH key created using the ssh-keygen utility. However, rather than utilizing it for authenticating the router or user directly, it's used to sign and validate the other keys that are used for authenticating the router and the user.

  • You can view the router and user certificate properties using the ssh-keygen.

  • The OpenSSH certificates support the following encryptions:

    • RSA

    • DSA

    • ECDSA

    • ED25519

Prerequisites

  • You must have a client machine which has OpenSSH feature with the ssh-keygen utility to act as CA.

Configuration Example

The following high-level steps help you set up OpenSSH based Authentication:

  1. Create a trustpoint in the router and configure the router to use this trustpoint for the host and user authentication.

  2. Creating CA, the CA here is a dedicated system with OpenSSH feature that provides a certificate signing infrastructure using the ssh-keygen utility.

  3. Host authentication, the host here is the Cisco IOS XR router.

  4. User authentication, a user is any entity attempting to access the router. Generally refers to system to access the router CLI remotely. User is also referred to as client.

  5. Access the router in the client using the OpenSSH authentication

This section contains the detailed procedure to enable this feature in your router.

  1. Create a trustpoint in the router and configure the router to use this trustpoint for the host and user authentication.

    1. [Router Config mode] Create a trustpoint in the router.

      Router# config
      Router(config)# crypto ca openssh trustpoint test
      Router(config)# commit
      
    2. [Router Config mode] Configure the trustpoint for host authentication.

      Router# config
      Router(config)# ssh server openssh trustpoint host test
      Router(config)# commit
      
    3. [Router Config mode] Configure the trustpoint for user authentication

      Router# config
      Router(config)# ssh server openssh trustpoint user test
      Router(config)# commit
      
  2. Creating CA

    1. [CA Server] In the dedicated machine with OpenSSH feature to act as CA, generate a certificate using the ssh-keygen utility:

      [root@CAServer test]# ssh-keygen -t rsa -f cacert
      Generating public/private rsa key pair.
      Enter passphrase (empty for no passphrase): 
      Enter same passphrase again: 
      Your identification has been saved in cacert.
      Your public key has been saved in cacert.pub.
      The key fingerprint is:
      SHA256:/B2b8V7jKXwGphf75fkO74U/mpuHgDHmvF4okexdKhY root@CAServer
      The key's randomart image is:
      +---[RSA 2048]----+
      |                 |
      |                 |
      |                 |
      |      ...+       |
      |       ES +.o    |
      |      . +=+o X . |
      |       = +o.O O.+|
      |      . o... B+@*|
      |        ..  .=XBX|
      +----[SHA256]-----+
      		  
      [root@CAServer test]# ls
      cacert  cacert.pub
      

      Note


      Leave the passphrase empty.


  3. Host (Router) authentication

    1. [CA Server] Open the CA public key from CA server and copy it contents.

      [root@CAServer test]# cat cacert.pub
      ssh-rsa AAAAB3NzaC1yc2EAAAADAQABAAABAQCigl/zhyjuGOBYz5bu+GL76
      HBaROV0pVS4Lx3pf1jcjrFkVibPKKkVeX/lE7sZIJ0anU9vYSJZW8zrl8z06G
      qzmnJqRRaXa9vfwNmjvNdRwxuBA3Uk/G1sbmcusMXBXoY6z0IEMhlVN0hCqE4
      cIFgLxgHpYAaqyl2hISaomTCNhkbD770Ot8zbyRjl6G0Ps0ggYHWmfLZf/tbF
      IBPWpuuuA3LvpZIiTaztevQaWYSyK22h3tp3K62IOBX3gUd4Yr+Gvo4PNA26e
      21cUE2aVJsl6J9MeFITR2NzY1cmZ44KWi6bglkPlE4KBiRsbHCvs4wlaUaO5q
      hNj1BdH3/Hha4x root@CAServer
      
    2. [Router EXEC mode] Add the contents of the CA public key to router trustpoint.

      Router#crypto ca openssh authenticate test
      Enter the CA pubkey.
      End with a blank line or the word "quit" on a line by itself
      ssh-rsa AAAAB3NzaC1yc2EAAAADAQABAAABAQCigl/zhyjuGOBYz5bu+GL7
      6HBaROV0pVS4Lx3pf1jcjrFkVibPKKkVeX/lE7sZIJ0anU9vYSJZW8zrl8z0
      6GqzmnJqRRaXa9vfwNmjvNdRwxuBA3Uk/G1sbmcusMXBXoY6z0IEMhlVN0hC
      qE4cIFgLxgHpYAaqyl2hISaomTCNhkbD770Ot8zbyRjl6G0Ps0ggYHWmfLZf
      /tbFIBPWpuuuA3LvpZIiTaztevQaWYSyK22h3tp3K62IOBX3gUd4Yr+Gvo4P
      NA26e21cUE2aVJsl6J9MeFITR2NzY1cmZ44KWi6bglkPlE4KBiRsbHCvs4wl
      aUaO5qhNj1BdH3/Hha4x root@CAServer
      Do you accept this certificate? [yes/no]: yes
      
    3. [Router EXEC mode] Validate the copied CA public key by viewing the OpenSSH certificates in the CA trustpoint configured in the router.

      Router#show crypto ca openssh certificates 
      Fri Sep 16 06:59:38.347 UTC
      
      Trustpoint       : test
      ===============================================================
      CA certificate 
      ===============================================================
      
      ssh-rsa AAAAB3NzaC1yc2EAAAADAQABAAABAQCigl/zhyjuGOBYz5bu+GL76HBa
      ROV0pVS4Lx3pf1jcjrFkVibPKKkVeX/lE7sZIJ0anU9vYSJZW8zrl8z06GqzmnJq
      RRaXa9vfwNmjvNdRwxuBA3Uk/G1sbmcusMXBXoY6z0IEMhlVN0hCqE4cIFgLxgHp
      YAaqyl2hISaomTCNhkbD770Ot8zbyRjl6G0Ps0ggYHWmfLZf/tbFIBPWpuuuA3Lv
      pZIiTaztevQaWYSyK22h3tp3K62IOBX3gUd4Yr+Gvvcjdvjwevfo4PNA26e21cUE
      2aVJsl6J9eFITR2NzY1cmZ44KWi6bglkPlE4KBiRsbHCvs4wlaUaO5qhNj1BdH3/
      Hha4x root@CAServer
      
    4. [Router EXEC mode] Generate a CSR for the CA public key in the router.

      Router#crypto ca openssh enroll test
      Fri Sep 16 06:34:41.230 UTC
      Display Certificate Request to terminal? [yes/no]: yes
      ---Hostkey follows---
      
      ssh-rsa AAAAB3NzaC1yc2EAAAADAQABAAABAQCaXqjc45LohfiHJ1iq8sSpaJmdR
      QQJo6bRMhkdxY1pbjEYrwjPTn5SnC1NZYwsTPSHlbYBxQRLBHLv80Gbb0v+uJ1T0T
      4tAmLgSYPXaHqYIyepCeMKSkSKLgZ0Pf+oGBMtf3uUuLqCgnFAwjrzDBXJYfF+bd/
      ieXMwKKNH3YiceLOqe4BAYRU6m+wiuZ8is+bIfy32Eq7gWuPUz8XpxaCt3icpqfrj
      7/vm7amKf1GpiheaRJH0Cg4JAmJpAQkuPjx+Y9SZw2yTJP+IKr9tSoSWyiHo2B/Yg
      3yERd7M8dQEsvrGy5KIf92x+eLPlGl5gB9ykEPDUpXeaYTu5wtDR/Jd
      
      ---End - This line not part of hostkey---
      Redisplay enrollment request? [yes/no]: n
      
    5. [Router EXEC mode] Select the hostkey contents of the CSR file and copy the hostkey of the CSR.

    6. [CA server] Create a .pub file in the CA server for the CSR hostkey and paste the copied hostkey contents in this file.

      [root@CAServer test]# vim host.pub
      /* Here we are using the vim text editor to create the host.pub file */
      /* You can use any text editor of your choice  */
      
    7. [CA server] Execute the following block to sign the CSR file using the CA certificate

      [root@CAServer test]# ssh-keygen -h -s cacert -I "server" -V +10w -z 10 host.pub
      Signed host key host-cert.pub: id "server" serial 10 valid from 2022-09-16T12:26:00 to 2022-11-25T12:27:17
      

      Note


      Use the following command to sign the CSR file using the CA certificate:

      ssh-keygen -h -s <CACert> -I <IdentityOfCSRSys> -V <CertValidity> -z <CertSerialNo> <CopiedCSRFile>


      Parameter

      Description

      CACert

      Specify the filename of the CA Server private key

      CertValidity

      Specify the validity period for the certificate.

      CertSerialNo

      Specify a serial number for the certificate.

      CopiedCSRFile

      Specify the name of the file created to copy the contents of CSR in the router.

    8. [CA server] Open the signed host certificate and copy the contents.

      [root@CAServer test]# cat host-cert.pub
      ssh-rsa-cert-v01@openssh.com AAAAHHNzaC1yc2EtY2VydC12MDFAb3BlbnNza
      C5jb20AAAAgzv0OXl42NNK9C4PtLZniRwBk5jbeS8quNhzVKsRpO7UAAAADAQABAAA
      BAQCaXqjc45LohfiHJ1iq8sSpaJmdRQQJo6bRMhkdxY1pbjEYrwjPTn5SnC1NZYwsT
      PSHlbYBxQRLBHLv80Gbb0v+uJ1T0T4tAmLgSYPXaHqYIyepCeMKSkSKLgZ0Pf+oGBM
      tf3uUuLqCgnFAwjrzDBXJYfF+bd/ieXMwKKNH3YiceLOqe4BAYRU6m+wiuZ8is+bIf
      y32Eq7gWuPUz8XpxaCt3icpqfrj7/vm7amKf1GpiheaRJH0Cg4JAmJpAQkuPjx+Y9S
      Zw2yTJP+IKr9tSoSWyiHo2B/Yg3yERd7M8dQEsvrGy5KIf92x+eLPlGl5gB9ykEPDU
      pXeaYTu5wtDR/JdAAAAAAAAAAoAAAACAAAABnNlcnZlcgAAAAAAAAAAYyQeAAAAAAB
      jgGdNAAAAAAAAAAAAAAAAAAABFwAAAAdzc2gtcnNhAAAAAwEAAQAAAQEAooJf84co7
      hjgWM+W7vhi++hwWkTldKVUuC8d6X9Y3I6xZFYmzyipFXl/5RO7GSCdGp1Pb2EiWVv
      M65fM9Ohqs5pyakUWl2vb38DZo7zXUcMbgQN1JPxtbG5nLrDFwV6GOs9CBDIZVTdIQ
      qhOHCBYC8YB6WAGqspdoSEmqJkwjYZGw++9DrfM28kY5ehtD7NIIGB1pny2X/7WxSA
      T1qbrrgNy76WSIk2s7Xr0GlmEsittod7adyutiDgV94FHeGK/hr6ODzQNunttXFBNm
      lSbJeifTHhSE0djc2NXJmeOCloum4JZD5ROCgYkbGxwr7OMJWlGjuaoTY9QXR9/x4W
      uMQAAAQ8AAAAHc3NoLXJzYQAAAQAIywc9o2OWzFq32MnE9IZVVRRiItdXaMVE1EvYu
      G92JK7wnMJd50M6QDyfkNmGF4ramF90/bVQpl3UYJzVxCJSEodAq6OmlG3zx/MVayT
      unMwV2Fq75PpaoZVpyEKx4kLKA6rNU5Tmbht2OfMQKFvIWyxTDmeLFMvnpt8R0Yrz4
      sG5EP1+4E3WthfzZr42Mq2LQJt6aBeYHZDZSp++j7RpA7+T/6n1aGtAjtDIKprOQuE
      1higCZmdI+kUZDOXjMJlPmJAnV8fdtnnEpYCyzYeD+rSSF7dlDVrTaiFdqrfCXh+uY
      jR1E621sP7UEJOWeiBqSDTJxSRdRBNZq9TLmgJH host.pub
      
    9. [Router EXEC mode] Import the signed host certificate to the router.

      Router# crypto ca openssh import test certificate 
      /* This command opens the CA trustpoint and you must paste the contents of signed certificate copied from the CA server */
      Fri Sep 16 07:00:27.573 UTC
      
      
      Enter the OpenSSH certificate.
      End with a blank line
      
      ssh-rsa-cert-v01@openssh.com AAAAHHNzaC1yc2EtY2VydC12MDFAb3BlbnNzaC
      5jb20AAAAgzv0OXl42NNK9C4PtLZniRwBk5jbeS8quNhzVKsRpO7UAAAADAQABAAABA
      QCaXqjc45LohfiHJ1iq8sSpaJmdRQQJo6bRMhkdxY1pbjEYrwjPTn5SnC1NZYwsTPSH
      lbYBxQRLBHLv80Gbb0v+uJ1T0T4tAmLgSYPXaHqYIyepCeMKSkSKLgZ0Pf+oGBMtf3u
      UuLqCgnFAwjrzDBXJYfF+bd/ieXMwKKNH3YiceLOqe4BAYRU6m+wiuZ8is+bIfy32Eq
      7gWuPUz8XpxaCt3icpqfrj7/vm7amKf1GpiheaRJH0Cg4JAmJpAQkuPjx+Y9SZw2yTJ
      P+IKr9tSoSWyiHo2B/Yg3yERd7M8dQEsvrGy5KIf92x+eLPlGl5gB9ykEPDUpXeaYTu
      5wtDR/JdAAAAAAAAAAoAAAACAAAABnNlcnZlcgAAAAAAAAAAYyQeAAAAAABjgGdNAAA
      AAAAAAAAAAAAAAAABFwAAAAdzc2gtcnNhAAAAAwEAAQAAAQEAooJf84co7hjgWM+W7v
      hi++hwWkTldKVUuC8d6X9Y3I6xZFYmzyipFXl/5RO7GSCdGp1Pb2EiWVvM65fM9Ohqs
      5pyakUWl2vb38DZo7zXUcMbgQN1JPxtbG5nLrDFwV6GOs9CBDIZVTdIQqhOHCBYC8YB
      6WAGqspdoSEmqJkwjYZGw++9DrfM28kY5ehtD7NIIGB1pny2X/7WxSAT1qbrrgNy76W
      SIk2s7Xr0GlmEsittod7adyutiDgV94FHeGK/hr6ODzQNunttXFBNmlSbJeifTHhSE0
      djc2NXJmeOCloum4JZD5ROCgYkbGxwr7OMJWlGjuaoTY9QXR9/x4WuMQAAAQ8AAAAHc
      3NoLXJzYQAAAQAIywc9o2OWzFq32MnE9IZVVRRiItdXaMVE1EvYuG92JK7wnMJd50M6
      QDyfkNmGF4ramF90/bVQpl3UYJzVxCJSEodAq6OmlG3zx/MVayTunMwV2Fq75PpaoZV
      pyEKx4kLKA6rNU5Tmbht2OfMQKFvIWyxTDmeLFMvnpt8R0Yrz4sG5EP1+4E3WthfzZr
      42Mq2LQJt6aBeYHZDZSp++j7RpA7+T/6n1aGtAjtDIKprOQuE1higCZmdI+kUZDOXjM
      JlPmJAnV8fdtnnEpYCyzYeD+rSSF7dlDVrTaiFdqrfCXh+uYjR1E621sP7UEJOWeiBq
      SDTJxSRdRBNZq9TLmgJH host.pub
      
    10. [Router EXEC mode] Verify the host certificate import in the router.

      Router#show crypto ca openssh certificates       
      Fri Sep 16 07:00:49.488 UTC
      
      Trustpoint       : test
      ===================================================================
      CA certificate 
      ===================================================================
      ssh-rsa AAAAB3NzaC1yc2EAAAADAQABAAABAQCigl/zhyjuGOBYz5bu+GL76HBaROV
      0pVS4Lx3pf1jcjrFkVibPKKkVeX/lE7sZIJ0anU9vYSJZW8zrl8z06GqzmnJqRRaXa9
      vfwNmjvNdRwxuBA3Uk/G1sbmcusMXBXoY6z0IEMhlVN0hCqE4cIFgLxgHpYAaqyl2hI
      SaomTCNhkbD770Ot8zbyRjl6G0Ps0ggYHWmfLZf/tbFIBPWpuuuA3LvpZIiTaztevQa
      WYSyK22h3tp3K62IOBX3gUd4Yr+Gvo4PNA26e21cUE2aVJsl6J9MeFITR2NzY1cmZ44
      KWi6bglkPlE4KBiRsbHCvs4wlaUaO5qhNj1BdH3/Hha4x root@CAServer
       
      Router certificate 
      ====================================================================
      Type         : Host Certificate
      Key ID       : server
      Serial       : 10
      Valid        : from Fri Sep 16 06:56:00 2022 to Fri Nov 25 06:57:17 2022
      
  4. User authentication

    1. [Client machine] Generate an SSH key pair in the client system using the ssh-keygen utility for the user.

      [root@userclient test]# ssh-keygen -t rsa 
      Generating public/private rsa key pair.
      Enter file in which to save the key (/root/.ssh/id_rsa): /root/openssh_client/test/user
      Enter passphrase (empty for no passphrase): 
      Enter same passphrase again: 
      Your identification has been saved in /root/openssh_client/test/user.
      Your public key has been saved in /root/openssh_client/test/user.pub.
      The key fingerprint is:
      SHA256:rNmS7P0u6l1pm75Kb4KhMxZThwaJ/AMnA9C//Z1GVEY root@userclient.cisco.com
      The key's randomart image is:
      +---[RSA 2048]----+
      |++ . .     .E    |
      |  B +       o    |
      |   B . .   o     |
      |    + +.. .      |
      |     * .S.       |
      |    +.o=  ..     |
      |     +*+oo+.     |
      |    =..=++=o     |
      |   . ++.+XO.     |
      +----[SHA256]-----+
      [root@userclient test]# ls
      user  user.pub
      
    2. [Client machine] Open the SSH public key file.


      Note


      Copy the public key content for the user certificate.


      [root@userclient test]# cat user.pub
      ssh-rsa AAAAB3NzaC1yc2EAAAADAQABAAABAQCspUNwiwlEy0VXQ1Ruh2peRnAP12LSICNe9
      H76xyBiCIXFLLXHTUZZM+W/Pa97pg3fObxaqyNYaeojfwmGeNyPLS9Ha0mqRuLmVCT/1got5I
      Rn1AZhufZz7iz1AdW8DMC//KUnUS/T+cEwGrZ//sbIPTMsQZhhaQVk9xqFp9ghPMxwar3vaHa
      t9NL6ThrR+viue9IOY5LKMeRnqrf2GFX3L6gHfcgYv9fQOKxI11WjTA645rQyB+NumVlrG6KI
      as/xmBCEFHpChGZ1/GSB/atrKeVEWqzsJkpQHXEtE7hwK8gMrL+ad38mbV2Zz6Cc7KHJFEWaZ
      sfjFscCP0kzU1gX root@userclient.cisco.com
      
    3. [CA server] Create a .pub file in the CA server for the user certificate public key and paste the public key contents from the previous step in this file.

      [root@CAServer test]# vim user.pub
      /* Here we are using the vim text editor to create the user.pub file */
      /* You can use any text editor of your choice  */
      
    4. [CA server] Sign the user public key using the CA certificate private key.

      [root@CAServer test]# ssh-keygen -s cacert -I "user" -V +10w -n testuser -z 20 user.pub 
      Signed user key user-cert.pub: id "user" serial 20 valid from 2022-09-16T12:42:00 to 2022-11-25T12:43:24


      Note


      The command to sign the CSR file using the CA certificate:

      ssh-keygen -s <CACert> -I <IdentityOfSysReqCert> -V <CertValidity> -n <Username> -z <CertSerialNo> <CopiedUserCertName>


      Note


      In addition to the mandatory fields specified for the user certificate, you can also configure critical options and extensions for the user certificate. For detailed information on the critical options and extensions, refer ssh-keygen.


      Parameter

      Description

      CACert

      Specify the filename of the CA Server private key/

      IdentityOfSysReqCert

      Specify the identity of the certificate as User

      CertValidity

      Specify the validity period for the certificate.

      <Username>

      Specify the principals that you want to add to the certificate.

      Note


      During authentication to the router, the principal in the user certificate is matched against the login username and requests with matching principal and username are permitted for further communication.

      Note


      You can have multiple principals that are associated with the same certificate. The principals must be separated by commas in the IdentityOfSysReqCert field in command to sign the user certificate file using CA certificate.

      CertSerialNo

      Specify a serial number for the certificate.

      CopiedUserCertName

      Specify the name of the file created to copy the contents of the user certificate file in the client machine.

    5. [CA server] Open the signed user certificate in the CA server and copy the contents.

      [root@CAServer test]# cat user-cert.pub
      ssh-rsa-cert-v01@openssh.com AAAAHHNzaC1yc2EtY2VydC12MDFAb3BlbnNzaC5jb20AA
      AAg6xlcZNQTKmUO27dHFcUCk7UzVCPWFMCep7Ldb4lBF6MAAAADAQABAAABAQCspUNwiwlEy0V
      XQ1Ruh2peRnAP12LSICNe9H76xyBiCIXFLLXHTUZZM+W/Pa97pg3fObxaqyNYaeojfwmGeNyPL
      S9Ha0mqRuLmVCT/1got5IRn1AZhufZz7iz1AdW8DMC//KUnUS/T+cEwGrZ//sbIPTMsQZhhaQV
      k9xqFp9ghPMxwar3vaHat9NL6ThrR+viue9IOY5LKMeRnqrf2GFX3L6gHfcgYv9fQOKxI11WjT
      A645rQyB+NumVlrG6KIas/xmBCEFHpChGZ1/GSB/atrKeVEWqzsJkpQHXEtE7hwK8gMrL+ad38
      mbV2Zz6Cc7KHJFEWaZsfjFscCP0kzU1gXAAAAAAAAABQAAAABAAAABHVzZXIAAAAAAAAAAGMkI
      cAAAAAAY4BrFAAAAAAAAACCAAAAFXBlcm1pdC1YMTEtZm9yd2FyZGluZwAAAAAAAAAXcGVybWl
      0LWFnZW50LWZvcndhcmRpbmcAAAAAAAAAFnBlcm1pdC1wb3J0LWZvcndhcmRpbmcAAAAAAAAAC
      nBlcm1pdC1wdHkAAAAAAAAADnBlcm1pdC11c2VyLXJjAAAAAAAAAAAAAAEXAAAAB3NzaC1yc2E
      AAAADAQABAAABAQCigl/zhyjuGOBYz5bu+GL76HBaROV0pVS4Lx3pf1jcjrFkVibPKKkVeX/lE
      7sZIJ0anU9vYSJZW8zrl8z06GqzmnJqRRaXa9vfwNmjvNdRwxuBA3Uk/G1sbmcusMXBXoY6z0I
      EMhlVN0hCqE4cIFgLxgHpYAaqyl2hISaomTCNhkbD770Ot8zbyRjl6G0Ps0ggYHWmfLZf/tbFI
      BPWpuuuA3LvpZIiTaztevQaWYSyK22h3tp3K62IOBX3gUd4Yr+Gvo4PNA26e21cUE2aVJsl6J9
      MeFITR2NzY1cmZ44KWi6bglkPlE4KBiRsbHCvs4wlaUaO5qhNj1BdH3/Hha4xAAABDwAAAAdzc
      2gtcnNhAAABABKOHeuTo9OMg6K+HjASpRXD7rQgiiOdljKdkpw4FZlwCOdBegQwPQkFYTNHmrH
      frQYY72ZINCAjseq+ZSUCkCqJjyXbvY+ZdmRyy76pQvjitgolZjppJqX38nz3uqz/81A/ZuJiF
      811sgJF0Loj7XDN9wjF/zBtsxsXPp7R5c775dmmFgZWQHbSWDlNmnPd9vLZMyBwId//+HV/bCF
      LjbqI/nr/amLVjcI0liOZXzsH7bcLFBSDZ3Epd6IAqFEe+URqvscjaaghcvnshvcafdgfaruO0
      wedsZX53/pEBKhlGacsachFa+S2QuYqTafqnEtkvJoNKVe7UDq/R4kEXM1s9CclIMOficYJm5L
      as+ALR4= root@CAServer.cisco.com
      
    6. [CA server] Create a .pub file in the client machine fo the CA signed user certificate and past the signed certificate contents in this file.

      [root@CAServer test]# vim user-cert.pub
      /* Here we are using the vim text editor to create the user-cert.pub file */
      /* You can use any text editor of your choice  */
      
    7. [Client machine] View the user certificate in the client machine.

      [root@userclient test]# ssh-keygen -Lf user-cert.pub
      user-cert.pub:
              Type: ssh-rsa-cert-v01@openssh.com user certificate
              Public key: RSA-CERT SHA256:rNmS7P0u6l1pm75Kb4KhMxZThwaJ/AMnA9C//Z1GVEY
              Signing CA: RSA SHA256:/B2b8V7jKXwGphf75fkO74U/mpuHgDHmvF4okexdKhY
              Key ID: "user"
              Serial: 20
              Valid: from 2022-09-16T12:44:00 to 2022-11-25T12:45:51
              Principals: 
                      testuser
              Critical Options: (none)
              Extensions: 
                      permit-X11-forwarding
                      permit-agent-forwarding
                      permit-port-forwarding
                      permit-pty
                      permit-user-rc
      
    8. [Client machine] Open the known hosts file in the client system and add the public key of the CA to this file.


      Note


      Add the CA public key to the known hosts file in the following format:

      @cert-authority <hostname> <CA Public Key>


      cat testuser@192.0.2.2 /root/.ssh/known_hosts
      @cert-authority ssh-rsa AAAAB3NzaC1yc2EAAAADAQABAAABAQCigl/zhyjuGOBYz5bu
      +GL76HBaROV0pVS4Lx3pf1jcjrFkVibPKKkVeX/lE7sZIJ0anU9vYSJZW8zrl8z06GqzmnJq
      RRaXa9vfwNmjvNdRwxuBA3Uk/G1sbmcusMXBXoY6z0IEMhlVN0hCqE4cIFgLxgHpYAaqyl2h
      ISaomTCNhkbD770Ot8zbyRjl6G0Ps0ggYHWmfLZf/tbFIBPWpuuuA3LvpZIiTaztevQaWYSy
      K22h3tp3K62IOBX3gUd4Yr+Gvo4PNA26e21cUE2aVJsl6J9MeFITR2NzY1cmZ44KWi6bglkP
      lE4KBiRsbHCvs4wlaUaO5qhNj1BdH3/Hha4x root@CAServer.cisco.com
    9. [Router Config mode] Configure the username in the router

      Router# config
      Router(config)# username testuser
      Router(config-un)# group root-lr 
      Router(config-un)# commit
      
  5. [Client machine] Access the router in the client using the OpenSSH certificate.

    [root@userclient test]# ssh -o CertificateFile=user-cert.pub -i user testuser@192.0.2.2 -o StrictHostKeyChecking=yes 
    Router#

    Note


    The command to access the router in the client machine remotely:

    ssh -o CertificateFile=<CA_Signed_User_Certificate_Name> -i <User_Certificate_Private_Key> <Username >@<Router_IP> -o StrictHostKeyChecking=yes


Public Key-Based Authentication of SSH Clients

Table 5. Feature History Table

Feature Name

Release Information

Feature Description

Public Key-Based Authentication of SSH Clients on Cisco IOS XR Routers

Release 7.10.1

You are now assured of cryptographic strength even as you avail of automated password-less login while establishing SSH connections with the server. With the password and keyboard-interactive authentication, Cisco IOS XR routers configured as SSH clients now support public key-based authentication. In this authentication method, passwords need not be sent over the network; hence, it provides an additional layer of security and aids in automation processes. This feature is available only for users locally configured on the router; not those configured on remote servers.

Previous releases supported SSH public key-based authentication only for Cisco IOS XR routers configured as SSH servers.

The feature introduces these changes:

Cisco IOS XR routers configured as SSH clients supported only password authentication and keyboard-interactive authentication for establishing SSH connection with the SSH server. Whereas those IOS XR routers that are configured as SSH servers supported public key-based user authentication as well. From Cisco IOS XR Software Release 7.10.1 and later, you can use public-key based user authentication for Cisco IOS XR routers configured as SSH clients as well. This feature thereby allows you to use password-less authentication for secure file transfer and copy operations using SFTP and SCP protocols.

Remote AAA servers such as RADIUS and TACACS+ servers do not support public-key based authentication. Hence this functionality is available only for users who are configured locally on the router and not for users who are configured remotely.

How Does it Work

Public key encryption algorithm works with two keys—a public key and a private key. These keys form a key pair that is specific to a user. They are cryptographically related. The public key is used to encrypt the data and the private key is used to decrypt the data. The data encrypted by the SSH server that holds the public key can then only be read by the entity who holds the corresponding private key.

This image shows the work flow of public key-based authentication of SSH clients.

Figure 1. Public Key-Based Authentication of SSH Clients: Work Flow

You can generate the key pair on the router that is configured as the SSH client. Once it is generated, copy the public key to the SSH server that the user wants to connect to. When the user tries to log in to the server, the SSH client sends a connection request to the SSH server. The SSH server allows access only to users who can confirm that they have the corresponding private key. For this. the SSH server uses the public key of the user to issue a challenge that can be rightly answered by the SSH client using the corresponding private key. The SSH client thus automatically authenticates the user who is logging in to the server using the unique copy of the private key. This process thereby establishes a secure SSH connection to the server in a way that does not require the user to enter the password each time.

Enable Public Key-Based Authentication of SSH Client

Guidelines

These guidelines apply to enabling public key-based SSH authentication on Cisco IOS XR routers that are configured as SSH clients.

  • Supports only RSA key.

  • Remote AAA servers such as RADIUS and TACACS+ servers do not support public key-based authentication. Hence this functionality is available only for users who are configured locally on the router and not for users who are configured remotely.

  • A user with root privileges has permission to create and delete keys for other users.

  • If authentication keys are not created, then the SSH client does not proceed with public key-based authentication.

  • If user adds the incorrect public key in the SSH server, then the user authentication fails.

Configuration Example

Establishing SSH connection using public key-based authentication on SSH client involves these high-level tasks:

  1. Generate RSA key pair on the router that is configured as the SSH client.

    Use the cyrpto key generate authentication-ssh rsa command to generate the RSA key pair:

    
    Router#crypto key generate authentication-ssh rsa 
    Wed Dec 21 10:02:57.684 UTC
    The name for the keys will be: cisco
      Choose the size of the key modulus in the range of 512 to 4096. Choosing a key modulus greater than 512 may take a few minutes.
    
    How many bits in the modulus [2048]: 
    Generating RSA keys ...
    Done w/ crypto generate keypair
    [OK]
    
    Router#
    
  2. View the details of the generated key.

    Use the show crypto key mypubkey authentication-ssh rsa command to view the details of the RSA key. The key value starts with ssh-rsa in this output.

    
    Router#show crypto key mypubkey authentication-ssh rsa 
    Wed Dec 21 10:24:34.226 UTC
    Key label: cisco
    Type     : RSA Authentication
    Size     : 2048
    Created  : 10:02:59 UTC Wed Dec 21 2022
    Data     : 
     30820122 300D0609 2A864886 F70D0101 01050003 82010F00 3082010A 02820101 
     00A292B0 E45ACBB9 47B9EDA8 47E4664E 58FC3EA5 CE0F6B7A 3C6B7A73 537E6CEB 
     .
     .
     .
     FF6BAF95 D9617CF6 65C058CC 7C6C22A9 9E48CC43 FDFF0EB7 ABADEB77 55A274DB 
     15020301 0001
     
    OpenSSH Format: 
    ssh-rsa AAAAB3NzaC1yc2EAAAADAQABAAABAQCikrDkWsu5R7ntqEfkZk5Y/.../2uvldlhfPZlwFjMfGwiqZ5IzEP9/w63q63rd1WidNsV
    
    Router#
    
  3. Copy the RSA public key from the SSH client to the SSH server.

    You can do this either by logging in to the remote SSH server with your established user credentials, or have a system administrator on the remote system add the key on the SSH server.

    If the SSH server is a Cisco IOS XR router, then you can use the crypto key import authentication rsa command on the router prompt of the server to import the key from the SSH client. You will then be prompted to enter the public key.

    If the SSH server is a Linux server, then you must add the public key to the ~/.ssh/authorized_keys file of the respective user account in that server. This file contains a list of all authorized public keys on that server.

  4. The user configured on the SSH client can now log in to the remote SSH server (209.165.200.225 in this example) without providing the user account password.

    
    Router#ssh user1@209.165.200.225

    This process establishes a successful SSH connection between the client and the server using public key-based authentication.

How to Delete the SSH Public Keys

Use the crypto key zeroize authentication-ssh rsa username command to delete the RSA keys.


Router#crypto key zeroize authentication-ssh rsa username user1

Public key-based Authentication to SSH Server on Routers

Table 6. Feature History Table

Feature Name

Release Information

Feature Description

Multiple Public Keys per User for Public Key-based Authentication

Release 7.11.1

We provide greater flexibility to access secure routers by allowing four public keys to be used for authentication. With the ability to associate multiple public keys with your user account on the router, we've also simplified the authentication process by eliminating the need to create unique users for each SSH client device.

The feature introduces these changes:

CLI:

YANG Data Models:

  • Cisco-IOS-XR-crypto-act

  • Cisco-IOS-XR-um-ssh-cfg

(See GitHub, YANG Data Models Navigator)

Public key-based authentication provides password-less authentication to the routers. In this method, the user authentication relies on a cryptographic key pair: a public key and a private key. The user generates a key pair in the client device using utilities such as ssh-keygen. The public key is imported and stored in the router(SSH server), while the private key is in the user device(SSH client). While attempting public key-based authentication from the client, the user presents a signature created using the private key to the router. The router verifies the authenticity of that signature using the public key associated with that user in its database. The authentication is successful when the signature matches the public key and user access is permitted. Otherwise, the authentication fails, and the router denies the user access. With public key-based authentication, the routers offer a more secure authentication method than traditional password-based authentication because it is less vulnerable to brute force attacks and password theft.

From Cisco IOS XR Software Release 7.11.1, the routers support up to four public keys per user for public key-based authentication to the routers. Previously, the users could have a single key pair. This constraint restricts an individual user in the router from having multiple systems to access the routers. Also, it necessitates creating a unique user in the router for each device to be an authorized SSH client to the router. However, the multiple public keys per user for public key-based authentication feature overcome these restrictions by allowing up to four public keys per user. As a result, the users can employ any corresponding private key to access the router.

Figure 2. Multiple Public Keys per User for Public Key-based Authentication

You can generate the key pair on each of the SSH clients. You must then copy the public keys to the router. When the user tries to log in to the router, the SSH client sends a connection request with a signature created using the private key. The router then checks the authenticity of the request by matching it against the public keys associated with that user in its database. Suppose one of the multiple public keys associated with that user matches the signature; the router authenticates such user, confirming that the user has the corresponding private key. This process thereby establishes a secure SSH connection to the router.

Guidelines and Restrictions for Public key-based authentication to Routers

  • You can add public keys by importing the public key file or directly adding the public keystring to the router.

  • The maximum number of public keys supported per user is four.

  • The router supports importing or adding only one public key at a time. Even though the router supports up to four keys per user, you can only import or add them to the router one after the other and not simultaneously.

  • To import the public key files to the router, use the crypto key import authentication rsa command.

  • The router supports importing public keys in the following formats:

    • RSA

    • Base 64

    • PEM PKCS1

    • PEM PKCS8

  • To delete the public key files in the router, use the crypto key zeroize authentication rsa command.

  • You can import the public keys using the crypto key import authentication rsa command in the Global Configuration mode and EXEC mode. However, use the same operation mode to import and delete the public keys. That is, if you import the public keys in the Global Configuration mode, delete such keys in Global Configuration mode only. Similarly, if you import the public keys in the EXEC mode, delete such keys in EXEC mode only.

  • You can use SSH configurations to add or delete a public key in the router.

  • The router supports only the RSA key format while using SSH configurations to add a public key for public key-based authentication to the router.

Configure Public key-based Authentication to Routers

This section details different methods of enabling flexible public key-based authentication and importing public keys to the router:

Configurations

Using public-key import:

  1. [Router] Create a user in the router:

    Router# config
    Router(config)# username testuser1
    Router(config)# commit
  2. [Client] Generate RSA key pairs on the SSH clients.

  3. [Router] Copy the public keys from the clients to the router.


    Note


    You can skip step 3 while using the tftp filepath in step 4. For more details, crypto key import authentication rsa command.


  4. [Router] Import public keys to the router:

    Router# configure
    Router(config)# crypto key import authentication rsa username testuser1 disk0:/id_rsa_key1.pub
    Router(config)# crypto key import authentication rsa username testuser1 second disk0:/id_rsa_key2.pub
    Router(config)# crypto key import authentication rsa username testuser1 third disk0:/id_rsa_key3.pub
    Router(config)# crypto key import authentication rsa username testuser1 fourth disk0:/id_rsa_key4.pub
    Router(config)# commit

    You can now access the router from any of the four SSH clients using the same user.

  5. [Client] Access the router in the client:

    [root@userclient test]# ssh testuser1@192.0.2.2

Using SSH configurations:

  1. [Router] Create a user in the router:

    Router# config
    Router(config)# ssh server username testuser2
    Router((config-user-key))# commit
  2. [Client] Generate RSA key pair on the SSH clients.

  3. [Router] Add public keys from the SSH clients for a user to the router:

    Router# configure
    Router(config)# ssh server username testuser2
    Router(config-user-key)# keystring ssh-rsa AAAAB3NzaC1yc2EAAAADAQABAAACAQDgX1C1LxQlvpRUI7pqbm6lOzgZ/D7eawdN6aBnxAC14cJXZ2zQzWXE4CqcG2EaPvIZoIot9WvuANShCWNuOkEG5JcbRLZORMryTxwJIy9js3RLyBBH+qi7NDwBMG9GkiEOn1FXsntgw3zo09KSE4EhtswhgXtSFx3bJmorN2jLBobrytB7pG8FcVFMpA1j5dx4Uvf7h0YVBqe3kLdMfevEkR8PL0IwlQRgHYmu0FClJteNyB2ewLm3G48R+wbjUPf8AJMTurtZ18H0LllZccmbK0jw9Fm3YJ+a1tDPBURfSCNoDIdMdfJ8jUPxWKF3qof3Fs3yH768qbie4y5ewSgek90PVo3cYQ8gw9PZbOgp4zqJr3y2r90eNtAeGakSx4xqB9LZ9XNJlJBhqgZWQxOP1mWL$
    Router(config-user-key)# keystring ssh-rsa second ABHJB8NzaC1yc2EAUJKIDAQABAAACAQDgX1C1LxQlvpRUI7pqbm6lOzgZ/D7eawdN6aBnxAC14cJXZ2zQzWXE4CqcG2EaPvIZoIot9WvuANShCWNuOkEG5JcbRLZORMryTxwJIy9js3RLyBBH+qi7NDwBMG9GkiEOn1FXsntgw3zo09KSE4EhtswhgXtSFx3bJmorN2jLBobrytB7pG8FcVFMpA1j5dx4Uvf7h0YVBqe3kLdMfevEkR8PL0IwlQRgHYmu0FClJteNyB2ewLm3G48R+wbjUPf8AJMTurtZ18H0LllZccmbK0jw9Fm3YJ+a1tDPBURfSCNoDIdMdfJ8jUPxWKF3qof3Fs3yH768NtAeGakSx4xqB9LZqbie4y5ewSgek90PVo3cYQ8gw9PZbOgp4zqJr3y2r90e9XNJlBhqgZWQxIL1mWL$
    Router(config-user-key)# keystring ssh-rsa third NKELY9NzaC1yc2EAAAADAQABAAACAQDgX1C1LxQlvpRUI7pqbm6lOzgZ/D7eawdN6aBnxAC14cJXZ2zQzWXE4CqcG2EaPvIZoIot9WvuANShCWNuOkEG5JcbRLZORMryTxwJIy9js3RLyBBH+qi7NDwBMG9GkiEOn1FXsntgw3zo09KSE4EhtswhgXtSFx3bJmorN2jLBobrytB7pG8FcVFMpA1j5dx4Uvf7h0YVBqe3kLdMfevEkR8PL0IwlQRgHYmu0FClJteNyB2ewLm3G48R+wbjUPf8AJMTurtZ18H0LllNJlBhqgZWQxCP1mW+a1tDPBURfSCNoDIdMdfJ8jUPxWKF3qof3Fs3yH768qbie4y5ewSgek90PVo3cYQ8gw9PZbOgp4zqJr3y2r90eNtAeGakSx4xqB9LZ9XJHQFVCJCBJCNSHCBL$
    Router(config-user-key)# keystring ssh-rsa fourth PUELI4NzaC1yc2EAAAADAQABAAACAQDgX1C1LxQlvpRUI7pqbm6lOzgZ/D7eawdN6aBnxAC14cJXZ2zQzWXE4CqcG2EaPvIZoIot9WvuANShCWNuOkEG5JcbRLZORMryTxwJIy9js3RLyBBH+qi7NDwBMG9GkiEOn1FXsntgw3zo09KSE4EhtswhgXtSFx3bJmorN2jLBobrytB7pG8FcVFMpA1j5dx4Uvf7h0YVBqe3kLdMfevEkR8PL0IwlQRgHYmu0FClJteNyB2ewLm3G48R+wbjUPf8AJMTurtZ18H0LllZccmbK0jw9Fm3YJ+a1tDPBURfSCNoDKF3qof3Fs3yH768qbie4y5ewSgek90PVo3cYQ8gw9PZbOgp4zqJr3y2r90eNtAeGakSx4xqB9LZ9XbTHSD78ahgsTHGBJU9qgZWQxBM1mWL$
    Router(config)# commit

    You can now access the router from any of the four SSH clients using the same user.

  4. [Client] Access the router in the client:

    [root@userclient test]# ssh testuser2@192.0.2.2

Verification

Public-key import:

Router# show crypto key authentication rsa testuser1 all
Wed Sep 20 16:28:09.114 IST
Key label: testuser1firstkey
Type     : RSA Signature
Size     : 768
Created  : 16:27:54 IST Wed Sep 20 2023
Data     : 
 307C300D 06092A86 4886F70D 01010105 00036B00 30680261 00BDD9A2 B8D61FA3 
 AED1B6EC FB975512 32BFE99E 65FDCC01 FA14956C 7B06C2A5 CEE9E637 56FE38F6 
 878ED2F4 CD1C1F28 3F535F23 9F5F8763 19BA0269 DA7B2507 0160A28B 7CD1A66D 
 75DF194B C217402E 7E74D466 4E39177B 81051774 25A71A0A 0F020301 0001
 
Key label: testuser1secondkey
Type     : RSA Encryption
Size     : 768
Created  : 16:27:54 IST Wed Sep 20 2023
Data     : 
 307C300D 06092A86 4886F70D 01010105 00036B00 30680261 00B87C2F 9B4972AC 
 47B40FB2 B5C10DBB 1205AD30 7E146698 2A6179AD 8F1B030D 5146C097 3A2FB3E2 
 19820DA5 2132E7C7 1B7281C4 8427DF76 60E39E3A 70126DAD 108B7805 34B45915 
 853956AA 301CCF4B 78F06D75 D7D90320 BE667F1D 1A479713 FD020301 0001
 
Key label: testuser1thirdkey
Type     : RSA General purpose
Size     : 768
Created  : 16:27:57 IST Wed Sep 20 2023
Data     : 
 307C300D 06092A86 4886F70D 01010105 00036B00 30680261 00E0DDF9 53C81AE1 
 35CE15E1 C7A9916F 4AED7887 65AC1E4E 48F420E4 2A56079E FD38D069 C97FC0F7 
 B6D8663D C7D6FC46 1CD27EA6 AC71D36C 40E35349 0A78DA64 465B7C8B B63E8627 
 BF074AF4 EC37AC0C 200AFAF3 C67E8E9B AE931964 8DF86CD9 E5020301 0001
 
Key label: testuser1fourthkey
Type     : RSA General purpose
Size     : 768
Created  : 16:27:57 IST Wed Sep 20 2023
Data     : 
 307C300D 06092A86 4886F70D 01010105 00036B00 30680261 00E0DDF9 53C81AE1 
 35CE15E1 C7A9916F 4AED7887 65AC1E4E 48F420E4 2A56079E FD38D069 C97FC0F7 
 B6D8663D C7D6FC46 1CD27EA6 AC71D36C 40E35349 0A78DA64 465B7C8B B63E8627 
 BF074AF4 EC37AC0C 200AFAF3 C67E8E9B AE931964 8DF86CD9 E5020301 0001

SSH configurations:

Router# show ssh 
SSH version : Cisco-2.0 

id       chan pty     location        state           userid           host        ver    authentication     connection type
-------------------------------------------------------------------------------------------------------------------------------
Incoming sessions
26       1    vty1    0/RP0/CPU0      SESSION_OPEN    testuser1     192.0.2.1       v2     rsa-pubkey     Command-Line-Interface 
27       1    vty2    0/RP0/CPU0      SESSION_OPEN    testuser1     192.0.2.2       v2     rsa-pubkey     Command-Line-Interface 
28       1    vty3    0/RP0/CPU0      SESSION_OPEN    testuser1     192.0.2.3       v2     rsa-pubkey     Command-Line-Interface 
29       1    vty4    0/RP0/CPU0      SESSION_OPEN    testuser1     192.0.2.4       v2     rsa-pubkey     Command-Line-Interface 

Outgoing sessions
1                     0/RP0/CPU0      SESSION_OPEN    testuser3  192.0.2.6          v2      password      Command-Line-Interface

Delete Public Keys in the Routers

This section details different methods to delete public keys in the router:

Router# configure
Router(config)# crypto key zeroize authentication rsa all
Thu Sep 21 21:45:23.260 IST
Do you really want to remove all these keys ?? [yes/no]: yes
Router# commit
/* Deleting public keys for the user logged in to the router */

Router# configure
Router(config)# crypto key zeroize authentication rsa username testuser all
Thu Sep 21 21:45:23.260 IST
Do you really want to remove all these keys ?? [yes/no]: yes
Router# commit
/* Deleting public keys for any user in the router */

Router# configure
Router(config)#  no ssh server username testuser
Router# commit 
/* Deleting all SSH configurations for a user in the router */

Router# configure
Router(config)# no ssh server username testuser keystring third
Router# commit
/* Deleting a specific public-key for a user using SSH configurations in the router */

Selective Authentication Methods for SSH Server

Table 7. Feature History Table

Feature Name

Release Information

Feature Description

Selective Authentication Methods for SSH Server

Release 7.8.1

You now have the flexibility to choose the preferred SSH server authentication methods on the router. These methods include password authentication, keyboard-interactive authentication, and public-key authentication. This feature allows you to selectively disable these authentication methods. By allowing the SSH clients to connect to the server only through these permitted authentication methods, this functionality brings in additional security for router access through SSH. Before this release, by default, the SSH server allowed all these authentication methods for establishing SSH connections.

The feature introduces these changes:

  • CLI: New disable auth-methods command

  • YANG Data Model: New XPaths for Cisco-IOS-XR-crypto-ssh-cfg.yang Cisco native model (see GitHub)

By default, the SSH server on the Cisco IOS XR routers allowed various authentication methods such as password authentication, keyboard-interactive authentication, and public-key authentication (including certificate-based authentication) for the SSH connections on the router. The SSH clients could use any of these authentication methods while attempting a connection to the SSH server on the router. From Cisco IOS XR Software Release 7.8.1, you can selectively disable these authentication methods, and allow connection attempts from the SSH client only through the remaining authentication methods. If the SSH client tries to establish a connection to the server using nonpermitted authentication methods (the ones that are disabled), then the login attempt fails.

Disable SSH Server Authentication Methods

Use the disable auth-methods command in ssh server configuration mode to disable the specific authentication method for the SSH server.

Public-key authentication includes certificate-based authentication as well. Hence, disabling public-key authentication automatically disables the certificate-based authentication.

Configuration Example

This example shows how to disable the keyboard-interactive authentication method for the SSH server on the router using CLI. Similarly, you can disable other authentication methods.


Router#configure
Router(config)# ssh server disable auth-methods keyboard-interactive
Router(config-ssh)# commit

Running Configuration


!
ssh server 
 disable auth-methods keyboard-interactive
!

Verification

Use the show ssh server command to see the list of authentication methods that the SSH server on the router supports. In this example, the keyboard-interactive method is disabled and the SSH server allows all other authentication methods.


Router#show ssh server 

Wed Feb 23 10:38:37.716 UTC
Authentication Method Supported 
------------------------------------
                 PublicKey := Yes
                  Password := Yes
      Keyboard-Interactive := No
         Certificate Based := Yes

SSH Port Forwarding

Table 8. Feature History Table

Feature Name

Release Information

Feature Description

SSH Port Forwarding

Release 7.3.2

With this feature enabled, the SSH client on a local host forwards the traffic coming on a given port to the specified host and port on a remote server, through an encrypted SSH channel. Legacy applications that do not otherwise support data encryption can leverage this functionality to ensure network security and confidentiality to the traffic that is sent to remote application servers.

This feature introduces the ssh server port-forwarding local command.

SSH port forwarding is a method of forwarding the otherwise insecure TCP/IP connections from the SSH client to server through a secure SSH channel. Since the traffic is directed to flow through an encrypted SSH connection, it is tough to snoop or intercept this traffic while in transit. This SSH tunneling provides network security and confidentiality to the data traffic, and hence legacy applications that do not otherwise support encryption can mainly benefit out of this feature. You can also use this feature to implement VPN and to access intranet services across firewalls.

Figure 3. SSH Port Forwarding

Consider an application on the SSH client residing on a local host, trying to connect to an application server residing on a remote host. With tunneling enabled, the application on the SSH client connects to a port on the local host that the SSH client listens to. The SSH client then forwards the data traffic of the application to the SSH server over an encrypted tunnel. The SSH server then connects to the actual application server that is either residing on the same router or on the same data center as the SSH server. The entire communication of the application is thus secured, without having to modify the application or the work flow of the end user.

The SSH port forwarding feature is disabled, by default. You can enable the feature by using the ssh server port-forwarding local command in the Global Configuration mode.

How Does SSH Port Forwarding Work?

Figure 4. Sample Topology for SSH Port Forwarding

Consider a scenario where port forwarding is enabled on the SSH server running on Router-1, in this topology. An SSH client running on a local host tries to create a secure tunnel to the SSH server, for a local application to eventually reach the remote application server running on Router-2.

The client tries to establish an SSH connection to Router-1 using the following command:


ssh -L local-port:remote-server-hostname:remote-port username@sshserver-hostname

where,

local-port is the local port number of the host where the SSH client and the application reside . Port 5678, in this example.

remote-server-hostname:remote-port is the TCP/IP host name and port number of the remote application server where the recipient (SSH server) must connect the channel from the SSH client to. 192.168.0.2 and 23, in this example.

sshserver-hostname is the domain name or IP address of the SSH server which is the recipient of the SSH client request. 192.168.0.1, in this example.

For example,


ssh -L 5678:192.168.0.2:23 admin@192.168.0.1

When the SSH server receives a TCP/IP packet from the SSH client, it accepts the packet and opens a socket to the remote server and port specified in that packet. Once the connection between SSH client and server is established, the SSH server connects that communication channel to the newly created socket. From then onwards, SSH server forwards all the incoming data from the client on that channel to that socket. This type of connection is known as port-forwarded local connection. When the client closes the connection, the SSH server closes the socket and the forwarded channel.

How to Enable SSH Port Forwarding

Guidelines for Enabling SSH Port Forwarding Feature

  • The Cisco IOS XR software supports SSH port forwarding only on SSH server; not on SSH client. Hence, to utilize this feature, the SSH client running at the end host must already have the support for SSH port forwarding or tunneling.

  • The application server must be reachable on the same VRF where the current SSH connection between the server and the client is established.

  • Port numbers need not match for SSH port forwarding to work. You can map any port on the SSH server to any port on the client.

  • If the SSH client tries to do port forwarding without the feature being enabled on the SSH server, the port forwarding fails, and displays an error message on the console. Similarly the port-forwarded channel closes in case there is any connectivity issue or if the server receives an SSH packet from the client in an improper format.

Configuration Example


Router#configure
Router(config)#ssh server port-forwarding local
Router(config)#commit

Running Configuration


Router#show running-configuration

ssh server port-forwarding local
!

Verification

Use the show ssh command to see the details of the SSH sessions. The connection type field shows as port-forwarded-local for the port-forwarded session.


Router#show ssh

Wed Oct 14 11:22:05.575 UTC
SSH version : Cisco-2.0 

id chan pty  location   state        userid host          ver authentication connection type
--------------------------------------------------------------------------------------------
Incoming sessions
15 1    XXX  0/RP0/CPU0 SESSION_OPEN  admin  192.168.122.1 v2  password       port-forwarded-local

Outgoing sessions

Router#

Use the show ssh server command to see the details of the SSH server. The Port Forwarding column shows as local for the port-forwarded session. Whereas, for a regular SSH session, the field displays as disabled .


Router#show ssh server
Tue Sep  7 17:43:22.483 IST
---------------------
SSH Server Parameters
---------------------

Current supported versions := v2
                  SSH port := 22
                  SSH vrfs := vrfname:=default(v4-acl:=, v6-acl:=)  
              Netconf Port := 830
              Netconf Vrfs := vrfname:=default(v4-acl:=, v6-acl:=)  
 
 Algorithms 
---------------
        Hostkey Algorithms := x509v3-ssh-rsa,ecdsa-sha2-nistp521,ecdsa-sha2-nistp384,ecdsa-sha2-nistp256,rsa-sha2-512,rsa-sha2-256,ssh-rsa,ssh-dsa,ssh-ed25519
   Key-Exchange Algorithms := ecdh-sha2-nistp521,ecdh-sha2-nistp384,ecdh-sha2-nistp256,diffie-hellman-group14-sha1
     Encryption Algorithms := aes128-ctr,aes192-ctr,aes256-ctr,aes128-gcm@openssh.com,aes256-gcm@openssh.com
            Mac Algorithms := hmac-sha2-512,hmac-sha2-256,hmac-sha1

 Authentication Method Supported 
------------------------------------
                 PublicKey := Yes
                  Password := Yes
      Keyboard-Interactive := Yes
         Certificate Based := Yes

 Others  
------------
                     DSCP  := 0
                Ratelimit  := 600
             Sessionlimit  := 110
                Rekeytime  := 30
       Server rekeyvolume  := 1024
  TCP window scale factor  := 1
            Backup Server  := Disabled
          Host Trustpoint  := 
          User Trustpoint  := tes,test,x509user
          Port Forwarding  := local
Max Authentication Limit  := 16
     Certificate username  := Common name(CN) User principle name(UPN)
Router#

Syslogs for SSH Port Forwarding Feature

The router console displays the following syslogs at various SSH session establishment events.

  • When SSH port forwarding session is successfully established:

    
    RP/0/RP0/CPU0:Aug 24 13:10:15.933 IST: SSHD_[66632]: %SECURITY-SSHD-6-PORT_FWD_INFO_GENERAL : Port Forwarding, Target:=10.105.236.155, Port:=22, Originator:=127.0.0.1,Port:=41590, Vrf:=0x60000000, Connection forwarded
  • If SSH client tries to establish a port forwarding session without SSH port forwarding feature being enabled on the SSH server:

    
    RP/0/RP0/CPU0:Aug 24 13:20:31.572 IST: SSHD_[65883]: %SECURITY-SSHD-3-PORT_FWD_ERR_GENERAL : Port Forwarding, Port forwarding is not enabled

Associated Command

  • ssh server port-forwarding local

Non-Default SSH Port

Table 9. Feature History Table

Feature Name

Release Information

Feature Description

Non-Default SSH Port

Release 7.7.1

We have enhanced the system security to minimize the automated attacks that may target the default Secure Socket Shell (SSH) port on your router. You can now specify a non-default port number for the SSH server on your router. The SSH, Secure Copy Protocol (SCP), and Secure File Transfer Protocol (SFTP) client services can then access your router only through this non-default port. The new port option also enables the SSH, SCP, and SFTP clients on your router to connect to SSH servers on the network that use a wide range of non-default port numbers. In earlier releases, these SSH, SCP, and SFTP connections were established through the default SSH port, 22. The non-default SSH port is supported only on SSH version 2.

The feature introduces the ssh server port command.

The feature modifies these commands to include the port option:

The SSH, SCP, and SFTP services on the Cisco IOS XR routers used the default SSH port number, 22, to establish connections between the server and the client. From Cisco IOS XR Software Release 7.7.1 and later, you can specify a non-default SSH port number within a specific range for these services on Cisco IOS XR 64-bit routers. This non-default port option is available for routers that are functioning as servers, or as clients for the SSH, SCP and SFTP services. This feature helps to restrict insecure client services from accessing the router through the default SSH server port. Similarly, for Cisco IOS XR routers that are running as SSH clients, the non-default port number option enables them to connect to other SSH servers on the network that listens on a wide range of non-default SSH port numbers.

The non-default SSH port number ranges from 5520 to 5529 for the SSH server, and from 1025 to 65535 for the SSH client.

The SSH server on the router does not listen on both the default and non-default ports at the same time. If you have configured a non-default SSH server port, then the server listens only on that non-default port for the client connections. The SSH clients can then establish sessions through this non-default SSH port. The SCP and SFTP services also use the same SSH port for their connections, and hence they establish the client sessions through the newly configured port.

If a session was already established through the default port, then that session remains intact even if you change the ssh server port to a non-default port. The further client sessions are attempted through the newly configured non-default port.

Restrictions for Non-Default SSH Port

These restrictions apply to the non-default SSH port option:

  • Available only on Cisco IOS XR 64-bit routers; not on 32-bit routers

  • Available only on Cisco IOS XR routers that support Cisco IOS XR SSH, the classic version of SSH; not on Cisco IOS XR routers that support CiscoSSH, the OpenSSH-based implementation of SSH

  • Available only on version 2 of SSH (SSHv2); not on version 1 (SSHv1)

How to Configure Non-Default SSH Port


Note


To establish SSH connections on the non-default port, ensure that the non-default port that you select for the SSH server is not used by any other application on the router.


Configuration Example

SSH Server:

To configure the non-default SSH port for the SSH server on the router, use the ssh server port command in the Global Configuration mode.


Router#configure
Router(config)#ssh server port 5520
Router(config)#commit

SSH Client:

Similarly, the port option is available for the SSH client also, to initiate a connection to another SSH server that listens on a non-default SSH port number.

This example shows how to connect to an SSH server, with IP address 198.51.100.1, that is listening on non-default SSH port 5525.


Router#ssh 198.51.100.1 port 5525 username user1

Running Configuration

This is a sample running configuration of the SSH server.


Router#show running-configuration
!
ssh server v2
ssh server port 5520
ssh server vrf default
!

Verification

Use the following show commands to verify the SSH server configuration and LPTS entries for SSH connections.

In this example, the SSH port field displays the port number, '5520', that you have configured for the SSH server.


Router#show ssh server
Fri May 20 07:22:57.579 UTC
---------------------
SSH Server Parameters
---------------------
 
Current supported versions := v2
                  SSH port := 5520
                  SSH vrfs := vrfname:=default(v4-acl:=, v6-acl:=) 
              Netconf Port := 830
              Netconf Vrfs :=
 
 Algorithms
---------------
        Hostkey Algorithms := x509v3-ssh-rsa,ssh-rsa-cert-v01@openssh.com,ecdsa-sha2-nistp521,ecdsa-sha2-nistp384,ecdsa-sha2-nistp256,rsa-sha2-512,rsa-sha2-256,ssh-rsa,ssh-dsa,ssh-ed25519
   Key-Exchange Algorithms := ecdh-sha2-nistp521,ecdh-sha2-nistp384,ecdh-sha2-nistp256,diffie-hellman-group14-sha1,curve25519-sha256,diffie-hellman-group14-sha256,diffie-hellman-group16-sha512,curve25519-sha256@libssh.org
     Encryption Algorithms := aes128-ctr,aes192-ctr,aes256-ctr,aes128-gcm@openssh.com,aes256-gcm@openssh.com,chacha20-poly1305@openssh.com
            Mac Algorithms := hmac-sha2-512,hmac-sha2-256,hmac-sha1
 
Authentication Method Supported
------------------------------------
                 PublicKey := Yes
                  Password := Yes
      Keyboard-Interactive := Yes
         Certificate Based := Yes
         
 Others 
------------
                     DSCP  := 16
                Ratelimit  := 60
             Sessionlimit  := 64
                Rekeytime  := 60
       Server rekeyvolume  := 1024
  TCP window scale factor  := 1
            Backup Server  := Disabled
          Host Trustpoint  :=
          User Trustpoint  :=
          Port Forwarding  := Disabled
Max Authentication Limit  := 20
     Certificate username  := Common name(CN)
  OpenSSH Host Trustpoint  :=
  OpenSSH User Trustpoint  :=


In the following example, the Port field in the Local-Address,Port column for the TCP entry for SSH displays the port number as '5520'. This is the port on which the SSH server listens for client connections.


Router#show lpts bindings brief
Fri May 20 07:23:21.416 UTC
 
@ - Indirect binding; Sc - Scope
 
Location   Clnt Sc L3   L4     VRF-ID    Interface    Local-Address,Port Remote-Address,Port
---------- ---- -- ---- ------ --------- ------------ --------------------------------------
0/RP0/CPU0 IPV4 LO IPV4 ICMP   *         any          any,ECHO           any
0/RP0/CPU0 IPV4 LO IPV4 ICMP   *         any          any,TSTAMP         any
0/RP0/CPU0 IPV4 LO IPV4 ICMP   *         any          any,MASKREQ        any
0/RP0/CPU0 IPV6 LO IPV6 ICMP6  *         any          any,ECHOREQ        any
0/RP0/CPU0 IPV6 LO IPV6 ICMP6  *         any          any,NDRTRSLCT      any
0/RP0/CPU0 IPV6 LO IPV6 ICMP6  *         any          any,NDRTRADV       any
0/RP0/CPU0 IPV6 LO IPV6 ICMP6  *         any          any,NDNBRSLCT      any
0/RP0/CPU0 IPV6 LO IPV6 ICMP6  *         any          any,NDNBRADV       any
0/RP0/CPU0 IPV6 LO IPV6 ICMP6  *         any          any,NDREDIRECT     any
0/RP0/CPU0 BFD  LO IPV4 UDP    *         any          any                any
0/0/CPU0   IPV4 LO IPV4 ICMP   *         any          any,ECHO           any
0/0/CPU0   IPV4 LO IPV4 ICMP   *         any          any,TSTAMP         any
0/0/CPU0   IPV4 LO IPV4 ICMP   *         any          any,MASKREQ        any
0/0/CPU0   IPV6 LO IPV6 ICMP6  *         any          any,ECHOREQ        any
0/0/CPU0   IPV6 LO IPV6 ICMP6  *         any          any,NDRTRSLCT      any
0/0/CPU0   IPV6 LO IPV6 ICMP6  *         any          any,NDRTRADV       any
0/0/CPU0   IPV6 LO IPV6 ICMP6  *         any          any,NDNBRSLCT      any
0/0/CPU0   IPV6 LO IPV6 ICMP6  *         any          any,NDNBRADV       any
0/0/CPU0   IPV6 LO IPV6 ICMP6  *         any          any,NDREDIRECT     any
0/0/CPU0   BFD  LR IPV4 UDP    *         any          any 128.64.0.0/16
0/RP0/CPU0 TCP  LR IPV6 TCP    default   any          any,5520           any
0/RP0/CPU0 TCP  LR IPV4 TCP    default   any          any,5520           any
0/RP0/CPU0 UDP  LR IPV6 UDP    default   any          any,33433          any
0/RP0/CPU0 UDP  LR IPV4 UDP    default   any          any,33433          any
0/RP0/CPU0 RAW  LR IPV4 IGMP   default   any          any                any
0/RP0/CPU0 RAW  LR IPV4 L2TPV3 default   any          any                any
0/RP0/CPU0 RAW  LR IPV6 ICMP6  default   any          any,MLDLQUERY      any
0/RP0/CPU0 RAW  LR IPV6 ICMP6  default   any          any,LSTNRREPORT    any
0/RP0/CPU0 RAW  LR IPV6 ICMP6  default   any          any,MLDLSTNRDN     any
0/RP0/CPU0 RAW  LR IPV6 ICMP6  default   any          any,LSTNRREPORT    any
 
Router#

If the non-default port was not configured, then the SSH server listens on the default SSH port 22, and the above Port field displays '22'.

If a session was already established through the default port, and if you change the ssh server port to a non-default port, then the output still displays an entry for that session on the default port, 22. Another entry shows that the SSH server is listening on the newly configured non-default port. New connections establish through the non-default port, 5520, in this example.


Location   Clnt Sc L3   L4  VRF-ID    Interface Local-Address,Port Remote-Address,Port
---------- ---- -- ---- --- --------- --------- -----------------  ------------------
.
.
.
0/RP0/CPU0 TCP  LR IPV4 TCP default   any       192.0.2.1,5520    198.51.100.1,37764
0/RP0/CPU0 TCP  LR IPV4 TCP default   any       any,5520 any
0/RP0/CPU0 TCP  LR IPV6 TCP default   any       any,5520 any
0/RP0/CPU0 TCP  LR IPV4 TCP default   any       192.0.2.1,22      198.51.100.1,45722
.
.
.

Additional References

The following sections provide references related to implementing secure shell.

Related Documents

Related Topic

Document Title

AAA commands: complete command syntax, command modes, command history, defaults, usage guidelines, and examples

Authentication, Authorization, and Accounting Commands on the Cisco ASR 9000 Series Router Software module in System Security Command Reference for Cisco ASR 9000 Series Routers.

AAA configuration tasks

Configuring AAA Services on the Cisco ASR 9000 Series RouterSoftware module in System Security Configuration Guide for Cisco ASR 9000 Series Routers.

Host services and applications commands: complete command syntax, command modes, command history, defaults, usage guidelines, and examples

Host Services and Applications Commands on the Cisco ASR 9000 Series Router module in IP Addresses and Services Command Reference for Cisco ASR 9000 Series Routers.

IPSec commands: complete command syntax, command modes, command history, defaults, usage guidelines, and examples

Note

 
IPSec is supported only for Open Shortest Path First version 3 (OSPFv3).

IPSec Network Security Commands on the Cisco ASR 9000 Series RouterSoftware module in System Security Command Reference for Cisco ASR 9000 Series Routers

SSH commands: complete command syntax, command modes, command history, defaults, usage guidelines, and examples

Secure Shell Commands on the Cisco ASR 9000 Series Router Software module in System Security Command Reference for Cisco ASR 9000 Series Routers

Standards

Standards

Title

Draft-ietf-secsh-userauth-17.txt

SSH Authentication Protocol, July 2003

Draft-ietf-secsh-connect-17.txt

SSH Connection Protocol, July 2003

Draft-ietf-secsh-architecture-14.txt

SSH Protocol Architecture, July 2003

Draft-ietf-secsh-transport-16.txt

SSH Transport Layer Protocol, July 2003

MIBs

MIBs

MIBs Link

To locate and download MIBs using Cisco IOS XR software, use the Cisco MIB Locator found at the following URL and choose a platform under the Cisco Access Products menu: http://cisco.com/public/sw-center/netmgmt/cmtk/mibs.shtml

RFCs

RFCs

Title

RFC 6020

Netconf/ Yang

Technical Assistance

Description

Link

The Cisco Technical Support website contains thousands of pages of searchable technical content, including links to products, technologies, solutions, technical tips, and tools. Registered Cisco.com users can log in from this page to access even more content.

http://www.cisco.com/techsupport