Upgrade from Oracle 18c to 19c

This section provides steps for upgrading Oracle DB from 18c to 19c.

Minimum Hardware Requirements

Ensure that your FND system meets the following physical memory requirements in the below table.

The recommendations in the Minimum Hardware Requirements table below are specified in the Server Configuration Checklist for Oracle Database Installation and Storage Checklist for Oracle Database Installation. Additional RAM and swap space may be required to tune and/or improve the RDBMS performance as provided in Additional Requirements to Support Oracle Install table.

Table 1. Minimum Hardware Requirements to Upgrade from 18c to 19c
RAM Swap Space Allocation Relative to RAM

Between 1GB (minimum) and 2GB (recommended)

1.5 times the size of RAM

Between 2GB and 16GB

Equal to the size of RAM

Greater than 16GB

16GB

Table 2. Additional Requirements to Support Oracle Install
Item Requirement

Disk space allocated to the /tmp directory

At least 1 GB of space in the /tmp directory.

Local disk space for Database software files

7.2 GB

Upgrade Steps

After you have successfully installed the Oracle 19c database, you can now upgrade your Oracle 18c software to Oracle 19c software by following the information noted under each step (for example, 1, 2 and 3, etc.) and sub-step (a, b, c, etc.) summarized below:

Before you begin

Install Oracle DB 19c

Procedure


Step 1

Go to the following directory:

/home/oracle/app/oracle/product/19.0.0.0/dbhome_1/bin

Step 2

Before running the upgrade process, run the following queries on the 18c database:

/home/oracle/app/oracle/product/18.1.0/dbhome_1/jdk/bin/java-jar

/home/oracle/app/oracle/product/19.0.0.0/dbhome_1/rdbms/admin/preupgrade.jar

SQL>@/home/oracle/app/oracle/cfgtoollogs/CGMS/preupgrade/preupgrade_fixups.sql

SQL>@$ORACLE_HOME/rdbms/admin/utlrp.sql

  • Remove Spatial

    connect / as sysdba

    alter session set current_schema=‘‘MDSYS”;

    @?/md/admin/deinssdo.sql

  • Remove Oracle Multimedia

    connect / as sysdba

    @?/ord/im/admin/imremov.sql

    Enter “Y” when prompted

  • Remove the parameters:

    NLS_SORT=‘BINARY’_CI’

    NLS_COMP=‘LINGUISTIC’

    by entering the following commands

    alter system reset NLS_SORT;

    alter system reset NLS_COMP;

  • connect / as sysdba

    @$ORACLE_HOME/rdbms/admin/utlrp.sql

  • SET SERVEROUTPUT ON;

    EXECUTE DBMS_PREUP.INVALID_OBJECTS;

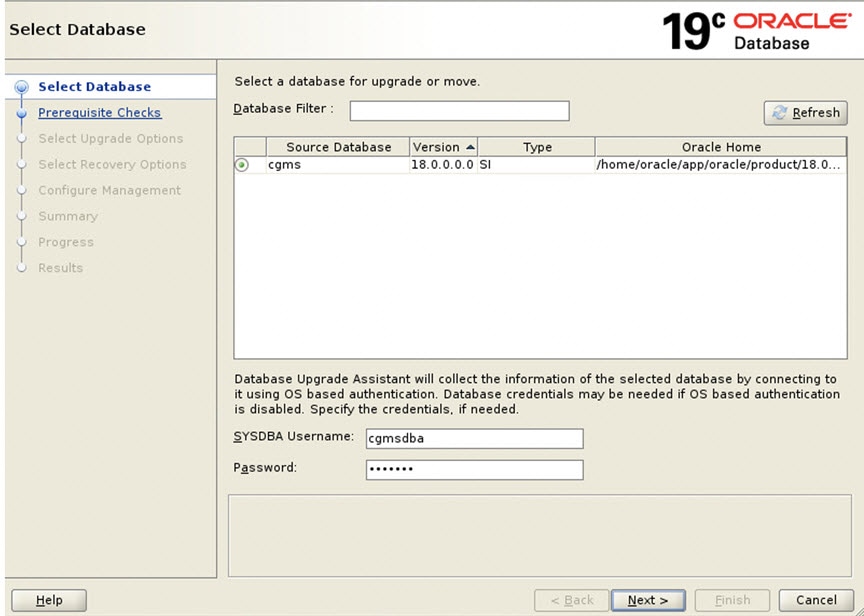
Once done, start the upgrade process by entering: ./dbua. Follow the screen instructions in the Database Upgrade Assistant.

Select the database and click Next >. The Database Upgrade Assistant ensures the database meets the necessary requirements by performing a prerequisite check.

Step 3

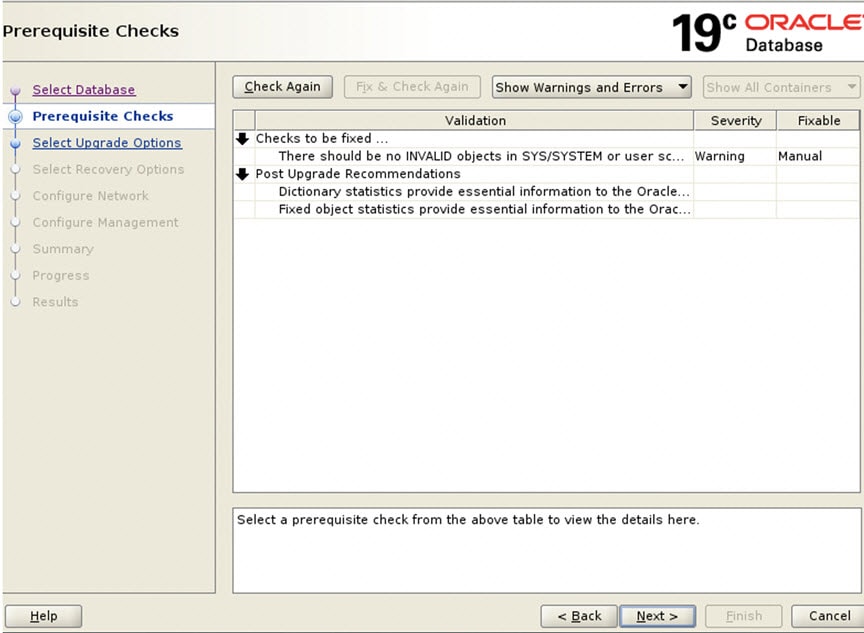
Database Upgrade Assistant : Prerequisite Checks

Click Next >. The upgrade begins. If there are any issues with the upgrade, a screen displays the issues that need to be resolved.

Step 4

Database Upgrade Assistant : Displays Issues to Fix Before and After Upgrade

After resolving any outstanding issues noted under Checks to be fixed, click Next >.

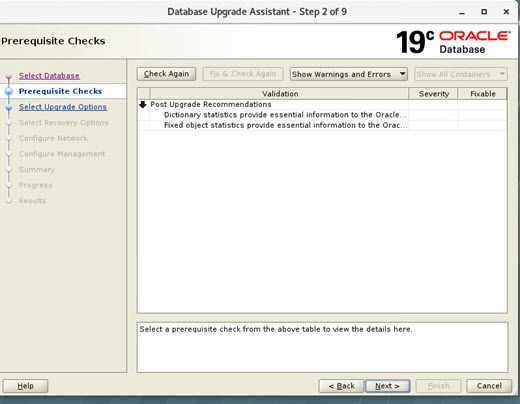
A page displays Recommendations for items that you should address after the upgrade completes (Post Upgrade).

Step 5

Displays Issues to Fix After Upgrade

Click Next > to go to the next screen.

Step 6

Select Upgrade Options. Uncheck the Recompile Invalid Object During Post Upgrade option.

Ensure that the Enable Parallel Upgrade and Unable Timezone Data options remain checked. Click Next >.

Step 7

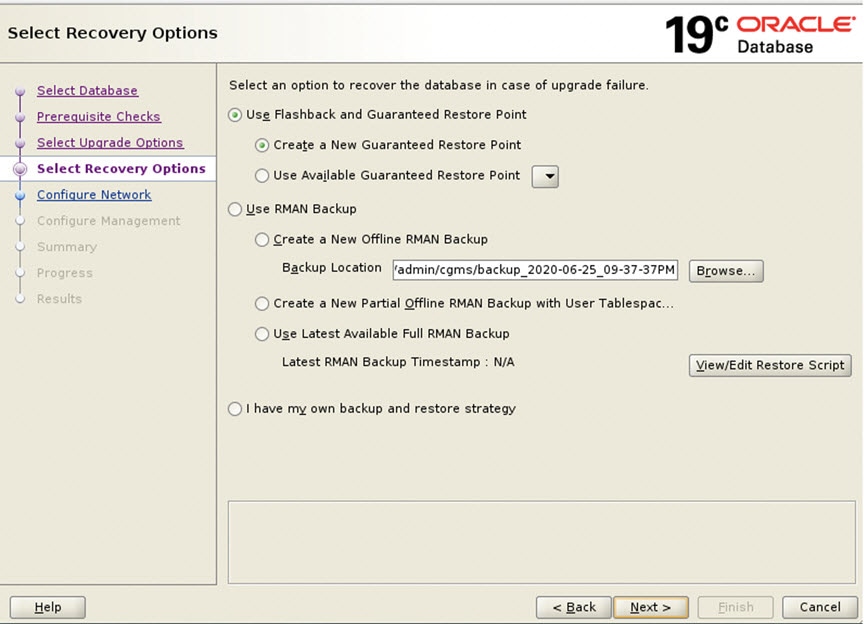
Select Recovery Options. Select Use Flashback and Guaranteed Restore Point and Create a New Guaranteed Restore Point. Click Next >.

Step 8

Configure Network. In the Listener Selection window, select the check box for ‘CGMSTNS’ (if not already checked). Click Next >.

Step 9

Configure Management. Ensure that the check box next to Configure Enterprise Manager (EM) database express option is unchecked. Click Next >.

Step 10

Database Upgrade Summary Page

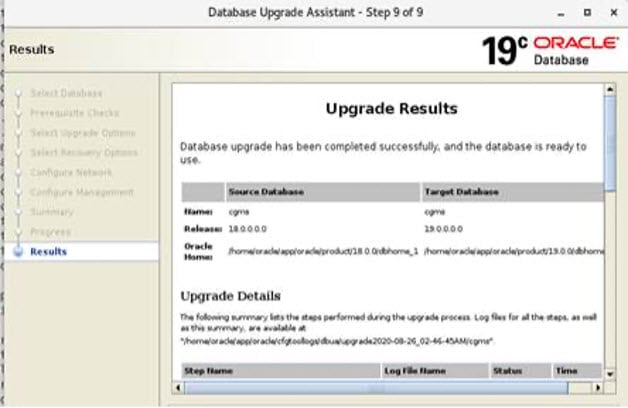
At the Database Upgrade Summary page, click Finish. The Database Upgrade Assistant page appears noting that the Oracle 18c to Oracle 19c upgrade was a success.

The database upgrade results are displayed.


Post Upgrade Steps

Procedure


Step 1

Once the DBUA process is successfully executed, update the /home/oracle/.bashrc file with the Oracle 19.0.0 path by removing the old 18c path.

vim /home/oracle/.bashrc

#Oracle Settings updated with Oracle 19.0.0 path
export ORACLE_BASE=/home/oracle/app/oracle
export ORACLE_HOME=/home/oracle/app/oracle/product/19.0.0/dbhome_1
export PATH=$PATH:/home/oracle/app/oracle/product/19.0.0/dbhome_1/bin
export LD_LIBRARY_PATH=/home/oracle/app/oracle/product/19.0.0/dbhome_1/lib:
export ORACLE_SID=cgms

Step 2

Restart the Database.

su - oracle

cd /opt/cgms-oracle/scripts

./stopOracle.sh

./startOracle.sh

Step 3

Update Cron job points to Oracle 19.0.0 to auto-start the Oracle for VM reboot.

./deinstallOracleJob.sh

./installOracleJob.sh

Step 4

Start FND service by entering:

service cgms start

Step 5

Check whether the listener is pointing to 19.0.0.0 database instead of 18c by entering:

ps -ef | grep oracle
00:00:02 /home/oracle/app/oracle/product/19.0.0.0/dbhome_1/bin/tnslsnr CGMSTNS -inherit

Step 6

Once FND service is started, log into the FND UI and verify the data. If there is no issue, the Oracle 18c to 19c upgrade process is completed.