Cisco Secure Equipment Access Integration with Cisco Catalyst SD-WAN

Cisco Secure Equipment Access Integration with Cisco Catalyst SD-WAN

Table 1. Feature History

Feature Name

Release Information

Feature Description

Cisco Secure Equipment Access Integration

Cisco IOS XE Catalyst SD-WAN Release 17.16.1a

Cisco Catalyst SD-WAN Manager Release 20.16.1

Cisco Secure Equipment Access (SEA) is a solution that provides remote access to network-connected assets. Assets can include anything reachable by IP address, such as servers, industrial internet of things (IIoT) devices, and so on.

Integration with Cisco Catalyst SD-WAN enables you to use Cisco SD-WAN Manager to deploy the Cisco SEA solution within a Cisco Catalyst SD-WAN network.

Information About Cisco Secure Equipment Access Integration

Cisco Secure Equipment Access (SEA) is a solution that provides remote access to network-connected assets. Assets can include anything reachable by IP address, such as servers, industrial internet of things (IIoT) devices, and so on. Integration with Cisco Catalyst SD-WAN enables you to use Cisco SD-WAN Manager to

  • install the SEA agent on devices, such as routers, in the Cisco Catalyst SD-WAN overlay network

  • configure connectivity between the devices in the overlay network and the Cisco Secure Equipment Access cloud portal, and

  • configure how remote assets connect to the devices.

After you install the SEA agent on devices and configure the connectivity described here, other remote access tasks operate as usual for Cisco SEA. See Secure Equipment Access Overview on the Cisco DevNet site.

Benefits of Cisco Secure Equipment Access Integration

Remote access is important for configuring, managing, and troubleshooting operational technology (OT) assets without time-consuming and costly site visits. Cisco Secure Equipment (SEA) combines all the benefits of a Zero-Trust Network Access (ZTNA) solution with a network architecture that makes it simple to deploy at scale in operational environments. There is no dedicated hardware to install and manage, or complex firewall rules to configure and maintain. It features comprehensive security capabilities, with advanced cybersecurity controls and easy-to-build policies based on identities and contexts.

Cisco SEA provides numerous benefits:

  • Operational efficiency

    Enables operations teams easy remote access to OT assets, even those behind NAT boundaries.

  • Simple installation and scalability

    Operates through existing routers and switches, so there is no need for dedicated appliances or complex firewall setups.

  • Strong security controls

    Authenticates users with MFA and SSO. Cisco SEA verifies each user's security posture, providing access only to relevant assets.

  • Least-privilege access

    Allows select users to access only specific devices, using only certain protocols, and only at defined times.

  • Audit trail

    Records sessions and builds audit trails for investigation and compliance.

Cisco Secure Equipment Access Application

Installing the SEA Agent

A Cisco IOx application called the Cisco Secure Equipment Access (SEA) agent provides Cisco SEA functionality to a device (a router in the network). When you enable Cisco SEA on a device through Cisco SD-WAN Manager, the device downloads and installs the Cisco SEA application.

Cisco SEA Cloud Portal

After a successful installation of the Cisco SEA agent, the device communicates with the Cisco SEA cloud portal. It appears in the device list in the Cisco SEA cloud portal.

Onboarding Process to the Cisco Secure Equipment Solution

Overview of the Onboarding Process

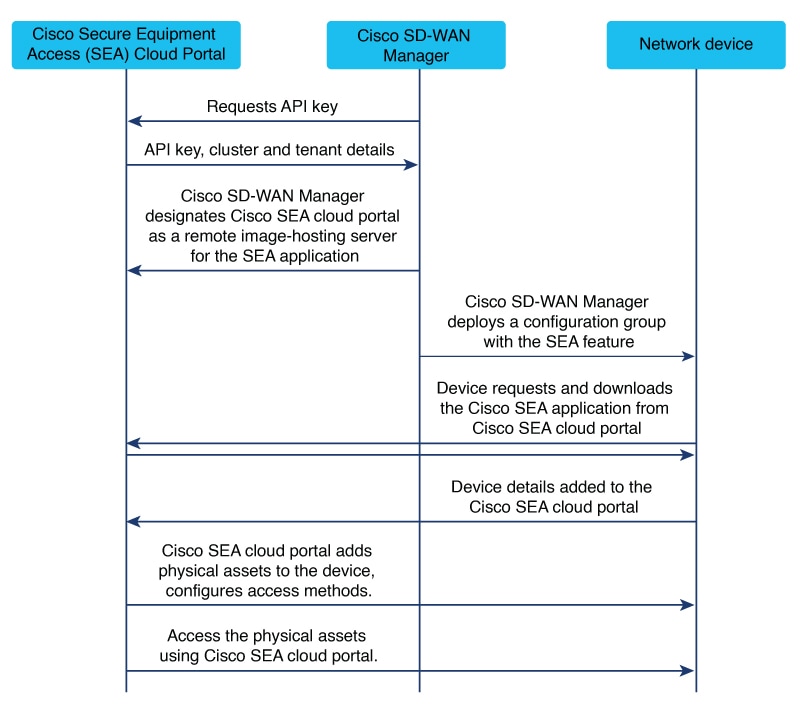
Figure 1. Integration of Cisco Secure Equipment Access and Cisco Catalyst SD-WAN
  1. Getting an API key to establish connectivity

    As described in the Configure a Connection to a Cisco Secure Equipment Access Portal in the Network Hierarchy procedure prerequisites, you log in to Cisco SEA cloud portal and generate an API key.

  2. Designating an image-hosting server for the Cisco SEA application

    When you complete the Configure a Connection to a Cisco Secure Equipment Access Portal in the Network Hierarchy procedure, Cisco SD-WAN Manager uses the information in the API key to designate the Cisco SEA cloud portal as a remote image-hosting server for the Cisco SEA application.

    To designate Cisco SEA as the host from which to download the application, Cisco SD-WAN Manager adds the Cisco SEA cloud portal as a remote server. As such, it appears on the Maintenance > Software Repository page, in the Remote server tab. As described in Guidelines for Cisco Secure Equipment Access Integration, do not edit or remove the server.

  3. Downloading the Cisco SEA application

    When you push a Cisco SEA configuration to devices in the network, the devices connect to Cisco SEA cloud portal to download the Cisco SEA application.

  4. Activating the application

    The devices install and activate the application. This enables the devices to operate as part of the Cisco SEA solution.

Using the Cisco Secure Equipment Access Solution

The procedures described here enable devices to operate as part of the Cisco Secure Equipment Access solution. After you’ve set this up, use Cisco SEA to manage access to remote assets. For information, see the Cisco Secure Equipment Access documentation on the Cisco DevNet site.

Supported Platforms for Cisco Secure Equipment Access Integration

Table 2. Supported Platforms

Platform Series

Models

Cisco Catalyst IR1100 Rugged Series Routers

Cisco Catalyst IR1101

Cisco Catalyst IR1800 Rugged Series Routers

Cisco Catalyst IR1821

Cisco Catalyst IR1831

Cisco Catalyst IR1833

Cisco Catalyst IR1835

Prerequisites for Cisco Secure Equipment Access Integration

Network Reachability to the Cisco Secure Equipment Access Portal

Before deploying a configuration group that includes the Cisco SEA feature, ensure that the routers in the network that will run the Cisco SEA agent application have network reachability to the Cisco SEA cloud portal.

Because of this requirement, configuring devices to work with Cisco SEA is a two-step process:

  1. Deploying a configuration group to a set of devices to establish reachability to a Cisco SEA cloud portal.

  2. Deploying a configuration group to a set of devices to enable Cisco SEA on the devices.

    After you confirm reachability in the previous step, you can modify the same configuration group that you used in that step, adding the Cisco SEA feature, and deploy the configuration group to the devices.

This same requirement applies when you add devices to a configuration group that has the Cisco SEA feature and that you have deployed to devices already. If you want to deploy the configuration group to additional devices, make note of the above and first establish reachability to a Cisco SEA cloud portal for the additional devices.

Virtual port group interfaces

The Cisco SEA application requires virtual port group (VPG) interfaces 7 to 10 to be available. Ensure that these VPG interfaces are not configured for use with a different application.

The Cisco SEA application uses VPG interface 7 to connect to the Cisco SEA cloud portal, and reserves VPG interfaces 8 to 10 to connect to remote assets. For restrictions that apply to virtual port groups, see Restrictions for Cisco Secure Equipment Access Integration.

IP address for virtual port group interface 7

For each router, configure an IP address for VPG interface 7 connectivity to the Cisco SEA cloud portal.

Guidelines for Cisco Secure Equipment Access Integration

Do not remove remote servers

Cisco SD-WAN Manager adds a Cisco SEA portal instance as a server on the Maintenance > Software Repository page, in the Remote server tab.

Do not edit or remove these remote servers.

Restrictions for Cisco Secure Equipment Access Integration

Single Cisco SEA cloud portal

Cisco SD-WAN Manager can connect to only a single Cisco SEA cloud portal.

Single Cisco SD-WAN Manager

A single organization, as defined in the Cisco SEA cloud portal, can connect to only one Cisco SD-WAN Manager. This has consequences for a Cisco SEA cloud portal that is operating in a multitenant environment, because a Cisco SD-WAN Manager instance represents a single organization.

Virtual port groups (VPG) and remote asset connectivity

The Cisco SEA application uses VPG interface 7 to connect to the Cisco SEA cloud portal, and reserves VPG interfaces 8 to 10 to connect to assets. A single VPG interface (8, 9, or 10) can provide connectivity for a single remote asset network. The remote asset network can include more than one asset.

Configure Cisco Secure Equipment Access Integration, High Level

Procedure


Step 1

Configure a Connection to a Cisco Secure Equipment Access Portal in the Network Hierarchy

Step 2

Create a Configuration Group Profile with an SEA Feature

Step 3

Add a Cisco SEA Feature to a Configuration Group

Step 4

Deploy a Configuration Group with a Cisco SEA Feature


What to do next

After the configuration steps, you can monitor the activity of the Cisco SEA application operating on a device. See Monitor the Cisco Secure Equipment Access Application on Devices.

Configure a Connection to a Cisco Secure Equipment Access Portal in the Network Hierarchy

Before you begin

  • API key

    In the Cisco SEA cloud portal, create an API key to enable devices to establish a secure link with the Cisco SEA cloud portal.

    For information about creating an API key, see the Cisco Secure Equipment Access documentation on the Cisco DevNet site. When you generate the API key, if there is an option to enable the key for external controller integration, choose that option.

    Copy the API key and have it ready for the procedure.

  • Connectivity

    The devices in your network that operate with Cisco SEA require network reachability to the Cisco SEA cloud portal. Ensure that your network topology provides this reachability.

Procedure


Step 1

From the Cisco SD-WAN Manager menu, choose Configuration > Network Hierarchy.

Step 2

Click External Services.

Step 3

In the Secure Equipment Access Cloud pane, enter these:

Table 3. Secure Equipment Access Cloud Pane

Field

Description

Cluster access type

Choose an API key option:

  • Manual: Enter the API key manually by copying it from the Cisco SEA cloud portal.

  • Auto: Retrieve the API key automatically from the Cisco SEA cloud portal.

API Key

(This field appears if you choose Manual in Cluster access type.)

Enter the API key that you generated in the Cisco SEA cloud portal.

Select Secure Equipment Access Cluster

(This field appears if you choose Auto in Cluster access type.)

Choose the cluster name associated with your Cisco SEA cloud portal account. Click Connect and log in with your Cisco SEA cloud portal credentials.

VPN

VPN providing reachability between devices and the Cisco SEA cloud portal.

Proxy

If devices in your network require a proxy for connectivity between devices and the Cisco SEA cloud portal, enter the IP address of the proxy.

Step 4

Click Save.

Using information contained in the API key, Cisco SD-WAN Manager automatically sets up a server as one of the remote image-hosting servers that appear on the Maintenance > Software Repository page, in the Remote server tab. See Onboarding Process to the Cisco Secure Equipment Solution.


Create a Configuration Group Profile with an SEA Feature

Before you begin

On the Configuration > Configuration Groups page, choose either

  • SD-WAN, or

  • SD-Routing

as the solution type.

Procedure


Step 1

From the Cisco SD-WAN Manager menu, choose Configuration > Configuration Groups.

Step 2

Create and configure an SEA feature in an Other profile.

  1. Enter a name and description for the feature.

    Table 4. Name and Description

    Field

    Description

    Name

    Name for the feature.

    Description

    Optionally, add a description.

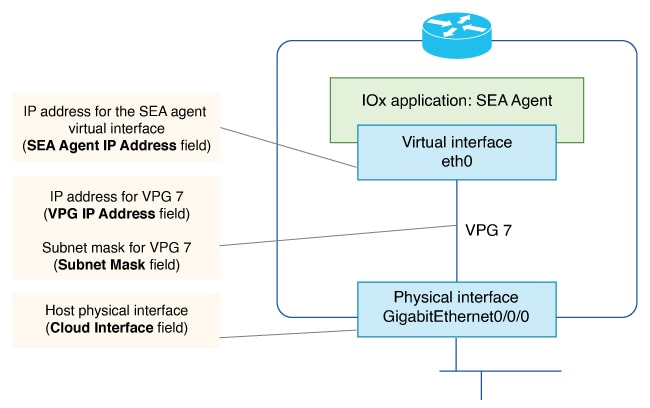
  2. Configure the connection between the Cisco SEA agent and the physical interface of the host device, using virtual port group (VPG) 7. This is necessary to enable the Cisco SEA agent to reach the Cisco SEA cloud portal.

    Table 5. Base Configuration

    Field

    Description

    VPG IP Address

    IP address to assign to virtual port group (VPG) 7. This VPG is a virtual link between the Cisco SEA agent and a physical interface of the host device.

    Example: 10.100.1.1

    Subnet Mask

    Subnet mask for VPG interface 7, which connects to the Cisco SEA cloud portal. Together with VPG IP Address, this defines the address space for the VPG 7 network.

    Example: 255.255.252.0

    SEA Agent IP Address

    IP address to assign to the Cisco SEA cloud agent to map it to VPG 7. Enter an address within the address space defined by VPG IP Address and Subnet Mask.

    Example: 10.100.1.2

    Cloud Interface

    This field appears when configuring an SEA feature for use with the SD-Routing solution.

    Enter the physical interface that the device uses to connect to the Cisco SEA cloud portal. The interface type can include cellular.

    Example: GigabitEthernet0/0/0

    Example: Cellular0/1/0

    Note


    For a device that you are configuring for the SD-WAN solution (not the SD-Routing solution), the VPG automatically connects to the host interface used for the control connection between the host device and Cisco SD-WAN Manager.

  3. Optionally, configure one or more asset networks for connectivity to assets.

    Table 6. Asset Access Networks (optional)

    Field

    Description

    Add Access Network

    Configure connectivity for up to three asset networks, each of which can include more than one asset.

    Service VPN

    (This field appears when configuring an SEA feature for use with the SD-WAN solution.)

    If your assets are distributed across multiple different service VPNs, you may need to add each of the service VPNs here.

    Note


    Configure route leaking to provide connectivity between (a) the service VPN used for connectivity with the Cisco SEA cloud portal, and (b) each service VPN that you configure here.

    Asset Interface

    (This field appears when configuring an SEA feature for use with the SD-Routing solution.)

    Physical interface that the device is using to connect to the asset network.

    VPG IP Address

    IP address to assign to the VPG interface on the router.

    SEA Agent IP Address

    IP address to assign to the SEA asset agent for mapping to the respective VPG interface on the router. The address must be within the same network as the asset VPG interface.

    Subnet Mask

    VPG subnet mask.

    Action

    A delete option removes a row of the table, removing an asset network configuration.

  4. Configure a DNS server within your network, capable of resolving Cisco SEA portal domain names.

    Table 7. Name Servers

    Field

    Description

    Add Name Server

    Configure a DNS server within your network, capable of resolving Cisco SEA portal domain names. Click Add Name Server to add a name server.

    For information about the Cisco SEA portal domain names, see Network ports and protocols.

    This is a mandatory field. If you do not configure a name server, you cannot save the configuration.

    Maximum number of name servers: 5

    Name Server

    IP address of a domain name server.

    Action

    A delete option removes a row of the table, removing a name server.


What to do next

Also see Deploy a configuration group.

Add a Cisco SEA Feature to a Configuration Group

Procedure


Step 1

From the Cisco SD-WAN Manager menu, choose Configuration > Configuration Groups.

Step 2

In the solution drop-down list, choose either

  • SD-WAN, or

  • SD-Routing

as the solution type to display configuration groups only for this solution.

Step 3

Click the Configuration Groups tab.

Step 4

If you need to create a configuration group, follow the steps described in Using Configuration Groups in Cisco Catalyst SD-WAN Configuration Groups.

Step 5

For an existing configuration group, click Add Profile and add an Other Profile to the configuration group.

Step 6

In the configuration group, locate the Other Profile drop-down list and choose a Cisco SEA profile.


Deploy a Configuration Group with a Cisco SEA Feature

Before you begin

  • See Supported Platforms for Cisco Secure Equipment Access Integration before deploying a configuration group with the Cisco SEA feature.

  • For each device that will be running the Cisco SEA agent, ensure that device has network reachability to the Cisco SEA cloud portal before deploying a configuration group that includes the Cisco SEA feature. This requires two steps:

    1. Deploy a configuration group to establish reachability to a Cisco SEA cloud portal.

    2. Deploy a configuration group to enable Cisco SEA on the devices.

      After you confirm reachability in the previous step, you can modify the same configuration group that you used in that step, adding the Cisco SEA feature, and deploy the configuration group to the devices.

    See Prerequisites for Cisco Secure Equipment Access Integration.


    Note


    This same requirement applies when you add devices to a configuration group that has the Cisco SEA feature and that you have deployed to devices already. If you want to deploy the configuration group to additional devices, make note of the above and first establish reachability to the Cisco SEA cloud portal for the additional devices.


Procedure


Step 1

Use the standard configuration group deployment procedure in Cisco Catalyst SD-WAN Configuration Groups to deploy a configuration group to devices in the network.

Step 2

If you are deploying to devices of the SD-WAN solution type, during deployment, enter any device-specific variables, as required, for each router.

If you are deploying to devices of the SD-Routing solution type, skip this step.

Step 3

If you want to monitor the progress of installing the Cisco SEA application on a device, view the log messages for the installation.

  1. Click the task list button near the top right.

  2. Click the Deploy configuration group task.

    This opens a page showing the deployment progress for each device.

  3. Adjacent to a device, click the log icon in the Action column.

    The View Logs pane opens, showing the deployment progress for the device. When the deployment is complete, and when the devices have established a connection to the Cisco SEA cloud portal, a success message, such as "Config Group successfully deployed to device," appears in the log.

    When you first deploy a configuration group with the Cisco SEA feature to a device, it triggers the device to install the Cisco SEA application. It takes several minutes for a device to install the Cisco SEA application. After a successful installation, the device operates as part of the Cisco SEA solution.


Verify that Cisco SD-WAN Manager Has Connected to the Cisco Secure Equipment Access Cloud Portal

When you create a configuration group with a Cisco SEA feature, deploying the configuration group to devices triggers the devices to install the Cisco SEA application. It takes several minutes for a device to install the Cisco SEA application. After a successful installation, the device operates as part of the Cisco SEA solution.

Before you begin

Deploy a configuration group with a Cisco SEA feature to one or more devices. See Deploy a Configuration Group with a Cisco SEA Feature.

Procedure


Step 1

Log in to the Cisco SEA cloud portal.

Step 2

View the device list. For details, see the Cisco Secure Equipment Access documentation on the Cisco DevNet site.


Verify that the Cisco Secure Equipment Access Application is Operating on a Device, Using the CLI

This verification method is applicable to devices in the SD-WAN or SD-Routing solutions.

Before you begin

Deploy a configuration group with a Cisco Secure Equipment Access feature to one or more devices. See Deploy a Configuration Group with a Cisco SEA Feature.

Procedure


Step 1

On a device running the Cisco Secure Equipment Access application, run this command.

Device# show iox-service

Step 2

Based on the output of the command in the previous step, do one of these:

  • If the command output shows that the IOxman service is running, then proceed to the next step.

  • If the command output shows that the IOxman service is not running, this indicates that the Cisco Secure Equipment Access application is not operating correctly. Reinstall the application. See Deploy a Configuration Group with a Cisco SEA Feature.

Step 3

On the same device, run this command. If the output shows that state as running, this indicates that the Cisco Secure Equipment Access application is operating correctly.

Device# show app-hosting detail appid sea

Example

In this example, the Cisco Secure Equipment Access application is installed and operating. Note that the command output is abbreviated here.

Device# show iox-service
IOx Infrastructure Summary:
IOx service (CAF)              : Running
IOx service (HA)               : Not Supported
IOx service (IOxman)           : Running
IOx service (Sec storage)      : Running
Libvirtd 5.5.0                 : Running
Dockerd v19.03.13-ce           : Running

Device# show app-hosting detail appid sea
App id                 : sea
Owner                  : iox
State                  : RUNNING
...

Monitor the Cisco Secure Equipment Access Application on Devices

Before you begin

Deploy a configuration group with a Cisco Secure Equipment Access feature to one or more devices. See Deploy a Configuration Group with a Cisco SEA Feature.

Procedure


Step 1

From the Cisco SD-WAN Manager menu, choose Monitor > Devices.

Step 2

Click a device name for a device in the SD-WAN solution.

Note


This monitoring method is applicable to devices in the SD-WAN solution, but not to devices in the SD-Routing solution.

Step 3

Click the Real Time tab.

Step 4

Enter any of these App Hosting commands in the Device Options field to view the resource usage or other details of the Cisco Secure Equipment Access application operating on the device:

  • App Hosting Details

  • App Hosting Utilization

  • App Hosting Network Utilization

  • App Hosting Storage Utilization

  • App Hosting Processes

  • App Hosting Attached Devices

  • App Hosting Network Interfaces

  • App Hosting Guest routes