Deploy the ASA Virtual Auto Scale Solution on AWS

Auto Scale Solution for the Threat Defense Virtual ASA Virtual on AWS

The following sections describe how the components of the auto scale solution work for the ASA virtual on AWS.

Overview

Cisco provides CloudFormation Templates and scripts for deploying an auto-scaling group of ASA virtual firewalls using several AWS services, including Lambda, auto scaling groups, Elastic Load Balancing (ELB), Amazon S3 Buckets, SNS, and CloudWatch.

The ASA virtual auto scale in AWS is a complete serverless implementation (i.e. no helper VMs involved in the automation of this feature) that adds horizontal auto scaling capability to ASA virtual instances in the AWS environment. Starting from version 6.4, the auto scale solution is supported on managed by management center.

The ASA virtual auto scale solution is a CloudFormation template-based deployment that provides:

  • Completely automated configuration automatically applied to scaled-out ASA virtual instances.

  • Support for Load Balancers and multi-availability zones.

  • Support for enabling and disabling the auto scale feature.

Auto Scale using Sandwich Topology Use Case

The Use Case for this ASA virtual AWS auto scale Solution is shown in the use case diagram. Because the AWS Load Balancer allows only Inbound-initiated connections, only externally generated traffic is allowed to pass inside via the ASA virtual firewall.


Note


Secured ports need an SSL/TLS certificate, as described SSL Server Certificate in the Prerequisites.


The Internet-facing load balancer can be a Network Load Balancer or an Application Load Balancer. All of the AWS requirements and conditions hold true for either case. As indicated in the Use Case diagram, the right side of the dotted line is deployed via the ASA virtual templates. The left side is completely user-defined.


Note


Application-initiated outbound traffic will not go through the ASA virtual.


Figure 1. ASA Virtual Auto Scale using Sandwich Topology Use Case Diagram

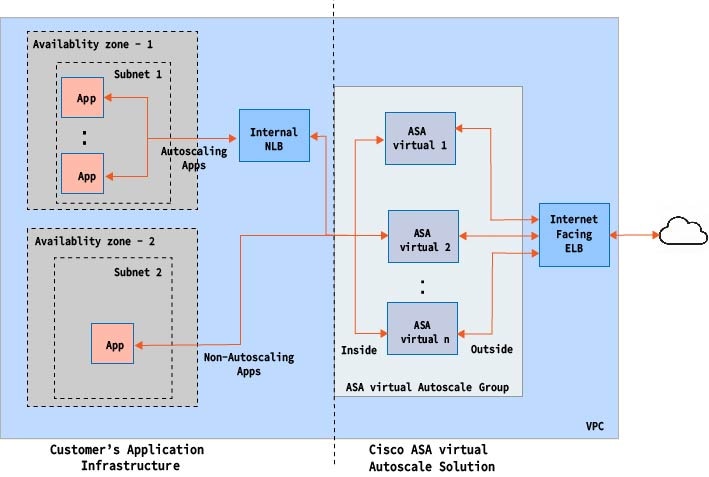
Port-based bifurcation for traffic is possible. This can be achieved via NAT rules. For example, traffic on Internet-facing LB DNS, Port: 80 can be routed to Application-1; Port: 88 traffic can be routed to Application-2.

Auto Scale Using AWS Gateway Load Balancer Use Case

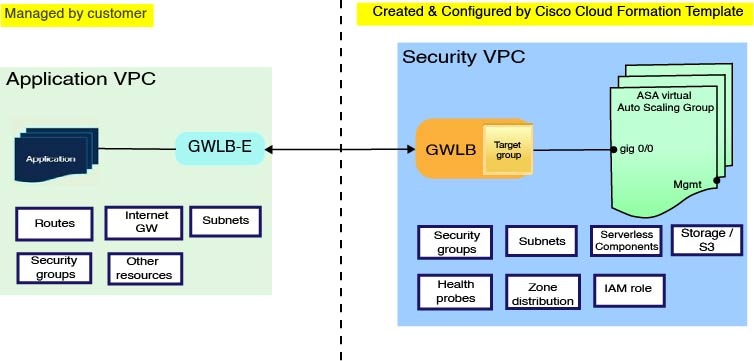
The use case for the ASA virtual AWS Gateway Load Balancer (GWLB) Auto Scale Solution is shown in the use case diagram. The AWS GWLB allows both Inbound and Outbound connections, hence both internally and externally generated traffic is allowed to pass inside via the Cisco ASA virtual firewall.

The Internet-facing load balancer can be a AWS Gateway Load Balancer Endpoint (GWLBe). The GWLBe sends traffic to the GWLB and then to ASA virtual for inspection. All the AWS requirements and conditions hold true for either case. As indicated in the Use Case diagram, the right side of the dotted line is ASA virtual GWLB Autoscale solution deployed via the ASA virtual templates. The left side is completely user-defined.


Note


Application-initiated outbound traffic will not go through the ASA virtual.


Figure 2. ASA Virtual AWS GWLB Auto Scale Use Case Diagram

How the Auto Scale Solution Works

To scale the ASA virtual instances in and out, an external entity called the Auto Scale Manager monitors metrics, commands an auto scale group to add or delete the ASA virtual instances, and configures the ASA virtual instances.

The Auto Scale Manager is implemented using AWS Serverless architecture and communicates with AWS resources and the ASA virtual. We provide CloudFormation templates to automate the deployment of Auto Scale Manager components. The template also deploys other resources required for complete solution to work.


Note


Serverless auto scale scripts are only invoked by CloudWatch events, hence they only run when an instance is launched.


Auto Scale Solution Components

The following components make up the auto scale solution.

CloudFormation Template

The CloudFormation template is used to deploy resources required by auto scale solution in AWS. The template consists of:

  • Auto Scale Group, Load Balancer, Security Groups, and other miscellaneous components.

  • The template takes user input to customize the deployment.


    Note


    The template has limitations in validating user input, hence it is the user’s responsibility to validate input during deployment.


Lambda Functions

The auto scale solution is a set of Lambda functions developed in Python, which gets triggered from Lifecycle hooks, SNS, CloudWatch event/alarm events. The basic functionality includes:

  • Add/Remove Gig0/0, and Gig 0/1 interfaces to instance.

  • Register Gig0/1 interface to Load Balancer’s Target Groups.

  • Configure and deploy a new ASA virtual with the ASA configuration file.

Lambda Functions are delivered to customer in the form of a Python package.

Lifecycle Hooks

  • Lifecycle hooks are used to get lifecycle change notification about an instance.

  • In the case of instance launch, a Lifecycle hook is used to trigger a Lambda function which can add interfaces to an ASA virtual instance, and register outside interface IPs to target groups.

  • In the case of instance termination, a Lifecycle hook is used to trigger a Lambda function to deregister an ASA virtual instance from the target group.

Simple Notification Service (SNS)

  • Simple Notification Service (SNS) from AWS is used to generate events.

  • Due to the limitation that there is no suitable orchestrator for Serverless Lambda functions in AWS, the solution uses SNS as a kind of function chaining to orchestrate Lambda functions based on events.

Prerequisites

Download Deployment Files

Download the files required to launch the ASA virtual auto scale for AWS solution. Deployment scripts and templates for your ASA version are available in the GitHub repository.


Attention


Note that Cisco-provided deployment scripts and templates for auto scale are provided as open source examples, and are not covered within the regular Cisco TAC support scope. Check GitHub regularly for updates and ReadMe instructions.


Infrastructure Configuration

In a cloned/downloaded GitHub repository, the infrastructure.yaml file can be found in the template folder. This CFT can be used to deploy VPCs, subnets, routes, ACLs, security groups, VPC end-points, and S3 buckets with bucket policies. This CFT can be modified to fit your requirements.

The following sections provide more information about these resources and their use in auto scale. You can manually deploy these resources and also use them in auto scale.


Note


The infrastructure.yaml template deploys VPCs, subnets, ACLs, security groups, S3 buckets, and VPC end-points only. It does not create the SSL certificate, Lambda layer, or KMS key resources.


VPC

You should create the VPC as required for your application requirements. It is expected that the VPC have an Internet gateway with at least one subnet attached with a route to the Internet. Refer to the appropriate sections for the requirements for Security Groups, Subnets, etc.

Subnets

Subnets can be created as needed for the requirements of the application. The ASA virtual machine requires 3 subnets for operation as shown in the Use Case.


Note


If multiple availability zone support is needed, then subnets are needed for each zone as subnets are zonal properties within the AWS Cloud


Outside Subnet

The Outside subnet should have a default route with '0.0.0.0/0' to the Internet gateway. This will contain the Outside interface of the ASA virtual, and also the Internet-facing NLB will be in this subnet.

Inside Subnet

This can be similar to the Application subnets, with or without NAT/Internet gateway. Please note that for the ASA virtual health probes, it should be possible to reach the AWS Metadata Server (169.254.169.254) via port 80.


Note


In this AutoScale solution, Load Balancer health probes are redirected to the AWS Metadata Server via inside/Gig0/0 interface. However, you can change this with your own application serving the health probe connections sent to the ASA virtual from the Load Balancer. In that case, you need to replace the AWS Metadata Server object to the respective application IP address to provide the health probes response.


Management Subnet

This subnet includes the ASA virtual Management interface. It’s optional for you to have a default route.

Lambda Subnets

The AWS Lambda function requires two subnets having the NAT gateway as the default gateway. This makes the Lambda function private to the VPC. Lambda subnets do not need to be as wide as other subnets. Please refer to AWS documentation for best practices on Lambda subnets.

Application Subnets

There is no restriction imposed on this subnet from the auto scale solution, but in case the application needs Outbound connections outside the VPC, there should be respective routes configured on the subnet. This is because outbound-initiated traffic does not pass through Load Balancers. See the AWS Elastic Load Balancing User Guide.

Security Groups

All connections are allowed in the provided Auto Scale Group template. You need only the following connections for the auto scale Solution to work.

Table 1. Required Ports

Port

Usage

Subnet

Health Probe port (default: 8080)

Internet-facing Load Balancer health probes

Outside, Inside Subnets

Application ports

Application data traffic

Outside, Inside Subnets

Amazon S3 Bucket

Amazon Simple Storage Service (Amazon S3) is an object storage service that offers industry-leading scalability, data availability, security, and performance. You can place all the required files for both the firewall template and the application template in the S3 bucket.

When templates are deployed, Lambda functions get created referencing Zip files in the S3 bucket. Hence the S3 bucket should be accessible to the user account.

Lambda Layer

The autoscale_layer.zip can be created in a Linux environment, such as Ubuntu 18.04 with Python 3.9 installed.


#!/bin/bash
mkdir -p layer
virtualenv -p /usr/bin/python3.9 ./layer/
source ./layer/bin/activate
pip3 install cffi==1.15.1
pip3 install cryptography==2.9.1
pip3 install paramiko==2.7.1
pip3 install requests==2.23.0
pip3 install scp==0.13.2
pip3 install jsonschema==3.2.0
pip3 install pycryptodome==3.15.0
echo "Copy from ./layer directory to ./python\n"
cp -r ./layer/lib/python3.9/site-packages/* ./python/
zip -r autoscale_layer.zip ./python

The resultant autoscale_layer.zip file should be copied to the lambda-python-files folder.

KMS Master Key

This is required if the ASA virtual passwords are in encrypted format. Otherwise this component is not required. Passwords should be encrypted using only the KMS provided here. If KMS ARN is entered on CFT, then passwords have to be encrypted. Otherwise passwords should be plain text.

For more information about master keys and encryption, see the AWS document Creating keys and the AWS CLI Command Reference about password encryption and KMS.

Example:


$ aws kms encrypt --key-id <KMS-ARN> --plaintext 'MyC0mplIc@tedProtect1oN'
{
    "KeyId": "KMS-ARN", 
    "CiphertextBlob": 
"AQICAHgcQFAGtz/hvaxMtJvY/x/rfHnKI3clFPpSXUU7HQRnCAFwfXhXHJAHL8tcVmDqurALAAAAajBoBgkqhki
G9w0BBwagWzBZAgEAMFQGCSqGSIb3DQEHATAeBglghkgBZQMEAS4wEQQM45AIkTqjSekX2mniAgEQgCcOav6Hhol
+wxpWKtXY4y1Z1d0z1P4fx0jTdosfCbPnUExmNJ4zdx8="
}
$

The value of CiphertextBlob key should be used as a password.

Python 3 Environment

A make.py file can be found in the cloned repository top directory. This will Zip the python files into a Zip file and copy to a target folder. In order to do these tasks, the Python 3 environment should be available.

Deploy the Auto Scale Solution

Preparation

It is expected that the Application is either deployed or its deployment plan is available.

Input Parameters

The following input parameters should be collected prior to deployment.


Note


For AWS Gateway Load Balancer (GWLB), the LoadBalancerType, LoadBalancerSG, LoadBalancerPort, and SSLcertificate parameters are not applicable.


Table 2. Auto Scale Input Parameters

Parameter

Allowed Values/Type

Description

PodNumber

String

Allowed Pattern: '^\d{1,3}$'

This is the pod number. This will be suffixed to the Auto Scale Group name (ASA virtual-Group-Name). For example, if this value is '1', then the group name will be ASA virtual-Group-Name-1.

It should be at least 1 numerical digit but not more than 3 digits. Default: 1

AutoscaleGrpNamePrefix

String

This is the Auto Scale Group Name Prefix. The pod number will be added as a suffix.

Maximum: 18 characters

Example: Cisco-ASA virtual-1

NotifyEmailID

String

Auto Scale events will be sent to this email address. You need to accept a subscription email request.

Example: admin@company.com

VpcId

String

The VPC ID in which the device needs to be deployed. This should be configured as per AWS requirements.

Type: AWS::EC2::VPC::Id

If the "infrastructure.yaml" file is used to deploy the infrastructure, the output section of the stack will have this value. Please use that value.

LambdaSubnets

List

The subnets where Lambda functions will be deployed.

Type: List<AWS::EC2::Subnet::Id>

If the "infrastructure.yaml" file is used to deploy the infrastructure, the output section of the stack will have this value. Please use that value.

LambdaSG

List

The Security Groups for Lambda functions.

Type: List<AWS::EC2::SecurityGroup::Id>

If the "infrastructure.yaml" file is used to deploy the infrastructure, the output section of the stack will have this value. Please use that value.

S3BktName

String

The S3 bucket name for files. This should be configured in your account as per AWS requirements.

If the "infrastructure.yaml" file is used to deploy the infrastructure, the output section of the stack will have this value. Please use that value.

LoadBalancerType

String

The type of Internet-facing Load Balancer, either “application” or “network”.

Example: application

LoadBalancerSG

String

The Security Groups for the Load Balancer. In the case of a network load balancer, it won't be used. But you should provide a Security Group ID.

Type: List<AWS::EC2::SecurityGroup::Id>

If the "infrastructure.yaml" file is used to deploy the infrastructure, the output section of the stack will have this value. Please use that value.

LoadBalancerPort

Integer

The Load Balancer port. This port will be opened on LB with either HTTP/HTTPS or TCP/TLS as the protocol, based on the chosen Load Balancer type.

Make sure the port is a valid TCP port, it will be used to create the Load Balancer listener.

Default: 80

SSLcertificate

String

The ARN for the SSL certificate for secured port connections. If not specified, a port opened on the Load Balancer will be TCP/HTTP. If specified, a port opened on the Load Balancer will be TLS/HTTPS.

TgHealthPort

Integer

This port is used by the Target group for health probes. Health probes arriving at this port on the ASA virtual will be routed to the AWS Metadata server and should not be used for traffic. It should be a valid TCP port.

If you want your application itself to reply to health probes, then accordingly NAT rules can be changed for the ASA virtual. In such a case, if the application does not respond, the ASA virtual will be marked as unhealthy and deleted due to the Unhealthy instance threshold alarm.

Example: 8080

AssignPublicIP

Boolean

If selected as "true" then a public IP will be assigned. In case of a BYOL-type ASA virtual, this is required to connect to https://tools.cisco.com.

Example: TRUE

ASAvInstanceType

String

The Amazon Machine Image (AMI) supports different instance types, which determine the size of the instance and the required amount of memory.

Only AMI instance types that support the ASA virtual should be used.

Example: c4.2xlarge

ASAvLicenseType

String

The ASA virtual license type, either BYOL or PAYG. Make sure the related AMI ID is of the same licensing type.

Example: BYOL

ASAvAmiId

String

The ASA virtual AMI ID (a valid Cisco ASA virtual AMI ID).

Type: AWS::EC2::Image::Id

Please choose the correct AMI ID as per the region and desired version of the image.

ConfigFileURL

String

The HTTP URL for the ASA virtual configuration files. Configuration files for each AZs should be available in the URL. The Lambda function will take care of choosing the correct file.

You can deploy an HTTP server to host configuration files, or you can use the AWS S3 static web-hosting facility.

Note


The last "/" is also needed as configuration file names will be appeneded to the URL at the time of import.

If the "infrastructure.yaml" file is used to deploy the infrastructure, the output section of the stack will have this value. Please use that value.

Example: https://myserver/asavconfig/asaconfig .txt/

NoOfAZs

Integer

The number of availability zones that the ASA virtual should span across, between 1 and 3. In the case of an ALB deployment, the minimum value is 2, as required by AWS.

Example: 2

ListOfAzs

Comma separated string

A comma-separated list of zones in order.

Note


The order in which these are listed matters. Subnet lists should be given in the same order.

If the "infrastructure.yaml" file is used to deploy the infrastructure, the output section of the stack will have this value. Please use that value.

Example: us-east-1a, us-east-1b, us-east-1c

ASAvMgmtSubnetId

Comma separated list

A comma-separated list of management subnet-ids. The list should be in the same order as the corresponding availability zones.

Type: List<AWS::EC2::SecurityGroup::Id>

If the "infrastructure.yaml" file is used to deploy the infrastructure, the output section of the stack will have this value. Please use that value.

ASAvInsideSubnetId

Comma separated list

A comma-separated list of inside/Gig0/0 subnet-ids. The list should be in the same order as the corresponding availability zones.

Type: List<AWS::EC2::SecurityGroup::Id>

If the "infrastructure.yaml" file is used to deploy the infrastructure, the output section of the stack will have this value. Please use that value.

ASAvOutsideSubnetId

Comma separated list

A comma-separated list of outside/Gig0/1 subnet-ids. The list should be in the same order as the corresponding availability zones.

Type: List<AWS::EC2::SecurityGroup::Id>

If the "infrastructure.yaml" file is used to deploy the infrastructure, the output section of the stack will have this value. Please use that value.

KmsArn

String

The ARN of an existing KMS (AWS KMS key to encrypt at rest). If specified, the ASA virtual passwords should be encrypted. The password encryption should be done using only the specified ARN.

Generating Encrypted Password Example: " aws kms encrypt --key-id <KMS ARN> --plaintext <password> ". Please used such generated passwords as shown.

Example: arn:aws:kms:us-east-1:[AWS Account]:key/7d586a25-5875-43b1-bb68-a452e2f6468e

CpuThresholds

Comma separated integers

The lower CPU threshold and the upper CPU threshold. The minimum value is 0 and maximum value is 99.

Defaults: 10, 70

Please note that the lower threshold should be less than the upper threshold.

Example: 30,70

Instance Metadata Service Version

Boolean

The Instance Metadata Data Service (IMDS) version you want enable for ASA Virtual instances.

  • V1 and V2 (token optional): Enables either IMDSv1, IMDSv2 or a combination of IMDSv1 and IMDSv2 API calls.

  • V2 only (token required): Enables only the IMDSv2 mode.

Note


ASA Virtual Version 9.20.3 and later support only IMDSv2 APIs.

If you are using ASA Virtualversion earlier than the Version 9.20.3, you must select the combination of IMDSv1 and IMDSv2 - V1 and V2 (token optional) parameter.

Update the ASA Configuration Files

You prepare ASA configuration files and store them in a http/https server accessible by an ASA virtual instance. This is a standard ASA configuration file format. A scaled-out ASA virtual will download a configuration file and update its configuration.

The following sections provide examples on how the ASA configuration file could be modified for the Auto Scale solution.

Objects, Device Groups, NAT Rules, and Access Policies
See the following for an example of objects, route, and NAT rules for the Load Balancer health probes for the ASA virtual configuration.

! Load Balancer Health probe Configuration
object network aws-metadata-server
host 169.254.169.254
object service aws-health-port
service tcp destination eq 7777
object service aws-metadata-http-port
service tcp destination eq 80
route inside 169.254.169.254 255.255.255.255 10.0.100.1 1
nat (outside,inside) source static any interface destination static interface aws-metadata-server service aws-health-port aws-metadata-http-port
!

Note


The health probe connections above should be allowed on your access policy.


See the following for an example of the data-plane configuration for an ASA virtual configuration.

! Data Plane Configuration
route inside 10.0.0.0 255.255.0.0 10.0.100.1 1
object network http-server-80
host 10.0.50.40
object network file-server-8000
host 10.0.51.27
object service http-server-80-port
service tcp destination eq 80
nat (outside,inside) source static any interface destination static interface http-server-80 service http-server-80-port http-server-80-port
object service file-server-8000-port
service tcp destination eq 8000
nat (outside,inside) source static any interface destination static interface file-server-8000 service file-server-8000-port file-server-8000-port
object service https-server-443-port
service tcp destination eq 443
nat (outside,inside) source static any interface destination static interface http-server-80 service https-server-443-port http-server-80-port
!
Configuration File Updates

The ASA virtual configuration should be updated in the az1-connfiguration.txt, az2-configuration.txt, and az3-configuration.txt files.


Note


Having three configuration files allows you to modify the configuration based on the Availability Zone (AZ). For example, the static route to the aws-metadata-server will have a different gateway in each AZ.


Template Updates
The deploy_autoscale.yaml template should be modified carefully. You should modify the UserData field of the LaunchTemplate. The UserData can be updated as needed. The name-server should be updated accordingly; for example, it can be the VPC DNS IP. Where your licensing is BYOL, the licensing idtoken should be shared here.

!
dns domain-lookup management
DNS server-group DefaultDNS
name-server <VPC DNS IP>
!
! License configuration
        call-home
        profile License
        destination transport-method http
        destination address http <url>
        license smart
        feature tier standard
        throughput level <entitlement>
        license smart register idtoken <token>

Upload Files to Amazon Simple Storage Service (S3)

All the files in the target directory should be uploaded to the Amazon S3 bucket. Optionally, you can use the CLI to upload all of the files in the target directory to the Amazon S3 bucket.

$ cd ./target
$ aws s3 cp . s3://<bucket-name> --recursive

Deploy Stack

After all of the prerequisites are completed for deployment, you can create the AWS CloudFormation stack.

Use the deploy_autoscale.yaml file in the target directory.

Use the deploy_ngfw_autoscale_with_gwlb.yaml file in the target directory for Geneve Autoscale.


Note


Before you deploy deploy_ngfw_autoscale_with_gwlb.yaml file, you must deploy infrastructure_gwlb.yaml file for AWS GWLB auto scale solution.

You must create the Gateway Loadbalancer Endpoint (GWLB-E) by choosing the GWLB that is created during deploy_autoscale_with_gwlb.yaml template deployment. After creating the GWLBe, you must update the default route to use GWLBe for Application Subnet and default Route table.

For more information, see https://docs.amazonaws.cn/en_us/vpc/latest/privatelink/create-endpoint-service-gwlbe.html.


Provide the parameters as collected in Input Parameters.

Validate Deployments

Once the template deployment is successful, you should validate that the Lambda functions and the CloudWatch events are created. By default, the Auto Scale Group has the minimum and maximum number of instances as zero. You should edit the Auto Scale group in the AWS EC2 console with how many instances you want. This will trigger the new ASA virtual instances.

We recommend that you launch only one instance and check its workflow and validate its behavior as to whether it is working as expected. Post that actual requirements of the ASA virtual can be deployed, they can also be verified for the behavior. The minimum number of ASA virtual instances can be marked as Scale-In protected to avoid their removal by AWS Scaling policies.

Maintenance Tasks

Scaling Processes

This topic explains how to suspend and then resume one or more of the scaling processes for your Auto Scale group.

Start and Stop Scale Actions

To start and stop scale out/in actions, follow these steps.

Health Monitor

Every 60 minutes, a CloudWatch Cron job triggers the Auto Scale Manager Lambda for the Health Doctor module:

  • If there are unhealthy IPs which belong to a valid ASA virtual VM, that instance gets deleted if the ASA virtual is more than an hour old.

  • If those IPs are not from a valid ASA virtual machine, then only IPs are removed from the Target Group.

Disable Health Monitor

To disable a health monitor, in constant.py make the constant as “True”.

Enable Health Monitor

To enable a health monitor, in constant.py make the constant as “False”.

Disable Lifecycle Hooks

In the unlikely event that Lifecycle hook needs to be disabled, if disabled it won’t add additional interfaces to Instances. It can also cause a series of failed deployment of the ASA virtual instances.

Disable Auto Scale Manager

To disable Auto Scale Manager, respective CloudWatch Events “notify-instance-launch” and “notify-instance-terminate” should be disabled. Disabling this won’t trigger Lambda for any new events. But already executing Lambda actions will continue. There is no abrupt stop of Auto Scale Manager. Trying abrupt stopping by stack deletion or deleting resources can cause an indefinite state.

Load Balancer Targets

Because the AWS Load Balancer does not allow instance-type targets for instances having more than one network interface, the Gigabit0/1 interface IP is configured as a target on Target Groups. As of now however, the AWS Auto Scale health checks work only for instance-type targets, not IPs. Also, these IPs are not automatically added or removed from target groups. Hence our Auto Scale solution programmatically handles both of these tasks. But in the case of maintenance or troubleshooting, there could be a situation demanding manual effort to do so.

Register a Target to a Target Group

To register the ASA virtual instance to the Load Balancer, its Gigabit0/1 instance IP (outside subnet) should be added as a target in Target Group(s). See Register or Deregister Targets by IP Address.

Deregister a Target from a Target Group

To deregister the ASA virtual instance to the Load Balancer, its Gigabit0/1 instance IP (outside subnet) should be deleted as a target in Target Group(s). See Register or Deregister Targets by IP Address.

Instance Stand-by

AWS does not allow instance reboot in the Auto Scale group, but it does allow a user to put an instance in Stand-by and perform such actions. However, this works best when the Load Balancer targets are instance-type. However, the ASA virtual machines cannot be configured as instance-type targets, because of multiple network interfaces.

Put an Instance in Stand-by

If an instance is put into stand-by, its IP in Target Groups will still continue to be in the same state until the health probes fail. Because of this, it is recommended to deregister respective IPs from the Target Group before putting the instance into stand-by state; see Deregister a Target from a Target Group for more information.

Once the IPs are removed, see Temporarily Removing Instances from Your Auto Scaling Group.

Remove an Instance from Stand-by

Similarly you can move an instance from stand-by to running state. After removal from stand-by state, the instance's IP should be registered to Target Group targets. See Register a Target to a Target Group.

For more information about how to put instances into stand-by state for troubleshooting or maintenance, see the AWS News Blog.

Remove/Detach Instance from Auto Scale Group

To remove an instance from the Auto Scale group, first it should be moved to stand-by state. See "Put Instances on Stand-by". Once the instance is in the stand-by state it can be removed or detached. See Detach EC2 Instances from Your Auto Scaling Group.

Terminate an Instance

To terminate an instance it should be put into stand-by state; see Instance Stand-by. Once the instance is in stand-by, you can proceed to terminate.

Instance Scale-In Protection

To avoid an accidental removal of any particular instance from the Auto Scale group, it can be made as Scale-In protected. If an instance is Scale-In protected, it won’t be terminated due to a Scale-In event.

Please refer to the following link to put an instance into Scale-In protected state.

https://docs.aws.amazon.com/autoscaling/ec2/userguide/as-instance-termination.html


Important


It is recommended to make the minimum number of instances which are healthy (the target IP should be healthy, not just the EC2 instance) as Scale-In protected.


Changes to Configuration

Any changes in configuration won’t be automatically reflected on already running instances. Changes will be reflected on upcoming devices only. Any such changes should be manually pushed to already existing devices.

If you are facing issues while manually updating the configuration on existing instances, we recommend removing these instances from the Scaling Group and replacing them with new instances.

Change the ASA Virtual Admin Password

A change to the ASA virtual password requires the user to change it on each device manually for running instances. For new ASA virtual devices to be onboarded, the ASA virtual password will be taken from the Lambda environment variables. See Using AWS Lambda Environment Variables.

Changes to AWS Resources

You can change many things in AWS post deployment, such as the Auto Scale Group, Launch Configuration, CloudWatch events, Scaling Policies etc. You can import your resources into a CloudFormation stack or create a new stack from your existing resources.

See Bringing Existing Resources Into CloudFormation Management for more information about how to manage changes performed on AWS resources.

Configure IMDSv2 Required Mode for Existing Autoscale Group Instances

You can configure the IMDSv2 Required mode for the ASA Virtual autoscale group instances that are already deployed on the AWS.

Before you begin

IMDSv2 Required mode is only supported by ASA Virtual version 9.20.3 and later. You must ensure that your existing instance ASA Virtual version supports (9.20.3 and later) IMDSv2 APIs before configuring the IMDSv2 Required mode for your deployments or instances.

Procedure


Step 1

Log into http://aws.amazon.com/.

Step 2

Click EC2 > Auto Scaling > Auto Scaling Groups.

Step 3

Select the auto scaling group from the list to configure IMDSv2 Required mode for its associated instances.

Step 4

Click Launch Template.

Step 5

On the Launch templates page, click Modify template (Create new version) from the Actions drop-down list.

Step 6

Update the AMI ID with IMDSv2 supported image.

Step 7

Under Advanced Details, enable the IMDSv2 metadata:

  1. Choose Enabled from the Metadata accessible drop-down list.

  2. Choose V2 only (token required) from the Metadata version drop-down list.

Step 8

Use this version of Launch template in the Auto scaling group to deploy with IMDSv2 Required mode on your auto scaling group instances.


Troubleshooting and Debugging

AWS CloudFormation Console

You can verify the input parameters to your CloudFormation stack in the AWS CloudFormation Console, which allows you to create, monitor, update and delete stacks directly from your web browser.

Navigate to the required stack and check the parameter tab. You can also check inputs to Lambda Functions on the Lambda Functions environment variables tab.

To learn more about the AWS CloudFormation console, see the AWS CloudFormation User Guide.

Amazon CloudWatch Logs

You can view logs of individual Lambda functions. AWS Lambda automatically monitors Lambda functions on your behalf, reporting metrics through Amazon CloudWatch. To help you troubleshoot failures in a function, Lambda logs all requests handled by your function and also automatically stores logs generated by your code through Amazon CloudWatch Logs.

You can view logs for Lambda by using the Lambda console, the CloudWatch console, the AWS CLI, or the CloudWatch API. To learn more about log groups and accessing them through the CloudWatch console, see the Monitoring system, application, and custom log files in the Amazon CloudWatch User Guide.

Load Balancer Health Check Failure

The load balancer health check contains information such as the protocol, ping port, ping path, response timeout, and health check interval. An instance is considered healthy if it returns a 200 response code within the health check interval.

If the current state of some or all your instances is OutOfService and the description field displays the message that the Instance has failed at least the Unhealthy Threshold number of health checks consecutively, the instances have failed the load balancer health check.

You should check the health probe NAT rule in the ASA configuration. For more information, see Troubleshoot a Classic Load Balancer: Health checks.

Traffic Issues

To troubleshoot traffic issues with your ASA virtual instances, you should check the Load Balancer rules, the NAT rules, and the static routes configured in the ASA virtual instances.

You should also check the AWS virtual network/subnets/gateway details provided in the deployment template, including security group rules, etc. You can also refer to AWS documentation, for example, Troubleshooting EC2 instances.

ASA Virtual Failed to Configure

If the ASA virtual fails to configure, you should check the connectivity to the Amazon S3 static HTTP webserver hosting configuration. See Hosting a static website on Amazon S3 for more information.

ASA Virtual Failed to License

If the ASA virtual fails to license, you should check the connectivity to the CSSM server, check the ASA virtual Security Group configuration, and check the Access Control Lists.

Unable to SSH into the ASA Virtual

If you are unable to SSH into the ASA virtual, check to see if the complex password was passed to the ASA virtual via the template.