- ASA FirePOWER Module User Guide
- Introduction to the Cisco ASA FirePOWER Module
- Managing Reusable Objects
- Managing Device Configuration
- Getting Started with Access Control Policies
- Blacklisting Using Security Intelligence IP Address Reputation
- Tuning Traffic Flow Using Access Control Rules
- Controlling Traffic with Network-Based Rules
- Controlling Traffic with Reputation-Based Rules
- Controlling Traffic Based on Users
- Controlling Traffic Using Intrusion and File Policies
- Understanding Network Analysis and Intrusion Policies
- Using Layers in a Network Analysis or Intrusion Policy
- Customizing Traffic Preprocessing
- Getting Started with Network Analysis Policies
- Using Application Layer Preprocessors
- Configuring SCADA Preprocessing
- Configuring Transport & Network Layer Preprocessing
- Tuning Preprocessing in Passive Deployments
- Getting Started with Intrusion Policies
- Tuning Intrusion Policies Using Rules
- Detecting Specific Threats
- Globally Limiting Intrusion Event Logging
- Understanding and Writing Intrusion Rules
- Blocking Malware and Prohibited Files
- Logging Connections in Network Traffic
- Viewing Events
- Configuring External Alerting
- Configuring External Alerting for Intrusion Rules
- Using the ASA FirePOWER Dashboard
- Using ASA FirePOWER Reporting
- Scheduling Tasks
- Managing System Policies
- Configuring ASA FirePOWER Module Settings
- Licensing the FireSIGHT System ASA FirePOWER Module
- Updating ASA FirePOWER Module Software
- Monitoring the System
- Using Backup and Restore
- Generating Troubleshooting Files
- Importing and Exporting Configurations
- Viewing the Status of Long-Running Tasks
- Security, Internet Access, and Communication Ports
- Detecting Back Orifice
- Detecting Portscans
- Preventing Rate-Based Attacks
- Detecting Sensitive Data
- Deploying Sensitive Data Detection
- Selecting Global Sensitive Data Detection Options
- Selecting Individual Data Type Options
- Using Predefined Data Types
- Configuring Sensitive Data Detection
- Selecting Application Protocols to Monitor
- Special Case: Detecting Sensitive Data in FTP Traffic
- Using Custom Data Types
Detecting Specific Threats
You can use several preprocessors in a network analysis policy to detect specific threats to your monitored network, such as Back Orifice attacks, several portscan types, and rate-based attacks that attempt to overwhelm your network with excessive traffic. Note that when an intrusion rule or rule argument requires a disabled preprocessor, the system automatically uses it with its current configuration even though it remains disabled in the network analysis policy’s user interface. For more information, see Limitations of Custom Policies.
You can also use sensitive data detection, which you configure in an intrusion policy, to detect unsecured transmission of sensitive numerical data.
See the following sections for more information on detecting specific threats:
- Detecting Back Orifice explains detection of Back Orifice attacks.
- Detecting Portscans describes the different types of portscans and explains how you can use portscan detection to identify threats to your networks before they develop into attacks.
- Preventing Rate-Based Attacks explains how to limit denial of service (DoS) and SYN flood attacks.
- Detecting Sensitive Data explains how to detect and generate events on sensitive data such as credit card numbers and Social Security numbers in ASCII text.
Detecting Back Orifice
The ASA FirePOWER module provides a preprocessor that detects the existence of the Back Orifice program. This program can be used to gain admin access to your Windows hosts. The Back Orifice preprocessor analyzes UDP traffic for the Back Orifice magic cookie, "* !*QWTY? ", which is located in the first eight bytes of the packet and is XOR-encrypted.
The Back Orifice preprocessor has a configuration page, but no configuration options. When it is enabled, you must also enable the preprocessor rules in the following table for the preprocessor to generate corresponding events. See Setting Rule States for more information.
|
|
|
|---|---|
To view the Back Orifice Detection page:
Step 1![]() Select Configuration > ASA FirePOWER Configuration > Policies > Access Control Policy.
Select Configuration > ASA FirePOWER Configuration > Policies > Access Control Policy.
The Access Control Policy page appears.
Step 2![]() Click the edit icon (
Click the edit icon ( ) next to the access control policy you want to edit.
The access control policy editor appears.
Step 3![]() Select the Advanced tab.
Select the Advanced tab.
The access control policy advanced settings page appears.
Step 4![]() Click the edit icon () next to Network Analysis and Intrusion Policies.
Click the edit icon () next to Network Analysis and Intrusion Policies.
The Network Analysis and Intrusion Policies pop-up window appears.
Step 5![]() Click Network Analysis Policy List.
Click Network Analysis Policy List.
The Network Analysis Policy List pop-up window appears.
Step 6![]() Click the edit icon (
Click the edit icon ( ) next to the policy you want to edit.
If you have unsaved changes in another policy, click OK to discard those changes and continue. See Resolving Conflicts and Committing Policy Changes for information on saving unsaved changes in another policy.
The Policy Information page appears.
Step 7![]() In the navigation panel on the left, click Settings.
In the navigation panel on the left, click Settings.
Step 8![]() You have two choices, depending on whether Back Orifice Detection under Specific Threat Detection is enabled:
You have two choices, depending on whether Back Orifice Detection under Specific Threat Detection is enabled:
The Back Orifice Detection page appears. A message at the bottom of the page identifies the intrusion policy layer that contains the configuration. See Using Layers in a Network Analysis or Intrusion Policy for more information.
Step 9![]() Save your policy, continue editing, discard your changes, or exit while leaving your changes in the system cache. See Resolving Conflicts and Committing Policy Changes for more information.
Save your policy, continue editing, discard your changes, or exit while leaving your changes in the system cache. See Resolving Conflicts and Committing Policy Changes for more information.
Detecting Portscans
A portscan is a form of network reconnaissance that is often used by attackers as a prelude to an attack. In a portscan, an attacker sends specially crafted packets to a targeted host. By examining the packets that the host responds with, the attacker can often determine which ports are open on the host and, either directly or by inference, which application protocols are running on these ports.
Note that when portscan detection is enabled, you must enable rules on the intrusion policy Rules page with generator ID (GID) 122 for enabled portscan types for the portscan detector to generate portscan events. See Setting Rule States and Table 21-5 for more information.
By itself, a portscan is not evidence of an attack. In fact, some of the portscanning techniques used by attackers can also be employed by legitimate users on your network. Cisco’s portscan detector is designed to help you determine which portscans might be malicious by detecting patterns of activity.
Attackers are likely to use several methods to probe your network. Often they use different protocols to draw out different responses from a target host, hoping that if one type of protocol is blocked, another may be available. The following table describes the protocols you can activate in the portscan detector.

Note![]() For events generated by the portscan connection detector, the protocol number is set to 255. Because portscan does not have a specific protocol associated with it by default, the Internet Assigned Numbers Authority (IANA) does not have a protocol number assigned to it. IANA designates 255 as a reserved number, so that number is used in portscan events to indicate that there is not an associated protocol for the event.
For events generated by the portscan connection detector, the protocol number is set to 255. Because portscan does not have a specific protocol associated with it by default, the Internet Assigned Numbers Authority (IANA) does not have a protocol number assigned to it. IANA designates 255 as a reserved number, so that number is used in portscan events to indicate that there is not an associated protocol for the event.
Portscans are generally divided into four types based on the number of targeted hosts, the number of scanning hosts, and the number of ports that are scanned. The following table describes the kinds of portscan activity you can detect.
The information that the portscan detector learns about a probe is largely based on seeing negative responses from the probed hosts. For example, when a web client tries to connect to a web server, the client uses port 80/tcp and the server can be counted on to have that port open. However, when an attacker probes a server, the attacker does not know in advance if it offers web services. When the portscan detector sees a negative response (that is, an ICMP unreachable or TCP RST packet), it records the response as a potential portscan. The process is more difficult when the targeted host is on the other side of a device such as a firewall or router that filters negative responses. In this case, the portscan detector can generate filtered portscan events based on the sensitivity level that you select.
The following table describes the three different sensitivity levels you can choose from.
See the following sections for more information:
Configuring Portscan Detection
The portscan detection configuration options allow you to finely tune how the portscan detector reports scan activity.
Note that when portscan detection is enabled, you must enable rules on the Rules page with generator ID (GID) 122 for enabled portscan types for the portscan detector to generate portscan events. See Setting Rule States and the Portscan Detection SIDs (GID:122) table for more information.
To configure portscan detection:
Step 1![]() Select Configuration > ASA FirePOWER Configuration > Policies > Access Control Policy.
Select Configuration > ASA FirePOWER Configuration > Policies > Access Control Policy.
The Access Control Policy page appears.
Step 2![]() Click the edit icon () next to the access control policy you want to edit.
Click the edit icon () next to the access control policy you want to edit.
The access control policy editor appears.
Step 3![]() Select the Advanced tab.
Select the Advanced tab.
The access control policy advanced settings page appears.
Step 4![]() Click the edit icon () next to Network Analysis and Intrusion Policies.
Click the edit icon () next to Network Analysis and Intrusion Policies.
The Network Analysis and Intrusion Policies pop-up window appears.
Step 5![]() Click Network Analysis Policy List.
Click Network Analysis Policy List.
The Network Analysis Policy List pop-up window appears.
Step 6![]() Click the edit icon () next to the policy you want to edit.
Click the edit icon () next to the policy you want to edit.
If you have unsaved changes in another policy, click OK to discard those changes and continue. See [was Committing Intrusion Policy Changes; update xref] for information on saving unsaved changes in another policy.
The Policy Information page appears.
Step 7![]() In the navigation panel on the left, click Settings.
In the navigation panel on the left, click Settings.
Step 8![]() You have two choices, depending on whether Portscan Detection under Specific Threat Detection is enabled:
You have two choices, depending on whether Portscan Detection under Specific Threat Detection is enabled:
The Portscan Detection page appears. A message at the bottom of the page identifies the intrusion policy layer that contains the configuration. See Using Layers in a Network Analysis or Intrusion Policy for more information.
Step 9![]() In the Protocol field, specify which of the following protocols you want to enable:
In the Protocol field, specify which of the following protocols you want to enable:
Use Ctrl or Shift while clicking to select multiple protocols or clear individual protocols. See the Protocol Types table for more information.
Note that you must ensure TCP stream processing is enabled to detect scans over TCP, and that UDP stream processing is enabled to detect scans over UDP.
Step 10![]() In the Scan Type field, specify which of the following portscans you want to detect:
In the Scan Type field, specify which of the following portscans you want to detect:
Use Ctrl or Shift while clicking to select or deselect multiple protocols. See the Portscan Types table for more information.
Step 11![]() In the Sensitivity Level list, select the level you want to use: low, medium, or high.
In the Sensitivity Level list, select the level you want to use: low, medium, or high.
See the Sensitivity Levels table for more information.
Step 12![]() Optionally, in the Watch IP field, specify which host you want to watch for signs of portscan activity, or leave the field blank to watch all network traffic.
Optionally, in the Watch IP field, specify which host you want to watch for signs of portscan activity, or leave the field blank to watch all network traffic.
You can specify a single IP address or address block, or a comma-separated lists of either or both. For information on using IPv4 and IPv6 address blocks, see IP Address Conventions.
Step 13![]() Optionally, in the Ignore Scanners field, specify which hosts you want to ignore as scanners. Use this field to indicate hosts on your network that are especially active. You may need to modify this list of hosts over time.
Optionally, in the Ignore Scanners field, specify which hosts you want to ignore as scanners. Use this field to indicate hosts on your network that are especially active. You may need to modify this list of hosts over time.
You can specify a single IP address or address block, or a comma-separated lists of either or both. For information on using IPv4 and IPv6 address blocks, see IP Address Conventions.
Step 14![]() Optionally, in the Ignore Scanned field, specify which hosts you want to ignore as the target of a scan. Use this field to indicate hosts on your network that are especially active. You may need to modify this list of hosts over time.
Optionally, in the Ignore Scanned field, specify which hosts you want to ignore as the target of a scan. Use this field to indicate hosts on your network that are especially active. You may need to modify this list of hosts over time.
You can specify a single IP address or address block, or a comma-separated lists of either or both. For information on using IPv4 and IPv6 address blocks, see IP Address Conventions.
Step 15![]() Optionally, clear the Detect Ack Scans check box to discontinue monitoring of sessions picked up in mid-stream.
Optionally, clear the Detect Ack Scans check box to discontinue monitoring of sessions picked up in mid-stream.
Note![]() Detection of mid-stream sessions helps to identify ACK scans, but may cause false events, particularly on networks with heavy traffic and dropped packets.
Detection of mid-stream sessions helps to identify ACK scans, but may cause false events, particularly on networks with heavy traffic and dropped packets.
Step 16![]() Save your policy, continue editing, discard your changes, or exit while leaving your changes in the system cache. See Resolving Conflicts and Committing Policy Changes for more information.
Save your policy, continue editing, discard your changes, or exit while leaving your changes in the system cache. See Resolving Conflicts and Committing Policy Changes for more information.
Understanding Portscan Events
When portscan detection is enabled, you must enable rules with generator ID (GID) 122 and a Snort® ID (SID) from among SIDs 1 through 27 to generate events for each enabled portscan type. See Setting Rule States for more information. The Preprocessor Rule SID column in the following table lists the SID for the preprocessor rule you must enable for each portscan type.
When you enable the accompanying preprocessor rules, the portscan detector generates intrusion events that you can view just as you would any other intrusion event. However, the information presented on the packet view is different from the other types of intrusion events. This section describes the fields that appear on the packet view for a portscan event and how you can use that information to understand the types of probes that occur on your network.
Begin by using the intrusion event views to drill down to the packet view for a portscan event.
Note that you cannot download a portscan packet because single portscan events are based on multiple packets; however, the portscan packet view provides all usable packet information.
Note![]() For events generated by the portscan connection detector, the protocol number is set to 255. Because portscan does not have a specific protocol associated with it by default, the Internet Assigned Numbers Authority (IANA) does not have a protocol number assigned to it. IANA designates 255 as a reserved number, so that number is used in portscan events to indicate that there is not an associated protocol for the event.
For events generated by the portscan connection detector, the protocol number is set to 255. Because portscan does not have a specific protocol associated with it by default, the Internet Assigned Numbers Authority (IANA) does not have a protocol number assigned to it. IANA designates 255 as a reserved number, so that number is used in portscan events to indicate that there is not an associated protocol for the event.
The following table describes the information provided in the packet view for portscan events.
Preventing Rate-Based Attacks
Rate-based attacks are attacks that depend on frequency of connection or repeated attempts to perpetrate the attack. You can use rate-based detection criteria to detect a rate-based attack as it occurs and respond to it when it happens, then return to normal detection settings after it stops. For more information on configuring rate-based detection, see the following topics:
- Understanding Rate-Based Attack Prevention
- Rate-Based Attack Prevention and Other Filters
- Configuring Rate-Based Attack Prevention
- Understanding Dynamic Rule States
- Setting a Dynamic Rule State
Understanding Rate-Based Attack Prevention
You can configure your network analysis policy to include rate-based filters that detect excessive activity directed at hosts on your network. You can use this feature on a device deployed in inline mode to block rate-based attacks for a specified time, then revert to only generating events and not drop traffic.
Rate-based attack prevention identifies abnormal traffic patterns and attempts to minimize the impact of that traffic on legitimate requests. Rate-based attacks usually have one of the following characteristics:
- any traffic containing excessive incomplete connections to hosts on the network, indicating a SYN flood attack
To configure SYN attack detection, see Preventing SYN Attacks.
- any traffic containing excessive complete connections to hosts on the network, indicating a TCP/IP connection flood attack
To configure simultaneous connection detection, see Controlling Simultaneous Connections.
- excessive rule matches in traffic going to a particular destination IP address or addresses or coming from a particular source IP address or addresses.
To configure source or destination-based dynamic rule states, see Setting a Dynamic Rule State.
To configure rule-based dynamic rule states, see Setting a Dynamic Rule State.
In a network analysis policy, you can either configure SYN flood or TCP/IP connection flood detection for the entire policy; in an intrusion policy, you can set rate-based filters for individual intrusion or preprocessor rules. Note that manually adding a rate-based filter to rules 135:1 and 135:2 has no effect. Rules with GID:135 use the client as the source value and the server as the destination value. See Preventing SYN Attacks and Controlling Simultaneous Connections for more information.
Each rate-based filter contains several components:
- for policy-wide or rule-based source or destination settings, the network address designation
- the rule matching rate, which you configure as a count of rule matches within a specific number of seconds
- a new action to be taken when the rate is exceeded
When you set a rate-based setting for the entire policy, the system generates events when it detects a rate-based attack, and optionally can drop the traffic in an inline deployment. When setting rate-based actions for individual rules, you have three available actions: Generate Events, Drop and Generate Events, and Disable.
Note that when started, the new action occurs until the timeout is reached, even if the rate falls below the configured rate during that time period. When the timeout period expires, if the rate has fallen below the threshold, the action for the rule reverts to the action initially configured for the rule. For policy-wide settings, the action reverts to the action of each rule the traffic matches or stops if it does not match any rules.
You can configure rate-based attack prevention in an inline deployment to block attacks, either temporarily or permanently. Without rate-based configuration, rules set to Generate Events create events, but the system does not drop packets for those rules. However, if the attack traffic matches rules that have rate-based criteria configured, the rate action may cause packet dropping to occur for the period of time that the rate action is active, even if those rules are not initially set to Drop and Generate Events.
Note![]() Rate-based actions cannot enable disabled rules or drop traffic that matches disabled rules. However, if you set a rate-based filter at the policy level, you can generate events on or generate events on and drop traffic that contains an excessive number of SYN packets or SYN/ACK interactions within a designated time period.
Rate-based actions cannot enable disabled rules or drop traffic that matches disabled rules. However, if you set a rate-based filter at the policy level, you can generate events on or generate events on and drop traffic that contains an excessive number of SYN packets or SYN/ACK interactions within a designated time period.
You can define multiple rate-based filters on the same rule. The first filter listed in the intrusion policy has the highest priority. Note that when two rate-based filter actions conflict, the system implements the action of the first rate-based filter. Similarly, policy-wide rate-based filters override rate-based filters set on individual rules if the filters conflict.
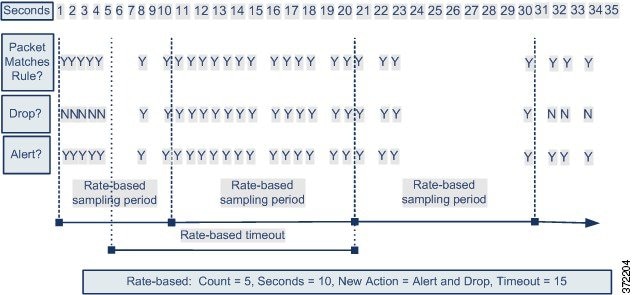
The following diagram shows an example where an attacker is attempting to access a host. Repeated attempts to find a password trigger a rule which has rate-based attack prevention configured. The rate-based settings change the rule attribute to Drop and Generate Events after rule matches occur five times in a 10-second span. The new rule attribute times out after 15 seconds.
After the timeout, note that packets are still dropped in the rate-based sampling period that follows. If the sampled rate is above the threshold in the current or previous sampling period, the new action continues. The new action reverts to generating events only after a sampling period completes where the sampled rate is below the threshold rate.
Preventing SYN Attacks
The SYN attack prevention option helps you protect your network hosts against SYN floods. You can protect individual hosts or whole networks based on the number of packets seen over a period of time. If your device is deployed passively, you can generate events. If your device is placed inline, you can also drop the malicious packets. After the timeout period elapses, if the rate condition has stopped, the event generation and packet dropping stops.
For example, you could configure a setting to allow a maximum of 10 SYN packets from any one IP address, and block further connections from that IP address for 60 seconds.
Enabling this option also activates rule 135:1. Manually activating this rule has no effect. The rule state is always displayed as Disabled, and never changes. The rule generates events when this option is enabled and a defined rate condition is exceeded.
Controlling Simultaneous Connections
You can also limit TCP/IP connections to or from hosts on your network to prevent denial of service (DoS) attacks or excessive activity by users. When the system detects the configured number of successful connections to or from a specified IP address or range of addresses, it generates events on additional connections. The rate-based event generation continues until the timeout period elapses without the rate condition occurring. In an inline deployment you can choose to drop packets until the rate condition times out.
For example, you could configure a setting to allow a maximum of 10 successful simultaneous connections from any one IP address, and block further connections from that IP address for 60 seconds.
Enabling this option also activates rule 135:2. Manually activating this rule has no effect. The rule state is always displayed as Disabled, and never changes. The rule generates events when this option is enabled and a defined rate condition is exceeded.
Rate-Based Attack Prevention and Other Filters
The detection_filter keyword and the thresholding and suppression features provide other ways to filter either the traffic itself or the events that the system generates. You can use rate-based attack prevention alone or in any combination with thresholding, suppression, or the detection_filter keyword.
Rate-Based Attack Prevention and Detection Filtering
The detection_filter keyword prevents a rule from triggering until a threshold number of rule matches occur within a specified time. When a rule includes the detection_filter keyword, the system tracks the number of incoming packets matching the pattern in the rule per timeout period. The system can count hits for that rule from particular source or destination IP addresses. After the rate exceeds the rate in the rule, event notification for that rule begins.
The following example shows an attacker attempting a brute-force login. Repeated attempts to find a password trigger a rule that also includes the detection_filter keyword, with a count set to 5. This rule has rate-based attack prevention configured. The rate-based settings change the rule attribute to Drop and Generate Events for 20 seconds when there are five hits on the rule in a 10-second span.
As shown in the diagram, the first five packets matching the rule do not generate events because the rule does not trigger until the rate exceeds the rate indicated by the detection_filter keyword. After the rule triggers, event notification begins, but the rate-based criteria do not trigger the new action of Drop and Generate Events until five more packets pass.
After the rate-based criteria are met, events are generated and the packets are dropped until the rate-based timeout period expires and the rate falls below the threshold. After twenty seconds elapse, the rate-based action times out. After the timeout, note that packets are still dropped in the rate-based sampling period that follows. Because the sampled rate is above the threshold rate in the previous sampling period when the timeout happens, the rate-based action continues.
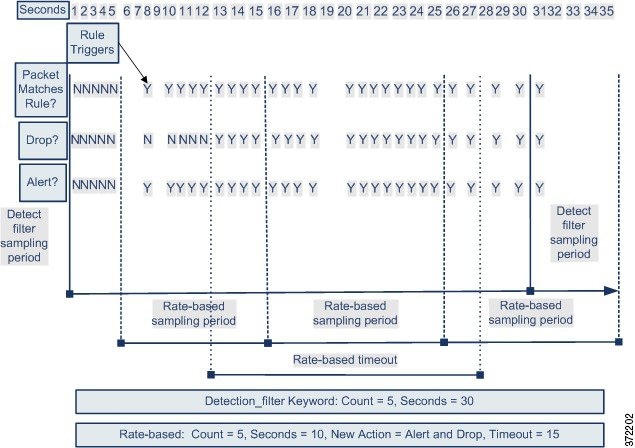
Note that although the example does not depict this, you can use the Drop and Generate Events rule state in combination with the detection_filter keyword to start dropping traffic when hits for the rule reach the specified rate. When deciding whether to configure rate-based settings for a rule, consider whether setting the rule to Drop and Generate Events and including the detection_filter keyword would achieve the same result, or whether you want to manage the rate and timeout settings in the intrusion policy. For more information, see Setting Rule States.
Dynamic Rule States and Thresholding or Suppression
You can use thresholding and suppression to reduce excessive events by limiting the number of event notifications for a rule or by suppressing notifications altogether for that rule. For more information on the available options for thresholding and suppression, see Configuring Event Thresholding and Configuring Suppression Per Intrusion Policy.
If you apply suppression to a rule, the system suppresses event notifications for that rule for all applicable IP addresses even if a rate-based action change occurs. However, the interaction between thresholding and rate-based criteria is more complex.
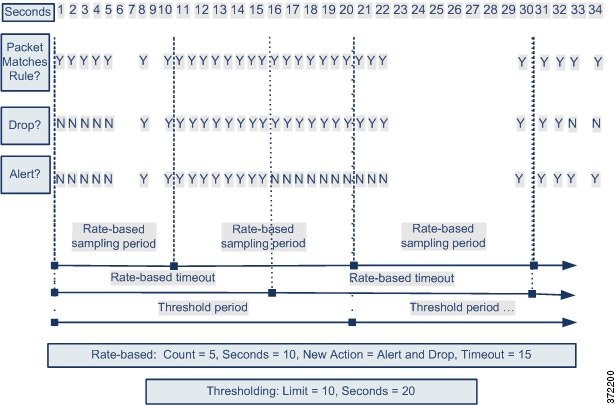
The following example shows an attacker attempting a brute-force login. Repeated attempts to find a password trigger a rule that has rate-based attack prevention configured. The rate-based settings change the rule attribute to Drop and Generate Events for 15 seconds when there are five hits on the rule in 10 seconds. In addition, a limit threshold limits the number of events the rule can generate to 10 events in 23 seconds.
As shown in the diagram, the rule generates events for the first five matching packets. After five packets, the rate-based criteria trigger the new action of Drop and Generate Events, and for the next five packets the rule generates events and the system drops the packet. After the tenth packet, the limit threshold has been reached, so for the remaining packets the system does not generate events but does drop the packets.
After the timeout, note that packets are still dropped in the rate-based sampling period that follows. If the sampled rate is above the threshold rate in the current or previous sampling period, the new action continues. The new action reverts to Generate Events only after a sampling period completes where the sampled rate is below the threshold rate.

Note that although it is not shown in this example, if a new action triggers because of rate-based criteria after a threshold has been reached, the system generates a single event to indicate the change in action. So, for example, when the limit threshold of 10 is reached and the system stops generating events and the action changes from Generate Events to Drop and Generate Events on the 14th packet, the system generates an eleventh event to indicate the change in action.
Policy-Wide Rate-Based Detection and Thresholding or Suppression
You can use thresholding and suppression to reduce excessive events by limiting the number of event notifications for a source or destination or by suppressing notifications altogether for that rule. For more information on the available options for thresholding and suppression, see Configuring Global Thresholds, Configuring Event Thresholding, and Configuring Suppression Per Intrusion Policy.
If suppression is applied to a rule, event notifications for that rule for all applicable IP addresses are suppressed even if a rate-based action change occurs because of a policy-wide or rule-specific rate-based setting. However, the interaction between thresholding and rate-based criteria is more complex.
The following example shows an attacker attempting denial of service (DoS) attacks on hosts in your network. Many simultaneous connections to hosts from the same sources trigger a policy-wide Control Simultaneous Connections setting. The setting generates events and drops malicious traffic when there are five connections from one source in 10 seconds. In addition, a global limit threshold limits the number of events any rule or setting can generate to 10 events in 20 seconds.
As shown in the diagram, the policy-wide setting generates events for the first ten matching packets and drops the traffic. After the tenth packet, the limit threshold is reached, so for the remaining packets no events are generated but the packets are dropped.
After the timeout, note that packets are still dropped in the rate-based sampling period that follows. If the sampled rate is above the threshold rate in the current or previous sampling period, the rate-based action of generating events and dropping traffic continues. The rate-based action stops only after a sampling period completes where the sampled rate is below the threshold rate.
Note that although it is not shown in this example, if a new action triggers because of rate-based criteria after a threshold has been reached, the system generates a single event to indicate the change in action. So, for example, if the limit threshold of 10 has been reached and the system stops generating events and the action changes to Drop and Generate events on the 14th packet, the system generates an eleventh event to indicate the change in action.
Rate-Based Detection with Multiple Filtering Methods
You may encounter situations where the detection_filter keyword, thresholding or suppression, and rate-based criteria all apply to the same traffic. When you enable suppression for a rule, events are suppressed for the specified IP addresses even if a rate-based change occurs.
The following example shows an attacker attempting a brute force login, and describes a case where a detection_filter keyword, rate-based filtering, and thresholding interact. Repeated attempts to find a password trigger a rule which includes the detection_filter keyword, with a count set to 5. This rule also has rate-based attack prevention settings that change the rule attribute to Drop and Generate Events for 30 seconds when there are five rule hits in 15 seconds. In addition, a limit threshold limits the rule to 10 events in 30 seconds.
As shown in the diagram, the first five packets matching the rule do not cause event notification because the rule does not trigger until the rate indicated in the detection_filter keyword is exceeded. After the rule triggers, event notification begins, but the rate-based criteria do not trigger the new action of Drop and Generate Events until five more packets pass. After the rate-based criteria are met, the system generates events for packets 11-15 and drops the packets. After the fifteenth packet, the limit threshold has been reached, so for the remaining packets the system does not generate events but does drop the packets.
After the rate-based timeout, note that packets are still dropped in the rate-based sampling period that follows. Because the sampled rate is above the threshold rate in the previous sampling period, the new action continues.

Configuring Rate-Based Attack Prevention
You can configure rate-based attack prevention at the policy level to stop SYN flood attacks. You can also stop excessive connections from a specific source or to a specific destination.
To configure rate-based attack prevention:
Step 1![]() Select Configuration > ASA FirePOWER Configuration > Policies > Access Control Policy.
Select Configuration > ASA FirePOWER Configuration > Policies > Access Control Policy.
The Access Control Policy page appears.
Step 2![]() Click the edit icon () next to the access control policy you want to edit.
Click the edit icon () next to the access control policy you want to edit.
The access control policy editor appears.
Step 3![]() Select the Advanced tab.
Select the Advanced tab.
The access control policy advanced settings page appears.
Step 4![]() Click the edit icon () next to Network Analysis and Intrusion Policies.
Click the edit icon () next to Network Analysis and Intrusion Policies.
The Network Analysis and Intrusion Policies pop-up window appears.
Step 5![]() Click Network Analysis Policy List.
Click Network Analysis Policy List.
The Network Analysis Policy List pop-up window appears.
Step 6![]() Click the edit icon () next to the policy you want to edit.
Click the edit icon () next to the policy you want to edit.
If you have unsaved changes in another policy, click OK to discard those changes and continue. See Resolving Conflicts and Committing Policy Changes for information on saving unsaved changes in another policy.
The Policy Information page appears.
Step 7![]() In the navigation panel on the left, click Settings.
In the navigation panel on the left, click Settings.
Step 8![]() You have two choices, depending on whether Rate-Based Attack Prevention under Specific Threat Detection is enabled:
You have two choices, depending on whether Rate-Based Attack Prevention under Specific Threat Detection is enabled:
The Rate-Based Attack Prevention page appears. A message at the bottom of the page identifies the intrusion policy layer that contains the configuration. See Using Layers in a Network Analysis or Intrusion Policy for more information.
The SYN Attack Prevention dialog box appears.
The Control Simultaneous Connections dialog box appears.
Step 10![]() Select how you want to track traffic:
Select how you want to track traffic:
- To track all traffic from a specific source or range of sources, select Source from the Track By drop-down list and type a single IP address or address block in the Network field.
- To track all traffic to a specific destination or range of destinations, select Destination from the Track By drop-down list and type an IP address or address block in the Network field.
Note that the system tracks traffic separately for each IP address included in the Network field. Traffic from an IP address that exceeds the configured rate results in generated events only for that IP address. As an example, you might set a source CIDR block of 10.1.0.0/16 for the network setting and configure the system to generate events when there are ten simultaneous connections open. If eight connections are open from 10.1.4.21 and six from 10.1.5.10, the system does not generate events, because neither source has the triggering number of connections open. However, if eleven simultaneous connections are open from 10.1.4.21, the system generates events only for the connections from 10.1.4.21.
For information on using CIDR notation and prefix lengths, see IP Address Conventions.
Step 11![]() Indicate the triggering rate for the rate tracking setting:
Indicate the triggering rate for the rate tracking setting:
Step 12![]() To drop packets matching the rate-based attack prevention settings, select Drop.
To drop packets matching the rate-based attack prevention settings, select Drop.
Step 13![]() In the Timeout field, indicate the time period after which to stop generating events, and if applicable, dropping, for traffic with the matching pattern of SYNs or simultaneous connections.
In the Timeout field, indicate the time period after which to stop generating events, and if applicable, dropping, for traffic with the matching pattern of SYNs or simultaneous connections.

Step 14![]() Save your policy, continue editing, discard your changes, or exit while leaving your changes in the system cache. See Resolving Conflicts and Committing Policy Changes for more information.
Save your policy, continue editing, discard your changes, or exit while leaving your changes in the system cache. See Resolving Conflicts and Committing Policy Changes for more information.
Detecting Sensitive Data
Sensitive data such as Social Security numbers, credit card numbers, driver’s license numbers, and so on may be leaked onto the Internet, intentionally or accidentally. The system provides a sensitive data preprocessor that can detect and generate events on sensitive data in ASCII text, which can be particularly useful in detecting accidental data leaks.
The system does not detect encrypted or obfuscated sensitive data, or sensitive data in a compressed or encoded format such as a Base64-encoded email attachment. For example, the system would detect the phone number (555)123-4567, but not an obfuscated version where each number is separated by spaces, as in (5 5 5) 1 2 3 - 4 5 6 7, or by intervening HTML code, such as <b>(555)</b>-<i>123-4567</i>. However, the system would detect, for example, the HTML coded number <b>(555)-123-4567</b> where no intervening codes interrupt the numbering pattern.

Tip![]() The sensitive data preprocessor can detect sensitive data in unencrypted Microsoft Word files that are uploaded and downloaded using FTP or HTTP; this is possible because of the way Word files group ASCII text and formatting commands separately.
The sensitive data preprocessor can detect sensitive data in unencrypted Microsoft Word files that are uploaded and downloaded using FTP or HTTP; this is possible because of the way Word files group ASCII text and formatting commands separately.
The system detects sensitive data per TCP session by matching individual data types against traffic. You can modify the default settings for each data type and for global options that apply to all data types in your intrusion policy. Cisco provides predefined, commonly used data types. You can also create custom data types.
A sensitive data preprocessor rule is associated with each data type. You enable sensitive data detection and event generation for each data type by enabling the corresponding preprocessor rule for the data type. A link on the configuration page takes you to a filtered view of sensitive data rules on the Rules page, where you can enable and disable rules and configure other rule attributes.
When you save changes to your intrusion policy, you are given the option to automatically enable the sensitive data preprocessor if the rule associated with a data type is enabled and sensitive data detection is disabled.
See the following sections for more information:
- Deploying Sensitive Data Detection
- Selecting Global Sensitive Data Detection Options
- Selecting Individual Data Type Options
- Using Predefined Data Types
- Configuring Sensitive Data Detection
- Selecting Application Protocols to Monitor
- Special Case: Detecting Sensitive Data in FTP Traffic
- Using Custom Data Types
Deploying Sensitive Data Detection
Because sensitive data detection can have a high impact on the performance of your system, Cisco recommends that you adhere to the following guidelines:
- Select the No Rules Active default policy as your base intrusion policy; see Understanding System-Provided Base Policies for more information.
- Ensure that the following settings are enabled in the corresponding network analysis policy:
–![]() FTP and Telnet Configuration under Application Layer Preprocessors
FTP and Telnet Configuration under Application Layer Preprocessors
–![]() IP Defragmentation and TCP Stream Configuration under Transport/Network Layer Preprocessors.
IP Defragmentation and TCP Stream Configuration under Transport/Network Layer Preprocessors.
- Apply the access control policy that includes the intrusion policy containing your sensitive data configuration to a device reserved for sensitive data detection; see Applying an Access Control Policy for more information.
Selecting Global Sensitive Data Detection Options
Global sensitive data preprocessor options control how the preprocessor functions. You can modify global options that specify the following:
- whether the preprocessor replaces all but the last four credit card or Social Security numbers in triggering packets
- which destination hosts on your network to monitor for sensitive data
- how many total occurrences of all data types in a single session result in an event
Note that global sensitive data options are policy-specific and apply to all data types.
You can configure the following global sensitive data detection options.
Replaces with Xs all but the last four digits of credit card numbers and Social Security numbers in the triggering packet. The masked numbers appear in the intrusion event packet view in the user interface and in downloaded packets.
Specifies the destination host or hosts to monitor for sensitive data. You can specify a single IP address, address block, or a comma-separated list of either or both. The system interprets a blank field as any, meaning any destination IP address. For information on using IPv4 and IPv6 address blocks, see IP Address Conventions.
Specifies the total number of all occurrences of all data types during a single session that the preprocessor must detect in any combination before generating a global threshold event. You can specify 1 through 65535.
Cisco recommends that you set the value for this option higher than the highest threshold value for any individual data type that you enable in your policy. See Selecting Individual Data Type Options for more information.
Note the following points regarding global thresholds:
–![]() You must enable preprocessor rule 139:1 to detect and generate events on combined data type occurrences. See Setting Rule States for information on enabling rules in your intrusion policy.
You must enable preprocessor rule 139:1 to detect and generate events on combined data type occurrences. See Setting Rule States for information on enabling rules in your intrusion policy.
–![]() The preprocessor generates up to one global threshold event per session.
The preprocessor generates up to one global threshold event per session.
–![]() Global threshold events are independent of individual data type events; that is, the preprocessor generates an event when the global threshold is reached, regardless of whether the event threshold for any individual data type has been reached, and vice versa.
Global threshold events are independent of individual data type events; that is, the preprocessor generates an event when the global threshold is reached, regardless of whether the event threshold for any individual data type has been reached, and vice versa.
Selecting Individual Data Type Options
Individual data types identify the sensitive data you can detect and generate events on in your specified destination network traffic. You can modify default settings for data type options that specify the following:
- a threshold that must be met for a detected data type to generate a single per-session event
- the destination ports to monitor for each data type
- the application protocols to monitor for each data type
At a minimum, each data type must specify an event threshold and at least one port or application protocol to monitor.
Each predefined data type provided by Cisco uses an otherwise inaccessible sd_pattern keyword to define a built-in data pattern to detect in traffic. See Table 21-8 for a listing of predefined data types. You can also create custom data types for which you use simple regular expressions to specify your own data patterns. See Using Custom Data Types for more information.
Note that data type names and patterns are system-wide; all other data type options are policy-specific.
The following table describes the data type options you can configure.
|
|
|
|---|---|
Specifies the number of occurrences of the data type when the system generates an event. You receive an error message when you save the policy if you do not set a threshold for an enabled data type. You can specify 1 through 255. Note that the preprocessor generates one event for a detected data type per session. Note also that global threshold events are independent of individual data type events; that is, the preprocessor generates an event when the data type event threshold is reached, regardless of whether the global event threshold has been reached, and vice versa. |
|
Specifies destination ports to monitor for the data type. You can specify a single port, a comma-separated list of ports, or |
|
Specifies up to eight application protocols to monitor for the data type. You receive an error message when you save the policy if you enable the rule for a data type without setting at least one port or application protocol for the data type. See Selecting Application Protocols to Monitor for detailed instructions for selecting application protocols for data types. |
|
For a custom data type, the specified pattern to detect (data patterns for data types provided by Cisco are predefined). See Using Custom Data Types for more information. The user interface does not display built-in patterns for predefined data types. Note that custom and predefined data patterns are system-wide. |
Using Predefined Data Types
Each intrusion policy includes predefined data types for detecting commonly used data patterns such as credit card numbers, email addresses, U.S. phone numbers, and U.S. Social Security numbers with and without dashes. Each predefined data type is associated with a single sensitive data preprocessor rule that has a generator ID (GID) of 138. You must enable the associated sensitive data rule in the intrusion policy to enable detection, and event generation, for each data type you want to use in your policy. See Setting Rule States for information on enabling rules in an intrusion policy.
To help you enable sensitive data rules, a link on the configuration page takes you to a filtered view of the Rules page that displays all predefined and custom sensitive data rules. You can also display only predefined sensitive data rules by selecting the sensitive-data rule filtering category on the Rules page. See Filtering Rules in an Intrusion Policy for more information. Predefined sensitive data rules are also listed on the Rule Editor page ( Policies > Intrusion > Rule Editor), where you can view but not edit them under the sensitive-data rule category.
The following table describes each data type and lists the corresponding preprocessor rule that you must enable to enable detection and event generation for the data type.
|
|
|
|
|---|---|---|
Matches Visa®, MasterCard®, Discover® and American Express® fifteen- and sixteen-digit credit card numbers, with or without their normal separating dashes or spaces; also uses the Luhn algorithm to verify credit card check digits. |
||
Matches U.S. phone numbers adhering to the pattern |
||
Matches 9-digit U.S. Social Security numbers that have valid 3-digit area numbers, valid 2-digit group numbers, and do not have dashes. |
||
Matches 9-digit U.S. Social Security numbers that have valid 3-digit area numbers, valid 2-digit group numbers, and dashes. |
||
Matches a user-defined data pattern in the specified traffic. See Using Custom Data Types for more information. |
To reduce false positives from 9-digit numbers other than Social Security numbers, the preprocessor uses an algorithm to validate the 3-digit area number and 2-digit group number that precede the 4-digit serial number in each Social Security number. The preprocessor validates Social Security group numbers through November 2009.
Configuring Sensitive Data Detection
You can modify default global settings and settings for individual data types. You must also enable the preprocessor rule for each data type you want to detect.
If you enable sensitive data preprocessor rules in your policy without enabling sensitive data detection, you are prompted to enable sensitive data detection when you save changes to your policy. See Resolving Conflicts and Committing Policy Changes for more information.
The following table describes actions you can take on the Sensitive Data Detection page.
|
|
|
|---|---|
see Table 21-6 for information on the global settings you can modify. |
|
click the data type name in the Targets page area. The Configuration page area updates to display the current settings for the data type. See the Individual Data Type Options table for information on the options you can modify. |
|
add or remove application protocols to monitor for a data type |
click inside the Application Protocols field, or click Edit next to the field. The Application Protocols pop-up window appears:
Use Ctrl or Shift while clicking to select multiple application protocols. You can also click and drag to select multiple adjacent application protocols. Note To detect sensitive data in FTP traffic, you must add the |
click the + sign next to Data Types on the left side of the page. The Add Data Type pop-up window appears. Specify a unique data type name and the pattern you want to detect with this data type and click OK, or click Cancel to abandon your edits. See Using Custom Data Types for more information. |
|
click the Configure Rules for Sensitive Data Detection link above the Global Settings page area. A listing of all sensitive data preprocessor rules appears in a filtered display of the Rules page. Optionally, you can enable or disable any of the listed rules. Note that you must enable the sensitive data preprocessor rule for each data type that you want to use in your intrusion policy. See Setting Rule States for more information. You can also configure sensitive data rules for any of the other actions available on the Rules page, such as rule suppression, rate-based attack prevention, and so on; see Tuning Intrusion Policies Using Rules for more information. |
To configure sensitive data detection:
Step 1![]() Select Configuration > ASA FirePOWER Configuration > Policies> Intrusion Policy.
Select Configuration > ASA FirePOWER Configuration > Policies> Intrusion Policy.
The Intrusion Policy page appears.
Step 2![]() Click the edit icon () next to the policy you want to edit.
Click the edit icon () next to the policy you want to edit.
If you have unsaved changes in another policy, click OK to discard those changes and continue. See Resolving Conflicts and Committing Policy Changes for information on saving unsaved changes in another policy.
The Policy Information page appears.
Step 3![]() Click Advanced Settings in the navigation panel on the left.
Click Advanced Settings in the navigation panel on the left.
The Advanced Settings page appears.
Step 4![]() You have two choices, depending on whether Sensitive Data Detection under Specific Threat Detection is enabled:
You have two choices, depending on whether Sensitive Data Detection under Specific Threat Detection is enabled:
The Sensitive Data Detection page appears. A message at the bottom of the page identifies the intrusion policy layer that contains the configuration. See Using Layers in a Network Analysis or Intrusion Policy for more information.
Step 5![]() You can take any of the actions described in the Sensitive Data Configuration Actions table.
You can take any of the actions described in the Sensitive Data Configuration Actions table.
Step 6![]() Save your policy, continue editing, discard your changes, or exit while leaving your changes in the system cache. See Resolving Conflicts and Committing Policy Changes for more information.
Save your policy, continue editing, discard your changes, or exit while leaving your changes in the system cache. See Resolving Conflicts and Committing Policy Changes for more information.
Selecting Application Protocols to Monitor
You can specify up to eight application protocols to monitor for each data type.
You must specify at least one application protocol or port to monitor for each data type. However, except in the case where you want to detect sensitive data in FTP traffic, Cisco recommends for the most complete coverage that you specify corresponding ports when you specify application protocols. For example, if you specify HTTP, you might also configure the well-known HTTP port 80. If a new host on your network implements HTTP, the system will monitor port 80 during the interval when it is discovering the new HTTP application protocol.
In the case where you want to detect sensitive data in FTP traffic, you must specify the FTP data application protocol; there is no advantage in specifying a port number. See Special Case: Detecting Sensitive Data in FTP Traffic for more information.
To modify application protocols to detect sensitive data:
Step 1![]() Select Configuration > ASA FirePOWER Configuration > Policies> Intrusion Policy.
Select Configuration > ASA FirePOWER Configuration > Policies> Intrusion Policy.
The Intrusion Policy page appears.
Step 2![]() Click the edit icon () next to the policy you want to edit.
Click the edit icon () next to the policy you want to edit.
If you have unsaved changes in another policy, click OK to discard those changes and continue. See Resolving Conflicts and Committing Policy Changes for information on saving unsaved changes in another policy.
The Policy Information page appears.
Step 3![]() Click Advanced Settings in the navigation panel on the left.
Click Advanced Settings in the navigation panel on the left.
The Advanced Settings page appears.
Step 4![]() You have two choices, depending on whether Sensitive Data Detection under Specific Threat Detection is enabled:
You have two choices, depending on whether Sensitive Data Detection under Specific Threat Detection is enabled:
The Sensitive Data Detection page appears.
A message at the bottom of the page identifies the intrusion policy layer that contains the configuration. See Using Layers in a Network Analysis or Intrusion Policy for more information.
Step 5![]() Click the data type name under Data Types to select the data type you want to modify.
Click the data type name under Data Types to select the data type you want to modify.
The Configuration area updates to display the current settings for the selected data type.
Step 6![]() Click inside the Application Protocols field, or click Edit next to the field.
Click inside the Application Protocols field, or click Edit next to the field.
The Application Protocols pop-up window appears.
Use Ctrl or Shift while clicking to select multiple application protocols. You can also click and drag to select multiple adjacent application protocols.
Note![]() To detect sensitive data in FTP traffic, you must add the
To detect sensitive data in FTP traffic, you must add the FTP data application protocol. See Special Case: Detecting Sensitive Data in FTP Traffic for more information.
Step 8![]() Click OK to add the application protocols.
Click OK to add the application protocols.
The Sensitive Data Detection page is displayed and the application protocols are updated.
Special Case: Detecting Sensitive Data in FTP Traffic
You usually determine which traffic to monitor for sensitive data by specifying the ports to monitor or, optionally, specifying application protocols in deployments. However, specifying ports or application protocols is not sufficient for detecting sensitive data in FTP traffic. Sensitive data in FTP traffic is found in traffic for the FTP application protocol, which occurs intermittently and uses a transient port number, making it difficult to detect. To detect sensitive data in FTP traffic, you must include the following in your configuration:
Specifying the FTP data application protocol enables detection of sensitive data in FTP traffic. See Selecting Application Protocols to Monitor for more information.
In the special case of detecting sensitive data in FTP traffic, specifying the FTP data application protocol does not invoke detection; instead, it invokes the rapid processing of the FTP/Telnet processor to detect sensitive data in FTP traffic. See Decoding FTP and Telnet Traffic for more information.
Note that it is not necessary to specify an FTP port except in the unlikely case where you only want to detect sensitive data in FTP traffic. Most sensitive data configurations will include other ports such as HTTP or email ports. In the case where you do want to specify only one FTP port and no other ports to monitor, Cisco recommends that you specify the FTP command port 23. See Configuring Sensitive Data Detection or more information.
Using Custom Data Types
You can create and modify custom data types to detect data patterns that you specify. For example, a hospital might create a data type to protect patient numbers, or a university might create a data type to detect student numbers that have a unique numbering pattern.
Each custom date type you create also creates a single sensitive data preprocessor rule that has a generator ID (GID) of 138 and a Snort ID of 1000000 or greater, that is, a SID for a local rule. You must enable the associated sensitive data rule to enable detection, and event generation, for each custom data type you want to use in your policy. See Setting Rule States for information on enabling rules in an intrusion policy.
To help you enable sensitive data rules, a link on the configuration page takes you to a filtered view of the Rules page that displays all predefined and custom sensitive data rules. You can also display custom sensitive data rules along with any local custom rules by selecting the local rule filtering category on the Rules page. See Filtering Rules in an Intrusion Policy for more information. Note that custom sensitive data rules are not listed on the Rule Editor page.
Custom data types you create are added to all intrusion policies. You must enable the associated sensitive data rule in any policy that you want to use to detect and generate events for a particular custom data type.
Note that you must use the Sensitive Data Detection configuration page to create data types and their associated rules. You cannot use the rule editor to create sensitive data rules.
Defining Data Patterns in Custom Data Types
You define the data pattern for a custom data type using a simple set of regular expressions comprised of the following:
- three metacharacters
- escaped characters that allow you to use the metacharacters as literal characters
- six character classes
Metacharacters are literal characters that have special meaning within regular expressions. The following table describes the metacharacters you can use when defining a custom data pattern.
|
|
|
|
|---|---|---|
Matches zero or one occurrence of the preceding character or escape sequence; that is, the preceding character or escape sequence is optional. |
||
For example, |
||
Allows you to use metacharacters as actual characters and is also used to specify a predefined character class. See Table 21-12 for a description of the character classes you can use in sensitive data patterns. |
|
You must use a backslash to escape the characters in the following table for the sensitive data preprocessor to interpret them correctly as literal characters.
|
|
|
|---|---|
The following table describes the character classes you can use when defining a custom sensitive data pattern.
The preprocessor treats characters entered directly, instead of as part of a regular expression, as literal characters. For example, the data pattern 1234 matches 1234.
The following data pattern example, which is used in predefined sensitive data rule 138:4, uses the escaped digits character class, the multiplier and option-specifier metacharacters, and the literal dash (-) and left and right parentheses () characters to detect U.S. phone numbers:
Exercise caution when creating custom data patterns. Consider the following alternative data pattern for detecting phone numbers which, although using valid syntax, could cause many false positives:
Because the second example combines optional parentheses, optional spaces, and optional dashes, it would detect, among others, phone numbers in the following desirable patterns:
However, the second example pattern would also detect, among others, the following potentially invalid patterns, resulting in false positives:
Consider finally, for illustration purposes only, an extreme example in which you create a data pattern that detects the lowercase letter a using a low event threshold in all destination traffic on a small company network. Such a data pattern could overwhelm your system with literally millions of events in only a few minutes.
Configuring Custom Data Types
You configure essentially the same data type options for custom data types that you configure for predefined data types. See Selecting Individual Data Type Options for information on setting options that are common to all data types. In addition, you must also specify the name and data pattern for custom data types.
Note that creating a custom data type also creates an associated custom sensitive data preprocessing rule, which you must enable in each policy where you want to use that data type. See Setting Rule States for information on enabling rules in your intrusion policy.
To create or modify a custom data type:
Step 1![]() Select Configuration > ASA FirePOWER Configuration > Policies> Intrusion Policy.
Select Configuration > ASA FirePOWER Configuration > Policies> Intrusion Policy.
The Intrusion Policy page appears.
Step 2![]() Click the edit icon () next to the policy you want to edit.
Click the edit icon () next to the policy you want to edit.
If you have unsaved changes in another policy, click OK to discard those changes and continue. See Resolving Conflicts and Committing Policy Changes for information on saving unsaved changes in another policy.
The Policy Information page appears.
Step 3![]() Click Advanced Settings in the navigation panel on the left.
Click Advanced Settings in the navigation panel on the left.
The Advanced Settings page appears.
Step 4![]() You have two choices, depending on whether Sensitive Data Detection under Specific Threat Detection is enabled:
You have two choices, depending on whether Sensitive Data Detection under Specific Threat Detection is enabled:
The Sensitive Data Detection page appears.
A message at the bottom of the page identifies the intrusion policy layer that contains the configuration. See Using Layers in a Network Analysis or Intrusion Policy for more information.
Step 5![]() You have the following options:
You have the following options:
Specify a unique data type name and the pattern you want to detect with this data type and click OK, or click Cancel to abandon your edits. See Editing Custom Data Type Names and Detection Patterns for more information.
The Sensitive Data Detection page appears. If you clicked OK, the page updates to display your changes.
The Configuration page area updates to display the current settings for the data type. See Configuring Sensitive Data Detection for more information.
- To edit the system-wide name and data pattern for a custom data type, see Editing Custom Data Type Names and Detection Patterns.
- To delete a custom data type, click the delete icon (
 ) next to the data type you want to remove and then click
OK, or click
Cancel to abandon deleting the data type.
) next to the data type you want to remove and then click
OK, or click
Cancel to abandon deleting the data type.
Note that you cannot delete a data type when the sensitive data rule for that data type is enabled in any intrusion policy. Deleting a custom data type deletes it from all intrusion policies.
Editing Custom Data Type Names and Detection Patterns
You can modify the system-wide name and detection pattern for custom sensitive data rules. Note that changing these settings changes them in all other policies on the system. Note also that you must reapply any applied access control policies that include intrusion policies that use custom data types that you modify.
Except for custom data type names and data patterns, all data type options are policy-specific for both custom and predefined data types. See Selecting Individual Data Type Options for information on modifying options other than the name and data pattern in your custom data types.
To edit custom data type names and data patterns:
Step 1![]() Select Configuration > ASA FirePOWER Configuration > Policies> Intrusion Policy.
Select Configuration > ASA FirePOWER Configuration > Policies> Intrusion Policy.
The Intrusion Policy page appears.
Step 2![]() Click the edit icon () next to the policy you want to edit.
Click the edit icon () next to the policy you want to edit.
If you have unsaved changes in another policy, click OK to discard those changes and continue. See Resolving Conflicts and Committing Policy Changes for information on saving unsaved changes in another policy.
The Policy Information page appears.
Step 3![]() Click Advanced Settings in the navigation panel on the left.
Click Advanced Settings in the navigation panel on the left.
The Advanced Settings page appears.
Step 4![]() You have two choices, depending on whether Sensitive Data Detection under Specific Threat Detection is enabled:
You have two choices, depending on whether Sensitive Data Detection under Specific Threat Detection is enabled:
The Sensitive Data Detection page appears.
A message at the bottom of the page identifies the intrusion policy layer that contains the configuration. See Using Layers in a Network Analysis or Intrusion Policy for more information.
Step 5![]() In the Targets page area, click the name of the custom data type you want to modify.
In the Targets page area, click the name of the custom data type you want to modify.
The page updates to show the current settings for the data type, and the Edit Data Type Name and Pattern link appears in the upper right of the Configuration page area.
Step 6![]() Click the Edit Data Type Name and Pattern link.
Click the Edit Data Type Name and Pattern link.
The Edit Data Type pop-up window appears.
Step 7![]() Modify the data type name, pattern, or both and click OK, or click Cancel to abandon your edits. See Defining Data Patterns in Custom Data Types for information on specifying the data pattern.
Modify the data type name, pattern, or both and click OK, or click Cancel to abandon your edits. See Defining Data Patterns in Custom Data Types for information on specifying the data pattern.
The Sensitive Data Detection page appears. If you clicked OK, the page displays your changes.
 Feedback