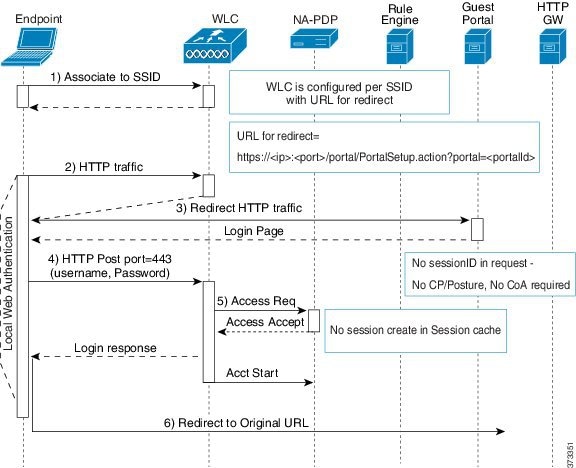
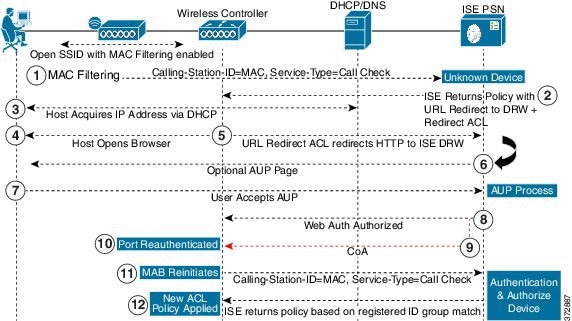
Guest and Secure WiFi

Cisco ISE Guest Services

Cisco Identity Services Engine (Cisco ISE) guest services enable you to provide secure network access to guests such as visitors, contractors, consultants, and customers. You can support guests with basic Cisco ISE licenses, and you can choose from several deployment options depending on your company’s infrastructure and feature requirements.

Cisco ISE provides web-based and mobile portals to provide on-boarding for guests and employees to your company’s network and internal resources and services.

From the Admin portal, you can create and edit guest and sponsor portals, configure guest access privileges by defining their guest type, and assign sponsor privileges for creating and managing guest accounts.

ISE Community Resource

For the complete list of ISE community resources for ISE Guest and Web Authentication, see ISE Guest Access - ISE Guest and Web Authentication.

End-User Guest and Sponsor Portals in Distributed Environment

Cisco ISE end-user web portals depend on the Administration, Policy Services, and Monitoring personas to provide configuration, session support, and reporting.

  • Policy Administration node (PAN): Configuration changes that you make to the users, devices, and end-user portals are written to the PAN.

  • Policy Service node (PSN): The end-user portals run on a PSN, which handles all session traffic, including: network access, client provisioning, guest services, posture, and profiling. If a PSN is part of a node group, and one node fails, the other nodes detect the failure and reset any pending sessions.

  • Monitoring node (MnT node): The MnT node collects, aggregates, and reports data about the end-user and device activity on the My Devices, Sponsor, and Guest portals. If the primary MnT node fails, the secondary MnT node automatically becomes the primary MonT node.

Guest and Sponsor Accounts

  • Guest Accounts: Guests typically represent authorized visitors, contractors, customers, or other users who require temporary access to your network. You can also use guest accounts for employees if you prefer to use one of the guest deployment scenarios to allow employees to access the network. You can access the Sponsor portal to view guest accounts created by a sponsor and by self-registering guests.

  • Sponsor Accounts: Use the Sponsor portal to create temporary accounts for authorized visitors to securely access your corporate network or the Internet. After creating the guest accounts, you can also use the Sponsor portal to manage these accounts and provide account details to the guests.

Guest accounts can be created by:

  • Sponsors: On the Admin portal, you can define the access privileges and feature support for sponsors, who can access the Sponsor portal to create and manage guest accounts.

  • Guests: Guests can also create their own accounts by registering themselves on the Self-Registered Guest portal. Based on the portal configuration, these self-registering guests may need sponsor approval before they receive their login credentials.

    Guests can also choose to access the network using the Hotspot Guest portal, which does not require the creation of guest accounts and login credentials, such as username and password.

  • Employees: Employees who are included in identity stores (such as Active Directory, LDAP, Internal Users) can also gain access through the credentialed Guest portals (Sponsored-Guest and Self-Registered Guest portals), if configured.

Devices onboarded through the Bring Your Own Device (BYOD) workflow will not be treated as a Guest device and the Endpoint Identity Group that is configured will not be changed. For more information on Bring Your Own Device (BYOD), see Bring Your Own Device (BYOD).

After their guest accounts are created, guests can use the Sponsored-Guest portal to log in and gain access to the network.


Note


During a successful guest flow, inside Access-Accept, Cisco ISE sends a RADIUS Session-Timeout Attribute with the value set to the remaining seconds of guest account duration. However, the Custom Session-Timeout attribute in the appropriate Authorization Profile takes precedence over the behavior of the RADIUS Session-Timeout Attribute.


Guest Types and User Identity Groups

Each guest account must be associated with a guest type. Guest types allow a sponsor to assign different levels of access and different network connection times to a guest account. These guest types are associated with particular network access policies. Cisco ISE includes these default guest types:

  • Contractor: Users who need access to the network for an extended amount of time, up to a year.

  • Daily: Guests who need access to the resources on the network for just 1 to 5 days.

  • Weekly: Users who need access to the network for a couple of weeks.

When creating guest accounts, certain sponsor groups can be restricted to using specific guest types. Members of such a group can create guests with only the features specified for their guest type. For instance, the sponsor group, ALL_ACCOUNTS, can be set up to use only the Contractor guest type, and the sponsor groups, OWN_ACCOUNTS and GROUP_ACCOUNTS, can be set up to use Daily and Weekly guest types. If the self-registering guests using the Self-Registered Guest portal typically need access for just a day, you can assign them the Daily guest type.

The guest type defines the user identity group for a guest.

For more information, see:

Create or Edit Guest Types

You can edit the default Guest Types and their default access privileges and settings, or you can create new Guest Types. Changes you make are applied to existing Guest accounts that were created using this particular Guest Type. Guest users who are logged in will not see these changes until they log out and log back in. You can also duplicate Guest Types to create additional Guest Types with the same access privileges.

Each Guest Type has a name, description, and a list of sponsor groups that can create Guest Accounts with this Guest Type. You can designate some Guest Types—use just for self-registering guests, or do not use to create Guest Accounts (by any sponsor group).

Procedure


In the Cisco ISE GUI, click the Menu icon () and choose Guest Access > Configure > Guest Types, and enter the required details.

Use these settings to create the types of guests who can access your network, and their access privileges. You can also specify which Sponsor Groups can create a Guest Type.

Field Name

Usage Guidelines

Guest Type Name

Provide a name (from 1 to 256 characters) that distinguishes this Guest Type from the default Guest Types and others that you create.

Description

Provide additional information (maximum of 2000 characters) about the recommended use of this Guest Type, for example, use for self-registering guests, Do not use for guest account creation, and so on.

Language File

Export or import the language file to use for portals using this Guest Type.

Collect Additional Data

Select custom fields to collect additional information from guests.

To view this window, click the Menu icon () and choose Guest Access > Settings > Custom Fields.

Maximum Access Time—Account Duration Starts

From First Login: The account start time starts when the guest user first logs in to the guest portal, and the end time equals the specified duration time. If the guest user never logs in, the account remains in the Awaiting First login state until the account is removed by the Guest Account Purge Policy. Self-registered and Sponsor-created user accounts start when they create their acoounts and log in to them.

Note


If you choose Allow access only on these days and times, the location is used to establish context of these times. If you do not want From First Login access to be based on location, do not set days and times for access.

From sponsor-specified date: Specify the maximum number of days, from 1 to 999, hours or minutes, that guests of this Guest Type can access and stay connected to the network.

If you change this setting, your changes will not apply to existing guest accounts created using this Guest Type.

Allow Access only on these Days and Times

Enter the time range and select the days of the week to specify when this Guest Type can access the network. If this Guest Type remains connected outside these time parameters, they will be logged out. The time ranges are related to the time zones defined by the locations assigned to the guests using this Guest Type.

Click + or - for adding or deleting restricted access times.

Configure Guest Account Purge Policy

You can schedule an endpoint purge job. The endpoint purge schedule is enabled by default and Cisco ISE deletes endpoints that are older than 30 days. See Endpoints Purge Settings for more information.

Login Options—Maximum simultaneous logins

Enter the maximum number of user sessions that this Guest Type can have running concurrently.

When Guest Exceeds Limit

When you select Maximum simultaneous logins, you must also select the action to take when a user connects after that limit is reached.

When the guest exceeds limit:

  • Disconnect the oldest connection

  • Disconnect the newest connection

    • Redirect user to a portal page showing an error message: An error message is displayed for a period of time that can be configured. After this, the session is disconnected, and the user is redirected to the Guest portal. The error page's content is configured on the Portal Page Customization dialog box, under the Messages > Error Messages tab.

Maximum Devices Guests can Register

Enter the maximum number of devices that can be registered to each guest. You can set the limit to a number lower than what is already registered for the guests of this Guest Type. This will only affect newly created guest accounts.

When guest users reach the maximum number of devices they can register, they view a notification that informs them that they can proceed in one of the following ways:

  • Select a registered device to remove from their device list and then add a new device.

  • Proceed with registering a new device. In this scenario, the oldest registered device on their list is automatically deregistered.

Assign Endpoint Identity Groups for Guest Devices

You must assign endpoint identity groups for guest device registration workflows.

Click the corresponding radio button to assign a

Standard endpoint identity group or a Dynamic endpoint identity group respectively:
  • Standard: From the identitygroup drop-down list, choose the required endpoint identity group.

  • Dynamic: You can only assign LDAP user groups through the dynamic option.

    If a user belongs to multiple user groups, Cisco ISE checks the following list sequentially and proceeds with the first user group (with its configured identity group) that the user matches with.

    • From the User Group drop-down list, choose the required LDAP user group.

    • From the Identity Group drop-down list, choose the required endpoint identity group.

Allow Guest to bypass the Guest portal

Allows users to bypass the credentialed Guest captive portal (web authentication page) and access the network by providing credentials to wired and wireless (dot1x) supplicants or VPN clients. Guest accounts go to Active state bypassing the Awaiting Initial Login state and the AUP page, even if it is required.

If you do not enable this setting, users must first log in through the credentialed Guest captive portal before they will be able to access other parts of the network.

Account Expiration Notification—Send account expiration notification __ days before account expires

Send a notification to Guests before their account expires and specify how many days, hours or minutes in advance of the expiration.

View messages in

Specify the language to use when displaying email or SMS notifications as you set them up.

Email

Select email as the method used for account expiry notification.

Use customization from

Select email customization from another portal.

Messages

Enter the text to use for account expiry notification.

Copy text from

Reuse email text that you created for another Guest Type for account expiry notification.

Send test email to me at

Ensure that the email notification displays as it should by sending it to your email address.

SMS

Select text (SMS) as the method used for account expiry notification.

Messages

Enter the text to use for account expiry notification.

Copy text from

Reuse text messages that you created for another Guest Type.

Send test SMS to me at

Ensure that the text notification displays as it should by sending it to your cell phone.

These sponsor groups can create this guest type

Select which sponsor groups can create Guest accounts with this Guest Type.

If you want to disable use of this Guest Type, do not assign it to any sponsor group. If you want to discontinue use of this Guest Type, delete the sponsor groups listed.


What to do next

  • Create or modify sponsor groups to use this guest type.

  • If appropriate, assign this guest type to self-registering guests in the Self-Registered Guest portal.

Disable a Guest Type

You cannot delete the last remaining guest type or guest types that are being used by guest accounts. If you want to delete a guest type that is in use, first ensure that it is no longer available for use. Disabling a guest type does not affect guest accounts that were created with that guest type.

The following steps explain how to prepare for and disable a target guest type.

Procedure


Step 1

Identify the sponsor groups that allow the sponsor to create guests using the target guest type. In the Cisco ISE GUI, click the Menu icon () and choose Work Centers > Guest Access > Configure > Portals and Components > Sponsor Groups. Open each sponsor group and examine the This sponsor group can create accounts using these guest types list.

Step 2

Identify the Self-Registered portals that assign the target guest type. In the Cisco ISE GUI, click the Menu icon () and choose Work Centers > Guest Access > Configure > Portals and Components > Guest Portals. Open each Self-Registered Guest portal. If the portal uses the specific guest type, expand Portal Settings, and change the assigned Guest Type in the Employees using this portal as guests inherit login options and dynamic endpoint group assignment from: field.

Step 3

Open the guest type you wish to delete, and delete all sponsor groups that you identified in the previous steps. This action effectively prevents all sponsors from using creating a new guest account with this guest type. In the Cisco ISE GUI, click the Menu icon () and choose Work Centers > Guest Access > Configure > Portals and Components > Guest Type.


Configure Maximum Simultaneous Logins for Endpoint Users

You can configure the maximum number of simultaneous logins that are allowed for a guest.

When the user logs in to a guest portal, and is successfully authenticated, that user's number of existing logins is checked to see if the user has already reached the maximum number of logins. If yes, the Guest user is redirected to an error page. An error page is displayed, and the session is stopped. If that user tries to access the internet again, the user's connection is redirected to the guest portal's login page.

Before you begin

Make sure that the authorization profile that you are using in the authorization policy for this portal has Access Type set to Access_Accept. If Access Type is set to Access_Reject, then maximum simultaneous logins is not enforced.

Procedure


Step 1

In the Cisco ISE GUI, click the Menu icon () and choose Work Centers > Guest Access > Portals & Components > Guest Type. Under Login Options:

  1. Check the Maximum simultaneous logins check box and enter the maximum number of simultaneous logins allowed.

  2. Under When guest exceeds limit, click the Disconnect the newest connection option.

  3. Check the Redirect user to a portal page showing an error message check box.

Step 2

Choose Policy > Policy Elements > Results, and create an authorization profile:

  1. Under Common Tasks, check Web Redirection and do the following:

    • In the first drop-down, choose Centralized Web Auth.

    • Enter the ACL you created as part of the prerequisite.

    • For Value, select the guest portal to be redirected to.

  2. Scroll down in Common Tasks, and check the Reauthentication check box and do the following:

    • In Timer, enter the amount of time you want the error page to display before redirecting the user to the guest portal.

    • In Maintain Connectivity During Reauthentication, choose Default.

Step 3

In the Cisco ISE GUI, click the Menu icon () and choose Policy > Policy Sets. Create an authorization policy so that when the attribute NetworkAccess.SessionLimitExceeded is true, the user is redirected to the portal.


What to do next

You can customize the text of the error page on the Portal Page Customization tab. Choose Messages > Error Messages and change the text of the error message key ui_max_login_sessions_exceeded_error.

Schedule When to Purge Expired Guest Accounts

When an active or suspended guest account reaches the end of its account duration (as defined by the sponsor when creating the account), the account expires. When guest accounts expire, the affected guests cannot access the network. Sponsors can extend expired accounts before they are purged. However, after an account is purged, sponsors must create new accounts.

When expired guest accounts are purged, the associated endpoints and reporting and logging information are retained.

Cisco ISE automatically purges expired guest accounts every 15 days, by default. The Date of next purge indicates when the next purge will occur. You can also:
  • Schedule a purge to occur every X days. The first purge will occur in X days at Time of Purge, then purges occur every X days.

  • Schedule a purge on a given day of the week every X weeks. The first purge occurs on the next Day of Week at Time of Purge, then purges occur every configured number of weeks on that day and time. For example, on Monday you set purges to occur on Thursday every 5 weeks. The next purge will be the Thursday of this week, not the Thursday 5 weeks from now.

  • Force a purge to happen immediately by clicking Purge Now.

If the Cisco ISE server is down when the purge is scheduled to run, the purge is not executed. The purge process will run again at the next scheduled purge time, assuming the server is operational at that time.

Procedure


Step 1

In the Cisco ISE GUI, click the Menu icon () and choose Work Centers > Guest Access > Settings > Guest Account Purge Policy.

Step 2

Choose one of these options:

  • Click Purge Now to immediately purge the expired guest account records.
  • Check Schedule purge of expired guest accounts to schedule a purge.

    Note


    After each purge is completed, the Date of next purge is reset to the next scheduled purge.

Step 3

Specify the number of days of inactivity to expire users in Expire portal-user information after. This setting prevents LDAP and Active Directory accounts that were never used from staying in the ISE database indefinitely.

If a first login does not happen, on expiry of the specified time period, the guest account is moved to the expired state and is then purged, based on the configured purge policy.

You can also specify the frequency (in days or weeks) at which the expired guest accounts must be purged. If you have selected the Purge occurs every _ weeks option, you can also specify the day and time for purging the expired accounts.

Step 4

Click Save. If you do not want to save any updates you made to the settings, click Reset to revert to the last saved values.


Add Custom Fields for Guest Account Creation

When providing guest access, you may want to collect information from your guests beyond just their names, email addresses, and phone numbers. Cisco ISE provides custom fields that you can use to collect additional information about guests that is specific to your company’s needs. You can associate the custom fields with guest types and with the Self-Registered Guest and Sponsor portals. Cisco ISE does not provide any default custom fields.

Procedure


Step 1

In the Cisco ISE GUI, click the Menu icon () and choose Guest Access > Settings > Custom Fields.

Step 2

Enter the Custom Field Name, pick a Data Type from the drop-down list, and enter Tip Text to help provide additional information about the custom field. For instance, if you enter Date of Birth, pick Date-MDY, and enter a tip for the date format as MM/DD/YYYY.

Step 3

Click Add.

The custom field appears in the list in alphabetical order or in the context of the sorted order.

Step 4

Click Save. If you do not want to save any updates you made to the settings, click Reset to revert to the last saved values.

Note


If you delete a custom field, it will no longer be available for selection in the Custom Fields list for guest types and in the Self-Registered Guest and Sponsor portals settings. If the field is being used, Delete will be disabled.


What to do next

You can include the desired custom fields:

Specify Email Addresses and SMTP Servers for Email Notifications

Cisco ISE allows you to send emails to sponsors and guests, notifying them of information and instructions. You can configure SMTP servers to deliver these email notifications. You can also specify the email address from which the notifications will be sent to guests.


Note


Guest notifications require an UTF-8 compatible e-mail client.

HTML-capable e-mail client (with functionality enabled) is needed to use the single click sponsor approval feature.


Procedure


Step 1

In the Cisco ISE GUI, click the Menu icon () and choose Work Centers > Guest Access > Settings > Guest Email Settings.

Step 2

Enable email notifications to guests is checked by default. If you disable this setting, guests will not receive email notifications regardless of any other settings you may have enabled while configuring Guest and Sponsor portals.

Step 3

Enter the Default “From” email address that is designated for sending email notifications to guests. For example, donotreply@ yourcompany.com.

Step 4

Do one of the following:

  • Check Send notifications from sponsor's email address (if sponsored) if you want guests to receive notifications from the sponsor who created their accounts. Self-registering guests will receive notifications from the default email address.
  • Check Always send notifications from the default email address if you want guests to receive notifications, regardless of whether they are sponsored and self-registering.

Step 5

Click Save. If you do not want to save any updates you made to the settings, click Reset to revert to the last saved values.


Assign Guest Locations and SSIDs

A Guest Location defines a name for a time zone, and is used by ISE to enforce time-related settings of logged on Guests. Guest Locations are assigned to Guest accounts by Sponsors creating a Guest account, and by self-registering Guests. The default Guest Location is San Jose. If no other Guest Locations are added, all accounts are assigned this Guest Location. You can't delete the San Jose Guest Location unless you create one or more new Locations. Unless all your Guests will be in the same time-zone as San Jose, create at least one Guest Location with the required time-zone.


Note


Guest access times are based on the Guest Location's time zone. A Guest user may not be able to login if the Guest Location's time zone doesn't match the system time zone. In this case, the Guest user may get an "Authentication Failed" error. You might see the "Guest active time period not yet started" error message in the debug report. As a workaround, you can adjust the Guest access start time to match the local time zone of the Guest user by using the Manage Accounts option.

The SSIDs you add here are available to Sponsor Portals, so Sponsors can tell the Guest which SSID to connect to.

You can't delete a Guest Location or a SSID if it is configured in a Sponsor portal or assigned to a Guest account.

Procedure


Step 1

In the Cisco ISE GUI, click the Menu icon () and choose Work Centers > Portals & Components > Settings > Guest Locations and SSIDs.

Step 2

For Guest Locations:

  1. For each time-zone that you need to support, enter a Location name and pick a Time zone from the drop-down list.

  2. Click Add.

    Note

     
    In a Guest Location, the name of the place, the name of the time zone, and the GMT offset are static; you cannot change them. The GMT offset does not change with daylight savings time changes. The GMT offsets are the opposite of what is shown in the list. For example, Etc/GMT+3 is actually GMT-3.

    Note

     
    For From First-login guest type, ensure that you configure a Guest Location (time zone) only if you intend to configure the access time restrictions in the Work Centers > Guest Access > Portals & Components > Guest Types page.

Step 3

For Guest SSIDs:

  1. Enter the SSID names of the networks that will be available for guests to use at the Guest Locations.

  2. Click Add.

Step 4

Click Save. To revert to the last saved values, click Reset.


What to do next

If you added a new Guest Location or SSID, you can:

  • Provide the SSIDs for Sponsors to use when creating Guest accounts. See Portal Settings for Sponsor Portals.

  • Add the Guest Locations to Sponsor Groups, so that Sponsors assigned to that group can use them when creating guest accounts. See Configure Sponsor Groups.

  • Assign the Guest Locations available to self-registering guests using a Self-Registered Guest portal. See Create a Self-Registered Guest Portal.

  • For existing guest accounts, edit them manually to add SSIDs or Locations.

Rules for Guest Password Policies

Cisco ISE has the following built-in rules for guest passwords:
  • The Guest password policy applies to sponsor portals, self registered portals, accounts uploaded in a CSV file, passwords created using the ERS API, and user created passwords.

  • Changes to the guest password policy do not affect existing accounts, until the guests passwords have expired and need to be changed.

  • Passwords are case sensitive.

  • The special characters <, >, /, space, comma, and % cannot be used.

  • Minimum length and minimum required characters apply to all passwords.

  • Passwords cannot match usernames.

  • New passwords cannot match current passwords.

  • Guests do not receive notifications before password expiration, unlike guest account expiration. When guest passwords expire, either sponsors can reset the password to a random password or guests can log in using their current login credentials and then change their password.


Note


The guest default username is four alpabetic and password is four numeric characters. Short, easy to remember usernames and passwords are adequate for short-term guests. You can change the username and password length in ISE, if you desire.


Set the Guest Password Policy and Expiration

You can define a password policy for all Guest portals. A Guest password policy determines how the password is generated for all guest accounts. A password can be a mixture of alphabetic, numeric, or special characters. You can also set the number of days after which guest passwords will expire, requiring guests to reset their passwords.

The Guest password policy applies to sponsor portals, self registered portals, accounts uploaded in a CSV file, passwords created using the ERS API, and user created passwords.

Procedure


Step 1

In the Cisco ISE GUI, click the Menu icon () and choose Guest Access > Settings > Guest Password Policy.

Step 2

Enter the Minimum password length (in characters) for the guest passwords.

Step 3

Specify the characters from each character set that can be used by guests to create passwords.

Choose one of the following options under Allowed Characters and Minimums to specify the password policy for guests:
  • Use all the characters from each character set.
  • To prevent the use of certain characters, choose Custom from the drop-down menu, and delete these characters from the predefined and complete sets.

Step 4

Enter the minimum number of characters to use from each set.

The total number of required characters across the four character sets should not exceed the overall Minimum password length.

Step 5

Choose one of the following options under Password Expiration:

  • Specify the frequency (in days) when guests have to change their passwords after they first log in. If the guests do not reset their passwords before they expire, the next time they log in to the network using their original login credentials, they are prompted to change their passwords.
  • Set the passwords to never expire.

Step 6

Click Save. If you do not want to save any updates you made to the settings, click Reset to revert to the last saved values.


What to do next

You should customize the error messages that are related to the password policy to provide the password requirements.

  1. Choose Guest Access > Portals & Components > Sponsored-Guest Portals or Self-Registered Guest Portals > Edit > Portal Page Customization > Error Messages.

  2. Search for the keyword policy.

Rules for Guest Username Policies

Cisco ISE has the following built-in rules for guest username policies:
  • Changes to the guest username policy do not affect existing accounts, until the guest accounts have expired and need to be changed.

  • The special characters <, >, /, space, comma, and % cannot be used.

  • Minimum length and minimum required characters apply to all system-generated usernames, including usernames based on email addresses.

  • Passwords cannot match usernames.

Set the Guest Username Policy

You can configure rules for how guest usernames are created. A generated username can be created based on the email address, or based on the first name and last name of the guest. The Sponsor can also create a random number of guest accounts to save time when creating multiple guests, or when guest names and email addresses are not available. Randomly generated guest usernames consist of a mixture of alphabetic, numeric, and special characters. These settings affect all guests.

Procedure


Step 1

In the Cisco ISE GUI, click the Menu icon () and choose Work Centers > Portals & Components > Settings > Guest Username Policy.

Step 2

Enter the Minimum username length (in characters) for the guest usernames.

Step 3

Choose one of the options under Username Criteria for Known Guests to specify the policy for creating usernames for known guests.

Step 4

Choose one of the following options under Characters Allowed in Randomly-Generated Usernames to specify the policy for creating random usernames for guests:

  • Use all characters from each character set.
  • To prevent the use of certain characters, choose Custom from the drop-down menu, and delete these characters from the predefined and complete sets.

Step 5

Enter the minimum number of characters to use from each set.

The total number of characters from the three character sets should not exceed the number specified in Minimum username length.

Step 6

Click Save. If you do not want to save any updates you made to the settings, click Reset to revert to the last saved values.


What to do next

You should customize the error messages that are related to the username policy to provide the username requirements.

  1. Choose Work Centers > Guest Access > Portals & Components > Sponsored-Guest Portals, Self-Registered Guest Portals, Sponsor Portals, or My Devices Portals > Edit > Portal Page Customization > Error Messages.

  2. Search for the keyword policy.

SMS Providers and Services

SMS services send SMS notifications to guests that are using credentialed Guest portals. If you plan to send SMS messages, enable this service. Whenever possible, configure and provide free SMS service providers to lower your company's expenses.

Cisco ISE supports a variety of cellular service providers that provide free SMS services to their own subscribers. You can use these providers without a service contract and without configuring their account credentials in Cisco ISE. These include ATT, Orange, Sprint, T-Mobile, and Verizon.

You can also add other cellular service providers that offer free SMS services or a global SMS service provider, such as a Click-A-Tell. The default global SMS service provider requires a service contract and you must configure their account credentials in Cisco ISE.

  • If self-registering guests pick their free SMS service provider on the Self-Registration form, SMS notifications with their login credentials are sent to them free of cost. If they do not pick an SMS service provider, then the default global SMS service provider that is contracted by your company sends the SMS notifications.

  • To allow sponsors to send SMS notifications to guests whose accounts they created, customize the sponsor portal and select all the appropriate SMS service providers that are available. If you do not select any SMS service providers for the Sponsor portal, the default global SMS service provider that is contracted by your company provides the SMS services.

SMS providers are configured as SMS Gateways in Cisco ISE. Email from Cisco ISE is converted to SMS by the SMS gateway. The SMS gateway can be behind a proxy server.


Note


Cisco ISE SMS gateway does not support authorization codes in JSON format.


Configure SMS Gateways to Send SMS Notifications to Guests

You must set up SMS gateways in Cisco ISE to enable:

  • Sponsors to manually send SMS notifications to guests with their login credentials and password reset instructions.

  • Guests to automatically receive SMS notifications with their login credentials after they successfully register themselves.

  • Guests to automatically receive SMS notifications with actions to take before their guest accounts expire.

When entering information in the fields, you should update all text within [ ], such as [USERNAME], [PASSWORD], [PROVIDER_ID], and so on, with information specific to your SMS provider's account.

Before you begin

Configure a default SMTP server to use for the SMS Email Gateway option.

Procedure

Step 1

In the Cisco ISE GUI, click the Menu icon () and choose Administration > System > Settings > SMS Gateway > SMS Gateway Providers.

Step 2

Click Add.

Step 3

Enter the following details to configure the SMS gateway:

Field Name Usage Guidelines

SMS Gateway Provider Domain

Enter the provider domain, which is used as the host portion and the guest account's mobile number as the user portion of the email address to send the message to the provider's SMS/MMS gateway.

Provider account address

(Optional)

Enter the account address, which is used as the FROM address (typically the account address) for the email and overrides the Default Email Address global setting in Guest Access > Settings.

SMTP API destination address

(Optional)

Enter the SMTP API Destination Address, if you are using an SMTP SMS API that requires a specific account recipient address, such as Clickatell SMTP API.

This is used as the TO address for the email and the guest account's mobile number is substituted into the message's body template.

SMTP API body template

(Optional)

Enter the SMTP API Body Template, if you are using an SMTP SMS API that requires a specific email body template for sending the SMS, such as Clicketell SMTP API.

The supported dynamic substitutions are $mobilenumber$, $timestamp$ (of format $YYYYMMDDHHHMISSmimi$), and $message$. You can use $timestamp$$mobilenumber$ for SMS gateways that require a unique idenitifier in the URL.

Use these settings to configure sending SMS messages to guests and sponsors via an HTTP API (GET or POST method).

Field Usage Guidelines

URL

Enter the URL for the API.

This field is not URL encoded. The guest account's mobile number is substituted into the URL. The supported dynamic substitutions are $mobilenumber$ and $message$.

If you are using HTTPS with the HTTP API, include HTTPS in the URL string and upload your provider's trusted certificates into Cisco ISE. In the Cisco ISE GUI, click the Menu icon () and choose Administration > System > Certificates > Trusted Certificates.

Data (Url encoded portion)

Enter the Data (URL encoded portion) for the GET or POST request.

This field is URL encoded. If using the default GET method, the data is appended to the URL specified above.

Use HTTP POST method for data portion

If you are using the POST method, check this option.

The data specified above is used as the content of the POST request.

HTTP POST data content type

If you are using the POST method, specify the content type such as "plain/text" or "application/xml".

HTTPS Username

HTTPS Password

HTTPS Host name

HTTPS Port number

Enter this information.

Step 4

(Optional) Check the Enable Mobile Number Format check box if you want to add a Javascript to format the mobile number before it is sent to the SMS provider.

Step 5

Click Submit.


What to do next

If you configured a new SMS gateway, you can:

Social Login for Self-Registered Guests

Guests can select a social media provider as a way to provide credentials as a self-registered guest, instead of entering username and password in the guest portal. To enable this, you configure a social media site as an external identity source, and configure a portal that allows users to use that external identity (social media provider). Additional information about social media login for Cisco ISE can be found here: https://community.cisco.com/t5/security-documents/how-to-configure-amp-use-a-facebook-social-media-login-on-ise/ta-p/3609532

After authenticating with social media, guests can edit the information retrieved from the social media site. Even though social media credentials are used, the social media site does not know that the user has used that site's information to log in. Cisco ISE still uses the information retrieved from the social media site internally for future tracking.

You can configure the guest portal to prevent users from changing the information retrieved from the social media site, or even suppress display of the registration form.

Social Login Guest Flow

Login flow varies, depending on how you configure the portal settings. You can configure social media login without user registration, with user registration, or with user registration and sponsor approval.

  1. User connects to the self-registered portal, chooses to log in using social media. If you configured an access code, the user must also enter the access code on the login page.

  2. The user is redirected to the social media site for authentication. The user must approve use of their social media site's basic profile information.

  3. If the login to the social media site is successful, Cisco ISE retrieves additional information about the user from the social media site. Cisco ISE uses the social media information to log the user on.

  4. After login, the user may have to accept the AUP, depending on configuration.

  5. The next action in the login flow depends on the configuration:

    • Without registration: Registration is done behind the scenes. Facebook provides a token for the user's device to Cisco ISE for login.

    • With registration: The user is instructed to complete a registration form that has been prepopulated with information from the social media providers. This allows the user to correct and add missing information, and submit updated information for login. If you configured a registration code in the Registration Form Settings, the user must also enter the registration code.

    • With registration and sponsor approval: In addition to allowing the user to update the social media-provided information, the user is informed that they must wait for sponsor approval. The sponsor receives an email requesting approval or denial of the account. If the sponsor approves the account, Cisco ISE emails the user that they have access. The user connects the guest portal, and is automatically logged in with social media token.

  6. Registration is successful. The user is directed to the option configured in After submitting the guest form for self-registration, direct guest to on Registration Form Settings. The user's account is added to the endpoint identity group configured for the portal's guest type.

  7. The user has access until the guest account expires, or the user disconnects from the network.

    If the account expired, the only way to allow the user to log in is to reactivate the account, or to delete it. The user must go through the login flow again.

    If a user disconnects from the network, and reconnects, the action Cisco ISE takes depends on the authorization rules. If the user hits an authorization similar to:
    rule if guestendpoint then permit access
    and the user is still in the endpoint group, then the user is redirected to the logon page. If a user still has a valid token, they are automatically logged in. If not, the user must go through registration again.

    If the user is no longer in the endpoint group, the user is redirected to the guest page to go through registration.

Social Login Account Duration

Account re-authorization varies by connection method:

  • For 802.1x, the default authorization rule
    if guestendpoint then permit access
    enables a guest to reconnect if the user device falls asleep, or if the user device roams to another building. When the user reconnects, the user is redirected back to guest page which either does auto login with a token, or starts registration again.
  • For MAB, every time the user reconnects, the user is redirected to the guest portal, and needs to click the social media again. If Cisco ISE still has a token for that user's account (guest account hasn't expired), then the flow goes to log in success immediately, without having to connect with the social media provider.

    To prevent every reconnect redirecting to another social login, you can configure an authorization rule that remembers the device, and permits access until the account expires. When the account expires, it is removed from the endpoint group, and the flow is redirected back to the rule for guest redirect. For example:

    if wireless_mab and guest endpoint then permit access
    if wireless_mab then redirect to self-registration social media portal

Reporting and User Tracking

Cisco ISE Live Logs and Facebook

  • Authentication Identity Store: This is the name of the application you created in your social media app for Cisco ISE.

  • Facebook username: This is the username reported by Facebook. If you allow the user to change their username during registration, the name reported by Cisco ISE is the social media username.

  • SocialMediaIdentifier: This is
    https://facebook.com/<number>
    where number identifies the social media user.

ISE Reports: The Guest username is the user's name on the social media site.

Facebook Analytics: You can see who is using your guest network through Facebook social logon by using analytics from Facebook.

Wireless and Facebook: The User Name on the Wireless controller is the unique Facebook ID, the same as the SocialMediaIdentifier on the Live Logs. To see the setting in the Wireless UI, choose Monitor > Clients > Detail, and look at the User Name field.

Block a Social Media-Authenticated Guest

You can create an authorization rule to block an individual social media user. This can be useful when using Facebook for authentication, when the token has not expired. The following example shows a Wi-Fi-connected guest user blocked by using their Facebook User Name.
Figure 1. WiFi-connected guest user is blocked by using their Facebook user name
WiFi-connected guest user is blocked by using their Facebook user name

For information about configuring Social Login for Cisco ISE, see Configuring Social Login.

Configuring Social Login

Before you begin

Configure the social media site so that Cisco ISE can connect to it. Only Facebook is supported currently.

Make sure the following HTTPS 443 URLs are open through your NADs so that Cisco ISE can access Facebook:
facebook.co
akamaihd.net
akamai.co
fbcdn.net

Note


The social login URL for Facebook is HTTPS. Not all NADs support redirection to a HTTPS URL. See https://communities.cisco.com/thread/79494?start=0&tstart=0&mobileredirect=true.
Procedure

Step 1

On Facebook, create a Facebook application:

  1. Log on to https://developers.facebook.com and sign up as a developer.

  2. Select Apps in the header and click Add a New App.

Step 2

Add a new Product, Facebook Login, of type Web. Click Settings, and set the following values:

  • Client OAuth Login: NO

  • Web OAuth Login: YES

  • Force Web OAuth Reauthentication: NO

  • Embedded Browser OAuth Login: NO

  • Valid OAuth redirect URIs: Add the automated redirect URLs from the Cisco ISE

  • Login from Devices: NO

Step 3

Click App Review, and select Yes for Your app is currently live and available to the public.

Step 4

In the Cisco ISE GUI, click the Menu icon () and choose Administration > Identity Management > External Identity Sources > Social Login. Click Add to create a new social login external identity source.

  • Type: Select the type of Social Login provider. Facebook is currently the only option.

  • App ID: Enter the App ID from the Facebook application.

  • App Secret: Enter the App Secret from the Facebook application.

Step 5

In Cisco ISE, enable Social Media Login in a self-registered portal. On the portal page, choose Portal & Page Settings > Login Page Settings, check the Allow Social Logincheck box, and enter the following details:

  • Show registration form after social login: This allows the user to change the information provided by Facebook.

  • Require guests to be approved: This informs the user that a sponsor must approve their account, and will send them credentials for login.

Step 6

Choose Administration > External Identity Sources, select the Facebook Login window, and edit your Facebook external identity source.

This creates redirect URIs, which you add to the Facebook application.

Step 7

In Facebook, add the URIs from the previous step to your Facebook application.


What to do next

In Facebook, you can display data about your app, which shows the guest activity with the Facebook Social Login.

Guest Portals

When people visiting your company wish to use your company’s network to access the internet, or resources and services on your network, you can provide them network access through a Guest portal. Employees can use these Guest portals to access your company’s network, if configured.

There are three default Guest portals:

  • Hotspot Guest portal: Network access is granted without requiring any credentials. Usually, an Acceptance of User Policy (AUP) must be accepted before network access is granted.

  • Sponsored-Guest portal: Network access is granted by a sponsor who creates accounts for guests, and provides the guest with login credentials.

  • Self-Registered Guest portal: Guests can create their own account credentials, and may need sponsor approval before they are granted network access.

Cisco ISE can host multiple Guest portals, including a predefined set of default portals.

The default portal themes have standard Cisco branding that you can customize through the Admin portal.

Wireless Setup has its own default theme (CSS) and you are able to modify some basic settings such as logo, banner, background image, coloring and fonts. In Cisco ISE, you can also choose to further customize your portal by changing more settings and going into advanced customizations.

Credentials for Guest Portals

Cisco ISE provides secured network access by requiring guests to log in using various types of credentials. You can require that guests log in using one or a combination of these credentials.

  • Username: Required. Applies to all guests using end-user portals (except Hotspot Guest portals) and is derived from the username policy. The username policy applies only to system-generated usernames and not to usernames specified using the Guest API programming interface or the self-registering process. You can configure the policy settings that apply to usernames at Work Centers > Guest Access > Settings > Guest Username Policy. Guests can be notified of their username in an email, SMS, or in printed form.

  • Password: Required. Applies to all guests using end-user portals (except Hotspot Guest portals) and is derived from the password policy. You can configure the policy settings that apply to passwords at Work Centers > Guest Access > Settings > Guest Password Policy. Guests can be notified of their password in an email, SMS, or in printed form.

  • Access code: Optional. Applies to guests using the Hotspot Guest and Credentialed Guest portals. An access code is primarily a locally known code that is given to physically present guests (either visually via a whiteboard or verbally by a lobby ambassador). It would not be known and used by someone outside the premises to gain access to the network. If the Access code setting is enabled:

    • Sponsored guests are prompted to enter it on the Login page (along with a username and password).

    • Guests using the Hotspot Guest portal are prompted to enter it on the Acceptable Use Policy (AUP) page.

  • Registration code: Optional. Applies to self-registering guests and is similar to an access code in how it is provided to the self-registering guests. If the Registration code setting is enabled, self-registering guests are prompted to enter it on the Self-Registration form.

The username and password can be provided by a sponsor at your company (for sponsored guests), or a Credentialed Guest portal can be configured to allow guests to register themselves to obtain these credentials.


Note


While doing bulk import of user entries in the guest portal, ensure that the phone numbers are provided in E.164 format. In addition, ensure that the format for the phone number column is set to Text in the Excel file.


Guest Access with Hotspot Guest Portals

Cisco ISE provides network access functionality that includes “hotspots,” which are access points that guests can use to access the Internet without requiring credentials to log in. When guests connect to the hotspot network with a computer or any device with a web browser and attempt to connect to a website, they are automatically redirected to a Hotspot Guest portal. Both wired and wireless (Wi-Fi) connections are supported with this functionality.

The Hotspot Guest portal is an alternative Guest portal that allows you to provide network access without requiring guests to have usernames and passwords and alleviates the need to manage guest accounts. Instead, Cisco ISE works together with the network access device (NAD) and Device Registration Web Authentication (Device Registration WebAuth) to grant network access directly to the guest devices. Sometimes, guests may be required to log in with an access code. Typically, this is a code that is locally provided to guests who are physically present on a company’s premises.

If you support the Hotspot Guest portal:

  • Based on the Hotspot Guest portal configuration and settings, guests are granted access to the network if the guest access conditions are met.

  • Cisco ISE provides you with a default guest identity group, GuestEndpoints, which enables you to cohesively track guest devices.

Guest Access with Credentialed Guest Portals

You can use a credentialed Guest portal to identify and authorize temporary access for external users to internal networks and services, as well as to the Internet. Sponsors can create temporary usernames and passwords for authorized visitors who can access the network by entering these credentials in the portal's Login page.

You can set up a credentialed Guest portal so that guests can log in using a username and password that is obtained:

  • From a sponsor. In this guest flow, guests are greeted by a sponsor, such as a lobby ambassador, when they enter company premises and are set up with individual guest accounts.

  • After they register themselves, using an optional registration code or access code. In this guest flow, guests are able to access the Internet without any human interaction and Cisco ISE ensures that these guests have unique identifiers that can be used for compliance.

  • After they register themselves, using an optional registration code or access code, but only after the request for a guest account is approved by a sponsor. In this guest flow, guests are provided access to the network, but only after an additional level of screening is done.

You can also force the user to enter a new password when logging in.

Cisco ISE enables you to create multiple credentialed Guest portals, which you can use to allow guest access based on different criteria. For example, you might have a portal for monthly contractors that is separate from the portal used for daily visitors.

Employee Access with Credentialed Guest Portals

Employees can also access the network using Credentialed Guest Portals by signing in using their employee credentials, as long as their credentials can be accessed by the identity source sequence configured for that portal.

Guest Device Compliance

When guests and non-guests access the network through credentialed Guest portals, you can check their devices for compliance before they are allowed to gain access. You can route them to a Client Provisioning window and require them to first download the posture agent that checks their posture profile and verifies if their device is compliant. You can do this by enabling the option in the Guest Device Compliance Settings in a credentialed Guest portal, which displays the Client Provisioning window as part of the guest flow.


Note


Client posture assessment in guest flow supports only the Temporal agent.


The Client Provisioning service provides posture assessments and remediations for guests. The Client Provisioning portal is available only with a Central Web Authorization (CWA) guest deployment. The guest login flow performs a CWA, and the credentialed Guest portal is redirected to the Client Provisioning portal after performing acceptable-use-policy and change-password checks. The posture subsystem performs a Change of Authorization (CoA) on the network access device to reauthenticate the client connection once the posture has been assessed.

Guest Portals Configuration Tasks

You can use a default portal and its default settings such as certificates, endpoint identity group, identity source sequence, portal themes, images, and other details provided by Cisco ISE. If you do not want to use the default settings, you should create a new portal or edit an existing one to meet your needs. You can duplicate a portal if you want to create multiple portals with the same settings.

After creating a new portal or editing a default one, you must authorize the portal for use. Once you authorize a portal for use, any subsequent configuration changes you make are effective immediately.

If you choose to delete a portal, you must first delete any authorization policy rules and authorization profiles associated with it or modify them to use another portal.

Use this table for the tasks related to configuring the different Guest portals.

Task Hotspot Guest Portal Sponsored-Guest Portal Self-Registered Guest Portal

Enable Policy Services

Required

Required

Required

Add Certificates for Guest Portals

Required

Required

Required

Create External Identity Sources

Not applicable

Required

Required

Create Identity Source Sequences

Not applicable

Required

Required

Create Endpoint Identity Groups

Required

Not required (defined by guest type)

Not required (defined by guest type)

Create a Hotspot Guest Portal

Required

Not applicable

Not applicable

Create a Sponsored-Guest Portal

Not applicable

Required

Not applicable

Create a Self-Registered Guest Portal

Not applicable

Not applicable

Required

Authorize Portals

Required

Required

Required

Customize Guest Portals

Optional

Optional

Optional

Enable Policy Services

To support the Cisco ISE end-user web portals, you must enable the portal-policy services on the node on which you want to host them.

Procedure

Step 1

In the Cisco ISE GUI, click the Menu icon () and choose Administration > System > Deployment.

Step 2

Click the node and click Edit.

Step 3

Under the General Settings tab, enable the Policy Service toggle button.

Step 4

Check the Enable Session Services check box.

Step 5

Click Save.


Add Certificates for Guest Portals

If you do not want to use the default certificates, you can add a valid certificate and assign it to a certificate group tag. The default certificate group tag used for all end-user web portals is Default Portal Certificate Group.

Procedure

Step 1

Step 2

In the Cisco ISE GUI, click the Menu icon () and choose Administration > System > Certificates > System Certificates.

Step 3

Add a system certificate and assign it to a certificate group tag that you want to use for the portal.

This certificate group tag will be available to select during portal creation or editing.

Step 4

Choose Work Centers > Guest Access > Portals & Components > Guest Portals > Create or Edit > Portal Settings.

Step 5

Select the specific certificate group tag from the Certificate group tag drop-down list that is associated with the newly added certificate.


Create External Identity Sources

Cisco ISE can connect with external identity sources such as Active Directory, LDAP, RADIUS Token, and RSA SecurID servers to obtain user information for authentication and authorization. External identity sources also include certificate authentication profiles that you need for certificate-based authentications.


Note


To work with passive identity services, which enable you to receive and share authenticated user identities, see Additional Passive Identity Service Providers.


Procedure

Step 1

In the Cisco ISE GUI, click the Menu icon () and choose Administration > Identity Management > External Identity Sources.

Step 2

Choose one of these options:


Configure Guest Portals to Redirect to SAML IDP Portals for Authentication

You can configure a Guest portal to allow users to be redirected to a SAML IDP portal for authentication.

Configuring the Allow the following identity-provider guest portal to be used for login option in a guest portal (self-registered or Sponsored Guest) enables a new login area in that portal. If a user selects that login option, they are redirected to the alternate identity portal (which they don't see), and then to the SAML IDP logon portal for authentication.

For example, the Guest portal could have a link for employee login. Instead of logging in on the existing portal, the user clicks the employee logon link, and is redirected to the SAML IDP single-signon portal. The employee is either reconnected using the token from the last logon with this SAML IDP, or logs in on that SAML site. That allows the same portal to handle both guests and employees from a single SSID.

The following steps show how to configure a Guest portal that calls another portal which is configured to use a SAML IDP for authentication.

Procedure

Step 1

Configure an external identity source. See SAMLv2 Identity Provider as an External Identity Source for more details.

Step 2

Create a guest portal for the SAML provider. Set the Authentication method in Portal Settings to the SAML provider. The user will not see this portal, it is just a placeholder to direct the user to the SAML IDP logon page. Other portals can be configured to redirect to this sub-portal, as described next.

Step 3

Create a guest portal with the option to redirect to the guest portal for the SAML provider portal that you just created. This is the main portal, which will redirect to the sub-portal.

You may want to customize the look of this portal to make it look like the SAML provider.

  1. On the Login Page Settings page of the main portal, check Allow the following identity-provider guest portal to be used for login.

  2. Select the guest portal that you configured to use with the SAML provider.


Create Identity Source Sequences

Before you begin

Ensure that you have configured your external identity sources in Cisco ISE.

To perform the following task, you must be a Super Admin or System Admin.

For allowing guest users to authenticate through Local WebAuth, you must configure both the Guest portal authentication source and the identity source sequence to contain the same identity stores.

Procedure

Step 1

In the Cisco ISE GUI, click the Menu icon () and choose Administration > Identity Management > Identity Source Sequences > Add.

Step 2

Enter a name for the identity source sequence. You can also enter an optional description.

Step 3

Check the Select Certificate Authentication Profile check box and choose a certificate authentication profile for certificate-based authentication.

Step 4

Choose the database or databases that you want to include in the identity source sequence in the Selected List field.

Step 5

Rearrange the databases in the Selected list field in the order in which you want Cisco ISE to search the databases.

Step 6

If a selected identity store cannot be accessed for authentication, choose one of the following options in the Advanced Search List area:

  • Do not access other stores in the sequence and set the AuthenticationStatus attribute to ProcessError

  • Treat as if the user was not found and proceed to the next store in the sequence

    While processing a request, Cisco ISE searches these identity sources in sequence. Ensure that you have the identity sources in the Selected list field listed in the order in which you want Cisco ISE to search them.

Step 7

Click Submit to create the identity source sequence that you can then use in policies.


Create Endpoint Identity Groups

Cisco ISE groups endpoints that it discovers in to the corresponding endpoint identity groups. Cisco ISE comes with several system-defined endpoint identity groups. You can also create additional endpoint identity groups from the Endpoint Identity Groups window. You can edit or delete the endpoint identity groups that you have created. You can only edit the description of the system-defined endpoint identity groups. You cannot edit the name of these groups or delete them.

Procedure

Step 1

In the Cisco ISE GUI, click the Menu icon () and choose Administration > Identity Management > Groups > Endpoint Identity Groups.

Step 2

Click Add.

Step 3

Enter the Name for the endpoint identity group that you want to create (do not include spaces in the name of the endpoint identity group).

Step 4

Enter the Description for the endpoint identity group that you want to create.

Step 5

Click the Parent Group drop-down list to choose an endpoint identity group to which you want to associate the newly created endpoint identity group.

Step 6

Click Submit.


Create a Hotspot Guest Portal

You can provide a Hotspot Guest portal to enable guests to connect to your network without requiring a username and password to log in. An access code can be required to log in.

You can create a new Hotspot Guest portal, or you can edit or duplicate an existing one. You can delete any Hotspot Guest portal, including the default portal provided by Cisco ISE.

Any changes that you make to the Page Settings on the Portal Behavior and Flow Settings tab are reflected in the graphical flow in the Guest Flow diagram. If you enable a page, such as the AUP page, it appears in the flow and the guest will experience it in the portal. If you disable it, it is removed from the flow and the next enabled page displays for the guest.

All the Page Settings, except the Authentication Success Settings, are optional.

Before you begin
  • Ensure that you have the required certificates and endpoint identity groups configured for use with this portal.

  • Ensure that the WLC that guests connect to for the Hotspot portal is supported by Cisco ISE. See the Identity Services Engine Network Component Compatibility guide for your version of Cisco ISE.

What to do next

You must authorize the portal in order to use it. You can also customize your portal either before or after you authorize it for use.

Create a Sponsored-Guest Portal

You can provide a Sponsored-Guest portal to enable designated sponsors to grant access to guests.

You can create a new Sponsored-Guest portal, or you can edit or duplicate an existing one. You can delete any Sponsored-Guest portal, including the default portal provided by Cisco ISE.

Any changes that you make to the Page Settings on the Portal Behavior and Flow Settings tab are reflected in the graphical flow in the Guest Flow diagram. If you enable a page, such as the AUP page, it appears in the flow and the guest will experience it in the portal. If you disable it, it is removed from the flow and the next enabled page displays for the guest.

All these page settings enable you to display an Acceptable Use Policy (AUP) for a guest and require its acceptance:

  • Login Page Settings

  • Acceptable Use Policy (AUP) Page Settings

  • BYOD Settings

Before you begin

Ensure that you have the required certificates, external identity sources, and identity source sequences configured for use with this portal.

Procedure

Step 1

In the Cisco ISE GUI, click the Menu icon () and choose Work Centers > Guest Access > Portals & Components > Guest Portals > Create, Edit or Duplicate.

Step 2

If creating a new portal, in the Create Guest Portal dialog box, select Sponsored-Guest Portal as the portal type and click Continue.

Step 3

Provide a unique Portal Name and a Description for the portal.

Ensure that the portal name that you use here is not used for any other end-user portals.

Step 4

Use the Language File drop-down menu to export and import language files to use with the portal.

Step 5

Update the default values for ports, Ethernet interfaces, certificate group tags, identity source sequences, authentication method, and so on in Portal Settings, and define behavior that applies to the overall portal.

Step 6

Update the following settings, which apply to each of the specific pages:

  • Login Page Settings: Specify guest credential and login guidelines. If you select the Allow guests to create their accounts option, users will be able to create their own guest accounts. If this option is not selected, sponsors will be required to create guest accounts.

    Note


    Login Page Settings option will be disabled if you have selected an identity provider (IdP) in the Authentication Method field.

  • Acceptable Use Policy (AUP) Page Settings: Add a separate AUP page and define the acceptable use policy behavior for guests, including employees who use the credentialed Guest portals.
  • Employee Change Password Settings: Require guests to change their password after the first time they log in.
  • Guest Device Registration Settings: Select whether Cisco ISE automatically registers guest devices or displays a page where guests can manually register their devices.
  • BYOD Settings: Let employees use their personal devices to access the network.
  • Post-Login Banner Page Settings: Notify guests of additional information before they are granted network access.
  • Guest Device Compliance Settings: Route guests to the Client Provisioning page and require them to first download the posture agent.
  • VLAN DHCP Release Page Settings: Release the guest device IP address from the guest VLAN and renew it to access another VLAN on the network.
  • Authentication Success Settings: Specify what guests should see once they are authenticated.
  • Support Information Page Settings: Help guests provide information that the Help Desk can use to troubleshoot network access issues.

Step 7

Click Save. A system-generated URL displays as the Portal test URL, which you can use to access the portal and test it.


What to do next

Note


The test portal does not support RADIUS sessions, so you won't see the entire portal flow for all portals. BYOD and Client Provisioning are examples of portals that depend on RADIUS sessions. For example, a redirect to an external URL will not work. If you have more than one PSN, ISE chooses the first active PSN.

You must authorize the portal in order to use it. You can also customize your portal either before or after you authorize it for use.

Create a Self-Registered Guest Portal

You can provide a Self-Registered Guest portal to enable guests to register themselves and create their own accounts so they can access the network. You can still require that these accounts be approved by a sponsor before access is granted.

You can create a new Self-Registered Guest portal, or you can edit or duplicate an existing one. You can delete any Self-Registered Guest portal, including the default portal provided by Cisco ISE.

Any changes that you make to the Page Settings on the Portal Behavior and Flow Settings tab are reflected in the graphical flow in the Guest Flow diagram. If you enable a page, such as the AUP page, it appears in the flow and the guest will experience it in the portal. If you disable it, it is removed from the flow and the next enabled page displays for the guest.

All these page settings enable you to display an Acceptable Use Policy (AUP) for a guest and require its acceptance:

  • Login Page Settings

  • Self-Registration Page Settings

  • Self-Registration Success Page Settings

  • Acceptable Use Policy (AUP) Page Settings

  • BYOD Settings

Before you begin

Ensure that you have configured the required certificates, external identity sources, and identity source sequences for this portal.

Procedure

Step 1

In the Cisco ISE GUI, click the Menu icon () and choose Work Centers > Guest Access > Portals & Components > Guest Portals > Create, Edit or Duplicate..

Step 2

If creating a new portal, in the Create Guest Portal dialog box, select Self-Registered Guest Portal as the portal type and click Continue.

Step 3

Provide a unique Portal Name and a Description for the portal.

Ensure that the portal name that you use here is not used for any other end-user portals.

Step 4

Use the Language File drop-down menu to export and import language files to use with the portal.

Step 5

In Portal Settings, update the default values for ports, Ethernet interfaces, certificate group tags, identity source sequences, authentication method,, and other settings that define behavior of this portal.

For more information about Portal Settings fields, see Portal Settings for Credentialed Guest Portals.

Step 6

Update the following settings, which apply to each of the specific pages:

  • Login Page Settings: Specify guest credential and login guidelines. For more information, see Login Page Settings for Credentialed Guest Portals.
  • Self-Registration Page Settings: Specify the information self-registering guests will read and should enter on the Self-Registration form, in addition to the guest experience after they have submitted the form.
  • Acceptable Use Policy (AUP) Page Settings: Add a separate AUP page and define the acceptable use policy behavior for guests, including employees who use the credentialed Guest portals. For more information, see Acceptable Use Policy (AUP) Page Settings for Credentialed Guest Portals.
  • Employee Change Password Settings: Require guests to change their password after the first time they log in.
  • Guest Device Registration Settings: Select whether Cisco ISE automatically registers guest devices or displays a page where guests can manually register their devices.
  • BYOD Settings: Let employees use their personal devices to access the network. For more information, see BYOD Settings for Credentialed Guest Portals.
  • Post-Login Banner Page Settings: Display additional information after the user successfully logs in, and before they are granted network access.
  • Guest Device Compliance Settings: Redirects guests to the Client Provisioning page for posture assessment. For more information, see Guest Device Compliance Settings for Credentialed Guest Portals.
  • VLAN DHCP Release Page Settings: Release the guest device IP address from the guest VLAN and renew it to access another VLAN on the network. For more information, see BYOD Settings for Credentialed Guest Portals.
  • Authentication Success Settings: Specify where to direct guests after they are authenticated. If you redirect a Guest to an external URL after authentication, there may be a delay while the URL address is resolved and the session is redirected. For more information, see Authentication Success Settings for Guest Portals.
  • Support Information Page Settings: Help guests provide information that the Help Desk can use to troubleshoot network access issues.

Step 7

Click Save. A system-generated URL displays as the Portal test URL, which you can use to access the portal and test it.


What to do next

Note


The test portal does not support RADIUS sessions, so you won't see the entire portal flow for all portals. BYOD and Client Provisioning are examples of portals that depend on RADIUS sessions. For example, a redirect to an external URL will not work. If you have more than one PSN, ISE chooses the first active PSN.

You must authorize the portal in order to use it. You can also customize your portal either before or after you authorize it for use.

Self-Registered Account Approval by a Sponsor

When you configure a registered guest to require approval of their account, Cisco ISE sends email to the approver to approve the account. The approver can either be the person being visited, or a sponsor user.

When the approver is a sponsor, you can configure the email to include links that deny or approve the account. The approval link contains a token, which ties the approval to the sponsor's email address. You can require the sponsor to authenticate, which ignores the token. The token can also time out, which requires the sponsor to authenticate before approving the account.

You configure account approval options on the Self-Registration Portal's Registration Form Settings. This feature is also called single-click sponsor approval.

When the sponsor opens the email, and clicks the approve link, the action varies depending on configuration of the approver.

If Email approval request to is configured as:

  • person being visited

    • And the guest account does not require authentication: A single click approves the account.

    • And the guest account does require authentication: The sponsor is directed to the sponsor portal, where the sponsor must enter their credentials before they can approve the account.

  • Sponsor email addresses listed below: Cisco ISE sends emails to all the provided email addresses. When one of those sponsors clicks the approve or deny link, they are directed to their sponsor portal. That sponsor enters their credentials, which are verified. If the sponsor group that they belong to allows them to approve the guest account, they can approve the account. If credentials fail, then Cisco ISE notifies the sponsor to log on to the sponsor portal, and approve the account manually.

Considerations
  • If your are upgrading or restoring the database from previous version of Cisco ISE, you must manually insert approve or deny links. Open the Self-Registered guest portal and choose the Portal Page Customization tab. Scroll down and choose the Approval Request Email window. Click Insert Approve/Deny Links in the Email Body section of that window.

  • Only Sponsor portals that authenticate with Active Directory and LDAP are supported. The sponsor group that the sponsor maps to must contain the Active Directory group that the sponsor belongs to.

  • When there is a list of sponsors, the customization from the first portal is used, even if that is not the portal that the sponsor logs on to.

  • The sponsor must use an HTM-capable email client to use the approve and deny links.

  • If the email address for the sponsor is not for a valid sponsor, the approval email is not sent.

For more information about single-click sponsor approval, see the Cisco ISE community resource: ISE Single Click Sponsor Approval FAQ. This document also has a link to a video that explains the entire process.

Configuring Account Approval Email Links
You can require that a self-registered guest is approved before gaining access to the network. Cisco ISE uses the email address of the person being visited to notify the approver. The approver is either the person being visitited, or a sponsor. For more information about approval, see Self-Registered Account Approval by a Sponsor.
Procedure

Step 1

In the Cisco ISE GUI, click the Menu icon () and choose Work Centers > Guest > Configure > Guest Portals. Select the self-registered portal that you want to configure for email account approval links.

Step 2

Expand the Self-Registration Page Settings tab.

Step 3

Check Require self-registered guests to be approved.

Approve/Deny Link Settings section appears. It also populates the email configuration of the Approval Request Email with approve and deny links.

Enter the following details:

  • Require self-registered guests to be approved: Specify that the self-registering guests using this portal require approval from a sponsor before receiving their guest credentials. Clicking this option displays more options for how sponsors approve a self-registered guest.

    • Allow guests to login automatically from self-registration after sponsor's approval: A self-registered guest will be logged in automatically after sponsor approval.

    • Email approval request to:

      • Sponsor email addresses listed below: Enter one or more email addresses of sponsors designated as approvers, or a mailer, to which all guest approval requests should be sent. If the email address is not valid, approval fails.

      • Person being visited: Require sponsor to provide credentials for authentication field is displayed, and the Required option in Fields to include is enabled (if it was previously disabled). These fields are displayed on the Self-Registration form requesting this information from the self-registering guests. If the email address is not valid, approval fails.

    • Approve/Deny Link Settings:

      • Links are valid for: You can set an expiration period for the account approval links.

      • Require sponsor to provide credentials for authentication: Check this to force the sponsor to enter credentials to approve the account, even if it is not required by the configuration in this section. This field is only visible if Require self-registered guests to be approved is set to person being visited.

      • Sponsor is matched to a Sponsor Portal to verify approval privileges: Click Details to select the portals that are searched to verify that the sponsor is a valid system user, a member of a sponsor group, and that the members of that group have authority to approve the account. Each sponsor portal has an identity source sequence, which is used to identify the sponsor. Portals are used in the order they are listed. The first portal in the list determines the style and customization used in the sponsor portal.


Authorize Portals

When you authorize a portal, you are setting up the network authorization profiles and rules for network access.
Before you begin

You must create a portal before you can authorize it.

Procedure

Step 1

Set up a special authorization profile for the portal.

Step 2

Create an authorization policy rule for the profile.


Create Authorization Profiles

Each portal requires that you set up a special authorization profile for it.

Before you begin

If you do not plan to use a default portal, you must first create the portal so you can associate the portal name with the authorization profile.

Procedure

Step 1

In the Cisco ISE GUI, click the Menu icon () and choose Policy > Policy Elements > Results > Authorization > Authorization Profiles.

Step 2

Create an authorization profile using the name of the portal that you want to authorize for use.


What to do next

You should create a portal authorization policy rule that uses the newly created authorization profile.

Create Authorization Policy Rules for Hotspot and MDM Portals

To configure the redirection URL for a portal to use when responding to the users' (guests, sponsors, employees) access requests, define an authorization policy rule for that portal.

The url-redirect takes the following form based on the portal type, where:

ip:port : the IP address and port number

PortalID: the unique portal name

For a Hotspot Guest portal: https://ip:port/guestportal/gateway?sessionID=SessionIdValue&portal=PortalID&action=cwa&type=drw

For a Mobile Device Management (MDM) portal: https://ip:port/mdmportal/gateway?sessionID=SessionIdValue&portal=PortalID&action=mdm

Procedure

Step 1

In the Cisco ISE GUI, click the Menu icon () and choose Policy > Policy Sets to create a new authorization policy rule under Standard policies.

Step 2

For Conditions, select an endpoint identity group that you want to use for the portal validation. For example, for the Hotspot Guest portal, select the default GuestEndpoints endpoint identity group and, for the MDM portal, select the default RegisteredDevices endpoint identity group.

Note


Reauthenticate and Terminate CoA types are supported by Hotspot Guest portals. You can use Network Access:UseCase EQUALS Guest Flow as one of the validation conditions in the Hotspot Guest authorization policy only when Reauthentication CoA type is chosen in the Hotspot Guest Portal.

Step 3

For Permissions, select the portal authorization profile that you created.


Note


While creating an authorization condition using a dictionary attribute with the MAC option enabled, such as RADIUS.Calling-Station-ID, you must use a Mac operator (for example, Mac_equals) to support different MAC formats.


Customize Guest Portals

You can customize the portal appearance and user (guests, sponsors, or employees as applicable) experience by customizing the portal themes, changing UI elements on the portal pages, and editing error messages and notifications that are displayed to the users. For more information about customizing portals, see Customization of End-User Web Portals.

Configure Periodic AUP Acceptance

Procedure


Choose Policy > Policy Sets, and create a new authorization rule at the top of the list that redirects the Guest user to a credentialed portal when the AUP period has expired. Use conditions to compare LastAUPAcceptanceHours against the desired maximum hours, for example, LastAUPAcceptanceHours > 8. You can check for a range of hours from 1 to 999.


What to do next

To verify that the endpoint has received the AUP settings:

  1. In the Cisco ISE GUI, click the Menu icon () and choose Administration > Identities > Endpoints.

  2. Click an endpoint to verify that the endpoint has the time that the AUP was last accepted (AUPAcceptedTime).

Forcing Periodic AUP

You can force a user to accept the AUP by using LastAUPAcceptance in a policy.

If LastAUPAcceptance >= 24: Hotspot Redirect
If LastAUPacceptance < 24: PermitAccess
If Wireless_MAB: Hotspot Redirect

This example shows how to force AUP on a hotspot portal every 24 hours.

  1. If the user accepted AUP more than 24 hours ago, then the must accept AUP (start over).

  2. If the user accepted AUP less than 24 hours ago, continue the session.

  3. On the first access to the network (MAB), they must accept AUP.

The same rules can be used with a credentialed portal, as long as you enable AUP for that portal.


Note


  • To ensure communication of the guest AUP page to the endpoint, add the LastAUPAcceptanceHours condition to the Redirection Authorization Rule for guest portal as follows:
    If AUP <= "X hours": Add in the Permit Access Rule
    If AUP > "X hours": Add in the Redirection Rule
  • New users can configure the Redirection Authorization rule without the LastAUPAcceptanceHours condition.


Guest Remember Me

This feature enables Cisco ISE to show a guest's username instead of MAC address in reports and logs.

When a guest first authenticates, the MAC address of user device is saved in the endpoint group, and the username is used in reports. If the user disconnects, and then reconnects to the network, the MAC address is already in the endpoint group, so the user does not have to log back in again (authenticate). In this case, the username is not available, so the MAC address is used in reporting and logs.

Cisco ISE keeps the portal user ID, and uses it in some reporting. To disable this feature, go to Guest > Settings > Logging. It is enabled by default on new installations.

For more information about Remember Me logging issues, see the following Cisco ISE community resource: ISE 2.3+ Remember Me guest using guest endpoint group logging display.

For more information about configuring remember me, see the Cisco ISE Guest Access Deployment guide: https://communities.cisco.com/docs/DOC-77590

For more information about which reporting methods are supported in each release, see the release notes for that release.

Sponsor Portals

The Sponsor portal is one of the primary components of Cisco ISE guest services. Using the Sponsor portal, sponsors can create and manage temporary accounts for authorized visitors to securely access the corporate network or the Internet. After creating a guest account, sponsors also can use the Sponsor portal to provide account details to the guest by printing, emailing, or texting. Before providing self-registering guests access to the company network, sponsors may be requested via email to approve their guests’ accounts.

Managing Guest Accounts on the Sponsor Portal

Sponsor Portal Log on Flow

A sponsor group specifies a set of permissions that are assigned to a sponsor user. When a sponsor logs in to a sponsor portal:

  1. ISE verifies the sponsor’s credentials.

  2. If the sponsor authenticates successfully, Cisco ISE searches all the available sponsor groups to find the sponsor groups that the sponsor belongs to. A sponsor matches or belongs to a sponsor group if both:

    • The sponsor is a member of one of the configured Member Groups.

    • If you are using Other Conditions, all the conditions evaluate to true for that sponsor.

  3. If the sponsor belongs to a sponsor group, then that sponsor gets the permissions from that group. A sponsor can belong to more than one sponsor group, in which case the permissions from those groups are combined. If the sponsor does not belong to any sponsor group, then the login to the sponsor portal fails.

Sponsor groups and their permissions are independent of the sponsor portals. The same algorithm for matching sponsor groups is used, regardless of which sponsor portal the sponsor logs in to.

Using a Sponsor Portal

Use a Sponsor portal to create temporary guest accounts for authorized visitors to securely access your corporate network or the Internet. After creating guest accounts, you can use a Sponsor portal to manage these accounts and to provide account details to the guests.

On a Sponsor portal, the sponsor can create new guest accounts individually, or import a group of users from a file.


Note


An ISE administrator authorized from an external identity store, such as Active Directory, can be part of a Sponsor group. However, internal administrator accounts, for example, the default "admin" account, cannot be part of a Sponsor group.

There are several ways to open a Sponsor portal:

  • In the Administrators console, on the Sponsor Portal configuration window. Click Guest Access > Portals & Components > Sponsor Portals, open a sponsor portal, and click the Portal Test URL link to the right of the Description field.

  • In a browser, by opening the URL (FQDN) configured in the sponsor portal's Portal Settings window, which must be defined in your DNS server.

What to do Next

For information abouit how to use the Sponsor portal, see the Sponsor Portal User Guide for your version of ISE https://www.cisco.com/c/en/us/support/security/identity-services-engine/products-installation-guides-list.html.

Managing Sponsor Accounts

A sponsor user is an employee or contractor of your organization who creates and manages guest-user accounts through the sponsor portal. Cisco ISE authenticates sponsors through a local database, or through external Lightweight Directory Access Protocol (LDAP), Microsoft Active Directory, or SAML identity stores. If you are not using an external source, you must create internal user accounts for sponsors.

Sponsor Groups

Sponsor groups control the permissions given to a sponsor when using any Sponsor portal. If a sponsor is a member of a sponsor group, then the sponsor receives the permissions defined in the group.

A sponsor is considered to be a member of a sponsor group if both of the following are true:

  1. The sponsor belongs to at least one of the Member Groups defined in the sponsor group. A Member Group can be a User Identity Group, or a group selected from an external identity source, such as Active Directory.

  2. The sponsor satisfies all of the Other Conditions specified in the sponsor group. The Other Conditions, which are optional, are conditions defined on dictionary attributes. These conditions are similar in behavior to those used in an Authorization Policy.

A sponsor can be a member of more than one sponsor group. If so, the sponsor receives the combined permissions from all of those groups, as follows:

  • An individual permission such as "Delete guests' accounts" is granted if it is enabled in any of the groups.

  • The sponsor can create guests using the Guest Types in any of the groups.

  • The sponsor can create guests at the locations in any of the groups.

  • For a numeric value such as a batch size limit, the largest value from the groups is used.

If a sponsor is not a member of any sponsor group, then the sponsor is not permitted to log in to any sponsor portal.

  • ALL_ACCOUNTS: Sponsors can manage all guest accounts.

  • GROUP_ACCOUNTS: Sponsors can manage the guest accounts created by sponsors from the same Sponsor Group.

  • OWN_ACCOUNTS: Sponsors can manage only the Guest accounts that they created.

You can customize the features available to particular sponsor groups to limit or expand the functionality of the Sponsor portal.

Create Sponsor Accounts and Assign to Sponsor Groups

To create internal sponsor user accounts and specify the sponsors who can use the Sponsor portals:

Procedure

Step 1

In the Cisco ISE GUI, click the Menu icon () and choose Administration > Identity Management > Identities > Users. Assign the internal sponsor user account to the appropriate user identity group.

Note


The default Sponsor Groups have the default Identity Group Guest_Portal_Sequence assigned to them.

Step 2

In the Cisco ISE GUI, click the Menu icon () and choose Work Centers > Guest Access > Portals & Components > Sponsor Groups > Create, Edit or Duplicate and click Members. Map the sponsor user identity groups to sponsor groups.


What to do next

You can also create additional user identity groups specific to your organization to use with sponsors. Choose Administration > Identity Management > Groups > User Identity Groups.

Configure Sponsor Groups

Cisco provides default sponsor groups. If you do not want to use the default options, you can either create new sponsor groups or edit the default sponsor groups and change the settings. You can also duplicate a sponsor group to create more sponsor groups with the same settings and privileges.

You can disable a sponsor group, which prevents the members of the sponsor group from logging in to the Sponsor portal. You can delete any of the sponsor groups, except the default sponsor groups provided by Cisco ISE.

Procedure

Step 1

In the Cisco ISE GUI, click the Menu icon () and choose Work Centers > Guest Access > Portals and Components > Sponsor Groups > Create, Edit or Duplicate.

Step 2

Enter the Sponsor group name and Description.

Step 3

Enter the following details in the Match Criteria section:

  • Member Groups: Click Members to select one or more user (identity) groups and groups from external identity sources, and add those groups. In order for a user to be a member of this sponsor group, they must belong to at least one of the configured groups.

  • Other conditions: Click Create New Condition to build one or more conditions that a sponsor must match to be included in this sponsor group. You can use authentication attributes from Active Directory, LDAP, SAML, and ODBC identity stores, but not RADIUS Token or RSA SecurID stores. You can also use internal user attributes. Conditions have an attribute, and operator, and a value.

    • To create a condition using the internal dictionary attribute Name, prefix the identity group name with User Identity Groups. For example:

      InternalUser:Name EQUALS bsmith

      This means that only internal users with the Name "bsmith" can belong to this sponsor group.

    • To create a condition using the ExternalGroups attribute of an Active Directory instance, select the AD “Primary Group” for the sponsor users you want to match. For example, AD1:LastName EQUALS Smith is true if the user’s name is Smith.

In addition to matching one or more of the configured member groups, a sponsor must also match all the conditions you create here. If an authenticating sponsor user meets the matching criteria for multiple sponsor groups, then that user is granted permissions as follows:

  • An individual permission, such as Delete guests' accounts is granted if it is enabled in any of the matching groups.

  • The sponsor can create guests using the Guest Types in any of the matching groups.

  • The sponsor can create guests using the Guest Types in any of the matching groups.

  • The sponsor can create guests at the locations in any of the matching groups.

  • For a numeric value such as a batch size limit, the largest value from the matching groups is used.

You can create Matching Criteria that contain Member Groups only, or Other Conditions only. If you only specify Other Conditions, then membership of a sponsor in the sponsor group is determined solely by matching dictionary attributes.

Step 4

To specify which guest types that sponsors based on this sponsor group can create, click This sponsor group can create accounts using these guest types, and select one or more guest types.

You can create more guest types to assign to this sponsor group by clicking the link under Create Guest Types at. After you create a new guest type, save, close, and reopen the sponsor group before you can select that new guest type.

Step 5

Use Select the locations that guests will be visiting to specify the locations (used to set the guest time zones) that sponsors in this sponsor group can choose from when creating guest accounts.

You can add more locations to choose from by clicking the link under Configure guest locations at and adding guest locations. After you create a new guest location, save, close, and reopen the sponsor group before you can select that new guest location.

This does not restrict guests from logging in from other locations.

Step 6

Under Automatic guest notification, check Automatically email guests upon account creation if email address is available if you want to save your sponsors the step of clicking Notify after creating a user. This causes a window to popup saying that an email was sent. Checking this also adds a header to the sponsor portal that says Guest notifications are sent automatically.

Step 7

Under Sponsor Can Create, configure options that sponsors in this group have for creating guest accounts.

  • Multiple guest accounts assigned to specific guests (Import): Enable the sponsor to create multiple guest accounts by importing guest details such as first name and last name from a file.

    If this option is enabled, the Import option appears on the Create Accounts window of the Sponsor portal. The Import option is only available on desktop browsers (not mobile), such as Internet Explorer, Firefox, Safari, and so forth

  • Limit to batch of: If this sponsor group is allowed to create multiple accounts simultaneously, specify the number of guest accounts that can be created in a single import operation.

    Although a sponsor can create a maximum of 10,000 accounts, we recommend that you limit the number of accounts you create, due to potential performance issues.

  • Multiple guest accounts to be assigned to any guests (Random): Enable the sponsor to create multiple random guest accounts as placeholders for guests who are not known as yet, or to create many accounts quickly.

    If this option is enabled, the Random option appears on the Create Accounts window of the Sponsor portal.

  • Default username prefix: Specify a username prefix that sponsors can use when creating multiple random guest accounts. If specified, this prefix appears in the Sponsor Portal when creating random guest accounts. In addition, if Allow sponsor to specify a username prefix is:

    • Enabled: The sponsor can edit the default prefix in the Sponsor portal.

    • Not enabled: The sponsor cannot edit the default prefix in the Sponsor portal.

    If you do not specify a username prefix or allow the sponsor to specify one, then the sponsor will not be able to assign username prefixes in the Sponsor portal.

  • Allow sponsor to specify a username prefix: If this sponsor group is allowed to create multiple accounts simultaneously, specify the number of guest accounts that can be created in a single import operation.

    Although a sponsor can create a maximum of 10,000 accounts, we recommend that you limit the number of accounts you create, due to potential performance issues.

Step 8

Under Sponsor Can Manage, you can restrict which guests accounts the members of this sponsor group can view and manage.

  • Only accounts sponsor has created: Sponsors in this group can view and manage only the guest accounts that they have created, which is based on the Sponsor’s email account.

  • Accounts created by members of this sponsor group: Sponsors in this group can view and manage the guest accounts created by any sponsor in this sponsor group.

  • All guest accounts: Sponsors view and manage all pending guest accounts.

Step 9

Under Sponsor Can, you can provide more privileges related to guest passwords and accounts to the members of this sponsor group.

  • Update guests' contact information (email, Phone Number): For guest accounts that they can manage, allow the sponsor to change a guest's contact information

  • View/print guests' passwords: When this option is enabled, the sponsor can print passwords for guests. The sponsor can see the passwords for guests on the Manage Accountswindow and in the details for a guest. When this is not checked, the sponsor can't print the password, but the user can still get the password through email or SMS, if configured.

  • Send SMS notifications with guests’ credentials: For guest accounts that they can manage, allow the sponsor to send SMS (text) notifications to guests with their account details and login credentials.

  • Reset guest account passwords: For guest accounts that they can manage, allow the sponsor to reset passwords for guests to a random password generated by Cisco ISE.

  • Extend guests’ accounts: For guest accounts that they can manage, allow the sponsor to extend them beyond their expiration date. The sponsor is automatically copied on email notifications sent to guests regarding their account expiration.

  • Delete guests’ accounts: For guest accounts that they can manage, allow the sponsor to delete the accounts, and prevent guests from accessing your company's network.

  • Suspend guests’ accounts: For guest accounts that they can manage, allow the sponsor to suspend their accounts to prevent guests from logging in temporarily.

    This action also issues a Change of Authorization (CoA) Terminate to remove the suspended guests from the network.

    • Require sponsor to provide a reason: Require the sponsor to provide an explanation for suspending the guest accounts.

  • Approve and view requests from self-registering guests: Sponsors who are included in this Sponsor Group can either view all pending account requests from self-registering guests (that require approval), or only the requests where the user entered the Sponsor's email address as the person being visited. This feature requires that the portal used by the Self-registering guest has Require self-registered guests to be approved checked, and the Sponsor's email is listed as the person to contact. This feature also requires that the Email attribute be properly configured in the Sponsor's identity source.

    • Any pending accounts: A sponsor belonging to this group an approve and review accounts that were created by any sponsor.

    • Only pending accounts assigned to this sponsor: A sponsor belonging to this group can only view and approve accounts that they created.

    Note


    The Email attribute is part of User Info Attributes. For more information on the Email attribute, see:

  • Access Cisco ISE guest accounts using the programmatic interface (Guest REST API): For guest accounts that they can manage, allow the sponsor to access guest accounts using the Guest REST API programming interface.

Step 10

Click Save and then Close.


Configure Account Content for Sponsor Account Creation

You can configure the type of user data that your guests and sponsors must provide to create a new guest account. Some fields are required to identify an ISE account, but you can eliminate other fields, and add your own custom fields.

To configure fields for account creation by Sponsors:

  1. In the Cisco ISE GUI, click the Menu icon () and choose Work Centers > Guest Access > Portals & Components > Sponsor Portals, and edit your sponsor portal.

  2. Select the Portal Page Customization tab.

  3. Scroll down and select Create Account for Known Guests.

  4. On the Preview display on the right, select Settings.

These settings determine which fields display and are required for guest accounts when they are created on the sponsor portal. This configuration applies to Known, Random, and Imported guest types. The template that the sponsor downloads to import new users is created dynamically, so that only the fields set in Known Guests are included.

Import Username and Password for Accounts

Sponsors can import username and password, but those rows are not added to the CSV template when the sponsor downloads it. The sponsor can add those headings. They must be named properly in order for the ISE to recognize the columns:

  • Username—Can be either User Name or UserName.

  • Password—Must be password.

Special Settings for the Sponsor Portal

The following settings are unique to the Create Account for Imported Guests page, on the Portal Page Customization tab, on the Sponsor Portal.

  • Allow sponsor to be copied in Guest Credentials email: If you enable this option, then each email of guest credentials that is sent to a successfully imported guest is also sent to the sponsor. The default is to not send emails to the sponsor.

  • Allow sponsor to receive summary email: When a sponsor imports a list of users, ISE sends one email with a summary of all the imported users. If you uncheck this option, the sponsor gets a separate email for each imported user.

Configure a Sponsor Portal Flow

You can use a default portal and its default settings such as certificates, endpoint identity group, identity source sequence, portal themes, images, and other details provided by Cisco ISE. If you do not want to use the default settings, you should create a new portal or edit an existing one to meet your needs. You can duplicate a portal if you want to create multiple portals with the same settings.

You may want to create multiple sponsor portals if your company has different branding for your corporate office and its retail locations, or if your company has different product brands, or if a city’s offices want different themed portals for the fire, police, and other departments.

These are the tasks related to configuring a Sponsor portal.

Before you begin

Configure or edit existing sponsor groups for your site, as described in Configure Sponsor Groups.

Procedure


Step 1

Enable Policy Services.

Step 2

Add Certificates for Guest Services.

Step 3

Create External Identity Sources.

Step 4

Create Identity Source Sequences.

Step 5

Create a Sponsor Portal.

Step 6

(Optional) Customize Sponsor Portals.


Enable Policy Services

To support the Cisco ISE end-user web portals, you must enable the portal-policy services on the node on which you want to host them.

Procedure

Step 1

In the Cisco ISE GUI, click the Menu icon () and choose Administration > System > Deployment.

Step 2

Click the node and click Edit.

Step 3

Under the General Settings tab, enable the Policy Service toggle button.

Step 4

Check the Enable Session Services check box.

Step 5

Click Save.


Add Certificates for Guest Services

If you do not want to use the default certificates, you can add a valid certificate and assign it to a certificate group tag. The default certificate group tag used for all end-user web portals is Default Portal Certificate Group.

Procedure

Step 1

In the Cisco ISE GUI, click the Menu icon () and choose Administration > System > Certificates > System Certificates.

Step 2

Add a system certificate and assign it to a certificate group tag that you want to use for the portal.

This certificate group tag will be available to select during portal creation or editing.

Step 3

Choose Work Centers > Guest Access > Portals & Components > Sponsor Portals > Create or Edit > Portal Settings.

Step 4

Select the specific certificate group tag from the Certificate Group Tag drop-down list that is associated with the newly added certificate.


Create External Identity Sources

Cisco ISE can connect with external identity sources such as Active Directory, LDAP, RADIUS Token, and RSA SecurID servers to obtain user information for authentication and authorization. External identity sources also include certificate authentication profiles that you need for certificate-based authentications.


Note


To work with passive identity services, which enable you to receive and share authenticated user identities, see Additional Passive Identity Service Providers.


Procedure

Step 1

In the Cisco ISE GUI, click the Menu icon () and choose Administration > Identity Management > External Identity Sources.

Step 2

Choose one of these options:


Create Identity Source Sequences

Before you begin

Ensure that you have configured your external identity sources in Cisco ISE.

To perform the following task, you must be a Super Admin or System Admin.

For allowing guest users to authenticate through Local WebAuth, you must configure both the Guest portal authentication source and the identity source sequence to contain the same identity stores.

Procedure

Step 1

In the Cisco ISE GUI, click the Menu icon () and choose Administration > Identity Management > Identity Source Sequences > Add.

Step 2

Enter a name for the identity source sequence. You can also enter an optional description.

Step 3

Check the Select Certificate Authentication Profile check box and choose a certificate authentication profile for certificate-based authentication.

Step 4

Choose the database or databases that you want to include in the identity source sequence in the Selected List field.

Step 5

Rearrange the databases in the Selected list field in the order in which you want Cisco ISE to search the databases.

Step 6

If a selected identity store cannot be accessed for authentication, choose one of the following options in the Advanced Search List area:

  • Do not access other stores in the sequence and set the AuthenticationStatus attribute to ProcessError

  • Treat as if the user was not found and proceed to the next store in the sequence

    While processing a request, Cisco ISE searches these identity sources in sequence. Ensure that you have the identity sources in the Selected list field listed in the order in which you want Cisco ISE to search them.

Step 7

Click Submit to create the identity source sequence that you can then use in policies.


Create a Sponsor Portal

You can provide a Sponsor portal to enable sponsors to create, manage, and approve accounts for guests who want to connect to your network to access the internet and internal resources and services.

Cisco ISE provides you with a default Sponsor portal that you can use without having to create another one. However, you can create a new Sponsor portal, or you can edit or duplicate an existing one. You can delete any of these portals, except the default Sponsor portal. IPv6 is not supported in Sponsor portal logins. Cisco ISE Release 3.3 onwards, the Sponsor portal supports IPv6 for internal users. Sponsor portal login using SAML does not support IPv6.

Any changes that you make to the Page Settings on the Portal Behavior and Flow Settings tab are reflected in the graphical flow in the Sponsor Flow diagram. If you enable a page, such as the AUP page, it appears in the flow and the sponsor will experience it in the portal. If you disable it, it is removed from the flow and the next enabled page displays for the sponsor.

Before you begin

Ensure that you have the required certificates, external identity sources, and identity source sequences configured for use with this portal.

Procedure

Step 1

Configure the Portal Settings page, as described in Portal Settings for Sponsor Portals.

Ensure that the portal name that you use here is not used for any other end-user portals.

Step 2

Configure the Login Settings page , as described in Login Settings for Sponsor Portals.

Step 3

Configure the Acceptable Use Policy (AUP) Page Settings page, as described in Acceptable Use Policy (AUP) Settings for Sponsor Portals .

Step 4

Configure the Sponsor Change Password Settings option, as described in Sponsor Change Password Settings for Sponsor Portals.

Step 5

Configure the Post-Login Banner Page Settings page, as described in Post-Login Banner Settings for Sponsor Portals.

Step 6

Click Sponsor Portal Application Settings if you want to customize the portal.

Step 7

Click Save.


Customize Sponsor Portals

You can customize the portal appearance and user experience by customizing the portal themes, changing UI elements on the portal pages, and editing error messages and notifications that display to the users. For more information about customizing portals, see Customization of End-User Web Portals.

Configuring Account Content for Sponsor Account Creation

You can configure the type of user data that your guests and sponsors must provide to create a new guest account. Some fields are required to identify an ISE account, but you can eliminate other fields, and add your own custom fields.

To configure fields for account creation by Sponsors:

  1. Choose Work Centers > Guest Access > Portals & Components > Sponsor Portals, and edit your sponsor portal.

  2. Select the Portal Page Customization tab.

  3. Scroll down and select Create Account for Known Guests.

    On the Preview display on the right, select Settings.These settings determine which fields display and are required for guest accounts when they are created on the sponsor portal.

This configuration applies to Known, Random, and Imported guest types. The template that the sponsor downloads to import new users is created dynamically, so that only the fields set in Known Guests are included.

Sponsor Import Usernames and Passwords for Accounts

Sponsors can import username and password, but those rows are not added to the template when the sponsor downloads it. The sponsor can add those headings. They must be named properly in order for the Cisco ISE to recognize the columns:

  • Username: Can be either User Name or UserName

  • Password: Must be password

Configuring the Time Settings Available to Sponsors

When sponsors create a new guest account, they configure the time that the account is active. You configure the options that are available to the sponsor, to allow them to set the account duration, and the start and end times. These options are configured by guest type. The sponsor sees the results under the heading Access Information.

The Guest Type settings that control sponsor portal account time options are under the heading Maximum Access Time, and are described below:

  • From first login: The sponsor portal shows the duration for which the account is active after the first login.

    The guest type setting Maximum Account Duration determines which values the Sponsor can enter for duration.

  • From sponsor-specified date (or date of self-registration, if applicable): The sponsor can choose between setting the duration as End of business day, or, by unchecking that field, the duration, start and end times.

    The guest type settings to control the duration time and effective dates are under the heading Allow access only on these days and times.

    • The days of the week that you select limits the dates that are selectable in the Sponsor's calendar.

    • Maximum account duration is enforced in the sponsor portal when picking duration and dates.

Kerberos Authentication for the Sponsor Portal

You can configure Cisco ISE to use Kerberos to authenticate a sponsor user who is logged onto Windows for access to the sponsor portal. This process uses the Active Directory credentials of the logged in sponsor user in the Kerberos ticket. Kerberos SSO is performed inside the secure tunnel after the browser establishes the SSL connection with Cisco ISE.

The following items must be in the same Active Directory domain:

  • Sponsor's PC

  • ISE PSN

  • FQDN configured for this sponsor portal

This requirement is because Microsoft does not support Kerberos SSO with 2-way trusts across Active Directory forests.

The sponsor user must be logged onto Windows.

Kerberos authentication is NOT supported for the Guest portal.

Configuring Kerberos

To enable Kerberos on the Sponsor portal, check the Allow Kerberos SSO check box in the Sponsor Settings and Customization window.

The sponsor's browser must also be configured properly. The following sections explain how to manually configure each browser.


Note


The username in the Active Directory and User Principle Name must match. The SSO will depend on the User Principle Name to identify the session of the user.


While accessing the sponsor portal using the sponsor portal FQDN from your browser, Cisco ISE redirects the request to the PSN FQDN instead of the configured sponsor portal FQDN.

For example, if the sponsor portal FQDN is sponsor.example.com and the PSN FQDN is psn.example.com, when you try accessing https://sponsor.example.com from your browser, you will be redirected to https://ise.example.com:8445/sponsorportal/PortalSetup.action?portal=b7e7d773-7bb3-442b-a50b-42837c12248a.

This behavior occurs only when you enable the Allow Kerberos SSO option.

To Manually Configure Firefox

  1. Enter about:config in the address bar.

  2. Ignore warnings that appear, and click to continue.

  3. Search for negotiate in the search bar.

  4. Add the FQDN to network.negotiate-auth.delegation-uris and network.negotiate-auth.trusted-uris. The list of URLs for each attribute is separated by commas.

  5. Close the tab. The browser is ready, no restart is required.

To Manually Configure Internet Explorer

  1. Click the gear on the top right, and select Internet Options.

  2. Click the Security tab.

  3. Click Local Intranet.

  4. Click Sites and then click Advanced.

  5. Add in the string <mydomain>.com, where <mydomain> is a wild card for the Sponsor portal FQDN, or you can enter the FQDN.

  6. Click Close and then click OK.

  7. Click the Advanced tab.

  8. Scroll down to the Security section and check the Enable Integrated Windows Authentication check box.

  9. Restart the computer.

Chrome gets the configuration from Internet Explorer

Troubleshooting
  • Run set user in the command prompt to verify that the machine is tied to proper AD domain.

  • Run klist in the command prompt to see list of cached Kerberos tickets and the hostnames.

  • Look at the SPNEGO token data. The NTLM password-based token string is much shorter than Kerberos token string; the correct token string should not fit on one line.

  • Use Wireshark using the filter kerberos to capture Kerberos request, if it exists.


Note


When the Kerberos SSO option is enabled, the user needs to access the sponsor portal by the node FQDN for Kerberos SSO to function properly. If a portal FQDN is configured for the sponsor portal, when the user connects to the portal FQDN, the user will be redirected to the portal by its node FQDN.


Sponsors Cannot Log In to the Sponsor Portal

Problem
The following error message appears when a sponsor tries to log in to the Sponsor portal:

“Invalid username or password. Please try again.”
Causes
  • The sponsor has entered invalid credentials.

  • The sponsor is not valid because the user record is not present in the database (Internal Users or Active Directory).

  • The sponsor group to which the sponsor belongs is disabled.

  • The Sponsor's user account is not a member of an active/enabled Sponsor Group, which means the Sponsor user's Identity Group is not a member of any Sponsor Group.

  • The sponsor’s internal user account is disabled (suspended).

Solution
  • Verify the user’s credentials.

  • Enable the sponsor group.

  • Reinstate the user account if disabled.

  • Add the sponsor user's Identity Group as a member of a Sponsor Group.

Monitor Guest and Sponsor Activity

Cisco ISE provides various reports and logs that allow you to view endpoint and user management information and guest and sponsor activity.

You can run these reports either on demand or on a scheduled basis.

Procedure


Step 1

In the Cisco ISE GUI, click the Menu icon () and choose Operations > Reports > Reports.

Step 2

Choose Guest or Endpoints and Users to view the various guest, sponsor, and endpoint related reports

Step 3

Choose the data with which you want to search using the Filters drop-down list.

Step 4

Select the Time Range during which you want to view the data.

Step 5

Click Run.


Metrics Dashboard

Cisco ISE provides an at-a-glance view of Authenticated Guests and Active Endpoints in the network in a metrics dashboard that appears on the Cisco ISE Home page.

Click the number displayed in Active Endpoints to launch the Live Sessions window that displays the details of the endpoints with active sessions.


Note


For Hotspot flow, the endpoints are not displayed in the Authenticated Guests dashlet.


AUP Acceptance Status Report

The AUP Acceptance Status report displays the acceptance status of the Acceptable Use Policy (AUP) by guests from all the Guest portals. To view this window, click the Menu icon () and choose Operations > Reports > Guest > AUP Acceptance Status.

You can use the report to track all the accepted and denied AUP connections for a given period of time.

Guest Accounting Report

The Guest Accounting report displays the guest login history for an indicated time period. To view this window, click the Menu icon () and choose Operations > Reports > Guest > Guest Accounting.

Primary Guest Report

The Primary Guest Report combines data from various reports into a single view enabling you to export data from different reporting sources. You can add more data columns and remove the ones you do not want to view or export. To view this window, click the Menu icon () and choose Operations > Reports > Reports > Guest > Primary Guest Report.

This report collects all guest activity and provides details about the websites that guest users visit. You can use this report for security auditing purposes to see when guest users accessed the network and what they did on it. To view the guests’ Internet activity, such as the URLs of the websites that they visited, you must first:

  • Enable the passed authentications logging category. In the Cisco ISE GUI, click the Menu icon () and choose Administration > System > Logging > Logging Categories and select Passed authentications.

  • Enable these options on the firewall used for guest traffic:

    • Inspect HTTP traffic and send data to Cisco ISE Monitoring node. Cisco ISE requires only the IP address and accessed URL for the Guest Activity report; so, limit the data to include just this information, if possible.

    • Send syslogs to Cisco ISE Monitoring node.

Sponsor Login and Audit Report

The Sponsor Login and Audit report is a combined report that tracks:

  • Login activity by the sponsors at the Sponsor portal.

  • Guest-related operations performed by the sponsors in the Sponsor portal.

To view this window, click the Menu icon () and choose Operations > Reports > Guest Access Reports > Sponsor Login and Audit.

Audit Logging for Guest and Sponsor Portals

During specific actions within the Guest and Sponsor portals, audit log messages are sent to the underlying audit system. Use the command show logging application localStore/iseLocalStore.log to view these messages.

You can configure these messages to be sent by syslog to the monitoring and troubleshooting system and log collector. The monitoring subsystem presents this information in the appropriate sponsor and device audit logs and guest activity logs.

Guest login flow is logged in the audit logs regardless of whether the guest login has passed or failed.

Guest Access Web Authentication Options

Cisco ISE Guest and Web Authentication Services support several deployment options that enable secure guest access. You can provide wired or wireless guest connectivity using Local or Central Web Authentication and Device Registration Web Authentication.

  • Central Web Authentication (Central WebAuth): Applies to all Guest portals. Uses Web authentication by a central Cisco ISE RADIUS server for both wired and wireless connection requests. Guests authenticate after by either entering an optional access code on the Hotspot Guest portals, or by entering a username and password on the Credentialed Guest portals.


    Note


    During redirection, if the browser opens more than one tab, Cisco ISE redirects to every tab. The user can log in to the portal, but Cisco ISE can't authorize the session, and the user fails to gain access. To work around this issue, the user must close all but one tab on the browser.


  • Local Web Authentication (Local WebAuth): Applies to the Credentialed Guest portals. The guest connects to a switch for a wired connections, or a wireless LAN controller (WLC) for a wireless connection. The network access device (NAD) directs them to web pages for authentication. The guest enters a username and password on the Credentialed Guest portals to authenticate.

  • Device Registration Web Authentication (Device Registration WebAuth): Applies only to the Hotspot Guest portal. Cisco ISE registers and authorizes the guest device before Web authentication. When guests connect to a wired or wireless NAD, they are directed to the Hotspot Guest portal. Guests get network access without providing credentials (username and password).

ISE Community Resource

For information on how to configure Cisco ISE with Cisco Wireless Controller to provide guest access, see ISE Guest Access Prescriptive Deployment Guide.

Also see the following Tech Note: ISE Wireless Guest Setup Guide & Wizard.

NAD with Central WebAuth Process

In this scenario, the network access device (NAD) makes a new authorization request to the Cisco ISE RADIUS server from an unknown endpoint connection. The endpoint then receives a url-redirect to Cisco ISE.


Note


webauth-vrf-aware command is supported only in IOS XE 3.7E, IOS 15.2(4)E or later versions. Other switches do not support WebAuth URL redirect in virtual routing and forwarding (VRF) environment. In such cases, as a workaround, you can add a route in the global routing table to leak the traffic back into the VRF.

If the guest device is connected to a NAD, the guest service interaction takes the form of a MAC Authentication Bypass (MAB) request that leads to a Guest portal Central WebAuth login. The following is an outline of the subsequent Central Web Authentication (Central WebAuth) process, which applies to both wireless and wired network access devices.

  1. The guest device connects to the NAD through a hard-wired connection. There is no 802.1X supplicant on the guest device.

  2. An authentication policy with a service type for MAB allows a MAB failure to continue and return a restricted network profile containing a url-redirect for the Central WebAuth user interface.

  3. The NAD is configured to authenticate MAB requests to the Cisco ISE RADIUS server.

  4. The Cisco ISE RADIUS server processes the MAB request and does not find an endpoint for the guest device.

    This MAB failure resolves to the restricted network profile and returns the url-redirect value in the profile to the NAD in an access-accept. To support this function, ensure that an authorization policy exists and features the appropriate wired or wireless MAB (under compound conditions) and, optionally, “Session:Posture Status=Unknown” conditions. The NAD uses this value to redirect all guest HTTPS traffic on the default port 8443 to the url-redirect value.

    The standard URL value in this case is: https://ip:port/guestportal/gateway?sessionId=NetworkSessionId&portal=<PortalID>&action=cwa

  5. The guest device initiates an HTTP request to redirect URL via a web browser.

  6. The NAD redirects the request to the url-redirect value returned from the initial access-accept.

  7. The gateway URL value with action CWA redirects to the Guest portal login page.

  8. The guest enters their login credentials and submits the login form.

  9. The guest server authenticates the login credentials.

  10. Depending on the type of flow, the following occurs:

    • If it is a non-posture flow (authentication without further validation), where the Guest portal is not configured to perform client provisioning, the guest server sends a CoA to the NAD. This CoA causes the NAD to reauthenticate the guest device using the Cisco ISE RADIUS server. A new access-accept is returned to the NAD with the configured network access. If client provisioning is not configured and the VLAN needs to be changed, the Guest portal performs VLAN IP renew. The guest does not have to re-enter login credentials. The username and password entered for the initial login are used automatically.

    • If it is a posture flow, where the Guest portal is configured to perform client provisioning, the guest device web browser displays the Client Provisioning page for posture agent installation and compliance. (You can also optionally configure the client provisioning resource policy to feature a “NetworkAccess:UseCase=GuestFlow” condition.)

The Guest portal redirects to the Client Provisioning portal (because there is no client provisioning or posture agent for Linux), which in turn redirects back to a guest authentication servlet to perform optional IP release/renew and then CoA.

With redirection to the Client Provisioning portal, the Client Provisioning service downloads a non-persistent web agent to the guest device and performs a posture check of the device. You can optionally configure the posture policy with a “NetworkAccess:UseCase=GuestFlow” condition.

If the guest device is non-compliant, ensure that you have configured an authorization policy that features “NetworkAccess:UseCase=GuestFlow” and “Session:Posture Status=NonCompliant” conditions.

When the guest device is compliant, ensure that you have an authorization policy configured with the conditions “NetworkAccess:UseCase=GuestFlow” and “Session:Posture Status=Compliant.” From here, the Client Provisioning service issues a CoA to the NAD. This CoA causes the NAD to reauthenticate the guest using the Cisco ISE RADIUS server. A new access-accept is returned to the NAD with the configured network access.


Note


“NetworkAccess:UseCase=GuestFlow” can also apply for Active Directory and LDAP users who log in as guests.

Wireless LAN Controller with Local WebAuth Process

In this scenario, the guest logs in and is directed to the wireless LAN controller (WLC). The WLC then redirects the guest to a Guest portal, where they are prompted to enter their login credentials, accept an optional Acceptable Use Policy (AUP), and perform an optional password change.

When this is complete, the guest device’s browser is redirected back to the WLC to provide login credentials via a POST.

The WLC can now log the guest in via the Cisco ISE RADIUS server. When this is complete, the WLC redirects the guest device's browser to the original URL destination. The Wireless LAN Controller (WLC) and the network access devices (NAD) requirements to support the original URL redirect for guest portals are WLC 5760 and Cisco Catalyst 3850, 3650, 2000, 3000, and 4000 Series Access Switches running releases IOS-XE 3.6.0.E and 15.2(2)E.

Figure 2. WLC with Local WebAuth Non-Posture Flow
WLC with Local WebAuth Non-Posture Flow

Wired NAD with Local WebAuth Process

In this scenario, the Guest portal redirects the guest login request to the switch (wired NAD). The login request is in the form of an HTTPS URL posted to the switch and contains the login credentials. The switch receives the guest login request and authenticates the guest using the configured Cisco ISE RADIUS server.

  1. Cisco ISE requires a login.html file with the HTML redirect to be uploaded to the NAD. This login.html file is returned to the browser of the guest device for any HTTPS request made.

  2. The browser of the guest device is redirected to the Guest portal where the guest’s login credentials are entered.

  3. After the Acceptable Use Policy (AUP) and change password are processed, both of which are optional, the Guest portal redirects the browser of the guest device to post the login credentials on the NAD.

  4. The NAD makes a RADIUS request to the Cisco ISE RADIUS server to authenticate and authorize the guest.

IP Address and Port Values Required for the Login.html Page

The IP address and port values must be changed in the following HTML code for the login.html page to those values being used by the Cisco ISE Policy Services nodes. The default port is 8443, but you can change this value, so ensure that the value you assign to the switch matches the setting in Cisco ISE.


<!DOCTYPE HTML PUBLIC "-//W3C//DTD HTML 4.0 Transitional//EN">
<HTML>
<head>
<title>ISE Guest Portal</title>
<meta Http-Equiv="Cache-Control" Content="no-cache">
<meta Http-Equiv="Pragma" Content="no-cache">
<meta Http-Equiv="Expires" Content="0">
<meta http-equiv="content-type" content="text/html; charset=ISO-8859-1">

<meta http-equiv="REFRESH" content="0;url=https://ip:port/portal/PortalSetup.action?switch_url=wired">

</HEAD>
<BODY>

<center>
Redirecting ... Login
<br>
<br>
<a href="https://ip:port/portal/PortalSetup.action?switch_url=wired">ISE Guest Portal</a>
</center>

</BODY>
</HTML>

The custom login page is a public web form, hence consider these guidelines:

  • The login form must accept user entries for the username and password and must show them as uname and pwd.

  • The custom login page should follow best practices for a web form, such as page timeout, hidden password, and prevention of redundant submissions.

HTTPS Server Enabled on the NAD

To use web-based authentication, you must enable the HTTPS server within the switch using the ip http secure-server command.

Support for Customized Authentication Proxy Web Pages on the NAD

You can upload custom pages for success, expiry, and failure to the NAD. Cisco ISE does not require any specific customization, so you can create these pages using the standard configuration instructions included with the NAD.

Configure Web Authentication on the NAD

You need to complete the web authentication on the NAD by replacing the default HTML pages with your custom files.

Before you begin

During web-based authentication, create four substitute HTML pages to use instead of the switch default HTML pages.

Procedure

Step 1

To specify the use of your custom authentication proxy web pages, first store your custom HTML files on the switch flash memory. To copy your HTML files to the switch flash memory, run the following command on the switch:

copy tftp/ftp flash

Step 2

After copying your HTML files to the switch, perform the following commands in global configuration mode:

ip admission proxy http login page file device:login-filename

Specifies the location in the switch memory file system of the custom HTML file to use in place of the default login page. The device: is flash memory.

ip admission proxy http success page file device:success-filename

Specifies the location of the custom HTML file to use in place of the default login success page.

ip admission proxy http failure page file device:fail-filename

Specifies the location of the custom HTML file to use in place of the default login failure page.

ip admission proxy http login expired page file device:expired-filename

Specifies the location of the custom HTML file to use in place of the default login expired page.

Step 3

Configure the customized authentication proxy web pages following the guidelines provided by the switch.

Step 4

Verify the configuration of a custom authentication proxy web page, as shown in the following example:


Switch# show ip admission configuration
Authentication proxy webpage
	Login page           : flash:login.htm
	Success page         : flash:success.htm
	Fail Page            : flash:fail.htm
	Login expired Page   : flash:expired.htm

Authentication global cache time is 60 minutes
Authentication global absolute time is 0 minutes
Authentication global init state time is 2 minutes
Authentication Proxy Session ratelimit is 100
Authentication Proxy Watch-list is disabled
Authentication Proxy Auditing is disabled
Max Login attempts per user is 5

Device Registration WebAuth Process

Using Device Registration Web Authentication (Device Registration WebAuth) and the Hotspot Guest portal, you can allow guest devices to connect to a private network without requiring usernames and passwords.

In this scenario, the guest connects to the network with a wireless connection. See Figure 16-1 for an example of the Device Registration WebAuth process flow.

The following is an outline of the subsequent Device Registration WebAuth process, which is similar for both wireless and wired connections:

  1. The network access device (NAD) sends a redirect to the Hotspot Guest portal.

  2. If the MAC address of the guest device is not in any endpoint identity group or is not marked with an Acceptable Use Policy (AUP) accepted attribute set to true, Cisco ISE responds with a URL redirection specified in an authorization profile.

  3. The URL redirection presents the guest with an AUP page (if enabled) when the guest attempts to access any URL.

    • If the guest accepts the AUP, the endpoint associated with their device MAC address is assigned to the configured endpoint identity group. This endpoint is now marked with an AUP accepted attribute set to true, to track the guest acceptance of the AUP.

    • If the guest does not accept the AUP or if an error occurs, for instance, while creating or updating the endpoint, an error message displays.

  4. Based on the Hotspot Guest portal configuration, a post-access banner page (if enabled) with additional information may appear.

  5. After the endpoint is created or updated, a Change of Authorization (CoA) termination is sent to the NAD.

  6. After the CoA, the NAD re-authenticates the guest connection with a new MAC Auth Bypass (MAB) request. The new authentication finds the endpoint with its associated endpoint identity group, and returns the configured access to the NAD.

  7. Based on the Hotspot Guest portal configuration, the guest is directed to the URL to which they requested access, or to a custom URL specified by the administrator, or to an Authentication Success Page.

The CoA type for both wired and wireless is Termination CoA. You can configure the Hotspot Guest portal to perform VLAN DHCP Release (and renew), thereby re-authorizing the CoA type for both wired and wireless to Change of Auth.

VLAN DHCP Release support is available for Windows devices only. It is not available for mobile devices. If the device being registered is mobile and the VLAN DHCP Release option is enabled, the guest is requested to manually renew their IP address. For mobile device users, we recommend using Access Control Lists (ACLs) on the WLC, rather than using VLANs.

Figure 3. Wireless Device Registration Web Authentication Flow

Wireless Device Registration Web Authentication Flow

Guest Portal Settings

Portal Identification Settings

To view this window, click the Menu icon () and choose Work Centers > Guest Access > Portals & Components > Guest Portals or Sponsor Portals > Create, Edit or Duplicate > Guest Portals or Sponsor Portals Settings and Customization.

  • Portal Name: Enter a unique portal name to access this portal. Do not use this portal name for any other Sponsor, Guest, or nonguest portals, such as Blocked List, Bring Your Own Device (BYOD), Client Provisioning, Mobile Device Management (MDM), or My Devices portals.

    This name appears in the authorization profile portal selection for redirection choices. It is applied to the list of portals for easy identification among other portals.

  • Description: Optional.

  • Portal Test URL: A system-generated URL displays as a link after you click Save. Use it to test the portal.

    Click the link to open a new browser tab that displays the URL for this portal. Policy Services Node (PSN) with Policy Services must be turned on. If Policy Services are disabled, the PSN only displays the Admin portal.


    Note


    The test portal does not support RADIUS sessions, so you won't see the entire portal flow for all portals. BYOD and Client Provisioning are examples of portals that depend on RADIUS sessions. For example, a redirect to an external URL will not work. If you have more than one PSN, Cisco ISE chooses the first active PSN.


  • Language File: Each portal type supports 15 languages by default, which are available as individual properties files bundled together in a single zipped language file. Export or import the zipped language file to use with the portal. The zipped language file contains all the individual language files that you can use to display text for the portal.

    The language file contains the mapping to the particular browser locale setting along with all of the string settings for the entire portal in that language. A single language file contains all the supported languages, so that it can easily be used for translation and localization purposes.

    If you change the browser locale setting for one language, the change is applied to all the other end-user web portals. For example, if you change the French.properties browser locale from fr,fr-fr,fr-ca to fr,fr-fr in the Hotspot Guest portal, the changes also apply to the My Devices portal.

    An alert icon displays when you customize any of the text on the Portal Page Customizations tab. The alert message reminds you that any changes made to one language while customizing the portal must also be added to all the supported languages properties files. You can manually dismiss the alert icon using the drop-down list option; or it is automatically dismissed after you import the updated zipped language file.

Portal Settings for Hotspot Guest Portals

To view this window, click the Menu icon () and choose Work Centers > Guest Access > Portals & Components > Guest Portals > Create, Edit or Duplicate > Portal Behavior and Flow Settings > Portal Settings.

  • HTTPS Port: Enter a port value between 8000 to 8999; the default value is 8443 for all the default portals, except the Blocked List Portal, which is 8444. If you upgraded with port values outside this range, they are honored until you modify this window. If you modify this window, update the port setting to comply with this restriction.

    If you assign ports used by a non-guest (such as My Devices) portal to a guest portal, an error message appears.

    For posture assessments and remediation only, the Client Provisioning portal also uses ports 8905 and 8909. Otherwise, it uses the same ports assigned to the Guest portal.

    Portals assigned to the same HTTPS port can use the same Gigabit Ethernet interface or another interface. If they use the same port and interface combination, they must use the same certificate group tag. For example:

    • Valid combinations include, using the Sponsor portal as an example:

      • Sponsor portal: Port 8443, Interface 0, Certificate tag A and My Devices portal: Port 8443, Interface 0, Certificate group A.

      • Sponsor portal: Port 8443, Interface 0, Certificate group A and My Devices portal: Port 8445, Interface 0, Certificate group B.

      • Sponsor portal: Port 8444, Interface 1, Certificate group A and Blocked List portal: Port 8444, Interface 0, Certificate group B.

    • Invalid combinations include:

      • Sponsor portal: Port 8443, Interface 0, Certificate group A and My Devices portal: 8443, Interface 0, Certificate group B.

      • Sponsor portal: Port 8444, Interface 0, Certificate tag A and Blocked List portal: Port 8444, Interface 0, Certificate group A.


    Note


    We recommend that you use interface 0 for Guest services for best performance. You can either configure only interface 0 in the Portal Settings, or you can use the CLI command ip host to map a hostname or FQDN to the IP address of interface 0.


  • Allowed Interfaces: Select the PSN interfaces which a PAN can use to run a portal. When a request to open a portal is made on the PAN, the PAN looks for an available allowed port on the PSN. You must configure the Ethernet interfaces using IP addresses on different subnets.

    These interfaces must be available on all the PSNs, including VM-based ones, that have Policy Services turned on. This is a requirement because any of these PSNs can be used for the redirect at the start of the guest session.

    • The Ethernet interfaces must use IP addresses on different subnets.

    • The interfaces you enable here must be available on all your PSNs, including VM-based ones when Policy Services turned on. This is required because any of these PSNs can be used for a redirect at the start of the guest session.

    • The portal certificate Subject Name or Alternate Subject Name must resolve to the interface IP address.

    • Configure ip host x.x.x.x yyy.domain.com in Cisco ISE CLI to map the secondary interface IP address to the FQDN, which is used to match the certificate Subject Name or Alternate Subject Name.

    • If only the bonded NIC is selected, when the PSN attempts to configure the portal it first attempts to configure the Bond interface. If that is not successful, perhaps because there was no bond setup on that PSN, then the PSN logs an error and exits. The PSN will not try to start the portal on the physical interface.

    • NIC Teaming or bonding is a configuration option that allows you to configure two individual NICs for high availability (fault tolerance). If one of the NICs fails, the other NIC that is part of the bonded connection continues the connection. A NIC is selected for a portal based in the Portal Settings configuration. If both physical NICs and the corresponding bonded NIC are configured, when the PSN attempts to configure the portal, it first attempts to connect to the Bond interface. If that is not successful, perhaps because there was no bond setup on that PSN, then the PSN attempts to start the portal on the physical interface.

  • Certificate Group tag: Pick a certificate group tag that specifies the certificate to be used for the portal’s HTTPS traffic.

  • Endpoint Identity Group: Choose an endpoint identity group to track guest devices. Cisco ISE provides the GuestEndpoints endpoint identity group to use as a default. You can also create more endpoint identity groups if you choose to not use the default.

    Choose an endpoint identity group to track employee devices. Cisco ISE provides the RegisteredDevices endpoint identity group to use as a default. You can also create more endpoint identity groups if you choose to not use the default.

  • Purge Endpoints in this Identity Group when they Reach __ Days: Specify the number of days after which the device is purged from the Cisco ISE database. Purging is done on a daily basis and the purge activity is synchronized with the overall purge timing. The change is applied globally for this endpoint identity group.

    If changes are made to the Endpoint Purge Policy based on other policy conditions, this setting is no longer available for use.

  • Display Language

    • Use Browser Locale: Use the language specified in the client browser's locale setting as the display language of the portal. If browser locale's language is not supported by Cisco ISE, then the Fallback Language is used as the language portal.

    • Fallback Language: Choose the language to use when the language cannot be obtained from the browser locale, or if the browser locale language is not supported by Cisco ISE.

    • Always Use: Choose the display language to use for the portal. This setting overrides the User Browser Locale option.

Acceptable Use Policy (AUP) Page Settings for Hotspot Guest Portals

To view this window, click the Menu icon () and choose Work Centers > Guest Access > Portals & Components > Guest Portals > Create, Edit or Duplicate > Portal Behavior and Flow Settings > Acceptable Use Policy (AUP) Page Settings.
  • Include an AUP Page: Display your company’s network-usage terms and conditions on a separate page to the user.

  • Require an Access Code: Assign an access code as the login credential that multiple guests should use to gain access to the network. An access code is primarily a locally known code that is given to physically present guests (either visually via a whiteboard or verbally by a lobby ambassador). It would not be known and used by someone outside the premises to access the network.

    You can use this option in addition to the usernames and passwords that are provided as the login credentials to individual guests.

  • Require scrolling to end of AUP—Ensure that the user has read the AUP completely. The Accept button activates only after the user has scrolled to the end of the AUP. Configure when the AUP appears to the user.

When configuring the Hotspot Guest Portals flow, the AUP access code is reliant on Endpoint Identity Group device registration.

The AUP access code page will appear only after the MAC address has been removed from the Endpoint Identity Group tied to the hotspot portal configuration. An endpoint is either manually deleted from the database through the Context Visibility page on Cisco ISE, or it is purged by way of the Endpoint Purge feature and configured endpoint purge policies.

Post-Access Banner Page Settings for Hotspot Portals

The navigation path for this page is Work Centers > Guest Access > Portals & Components > Guest Portals > Create, Edit or Duplicate > Portal Behavior and Flow Settings > Post-Access Banner Page Settings.

Use this setting to inform guests of their access status and any other additional actions, if required.

Field Usage Guidelines

Include a Post-Access Banner page

Display additional information after the guests are successfully authenticated and before they are granted network access.

Portal Settings for Credentialed Guest Portals

To view this window, click the Menu icon () and choose Work Centers > Guest Access > Portals & Components > Guest Portals > Create, Edit or Duplicate > Portal Behavior and Flow Settings > Portal Settings.

  • HTTPS Port: Enter a port value between 8000 to 8999; the default value is 8443 for all the default portals, except the Blocked List Portal, which is 8444. If you upgraded with port values outside this range, they are honored until you modify this window. If you modify this window, update the port setting to comply with this restriction.

    If you assign ports used by a non-guest (such as My Devices) portal to a guest portal, an error message appears.

    For posture assessments and remediation only, the Client Provisioning portal also uses ports 8905 and 8909. Otherwise, it uses the same ports assigned to the Guest portal.

    Portals assigned to the same HTTPS port can use the same Gigabit Ethernet interface or another interface. If they use the same port and interface combination, they must use the same certificate group tag. For example:

    • Valid combinations include, using the Sponsor portal as an example:

      • Sponsor portal: Port 8443, Interface 0, Certificate tag A and My Devices portal: Port 8443, Interface 0, Certificate group A.

      • Sponsor portal: Port 8443, Interface 0, Certificate group A and My Devices portal: Port 8445, Interface 0, Certificate group B.

      • Sponsor portal: Port 8444, Interface 1, Certificate group A and Blocked List portal: Port 8444, Interface 0, Certificate group B.

    • Invalid combinations include:

      • Sponsor portal: Port 8443, Interface 0, Certificate group A and My Devices portal: 8443, Interface 0, Certificate group B.

      • Sponsor portal: Port 8444, Interface 0, Certificate tag A and Blocked List portal: Port 8444, Interface 0, Certificate group A.


    Note


    We recommend that you use interface 0 for Guest services for best performance. You can either configure only interface 0 in the Portal Settings, or you can use the CLI command ip host to map a hostname or FQDN to the IP address of interface 0.


  • Allowed Interfaces: Select the PSN interfaces which a PAN can use to run a portal. When a request to open a portal is made on the PAN, the PAN looks for an available allowed port on the PSN. You must configure the Ethernet interfaces using IP addresses on different subnets.

    These interfaces must be available on all the PSNs, including VM-based ones, that have Policy Services turned on. This is a requirement because any of these PSNs can be used for the redirect at the start of the guest session.

    • The Ethernet interfaces must use IP addresses on different subnets.

    • The interfaces you enable here must be available on all your PSNs, including VM-based ones when Policy Services turned on. This is required because any of these PSNs can be used for a redirect at the start of the guest session.

    • The portal certificate Subject Name or Alternate Subject Name must resolve to the interface IP address.

    • Configure ip host x.x.x.x yyy.domain.com in Cisco ISE CLI to map the secondary interface IP address to the FQDN, which is used to match the certificate Subject Name or Alternate Subject Name.

    • If only the bonded NIC is selected, when the PSN attempts to configure the portal it first attempts to configure the Bond interface. If that is not successful, perhaps because there was no bond setup on that PSN, then the PSN logs an error and exits. The PSN will not try to start the portal on the physical interface.

    • NIC Teaming or bonding is a configuration option that allows you to configure two individual NICs for high availability (fault tolerance). If one of the NICs fails, the other NIC that is part of the bonded connection continues the connection. A NIC is selected for a portal based in the Portal Settings configuration. If both physical NICs and the corresponding bonded NIC are configured, when the PSN attempts to configure the portal, it first attempts to connect to the Bond interface. If that is not successful, perhaps because there was no bond setup on that PSN, then the PSN attempts to start the portal on the physical interface.

  • The portal certificate Subject Name or Alternate Subject Name must resolve to the interface IP address.

  • Authentication Method: Choose which identity source sequence or Identity Provider (IdP) to use for user authentication. The identity source sequence is a list of identity stores that are searched in sequence to verify user credentials.

    Cisco ISE includes a default identity source sequence for sponsor portals, Sponsor_Portal_Sequence.

    To configure IdP, choose Administration > Identity Management > External Identity Sources > SAML Id Providers.

    To configure an identity source sequence, choose Administration > Identity Management > Identity Source Sequences.

  • Employees Using this Portal as Guests Inherit Login Options and Dynamic Endpoint Group Assignment from: Choose the Guest Type that employees are assigned to when they log in to this portal. The employees' endpoint data is stored in the endpoint identity group configured in that guest type for the Store device information in endpoint identity group attribute. No other attributes from the associated guest type are inherited.

  • Display Language

    • Use Browser Locale: Use the language specified in the client browser's locale setting as the display language of the portal. If browser locale's language is not supported by Cisco ISE, then the Fallback Language is used as the language portal.

    • Fallback Language: Choose the language to use when the language cannot be obtained from the browser locale, or if the browser locale language is not supported by Cisco ISE.

    • Always Use: Choose the display language to use for the portal. This setting overrides the User Browser Locale option.

Login Page Settings for Credentialed Guest Portals

To view this window, click the Menu icon () and choose Work Centers > Guest Access > Portals & Components > Guest Portals > Create, Edit or Duplicate > Portal Behavior and Flow Settings > Login Page Settings.

  • Require an Access Code: Assign an access code as the login credential that multiple guests should use to gain access to the network. An access code is primarily a locally known code that is given to physically present guests (either visually via a whiteboard or verbally by a lobby ambassador). It would not be known and used by someone outside the premises to access the network.

    You can use this option in addition to the usernames and passwords that are provided as the login credentials to individual guests.

  • Maximum Failed Login Attempts Before Rate Limiting: Specify the number of failed login attempts from a single browser session before Cisco ISE starts to throttle that account. This does not cause an account lockout. The throttled rate is configured in Time between login attempts when rate limiting.

  • Time Between Login Attempts when Rate Limiting: Set the length of time in minutes that a user must wait before attempting to log in again (throttled rate), after failing to log in the number of times defined in Maximum failed login attempts before rate limiting.

  • Include an AUP: Add a acceptable use policy window to the flow. You can add the AUP to the window, or link to another window.

  • Allow Guests to Create their Own Accounts: Provide an option on this portal’s Login page for guests to register themselves. If this option is not selected, sponsors create guest accounts. Enabling this also enables tabs on this page for you to configure Self-Registration Page Settings and Self-Registration Success Page Settings.

    If guests choose this option, they are presented with the Self-Registration form where they can enter the requested information to create their own guest accounts.

  • Allow Guests to Recover the Password: This option enables a Reset Password button on the Guest portal for self-registered guests. If a self-registered guest who still has a valid account connects to the login portal, and forgot their password, they can click Reset Password. That brings them back to the self-registration window, where they can enter their phone or email (whichever they registered with) and enter a new password.

  • Allow Social Login: Use a social media site to get login credentials for users of this portal. Checking this option displays the following settings:

    • Show registration form after social login: This allows the user to change the information provided by Facebook.

    • Require guests to be approved: This informs the user that a sponsor must approve their account, and will send them credentials for login.

  • Allow guests to change password after login: Allow guests to change their password after successfully authenticating and accepting the AUP, if it is required. If guests change their passwords, sponsors cannot provide guests with their login credentials if lost. The sponsor can only reset the guest’s password back to a random password.


    Note


    Internal users logged in through the guest portal cannot reset their passwords.


  • Allow the following identity-provider guest portal to be used for login: Checking this option and selecting a SAML Id identity provider adds a link for that SAML Id to this portal. This sub-portal can be configured to look like the SAML IDP that the user is providing credentials for.

  • Allow social login: Allow this portal to use a social media type for user login. For more information about configuring social login, see Social Login for Self-Registered Guests.

Self-Registration Page Settings

To view this window, click the Menu icon () and choose Work Centers > Guest Access > Portal & Components > Guest Portals > Create, Edit or Duplicate > Portal Behavior and Flow Settings > Self Registration Page Settings. Use these settings to enable guests to register themselves and specify the information that they must provide on the Self-Registration form.

  • Assign self-registered guests to guest type: Choose the guest type to which all the self-registered guests using this portal are assigned.

  • Account valid for: Specify the duration for the account in days, hours, or minutes after which the account expires unless you or the sponsor extend the account duration in the Sponsor portal.

  • Require a registration code for self registration: Assign a code that the self-registering guests must enter to successfully submit their Self-Registration form. Similar to the access code, the registration code is provided to the guest offline to prevent someone who is outside the premises from accessing the system.

  • Fields to include: Check the fields that you want to display on the Self-Registration form. Then check which fields are mandatory for the guests to complete in order to submit the form and receive a guest account. You may want to require fields such as SMS Service Provider and Person being Visited to gather important information from self-registering guests.

    • Location: Enter locations that the self-registering guests can select at registration time using the list of locations that you have defined. This automatically assigns the related time zones as the valid access times for these guests. Use clear location names to avoid ambiguity during selection (for example, Boston Office, 500 Park Ave New York, Singapore).

      If you plan to restrict guest access by time of day, the time zone is used to determine that time. Unless all your time-access controlled guests are in the San Jose time zone, then create a time zone for your locale. If there is only one location, it is automatically assigned as the default location, and this field does not display in the portal for guests to view. Also, Location is disabled in the list of Fields to include.

    • SMS Service Provider: Select which SMS providers to display on the Self-Registration form to enable self-registering guests to choose their own SMS provider. You can then use the guest’s SMS service to send them SMS notifications, which minimize expenses for your company. If you only selected one SMS provider for the guest to use, this field will not display on the Self-Registration form.

    • Person being visited: This is a text field, so if you want to use it, instruct your guests what kind of information to enter into this field.

    • Custom Fields: Select the custom fields that you previously created to collect more data from the self-registering guests. Then check which fields are mandatory for the guests to complete in order to submit the Self-Registration form and receive a guest account. These fields are listed in alphabetical order by name. You create these fields on Work Centers > Guest Access > Settings > Custom Fields to add more custom fields.

    • Include an AUP: Display your company’s network-usage terms and conditions, either as text on the page currently being displayed for the user or as a link that opens a new tab or window with AUP text.

      • Require acceptance: Ensure that the user has read the AUP completely. This configures an Accept button on the self-registration page. If you configured AUP as on page, then you can also disable the Accept button until after the user has scrolled to the end of the AUP.

  • Only allow guests with an email address from: Specify an allowed list of domains which the self-registering guests can use in Email Address to create email addresses, for example, cisco.com.

    If you leave this field blank, any email address is valid, except for domains listed in Do not allow guests with email address from.

  • Do not allow guests with an email address from: Specify a blocked list of domains which the self-registering guests cannot use in Email Address to create email addresses, for example, czgtgj.com.

  • Require self-registered guests to be approved: Specify that the self-registering guests using this portal require approval from a sponsor before receiving their guest credentials. Clicking this option displays more options for how sponsors approve a self-registered guest.

    • Allow guests to login automatically from self-registration after sponsor's approval: A self-registered guest will be logged in automatically after sponsor approval.

    • Email approval request to:

      • Sponsor email addresses listed below: Enter one or more email addresses of sponsors designated as approvers, or a mailer, to which all guest approval requests should be sent. If the email address is not valid, approval fails.

      • Person being visited: Require sponsor to provide credentials for authentication field is displayed, and the Required option in Fields to include is enabled (if it was previously disabled). These fields are displayed on the Self-Registration form requesting this information from the self-registering guests. If the email address is not valid, approval fails.

    • Approve/Deny Link Settings:

      • Links are valid for: You can set an expiration period for the account approval links.

      • Require sponsor to provide credentials for authentication: Check this to force the sponsor to enter credentials to approve the account, even if it is not required by the configuration in this section. This field is only visible if Require self-registered guests to be approved is set to person being visited.

      • Sponsor is matched to a Sponsor Portal to verify approval privileges: Click Details to select the portals that are searched to verify that the sponsor is a valid system user, a member of a sponsor group, and that the members of that group have authority to approve the account. Each sponsor portal has an identity source sequence, which is used to identify the sponsor. Portals are used in the order they are listed. The first portal in the list determines the style and customization used in the sponsor portal.

  • After registration submission, direct guest to: Choose where the self-registered guest is directed after successfully registering.

    • Self-Registration Success page: Direct successfully self-registered guests to the Self-Registration Success window, which displays the fields and messages you have specified on Self Registration Success Page Settings.

      It may not be desirable to display all the information, because the system may be awaiting account approval (if enabled on this window) or delivering the login credentials to an email address or phone number based on the allowed list and blocked list domains specified on this window.

      If you enabled Allow guests to log in directly from the Self-Registration Success page in Self-Registration Success Page Settings, successfully self-registered guests can log in directly from this window. If it is not enabled, they are directed to the portal's Login window after the Self-Registration Success window is displayed.

    • Login page with instructions about how to obtain login credentials: Direct successfully self-registered guests back to the portal’s Login window and display a message, such as “Please wait for your guest credentials to be delivered either via email, SMS, or print format and proceed with logging in.”

      To customize the default message, click the Portal Page Customization tab and select Self-Registration Page Settings.

      The system may be awaiting account approval (if enabled on this window) or delivering the login credentials to an email address or phone number based on the allowed list and blocked list domains specified on this window.

    • URL: Direct successfully self-registered guests to the specified URL while waiting for their account credentials to be delivered.

      The system may be awaiting account approval (if enabled on this window) or delivering the login credentials to an email address or phone number based on the allowed list and blocked list domains specified on this window.

  • Send credential notification automatically using:

    • Email: Choose email as the option by which successfully self-registered guests receive their login credential information. If you choose this option, Email address becomes a required field in the list of Fields to include and you can no longer disable this option.

    • SMS: Choose SMS as the option by which successfully self-registered guests receive their login credential information. If you choose this option, SMS Service Provider becomes a required field in the list of Fields to include and you can no longer disable this option.

Self Registration Success Page Settings

To view this window, click the Menu icon () and choose Work Centers > Guest Access > Portals & Components > Guest Portals > Create, Edit or Duplicate > Portal Behavior and Flow Settings > Self Registration Success Page Settings. Use these settings to notify successfully self-registered guests of the credentials they need to gain access to the network.

Field Usage Guidelines

Include this information on the Self-Registration Success page

Check the fields that you want to display for the successfully self-registered guests on the Self-Registration Success page.

If sponsor approval of the guest is not required, check Username and Password to display these credentials for the guest. If sponsor approval is required, these fields are disabled, because the credentials can only be delivered to the guest after they have been approved.

Allow guest to send information to self using

Check the options by which the successfully self-registered guest can send credential information to themselves: Print, Email, or SMS.

Include an AUP (on page/as link)

Display your company’s network-usage terms and conditions, either as text on the window currently being displayed for the user or as a link that opens a new tab or window with AUP text.

Require Acceptance

Require users to accept an AUP before their account is fully enabled. The Login button is not enabled unless the user accepts the AUP. If users do not accept the AUP, they will not obtain network access.

Require scrolling to end of AUP

This field displays if you chose the AUP on page option.

Ensure that the user has read the AUP completely. The Accept button is enabled only after the user has scrolled to the end of the AUP.

Allow guests to log in directly from the Self-Registration Success page

Display a Login button at the bottom of the Self-Registration Success page. This enables the guest to bypass the Login page and automatically deliver the login credentials to the portal and display the next page in the portal flow (for instance, the AUP page).

Acceptable Use Policy (AUP) Page Settings for Credentialed Guest Portals

To view this window, click the Menu icon () and choose Work Centers > Guest Access > Portals & Components > Guest Portals > Create, Edit or Duplicate > Portal Behavior and Flow Settings > Acceptable Use Policy (AUP) Page Settings.

  • Include an AUP Page: Display your company’s network-usage terms and conditions on a separate page to the user.

  • Use Different AUP for Employees: Display a different AUP and network-usage terms and conditions for employees only. If you choose this option, you cannot also choose Skip AUP for employees.

  • Skip AUP for Employees: Employees are not required to accept an AUP before accessing the network. If you choose this option, you cannot also choose Use different AUP for employees.

  • Require Scrolling to End of AUP: This option displays only if Include an AUP on page is enabled.

    Ensure that the user has read the AUP completely. The Accept button activates only after the user has scrolled to the end of the AUP. Configure when the AUP appears to the user.

    • On First Login only: Display an AUP the first time the user logs into the network or portal.

    • On Every Login: Display an AUP every time the user logs into the network or portal.

    • Every __ Days (starting at first login): Display an AUP periodically after the user first logs into the network or portal.

Guest Change Password Settings for Credentialed Guest Portals

Guest Change Password Settings

To view this window, click the Menu icon () and choose Work Centers > Guest Access > Portals & Components > Guest Portals > Create, Edit or Duplicate > Portal Behavior and Flow Settings > Guest Change Password Settings

  • Allow guests to change password after login: Allow guests to change their password after successfully authenticating and accepting the AUP, if it is required. If guests change their passwords, sponsors cannot provide guests with their login credentials if lost. The sponsor can only reset the guest’s password back to a random password.


    Note


    Internal users logged in through the guest portal cannot reset their passwords.


Guest Device Registration Settings for Credentialed Guest Portals

To view this window, click the Menu icon () and choose Work Centers > Guest Access > Portals & Components > Guest Portals > Create, Edit or Duplicate > Portal Behavior and Flow Settings > Guest Device Registration Settings.

Use these settings to either ensure that Cisco ISE automatically registers guest devices when they log in to or to allow guests to manually register their devices after they log in.

The maximum number of devices is specified for each guest type in Work Centers > Guest Access > Portals & Components > Guest Types.

  • Automatically Register Guest Devices: Automatically create an endpoint for the device from which the guest is accessing this portal. The endpoint is added to the endpoint identity group specified for this portal.

    An authorization rule can now be created to allow access to endpoints in that identity group, so that web authentication is no longer required.

    If the maximum number of registered devices is reached, the system automatically deletes the first registered device, registers the device the guest is trying to log in with, and notifies them. Choose Work Centers > Guest Access > Portals & Components > Guest Types to change the maximum number of devices with which a guest can register.

  • Allow Guests to Register Devices: Guests can register their devices manually by providing a name, description and MAC address. The MAC address is associated with an endpoint identity group.

    If the maximum number of registered devices is reached, the guest is required to delete at least one device before being allowed to register another device.

BYOD Settings for Credentialed Guest Portals

The navigation path for this page is Work Centers > Guest Access > Portals & Components > Guest Portals > Create, Edit or Duplicate > Portal Behavior and Flow Settings > BYOD Settings.

Use these settings to enable Bring Your Own Device (BYOD) functionality for non-guests, such as employees, using the Credentialed Guest portals to access your corporate network.

Field Usage Guidelines

Allow Employees to use Personal Devices on the Network

Add the BYOD Registration window to this portal allowing employees to go through the employee device registration process, and possibly native supplicant and certificate provisioning, depending on the settings for Client Provisioning for the employee’s personal device type (for example, iOS, Android, OSX).

Endpoint Identity Group

Choose an endpoint identity group to track guest devices. Cisco ISE provides the GuestEndpoints endpoint identity group to use as a default. You can also create more endpoint identity groups if you choose to not use the default.

Allow employees to choose to get guest access only

Let employees access your guest network and avoid additional provisioning and registration that may be required to access your corporate network.

Display Device ID Field During Registration

Display the device ID to the user during the registration process, even though the device ID is pre-configured and cannot be changed while using the BYOD portal.

Originating URL

After successfully authenticating to the network, redirect the user’s browser to the original website that the user is trying to access, if available. If not available, the Authentication Success window appears. Make sure that the redirect URL is allowed to work on port 8443 of the PSN by the access-control list on the NAD and by authorization profiles configured in Cisco ISE for that NAD.

For Windows, MAC, and Android devices, control is given to the Self-Provisioning Wizard app, which does provisioning. Therefore, these devices are not redirected to the originating URL. However, iOS (dot1X) and unsupported devices (that are allowed network access) are redirected to this URL.

Success page

Display a page indicating that the device registration was successful.

URL

After successfully authenticating to the network, redirect the user's browser to the specified URL, such as your company’s website.

Post-Login Banner Page Settings for Credentialed Guest Portals

To view this window, click the Menu icon () and choose Work Centers > Guest Access > Portals & Components > Guest Portals or Sponsor Portals > Create, Edit or Duplicate > Portal Behavior and Flow Settings > Post-Login Banner Page Settings.

Use this setting to notify users (guests, sponsors or employees as applicable) of additional information after they log in successfully.

Field Usage Guidelines

Include a Post-Login Banner page

Display additional information after the users successfully log in and before they are granted network access.

Guest Device Compliance Settings for Credentialed Guest Portals

To view this window, click the Menu icon () and choose Work Centers > Guest Access > Portals & Components > Guest Portals > Create, Edit or Duplicate > Portal Behavior and Flow Settings > Guest Device Compliance Settings. Use these settings to require guests, and employees using the guest portal, to undergo client provisioning of their devices in order to gain access to the network.

  • Require guest device compliance—Redirect guests to the Client Provisioning page, which requires them to download a posture agent. This adds client provisioning to the Guest flow, where you configure posture policies for guests, such as checking for virus protection software.

    If the guest is an employee using the Credentialed Guest portals to access the network and:

    • If you enabled Allow employees to use personal devices on the network in the BYOD Settings, the employee is redirected to the BYOD flow and will not undergo client provisioning.

    • If you enabled both Allow employees to use personal devices on the network and Allow employees to choose to get guest access only in the BYOD Settings, and the employee chooses guest access, they are routed to the Client Provisioning page.

VLAN DHCP Release Page Settings for Guest Portals

To view this window, click the Menu icon () and choose Work Centers > Guest Access > Portals & Components > Guest Portals > Create, Edit or Duplicate > Portal Behavior and Flow Settings > VLAN DHCP Release Page Settings.

  • Enable VLAN DHCP release: Refresh a guest's IP address for Windows devices after a VLAN change in both wired and wireless environments.

    This affects the Central WebAuth (CWA) flow during final authorization, when the network access changes the guest VLAN to a new VLAN. The guest’s old IP address must be released before the VLAN change, and a new guest IP address must be requested through DHCP when the guest connects to the new VLAN. The IP address release and renew operations are supported only on the Internet Explorer Browser which uses DirectX controls.

    The VLAN DHCP Release option does not work on mobile devices. Instead, guests are requested to manually reset the IP address. This method varies by devices. For example, on Apple iOS devices, guests can select the Wi-Fi network and click the Renew Lease button.

  • Delay to Release __ Seconds: Enter the delay to release time. We recommend a short value, because the release must occur immediately after the applet is downloaded, and before the Cisco ISE server directs the NAD to re-authenticate with a CoA request.

  • Delay to CoA __ Seconds: Enter the time to delay Cisco ISE from executing the CoA. Provide enough time (use the default value as a guideline) to allow the applet to download and perform the IP release on the client.

  • Delay to Renew __ Seconds: Enter the delay to renew value. This time is added to the IP release value and does not begin timing until the control is downloaded. Provide enough time (use the default value as a guideline) so that the CoA is allowed to process and the new VLAN access granted.

Authentication Success Settings for Guest Portals

To view this window, click the Menu icon () and choose Work Centers > Guest Access > Portals & Components > Guest Portals > Create, Edit or Duplicate > Portal Behavior and Flow Settings > Authentication Success Settings.

These settings notify the users (guests, sponsors, or employees as applicable) of authentication success or display a URL. Under Once authenticated, take guest to:, configure the following fields:

  • Originating URL: After successfully authenticating to the network, redirect the user’s browser to the original website that the user is trying to access, if available. If not available, the Authentication Success window appears. Make sure that the redirect URL is allowed to work on port 8443 of the PSN by the access-control list on the NAD and by authorization profiles configured in ISE for that NAD.

    For Windows, MAC, and Android devices, control is given to the Self-Provisioning Wizard app, which does provisioning. Therefore, these devices are not redirected to the originating URL. However, iOS (dot1X) and unsupported devices (that are allowed network access) are redirected to this URL.

  • Authentication Success page: Notification of successful authentication of the user.

  • URL: After successfully authenticating to the network, redirect the user's browser to the specified URL, such as your company’s website.


Note


If you redirect a Guest to an external URL after authentication, there may be a delay while the URL address is resolved and the session is redirected. Make sure that the redirect URL is allowed to work on port 8443 of the PSN by the access-control list on the NAD and by authorization profiles configured in ISE for that NAD.

Support Information Page Settings for Guest Portals

To view this window, click the Menu icon () and choose Work Centers > Guest Access > Portals & Components > Guest Portals > Create, Edit or Duplicate > Portal Behavior and Flow Settings > Support Information Page Settings.

Use these settings to display the information that your Help Desk can use to troubleshoot access issues experienced by users (guests, sponsors or employees as applicable).

Field Usage Guidelines

Include a Support Information Page

Display a link to an information window, such as Contact Us, on all enabled windows for the portal.

MAC Address

Include the MAC address of the device on the Support Information window.

IP Address

Include the IP address of the device on the Support Information window.

Browser User Agent

Include the browser details such as the product name and version, layout engine, and version of the user agent originating the request on the Support Information window.

Policy Server

Include the IP address of the ISE Policy Service Node (PSN) that is serving this portal on the Support Information window.

Failure Code

If available, include the corresponding number from the log message catalog. To view the message catalog, choose Administration > System > Logging > Message Catalog.

Hide Field

Do not display any field labels on the Support Information window if the information that they would contain is non-existent. For example, if the failure code is unknown, and therefore blank, do not display Failure Code, even if it is selected.

Display Label with no Value

Display all selected field labels on the Support Information window, even if the information that they would contain is non-existent. For example, if the failure code is unknown, display Failure Code, even if it is blank.

Display Label with Default Value

Display this text in any selected field on the Support Information window, if the information that they would contain is non-existent. For example, if you enter Not Available in this field, and the failure code is unknown, the Failure Code field displays Not Available.

Sponsor Portal Application Settings

Portal Identification Settings

To view this window, click the Menu icon () and choose Work Centers > Guest Access > Portals & Components > Guest Portals or Sponsor Portals > Create, Edit or Duplicate > Guest Portals or Sponsor Portals Settings and Customization.

  • Portal Name: Enter a unique portal name to access this portal. Do not use this portal name for any other Sponsor, Guest, or nonguest portals, such as Blocked List, Bring Your Own Device (BYOD), Client Provisioning, Mobile Device Management (MDM), or My Devices portals.

    This name appears in the authorization profile portal selection for redirection choices. It is applied to the list of portals for easy identification among other portals.

  • Description: Optional.

  • Portal Test URL: A system-generated URL displays as a link after you click Save. Use it to test the portal.

    Click the link to open a new browser tab that displays the URL for this portal. Policy Services Node (PSN) with Policy Services must be turned on. If Policy Services are disabled, the PSN only displays the Admin portal.


    Note


    The test portal does not support RADIUS sessions, so you won't see the entire portal flow for all portals. BYOD and Client Provisioning are examples of portals that depend on RADIUS sessions. For example, a redirect to an external URL will not work. If you have more than one PSN, Cisco ISE chooses the first active PSN.


  • Language File: Each portal type supports 15 languages by default, which are available as individual properties files bundled together in a single zipped language file. Export or import the zipped language file to use with the portal. The zipped language file contains all the individual language files that you can use to display text for the portal.

    The language file contains the mapping to the particular browser locale setting along with all of the string settings for the entire portal in that language. A single language file contains all the supported languages, so that it can easily be used for translation and localization purposes.

    If you change the browser locale setting for one language, the change is applied to all the other end-user web portals. For example, if you change the French.properties browser locale from fr,fr-fr,fr-ca to fr,fr-fr in the Hotspot Guest portal, the changes also apply to the My Devices portal.

    An alert icon displays when you customize any of the text on the Portal Page Customizations tab. The alert message reminds you that any changes made to one language while customizing the portal must also be added to all the supported languages properties files. You can manually dismiss the alert icon using the drop-down list option; or it is automatically dismissed after you import the updated zipped language file.

Portal Settings for Sponsor Portals

Configure these settings to identify the portal and select the language files to be used for all the portal pages.

  • HTTPS Port: Enter a port value between 8000 to 8999; the default value is 8443 for all the default portals, except the Blocked List Portal, which is 8444. If you upgraded with port values outside this range, they are honored until you modify this window. If you modify this window, update the port setting to comply with this restriction.

    If you assign ports used by a non-guest (such as My Devices) portal to a guest portal, an error message appears.

    For posture assessments and remediation only, the Client Provisioning portal also uses ports 8905 and 8909. Otherwise, it uses the same ports assigned to the Guest portal.

    Portals assigned to the same HTTPS port can use the same Gigabit Ethernet interface or another interface. If they use the same port and interface combination, they must use the same certificate group tag. For example:

    • Valid combinations include, using the Sponsor portal as an example:

      • Sponsor portal: Port 8443, Interface 0, Certificate tag A and My Devices portal: Port 8443, Interface 0, Certificate group A.

      • Sponsor portal: Port 8443, Interface 0, Certificate group A and My Devices portal: Port 8445, Interface 0, Certificate group B.

      • Sponsor portal: Port 8444, Interface 1, Certificate group A and Blocked List portal: Port 8444, Interface 0, Certificate group B.

    • Invalid combinations include:

      • Sponsor portal: Port 8443, Interface 0, Certificate group A and My Devices portal: 8443, Interface 0, Certificate group B.

      • Sponsor portal: Port 8444, Interface 0, Certificate tag A and Blocked List portal: Port 8444, Interface 0, Certificate group A.


    Note


    We recommend that you use interface 0 for Guest services for best performance. You can either configure only interface 0 in the Portal Settings, or you can use the CLI command ip host to map a hostname or FQDN to the IP address of interface 0.


  • Allowed Interfaces: Select the PSN interfaces which a PAN can use to run a portal. When a request to open a portal is made on the PAN, the PAN looks for an available allowed port on the PSN. You must configure the Ethernet interfaces using IP addresses on different subnets.

    These interfaces must be available on all the PSNs, including VM-based ones, that have Policy Services turned on. This is a requirement because any of these PSNs can be used for the redirect at the start of the guest session.

    • The Ethernet interfaces must use IP addresses on different subnets.

    • The interfaces you enable here must be available on all your PSNs, including VM-based ones when Policy Services turned on. This is required because any of these PSNs can be used for a redirect at the start of the guest session.

    • The portal certificate Subject Name or Alternate Subject Name must resolve to the interface IP address.

    • Configure ip host x.x.x.x yyy.domain.com in Cisco ISE CLI to map the secondary interface IP address to the FQDN, which is used to match the certificate Subject Name or Alternate Subject Name.

    • If only the bonded NIC is selected, when the PSN attempts to configure the portal it first attempts to configure the Bond interface. If that is not successful, perhaps because there was no bond setup on that PSN, then the PSN logs an error and exits. The PSN will not try to start the portal on the physical interface.

    • NIC Teaming or bonding is a configuration option that allows you to configure two individual NICs for high availability (fault tolerance). If one of the NICs fails, the other NIC that is part of the bonded connection continues the connection. A NIC is selected for a portal based in the Portal Settings configuration. If both physical NICs and the corresponding bonded NIC are configured, when the PSN attempts to configure the portal, it first attempts to connect to the Bond interface. If that is not successful, perhaps because there was no bond setup on that PSN, then the PSN attempts to start the portal on the physical interface.

  • Certificate Group tag: Pick a certificate group tag that specifies the certificate to be used for the portal’s HTTPS traffic.

  • Fully Qualified Domain Name (FQDN): Enter at least one unique FQDN or hostname for the Sponsor or MyDevices portal. For example, you can enter sponsorportal.yourcompany.com,sponsor, so that when the user enters either of those into a browser, the sponsor portal displays. Separate names with commas, but do not include spaces between entries.

    If you change the default FQDN, then also do the following:

    • Update your DNS so that the FQDN of the new URL resolves to a valid Policy Services Node (PSN) IP address. Optionally, this address could point to a load balancer virtual IP address that serves a pool of PSNs.

    • To avoid certificate warning messages due to name mismatches, include the FQDN of the customized URL, or a wildcard, in the subject alternative name (SAN) attribute of the local server certificate of the Cisco ISE PSN. If the Allow Kerberos SSO option is enabled for the sponsor portal, you must include the FQDN of the Cisco ISE PSN, or a wildcard, in the SAN attribute of the local server certificate used by the portal.

  • Authentication Method: Choose which identity source sequence or Identity Provider (IdP) to use for user authentication. The identity source sequence is a list of identity stores that are searched in sequence to verify user credentials.

    Cisco ISE includes a default identity source sequence for sponsor portals, Sponsor_Portal_Sequence.

    To configure IdP, choose Administration > Identity Management > External Identity Sources > SAML Id Providers.

    To configure an identity source sequence, choose Administration > Identity Management > Identity Source Sequences.

  • Idle Timeout: Enter the time in minutes that you want Cisco ISE to wait before it logs out the user if there is no activity in the portal. The valid range is from 1 to 30 minutes.

  • Allow Kerberos: Use Kerberos to authenticate a sponsor for access to the sponsor portal. Kerberos SSO is performed inside the secure tunnel after the browser establishes the SSL connection with ISE.

    Kerberos authentication requires the following items to be in the same domain:
    • Sponsor's PC

    • ISE PSN

    • FQDN configured for this sponsor portal


    Note


    Kerberos authentication is NOT supported for the Guest portal.


  • Display Language

    • Use Browser Locale: Use the language specified in the client browser's locale setting as the display language of the portal. If browser locale's language is not supported by Cisco ISE, then the Fallback Language is used as the language portal.

    • Fallback Language: Choose the language to use when the language cannot be obtained from the browser locale, or if the browser locale language is not supported by Cisco ISE.

    • Always Use: Choose the display language to use for the portal. This setting overrides the User Browser Locale option.

  • SSIDs Available to Sponsors: Enter the names or the SSIDs (Session Service Identifiers) of the networks that a sponsor can notify guests as the correct networks to connect to for their visit.

Login Settings for Sponsor Portals

Login Page Settings for Sponsor Portals

To view this window, click the Menu icon () and choose Work Centers > Guest Access > Portals & Components > Sponsor Portals > Create, Edit or Duplicate > Portal Behavior and Flow Settings > Login Page Settings.

  • Maximum Failed Login Attempts Before Rate Limiting: Specify the number of failed login attempts from a single browser session before Cisco ISE starts to throttle that account. This does not cause an account lockout. The throttled rate is configured in Time between login attempts when rate limiting.

  • Time Between Login Attempts when Rate Limiting: Set the length of time in minutes that a user must wait before attempting to log in again (throttled rate), after failing to log in the number of times defined in Maximum failed login attempts before rate limiting.

  • Include an AUP: Add a acceptable use policy window to the flow. You can add the AUP to the window, or link to another window.

Acceptable Use Policy (AUP) Settings for Sponsor Portals

To view this window, click the Menu icon () and choose Work Centers > Guest Access > Portals & Components > Sponsor Portals > Create, Edit or Duplicate > Portal Behavior and Flow Settings > Acceptable Use Policy (AUP) Page Settings.

Use these settings to define the AUP experience for the users (guests, sponsors or employees as applicable).

Field Usage Guidelines

Include an AUP Page

Display your company’s network-usage terms and conditions on a separate page to the user.

Require scrolling to end of AUP

Ensure that the user has read the AUP completely. The Accept button is enabled only after the user has scrolled to the end of the AUP.

On First Login only

Display an AUP when the user logs into the network or portal for the first time only.

On Every Login

Display an AUP each time the user logs into the network or portal.

Every __ Days (starting at first login)

Display an AUP periodically after the user first logs into the network or portal.

Sponsor Change Password Settings for Sponsor Portals

To view this window, click the Menu icon () and choose Work Centers > Guest Access > Portals & Components > Sponsor Portals > Create, Edit or Duplicate > Portal Behavior and Flow Settings > Sponsor Change Password Settings. These settings define the password requirements for sponsors using the Sponsor portal.

Field Usage Guidelines

Allow sponsors to change their own passwords

Allow sponsors to change their passwords after they log into the Sponsor portal. This option displays a Change Password page only if the sponsors are part of the Internal Users database.

Post-Login Banner Settings for Sponsor Portals

To view this window, click the Menu icon () and choose Work Centers > Guest Access > Portals & Components > Guest Portals or Sponsor Portals > Create, Edit or Duplicate > Portal Behavior and Flow Settings > Post-Login Banner Page Settings.

Use this setting to notify users (guests, sponsors or employees as applicable) of additional information after they log in successfully.

Field Usage Guidelines

Include a Post-Login Banner page

Display additional information after the users successfully log in and before they are granted network access.

Support Information Page Settings for Sponsor Portals

To view this window, click the Menu icon () and choose Work Centers > Guest Access > Portals & Components > Sponsor Portals > Create, Edit or Duplicate > Portal Behavior and Flow Settings > Support Information Page Settings.

Use these settings to display the information that your Help Desk can use to troubleshoot access issues experienced by users (guests, sponsors or employees as applicable).

Field Usage Guidelines

Include a Support Information Page

Display a link to an information window, such as Contact Us, on all enabled windows for the portal.

MAC Address

Include the MAC address of the device on the Support Information window.

IP Address

Include the IP address of the device on the Support Information window.

Browser User Agent

Include the browser details such as the product name and version, layout engine, and version of the user agent originating the request on the Support Information window.

Policy Server

Include the IP address of the ISE Policy Service Node (PSN) that is serving this portal on the Support Information window.

Failure Code

If available, include the corresponding number from the log message catalog. To view the message catalog, choose Administration > System > Logging > Message Catalog.

Hide Field

Do not display any field labels on the Support Information window if the information that they would contain is non-existent. For example, if the failure code is unknown, and therefore blank, do not display Failure Code, even if it is selected.

Display Label with no Value

Display all selected field labels on the Support Information window, even if the information that they would contain is non-existent. For example, if the failure code is unknown, display Failure Code, even if it is blank.

Display Label with Default Value

Display this text in any selected field on the Support Information window, if the information that they would contain is non-existent. For example, if you enter Not Available in this field, and the failure code is unknown, the Failure Code field displays Not Available.

Notify Guests Customization for Sponsor Portals

To view this window, click the Menu icon () and choose Work Centers > Guest Access > Portals & Components > Sponsor Portals > Create, Edit or Duplicate > Portal Page Customization > Notify Guests.

Under Page Customizations, you can customize the messages, titles, content, instructions, and field and button labels that appear on the notifications that sponsors send to guests from the Sponsor portal.

Under Settings, you can specify whether sponsors can send usernames and passwords separately to guests using email or SMS. You can also specify whether sponsors can display a Support Information page for guests to provide information that a help desk can use to troubleshoot access issues.

Manage and Approve Customization for Sponsor Portals

To view this window, click the Menu icon () and choose Work Centers > Guest Access > Portals & Components > Sponsor Portals > Create, Edit or Duplicate > Portal Page Customization > Manage and Approve.

Under Page Customizations, you can customize the messages, titles, content, instructions, and field and button labels that appear on the Manage and Approve tabs of the Sponsor portal.

These include the accounts (registered and pending) summary and detailed views, the pop-up dialogs that display based on the operations the sponsor performs on guest accounts such as edit, extend, suspend and so on, and also general portal and account action messages.

Global Settings for Guest and Sponsor Portals

In the Cisco ISE GUI, click the Menu icon () and choose Guest Access > Settings. You can configure the following general settings that apply to Guest and Sponsor portals, guest types, and sponsor groups in Cisco ISE:

  • Policies for purging guest accounts and generating usernames and passwords.

  • SMTP servers and SMS gateways to use when sending email and SMS notifications to guests and sponsors.

  • Locations, time zones, SSIDs, and custom fields to select from when creating guest accounts and when registering guests using Self-Registration Guest portals.

After configuring these global settings, you can use them as needed when configuring specific Guest and Sponsor portals, guest types, and sponsor groups.

The following tabs are on the Portal settings page:

Guest Type Settings

To view this window, click the Menu icon () and choose Work Centers > Guest Access > Portals & Components > Guest Types. Use these settings to create the types of Guests that can access your network and their access privileges. You can also specify which Sponsor Groups can create this type of Guest.

  • Guest type name: Provide a name (from 1 to 256 characters) that distinguishes this Guest Type from the other Guest Types.

  • Description: Provide additional information (maximum of 2000 characters) about the recommended use of this Guest Type, for example, Use for self-registering Guests.

  • Language File: This field allows you to export and import the language file, which contains content for email subject, email message, and SMS messages in all supported languages. These languages and content are used in notifications about an expired account, and are sent to guests who are assigned to this guest type. If you are creating a new guest type, this feature is disabled until after you save the guest type. For more information about editing the lanaguage file, see Portal Language Customization.

  • Collect Additional Data: Click the Custom Fields option to select which custom fields to use to collect additional data from guests using this Guest Type.

    To manage custom fields, choose Work Centers > Guest Access > Settings > Custom Fields.

  • Maximum Access Time

    • Account duration starts: If you select From first login, the account start time starts when the guest user first logs in to the guest portal, and the end time equals the configured duration time. If the guest user never logs in, the account remains in the Awaiting first login state until the guest account purge policy removes the account.

      Values are from 1 to 999 days, hours, or minutes.

      A self-registered user's account starts when they create and log on to their account.

      If you select From sponsor-specified date, enter the maximum number of days, hours, or minutes that Guests of this Guest Type can access and stay connected to the network.

      If you change these settings, your changes will not apply to existing Guest accounts that were created using this Guest Type.

    • Maximum account duration: Enter the number of days, hours, or minutes that guests assigned to this guest type can log on.


      Note


      The account purge policy checks for expired guest accounts, and sends expiration notification. This policy runs every 20 minutes, so if you set the account duration to less than 20 mins, it is possible that expiration notices may not be sent out before the account is purged.


      You can specify the duration time and the days of the week when access is provided to the guests of this Guest Type by using the Allow access only on these days and times option.

      • The days of the week that you select limits access to the dates that are selectable in the Sponsor's calendar.

      • Maximum account duration is enforced in the sponsor portal, when the Sponsor picks duration and dates.

    The settings you make here for access time affect the time settings that are available on the sponsor portal when creating a guest account. For more information, see Configuring the Time Settings Available to Sponsors.

  • Logon Options

    • Maximum simultaneous logins: Enter the maximum number of user sessions that users assigned to this Guest Type can have running concurrently.

    • When guest exceeds limit: When you select Maximum simultaneous logins, you must also select the action to take when a user connects after the maximum number of login is reached.

      • Disconnect the oldest connection

      • Disconnect the newest connection: If you select Redirect user to a portal page showing an error message, an error message is displayed for a configurable amount of time, then the session is disconnected, and the user is redirected to the Guest portal. The error page's content is configured on the Portal Page Customization dialog, on the Messages > Error Messages window.

    • Maximum devices guests can register: Enter the maximum number of devices that can be registered to each Guest. You can set the limit to a number lower than what is already registered for the Guests of this Guest Type. This only affects newly created Guest accounts. When a new device is added, and the maximum is reached, the oldest device is disconnected.

    • Endpoint identity group for guest device registration: Choose an endpoint identity group to assign to guest devices. Cisco ISE provides the GuestEndpoints endpoint identity group to use as a default. You can also create more endpoint identity groups if you choose to not use the default.

    • Allow guest to bypass the Guest portal: Allows users to bypass the credentialed guest-type captive portal (web authentication page), and access the network by providing credentials to wired and wireless (dot1x) supplicants or VPN clients. Guest accounts change to the Active state, bypassing the Awaiting Initial Login state and the AUP page, even if the AUP is required.

      If you do not enable this setting, users must first log in through the credentialed Guest captive portal before they are able to access other parts of the network.

  • Account Expiration Notification

    • Send account expiration notification __ days before account expires: Send a notification to Guests before their account expires and specify how many days, hours, or minutes before the expiration.

    • View messages in: Specify the language to use when displaying email or SMS notifications as you set them up.

    • Email: Send account expiration notices by email.

    • Use customization from: Apply the same customizations that you configured for the selected portal to this Guest Type's account expiration emails.

    • Copy text from: Reuse email text that you created for another Guest Type's account expiration email.

    • SMS: Send account expiration notices by SMS.

      The settings that follow for SMS are the same as for email notifications, except that you choose an SMS gateway for Send test SMS to me.

  • Sponsor Groups: Specify the sponsor groups whose members can create a guest account using this guest type. Delete the sponsor groups that you do not want to have access to this guest type.

Sponsor Group Settings

To view this window, click the Menu icon () and choose Work Centers > Guest Access > Portals & Components > Sponsor Groups. Use these settings to add members to the sponsor group, define guest types and location privileges, and set permissions related to creating and managing guest accounts.

  • Disable Sponsor Group: Disable members of this sponsor group from accessing the Sponsor portal.

    For instance, you may want to temporarily prevent sponsors from logging in to the Sponsor portal while configuration changes are being made in the Admin portal. Or, you may want to disable a sponsor group that is involved in infrequent activity, such as sponsoring guests for an annual convention, until the time they need to be activated again.

  • Sponsor group name: Enter a unique name (from 1 to 256 characters).

  • Description: Include useful information (maximum of 2000 characters) such as the guest types used by this sponsor group.

  • Configure Guest Types: If the guest type you need is not available, click Work Centers > Guest Access > Portals & Components > Guest Types and create a new guest type or edit an existing one.

  • Match Criteria

    • Members: Click to display the Select Sponsor Group Members box, where you can select available user identity groups (from internal and external identity stores) and add them as members of this sponsor group.

      • Sponsor Group Members: Search and filter the list of selected sponsor groups and delete any groups you do not want to include.

    • Other conditions: Click Create New Condition to build one or more conditions that a sponsor must match to be included in this sponsor group. You can use authentication attributes from Active Directory, LDAP, SAML, and ODBC identity stores, but not RADIUS Token or RSA SecurID stores. You can also use internal user attributes. Conditions have an attribute, and operator, and a value.

      • To create a condition using the internal dictionary attribute Name, prefix the identity group name with User Identity Groups. For example:

        InternalUser:Name EQUALS bsmith

        This means that only internal users with the Name "bsmith" can belong to this sponsor group.

  • This sponsor group can create accounts using these guest types: Specify the guest types that the members in this sponsor group can use when creating guest accounts. For a sponsor group to be enabled, it must have at least one guest type that it can use.

    If you assign only one guest type to this sponsor group, you can choose not to display it in the Sponsor portal because it is the only valid guest type available for use. Choose Work Centers > Guest Access > Portals & Components > Sponsor Portal > Page Customization > Create Accounts > Guest Types > Settings. Check Hide guest type if only one is available to sponsor to enable this option.

  • Select the locations that guests will be visiting: Select the locations that can be assigned to guests while creating their accounts. This helps define the valid time zones for these guest accounts and specifies all the time parameters that apply to the guest, such as valid access times. This does not prevent guests from connecting to the network from other locations.

    For a sponsor group to be enabled, it must have at least one location that it can use.

    If you assign only one location to this sponsor group, it will be the only valid time zone for the guest accounts created by its members. By default, it does not display in the Sponsor portal.

Sponsor Can Create

  • Multiple guest accounts assigned to specific guests (Import): Enable the sponsor to create multiple guest accounts by importing guest details such as first name and last name from a file.

    If this option is enabled, the Import option appears in the Create Accounts page of the Sponsor portal. The Import option is only available on desktop browsers (not mobile), such as Internet Explorer, Firefox, Safari, and so on.

  • Limit to batch of: If this sponsor group is allowed to create multiple accounts simultaneously, specify the number of guest accounts that can be created in a single import operation.

    Although a sponsor can create a maximum of 10,000 accounts, we recommend that you limit the number of accounts you create, due to potential performance issues.

  • Multiple guest accounts to be assigned to any guests (Random): Enable the sponsor to create multiple random guest accounts as placeholders for guests who are not known as yet, or when they need to create many accounts quickly.

    If this option is enabled, the Random option appears in the Create Accounts window of the Sponsor portal.

  • Default username prefix: Specify a username prefix that sponsors can use when creating multiple random guest accounts. If specified, this prefix appears in the Sponsor Portal when creating random guest accounts. In addition, if Allow sponsor to specify a username prefix is:

    • Enabled: The sponsor can edit the default prefix in the Sponsor portal.

    • Not enabled: The sponsor cannot edit the default prefix in the Sponsor portal.

    If you do not specify a username prefix or allow the sponsor to specify one, then the sponsor will not be able to assign username prefixes in the Sponsor portal.

  • Allow sponsor to specify a username prefix: If this sponsor group is allowed to create multiple accounts simultaneously, specify the number of guest accounts that can be created in a single import operation.

    Although a sponsor can create a maximum of 10,000 accounts, we recommend that you limit the number of accounts you create, due to potential performance issues.

  • Start date can be no more than __ days into the future: Specify the number of days within which sponsors have to set as the start date for the multiple guest accounts they have created.

Sponsor Can Manage

  • Only accounts sponsor has created: Sponsors in this group can view and manage only the guest accounts that they have created, which is based on the Sponsor’s email account.

  • Accounts created by members of this sponsor group: Sponsors in this group can view and manage the guest accounts created by any sponsor in this sponsor group.

  • All guest accounts: Sponsors view and manage all pending guest accounts.


Note


Regardless of the group membership, all sponsors can see all pending accounts, unless you check Approve and view requests from self-registering guests with the option Only pending accounts assigned to this sponsor under Sponsor Can.

Sponsor Can

  • Update guests' contact information (email, Phone Number): For guest accounts that they can manage, allow the sponsor to change a guest's contact information

  • View/print guests' passwords: When this option is enabled, the sponsor can print passwords for guests. The sponsor can see the passwords for guests on the Manage Accountswindow and in the details for a guest. When this is not checked, the sponsor can't print the password, but the user can still get the password through email or SMS, if configured.

  • Send SMS notifications with guests’ credentials: For guest accounts that they can manage, allow the sponsor to send SMS (text) notifications to guests with their account details and login credentials.

  • Reset guest account passwords: For guest accounts that they can manage, allow the sponsor to reset passwords for guests to a random password generated by Cisco ISE.

  • Extend guests’ accounts: For guest accounts that they can manage, allow the sponsor to extend them beyond their expiration date. The sponsor is automatically copied on email notifications sent to guests regarding their account expiration.

  • Delete guests’ accounts: For guest accounts that they can manage, allow the sponsor to delete the accounts, and prevent guests from accessing your company's network.

  • Suspend guests’ accounts: For guest accounts that they can manage, allow the sponsor to suspend their accounts to prevent guests from logging in temporarily.

    This action also issues a Change of Authorization (CoA) Terminate to remove the suspended guests from the network.

    • Require sponsor to provide a reason: Require the sponsor to provide an explanation for suspending the guest accounts.

  • Approve and view requests from self-registering guests: Sponsors who are included in this Sponsor Group can either view all pending account requests from self-registering guests (that require approval), or only the requests where the user entered the Sponsor's email address as the person being visited. This feature requires that the portal used by the Self-registering guest has Require self-registered guests to be approved checked, and the Sponsor's email is listed as the person to contact. This feature also requires that the Email attribute be properly configured in the Sponsor's identity source.

    • Any pending accounts: A sponsor belonging to this group an approve and review accounts that were created by any sponsor.

    • Only pending accounts assigned to this sponsor: A sponsor belonging to this group can only view and approve accounts that they created.


    Note


    The Email attribute is part of User Info Attributes. For more information on the Email attribute, see:


  • Access Cisco ISE guest accounts using the programmatic interface (Guest REST API): For guest accounts that they can manage, allow the sponsor to access guest accounts using the Guest REST API programming interface.

End-User Portals

Cisco ISE provides web-based portals for three primary sets of end users:

  • Guests who need to temporarily access your enterprise network using the Guest portals (Hotspot and credentialed Guest portals).

  • Employees who are designated as sponsors who can create and manage guest accounts using the Sponsor portal.

  • Employees who are using their personal devices on the enterprise network using the various non-guest portals such as the Bring Your Own Device (BYOD), Mobile Device Management (MDM), and My Devices portals.

Customization of End-User Web Portals

You can edit, duplicate, and create more portals. You can also fully customize the portal appearance and, therefore, the portal experience. You can customize each individual portal without affecting other portals.

You can customize various aspects of the portal interface that apply to the entire portal or to specific pages of the portal, such as:

  • Themes, images, colors, banners, and footers

  • Languages used for displaying portal text, error messages, and notifications

  • Titles, content, instructions, and field and button labels

  • Notifications sent to guests via email, SMS, and printer (applies only to the Self-Registered Guest and Sponsor portals)

  • Error and informational messages displayed to users

  • For the the Self-Registered Guest and Sponsor portals, you can create custom fields to gather guest information specific to your needs

ISE Community Resource

For more information about customizing web portals, see ISE Portal Builder and HowTo: ISE Web Portal Customization Options.

Customization Methods

There are several different ways to customize the end user portals pages, which require different levels of knowledge.

  • Basic: You can modify the portal Customization page:

    • Upload banners and logos

    • Change some colors (except for buttons)

    • Change the text on the screens, and the language used on the entire portal

  • Intermediate

    • Use the minieditor to add HTML and Javascript


      Note


      Before you can enter HTML in a minieditor, click the HTML icon.


    • Use the jQuery mobile theme roller to change the color of all page elements

  • Advanced

    • Manually modify properties and CSS files.

After you customize your portal, you can create multiple portals (of the same type) by duplicating it. For example, if you customized your Hotspot Guest portal for one business entity, you can duplicate it and make minor changes to create custom Hotspot Guest portals for other business entities.

Tips for Customizing Portals with the Mini Editors

  • Long words in a minieditor box may scroll off the screen area of the portal. You can break the line with the HTML paragraph attribute style="word-wrap: break-word". For example:

     <p style="word-wrap:break-word">
     thisisaverylonglineoftextthatwillexceedthewidthoftheplacethatyouwanttoputitsousethisstructure
     </p>
    
  • When you use HTML or javascript to customize portal pages, make sure that you use valid syntax. Cisco ISE doesn’t validate the tags and code that you enter into a minieditor. Invalid syntax may cause problems during the portal flow.

Portal Content Types

Cisco ISE provides a default set of portal themes that you can use “as is” or customize by using the existing CSS files as models to create new custom files. However, you can alter the appearance of the portals without using customized CSS files.

For instance, if you want to use unique corporate logos and banner images, you can simply upload and use these new image files. You can customize the default color scheme by changing the color of the different elements and areas of the portals. You can even choose the language in which you want to view the custom changes as you make them.

When you design images to replace the logos and banner, make the images as close to the following pixel size as you can:

Banner 1724 X 133
Desktop Logo 86 X 45
Mobile Logo 80 X 35

Note that ISE resizes the images to fit the portal, but images that are too small may not look right after resizing.

To perform advanced customization, such as changing the page layout or adding video clips or advertisements to your portal pages, you can use your own custom CSS files.

These types of changes within a specific portal are applied globally to all the pages of that portal. Changes to the page layout can be applied either globally or to just one specific page in the portal.

Portal Page Titles, Content, and Labels

You can customize the titles, text boxes, instructions, field and button labels, and other visual elements that the guest views on the end-user web portal pages. While you are customizing the page, you can even edit the page settings dynamically.

These changes are applied only to the specific page that you are customizing.

Basic Customization of Portals

Select a predefined theme that best suits your needs, and use most of its default settings. You can then do some basic customization, such as:


Tip


You can View Your Customization as you make the updates.


Modify the Portal Theme Colors

You can customize the default color scheme in the default portal themes and change the color of the different elements and areas of the portals. These changes apply to the entire portal that you are customizing.

If you plan to change the portal colors, be aware of the following:

  • You cannot use this option to change the color scheme in any of the custom portal themes that you may have imported for use with this portal. You must edit the custom theme CSS file to change its color settings.

  • After changing the colors in a portal theme, if you select another portal theme from the Portal Theme drop-down menu, the changes are lost in the original portal theme and it reverts to its default colors.

  • If you tweak the colors of a portal theme with an already modified color scheme and then reset its colors before saving it, the color scheme reverts to its default colors and any previous modifications are lost.

Procedure


Step 1

Navigate to these portals:

  • For Guest portals, click the Menu icon () and choose Work Centers > Guest Access > Portals & Components > Configure > Guest Portals > Edit > Portal Page Customization.
  • For Sponsor portals, click the Menu icon () and choose Guest Access > Portals & Components > Sponsor Portals > Edit > Portal Page Customization.
  • For Device portals, click the Menu icon () and choose Administration > Device Portal Management > (any Portals) > Edit > Portal Page Customization.

Step 2

Select one of the default themes from the Portal Theme drop-down list.

Step 3

Click Tweaks to override some of the color settings in the selected default portal theme.

  1. Change the color settings for the banner and page backgrounds, text, and labels.

  2. If you want to revert to the theme’s default color scheme, click Reset Colors.

  3. Click OK if you want to view the color changes in Preview.

Step 4

Click Save.


Change the Portal Display Language

You can choose the language in which you want to view the custom changes as you make them. This change applies to the entire portal that you are customizing.

Procedure


Step 1

Navigate to these portals:

  • For Guest portals, click the Menu icon () and choose Work Centers > Guest Access > Portals & Components > Guest Portals > Edit > Portal Page Customization > Global Customization.
  • For Sponsor portals, click the Menu icon () and choose Work Centers > Guest Access > Portals & Components > Sponsor Portals > Edit > Portal Page Customization > Global Customization.
  • For Device portals, click the Menu icon () and choose Administration > Device Portal Management > (any Portals) > Edit > Portal Page Customization > Global Customization.

Step 2

From the View In drop-down list, choose the language in which you want to view the text while customizing the page.

The drop-down list includes all languages in the language file associated with the specific portal.


What to do next

Make sure that you update any changes made in the selected language while customizing the portal page into all the supported language properties files.

Change the Portal Icons, Images, and Logos

If you want to use unique corporate logos, icons, and banner images, you can simply replace the existing images by uploading your custom images. Supported image formats include .gif, .jpg, .jpeg, and .png. These changes apply to the entire portal that you are customizing.

Before you begin

To include images in the footer of the portal, for instance in an advertisement, you should be able to access an external server that has these images.

Procedure


Step 1

Navigate to these portals:

  • For Guest portals, click the Menu icon () and choose Work Centers > Guest Access > Portals & Components > Guest Portals > Edit > Portal Page Customization.
  • For Sponsor portals, click the Menu icon () and choose Work Centers > Guest Access > Portals & Components > Configure > Sponsor Portals > Edit > Portal Page Customization.
  • For Device portals, click the Menu icon () and choose Administration > Device Portal Management > (any Portals) > Edit > Portal Page Customization.

Step 2

Under Images, click any of the logos, icons, and image buttons and upload your custom images.

Step 3

Click Save.


Update the Portal Banner and Footer Elements

You can customize the information that appears in the banner and footer sections of every page in the portal. These changes apply to the entire portal that you are customizing.

Procedure


Step 1

Navigate to these portals:

  • For Guest portals, click the Menu icon () and choose Work Centers > Guest Access > Portals & Components > Guest Portals > Edit > Portal Page Customization.
  • For Sponsor portals, click the Menu icon () and choose Work Centers > Guest Access > Portals & Components > Sponsor Portals > Edit > Portal Page Customization.
  • For Device portals, click the Menu icon () and choose Administration > Device Portal Management > (any Portals) > Edit > Portal Page Customization.

Step 2

Change the Banner title that appears on every portal page.

Step 3

Include these links for the guests who use your portals:

  • Help—Online help (provided for only the Sponsor and My Devices portals).

  • Contact—Technical support (set up the Support Information page to enable this).

Step 4

Add a disclaimer or a copyright notice in the Footer Elements to appear on the bottom of every portal page.

Step 5

Click Save.


Change the Titles, Instructions, Buttons, and Label Text

You can update all the text that is displayed in the portal. Each UI element on the page that you are customizing has a minimum and maximum range for the number of characters that you can enter. When available in some of the text blocks, you can use a mini-editor to apply visual styling to the text. These changes apply only to the specific portal page you are customizing. These page elements are different for email, SMS, and print notifications.

Procedure


Step 1

Navigate to these portals:

  • For Guest portals, click the Menu icon () and choose Work Centers > Guest Access > Portals & Components > Configure > Guest Portals > Edit > Portal Page Customization.
  • For Sponsor portals, click the Menu icon () and choose Work Centers > Guest Access > Portals & Components > Sponsor Portals > Edit > Portal Page Customization.
  • For Device portals, click the Menu icon () and choose Administration > Device Portal Management > (any Portals) > Edit > Portal Page Customization.

Step 2

Under Pages, choose the page that you want to change.

Step 3

Under Page Customizations, update any of the displayed UI elements. All pages contain Browser Page Title, Content Title, Instructional Text, Content, and two Optional Content text blocks. The fields in the Content area are specific to each page.


Format and Style Text Box Content

Use the mini-editor that is available in the Instructional Text, Optional Content 1, and Optional Content 2 text boxes to do basic formatting of the text. These changes apply only to the specific portal pages that you are customizing.

Use the Toggle Full Screen button to increase and decrease the size of the text boxes as you work in them.

Procedure


Step 1

Navigate to these portals:

  • For Guest portals, click the Menu icon () and choose Work Centers > Guest Access > Portals & Components > Guest Portals > Edit > Portal Page Customization.
  • For Sponsor portals, click the Menu icon () and choose Work Centers > Guest Access > Portals & Components > Sponsor Portals > Edit > Portal Page Customization.
  • For Device portals, click the Menu icon () and choose Administration > Device Portal Management > (any Portals) > Edit > Portal Page Customization.

Step 2

Under Pages, choose the page that you want to change.

Step 3

Under Page Customizations, in the Instructional Text and Optional Content text blocks, you can:

  • Change the font, size, and color of the text.
  • Style the text as bold, italics, or underlined.
  • Create bulleted and numbered lists.

Note


You can use the Toggle HTML Source button to view the HTML tags that were applied to the text that you formatted using the mini-editor. If you edit the text in the HTML Source view, click the Toggle HTML Source button again, before saving your changes in the Portal Page Customization window.


Variables for Portal Pages Customization

The navigation paths for these portal page text boxes are:

  • For Guest portals, click the Menu icon () and choose Work Centers > Guest Access > Portals & Components > Guest Portals > Edit > Portal Page Customization > Pages.

  • For Sponsor portals, click the Menu icon () and choose Work Centers > Guest Access > Portals & Components > Sponsor Portals > Edit > Portal Page Customization > Pages.

  • For Device portals, click the Menu icon () and choose Administration > Device Portal Management > (any Portals) > Edit > Portal Page Customization > Pages.

Use these variables when creating templates for portal content and guest notifications to enable consistency in the information presented to the portal users (guests, sponsors, and employees). Substitute text with the variable names listed here for each of the portals in the Instructional Text , Optional Content 1, and Optional Content 2 text boxes.

Table 1. List of Variables for Guest Portals
Display Name Substitute with Variable Name

Access code

Use to provide an access code to guests using either email, text, or print notifications.

ui_access_code

BYOD IOS SSID

Use to specify the network that a device should connect to after on-boarding in a dual SSID flow.

ui_byod_success_ios_ssid

Client Provisioning Agent Type

Use to specify the currently configured agent in the client provisioning policy.

ui_client_provision_agent_type

Client Provisioning Agent URL

Use to specify the download URL for the posture agent.

ui_client_provision_agent_url

Client Provisioning agent install minutes

Use to notify guests the amount of time (set by the remediation timer) in which they must complete the installation instructions on the Client Provisioning window. If guests do not complete the installation instructions before the timer expires, they must refresh the browser page and go through the login process again.

ui_client_provision_install_agent_mins

Company

ui_company

Email address

ui_email_address

End date and time

ui_end_date_time

First name

ui_first_name

Last name

ui_last_name

Location name

ui_location_name

Maximum registered devices

ui_max_reg_devices

Maximum simultaneous logins

ui_max_siml_login

Password

ui_password

Person being visited (email)

ui_person_visited

Phone number

ui_phone_number

Reason for visit

ui_reason_visit

SMS Provider

ui_sms_provider

SSID

Use to specify the wireless network that a guest can use to connect to the network.

ui_ssid

Start date and time

ui_start_date_time

Time left

ui_time_left

Username

ui_user_name

Table 2. List of Variables for Sponsor Portals
Display Name Substitute with Variable Name

Guest - Company

ui_guest_company

Guest - Email address

ui_guest_email_address

Guest - End date and time

ui_guest_end_date_time

Guest - First name

ui_guest_first_name

Guest - Last name

ui_guest_last_name

Guest - Location name

ui_guest_location_name

Guest - Maximum registered devices

ui_guest_max_reg_devices

Guest - Maximum simultaneous logins

ui_guest_max_siml_login

Guest - Password

ui_guest_password

Guest - Person being visited (email)

ui_guest_person_visited

Guest - Phone number

ui_guest_phone_number

Guest - Reason for visit

ui_guest_reason_visit

Guest - SMS Provider

ui_guest_sms_provider

Guest - SSID

Use to specify the wireless network that a guest can use to connect to the network.

ui_guest_ssid

Guest - Start date and time

ui_guest_start_date_time

Guest - Time left

ui_guest_time_left

Guest - Username

ui_guest_user_name

Username

Use to specify the username of the user logged into the portal.

ui_sponsor_user_name

Use to display "From" in the Guest Access Information window.

ui_from_label

Use to display "First Login" in the Guest Access Information window.

ui_first_login_text

Use to display guest account notification message if the access time starts at First Login.

ui_notification_first_login_text

Dynamic variable that represents the account duration in email notifications.

ui_access_duration

Dynamic variable to display an account that is no longer available. For Start-End accounts, the date is the End date and for From-First-Login account, the date is the account creation date plus the purge duration days.

ui_account_purge_date

Use to restrict the sponsor from changing the guest type from From First Login to Start-End or vice versa, if the guest user has logged in at least once in the past. Displayed in the General Sponsor Portal Messages.

ui_guest_type_change_ffl_startend_not_allowed_error

ui_guest_type_change_ startend_ffl_not_allowed_error

Table 3. List of Variables for MDM Portals
Display Name Substitute with Variable Name

MDM - Vendor Name

ui_mdm_vendor_name

Table 4. List of Variables for My Devices Portals
Display Name Substitute with Variable Name

MyDevices - Login Failure Rate Limit

$user_login_failure_rate_limit$

MyDevices - Max Devices to Register

ui_max_register_devices

MyDevices - User Name

Use to specify the username of the user logged into the portal.

$session_username$

View Your Customization

You can view how your customization will display to the portal users (guests, sponsors, or employees).

Procedure


Step 1

Click Portal test URL to view your changes.

Step 2

(Optional) Click Preview to dynamically view how your changes appear on various devices:

  • Mobile devices: View your changes under Preview.

  • Desktop devices: Click Preview and then click Desktop Preview.

    If the changes are not displayed, click Refresh Preview. The portal displayed is only meant for viewing your changes; you cannot click buttons or enter data.

Note


The test portal does not support RADIUS sessions, so you won't see the entire portal flow for all portals. BYOD and Client Provisioning are examples of portals that depend on RADIUS sessions. If you have more than one PSN, Cisco ISE chooses the first active PSN.


Custom Portal Files

The custom portal files menu lets you upload your own files to the ISE server, which you can use to customize all user facing portals (except for the Admin portal). The files you upload are stored on the PSN and synchronized to all PSNs.

Supported file types are:

  • .png, .gif, .jpg, .jpeg, ico: For backgrounds, announcements, and advertisements

  • .htm, .html, .js, .json, .css, .m4a, .m4v, .mp3, .mp4, .mpeg, .ogg, .wav: For advanced customization (for example,portal builder)

File sizes are limited to:

  • 20 MB per file

  • 200 MB total of all files

The path column in the list of files displays the URL to the file on this server, which you can use to reference it outside the mini-editor. If the file is an image, when you click the link, it opens a new window that displays the image.

Uploaded files can be referenced by all portal types, except the Admin portal, in the mini-editors under Portal Page Customization. To insert the file into a mini-editor, click Insert File. Toggle to the HTML Source view, and you will see the inserted file surrounded by the appropriate HTML tags.

You can also view the displayable uploaded files in your browser from outside of ISE, for testing. The URL is https://ise_ip:8443/portal/customFiles/filename.

Advanced Customization of Portals

If you do not want to use one of the default portal themes provided by Cisco ISE, you can customize the portal to suit your needs. To do so, you must have experience working with CSS and Javascript files and the jQuery Mobile ThemeRoller application.

You cannot alter the default portal themes, but you can:

Depending on your expertise and requirements, you can perform various types of advanced customization. You can use predefined variables to enable consistency in displayed information, add advertisements to your portal pages, use HTML, CSS and Javascript code to customize your content, and modify the portal page layout.

You modify the portal by adding HMTL, CSS, and javascript into the content boxes on the Portal Page Customization tab of each portal. This document has examples of customization with HTML and CSS. Examples using javascript are on the ISE community here: http://cs.co/ise-community. More HTML, CSS, and Javascript examples are on the ISE community here: https://community.cisco.com/t5/security-documents/how-to-ise-web-portal-customization-options/ta-p/3619042.


Note


TAC does not support Javascript customizations of Cisco ISE portals. If you are having problems with Javascript customizations, please post your questions to the ISE community https://community.cisco.com/t5/identity-services-engine-ise/bd-p/5301j-disc-ise.


Portal Theme and Structure CSS Files

If you have experience with working with CSS files, you can customize the default portal theme CSS files to alter the portal presentation and manipulate elements such as the page layout, colors, and fonts. Customizing the CSS files provides you with flexibility and control in specifying the presentation characteristics, it enables you to share formatting across multiple pages, and it reduces the complexity and repetition in the structural content.

Cisco ISE end-user portals use two distinct types of CSS files: structure.css and theme.css. Every portal theme has its own theme.css file, but there is only one structure.css file per portal type; for example guest.structure.css for Guest portals, sponsor.structure.css for Sponsor Portals, and mydevices.structure.css for My Devices portals.

The structure.css provides the styling for the page layout and structure. It defines the positioning of elements on each page and also includes jQuery Mobile structure styles. You can only view the structure.css file, but you cannot edit it. However, when you change the page layout within theme.css files, import these files into the portal, and apply them, the most recent changes take priority over the structure.css styles.

The theme.css files specify styles such as fonts, button colors, and header background. You can export the theme.css files, change the theme settings, and import them to use as custom themes for your portal. Any page layout style changes made to the theme.css files take priority over the styles that are defined in the structure.css file.

You cannot alter any of the Cisco provided default portal theme.css files. However, you can edit the settings in the files and save them to a new custom theme.csstheme.css file. You can make further edits to the custom theme.css file, but when you import it back into Cisco ISE, remember to use the same theme name you originally used for it. You cannot use two different theme names for the same theme.css file.

For example, you can use a default green theme.css file to create a new custom blue theme.css file and name it as Blue. You can then edit the blue theme.css file, but when you import it again, you must reuse the same Blue theme name. You cannot call it Red, since Cisco ISE checks for the relationship between a filename and its name and the uniqueness of the theme’s name. You can however edit the blue theme.css file, save it as red theme.css, import the new file, and name it as Red.

Changing Theme Colors with jQuery Mobile

The color scheme of Cisco's end-user portals is compatible with jQuery ThemeRoller. You can easily edit the colors for an entire portal using the ThemeRoller web site.

ThemeRoller color “swatches” contain a unique color scheme, which defines the colors, textures, and font settings for the primary UI elements, such as toolbars, content blocks, buttons, list items, and font text-shadow. A color scheme also defines the settings for various interaction states of the buttons: normal, hover, and pressed.

Cisco uses three swatches:

  • Swatch A—The default swatch.

  • Swatch B—Defines emphasized elements, such as an Accept button.

  • Swatch C—Defines critical elements such as alerts, error messages, invalid input fields, and delete buttons.

You cannot apply additional swatches, unless you add HTML code (to the Optional Content, for example) with elements that use the newly added swatches.

To edit the default Cisco-provided CSS files or create new files based on the CSS classes and structures defined in the default themes, use the required version of jQuery Mobile ThemeRoller (Release 1.3.2).

For additional information on swatches and themes in jQuery Mobile ThemeRoller, see "Theming Overview" in Creating a Custom Theme with ThemeRoller. Use the online help in jQuery Mobile ThemeRoller to learn how to download, import, and share your custom themes.

For tutorials on how to use HTML, CSS, and Javascript code to customize the text and content that appears on your portal pages, visit Codecademy.

Example of a Theme That Shows Cisco Swatches

To demonstrate how swatches are used, the default theme for the Guest Portal was edited in ThemeRoller to show the differences in color.

The following screen shows a guest portal logon error (swatch C) along with a button that takes an action from the user (swatch B), and the rest of the screen is Swatch A.

Change Theme Colors with jQuery Mobile

Before you begin

Make sure you are using version 1.3.2 of jQuery Mobile ThemeRoller. The version you are using is displayed in the top-left corner of the screen, as shown below.

Procedure

Step 1

Export an existing theme from the portal you wish to change by clicking the Configuration tab on the portal.

Step 2

Choose Advanced Customization > Export/Import Themes.

Step 3

In the Custom Theming dialog, export the theme you want to update.

Step 4

Open that theme in a text editor, select all, and copy.

Step 5

Paste that text (CSS) into the jQuery web site's Import Theme field.

Step 6

Make your changes in the jQuery Mobil web-based application.

Step 7

Export the updated theme from the jQuery website (the export format is ZIP).

Step 8

Unzip the updated theme, and extract the updated theme in themes folder to your PC. The name of the theme is the one you provided on the jQuery website.

Step 9

Import the extracted CSS theme file into your portal in the portal configuration page's Custom Theming dialog.

You can switch back and forth between the old theme and the new theme by clicking the Portal Theme drop-down list on the Portal Configuration window.


Location Based Customization

When guest accounts are created, you can associate them with a location and specify a Service Set Identifier (SSID) attribute. Both the location and SSID are available as CSS classes that you can use to apply different CSS styles to portal pages, based on the guest's location and SSID.

For example:

  • Guest location—When guests with accounts that have San Jose or Boston as their locations log into a credentialed Guest portal, one of these classes is available on every portal page: guest-location-san-jose or guest-location-boston.

  • Guest SSID—For an SSID named Coffee Shop Wireless, the following CSS class is available on every portal page: guest-ssid-coffee-shop-wireless. This SSID is the one you specified on the guest account and not the SSID that the guests connected to when they logged in.


Note


This information applies only to the credentialed Guest portals after the guests log in.


You can also specify locations when you add devices such as switches and Wireless LAN Controllers (WLCs) to a network. This location is also available as a CSS class that you can use to apply different CSS styles to portal pages depending on the network device's location.

For example, if a WLC is assigned to Seattle and guests are redirected to Cisco ISE from the Seattle-WLC, the following CSS class is available on every portal page: device-location-my-locations-usa-seattle.

User Device Type Based Customization

Cisco ISE detects the type of client device (guest, sponsor, or employee) to access your company’s network or end-user web portals (Guest, Sponsor, and Device). It is detected either as a mobile device (Android, iOS, and so on) or a desktop device (Windows, MacOS, and so on). The device type is available as a CSS class that you can use to apply different CSS styles to portal pages based on the user’s device type.

When a user logs in to any of the Cisco ISE end-user web portals, the following class is available on their portal pages: cisco-ise-mobile or cisco-ise-desktop.

Export a Portal’s Default Theme CSS File

You can download a default portal theme provided by Cisco and customize it to suit your needs. You can use it as a base for performing advanced customization.

Procedure


Step 1

Navigate to these portals:

  • For Guest portals, click the Menu icon () and choose Work Centers > Guest Access > Portals & Components > Guest Portals > Edit > Portal Page Customization > Pages.
  • For Sponsor portals, click the Menu icon () and choose Work Centers > Guest Access > Portals & Components > Sponsor Portals > Edit > Portal Page Customization > Pages.
  • For Device portals, click the Menu icon () and choose Administration > Device Portal Management > (any Portals) > Edit > Portal Page Customization > Pages.

Step 2

From the Advanced Customization drop-down list, choose Export/Import Themes.

Step 3

In the Custom Theming dialog box, use the drop-down list to select the theme that you want to customize.

Step 4

Click Export Theme CSS to download a default theme.css file to customize.

Step 5

Click Save to save the file to your desktop.


Create a Custom Portal Theme CSS File

You can create a custom portal theme by customizing an existing default portal theme and saving the changes in a new portal theme.css file. You can modify the default theme settings and the swatches to make global changes to the selected portal.

Before you begin

  • Download the theme.css file from the portal that you want to customize to your desktop .

  • This task requires experience working with HTML, CSS, and Javascript code.

  • Use Release 1.3.2 of jQuery Mobile ThemeRoller.

Procedure


Step 1

Import the downloaded portal theme.css file contents into the jQuery Mobile ThemeRoller tool.

Tip


You can View Your Customization as you make your changes.

Step 2

(Optional) Embed Links in Portal Content

Step 3

(Optional) Insert Variables for Dynamic Text Updates

Step 4

(Optional) Use Source Code to Format Text and Include Links

Step 5

(Optional) Add an Image as an Advertisement

Step 6

(Optional) Customize Greetings Based on Guest Location

Step 7

(Optional) Customize Greetings Based on User Device Type

Step 8

(Optional) Set Up Carousel Advertising

Step 9

(Optional) Modify the Portal Page Layout

Step 10

Save the customized file as a new theme.css file.

Note


You cannot save the edits to the default CSS theme files. You can only create new custom files with any edits you have made.

Step 11

When your new theme.css file is ready, you can import it into Cisco ISE.


Embed Links in Portal Content

You can add links to enable guests to access various websites from the portal pages. These changes apply only to the specific portal page that you are customizing.

Use the Toggle Full Screen option to increase and decrease the size of the fields as you work in them.

Procedure


Step 1

Navigate to these portals:

  • For Guest portals, click the Menu icon () and choose Work Centers > Guest Access > Portals and Components > Guest Portals > Edit > Portal Page Customization.
  • For Sponsor portals, click the Menu icon () and choose Work Centers > Guest Access > Portals and Components > Sponsor Portals > Edit > Portal Page Customization.
  • For Device portals, click the Menu icon () and choose Administration > Device Portal Management > (any Portals) > Edit > Portal Page Customization.
  • For Certificate Provisioning portal, click the Menu icon () and choose Administration > Device Portal Management > Certificate Provisioning > Edit > Portal Page Customization.

Step 2

Under Pages, choose the page that you want to update.

Step 3

Under Page Customizations, use the mini-editor provided with the Optional Content text blocks to add links to portal pages.

Step 4

Click the Create Link button.

Link Properties dialog box appears.

Step 5

Enter the URL and the text you want to hyperlink in the Description window for the URL.

For the link to work correctly, include the protocol identifier in the URL. For example, use http://www.cisco.com instead of www.cisco.com.

Step 6

Click Set and then click Save.

You can use the Toggle HTML Source option to view the HTML tags that were applied to the text that you formatted using the mini-editor.


Insert Variables for Dynamic Text Updates

You can also create templates for text displayed on the portal by substituting predefined variables ($variable$) that dynamically update the content. This enables consistency in the text and information that you display to guests. These changes apply only to the specific portal pages that you are customizing.

Use the Toggle Full Screen option to increase and decrease the size of the fields as you work in them.

Procedure


Step 1

Navigate to these portals:

  • For Guest portals, click the Menu icon () and choose Work Centers > Guest Access > Portals and Components > Guest Portals > Edit > Portal Page Customization.
  • For Sponsor portals, click the Menu icon () and choose Work Centers > Guest Access > Portals and Components > Sponsor Portals > Edit > Portal Page Customization.
  • For Device portals, click the Menu icon () and choose Administration > Device Portal Management > (any Portals) > Edit > Portal Page Customization.

Step 2

Under Pages, choose the page you want to update.

Step 3

Under Page Customizations, use the mini-editor provided with the Instructional Text, Optional Content 1, and Optional Content 2fields to create text templates for the portal pages.

For example, you can create a single welcome message template for multiple guests, but personalize the message that displays to the guests after they successfully log in and connect to the network.

Step 4

Enter the information in the fields as you normally would.

For example, you could enter a welcome message for your portal:
Welcome to our company’s Guest portal, 

Step 5

At the point where you want to substitute a variable for the text, click Insert Variable.

A list of variables appears in the pop-up menu.

Step 6

Select the variable that you want to substitute in your text.

For example, choose First name to display each guest’s first name in the welcome message. The variable $ui_first_name$ is inserted at your cursor position:
Welcome to our company’s Guest portal,$ui_first_name$.

This is the welcome message that would appear on the portal welcome page for guests whose first name is John: Welcome to our company’s Guest portal, John.

Step 7

Continue to use the list of variables as needed until you have completed entering the information in the text boxes.

Step 8

Click Save.

You can use the Toggle HTML Source option to view the HTML tags that were applied to the text that you formatted using the mini-editor.


Use Source Code to Format Text and Include Links

Besides using the mini-editor’s formatting and link icons with plain text, you can also use HTML, CSS, and Javascript code to customize text that displays on the portal pages. These changes apply only to the specific portal pages that you are customizing.

Use the Toggle Full Screen option to increase and decrease the size of the text boxes as you work in them.

Before you begin

Ensure that Enable portal customization with HTML is enabled by default in Administration > System > Admin Access > Settings > Portal Customization.

Procedure


Step 1

Navigate to these portals:

  • For Guest portals, click the Menu icon () and choose Work Centers > Guest Access > Portals & Components > Guest Portals > Edit > Portal Page Customization.
  • For Sponsor portals, click the Menu icon () and choose Work Centers > Guest Access > Portals & Components > Sponsor Portals > Edit > Portal Page Customization.
  • For Device portals, click the Menu icon () and choose Administration > Device Portal Management > (any Portals) > Edit > Portal Page Customization.

Step 2

Under Pages, choose the page that you want to update.

Step 3

Under Page Customizations, use the mini-editor provided with the Instructional Text, Optional Content 1, and Optional Content 2 fields to enter and view source code.

Step 4

Click Toggle HTML Source.

Step 5

Enter your source code.

For example, to underline your text, enter:
<p style="text-decoration:underline;">Welcome to Cisco!</p>
For example, to include a link using HTML code, enter:
<a href="http://www.cisco.com">Cisco</a>

Important


When inserting an external URL in the HTML code, make sure that you enter the absolute (entire) URL path, including “http” or “https”.

Step 6

Click Save.


Add an Image as an Advertisement

You can include images and advertisements to appear in specific areas of the portal pages.

Use the Toggle Full Screen option to increase and decrease the size of the text boxes as you work in them.

Procedure


Step 1

Navigate to these portals:

  • For Guest portals, click the Menu icon () and choose Work Centers > Guest Access > Portals & Components > Guest Portals > Edit > Portal Page Customization.
  • For Sponsor portals, click the Menu icon () and choose Work Centers > Guest Access > Portals & Components > Sponsor Portals > Edit > Portal Page Customization.
  • For Device portals, click the Menu icon () and choose Administration > Device Portal Management > (any Portals) > Edit > Portal Page Customization.

Step 2

Under Pages, choose the page that you want to update.

Step 3

Under Page Customizations, use the mini-editor provided with the Instructional Text, Optional Content 1, and Optional Content 2 fields to enter and view source code.

Step 4

Click Toggle HTML Source.

Step 5

Enter your source code.

For example, to include a product advertisement and its image using HTML code on the Hotspot Guest portal post-access banner, enter this code in the Optional Content 1 text box on the Post-Access Banner page:
<p style="text-decoration:underline;">Optimized for 10/40/100 Campus Services!</p>
<img  src="http://www.static-cisco.com/assets/prod/root/catalyst_6800.jpg" width="100%" />

Note


When inserting an external URL in the HTML code, make sure that you enter the absolute (entire) URL path, including “http” or “https”.

Step 6

Click Save.


Set Up Carousel Advertising

Carousel advertising is an advertisement format in which several product images or text descriptions are displayed and rotate in a repeating loop within a banner. Use carousel advertising on your guest portals to promote several related products or a variety of different products offered by your company.

Use the Toggle Full Screen option to increase and decrease the size of the text boxes as you work in them.

Before you begin

In the Cisco ISE GUI, click the Menu icon () and choose Administration > System > Admin Access > Settings > Portal Customization and check Enable portal customization with HTML and Javascript.

Procedure


Step 1

Navigate to these portals:

  • For Guest portals, click the Menu icon () and choose Work Centers > Guest Access > Portals & Components > Guest Portals > Edit > Portal Page Customization.
  • For Sponsor portals, click the Menu icon () and choose Work Centers > Guest Access > Portals & Components > Sponsor Portals > Edit > Portal Page Customization.
  • For Device portals, click the Menu icon () and choose Administration > Device Portal Management > (any Portals) > Edit > Portal Page Customization.

Step 2

Under Pages, choose the page that you want to update.

Step 3

Under Page Customizations, use the mini-editor provided with the Instructional Text, Optional Content 1, and Optional Content 2 fields to enter and view source code.

Step 4

Click Toggle HTML Source.

Step 5

Enter your source code.

For example, to implement carousel advertising using product images on the Guest portals, enter the following HTML and Javascript code in the Optional Content 1 field on the Post-Access Banner (for Hotspot portals) or Post Login Banner (for credentialed Guest portals) window:

<script>
var currentIndex = 0;
setInterval(changeBanner, 5000);

function changeBanner(){
var bannersArray = ["<img src='http://www.cisco.com/c/en/us/products/routers/index/_jcr_content/
content_parsys/overview/layout-overview/gd12v2/gd12v2-left/n21v1_cq/
n21v1DrawerContainer.img.jpg/1379452035953.jpg' width='100%'/>", 
"<img src='http://www.cisco.com/c/en/us/products/routers/index/_jcr_content/
content_parsys/overview/layout-overview/gd12v2/gd12v2-left/n21v1_cq_0/
n21v1DrawerContainer.img.jpg/1400748629549.jpg' width='100%' />", 
"<img src='http://www.cisco.com/c/en/us/products/routers/index/_jcr_content/
content_parsys/overview/layout-overview/gd12v2/gd12v2-left/n21v1_cq_1/
n21v1DrawerContainer.img.jpg/1376556883237.jpg' width='100%'/>"  

];
  var div = document.getElementById("image-ads");
  if(div){
     currentIndex = (currentIndex<2) ? (currentIndex+1) : 0;
      div.innerHTML = bannersArray[currentIndex];
   }
}
</script>
<style>
.grey{
color: black;
background-color: lightgrey;
}
</style>
<div class="grey" id="image-ads">
<img src='http://www.cisco.com/c/en/us/products/routers/index/_jcr_content/
content_parsys/overview/layout- overview/gd12v2/gd12v2-left/n21v1_cq/
n21v1DrawerContainer.img.jpg/1379452035953.jpg'/>
</div>
For example, to implement carousel advertising using text product descriptions on the Guest portals, enter the following HTML and Javascript code in the Optional Content 2 field on the Post-Access Banner (for Hotspot portals) or Post Login Banner (for credentialed Guest portals) window:

<script>
var currentIndex = 0;
setInterval(changeBanner, 2000);

function changeBanner(){
var bannersArray = ["Optimize branch services on a single platform while delivering an optimal 
application experience across branch and WAN infrastructure", "Transform your Network Edge to 
deliver high-performance, highly secure, and reliable services to unite campus, data center, 
and branch networks",  "Differentiate your service portfolio and increase revenues by delivering 
end-to-end scalable solutions and subscriber-aware services"];

var colorsArray = ["grey", "blue",  "green"];
  var div = document.getElementById("text-ads");
  if(div){
     currentIndex = (currentIndex<2) ? (currentIndex+1) : 0;
      div.innerHTML = bannersArray[currentIndex];
               div.className = colorsArray[currentIndex];
   }
}
</script>
<style>
.grey{
color: black;
background-color: lightgrey;
}
.blue{
color: black;
background-color: lightblue;
}
.green{
color: black;
background-color: lightgreen;
}
</style>
<div class="grey" id="text-ads">
Optimize branch services on a single platform while delivering an optimal application 
experience across branch and WAN infrastructure
</div>

Note


When inserting an external URL in the HTML code, you must enter the absolute (entire) URL path, including “http” or “https”.

Step 6

Click Save.


Customize Greetings Based on Guest Location

This example shows how to customize the successful login message that your guests see after they log into a credentialed Guest portal (not Hotspot), based on the locations configured in their guest type.

Use the Toggle Full Screen option to increase and decrease the size of the fields as you work in them.

Procedure


Step 1

Navigate to one of these portals:

  • For Guest portals, click the Menu icon () and choose Work Centers > Guest Access > Portals & Components > Guest Portals > Edit > Portal Page Customization.
  • For Sponsor portals, click the Menu icon () and choose Work Centers > Guest Access > Portals & Components > Sponsor Portals > Edit > Portal Page Customization.

Step 2

Under Pages, click Authentication Success.

Step 3

Under Page Customizations, use the mini-editor provided with the Optional Content 1 fields to enter and view HTML source code.

Step 4

Click Toggle HTML Source.

Step 5

Enter your source code.

For example, to include a location-based greeting, enter this code in Optional Content 1:
<style>
    .custom-greeting {
        display: none;
    }
    .guest-location-san-jose .custom-san-jose-greeting {
        display: block;
    }
    .guest-location-boston .custom-boston-greeting {
        display: block;
    }
</style>
<div class="custom-greeting custom-san-jose-greeting">
    Welcome to The Golden State!
</div>
<div class="custom-greeting custom-boston-greeting">
    Welcome to The Bay State!
</div>
Guests will see a different message after successful logon, depending on their specific location.

Customize Greetings Based on User Device Type

You can customize the greetings that you send to your users (guest, sponsor, or employee) after they log into any of the Cisco ISE end-user web portals (Guest, Sponsor and Device), based on their client device type (mobile or desktop).

Use the Toggle Full Screen option to increase and decrease the size of the fields as you work in them.

Procedure


Step 1

Navigate to these portals:

  • For Guest portals, click the Menu icon () and choose Work Centers > Guest Access > Portals & Components > Guest Portals > Edit > Portal Page Customization.
  • For Sponsor portals, click the Menu icon () and choose Work Centers > Guest Access > Portals & Components > Sponsor Portals > Edit > Portal Page Customization.
  • For Device portals, click the Menu icon () and choose Administration > Device Portal Management > (any Portals) > Edit > Portal Page Customization.

Step 2

Under Pages, choose the page that you want to update.

Step 3

Under Page Customizations, use the mini-editor provided with the Optional Content 1 field to enter and view HTML source code.

Step 4

Click Toggle HTML Source.

Step 5

Enter your source code.

For example, to include a device type-based greeting on the AUP page, enter this code in the Optional Content 1 field on the AUP window:
<style>
    .custom-greeting {
        display: none;
    }
    .cisco-ise-desktop .custom-desktop-greeting {
        display: block;
    }
    .cisco-ise-mobile .custom-mobile-greeting {
        display: block;
    }
</style>
<div class="custom-greeting custom-mobile-greeting">
    Try our New Dark French Roast! Perfect on the Go!
</div>
<div class="custom-greeting custom-desktop-greeting">
    We brough back our Triple Chocolate Muffin!
    Grab a seat and dig in!
</div>
Users will see a different greeting on the AUP page depending on the type of device they used to gain access to the network or portal.

Modify the Portal Page Layout

You can manipulate the overall layout of the pages; for example, you can add a sidebar to an AUP page that provides additional information or links to information.

Procedure


Step 1

Add the following CSS code to the bottom of the custom theme.css file that you create and plan to apply to your portal. This changes the AUP page layout. The Optional Content 1 field appears as a side bar in the desktop and mobile device mode.

#page-aup .cisco-ise-optional-content-1 {
        margin-bottom: 5px;
}
@media all and ( min-width: 60em ) {
        #page-aup .cisco-ise-optional-content-1 {
                float: left;
                margin-right: 5px;
                width: 150px;
        }
        #page-aup .cisco-ise-main-content {
                float: left;
                width: 800px;
        }
        #page-aup .cisco-ise-main-content h1,
        #page-aup .cisco-ise-main-content p {
                margin-right: auto;
                margin-left: -200px;
        }
}

You can then add links using HTML code in the Optional Content 1 field for the AUP window for that portal.

Step 2

Navigate to these portals:

  • For Guest portals, click the Menu icon () and choose Work Centers > Guest Access > Portal & Components > Guest Portals > Edit > Portal Page Customization.
  • For Sponsor portals, click the Menu icon () and choose Work Centers > Guest Access > Portal & Components > Sponsor Portals > Edit > Portal Page Customization.
  • For Device portals, click the Menu icon () and choose Administration > Device Portal Management > (any Portals) > Edit > Portal Page Customization.

Step 3

Under Pages, choose the page for which you want to include a side bar.

Step 4

Under Page Customizations, use the mini-editor provided with the Optional Content 1 field to enter and view source code.

Step 5

Click Toggle HTML Source.

Step 6

Enter your source code.

For example, to include a side bar for the AUP window, enter this code in the Optional Content 1 field on the AUP window:
<ul data-role="listview">
    <li>Rent a Car</li>
    <li>Top 10 Hotels</li>
    <li>Free Massage</li>
    <li>Zumba Classes</li>
</ul>

Step 7

Click Save.


What to do next

You can customize other pages by entering different text or HTML code in the Optional Content fields.

Import the Custom Portal Theme CSS File

You can upload any custom theme.css file that you have created and apply it to any of your end-user portals. These changes apply to the entire portal that you are customizing.

Any time you edit a custom theme.css file and import it back into Cisco ISE, remember to use the same theme name you originally used for it. You cannot use two different theme names for the same theme.css file.

Procedure


Step 1

Navigate to these portals:

  • For Guest portals, click the Menu icon () and choose Work Centers > Guest Access > Portals & Components > Configure > Guest Portals > Edit > Portal Page Customization.
  • For Sponsor portals, click the Menu icon () and choose Work Centers > Guest Access > Portals & Components > Sponsor Portals > Edit > Portal Page Customization.
  • For Device portals, click the Menu icon () and choose Administration > Device Portal Management > (any Portals) > Edit > Portal Page Customization.

Step 2

From the Advanced Customization drop-down list, choose Export/Import Themes.

Step 3

In the Custom Theming dialog box, click Browse to find your new theme.css file.

Step 4

Enter a Theme Name for the new file.

Step 5

Click Save.


What to do next

You can apply this custom portal theme to the portal that you want to customize.

  1. Choose the updated theme from the Portal Themes drop-down list to apply to the entire portal.

  2. Click Save.

Delete a Custom Portal Theme

You can delete any custom portal theme that you have imported into Cisco ISE, unless it is being used by one of your portals. You cannot delete any of the default themes provided by Cisco ISE.

Before you begin

The portal theme that you want to delete should not be used by any of the portals.

Procedure


Step 1

Navigate to these portals:

  • For Guest portals, click the Menu icon () and choose Work Centers > Guest Access > Portals & Components > Guest Portals > Edit > Portal Page Customization.
  • For Sponsor portals, click the Menu icon () and choose Work Centers > Guest Access > Portals & Components > Sponsor Portals > Edit > Portal Page Customization.
  • For Device portals, click the Menu icon () and choose Administration > Device Portal Management > (any Portals) > Edit > Portal Page Customization.

Step 2

From the Advanced Customization drop-down list, choose Delete Themes.

Step 3

Select the portal theme that you want to delete from the Theme Name drop-down list.

Step 4

Click Delete and then Save.


View Your Customization

You can view how your customization will display to the portal users (guests, sponsors, or employees).

Procedure


Step 1

Click Portal test URL to view your changes.

Step 2

(Optional) Click Preview to dynamically view how your changes appear on various devices:

  • Mobile devices: View your changes under Preview.

  • Desktop devices: Click Preview and then click Desktop Preview.

    If the changes are not displayed, click Refresh Preview. The portal displayed is only meant for viewing your changes; you cannot click buttons or enter data.

Note


The test portal does not support RADIUS sessions, so you won't see the entire portal flow for all portals. BYOD and Client Provisioning are examples of portals that depend on RADIUS sessions. If you have more than one PSN, Cisco ISE chooses the first active PSN.


Portal Language Customization

The Guest, Sponsor, My Devices, and Client Provisioning portals are localized into all supported languages and locales. This includes text, labels, messages, field names, and button labels. If the client browser requests a locale that is not mapped to a template in Cisco ISE, the portals display content using the English template.

Using the Admin portal, you can modify the fields used for the Guest, Sponsor, and My Devices portals for each language individually, and you can add more languages. Currently, you cannot customize these fields for the Client Provisioning portal.

By default, each type of portal supports 15 languages. You select which language a portal uses, and optionally update page content for that language, on the Portal Page Customization window. Note, if you change fonts and content on the page for one language, those changes to not carry over into the other languages. The changes you make on the Portal Page Customization window are included when you export the Lanaguage File.

The supported languages are:

  • Chinese Simplified

  • Chinese Traditional

  • Czech

  • Dutch

  • English

  • French

  • German

  • Hungarian

  • Italian

  • Japanese

  • Korean

  • Polish

  • Portuguese

  • Russian

  • Spanish

  • Ukrainian

To Edit the Language Used by a Portal

  1. Open the portal that you want to edit.

  2. On the Portal Page Customization tab, select the language that you want to edit in the view in drop-down list.

  3. Change content, headings, and fonts as desired.

  4. Save that portal configuration, and repeat this flow for the other languages that you want to update.

To Edit the Language File

Each Portal Page Customization window also provides a Language File. The Language File is a ZIP of attribute files that you can use to customize headings and text that are part of the portal flow, but is not available to customize on the Portal Page Customization window.

The Language File also contains the mapping to the particular browser locale setting along with all of the string settings for the entire portal in that language. If you change the browser locale setting for one language, the change is applied to all the other end-user web portals. For example, if you change the French.properties browser locale from fr,fr-fr,fr-ca to fr,fr-fr in the Hotspot Guest portal, the change is applied to the My Devices portal also.

You can export the zipped language file and make updates to it, including adding new languages or deleting existing ones you do not need.

For instructions about how to update the Language File, see:

Export the Language File

You can export the language file available for each portal type to edit and customize the existing values specified in it, and add or delete a language.


Note


Only some of the dictionary keys in the language properties files support HTML in their values (text).


Procedure


Step 1

Navigate to these portals:

  • For Guest portals, click the Menu icon () and choose Work Centers > Guest Access > Portals & Components > Edit .
  • For Sponsor portals, click the Menu icon () and choose Work Centers > Configure > Portals & Components > Sponsor Portals > Edit .
  • For Device portals, click the Menu icon () and choose Administration > Device Portal Management > (any Portals) > Edit .

Step 2

Click Language File and choose Export from the drop-down list.

Step 3

Save the zipped language file to your desktop.


Add or Delete Languages from the Language File

If a language you want to use for your portal type is missing from the language file, you can create a new language properties file and add it to the zipped language file. If there are languages you do not need, you can delete their language properties files.

Before you begin

Export the zipped language file available with each portal type in order to add or delete language properties files.

Procedure


Step 1

Use any editor that displays UTF-8 (such as Notepad ++) to open the predefined language file for the portal type to which you want to add or delete languages.

If you want to add or delete languages for more than one portal type, use all the appropriate portal properties files.

Step 2

To add a new language, save an existing language properties file as the new language properties file using the same naming convention of the other files in the zipped language file. For example, to create a new Japanese language properties file, save the file as Japanese.properties (LanguageName.properties).

Step 3

Associate the new language with its browser locale by specifying the browser local value in the first line of the new language properties file. For example, LocaleKeys= ja,ja-jp (LocaleKeys=browser locale value) should be the first line in the Japanese.properties file.

Step 4

Update all the values (text) of the dictionary keys in the new language properties file.

You cannot change the dictionary keys. You can update only their values.

Note


Only some of the dictionary keys support HTML in their values (text).


What to do next

  1. Zip all the properties files (new and existing) and create a new zipped language file. Do not include any folders or directories.


    Note


    When using a Mac, extracting the ZIP file produces a DS store. When you compress the language file after editing, do not include the DS store in the ZIP. To learn methods of extracting the DS store, see https://superuser.com/questions/198569/compressing-folders-on-a-mac-without-the-ds-store.


  2. Use a new name or its original name for the zipped language file.

  3. Import the zipped language file into the specific portal you exported it from.

Import the Updated Language File

You can import an edited language file that you have customized by adding or deleting language properties files or by updating text in existing properties files.


Note


Ensure that you do not copy and paste customization content from Word files. Alternately, choose File > Save As and save the Word file in HTML format. You can then copy and paste customization content from the HTML file.


Procedure


Step 1

Navigate to these portals:

  • For Sponsor portals, click the Menu icon () and choose Work Centers > Guest Access > Portals & Components > Sponsor Portals > Edit .
  • For Device portals, click the Menu icon () and choose Administration > Device Portal Management > (any Portals) > Edit .

Step 2

Click Language File and choose Import from the drop-down list.

Step 3

Browse to find the new zipped language file on your desktop.

Step 4

Import it back for the portal type from where you exported it.


What to do next

To display the changed text or the new language you added, select the specific language from the View In drop-down list.

Customization of Guest Notifications, Approvals, and Error Messages

Within in each portal, you can customize how guests receive notifications via email, SMS text messages, and print. Use these notifications to email, text, or print the login credentials:

  • When guests use the Self-Registration Guest portal and successfully register themselves.

  • When sponsors create guest accounts and want to provide the details to guests. When you create sponsor groups, you can determine whether to authorize sponsors to use SMS notifications. They can always use email and print notifications, if these facilities are available.

You can also customize email notifications to sponsors requesting that they approve a self-registering guest trying to gain access to the network. Additionally, you can customize the default error messages that display to guests and sponsors.

Customize Email Notifications

You can customize the information that is sent via email to guests.

Before you begin

  • Configure the SMTP server to enable email notifications. In the Cisco ISE GUI, click the Menu icon () and choose Administration > System > Settings > SMTP Server.

  • Configure support for email notifications to guests. In the Cisco ISE GUI, click the Menu icon () and choose Work Centers > Guest Access > Settings > Guest Email Settings. Check Enable email notifications to guests.

  • Ensure that Enable portal customization with HTML is enabled by default in Administration > System > Admin Access > Settings > Portal Customization.

Procedure


Step 1

For Self-Registered Sponsor portals, click the Menu icon () and choose Work Centers > Guest Access > Portals & Components > Sponsor Portals > Edit > Portal Page Customization > Notify Guests > Email Notification.

Step 2

You can change the default Logo (Email) that was specified under Global Page Customizations.

Step 3

Specify the Subject and Email body. Use predefined variables to specify the guest account information to be included in the email message. Use the mini-editor and HTML tags to customize the text.

Step 4

Under Settings, you can:

  • Send username and password separately in different emails. If you select this option, two separate tabs appear in Page Customizations for customizing the Username Email and Password Email notifications.
  • Send Test Email to your email address to preview your customization on all devices to ensure that the information appears as it should.

Step 5

Click Save and then Close.


Customize SMS Text Message Notifications

You can customize the information that is sent via SMS text messages to guests.

Before you begin

  • Configure the SMTP server, which is used to send emails to the SMS gateway to deliver the SMS text message. In the Cisco ISE GUI, click the Menu icon () and choose Administration > System > Settings > SMTP Server.

  • Configure the sponsor groups to support the SMS text notification.

  • Set up an account with a third-party SMS gateway. In the Cisco ISE GUI, click the Menu icon () and choose Administration > Systems > Settings > SMS Gateway. Cisco ISE sends the text messages as email messages to the gateway, which forwards the messages via the SMS provider to the specified user.

  • Ensure that Enable portal customization with HTML is enabled by default in Administration > System > Admin Access > Settings > Portal Customization.

Procedure


Step 1

For Self-Registered Guest or Sponsor portals, click the Menu icon () and choose Work Centers > Guest Access > Portals & Components > Guest or Sponsor Portals > Edit > Portal Page Customization > SMS Receipt or SMS Notification.

Step 2

Use the mini-editor and HTML tags to customize the Message Text. Use predefined variables to specify the guest account information to be included in the SMS text message.

Step 3

Under Settings, you can:

  • Send username and password separately in different text messages. If you select this option, two separate tabs appear in Page Customizations for customizing the Username Message and Password Message notifications.
  • Send Test Message to a cell phone to preview your customization to ensure that the information appears as it should.

Step 4

Click Save and then Close.


Customize Print Notifications

You can customize the information that is printed for guests.


Note


Within each portal, the print notification logo is inherited from the email notification logo setting.


Before you begin

Ensure that Enable portal customization with HTML is enabled by default in Administration > System > Admin Access > Settings > Portal Customization.

Procedure


Step 1

For Self-Registered Guest and Sponsor portals, click the Menu icon () and choose Work Centers > Guest Access > Portals & Components > Guest or Sponsor Portals > Edit > Portal Page Customization > Print Receipt or Print Notification.

Step 2

Specify the Print Introduction Text. Use predefined variables to specify the guest account information to be included in the email message. Use the mini-editor and HTML tags to customize the text.

Step 3

Preview your customization in the thumbnail or click Print Preview. You cannot view any HTML customization in the thumbnail.

If you select the Print Preview option, a window appears from which you can print the account details to ensure that the information appears as it should.

Step 4

Click Save and then Close.


Customize Approval Request Email Notifications

You can require sponsors to approve self-registering guests before their accounts are created and before they can obtain their login credentials. You can customize the information that is sent via email to sponsors requesting their approval. This notification only displays if you have specified that self-registering guests using the Self-Registered Guest portals require approval before they are granted network access.

Before you begin

  • Configure the SMTP server to enable email notifications. In the Cisco ISE GUI, click the Menu icon () and choose Administration > Systems > Settings > SMTP Server.

  • Configure support for email notifications to guests. In the Cisco ISE GUI, click the Menu icon () and choose Work Centers > Guest Access > Settings > Guest Email Settings. Check Enable email notifications to guests.

  • If you want a sponsor to approve self-registered account requests, check Require self-registered guests to be approved under Self-Registration Page Settings on the Portal Behavior and Flow Settings tab. That enables the Approval Request Email tab under Notifications in Portal Page Customization, where you can customize the email that goes to the sponsor.

Procedure


Step 1

In the Cisco ISE GUI, click the Menu icon () and choose Work Centers > Guest Access > Portals & Components > Configure > Self-Registered Guest Portals > Edit > Portal Page Customization > Approval Request Email. Here you can:

Step 2

Do the following:

  1. Change the default Logo that is specified under Global Page Customizations.

  2. Specify the Subject and Email body. Use predefined variables to specify the guest account information to be included in the email message. Use the mini-editor and HTML tags to customize the text. For example, to include a link to the Sponsor portal in the request approval email, click Create a Link and add the FQDN to the Sponsor portal.

  3. Preview your customization on all devices using Send Test Email to ensure that it appears as it should.

  4. Click Save and then Close.

Step 3

Customize the content of the approval email sent by the sponsor:

  1. Choose Work Centers > Guest Access > Portals & Components > Sponsor Portals.

  2. Click Portal Page Customization.

  3. Click the Email Notification tab and enter the required details.


Edit Error Messages

You can fully customize the error messages that appear on the Failure pages displayed for guests, sponsors and employees. Failure pages are available with all end-user web portals, except the Blocked List portal.

Procedure


Step 1

Do one of the following:

  • For Guest portals, click the Menu icon () and choose Work Centers > Guest Access > Portals & Components > Guest Portals > Edit > Portal Page Customizations > Messages > Error Messages.
  • For Sponsor Portals, click the Menu icon () and choose Work Centers > Guest Access > Portals & Components > Sponsor Portals > Edit > Portal Page Customizations > Messages > Error Messages.
  • For Device portals, click the Menu icon () and choose Adminsitration > Device Portals Management > (any portals) > Edit > Portal Page Customizations > Messages > Error Messages.

Step 2

From the View In drop-down list, choose the language in which you want to view the text while customizing the messages.

The drop-down list includes all the languages in the language file associated with a specific portal. Make sure that you update any changes made while customizing the portal page into the supported languages properties files.

Step 3

Update the error message text. You can search for specific error messages by typing in keywords such as aup to find AUP related error messages.

Step 4

Click Save and Close.


Portal Pages Titles, Content and Labels Character Limits

There is a maximum and minimum range of characters you can enter in the titles, text boxes, instructions, field and button labels, and other visual elements on the Portal Page Customization tab.

Character Limits for Portal Pages Titles, Content and Labels

The navigation paths for these portal page UI elements are:
  • For Guest portals, click the Menu icon () and choose Work Centers > Guest Access > Portals & Components > Guest Portals > Edit > Portal Page Customization > Pages.

  • For Sponsor portals, click the Menu icon () and choose Work Centers > Guest Access > Portals & Components > Sponsor Portals > Edit > Portal Page Customization > Pages.

  • For Device portals, click the Menu icon () and choose Administration > Device Portal Management > (any Portals) > Edit > Portal Page Customization > Pages.

Use this information when you enter content in the titles, text boxes, instructions, field and button labels, and other visual elements of the portal page the you are customizing. These updates are applied only to the specific page that you are customizing.

Note


Whether you enter single-byte or multi-byte characters, you can only enter the maximum number of characters identified for a field. Multi-byte characters do not affect the character limit.


Field Category Fields Field Labels: Minimum Characters Field Labels: Maximum Characters Field Input Values: Minimum Characters Field Input Values: Maximum Characters

Common page elements

Banner title

256

Footer elements

0

2000

Browser Page Title

0

256

Instructional Text

0

2000

Content Title

0

256

Optional Content 1

0

2000

Optional Content 2

0

2000

Button labels

0

64

Check box labels

0

64

Tab labels

0

64

Link labels

0

256

AUP

AUP Text

0

50,000

Message text

Message text (displayed on page)

0

2000

Message text (displayed in pop-up window)

0

256

Field labels

All fields labels

0

256

Field input (general)

Field input in general (see special cases below)

0

256

Field input (special cases)

Access Code field

1

20

Registration Code field

1

20

Username fields

1

64

Password fields

1

256

Phone Number field

0

64

Device ID field

12

17

Portal Customization

You can customize the appearance of the end-user web portals and the guest experience. If you have experience with the cascading style sheet (CSS) language and with Javascript, you can use the jQuery Mobile ThemeRoller application to customize portal themes by changing the portal page layout.

You can view all the fields by exporting the CSS theme or language properties from the required portal page. See Export a Portal's Default Theme CSS File for more information.

CSS Classes and Descriptions for End-User Portals Page Layout

Use these CSS classes to define and modify the page layout of the Cisco ISE end-user web portals.

CSS Class Name Description

cisco-ise-banner

Includes logos, banner image, and banner text.

On the Sponsor and My Devices portals, this class also contains buttons that can activate a context menu. For example, the menu can bring up a pop-up window with options to Log Out, Change Password, and so on.

cisco-ise-body

Contains all page elements that are not part of the banner.

cisco-ise-optional-content-1

Empty by default. You can add text, links, and HTML and Javascript code.

cisco-ise-main-content

Includes the main contents of the portal page, such as instructional text, action buttons, and the cisco-ise-footer container.

cisco-ise-optional-content-2

Empty by default. You can add text, links, and HTML and Javascript code.

cisco-ise-footer

Part of the footer, it is a placeholder for links such as Contact Support and online Help.

cisco-ise-footer-text

Empty by default. It is a placeholder for anything that you want to display at the bottom of the portal page, such as a copyright notice or a disclaimer.

HTML Support for a Portal Language File

The zipped language file for each portal includes the default language properties files for that portal. Each properties file includes dictionary keys that define the content that displays on the portal.

You can customize the text that displays on a portal, including the content in the Instructional Text, Content, Optional Content 1, and Optional Content 2 fields. Some of these fields have default content and some are empty.

Only some of these dictionary keys associated with these fields support HTML in their values (text).

HTML Support for the Blocked List Portal Language File

To view this window, click the Menu icon () and choose Administration > Device Portal Management > Blocked List Portal > Edit > Portal Page Customization > Pages. You can use the View HTML Source icon in the mini-editor and add HTML code in your content.

These dictionary keys in the portal's language properties files support HTML in their text.

Note


This is not a complete list of the dictionary keys in the files.


  • key.blacklist.ui_reject_message

HTML Support for Bring Your Own Device Portals Language Files

To view this window, click the Menu icon () and choose Administration > Device Portal Management > BYOD Portals > Edit > Portal Page Customization > Pages. You can use the View HTML Source icon in the mini-editor and add HTML code in your content.
These dictionary keys in the portal's language properties files support HTML in their text.

Note


This is not a complete list of the dictionary keys in the files.


  • key.guest.ui_contact_instruction_message

  • key.guest.ui_byod_welcome_optional_content_1

  • key.guest.ui_byod_welcome_optional_content_2

  • key.guest.ui_byod_reg_limit_message

  • key.guest.ui_byod_reg_content_message

  • key.guest.ui_byod_success_manual_reconnect_message

  • key.guest.ui_byod_install_winmac_instruction_message

  • key.guest.ui_byod_install_optional_content_1

  • key.guest.ui_byod_reg_optional_content_2

  • key.guest.ui_byod_install_optional_content_2

  • key.guest.ui_byod_reg_optional_content_1

  • key.guest.ui_byod_reg_instruction_message

  • key.guest.ui_byod_welcome_aup_text

  • key.guest.ui_contact_optional_content_2

  • key.guest.ui_contact_optional_content_1

  • key.guest.ui_byod_install_ios_instruction_message

  • key.guest.ui_byod_welcome_instruction_message

  • key.guest.ui_error_optional_content_2

  • key.guest.ui_error_optional_content_1

  • key.guest.ui_byod_welcome_renew_cert_message

  • key.guest.ui_byod_install_android_instruction_message

  • key.guest.ui_byod_install_instruction_message

  • key.guest.ui_byod_welcome_config_device_message

  • key.guest.ui_byod_success_message

  • key.guest.ui_byod_success_unsupported_device_message

  • key.guest.ui_byod_success_optional_content_1

  • key.guest.ui_byod_success_optional_content_2

  • key.guest.ui_error_instruction_message

HTML Support for Certificate Provisioning Portal Language Files

To view this window, click the Menu icon () and choose Administration > Device Portal Management > Certificate Provisioning Portal > Edit > Portal Page Customization > Pages. You can use the View HTML Source icon in the mini-editor and add HTML code in your content.

These dictionary keys in the portal's language properties files support HTML in their text.

Note


This is not a complete list of the dictionary keys in the files.


  • key.manualcertprov.ui_login_instruction_message

  • key.manualcertprov.ui_aup_instruction_message

  • key.manualcertprov.ui_changepwd_instruction_message

  • key.manualcertprov.ui_post_access_instruction_message

  • key.manualcertprov.ui_status_csv_invalid_instruction_message

  • key.manualcertprov.ui_login_optional_content_1

  • key.manualcertprov.ui_login_optional_content_2

  • key.manualcertprov.ui_aup_optional_content_1

  • key.manualcertprov.ui_aup_optional_content_2

  • key.manualcertprov.ui_changepwd_optional_content_1

  • key.manualcertprov.ui_changepwd_optional_content_2

  • key.manualcertprov.ui_post_access_optional_content_1

  • key.manualcertprov.ui_post_access_optional_content_2

  • key.manualcertprov.ui_landing_instruction_message

  • key.manualcertprov.ui_status_page_single_generated_content

  • key.manualcertprov.ui_status_generated_content

HTML Support for Client Provisioning Portal Language Files

To view this window, click the Menu icon () and choose Administration > Device Portal Management > Client Provisioning Portals > Edit > Portal Page Customization > Pages. You can use the View HTML Source icon in the mini-editor and add HTML code in your content.

These dictionary keys in the portal's language properties files support HTML in their text.

Note


This is not a complete list of the dictionary keys in the files.


  • key.guest.ui_client_provision_agent_installed_instructions_without_java_message

  • key.guest.ui_contact_instruction_message

  • key.guest.ui_success_message

  • key.guest.ui_client_provision_unable_to_detect_message

  • key.guest.ui_client_provision_instruction_message

  • key.guest.ui_client_provision_agent_installation_message

  • key.guest.ui_client_provision_posture_agent_check_message

  • key.guest.ui_vlan_instruction_message

  • key.guest.ui_client_provision_agent_installation_instructions_with_no_java_message

  • key.guest.ui_success_instruction_message

  • key.guest.ui_vlan_optional_content_1

  • key.guest.ui_vlan_optional_content_2

  • key.guest.ui_contact_optional_content_2

  • key.guest.ui_contact_optional_content_1

  • key.guest.ui_contact_optional_content_1

  • key.guest.ui_client_provision_posture_check_compliant_message

  • key.guest.ui_client_provision_optional_content_2

  • key.guest.ui_client_provision_optional_content_1

  • key.guest.ui_error_optional_content_2

  • key.guest.ui_error_optional_content_1

  • key.guest.ui_client_provision_posture_check_non_compliant_message

  • key.guest.ui_vlan_install_message

  • key.guest.ui_success_optional_content_1

  • key.guest.ui_success_optional_content_2

  • key.guest.ui_client_provision_posture_agent_scan_message

HTML Support for Credential Guest Portals Language Files

To view this window, click the Menu icon () and choose Work Centers > Guest Access > Portals & Components > Guest Portals > Edit > Portal Page Customization > Pages. You can use the View HTML Source icon in the mini-editor and add HTML code in your content.

These dictionary keys in the portal's language properties files support HTML in their text.

Note


This is not a complete list of the dictionary keys in the files.


  • key.guest.ui_contact_instruction_message

  • key.guest.ui_login_optional_content_1

  • key.guest.ui_login_optional_content_2

  • key.guest.ui_client_provision_unable_to_detect_message

  • key.guest.ui_client_provision_instruction_message

  • key.guest.ui_device_reg_optional_content_2

  • key.guest.ui_device_reg_optional_content_1

  • key.guest.ui_byod_success_manual_reconnect_message

  • key.guest.ui_byod_reg_optional_content_2

  • key.guest.ui_byod_reg_optional_content_1

  • key.guest.ui_client_provision_agent_installation_instructions_with_no_java_message

  • key.guest.ui_success_instruction_message

  • key.guest.ui_max_devices_instruction_message

  • key.guest.ui_max_devices_optional_content_1

  • key.guest.ui_self_reg_results_instruction_message

  • key.guest.notification_credentials_email_body

  • key.guest.ui_max_devices_optional_content_2

  • key.guest.ui_contact_optional_content_2

  • key.guest.ui_contact_optional_content_1

  • key.guest.ui_byod_install_ios_instruction_message

  • key.guest.ui_changepwd_instruction_message

  • key.guest.ui_client_provision_posture_check_compliant_message

  • key.guest.ui_aup_instruction_message

  • key.guest.ui_changepwd_optional_content_2

  • key.guest.ui_changepwd_optional_content_1

  • key.guest.ui_self_reg_results_optional_content_2

  • key.guest.ui_self_reg_results_optional_content_1

  • key.guest.ui_device_reg_instruction_message

  • key.guest.ui_byod_welcome_renew_cert_message

  • key.guest.ui_vlan_execute_message

  • key.guest.ui_byod_install_android_instruction_message

  • key.guest.ui_client_provision_posture_check_non_compliant_message

  • key.guest.ui_byod_install_instruction_message

  • key.guest.ui_device_reg_max_reached_message

  • key.guest.ui_byod_success_message

  • key.guest.ui_byod_success_unsupported_device_message

  • key.guest.ui_byod_success_optional_content_1

  • key.guest.ui_byod_success_optional_content_2

  • key.guest.ui_aup_employee_text

  • key.guest.ui_client_provision_agent_installed_instructions_without_java_message

  • key.guest.ui_success_message

  • key.guest.ui_byod_welcome_optional_content_1

  • key.guest.ui_byod_welcome_optional_content_2

  • key.guest.ui_self_reg_optional_content_2

  • key.guest.ui_self_reg_optional_content_1

  • key.guest.ui_byod_reg_limit_message

  • key.guest.notification_credentials_print_body

  • key.guest.ui_byod_reg_content_message

  • key.guest.ui_client_provision_agent_installation_message

  • key.guest.ui_post_access_message

  • key.guest.ui_vlan_instruction_message

  • key.guest.ui_byod_install_winmac_instruction_message

  • key.guest.ui_aup_guest_text

  • key.guest.ui_byod_install_optional_content_1

  • key.guest.ui_byod_install_optional_content_2

  • key.guest.ui_byod_reg_instruction_message

  • key.guest.ui_aup_optional_content_1

  • key.guest.ui_aup_optional_content_2

  • key.guest.ui_self_reg_aup_text

  • key.guest.ui_login_instruction_message

  • key.guest.ui_vlan_optional_content_1

  • key.guest.ui_vlan_optional_content_2

  • key.guest.ui_self_reg_results_aup_text

  • key.guest.ui_device_reg_register_message

  • key.guest.ui_byod_welcome_instruction_message

  • key.guest.ui_client_provision_optional_content_2

  • key.guest.ui_self_reg_instruction_message

  • key.guest.ui_vlan_install_message

  • key.guest.ui_success_optional_content_1

  • key.guest.ui_success_optional_content_2

  • key.guest.ui_post_access_instruction_message

  • key.guest.ui_post_access_optional_content_2

  • key.guest.ui_post_access_optional_content_1

  • key.guest.ui_byod_welcome_config_device_message

  • key.guest.ui_client_provision_posture_agent_scan_message

HTML Support for Hotspot Guest Portals Language Files

To view this window, click the Menu icon () and choose Work Centers > Guest Access > Portals & Components > Guest Portals > Edit > Portal Page Customization > Pages. You can use the View HTML Source icon in the mini-editor and add HTML code in your content.

These dictionary keys in the portal's language properties files support HTML in their text.

Note


This is not a complete list of the dictionary keys in the files.


  • key.guest.ui_contact_instruction_message

  • key.guest.ui_success_message

  • key.guest.ui_post_access_message

  • key.guest.ui_vlan_instruction_message

  • key.guest.ui_success_instruction_message

  • key.guest.ui_aup_optional_content_1

  • key.guest.ui_aup_optional_content_2

  • key.guest.ui_vlan_unsupported_error_message

  • key.guest.ui_vlan_optional_content_1

  • key.guest.ui_vlan_optional_content_2

  • key.guest.ui_contact_optional_content_2

  • key.guest.ui_contact_optional_content_1

  • key.guest.ui_aup_instruction_message

  • key.guest.ui_aup_hotspot_text

  • key.guest.ui_vlan_execute_message

  • key.guest.ui_vlan_install_message

  • key.guest.ui_success_optional_content_1

  • key.guest.ui_success_optional_content_2

  • key.guest.ui_post_access_instruction_message

  • key.guest.ui_post_access_optional_content_2

  • key.guest.ui_post_access_optional_content_1

HTML Support for Mobile Device Management Portals Language Files

To view this window, click the Menu icon () and choose Administration > Device Portal Management > MDM Portals > Edit > Portal Page Customization > Pages. You can use the View HTML Source icon in the mini-editor and add HTML code in your content.

These dictionary keys in the portal's language properties files support HTML in their text.

  • key.mdm.ui_contact_instruction_message

  • key.mdm.ui_mdm_enrollment_after_message

  • key.mdm.ui_error_optional_content_2

  • key.mdm.ui_error_optional_content_1

  • key.mdm.ui_mdm_enroll_optional_content_1

  • key.mdm.ui_mdm_enroll_optional_content_1

  • key.mdm.ui_mdm_enroll_optional_content_2

  • key.mdm.ui_mdm_enroll_instruction_message

  • key.mdm.ui_error_instruction_message

  • key.mdm.ui_mdm_enrollment_link_message

  • key.mdm.ui_mdm_not_reachable_message

  • key.mdm.ui_contact_optional_content_2

  • key.mdm.ui_mdm_continue_message

  • key.mdm.ui_contact_optional_content_1

HTML Support for My Devices Portals Language Files

To view this window, click the Menu icon () and choose Administration > Device Portal Management > My Devices Portals > Edit > Portal Page Customization > Pages. You can use the View HTML Source icon in the mini-editor and add HTML code in your content.

These dictionary keys in the portal's language properties files support HTML in their text.

Note


This is not a complete list of the dictionary keys in the files.


  • key.mydevices.ui_add_optional_content_1

  • key.mydevices.ui_add_optional_content_2

  • key.mydevices.ui_post_access_instruction_message

  • key.mydevices.ui_edit_instruction_message

  • key.mydevices.ui_contact_optional_content_2

  • key.mydevices.ui_contact_optional_content_1

  • key.mydevices.ui_changepwd_optional_content_1

  • key.mydevices.ui_changepwd_optional_content_2

  • key.mydevices.ui_post_access_message

  • key.mydevices.ui_home_instruction_message

  • key.mydevices.ui_edit_optional_content_1

  • key.mydevices.ui_edit_optional_content_2

  • key.mydevices.ui_add_instruction_message

  • key.mydevices.ui_post_access_optional_content_2

  • key.mydevices.ui_post_access_optional_content_1

  • key.mydevices.ui_error_instruction_message

  • key.mydevices.ui_actions_instruction_message

  • key.mydevices.ui_home_optional_content_2

  • key.mydevices.ui_aup_optional_content_1

  • key.mydevices.ui_aup_optional_content_2

  • key.mydevices.ui_home_optional_content_1

  • key.mydevices.ui_changepwd_instruction_message

  • key.mydevices.ui_contact_instruction_message

  • key.mydevices.ui_aup_employee_text

  • key.mydevices.ui_login_optional_content_2

  • key.mydevices.ui_login_optional_content_1

  • key.mydevices.ui_login_instruction_message

  • key.mydevices.ui_error_optional_content_1

  • key.mydevices.ui_error_optional_content_2

  • key.mydevices.ui_aup_instruction_message

HTML Support for Sponsor Portals Language Files

To view this window, click the Menu icon () and choose Work Centers > Guest Access > Portals & Components > Sponsor Portals > Edit > Portal Page Customization > Pages. You can use the View HTML Source icon in the mini-editor and add HTML code in your content.

These dictionary keys in the portal's language properties files support HTML in their text.

Note


This is not a complete list of the dictionary keys in the files.


  • key.sponsor.ui_aup_instruction_message

  • key.sponsor.ui_create_random_instruction_message

  • key.sponsor.ui_home_instruction_message

  • key.sponsor.ui_post_access_instruction_message

  • key.sponsor.notification_credentials_print_body

  • key.sponsor.ui_aup_sponsor_text

  • key.sponsor.ui_create_accounts_access_info_instruction_message

  • key.sponsor.ui_login_instruction_message

  • key.sponsor.notification_credentials_email_body

  • key.sponsor.ui_create_known_instruction_message

  • key.sponsor.ui_create_import_instruction_message

  • key.sponsor.ui_suspend_account_instruction_message

  • key.sponsor.ui_post_access_message

  • key.sponsor.ui_login_optional_content_2

  • key.sponsor.ui_login_optional_content_1

  • key.sponsor.notification_credentials_email_password_body

  • key.sponsor.ui_contact_optional_content_2

  • key.sponsor.ui_contact_optional_content_1

  • key.sponsor.ui_login_aup_text

  • key.sponsor.ui_changepwd_instruction_message

  • key.sponsor.ui_create_accounts_guest_type_instruction_message

  • key.sponsor.ui_changepwd_optional_content_1

  • key.sponsor.ui_changepwd_optional_content_2

  • key.sponsor.notification_credentials_email_username_body

  • key.sponsor.ui_aup_optional_content_1

  • key.sponsor.ui_aup_optional_content_2

  • key.sponsor.ui_post_access_optional_content_1

  • key.sponsor.ui_post_access_optional_content_2

  • key.sponsor.ui_contact_instruction_message