You can view any zone information by using the show command. If you request information for a specific object (for example, a specific zone, zoneset, VSAN, or alias, or keywords
such as brief or active ), only information for the specified object is displayed. If you do not request specific information, all available information
is displayed.
Displays Zone Information for All VSANs
switch# show zone
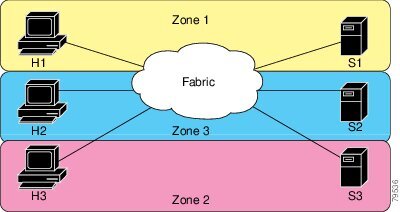
zone name Zone3 vsan 1
pwwn 21:00:00:20:37:6f:db:dd
pwwn 21:00:00:20:37:9c:48:e5
zone name Zone2 vsan 2
fwwn 20:41:00:05:30:00:2a:1e
fwwn 20:42:00:05:30:00:2a:1e
fwwn 20:43:00:05:30:00:2a:1e
zone name Zone1 vsan 1
pwwn 21:00:00:20:37:6f:db:dd
pwwn 21:00:00:20:37:a6:be:2f
pwwn 21:00:00:20:37:9c:48:e5
fcalias Alias1
zone name Techdocs vsan 3
ip-address 10.15.0.0 255.255.255.0
zone name Zone21 vsan 5
pwwn 21:00:00:20:37:a6:be:35
pwwn 21:00:00:20:37:a6:be:39
fcid 0xe000ef
fcid 0xe000e0
symbolic-nodename iqn.test
fwwn 20:1f:00:05:30:00:e5:c6
fwwn 12:12:11:12:11:12:12:10
interface fc1/5 swwn 20:00:00:05:30:00:2a:1e
ip-address 12.2.4.5 255.255.255.0
fcalias name Alias1 vsan 1
pwwn 21:00:00:20:37:a6:be:35
zone name Zone2 vsan 11
interface fc1/5 pwwn 20:4f:00:05:30:00:2a:1e
zone name Zone22 vsan 6
fcalias name Alias1 vsan 1
pwwn 21:00:00:20:37:a6:be:35
zone name Zone23 vsan 61
pwwn 21:00:00:04:cf:fb:3e:7b lun 0000
Displays Zone Information for a Specific VSAN
switch# show zone vsan 1
zone name Zone3 vsan 1
  pwwn 21:00:00:20:37:6f:db:dd
  pwwn 21:00:00:20:37:9c:48:e5
zone name Zone2 vsan 1
    fwwn 20:4f:00:05:30:00:2a:1e
    fwwn 20:50:00:05:30:00:2a:1e
    fwwn 20:51:00:05:30:00:2a:1e
    fwwn 20:52:00:05:30:00:2a:1e
    fwwn 20:53:00:05:30:00:2a:1e
zone name Zone1 vsan 1
  pwwn 21:00:00:20:37:6f:db:dd
  pwwn 21:00:00:20:37:a6:be:2f
  pwwn 21:00:00:20:37:9c:48:e5
  fcalias Alias1
Use the show
zoneset command to view the configured zonesets.
Displays Configured Zoneset Information
switch# show zoneset vsan 1
zoneset name ZoneSet2 vsan 1
  zone name Zone2 vsan 1
    fwwn 20:4e:00:05:30:00:2a:1e
    fwwn 20:4f:00:05:30:00:2a:1e
    fwwn 20:50:00:05:30:00:2a:1e
    fwwn 20:51:00:05:30:00:2a:1e
    fwwn 20:52:00:05:30:00:2a:1e
  zone name Zone1 vsan 1
    pwwn 21:00:00:20:37:6f:db:dd
    pwwn 21:00:00:20:37:a6:be:2f
    pwwn 21:00:00:20:37:9c:48:e5
    fcalias Alias1
zoneset name ZoneSet1 vsan 1
  zone name Zone1 vsan 1
    pwwn 21:00:00:20:37:6f:db:dd
    pwwn 21:00:00:20:37:a6:be:2f
    pwwn 21:00:00:20:37:9c:48:e5
    fcalias Alias1
Displays Configured Zoneset Information for a Range of VSANs
switch# show zoneset vsan 2-3
zoneset name ZoneSet2 vsan 2
  zone name Zone2 vsan 2
    fwwn 20:52:00:05:30:00:2a:1e
    fwwn 20:53:00:05:30:00:2a:1e
    fwwn 20:54:00:05:30:00:2a:1e
    fwwn 20:55:00:05:30:00:2a:1e
    fwwn 20:56:00:05:30:00:2a:1e
  zone name Zone1 vsan 2
    pwwn 21:00:00:20:37:6f:db:dd
    pwwn 21:00:00:20:37:a6:be:2f
    pwwn 21:00:00:20:37:9c:48:e5
    fcalias Alias1
zoneset name ZoneSet3 vsan 3
  zone name Zone1 vsan 1
    pwwn 21:00:00:20:37:6f:db:dd
    pwwn 21:00:00:20:37:a6:be:2f
    pwwn 21:00:00:20:37:9c:48:e5
    fcalias Alias1
Use the show
zone
name command to display members of a specific zone.
Displays Members of a Zone
switch# show zone name Zone1
zone name Zone1 vsan 1
  pwwn 21:00:00:20:37:6f:db:dd
  pwwn 21:00:00:20:37:a6:be:2f
  pwwn 21:00:00:20:37:9c:48:e5
  fcalias Alias1
Use the show
fcalias
command to display fcalias configuration.
Displays fcalias Configuration
switch# show fcalias vsan 1
fcalias name Alias2 vsan 1
fcalias name Alias1 vsan 1
  pwwn 21:00:00:20:37:6f:db:dd
  pwwn 21:00:00:20:37:9c:48:e5
Use the show
zone
member command to display all zones to which a member belongs using the FC ID.
Displays Membership Status
switch# show zone member pwwn 21:00:00:20:37:9c:48:e5
           VSAN: 1
zone Zone3
zone Zone1
fcalias Alias1
Use the show
zone
statistics command to display the number of control frames exchanged with other switches.
Displays Zone Statistics
switch# show zone statistics
Statistics For VSAN: 1
**********************************
Number of Merge Requests Sent: 24
Number of Merge Requests Recvd: 25
Number of Merge Accepts Sent: 25
Number of Merge Accepts Recvd: 25
Number of Merge Rejects Sent: 0
Number of Merge Rejects Recvd: 0
Number of Change Requests Sent: 0
Number of Change Requests Recvd: 0
Number of Change Rejects Sent: 0
Number of Change Rejects Recvd: 0
Number of GS Requests Recvd: 0
Number of GS Requests Rejected: 0
Statistics For VSAN: 2
**********************************
Number of Merge Requests Sent: 4
Number of Merge Requests Recvd: 4
Number of Merge Accepts Sent: 4
Number of Merge Accepts Recvd: 4
Number of Merge Rejects Sent: 0
Number of Merge Rejects Recvd: 0
Number of Change Requests Sent: 0
Number of Change Requests Recvd: 0
Number of Change Rejects Sent: 0
Number of Change Rejects Recvd: 0
Number of GS Requests Recvd: 0
Number of GS Requests Rejected: 0
Displays LUN Zone Statistics
switch# show zone statistics lun-zoning
LUN zoning statistics for VSAN: 1
************************************************************
S-ID: 0x123456, D-ID: 0x22222, LUN: 00:00:00:00:00:00:00:00
------------------------------------------------------------
Number of Inquiry commands received:            10
Number of Inquiry data No LU sent:               5
Number of Report LUNs commands received:        10
Number of Request Sense commands received:       1
Number of Other commands received:               0
Number of Illegal Request Check Condition sent:  0
S-ID: 0x123456, D-ID: 0x22222, LUN: 00:00:00:00:00:00:00:01
------------------------------------------------------------
Number of Inquiry commands received:             1
Number of Inquiry data No LU sent:               1
Number of Request Sense commands received:       1
Number of Other commands received:               0
Number of Illegal Request Check Condition sent:  0
Displays LUN Zone Statistics
Need the latest output
switch# show zone statistics read-only-zoning
Read-only zoning statistics for VSAN: 2
************************************************************
S-ID: 0x33333, D-ID: 0x11111, LUN: 00:00:00:00:00:00:00:64
------------------------------------------------------------
Number of Data Protect Check Condition Sent:    12
Displays Active Zone Sets
switch# show zoneset active
zoneset name ZoneSet1 vsan 1
  zone name zone1 vsan 1
    fcid 0x080808
    fcid 0x090909
    fcid 0x0a0a0a
  zone name zone2 vsan 1
  * fcid 0xef0000 [pwwn 21:00:00:20:37:6f:db:dd]
  * fcid 0xef0100 [pwwn 21:00:00:20:37:a6:be:2f]
Displays Brief Descriptions of Zone Sets
switch# show zoneset brief
zoneset name ZoneSet1 vsan 1
  zone zone1
  zone zone2
Displays Active Zones
switch# show zone active
zone name Zone2 vsan 1
* fcid 0x6c01ef [pwwn 21:00:00:20:37:9c:48:e5]
zone name IVRZ_IvrZone1 vsan 1
  pwwn 10:00:00:00:77:99:7a:1b
* fcid 0xce0000 [pwwn 10:00:00:00:c9:2d:5a:dd]
zone name IVRZ_IvrZone4 vsan 1
* fcid 0xce0000 [pwwn 10:00:00:00:c9:2d:5a:dd]
* fcid 0x6c01ef [pwwn 21:00:00:20:37:9c:48:e5]
zone name Zone1 vsan 1667
  fcid 0x123456
zone name $default_zone$ vsan 1667
Displays Active Zone Sets
switch# show zoneset active
zoneset name ZoneSet4 vsan 1
  zone name Zone2 vsan 1
  * fcid 0x6c01ef [pwwn 21:00:00:20:37:9c:48:e5]
  zone name IVRZ_IvrZone1 vsan 1
    pwwn 10:00:00:00:77:99:7a:1b
  * fcid 0xce0000 [pwwn 10:00:00:00:c9:2d:5a:dd]
zoneset name QosZoneset vsan 2
  zone name QosZone vsan 2
  attribute qos priority high
  * fcid 0xce0000 [pwwn 10:00:00:00:c9:2d:5a:dd]
  * fcid 0x6c01ef [pwwn 21:00:00:20:37:9c:48:e5]
Active zoneset vsan 1667
  zone name Zone1 vsan 1667
    fcid 0x123456
  zone name $default_zone$ vsan 1667
Displays Zone Status
switch(config)# show zone status
VSAN: 1 default-zone: deny distribute: active only Interop: default
mode: basic merge-control: allow
session: none
hard-zoning: enabled broadcast: disabled
smart-zoning: disabled
rscn-format: fabric-address
activation overwrite control:disabled
Default zone:
qos: none broadcast: disabled ronly: disabled
Full Zoning Database :
DB size: 4 bytes
Zonesets:0 Zones:0 Aliases: 0
Active Zoning Database :
Database Not Available
Current Total Zone DB Usage: 4 / 2097152 bytes (0 % used)
Pending (Session) DB size:
Full DB Copy size: n/a
Active DB Copy size: n/a
SFC size: 4 / 2097152 bytes (0 % used)
Status:
VSAN: 8 default-zone: deny distribute: full Interop: default
mode: basic merge-control: allow
session: none
hard-zoning: enabled broadcast: disabled
smart-zoning: disabled
rscn-format: fabric-address
Default zone:
qos: none broadcast: disabled ronly: disabled
Full Zoning Database :
DB size: 1946498 bytes
Zonesets:6 Zones:8024 Aliases: 0
Active Zoning Database :
DB size: 150499 bytes
Name: zoneset-1000 Zonesets:1 Zones:731
Current Total Zone DB Usage: 2096997 / 2097152 bytes (99 % used)
Pending (Session) DB size:
Full DB Copy size: n/a
Active DB Copy size: n/a
SFC size: 2096997 / 2097152 bytes (99 % used)
Status: Zoneset distribution failed [Error: Fabric changing Dom 33]:
at 17:05:06 UTC Jun 16 2014
VSAN: 9 default-zone: deny distribute: full Interop: default
mode: enhanced merge-control: allow
session: none
hard-zoning: enabled broadcast: enabled
smart-zoning: disabled
rscn-format: fabric-address
Default zone:
qos: none broadcast: disabled ronly: disabled
Full Zoning Database :
DB size: 2002584 bytes
Zonesets:4 Zones:7004 Aliases: 0 Attribute-groups: 1
Active Zoning Database :
DB size: 94340 bytes
Name: zoneset-hac13-200 Zonesets:1 Zones:176
Current Total Zone DB Usage: 2096924 / 2097152 bytes (99 % used)
Pending (Session) DB size:
Full DB Copy size: 0 bytes
Active DB Copy size: 0 bytes
SFC size: 0 / 2097152 bytes (0 % used)
Status: Activation completed at 17:28:04 UTC Jun 16 2014
VSAN: 12 default-zone: deny distribute: full Interop: default
mode: enhanced merge-control: allow
session: none
hard-zoning: enabled broadcast: enabled
smart-zoning: disabled
rscn-format: fabric-address
Default zone:
qos: none broadcast: disabled ronly: disabled
Full Zoning Database :
DB size: 84 bytes
Zonesets:0 Zones:1 Aliases: 0 Attribute-groups: 1
Active Zoning Database :
DB size: 144 bytes
Name: zs1 Zonesets:1 Zones:2
Current Total Zone DB Usage: 228 / 2097152 bytes (0 % used)
Pending (Session) DB size:
Full DB Copy size: 0 bytes
Active DB Copy size: 0 bytes
SFC size: 0 / 2097152 bytes (0 % used)
Status: Commit completed at 14:39:33 UTC Jun 27 201
Use the show
zone
command to display the zone attributes for all configured zones.
Displays Zone Statistics
switch# show zone
zone name lunSample vsan 1              <-----------------Read-write attribute
zone name ReadOnlyZone vsan 2
    attribute read-only                 <-----------------Read-only attribute
Use the show
running and show
zone
active commands to display the configured interface-based zones.
Displays the Interface-Based Zones
switch# show running zone name if-zone vsan 1
      member interface fc2/15 swwn 20:00:00:0c:88:00:4a:e2
      member fwwn 20:4f:00:0c:88:00:4a:e2
      member interface fc2/1 swwn 20:00:00:05:30:00:4a:9e
      member pwwn 22:00:00:20:37:39:6b:dd
Displays the fWWNs and Interfaces in an Active Zone
switch# show zone active zone name if-zone vsan 1
  * fcid 0x7e00b3 [interface fc2/15 swwn 20:00:00:0c:88:00:4a:e2]
  * fcid 0x7e00b1 [interface fc2/15 swwn 20:00:00:0c:88:00:4a:e2]
  * fcid 0x7e00ac [interface fc2/15 swwn 20:00:00:0c:88:00:4a:e2]
  * fcid 0x7e00b3 [fwwn 20:4f:00:0c:88:00:4a:e2]
  * fcid 0x7e00b1 [fwwn 20:4f:00:0c:88:00:4a:e2]
  * fcid 0x7e00ac [fwwn 20:4f:00:0c:88:00:4a:e2]
    interface fc2/1 swwn 20:00:00:05:30:00:4a:9e
A similar output is also available on the remote switch (see the following example).
Displays the Local Interface Active Zone Details for a Remote Switch
switch# show zone active zone name if-zone vsan 1
   * fcid 0x7e00b3 [interface fc2/15 swwn 20:00:00:0c:88:00:4a:e2]
  * fcid 0x7e00b1 [interface fc2/15 swwn 20:00:00:0c:88:00:4a:e2]
  * fcid 0x7e00ac [interface fc2/15 swwn 20:00:00:0c:88:00:4a:e2]
  * fcid 0x7e00b3 [fwwn 20:4f:00:0c:88:00:4a:e2]
  * fcid 0x7e00b1 [fwwn 20:4f:00:0c:88:00:4a:e2]
  * fcid 0x7e00ac [fwwn 20:4f:00:0c:88:00:4a:e2]
    interface fc2/1 swwn 20:00:00:05:30:00:4a:9e
Displays the Zone Status for a VSAN
switch(config)# show zone status vsan 1
VSAN: 1 default-zone: deny distribute: active only Interop: default
mode: basic merge-control: allow
session: none
hard-zoning: enabled broadcast: disabled
smart-zoning: disabled
rscn-format: fabric-address
activation overwrite control:disabled
Default zone:
qos: none broadcast: disabled ronly: disabled
Full Zoning Database :
DB size: 4 bytes
Zonesets:0 Zones:0 Aliases: 0
Active Zoning Database :
Database Not Available
Current Total Zone DB Usage: 4 / 2097152 bytes (0 % used)
Pending (Session) DB size:
Full DB Copy size: n/a
Active DB Copy size: n/a
SFC size: 4 / 2097152 bytes (0 % used)
Status:
Displays the Zone Policy for a VSAN
switch# show zone policy vsan 1
Vsan: 1
   Default-zone: deny
   Distribute: full
   Broadcast: enable
   Merge control: allow
   Generic Service: read-write
   Smart-zone: enabled
Displays How to Create a Zone Attribute-Group to for a VSAN in the Enhanced Mode to Disable Smart Zoning at an Individual
Zone Level

Note |
After the attribute-group is created, it needs to be applied to any zones requiring smart zoning to be disabled.
|
config# zone-attribute-group name <name> vsan 1
config-attribute-group# disable-smart-zoning
config-attribute-group# exit
config# zone commit vsan 1
Displays how to Auto-convert Zones
config# show zoneset vsan 1
zoneset name ZSv1 vsan 1
  zone name ddasZone vsan 1
    device-alias Init1
    device-alias Init2
    device-alias Init3
    device-alias Target1
config# zone convert smart-zoning vsan 1
smart-zoning auto_convert initiated. This operation can take few minutes. Please wait..
config# show zoneset vsan1
zoneset name ZSv1 vsan 1
  zone name ddasZone vsan 1
    device-alias Init1  init
    device-alias Init2  init
    device-alias Init3  init
    device-alias Target1 target
Displays how to Clear Device type Configuration for Members
config# show zoneset vsan 1
zoneset name ZSv1 vsan 1
  zone name ddasZone vsan 1
    device-alias Init1  init
    device-alias Init2  init
    device-alias Init3  init
    device-alias Target1 target
config# clear zone smart-zoning vsan1
config# show zoneset vsan 1
zoneset name ZSv1 vsan 1
  zone name ddasZone vsan 1
    device-alias Init1
    device-alias Init2
    device-alias Init3
    device-alias Target1


 Feedback