- Index
- Preface
- Product Overview
-
- Configuring Ethernet Interfaces
- Configuring VLANs
- Configuring Private VLANs
- Configuring Rapid PVST+
- Configuring Multiple Spanning Tree
- Configuring STP Extensions
- Configuring Port Channels
- Configuring Access and Trunk Interfaces
- Configuring the MAC Address Table
- Configuring IGMP Snooping
- Configuring Traffic Storm Control
-
- Configuring Fibre Channel Interfaces
- Configuring Domain Parameters
- Configuring N-Port Virtualization
- Configuring VSAN Trunking
- Configuring SAN PortChannels
- Configuring and Managing VSANs
- Configuring and Managing Zones
- Distributing Device Alias Services
- Configuring Fibre Channel Routing Services and Protocols
- Managing FLOGI, Name Server, FDMI, and RSCN Databases
- Discovering SCSI Targets
- Advanced Features and Concepts
- Configuring FC-SP and DHCHAP
- Configuring Port Security
- Configuring Fabric Binding
- Configuring Fabric Configuration Servers
- Configuring Port Tracking
Cisco Nexus 5000 Series NX-OS Software Configuration Guide
Bias-Free Language
The documentation set for this product strives to use bias-free language. For the purposes of this documentation set, bias-free is defined as language that does not imply discrimination based on age, disability, gender, racial identity, ethnic identity, sexual orientation, socioeconomic status, and intersectionality. Exceptions may be present in the documentation due to language that is hardcoded in the user interfaces of the product software, language used based on RFP documentation, or language that is used by a referenced third-party product. Learn more about how Cisco is using Inclusive Language.
- Updated:
- May 11, 2008
Chapter: Configuring FC-SP and DHCHAP
- Information About Fabric Authentication
- DHCHAP
- DHCHAP Compatibility with Fibre Channel Features
- About Enabling DHCHAP
- Enabling DHCHAP
- About DHCHAP Authentication Modes
- Configuring the DHCHAP Mode
- About the DHCHAP Hash Algorithm
- Configuring the DHCHAP Hash Algorithm
- About the DHCHAP Group Settings
- Configuring the DHCHAP Group Settings
- About the DHCHAP Password
- Configuring DHCHAP Passwords for the Local Switch
- About Password Configuration for Remote Devices
- Configuring DHCHAP Passwords for Remote Devices
- About the DHCHAP Timeout Value
- Configuring the DHCHAP Timeout Value
- Configuring DHCHAP AAA Authentication
- Displaying Protocol Security Information
- Sample Configuration
- Default Settings
Configuring FC-SP and DHCHAP
Fibre Channel Security Protocol (FC-SP) capabilities provide switch-to-switch and host-to-switch authentication to overcome security challenges for enterprise-wide fabrics. Diffie-Hellman Challenge Handshake Authentication Protocol (DHCHAP) is an FC-SP protocol that provides authentication between Cisco Nexus 5000 Series switches and other devices. DHCHAP consists of the CHAP protocol combined with the Diffie-Hellman exchange.
Information About Fabric Authentication
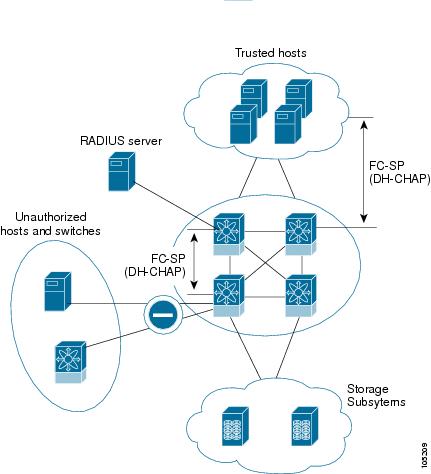
All Cisco Nexus 5000 Series switches enable fabric-wide authentication from one switch to another switch, or from a switch to a host. These switch and host authentications are performed locally or remotely in each fabric. As storage islands are consolidated and migrated to enterprise-wide fabrics new security challenges arise. The approach of securing storage islands cannot always be guaranteed in enterprise-wide fabrics. For example, in a campus environment with geographically distributed switches, someone could maliciously interconnect incompatible switches or you could accidentally do so, resulting in Inter-Switch Link (ISL) isolation and link disruption.
Cisco Nexus 5000 Series switches support authentication features to address physical security (see Figure 1-1).
Figure 1-1 Switch and Host Authentication

Note![]() Fibre Channel host bus adapters (HBAs) with appropriate firmware and drivers are required for host-switch authentication.
Fibre Channel host bus adapters (HBAs) with appropriate firmware and drivers are required for host-switch authentication.
DHCHAP
DHCHAP is an authentication protocol that authenticates the devices connecting to a switch. Fibre Channel authentication allows only trusted devices to be added to a fabric, which prevents unauthorized devices from accessing the switch.
Note![]() The terms FC-SP and DHCHAP are used interchangeably in this chapter.
The terms FC-SP and DHCHAP are used interchangeably in this chapter.
DHCHAP is a mandatory password-based, key-exchange authentication protocol that supports both switch-to-switch and host-to-switch authentication. DHCHAP negotiates hash algorithms and DH groups before performing authentication. It supports MD5 and SHA-1 algorithm-based authentication.
To configure DHCHAP authentication using the local password database, perform this task:
Step 2![]() Identify and configure the DHCHAP authentication modes.
Identify and configure the DHCHAP authentication modes.
Step 3![]() Configure the hash algorithm and DH group.
Configure the hash algorithm and DH group.
Step 4![]() Configure the DHCHAP password for the local switch and other switches in the fabric.
Configure the DHCHAP password for the local switch and other switches in the fabric.
Step 5![]() Configure the DHCHAP timeout value for reauthentication.
Configure the DHCHAP timeout value for reauthentication.
Step 6![]() Verify the DHCHAP configuration.
Verify the DHCHAP configuration.
This section includes the following topics:
- DHCHAP Compatibility with Fibre Channel Features
- About Enabling DHCHAP
- Enabling DHCHAP
- About DHCHAP Authentication Modes
- Configuring the DHCHAP Mode
- About the DHCHAP Hash Algorithm
- Configuring the DHCHAP Hash Algorithm
- About the DHCHAP Group Settings
- Configuring the DHCHAP Group Settings
- About the DHCHAP Password
- Configuring DHCHAP Passwords for the Local Switch
- About Password Configuration for Remote Devices
- Configuring DHCHAP Passwords for Remote Devices
- About the DHCHAP Timeout Value
- Configuring the DHCHAP Timeout Value
- Configuring DHCHAP AAA Authentication
- Displaying Protocol Security Information
DHCHAP Compatibility with Fibre Channel Features
This section identifies the impact of configuring the DHCHAP feature along with existing Cisco NX-OS features:
- SAN port channel interfaces—If DHCHAP is enabled for ports belonging to a SAN port channel, DHCHAP authentication is performed at the physical interface level, not at the port channel level.
- Port security or fabric binding—Fabric-binding policies are enforced based on identities authenticated by DHCHAP.
- VSANs—DHCHAP authentication is not done on a per-VSAN basis.
About Enabling DHCHAP
By default, the DHCHAP feature is disabled in all Cisco Nexus 5000 Series switches.
You must explicitly enable the DHCHAP feature to access the configuration and verification commands for fabric authentication. When you disable this feature, all related configurations are automatically discarded.
Enabling DHCHAP
To enable DHCHAP for a Cisco Nexus 5000 Series switch, perform this task:
|
|
|
|
|---|---|---|
About DHCHAP Authentication Modes
The DHCHAP authentication status for each interface depends on the configured DHCHAP port mode.
When the DHCHAP feature is enabled in a switch, each Fibre Channel interface or FCIP interface may be configured to be in one of four DHCHAP port modes:
- On—During switch initialization, if the connecting device supports DHCHAP authentication, the software performs the authentication sequence. If the connecting device does not support DHCHAP authentication, the link is placed in an isolated state.
- Auto-Active—During switch initialization, if the connecting device supports DHCHAP authentication, the software performs the authentication sequence. If the connecting device does not support DHCHAP authentication, the software continues with the rest of the initialization sequence.
- Auto-Passive (default)—The switch does not initiate DHCHAP authentication, but participates in DHCHAP authentication if the connecting device initiates DHCHAP authentication.
- Off—The switch does not support DHCHAP authentication. Authentication messages sent to ports in this mode return error messages to the initiating switch.
Note![]() Whenever DHCHAP port mode is changed to a mode other than the Off mode, reauthentication is performed.
Whenever DHCHAP port mode is changed to a mode other than the Off mode, reauthentication is performed.
Table 1-1 identifies switch-to-switch authentication between two Cisco switches in various modes.
|
|
|
|||
|---|---|---|---|---|
|
|
|
|
|
|
|
|
||||
|
|
||||
|
|
||||
|
|
||||
Configuring the DHCHAP Mode
To configure the DHCHAP mode for a particular interface, perform this task:
About the DHCHAP Hash Algorithm
Cisco SAN switches support a default hash algorithm priority list of MD5 followed by SHA-1 for DHCHAP authentication.

Tip![]() If you change the hash algorithm configuration, then change it globally for all switches in the fabric.
If you change the hash algorithm configuration, then change it globally for all switches in the fabric.

Configuring the DHCHAP Hash Algorithm
To configure the hash algorithm, perform this task:
|
|
|
|
|---|---|---|
Reverts to the factory default priority list of the MD5 hash algorithm followed by the SHA-1 hash algorithm. |
About the DHCHAP Group Settings
All Cisco Nexus 5000 Series switches support all DHCHAP groups specified in the standard: 0 (null DH group, which does not perform the Diffie-Hellman exchange), 1, 2, 3, or 4.
Tip![]() If you change the DH group configuration, change it globally for all switches in the fabric.
If you change the DH group configuration, change it globally for all switches in the fabric.
Configuring the DHCHAP Group Settings
To change the DH group settings, perform this task:
|
|
|
|
|---|---|---|
switch(config)# no fcsp dhchap dhgroup [ 0 | 1 | 2 | 3 | 4 ] |
Reverts to the DHCHAP factory default order of 0, 4, 1, 2, and 3. |
About the DHCHAP Password
DHCHAP authentication in each direction requires a shared secret password between the connected devices. To do this, you can use one of three configurations to manage passwords for all switches in the fabric that participate in DHCHAP:
- Configuration 1—Use the same password for all switches in the fabric. This is the simplest configuration. When you add a new switch, you use the same password to authenticate that switch in this fabric. It is also the most vulnerable configuration if someone from the outside maliciously attempts to access any one switch in the fabric.
- Configuration 2—Use a different password for each switch and maintain that password list in each switch in the fabric. When you add a new switch, you create a new password list and update all switches with the new list. Accessing one switch yields the password list for all switches in that fabric.
- Configuration 3—Use different passwords for different switches in the fabric. When you add a new switch, multiple new passwords corresponding to each switch in the fabric must be generated and configured in each switch. Even if one switch is compromised, the password of other switches are still protected. This configuration requires considerable password maintenance by the user.
Note![]() All passwords are restricted to 64 alphanumeric characters and can be changed, but not deleted.
All passwords are restricted to 64 alphanumeric characters and can be changed, but not deleted.
Tip![]() We recommend using RADIUS or TACACS+ for fabrics with more than five switches. If you need to use a local password database, you can continue to do so using Configuration 3 and using the Cisco MDS 9000 Family Fabric Manager to manage the password database.
We recommend using RADIUS or TACACS+ for fabrics with more than five switches. If you need to use a local password database, you can continue to do so using Configuration 3 and using the Cisco MDS 9000 Family Fabric Manager to manage the password database.
Configuring DHCHAP Passwords for the Local Switch
To configure the DHCHAP password for the local switch, perform this task:
|
|
|
|
|---|---|---|
switch(config)# fcsp dhchap password [ 0 | 7 ] password [ wwn wwn-id ] |
The following example shows how to configure a clear text password for the local switch to be used for the device with the specified WWN:
The following example removes the clear text password for the local switch to be used for the device with the specified WWN:
The following example shows configures a password entered in an encrypted format for the local switch:
About Password Configuration for Remote Devices
You can configure passwords in the local authentication database for other devices in a fabric. The other devices are identified by their device name, which is also known as the switch WWN or device WWN. The password is restricted to 64 characters and can be specified in clear text (0) or in encrypted text (7).
Note![]() The switch WWN identifies the physical switch. This WWN is used to authenticate the switch and is different from the VSAN node WWN.
The switch WWN identifies the physical switch. This WWN is used to authenticate the switch and is different from the VSAN node WWN.
Configuring DHCHAP Passwords for Remote Devices
To locally configure the remote DHCHAP password for another switch in the fabric, perform this task:
The following example configures a clear text password for another switch in the fabric that is identified by the switch WWN device name:
The following example configures a password entered in an encrypted format for another switch in the fabric that is identified by the switch WWN device name:
About the DHCHAP Timeout Value
During the DHCHAP protocol exchange, if the Cisco Nexus 5000 Series switch does not receive the expected DHCHAP message within a specified time interval, authentication failure is assumed. The time ranges from 20 (no authentication is performed) to 1000 seconds. The default is 30 seconds.
When changing the timeout value, consider the following factors:
Configuring the DHCHAP Timeout Value
To configure the DHCHAP timeout value, perform this task:
|
|
|
|
|---|---|---|
Configures the reauthentication timeout to the specified value. The unit is seconds. |
||
Configuring DHCHAP AAA Authentication
You can configure AAA authentication to use a RADIUS or TACACS+ server group. If AAA authentication is not configured, local authentication is used by default.
To configure the AAA authentication, see the “Configuring AAA” section.
Displaying Protocol Security Information
Use the show fcsp commands to display configurations for the local database.
The following example shows how to display the DHCHAP configuration for the specified interface:
The following example shows how to display DHCHAP statistics for the specified interface:
The following example shows how to display the FC-SP WWN of the device connected to the specified interface:
The following example shows how to display the hash algorithm and DHCHAP groups configured in the switch:
The following example shows how to display the DHCHAP local password database:
Tip![]() Use the ASCII representation of the device WWN to configure the switch information on RADIUS and TACACS+ servers.
Use the ASCII representation of the device WWN to configure the switch information on RADIUS and TACACS+ servers.
Sample Configuration
This section provides the steps to configure the example illustrated in Figure 1-2.
Figure 1-2 Sample DHCHAP Authentication

To configure the authentication setup shown in Figure 1-2, perform this task:
Step 1![]() Obtain the device name of the Cisco Nexus 5000 Series switch in the fabric. The Cisco Nexus 5000 Series switch in the fabric is identified by the switch WWN.
Obtain the device name of the Cisco Nexus 5000 Series switch in the fabric. The Cisco Nexus 5000 Series switch in the fabric is identified by the switch WWN.
Step 2![]() Explicitly enable DHCHAP in this switch.
Explicitly enable DHCHAP in this switch.
Note![]() When you disable DHCHAP, all related configurations are automatically discarded.
When you disable DHCHAP, all related configurations are automatically discarded.
Step 3![]() Configure a clear text password for this switch. This password will be used by the connecting device.
Configure a clear text password for this switch. This password will be used by the connecting device.
Step 4![]() Configures a password for another switch in the fabric that is identified by the switch WWN device name.
Configures a password for another switch in the fabric that is identified by the switch WWN device name.
Step 5![]() Enable the DHCHAP mode for the required Fibre Channel interface.
Enable the DHCHAP mode for the required Fibre Channel interface.
Note![]() Whenever DHCHAP port mode is changed to a mode other than the Off mode, reauthentication is performed.
Whenever DHCHAP port mode is changed to a mode other than the Off mode, reauthentication is performed.
Step 6![]() Verify the protocol security information configured in this switch by displaying the DHCHAP local password database.
Verify the protocol security information configured in this switch by displaying the DHCHAP local password database.
Step 7![]() Display the DHCHAP configuration in the Fibre Channel interface,
Display the DHCHAP configuration in the Fibre Channel interface,
Step 8![]() Repeat these steps on the connecting MDS 9509 switch.
Repeat these steps on the connecting MDS 9509 switch.
You have now enabled and configured DHCHAP authentication for the sample setup in Figure 1-2.
Default Settings
Table 1-2 lists the default settings for all fabric security features in any switch.
|
|
|
|---|---|
A priority list of MD5 followed by SHA-1 for DHCHAP authentication |
|
 Feedback