Smart Licensing Using Policy

Introduction to Smart Licensing Using Policy

Smart Licensing Using Policy is an enhanced version of Smart Licensing, with the overarching objective of providing a licensing solution that does not interrupt the operations of your network, rather, one that enables a compliance relationship to account for the hardware and software licenses you purchase and use.

Smart Licensing Using Policy is supported starting with Cisco IOS XE Amsterdam 17.3.2a.

The primary benefits of this enhanced licensing model are:

  • Seamless day-0 operations

    After a license is ordered, no preliminary steps, such as registration or generation of keys etc., are required unless you use an export-controlled or enforced license. Only these licenses require authorization before use. For all other licenses, product features can be configured on the device right-away.

  • Consistency in Cisco IOS XE

    Campus and industrial ethernet switching, routing, and wireless devices that run Cisco IOS XE software, have a uniform licensing experience.

  • Visibility and manageability

    Tools, telemetry and product tagging, to know what is in-use.

  • Flexible, time series reporting to remain compliant

    Easy reporting options are available, whether you are directly or indirectly connected to Cisco Smart Software Manager (CSSM), or in an air-gapped network.

This document provides conceptual, configuration, and troubleshooting information for Smart Licensing Using Policy on Cisco Catalyst Access, Core, and Aggregation Switches.

For a more detailed overview on Cisco Licensing, go to cisco.com/go/licensingguide.

Information About Smart Licensing Using Policy

This section provides information about the components that can be part of your implementation of Smart Licensing Using Policy, the key concepts associated with the feature, the supported products, overviews of all supported topologies (the different ways in which you can implement the feature), and how Smart Licensing Using Policy interacts with other features.

Overview

Smart Licensing Using Policy is a software license management solution that provides a seamless experience with the various aspects of licensing. The following summarizes how you operate in this environement:

  • Purchase licenses: Purchase licenses through the existing channels and use the Cisco Smart Software Manager (CSSM) portal to view product instances and licenses.


    Note


    For new hardware or software orders, Cisco simplifies the implementation of Smart Licensing Using Policy, by factory-installing the following (terms are explained in the Concepts section further below):

    • A custom policy, if available.

    • An authorization code, if applicable. For this, you must provide your Smart Account and Virtual Account information when placing the order.

    • A trust code, which ensures authenticity of data sent to CSSM. This is installed starting with Cisco IOS XE Cupertino 17.7.1. This trust code cannot be used to communicate with CSSM.


  • Use: Most licenses are unenforced. This means that you do not have to complete any licensing-specific operations, such as registering or generating keys before you start using the software and the licenses that are tied to it. Only export-controlled and enforced licenses require Cisco authorization before use and only certain products support an export-controlled license. License usage is recorded on your device with timestamps and the required workflows can be completed at a later date

  • Report license usage to CSSM: Multiple options are available for license usage reporting. You can use the Cisco Smart Licensing Utility (CSLU), report usage information directly to CSSM, use a Controller (like Cisco DNA Center), deploy Smart Software Manager On-Prem (SSM On-Prem) to administer products and licenses on your premises. The usage report is in plain text XML format. See: Sample Resource Utilization Measurement Report.

  • Reconcile: For situations where delta billing applies (purchased versus consumed).

Supported Products

This section provides information about the Cisco IOS-XE product instances that are within the scope of this document and support Smart Licensing Using Policy. All models (Product IDs or PIDs) in a product series are supported – unless indicated otherwise.

Table 1. Supported Product Instances: Cisco Catalyst Access, Core, and Aggregation Switches

Cisco Catalyst Access, Core, and Aggregation Switches

When Support was Introduced

Cisco Catalyst 9200 Series Switches

Cisco IOS XE Amsterdam 17.3.2a

Cisco Catalyst 9300 Series Switches

Cisco IOS XE Amsterdam 17.3.2a

Cisco Catalyst 9400 Series Switches

Cisco IOS XE Amsterdam 17.3.2a

Cisco Catalyst 9500 Series Switches

Cisco IOS XE Amsterdam 17.3.2a

Cisco Catalyst 9600 Series Switches

Cisco IOS XE Amsterdam 17.3.2a

Architecture

This section explains the various components that can be part of your implementation of Smart Licensing Using Policy.

Product Instance

A product instance is a single instance of a Cisco product, identified by a Unique Device Identifier (UDI).

A product instance records and reports license usage (RUM reports), and provides alerts and system messages about overdue reports, communication failures, etc. RUM reports and usage data are securely stored in the product instance.

Throughout this document, the term product instance refers to all supported physical and virtual product instances - unless noted otherwise. For information about the product instances that are within the scope of this document, see Supported Products.

CSLU

Cisco Smart License Utility (CSLU) is a Windows-based reporting utility that provides aggregate licensing workflows. This utility performs the following key functions:

  • Provides options relating to how workflows are triggered. The workflows can be triggered by CSLU or by the product instance.

  • Collects usage reports from the product instance and uploads these usage reports to the corresponding Smart Account or Virtual Account – online, or offline, using files. Similarly, the RUM report ACK is collected online, or offline, and sent back to the product instance.

  • Sends authorization code requests to CSSM and receives authorization codes from CSSM, if applicable.

CSLU can be part of your implementation in the following ways:

  • Install the windows application, to use CSLU as a standalone tool that is connected to CSSM.

  • Install the windows application, to use CSLU as a standalone tool that is disconnected from CSSM. With this option, the required usage information is downloaded to a file and then uploaded to CSSM. This is suited to air-gapped networks.

  • Deploy CSLU on a machine (laptop or desktop) running Linux.

  • Embedded (by Cisco) in a controller such as Cisco DNA Center.

CSLU supports Windows 10 and Linux operating systems. We recommend that you always use the latest version of CSLU that is available. For the release notes and to download the latest version, click Smart Licensing Utility on the Software Download page.

CSSM

Cisco Smart Software Manager (CSSM) is a portal that enables you to manage all your Cisco software licenses from a centralized location. CSSM helps you manage current requirements and review usage trends to plan for future license requirements.

You can access the CSSM Web UI at https://software.cisco.com. Under the Smart Software Manager click the Manage Licenses link.

The Supported Topologies in this document explains the different ways in which you can connect to CSSM.

In CSSM you can:

  • Create, manage, or view virtual accounts.

  • Transfer licenses between virtual accounts or view licenses.

  • Transfer, remove, or view product instances.

  • Run reports against your virtual accounts.

  • Modify your email notification settings.

  • View overall account information.

Controller

A management application or service that manages multiple product instances.

On Cisco Catalyst Access, Core, and Aggregation Switches, Cisco DNA Center is the supported controller. Information about the controller, product instances that support the controller, and minimum required software versions on the controller and on the product instance is provided below:

Table 2. Support Information for Controller: Cisco DNA Center

Minimum Required Cisco DNA Center Version for Smart Licensing Using Policy1

Minimum Required Cisco IOS XE Version2

Supported Product Instances

Cisco DNA Center Release 2.2.2

Cisco IOS XE Amsterdam 17.3.2a

  • Cisco Catalyst 9200 Series Switches

  • Cisco Catalyst 9300 Series Switches

  • Cisco Catalyst 9400 Series Switches

  • Cisco Catalyst 9500 Series Switches

  • Cisco Catalyst 9600 Series Switches

1 The minimum required software version on the controller. This means support continues on all subsequent releases - unless noted otherwise
2 The minimum required software version on the product instance. This means support continues on all subsequent releases - unless noted otherwise.

For more information about Cisco DNA Center, see the support page at: https://www.cisco.com/c/en/us/support/cloud-systems-management/dna-center/series.html.

SSM On-Prem

Smart Software Manager On-Prem (SSM On-Prem) is an asset manager, which works in conjunction with CSSM. It enables you to administer products and licenses on your premises instead of having to directly connect to CSSM.

Information about the required software versions to implement Smart Licensing Using Policy with SSM On-Prem, is provided below:

Minimum Required SSM On-Prem Version for Smart Licensing Using Policy3

Minimum Required Cisco IOS XE Version4

Supported Product Instances

Version 8, Release 202102

Cisco IOS XE Amsterdam 17.3.3

  • Cisco Catalyst 9200 Series Switches

  • Cisco Catalyst 9300 Series Switches

  • Cisco Catalyst 9400 Series Switches

  • Cisco Catalyst 9500 Series Switches

  • Cisco Catalyst 9600 Series Switches

3 The minimum required SSM On-Prem version. This means support continues on all subsequent releases - unless noted otherwise
4 The minimum required software version on the product instance. This means support continues on all subsequent releases - unless noted otherwise.

For more information about SSM On-Prem, see Smart Software Manager On-Prem on the Software Download page. Hover over the .iso image to display the documentation links.

Concepts

This section explains the key concepts of Smart Licensing Using Policy.

License Enforcement Types

A given license belongs to one of three enforcement types. The enforcement type indicates if the license requires authorization before use, or not.

  • Unenforced or Not Enforced

    Unenforced licenses do not require authorization before use in air-gapped networks, or registration, in connected networks. The terms of use for such licenses are as per the end user license agreement (EULA).

    Network Essentials, Network Advantage, Digital Network Architecture (DNA) Essentials, and DNA Advantage are all examples of unenforced licenses supported on Cisco Catalyst Access, Core, and Aggregation Switches.

  • Enforced

    Licenses that belong to this enforcement type require authorization before use. The required authorization is in the form of an authorization code, which must be installed in the corresponding product instance.

    An example of an enforced license is the Media Redundancy Protocol (MRP) Client license, which is available on Cisco’s Industrial Ethernet Switches.

  • Export-Controlled

    Licenses that belong to this enforcement type are export-restricted by U.S. trade-control laws and these licenses require authorization before use. The required authorization code must be installed in the corresponding product instance for these licenses as well. Cisco may pre-install export-controlled licenses when ordered with hardware purchase.

    An example of an export-controlled license is the Export Control Key for High Security (HSECK9), which is available on certain Cisco Catalyst Access, Core, and Aggregation Switches.

License Duration

This refers to the duration or term for which a purchased license is valid. A given license may belong to any one of the enforcement types mentioned above and be valid for the following durations:

  • Perpetual: There is no expiration date for such a license.

    Network Essentials, Network Advantage, and HSECK9 are examples of perpetual licenses.

  • Subscription: The license is valid only until a certain date.

    DNA Essentials and DNA Advantage licenses are examples of subscription licenses.

Authorization Code

The Smart Licensing Authorization Code (SLAC) allows activation and continued use of a license that is export-controlled or enforced. The authorization code is installed on the product instance. If an authorization code is required for the license you are using, you can request one from CSSM.

You can remove and return a SLAC to your CSSM license pool. But in order to do this, you must first disable the feature that uses the license. You cannot return a SLAC if it is in-use.

Table 3. Licenses that Require SLAC, Supported Platforms, and Releases

Export-Controlled License or Key Which Requires SLAC

Enforcement Type

Supporting Products and When Support was Introduced

HSECK9

Export-controlled

Cisco Catalyst 9300X Series Switches, starting from Cisco IOS XE Bengaluru 17.6.2.

Cisco Catalyst 9500X Series Switches, starting from Cisco IOS XE Cupertino 17.8.1.

Cisco Catalyst 9600 Series 40-Port 50G, 2-Port 200G, 2-Port 400G Line Card (C9600-LC-40YL4CD) with Cisco Catalyst 9600 Series Supervisor Engine 2 (C9600X-SUP-2), starting from Cisco IOS XE Cupertino 17.8.1.

For detailed information about the HSECK9 key on supported products, see the Export Control Key for High Security section of the Available Licenses chapter in this guide.

SLR Authorization Codes

If you are upgrading from an earlier licensing model to Smart Licensing Using Policy, you may have a Specific License Reservation (SLR) with its own authorization code. An SLR authorization code is supported after upgrade to Smart Licensing Using Policy.


Note


While existing SLRs are carried over after upgrade, you cannot request a new SLR in the Smart Licensing Using Policy environment, because the notion of “reservation” does not apply. If you are in an air-gapped network, the No Connectivity to CSSM and No CSLU topology applies instead.


For more information about how the SLR authorization code is handled, see Upgrades. If you want to return an SLR authorization code, see Returning an Authorization Code.

Policy

A policy provides the product instance with these reporting instructions:

  • License usage report acknowledgement requirement (Reporting ACK required): The license usage report is known as a RUM Report and the acknowledgement is referred to as an ACK (See RUM Report and Report Acknowledgement). This is a yes or no value which specifies if the report for this product instance requires CSSM acknowledgement or not. The default policy is always set to “yes”.

  • First report requirement (days): The first report must be sent within the duration specified here.

    If the value here is zero, no first report is required.

  • Reporting frequency (days): The subsequent report must be sent within the duration specified here.

    If the value here is zero, it means no further reporting is required unless there is a usage change.

  • Report on change (days): In case of a change in license usage, a report must be sent within the duration specified here.

    If the value here is zero, no report is required on usage change.

    If the value here is not zero, reporting is required after the change is made. All the scenarios listed below count as changes in license usage on the product instance:

    • Changing licenses consumed (includes changing to a different license, and, adding or removing a license).

    • Going from consuming zero licenses to consuming one or more licenses.

    • Going from consuming one or more licenses to consuming zero licenses.


Note


If a product instance has never consumed a license, reporting is not required even if the policy has a non-zero value for any of the reporting requirements (First report requirement, Reporting frequency, Report on change).
Understanding Policy Selection

CSSM determines the policy that is applied to a product instance. Only one policy is in use at a given point in time. The policy and its values are based on a number of factors, including the licenses being used.

Cisco default is the default policy that is always available in the product instance. If no other policy is applied, the product instance applies this default policy. The table below (Table 1) shows the Cisco default policy values.

While you cannot configure a policy, you can request for a customized one, by contacting the Cisco Global Licensing Operations team. Go to Support Case Manager. Click OPEN NEW CASE > Select Software Licensing. The licensing team will contact you to start the process or for any additional information. Customized policies are also made available through your Smart account in CSSM.


Note


To know which policy is applied (the policy in-use) and its reporting requirements, enter the show license all command in privileged EXEC mode.


Table 4. Policy: Cisco default

Policy: Cisco default

Default Policy Values

Export (Perpetual/Subscription)

Note


Applied only to licenses with enforcement type "Export-Controlled".

Reporting ACK required: Yes

First report requirement (days): 0

Reporting frequency (days): 0

Report on change (days): 0

Enforced (Perpetual/Subscription)

Note


Applied only to licenses with enforcement type "Enforced".

Reporting ACK required: Yes

First report requirement (days): 0

Reporting frequency (days): 0

Report on change (days): 0

Unenforced/Non-Export Perpetual5

Reporting ACK required: Yes

First report requirement (days): 365

Reporting frequency (days): 0

Report on change (days): 90

Unenforced/Non-Export Subscription

Reporting ACK required: Yes

First report requirement (days): 90

Reporting frequency (days): 90

Report on change (days): 90

5 For Unenforced/Non-Export Perpetual: the default policy’s first report requirement (within 365 days) applies only if you have purchased hardware or software from a distributor or partner.

RUM Report and Report Acknowledgement

A Resource Utilization Measurement report (RUM report) is a license usage report, which fulfils reporting requirements as specified by the policy. RUM reports are generated by the product instance and consumed by CSSM. The product instance records license usage information and all license usage changes in an open RUM report. At system-determined intervals, open RUM reports are closed and new RUM reports are opened to continue recording license usage. A closed RUM report is ready to be sent to CSSM.

A RUM acknowledgement (RUM ACK or ACK) is a response from CSSM and provides information about the status of a RUM report. Once the ACK for a report is available on the product instance, it indicates that the corresponding RUM report is no longer required and can be deleted.

The reporting method, that is, how a RUM report is sent to CSSM, depends on the topology you implement.

CSSM displays license usage information as per the last received RUM report.

A RUM report may be accompanied by other requests, such as a trust code request, or a SLAC request. So in addition to the RUM report IDs that have been received, an ACK from CSSM may include authorization codes, trust codes, and policy files.

The policy that is applied to a product instance determines the following aspects of the reporting requirement:

  • Whether a RUM report is sent to CSSM and the maximum number of days provided to meet this requirement.

  • Whether the RUM report requires an acknowledgement (ACK) from CSSM.

  • The maximum number of days provided to report a change in license consumption.

RUM report generation, storage, and management

Starting with Cisco IOS XE Cupertino 17.7.1, RUM report generation and related processes have been optimized and enhanced as follows:

  • You can display the list of all available RUM reports on a product instance (how many there are, the processing state each one is in, if there are errors in any of them, and so on). This information is available in the show license rum , show license all , and show license tech privileged EXEC commands. For detailed information about the fields displayed in the output, see the command reference of the corresponding release.

  • RUM reports are stored in a new format that reduces processing time, and reduces memory usage. In order to ensure that there are no usage reporting inconsistencies resulting from the difference in the old and new formats, we recommend that you send a RUM report in the method that will apply to your topology, in these situations:

    When you upgrade from an earlier release supporting Smart Licensing Using Policy, to Cisco IOS XE Cupertino 17.7.1 or a later release.

    When you downgrade from Cisco IOS XE Cupertino 17.7.1 or a later release to an earlier release supporting Smart Licensing Using Policy.

  • To ensure continued disk space and memory availability, the product instance detects and triggers deletion of RUM reports that are deemed eligible.

Trust Code

A UDI-tied public key, which the product instance uses to

  • Sign a RUM report. This prevents tampering and ensures data authenticity.

  • Enable secure communication with CSSM.

There are multiple ways to obtain a trust code.

  • From Cisco IOS XE Cupertino 17.7.1, a trust code is factory-installed for all new orders.


    Note


    A factory-installed trust code cannot be used for communication with CSSM.


  • A trust code can obtained from CSSM, using an ID token.

    Here you generate an ID token in the CSSM Web UI to obtain a trust code and install it on the product instance. You must overwrite the factory-installed trust code if there is one. If a product instance is directly connected to CSSM, use this method to enable the product instance to communicate with CSSM in a secure manner. This method of obtaining a trust code is applicable to all the options of directly connecting to CSSM. For more information, see Connected Directly to CSSM.

  • From Cisco IOS XE Cupertino 17.7.1, a trust code is automatically obtained in topologies where the product instance initiates the sending of data to CSLU and in topologies where the product instance is in an air-gapped network.

    From Cisco IOS XE Cupertino 17.9.1, a trust code is automatically obtained in topologies where CSLU initiates the retrieval of data from the product instance.

    If there is a factory-installed trust code, it is automatically overwritten. A trust code obtained this way can be used for secure communication with CSSM.

    Refer to the corresponding topology description and workflow to know how the trust code is requested and installed in each scenario Supported Topologies.

If a trust code is installed on the product instance, the output of the show license status command displays a timestamp in the Trust Code Installed: field.

Supported Topologies

This section describes the various ways in which you can implement Smart Licensing Using Policy. For each topology, refer to the accompanying overview to know the how the set-up is designed to work, and refer to the considerations and recommendations, if any.

After Topology Selection

After you have selected a topology, see How to Configure Smart Licensing Using Policy: Workflows by Topology. These workflows are only for new deployments. They provide the simplest and fastest way to implement a topology.

If you are migrating from an existing licensing model, see Migrating to Smart Licensing Using Policy.

If you want to perform any additional configuration tasks, for instance, if you want to configure a different license, or use an add-on license, or if you want to configure a narrower reporting interval, see the Task Library for Smart Licensing Using Policy. Check the "Supported Topologies" where provided, before you proceed.

Connected to CSSM Through CSLU

Overview:

Here, product instances in the network are connected to CSLU, and CSLU becomes the single point of interface with CSSM. A product instance can be configured to push the required information to CSLU. Alternatively, CSLU can be set-up to pull the required information from a product instance at a configurable frequency.

Product instance-initiated communication (push): A product instance initiates communication with CSLU, by connecting to a REST endpoint in CSLU. Data that is sent includes RUM reports and requests for authorization codes, UDI-tied trust codes, and policies. You can configure the product instance to automatically send RUM reports to CSLU at required intervals. This is the default method for a product instance.

CSLU-initiated communication (pull): To initiate the retrieval of information from a product instance, CSLU uses NETCONF, or RESTCONF, or gRPC with YANG models, or native REST APIs, to connect to the product instance. Supported workflows include retrieving RUM reports from the product instance and sending the same to CSSM, authorization code installation, UDI-tied trust code installation, and application of policies.

Figure 1. Topology: Connected to CSSM Through CSLU
Considerations or Recommendations:

Choose the method of communication depending on your network’s security policy.

Release-Wise Changes and Enhancements:

This section outlines important release-wise software changes and enhancements that affect this topology.

From Cisco IOS XE Cupertino 17.7.1:

  • Trust code request and installation

    If a trust code is not available on the product instance, the product instance detects and automatically includes a request for one, as part of a RUM report. A corresponding ACK from CSSM includes the trust code. If there is an existing factory-installed trust code, it is automatically overwritten. A trust code obtained this way can be used for communication with CSSM.

    This is supported in a standalone, as well as a High Availability set-up. In a High Availability set-up, the active product instance requests the trust code for all connected product instances where a trust code is not available.

    In this release, this enhancement applies only to the product instance-initiated mode.

From Cisco IOS XE Cupertino 17.9.1:

  • Trust code request and installation

    From this release, trust code request and installation is supported in the CSLU-initiated mode as well.

  • RUM report throttling

    In the product instance-initiated mode, the minimum reporting frequency is throttled to one day. This means the product instance does not send more than one RUM report a day. This resolves the problem of too many RUM reports being generated and sent for certain licenses. It also resolves the memory-related issues and system slow-down caused by an excessive generation of RUM reports.

    You can override the throttling restriction by entering the license smart sync command in privileged EXEC mode.

    RUM report throttling also applies to the Cisco IOS XE Amsterdam 17.3.6 and later releases of the 17.3.x train, and Cisco IOS XE Bengaluru 17.6.4 and later releases of the 17.6.x train. From 17.9.1, RUM report throttling is applicable to all subsequent releases.

Where to Go Next:

To implement this topology, see Workflow for Topology: Connected to CSSM Through CSLU.

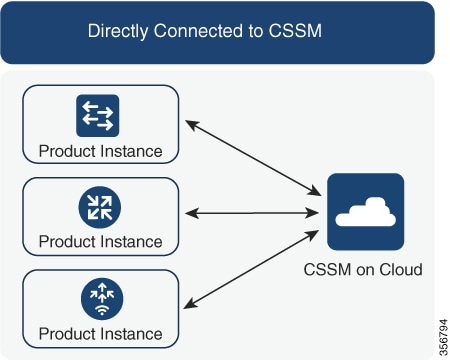
Connected Directly to CSSM

Overview:

This topology is available in the earlier version of Smart Licensing and continues to be supported with Smart Licensing Using Policy.

Here, you establish a direct and trusted connection from a product instance to CSSM. The direct connection, requires network reachability to CSSM. For the product instance to then exchange messages and communicate with CSSM, configure one of the transport options available with this topology (described below). Lastly, the establishment of trust requires the generation of a token from the corresponding Smart Account and Virtual Account in CSSM, and installation on the product instance.


Note


A factory-installed trust code cannot be used for communication with CSSM. This means that for this topology, you must generate an ID token in the CSSM Web UI to obtain a trust code and install it on the product instance. You must overwrite the factory-installed trust code if there is one. Also see Trust Code.


You can configure a product instance to communicate with CSSM in the following ways:

  • Use Smart transport to communicate with CSSM

    Smart transport is a transport method where a Smart Licensing (JSON) message is contained within an HTTPs message, and exchanged between a product instance and CSSM, to communicate. The following Smart transport configuration options are available:

    • Smart transport: In this method, a product instance uses a specific Smart transport licensing server URL. This must be configured exactly as shown in the workflow section.

    • Smart transport through an HTTPs proxy: In this method, a product instance uses a proxy server to communicate with the licensing server, and eventually, CSSM.

  • Use Call Home to communicate with CSSM.

    Call Home provides e-mail-based and web-based notification of critical system events. This method of connecting to CSSM is available in the earlier Smart Licensing environment, and continues to be available with Smart Licensing Using Policy. The following Call Home configuration options are available:

    • Direct cloud access: In this method, a product instance sends usage information directly over the internet to CSSM; no additional components are needed for the connection.

    • Direct cloud access through an HTTPs proxy: In this method, a product instance sends usage information over the internet through a proxy server - either a Call Home Transport Gateway or an off-the-shelf proxy (such as Apache) to CSSM.

Figure 2. Topology: Connected Directly to CSSM
Considerations or Recommendations:

Smart transport is the recommended transport method when directly connecting to CSSM. This recommendation applies to:

  • New deployments.

  • Earlier licensing models. Change configuration after migration to Smart Licensing Using Policy.

  • Registered licenses that currently use the Call Home transport method. Change configuration after migration to Smart Licensing Using Policy.

  • Evaluation or expired licenses in an earlier licensing model. Change configuration after migration to Smart Licensing Using Policy.

To change configuration after migration, see Workflow for Topology: Connected Directly to CSSM > Product Instance Configuration > Configure a connection method and transport type > Option 1.

Release-Wise Changes and Enhancements:

This section outlines important release-wise software changes and enhancements that affect this topology.

From Cisco IOS XE Cupertino 17.9.1:

  • RUM report throttling

    The minimum reporting frequency for this topology, is throttled to one day. This means the product instance does not send more than one RUM report a day. This resolves the problem of too many RUM reports being generated and sent for certain licenses. It also resolves the memory-related issues and system slow-down caused by an excessive generation of RUM reports.

    You can override the throttling restriction by entering the license smart sync command in privileged EXEC mode.

    RUM report throttling also applies to the Cisco IOS XE Amsterdam 17.3.6 and later releases of the 17.3.x train, and Cisco IOS XE Bengaluru 17.6.4 and later releases of the 17.6.x train. From 17.9.1, RUM report throttling is applicable to all subsequent releases.

Where to Go Next:

To implement this topology, see Workflow for Topology: Connected Directly to CSSM.

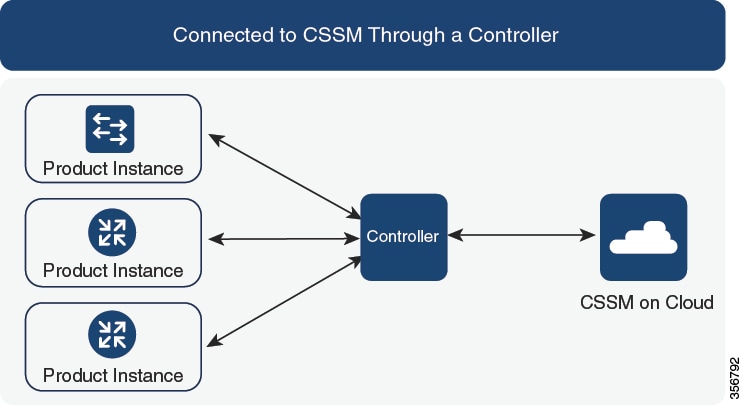
Connected to CSSM Through a Controller

When you use a controller to manage a product instance, the controller connects to CSSM, and is the interface for all communication to and from CSSM. The supported controller for Cisco Catalyst Access, Core, and Aggregation Switches is Cisco DNA Center.

Overview

If a product instance is managed by Cisco DNA Center as the controller, the product instance records license usage and saves the same, but it is the Cisco DNA Center that initiates communication with the product instance to retrieve RUM reports, report to CSSM, and return the ACK for installation on the product instance.

All product instances that must be managed by Cisco DNA Center must be part of its inventory and must be assigned to a site. Cisco DNA Center uses the NETCONF protocol to provision configuration and retrieve the required information from the product instance - the product instance must therefore have NETCONF enabled, to facilitate this.

In order to meet reporting requirements, Cisco DNA Center retrieves the applicable policy from CSSM and provides the following reporting options:

  • Ad hoc reporting: You can trigger an ad hoc report when required.

  • Scheduled reporting: Corresponds with the reporting frequency specified in the policy and is automatically handled by Cisco DNA Center.


Note


Ad hoc reporting must be performed at least once before a product instance is eligible for scheduled reporting.


The first ad hoc report enables Cisco DNA Center to determine the Smart Account and Virtual Account to which subsequent RUM reports must be uploaded. You will receive notifications if ad hoc reporting for a product instance has not been performed even once.

A trust code is not required.

Figure 3. Topology: Connected to CSSM Through a Controller
Considerations or Recommendations:

This is the recommended topology if you are using Cisco DNA Center.


Note


The HSECK9 key, which is an export-controlled license is supported on certain models of the Cisco Catalyst Access, Core, and Aggregation Switches (See Authorization Code). If you are using a product instance where an HSECK9 key is supported, note that the Cisco DNA Center GUI does not provide an option to generate a SLAC.
Where to Go Next:

To implement this topology, see Workflow for Topology: Connected to CSSM Through a Controller

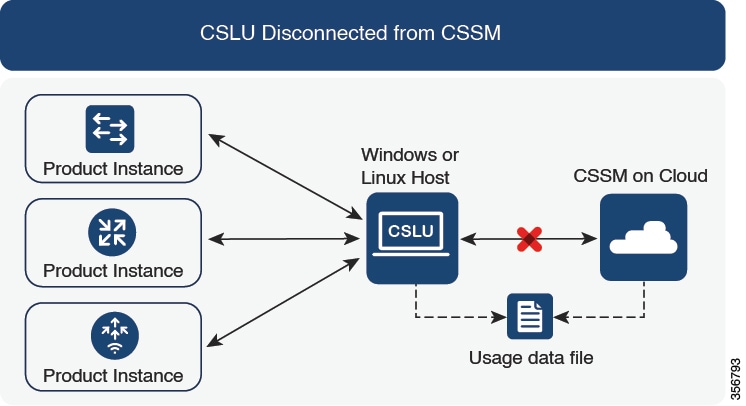
CSLU Disconnected from CSSM

Overview:

Here, a product instance communicates with CSLU, and you have the option of implementing product instance-initiated communication or CSLU-initiated communication (as in the Connected to CSSM Through CSLU topology). The other side of the communication, between CSLU and CSSM, is offline. CSLU provides you with the option of working in a mode that is disconnected from CSSM.

Communication between CSLU and CSSM is sent and received in the form of signed files that are saved offline and then uploaded to or downloaded from CSLU or CSSM, as the case may be.

Figure 4. Topology: CSLU Disconnected from CSSM
Considerations or Recommendations:

Choose the method of communication depending on your network’s security policy.

Release-Wise Changes and Enhancements:

This section outlines important release-wise software changes and enhancements that affect this topology.

From Cisco IOS XE Cupertino 17.7.1:

  • Trust code request and installation

    If a trust code is not available on the product instance, the product instance detects and automatically includes a request for one, as part of a RUM report that is sent to CSLU, which you upload to CSSM. The ACK that you download from CSSM includes the trust code. If there is an existing factory-installed trust code, it is automatically overwritten. A trust code obtained this way can be used for communication with CSSM.

    This is supported in a standalone, as well as a High Availability set-up. In a High Availability set-up, the active product instance requests the trust code for members or standbys where a trust code is not available.

    In this release, this enhancement applies only to the product instance-initiated mode.

From Cisco IOS XE Cupertino 17.9.1:

  • Trust code request and installation

    From this release, trust code request and installation is supported in the CSLU-initiated mode as well.h

  • RUM report throttling

    In the product instance-initiated mode, the minimum reporting frequency is throttled to one day. This means the product instance does not send more than one RUM report a day. This resolves the problem of too many RUM reports being generated and sent for certain licenses. It also resolves the memory-related issues and system slow-down caused by an excessive generation of RUM reports.

    You can override the throttling restriction by entering the license smart sync command in privileged EXEC mode.

    RUM report throttling also applies to the Cisco IOS XE Amsterdam 17.3.6 and later releases of the 17.3.x train, and Cisco IOS XE Bengaluru 17.6.4 and later releases of the 17.6.x train. From 17.9.1, RUM report throttling is applicable to all subsequent releases.

Where to Go Next:

To implement this topology, see Workflow for Topology: CSLU Disconnected from CSSM.

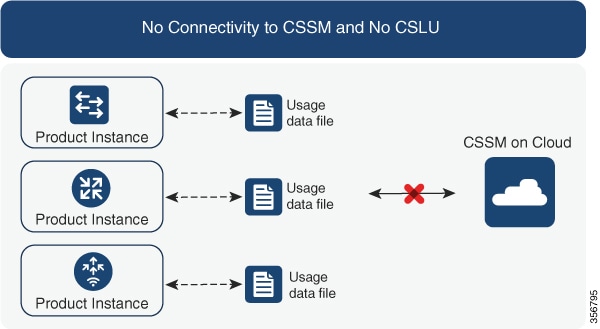
No Connectivity to CSSM and No CSLU

Overview:

Here you have a product instance and CSSM disconnected from each other, and without any other intermediary utilities or components. All communication is in the form of uploaded and downloaded files. These files can be RUM reports, requests for UDI-tied trust codes and SLAC request or return files.

Figure 5. Topology: No Connectivity to CSSM and No CSLU
Considerations or Recommendations:

This topology is suited to a high-security deployment where a product instance cannot communicate online, with anything outside its network.

Release-Wise Changes and Enhancements:

This section outlines important release-wise software changes and enhancements that affect this topology.

From Cisco IOS XE Cupertino 17.7.1:

  • Trust code request and installation

    If a trust code is not available on the product instance, the product instance automatically includes a trust code request in the RUM report that you save, to upload to CSSM. The ACK that you then download from CSSM includes the trust code.

    If there is a factory-installed trust code, it is automatically overwritten when you install the ACK. A trust code obtained this way can be used for secure communication with CSSM.

    This is supported in a standalone, as well as a High Availability set-up. In a High Availability set-up, the active product instance requests the trust code for all connected product instances where a trust code is not available.

  • SLAC request and installation

    You can generate a SLAC request and save it in a file on the product instance. The saved file includes all the required details (UDI, license information etc). With this method you do not have to gather and enter the required details on the CSSM Web UI to generate a SLAC. You have to upload the SLAC request file to CSSM and download the file containing the SLAC code and install it on the product instance - as you would a RUM report and ACK.

    Similarly, when you return a SLAC you do not have to locate the product instance in the correct Virtual Account. Simply upload the SLAC return file, as you would a RUM report.

Where to Go Next:

To implement this topology, see Workflow for Topology: No Connectivity to CSSM and No CSLU.

SSM On-Prem Deployment

Overview:

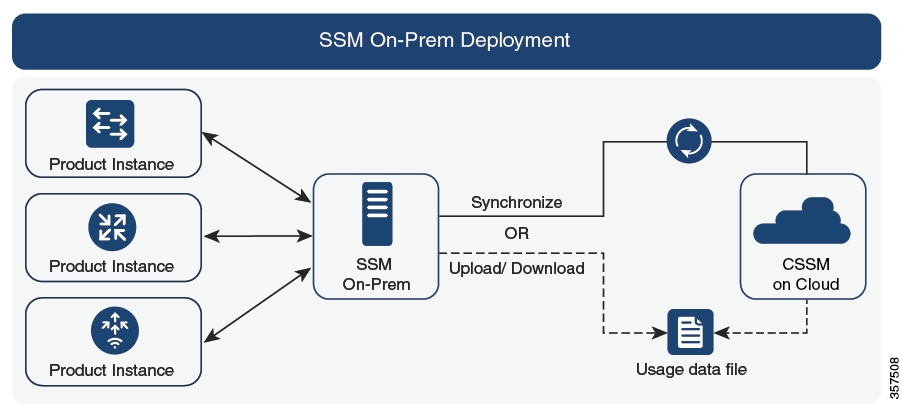
SSM On-Prem is designed to work as an extension of CSSM that is deployed on your premises.

Here, a product instance is connected to SSM On-Prem and SSM On-Prem becomes the single point of interface with CSSM. Each instance of SSM On-Prem must be made known to CSSM through a mandatory registration and synchronization of the local account in SSM On-Prem, with a Virtual Account in CSSM.

When you deploy SSM On-Prem to manage a product instance, the product instance can be configured to push the required information to SSM On-Prem. Alternatively, SSM On-Prem can be set-up to pull the required information from a product instance at a configurable frequency.

  • Product instance-initiated communication (push): The product instance initiates communication with SSM On‐Prem, by connecting to a REST endpoint in SSM On‐Prem. Data that is sent includes RUM reports and requests for authorization codes, trust codes, and policies.

    Options for communication between the product instance and SSM On-Prem in this mode:

    • Use a CLI command to push information to SSM On-Prem as and when required.

    • Use a CLI command and configure a reporting interval, to automatically send RUM reports to SSM On‐Prem at a scheduled frequency.

  • SSM On-Prem-initiated communication (pull): To initiate the retrieval of information from a product instance, SSM On‐Prem NETCONF, RESTCONF, and native REST API options, to connect to the product instance. Supported workflows include receiving RUM reports from the product instance and sending the same to CSSM, authorization code installation, trust code installation, and application of policies.

    Options for communication between the product instance and SSM On-Prem in this mode:

    • Collect usage information from one or more product instances as and when required (on-demand).

    • Collect usage information from one or more product instances at a scheduled frequency.

In SSM On-Prem, the reporting interval is set to the default policy on the product instance. You can change this, but only to report more frequently (a narrower interval), or you can install a custom policy if available.

After usage information is available in SSM On-Prem, you must synchronize the same with CSSM, to ensure that the product instance count, license count and license usage information is the same on both, CSSM and SSM On‐Prem. Options for usage synchronization between SSM On-Prem and CSSM – for the push and pull mode:

  • Perform ad-hoc synchronization with CSSM (Synchronize now with Cisco).

  • Schedule synchronization with CSSM for specified times.

  • Communicate with CSSM through signed files that are saved offline and then upload to or download from SSM On-Prem or CSSM, as the case may be.


Note


This topology involves two different kinds of synchronization between SSM On-Prem and CSSM. The first is where the local account is synchronized with CSSM - this is for the SSM On-Prem instance to be known to CSSM and is performed by using the Synchronization widget in SSM On-Prem. The second is where license usage is synchronized with CSSM, either by being connected to CSSM or by downloading and uploading files. You must synchronize the local account before you can synchronize license usage.


Figure 6. Topology: SSM On-Prem Deployment
Considerations or Recommendations:

This topology is suited to the following situations:

  • If you want to manage your product instances on your premises, as opposed communicating directly with CSSM for this purpose.

  • If your company’s policies prevent your product instances from reporting license usage directly to Cisco (CSSM).

  • If your product instances are in an air-gapped network and cannot communicate online, with anything outside their network.

Apart from support for Smart Licensing Using Policy, some of the key benefits of SSM On‐Prem Version 8 include:

  • Multi-tenancy: One tenant constitutes one Smart Account-Virtual Account pair. SSM On-Prem enables you to manage multiple pairs. Here you create local accounts that reside in SSM On-Prem. Multiple local accounts roll-up to a Smart Account-Virtual Account pair in CSSM. For more information, see the Cisco Smart Software Manager On‐Prem User Guide > About Accounts and Local Virtual Accounts.


    Note


    The relationship between CSSM and SSM On‐Prem instances is still one‐to‐one.
  • Scale: Supports up to a total of 300,000 product instances

  • High-Availability: Enables you to run two SSM On‐Prem servers in the form of an active-standby cluster. For more information, see the Cisco Smart Software On‐Prem Installation Guide > Appendix 4. Managing a High Availability (HA) Cluster in Your System.

    High-Availability deployment is supported in the SSM On‐Prem console and the required command details are available in the Cisco Smart Software On‐Prem Console Guide.

  • Options for online and offline connectivity to CSSM.

SSM On-Prem Limitations:

  • Proxy support for communication with CSSM, for the purpose of license usage synchronization is available only from Version 8 202108 onwards. The use of a proxy for local account synchronization, which is performed by using the Synchronization widget, is available from the introductory SSM On-Prem release where Smart Licensing Using Policy is supported.

  • SSM On-Prem-initiated communication is not supported on a product instance that is in a Network Address Translation (NAT) set-up. You must use product instance-initiated communication, and further, you must enable SSM On-Prem to support a product instance that is in a NAT setup. Details are provided in the workflow for this topology.

Release-Wise Changes and Enhancements:

This section outlines important release-wise software changes and enhancements that affect this topology.

From Cisco IOS XE Cupertino 17.9.1:

  • RUM report throttling

    In the product instance-initiated mode, the minimum reporting frequency is throttled to one day. This means the product instance does not send more than one RUM report a day. This resolves the problem of too many RUM reports being generated and sent for certain licenses. It also resolves the memory-related issues and system slow-down caused by an excessive generation of RUM reports.

    You can override the throttling restriction by entering the license smart sync command in privileged EXEC mode.

    RUM report throttling also applies to the Cisco IOS XE Amsterdam 17.3.6 and later releases of the 17.3.x train, and Cisco IOS XE Bengaluru 17.6.4 and later releases of the 17.6.x train. From 17.9.1, RUM report throttling is applicable to all subsequent releases.

Where to Go Next:

To implement this topology, see Workflow for Topology: SSM On-Prem Deployment.

If you are migrating from an existing version of SSM On-Prem, the sequence in which you perform the various upgrade-related activities is crucial. See Migrating to a Version of SSM On-Prem That Supports Smart Licensing Using Policy.

Interactions with Other Features

High Availability

This section explains considerations that apply to a High Availability configuration, when running a software version that supports Smart Licensing Using Policy. The following High Availability setups are within the scope of this document:

A device stack with an active, a standby and one or more members.

A dual-supervisor setup, where two supervisor modules are installed in a chassis, one being the active and the other, the standby.

A dual-chassis setup6 (could be fixed or modular), with the active in one chassis and a standby in the other chassis.

A dual-chassis and dual-supervisor setup7, on a modular chassis. Two chassis are involved here as well. An active supervisor module is in one chasses and a standby supervisor module in a second chassis. The "dual-supervisor" aspect refers to an additional in-chassis standby supervisor in just one of the chassis, which is the minimum requirement, or an in-chassis standby supervisor in each chassis.

Authorization Code Requirements in a High Availability Setup

The number of SLACs required in a High Availability setup, corresponds with the number of UDIs. Tabled below are the stacking and High Availability setups that are supported when using an export-controlled license (HSECK9 key), and the SLAC requirements in each setup.

Product Instance Supporting HSECK9 Key

Supported High Availability Setup When Using HSECK9 Key

SLAC Requirements in the Setup

Cisco Catalyst 9300X Series Switches

A device stack with an active, a standby and one or more members.

The SLAC requirement corresponds with the number of UDIs on which you want to configure the cryptographic feature. Each such UDI in the stack requires one SLAC.

At a minimum, only the active requires a SLAC. But for uninterrupted use of the cryptographic feature in the event of a switchover, we recommend that you install SLAC on the standby also.

Cisco Catalyst 9500X Series Switches.

None.

Not applicable. High Availability is not supported on Cisco Catalyst 9500X Series Switches.

C9600-LC-40YL4CD line card with supervisor module C9600X-SUP-2

A dual-supervisor setup, where two supervisor modules are installed in a chassis, one being the active and the other, the standby.

No other High Availability setup is supported when using an HSECK9 key.

The SLAC requirement corresponds with the number of UDIs.

Here the UDI is on the chassis and not the individual supervisor modules. (The UDIs of the active and standby supervisor modules are the same).

One SLAC is required for each chassis UDI, regardless of the number of supervisors installed.

Trust Code Requirements in a High Availability setup

The number of trust codes required depends on the number of UDIs. The active product instance can submit requests for all devices in the High Availability setup and install all the trust codes that are returned in an ACK.

Policy Requirements in a High Availability setup

There are no policy requirements that apply exclusively to a High Availability setup. As in the case of a standalone product instance, only one policy exists in a High Availability setup as well, and this is on the active. The policy on the active applies to the standby or members in the setup.

Product Instance Functions in a High Availability setup

This section explains general product instance functions in a High Availability setup, as well as what the product instance does when a new standby or member is added to an existing High Available setup.

For authorization and trust codes: The active product instance can request (if required) and install authorization codes and trust codes for standbys and members.

For policies: The active product instance synchronizes with the standby.

For reporting: Only the active product instance reports usage. The active reports usage information for all devices (standbys or members – as applicable) in the High Availability setup.

In addition to scheduled reporting, the following events trigger reporting:

  • The addition or removal of a standby. The RUM report includes information about the standby that was added or removed.

  • The addition or removal of a member, including stack merge and stack split events. The RUM report includes information about member that was added or removed.

  • A switchover.

  • A reload.

When one of the above events occur, the “Next report push” date of the show license status privileged EXEC command is updated. But it is the implemented topology and associated reporting method that determine if the report is sent by the product instance or not. For example, if you have implemented a topology where the product instance is disconnected (Transport Type is Off), then the product instance does not send RUM reports even if the “Next report push” date is updated.

For a new member or standby addition:

  • A product instance that is connected to CSLU, does not take any further action.

  • A product instance that is directly connected to CSSM, performs trust synchronization. Trust synchronization involves the following:

    Installation of trust code on the standby or member if not installed already.

    If a trust code is already installed, the trust synchronization process ensures that the new standby or member is in the same Smart Account and Virtual Account as the active. If it is not, the new standby or member is moved to the same Smart Account and Virtual Account as the active.

    Installation of an authorization code, policy, and purchase information, if applicable

    Sending of a RUM report with current usage information.

Upgrades

This section explains the following aspects:

  • Migrating from earlier licensing models to Smart Licensing Using Policy.

    Earlier licensing models include Smart Licensing, Specific License Reservation (SLR), Right-to-Use Licensing (RTU), and evaluation or expired licenses from earlier licensing models. The Migrating to Smart Licensing Using Policy section provides details and examples for migration scenarios.

    Device-led conversion is not supported for migration to Smart Licensing Using Policy.

  • Upgrading in the Smart Licensing Using Policy environment - where the software version you are upgrading from and the software version you are upgrading to, both support Smart Licensing Using Policy.

Refer to the corresponding sections:

Identifying the Current Licensing Model Before Upgrade

Before you upgrade to Smart Licensing Using Policy, if you want to know the current licensing model that is effective on the product instance, enter the show license all command in privileged EXEC mode. This command displays information about the current licensing model for all except the RTU licensing model. The show license right-to-use privileged EXEC command displays license information only if the licensing model is RTU.

How Upgrade Affects Enforcement Types for Existing Licenses

When you upgrade to a software version which supports Smart Licensing Using Policy, the way existing licenses are handled, depends primarily on the license enforcement type.

  • An unenforced license that was being used before upgrade, continues to be available after the upgrade. This includes all licenses from all earlier licensing models.

    • Smart Licensing.

    • Specific License Reservation (SLR), which has an accompanying authorization code. The authorization code continues to be valid after upgrade to Smart Licensing Using Policy and authorizes existing license consumption.

    • Right-to-Use (RTU) Licensing.

    • Evaluation or expired licenses from any of the above mentioned licensing models.

  • An enforced or export-controlled license that was being used before upgrade, continues to be available after upgrade if the required authorization exists.

    An export-controlled license is supported on certain models and only starting from Cisco IOS XE Bengaluru 17.6.2. No export-controlled or enforced licenses were available on any of the Cisco Catalyst Access, Core, and Aggregation Switches prior to this.

How Upgrade Affects Reporting for Existing Licenses

Existing License

Reporting Requirements After Migration to Smart Licensing Using Policy

Right-to-Use (RTU)

Depends on the license being used.

After migration and deployment of a supported topology, in output of the show license usage command, refer to the Next ACK deadline field to know if and when reporting is required.

Specific License Reservation (SLR)

Required only if there is a change in license consumption.

An existing SLR authorization code authorizes existing license consumption after upgrade to Smart Licensing Using Policy.

Smart Licensing (Registered and Authorized licenses): Reporting for these licenses is based on the reporting requirements in the policy.

Depends on the policy.

Evaluation or expired licenses

Based on the reporting requirements of the Cisco default policy.

How Upgrade Affects Transport Type for Existing Licenses

The transport type, if configured in your existing set-up, is retained after upgrade to Smart Licensing Using Policy.

When compared to the earlier version of Smart Licensing, additional transport types are available with Smart Licensing Using Policy. There is also a change in the default transport mode. The following table clarifies how this may affect upgrades:

Transport type Before Upgrade

License or License State Before Upgrade

Transport Type After Upgrade

Default (callhome)

evaluation

cslu (default in Smart Licensing Using Policy)

SLR

off

registered

callhome

smart

evaluation

off

SLR

off

registered

smart

Not applicable

For example, if the existing licensing model is RTU.

Not applicable

For example, if the existing licensing model is RTU.

cslu

How Upgrade Affects the Token Registration Process

In the earlier version of Smart Licensing, a token was used to register and connect to CSSM. ID token registration is not required in Smart Licensing Using Policy. The token generation feature is still available in CSSM, and is used to establish trust when a product instance is directly connected to CSSM. See Connected Directly to CSSM.

Upgrades Within the Smart Licensing Using Policy Environment

This section covers any release-specific considerations or actions that apply when you upgrade the product instance from one release where Smart Licensing Using Policy is supported to another release where Smart Licensing Using Policy is supported.

Starting with Cisco IOS XE Cupertino 17.7.1, RUM reports are stored in a format that reduces processing time. In order to ensure that there are no usage reporting inconsistencies resulting from the differences in the old and new formats, we recommend completing one round of usage reporting as a standard practice when upgrading from an earlier release that supports Smart Licensing Using Policy, to Cisco IOS XE Cupertino 17.7.1 or a later release.

Downgrades

This section provides information about downgrades to an earlier licensing model, for new deployments and existing deployments. It also covers information relevant to downgrades within the Smart Licensing Using Policy environment.

New Deployment Downgrade

This section applies if you had a newly purchased product instance with a software version where Smart Licensing Using Policy was already enabled by default and you want to downgrade to a software version where Smart Licensing Using Policy is not supported.

The outcome of the downgrade depends on whether a trust code was installed while you were still operating in the Smart Licensing Using Policy environment, and further action may be required depending on the release you downgrade to.

If the topology you implemented while in the Smart Licensing Using Policy environment was "Connected Directly to CSSM", then a trust code installation can be expected or assumed, because it is required as part of topology implementation. For any of the other topologies, trust establishment is not mandatory. Downgrading product instances with one of these other topologies will therefore mean that you have to restore licenses to a registered and authorized state by following the procedures that are applicable in the Smart Licensing environment. See Outcome and Action for New Deployment Downgrade to Smart Licensing below.

Table 5. Outcome and Action for New Deployment Downgrade to Smart Licensing

In the Smart Licensing Using Policy Environment

Downgrade to..

Outcome and Further Action

Standalone product instance, connected directly to CSSM, and trust established.

Cisco IOS XE Amsterdam 17.3.1

OR

Cisco IOS XE Gibraltar 16.12.4 and later releases in Cisco IOS XE Gibraltar 16.12.x

OR

Cisco IOS XE Fuji 16.9.6 and later releases in Cisco IOS XE Fuji 16.9.x

No further action is required.

The product instance attempts to renew trust with CSSM after downgrade.

After a successful renewal, licenses are in a registered state and the earlier version of Smart Licensing is effective on the product instance.

Any other release (other than the ones mentioned in the row above) that supports Smart Licensing

Action is required: You must reregister the product instance.

Generate an ID token in the CSSM Web UI and on the product instance, configure the license smart register idtoken idtoken command in global configuration mode.

High Availability set-up, connected directly to CSSM, and trust established.

Any release that supports Smart Licensing

Action is required: You must reregister the product instance.

Generate an ID token in the CSSM Web UI and on the product instance, configure the license smart register idtoken idtoken all command in global configuration mode.

Any other topology. (Connected to CSSM Through CSLU, CSLU Disconnected from CSSM, No Connectivity to CSSM and No CSLU)

Any release that supports Smart Licensing

Action is required.

Restore licenses to a registered and authorized state by following the procedures that are applicable in the Smart Licensing environment.

Upgrading to Smart Licensing Using Policy and Then Downgrading
Downgrades Within the Smart Licensing Using Policy Environment

This section covers any release-specific considerations or actions that apply when you downgrade the product instance from one release where Smart Licensing Using Policy is supported to another release where Smart Licensing Using Policy is supported.

Starting with Cisco IOS XE Cupertino 17.7.1, RUM reports are stored in a format that reduces processing time. In order to ensure that there are no usage reporting inconsistencies resulting from the differences in the old and new formats, we recommend completing one round of usage reporting as a standard practice when downgrading from Cisco IOS XE Cupertino 17.7.1 or a later release to an earlier release supporting Smart Licensing Using Policy.

How to Configure Smart Licensing Using Policy: Workflows by Topology

This section provides the simplest and fastest way to implement a topology.


Note


These workflows are meant for new deployments only. If you are migrating from an existing licensing model, see Migrating to Smart Licensing Using Policy.


Workflow for Topology: Connected to CSSM Through CSLU

Depending on whether you want to implement a product instance-initiated or CSLU-initiated method of communication, complete the corresponding sequence of tasks:

Tasks for Product Instance-Initiated Communication

CSLU Installation CSLU Preference SettingsProduct Instance ConfigurationAuthorization Code Installation (Only if Applicable)

  1. CSLU Installation

    Where task is performed: A laptop, destop, or a Virtual Machine (VM) running Windows 10 or Linux.

    Download the file from Smart Software Manager > Smart Licensing Utility.

    Refer to Cisco Smart License Utility Quick Start Setup Guide and Cisco Smart Licensing Utility User Guide for help with installation and set-up.

  2. CSLU Preference Settings

    Where tasks are performed: CSLU Interface

    1. Logging into Cisco (CSLU Interface)

    2. Configuring a Smart Account and a Virtual Account (CSLU Interface)

    3. Adding a Product-Initiated Product Instance in CSLU (CSLU Interface)

  3. Product Instance Configuration

    Where tasks are performed: Product Instance

    1. Ensuring Network Reachability for Product Instance-Initiated Communication

    2. Ensure that transport type is set to cslu.

      CSLU is the default transport type. If you have configured a different option, enter the license smart transport cslu command in global configuration mode. Save any changes to the configuration file.
      Device(config)# license smart transport cslu
      Device(config)# exit
      Device# copy running-config startup-config
    3. Specify how you want CSLU to be discovered (choose one):

      • Option 1:

        No action required. Name server configured for Zero-touch DNS discovery of cslu-local

        Here, if you have configured DNS (The name server IP address is configured on the product instance), and the DNS server has an entry where hostname cslu-local is mapped to the CSLU IP address, then no further action is required. The product instance automatically discovers hostname cslu-local.

      • Option 2:

        No action required. Name server and domain configured for Zero-touch DNS discovery of cslu-local.<domain>

        Here if you have configured DNS, (The name server IP address and domain is configured on the product instance), and the DNS server has an entry where cslu-local.<domain> is mapped to the CSLU IP address, then no further action is required. The product instance automatically discovers hostname cslu-local.

      • Option 3:

        Configure a specific URL for CSLU.

        Enter the license smart url cslu http://<cslu_ip_or_host>:8182/cslu/v1/pi command in global configuration mode. For <cslu_ip_or_host>, enter the hostname or the IP address of the windows host where you have installed CSLU. 8182 is the port number and it is the only port number that CSLU uses.
        Device(config)# license smart url cslu http://192.168.0.1:8182/cslu/v1/pi
        Device(config)# exit
        Device# copy running-config startup-config
  4. Authorization Code Installation (Only if Applicable)

    Where tasks is performed: Product Instance

    An export-controlled license is supported only on certain models of the Cisco Catalyst Access, Core, and Aggregation Switches (See Authorization Code). If you want to use an export-controlled license, complete the following task on supported platforms: Manually Requesting and Auto-Installing a SLAC.

Result:

Since the product instance initiates communication, it automatically sends out the first RUM report at the scheduled time, as per the policy. Along with this first report, if applicable, it sends a request for a UDI-tied trust code. CSLU forwards the RUM report to CSSM and retrieves the ACK, which also contains the trust code. The ACK is applied to the product instance the next time the product instance contacts CSLU.

In the product instance-initiated mode, the product instance does not send more than one RUM report a day. You can override this for an on-demand synchronization between the product instance and CSLU, by entering the license smart sync command in privileged EXEC mode

To know when the product instance will be sending the next RUM report, enter the show license all command in privileged EXEC mode and in the output, check the date in the Next report push field.

To verify trust code installation, enter the show license status command in privileged EXEC mode. Check for the updated timestamp in the Trust Code Installed field.

If you want to change the boot level license, see Configuring a Base or Add-On License.

If you want to return an authorization code, see Returning an Authorization Code.

Tasks for CSLU-Initiated Communication

CSLU Installation CSLU Preference SettingsProduct Instance ConfigurationAuthorization Code Installation (Only if Applicable)Usage Synchronization

  1. CSLU Installation

    Where task is performed: A laptop, destop, or a Virtual Machine (VM) running Windows 10 or Linux.

    Download the file from Smart Software Manager > Smart Licensing Utility.

    Refer to Cisco Smart License Utility Quick Start Setup Guide and Cisco Smart Licensing Utility User Guide for help with installation and set-up.

  2. CSLU Preference Settings

    Where tasks are performed: CSLU Interface

    1. Logging into Cisco (CSLU Interface)

    2. Configuring a Smart Account and a Virtual Account (CSLU Interface)

    3. Adding a CSLU-Initiated Product Instance in CSLU (CSLU Interface)

  3. Product Instance Configuration

    Where tasks is performed: Product Instance

    Ensuring Network Reachability for CSLU-Initiated Communication

  4. Authorization Code Installation (Only if Applicable)

    Where tasks are performed: CSLU Interface and CSSM Web UI

    An export-controlled license is supported only on certain models of the Cisco Catalyst Access, Core, and Aggregation Switches (See Authorization Code). If you want to use an export-controlled license, complete the following tasks on supported platforms:

    1. Manually Requesting and Auto-Installing a SLAC

    2. Requesting SLAC for One or More Product Instance (CSLU Interface)

    3. Generating and Downloading SLAC from CSSM to a File

    4. Import from CSSM (CSLU Interface)

  5. Usage Synchronization

    Where tasks is performed: CSLU Interface

    Collecting Usage Reports: CSLU Initiated (CSLU Interface)

Result:

Since CSLU is logged into CSSM, the reports are automatically sent to the associated Smart Account and Virtual Account in CSSM and CSSM will send an ACK to CSLU as well as to the product instance. It gets the ACK from CSSM and sends this back to the product instance for installation. The ACK from CSSM contains the trust code and SLAC if this was requested.

Trust code request and installation is supported starting with Cisco IOS XE Cupertino 17.9.1.

If you want to change the boot level license, see Configuring a Base or Add-On License.

If you want to return an authorization code, see Returning an Authorization Code.

Workflow for Topology: Connected Directly to CSSM

Smart Account Set-UpProduct Instance ConfigurationTrust Establishment with CSSMAuthorization Code Installation (Only if Applicable)

  1. Smart Account Set-Up

    Where task is performed: CSSM Web UI, https://software.cisco.com/.

    Ensure that you have a user role with proper access rights to a Smart Account and the required Virtual Accounts.

  2. Product Instance Configuration

    Where tasks are performed: Product Instance

    1. Set-Up product instance connection to CSSM: Setting Up a Connection to CSSM.

    2. Configure a connection method and transport type (choose one)

  3. Trust Establishment with CSSM

    Where task is performed: CSSM Web UI and then the product instance

    1. Generate one token for each Virtual Account you have. You can use same token for all the product instances that are part of one Virtual Account: Generating a New Token for a Trust Code from CSSM.

    2. Having downloaded the token, you can now install the trust code on the product instance: Establishing Trust with an ID Token..

  4. Authorization Code Installation (Only if Applicable)

    Where tasks are performed: Product Instance

    An export-controlled license is supported only on certain models of the Cisco Catalyst Access, Core, and Aggregation Switches (See Authorization Code). If you want to use an export-controlled license, complete the following task on supported platforms: Manually Requesting and Auto-Installing a SLAC.

Result:

After establishing trust, CSSM returns a policy. The policy is automatically installed on all product instances of that Virtual Account. The policy specifies if and how often the product instance reports usage.

The product instance does not send more than one RUM report a day. You can override this for an on-demand synchronization between the product instance and CSSM, by entering the license smart sync command in privileged EXEC mode.

To change the reporting interval, configure the license smart usage interval command in global configuration mode. For syntax details see the license smart (privileged EXEC) command in the Command Reference for the corresponding release.

If you want to change the boot level license, see Configuring a Base or Add-On License.

If you want to return an authorization code, see Returning an Authorization Code.

Workflow for Topology: Connected to CSSM Through a Controller

To deploy Cisco DNA Center as the controller, complete the following workflow:

Product Instance ConfigurationCisco DNA Center Configuration

  1. Product Instance Configuration

    Where task is performed: Product Instance

    Enable NETCONF. Cisco DNA Center uses the NETCONF protocol to provision configuration and retrieve the required information from the product instance - the product instance must therefore have NETCONF enabled, to facilitate this.

    For more information, see the Programmability Configuration Guide, Cisco IOS XE Amsterdam 17.3.x. In the guide, go to Model-Driven Programmability > NETCONF Protocol.

  2. Cisco DNA Center Configuration

    Where tasks is performed: Cisco DNA Center GUI

    An outline of the tasks you must complete and the accompanying documentation reference is provided below. The document provides detailed steps you have to complete in the Cisco DNA Center GUI:

    1. Set-up the Smart Account and Virtual Account.

      Enter the same log in credentials that you use to log in to the CSSM Web UI. This enables Cisco DNA Center to establish a connection with CSSM.

      See the Cisco DNA Center Administrator Guide of the required release (Release 2.2.2 onwards) > Manage Licenses > Set Up License Manager.

    2. Add the required product instances to Cisco DNA Center inventory and assign them to a site.

      This enables Cisco DNA Center to push any necessary configuration, including the required certificates, for Smart Licensing Using Policy to work as expected.

      See the Cisco DNA Center User Guide of the required release (Release 2.2.2 onwards) > Display Your Network Topology > Assign Devices to a Site.

Result:

After you implement the topology, you must trigger the very first ad hoc report in Cisco DNA Center, to establish a mapping between the Smart Account and Virtual Account, and product instance. See the Cisco DNA Center Administrator Guide of the required release (Release 2.2.2 onwards) > Manage Licenses > Upload Resource Utilization Details to CSSM. Once this is done, Cisco DNA Center handles subsequent reporting based on the reporting policy.

If multiple policies are available, Cisco DNA Center maintains the narrowest reporting interval. You can change this, but only to report more frequently (a narrower interval). See the Cisco DNA Center Administrator Guide of the required release (Release 2.2.2 onwards) > Manage Licenses > Modify License Policy.

If you want to change the license level after this, see the Cisco DNA Center Administrator Guide of the required release (Release 2.2.2 onwards) > Manage Licenses > Change License Level.

Workflow for Topology: CSLU Disconnected from CSSM

Depending on whether you want to implement a product instance-initiated or CSLU-initiated method of communication. Complete the corresponding table of tasks below.

Tasks for Product Instance-Initiated Communication

CSLU Installation CSLU Preference SettingsProduct Instance ConfigurationAuthorization Code Installation (Only if Applicable)Usage Synchronization

  1. CSLU Installation

    Where task is performed: A laptop, destop, or a Virtual Machine (VM) running Windows 10 or Linux.

    Download the file from Smart Software Manager > Smart Licensing Utility.

    Refer to Cisco Smart License Utility Quick Start Setup Guide and Cisco Smart Licensing Utility User Guide for help with installation and set-up.

  2. CSLU Preference Settings

    Where tasks are performed: CSLU interface

    1. In the CSLU Preferences tab, click the Cisco Connectivity toggle switch to off. The field switches to “Cisco Is Not Available”.

    2. Configuring a Smart Account and a Virtual Account (CSLU Interface)

    3. Adding a Product-Initiated Product Instance in CSLU (CSLU Interface)

  3. Product Instance Configuration

    Where tasks are performed: Product Instance

    1. Ensuring Network Reachability for Product Instance-Initiated Communication

    2. Ensure that transport type is set to cslu.

      CSLU is the default transport type. If you have configured a different option, enter the license smart transport cslu command in global configuration mode. Save any changes to the configuration file.
      Device(config)# license smart transport cslu
      Device(config)# exit
      Device# copy running-config startup-config
    3. Specify how you want CSLU to be discovered (choose one)

      • Option 1:

        No action required. Name server configured for Zero-touch DNS discovery of cslu-local

        Here, if you have configured DNS (The name server IP address is configured on the product instance), and the DNS server has an entry where hostname cslu-local is mapped to the CSLU IP address, then no further action is required. The product instance automatically discovers hostname cslu-local.

      • Option 2:

        No action required. Name server and domain configured for Zero-touch DNS discovery of cslu-local.<domain>

        Here if you have configured DNS, (The name server IP address and domain is configured on the product instance), and the DNS server has an entry where cslu-local.<domain> is mapped to the CSLU IP address, then no further action is required. The product instance automatically discovers hostname cslu-local.

      • Option 3:

        Configure a specific URL for CSLU.

        Enter the license smart url cslu http://<cslu_ip_or_host>:8182/cslu/v1/pi command in global configuration mode. For <cslu_ip_or_host>, enter the hostname or the IP address of the windows host where you have installed CSLU. 8182 is the port number and it is the only port number that CSLU uses.
        Device(config)# license smart url cslu http://192.168.0.1:8182/cslu/v1/pi
        Device(config)# exit
        Device# copy running-config startup-config
  4. Authorization Code Installation (Only if Applicable)

    Where tasks are performed: Product Instance and CSSM Web UI

    An export-controlled license is supported only on certain models of the Cisco Catalyst Access, Core, and Aggregation Switches (See Authorization Code). If you want to use an export-controlled license, complete the following tasks on supported platforms:

    1. Manually Requesting and Auto-Installing a SLAC

    2. Requesting SLAC for One or More Product Instance (CSLU Interface)

    3. Generating and Downloading SLAC from CSSM to a File

    4. Import from CSSM (CSLU Interface)

  5. Usage Synchronization

    Where tasks are performed: CSLU and CSSM

    Since the product instance initiates communication, it automatically sends out the first RUM report at the scheduled time, as per the policy. You can also enter the license smart sync privileged EXEC command to trigger this. Along with this first report, if applicable, it sends a request for a UDI-tied trust code. Since CSLU is disconnected from CSSM, perform the following tasks to send the RUM Reports to CSSM.

    1. Export to CSSM (CSLU Interface)

    2. Uploading Data or Requests to CSSM and Downloading a File

    3. Import from CSSM (CSLU Interface)

Result:

The ACK you have imported from CSSM contains the trust code if this was requested. The ACK is applied to the product instance the next time the product instance contacts CSLU.

In the product instance-initiated mode, the product instance does not send more than one RUM report a day. You can override this for an on-demand synchronization between the product instance and CSLU, by entering the license smart sync command in privileged EXEC mode

To know when the product instance will be sending the next RUM report, enter the show license all command in privileged EXEC mode and in the output, check the date in the Next report push field.

To verify trust code installation, enter the show license status command in privileged EXEC mode. Check for the updated timestamp in the Trust Code Installed field.

If you want to change the boot level license, see Configuring a Base or Add-On License.

If you want to return an authorization code, see Returning an Authorization Code.


Tasks for CSLU-Initiated Communication

CSLU Installation CSLU Preference SettingsProduct Instance ConfigurationAuthorization Code Installation (Only if Applicable)Usage Synchronization

  1. CSLU Installation

    Where task is performed: A laptop, destop, or a Virtual Machine (VM) running Windows 10 or Linux.

    Download the file from Smart Software Manager > Smart Licensing Utility.

    Refer to Cisco Smart License Utility Quick Start Setup Guide and Cisco Smart Licensing Utility User Guide for help with installation and set-up.

  2. CSLU Preference Settings

    Where tasks is performed: CSLU

    1. In the CSLU Preferences tab, click the Cisco Connectivity toggle switch to off. The field switches to “Cisco Is Not Available”.

    2. Configuring a Smart Account and a Virtual Account (CSLU Interface)

    3. Adding a CSLU-Initiated Product Instance in CSLU (CSLU Interface)

    4. Collecting Usage Reports: CSLU Initiated (CSLU Interface)

  3. Product Instance Configuration

    Where task is performed: Product Instance

    Ensuring Network Reachability for CSLU-Initiated Communication

  4. Authorization Code Installation (Only if Applicable)

    Where tasks are performed: Product Instance

    An export-controlled license is supported only on certain models of the Cisco Catalyst Access, Core, and Aggregation Switches (See Authorization Code). If you want to use an export-controlled license, complete the following tasks on supported platforms:

    1. Manually Requesting and Auto-Installing a SLAC

    2. Requesting SLAC for One or More Product Instance (CSLU Interface)

    3. Generating and Downloading SLAC from CSSM to a File

    4. Import from CSSM (CSLU Interface)

  5. Usage Synchronization

    Where tasks are performed: CSLU and CSSM

    Collect usage data from the product instance. Since CSLU is disconnected from CSSM, you then save usage data which CSLU has collected from the product instance to a file. Along with this first report, if applicable, an authorization code and a UDI-tied trust code request is included in the RUM report. Then, from a workstation that is connected to Cisco, upload it to CSSM. After this, download the ACK from CSSM. In the workstation where CSLU is installed and connected to the product instance, upload the file to CSLU.

    1. Export to CSSM (CSLU Interface)

    2. Uploading Data or Requests to CSSM and Downloading a File

    3. Import from CSSM (CSLU Interface)

Result:

The ACK you have imported from CSSM contains the trust code and SLAC if this was requested. The uploaded ACK is applied to the product instance the next time CSLU runs an update.

Trust code request and installation is supported starting with Cisco IOS XE Cupertino 17.9.1.

If you want to change the boot level license, see Configuring a Base or Add-On License.

If you want to return an authorization code, see Returning an Authorization Code.

Workflow for Topology: No Connectivity to CSSM and No CSLU

Since you do not have to configure connectivity to any other component, the list of tasks required to set-up the topology is a small one. See, the Results section at the end of the workflow to know how you can complete requisite usage reporting after you have implemented this topology.

Product Instance ConfigurationAuthorization Code Installation (Only if Applicable)

  1. Product Instance Configuration

    Where task is performed: Product Instance

    Set transport type to off.

    Enter the license smart transport off command in global configuration mode. Save any changes to the configuration file.
    Device(config)# license smart transport off
    Device(config)# exit
    Device# copy running-config startup-config
  2. Authorization Code Installation (Only if Applicable)

    Where task is performed: CSSM Web UI and Product Instance

    An export-controlled license is supported only on certain models of the Cisco Catalyst Access, Core, and Aggregation Switches (See Authorization Code). If you want to use an export-controlled license, choose one of the options to install SLAC:

Result:

All communication to and from the product instance is disabled. To report license usage you must save RUM reports to a file (on your product instance) and upload it to CSSM (from a workstation that has connectivity to the internet, and Cisco):

  1. Generate and save RUM reports

    Enter the license smart save usage command in provileged EXEC mode. In the example below, all RUM reports are saved to the flash memory of the product instance, in file all_rum.txt.

    Starting with Cisco IOS XE Cupertino 17.7.1, configuring this command automatically includes a trust code request in the RUM report - if a trust code does not already exist on the product instance.

    Device# license smart save usage all file bootflash:all_rum.txt 
    Device# copy bootflash:all_rum.txt tftp://10.8.0.6/user01 
  2. Upload usage data to CSSM: Uploading Data or Requests to CSSM and Downloading a File

  3. Install the ACK on the product instance: Installing a File on the Product Instance

If you want to change the boot level license, see Configuring a Base or Add-On License.

If you want to return an authorization code, see Returning an Authorization Code.

Workflow for Topology: SSM On-Prem Deployment

Depending on whether you want to implement a product instance-initiated method of communicatio (push) or SSM On-Prem-initiated method of communication (pull), complete the corresponding sequence of tasks:

Tasks for Product Instance-Initiated Communication

SSM On-Prem Installation Addition and Validation of Product Instances (Only if Applicable)Product Instance ConfigurationInitial Usage Synchronization

  1. SSM On-Prem Installation

    Where task is performed: A physical server such as a Cisco UCS C220 M3 Rack Server, or a hardware-based server that meets the necessary requirements.

    Download the file from Smart Software Manager > Smart Software Manager On-Prem.

    Refer to the Cisco Smart Software On‐Prem Installation Guide and the Cisco Smart Software On‐Prem User Guide for help with installation.

    Installation is complete when you have deployed SSM On-Prem, configured a common name on SSM On-Prem (Security Widget > Certificates), synchronized the NTP server (Settings widget > Time Settings), and created, registered, and synchronized (Synchronization widget) the SSM On-Prem local account with your Smart Account and Virtual Account in CSSM.


    Note


    Licensing functions in the On-Prem Licensing Workspace are greyed-out until you complete the creation, registration, and synchronization of the local account with your Smart Account in CSSM. The local account synchronization with CSSM is for the SSM On-Prem instance to be known to CSSM, and is different from usage synchronization which is performed in 4. Initial Usage Synchronization below.
  2. Addition and Validation of Product Instances

    Where tasks are performed: SSM On-Prem UI

    This step ensures that the product instances are validated and mapped to the applicable Smart Account and Virtual account in CSSM. This step is required only in the following cases:

    • If you want your product instances to be added and validated in SSM On-Prem before they are reported in CSSM (for added security).

    • If you want to use a license that requires authorization before use (enforcement type: enforced or export-controlled). Such a product instance must be added to SSM On-Prem before you can request the necessary SLAC in Step 3 d below.

    • If you have created local virtual accounts (in addition to the default local virtual account) in SSM On-Prem. In this case you must provide SSM On-Prem with the Smart Account and Virtual Account information for the product instances in these local virtual accounts, so that SSM On-Prem can report usage to the correct license pool in CSSM.

    1. Assigning a Smart Account and Virtual Account (SSM On-Prem UI)

    2. Validating Devices (SSM On-Prem UI)


      Note


      If your product instance is in a NAT set-up, also enable support for a NAT Setup when you enable device validation – both toggle switches are in the same window.


  3. Product Instance Configuration

    Where tasks are performed: Product Instance and the SSM On-Prem UI

    Remember to save any configuration changes on the product instance, by entering the copy running-config startup-config command in privileged EXEC mode.

    1. Ensuring Network Reachability for Product Instance-Initiated Communication

    2. Retrieving the Transport URL (SSM On-Prem UI)

    3. Setting the Transport Type, URL, and Reporting Interval

      The transport type configuration for CSLU and SSM On-Prem are the same (license smart transport cslu command in global configuration mode), but the URLs are different.

    4. An export-controlled license is supported only on certain models of the Cisco Catalyst Access, Core, and Aggregation Switches (See Authorization Code). Complete these sub-steps only if you want to use an export-controlled license on supported platforms: Submitting an Authorization Code Request (SSM On-Prem UI) and Manually Requesting and Auto-Installing a SLAC.

  4. Initial Usage Synchronization

    Where tasks are performed: Product instance, SSM On-Prem UI, CSSM

    1. Synchronize the product instance with SSM On-Prem.

      On the product instance, enter the license smart sync {all| local} command, in privileged EXEC mode. This synchronizes the product instance with SSM On-Prem, to send and receive any pending data.
      Device(config)# license smart sync local

      You can verify this in the SSM On-Prem UI. Log in and select the Smart Licensing workspace. Navigate to the Inventory > SL Using Policy tab. In the Alerts column of the corresponding product instance, the following message is displayed: Usage report from product instance.


      Note


      If you have not performed Step 2 above (Addition and Validation of Product Instances), completing this sub-step will add the product instance to the SSM On-Prem database.


    2. Synchronize usage information with CSSM (choose one):

      • Option 1:

        SSM On-Prem is connected to CSSM: In the SSM On-Prem UI, Smart Licensing workspace, nagivate to Reports > Usage Schedules > Synchronize now with Cisco.

      • Option 2:

        SSM On-Prem is not connected to CSSM: See Exporting and Importing Usage Data (SSM On-Prem UI).

Result:

You have completed initial usage synchronization. Product instance and license usage information is now displayed in SSM On-Prem.

For subsequent reporting, you have the following options:

  • To synchronize data between the product instance and SSM On-Prem:

    Schedule periodic synchronization between the product instance and the SSM On-Prem, by configuring the reporting interval. Enter the license smart usage interval interval_in_days command in global configuration mode.

    In the product instance-initiated mode, the product instance does not send more than one RUM report a day. You can override this for an on-demand synchronization between the product instance and SSM On-Prem, by entering the license smart sync command in privileged EXEC mode.

    To know when the product instance will be sending the next RUM report, enter the show license all command in privileged EXEC mode and in the output, check the Next report push: field.

  • To synchronize usage information with CSSM:

    • Schedule periodic synchronization with CSSM. In the SSM On-Prem UI, navigate to Reports > Usage Schedules > Synchronization schedule with Cisco. Enter the following frequency information and save:

      • Days: Refers to how often synchronization occurs. For example, if you enter 2, synchronization occurs once every two days.

      • Time of Day:: Refers to the time at which synchronization occurs, in the 24-hour notation system. For example, if you enter 14 hours and 0 minutes, synchronization occurs at 2 p.m. (1400) in your local time zone.

    • Upload and download the required files for reporting: Exporting and Importing Usage Data (SSM On-Prem UI)).

If you want to change the boot level license, see Configuring a Base or Add-On License.

If you want to return an authorization code, see Returning an Authorization Code.

Tasks for SSM On-Prem Instance-Initiated Communication

SSM On-Prem Installation Product Instance AdditionProduct Instance ConfigurationInitial Usage Synchronization

  1. SSM On-Prem Installation

    Where task is performed: A physical server such as a Cisco UCS C220 M3 Rack Server, or a hardware-based server that meets the necessary requirements.

    Download the file from Smart Software Manager > Smart Software Manager On-Prem.

    Refer to the Cisco Smart Software On‐Prem Installation Guide and the Cisco Smart Software On‐Prem User Guide for help with installation.

    Installation is complete when you have deployed SSM On-Prem, configured a common name on SSM On-Prem (Security Widget > Certificates), synchronized the NTP server (Settings widget > Time Settings), and created, registered, and synchronized (Synchronization widget) the SSM On-Prem local account with your Smart Account and Virtual Account in CSSM.


    Note


    Licensing functions in the On-Prem Licensing Workspace are greyed-out until you complete the creation, registration, and synchronization of the local account with your Smart Account in CSSM. The local account synchronization with CSSM is for the SSM On-Prem instance to be known to CSSM, and is different from usage synchronization which is performed in 4. Initial Usage Synchronization below.
  2. Product Instance Addition

    Where task is performed: SSM On-Prem UI

    Depending on whether you want to add a single product instance or multiple product instances, follow the corresponding sub-steps: Adding One or More Product Instances (SSM On-Prem UI).

  3. Product Instance Configuration

    Where tasks are performed: Product Instance

    Remember to save any configuration changes on the product instance, by entering the copy running-config startup-config command in privileged EXEC mode.

    1. Ensuring Network Reachability for SSM On-Prem-Initiated Communication

    2. An export-controlled license is supported only on certain models of the Cisco Catalyst Access, Core, and Aggregation Switches (See Authorization Code). Complete these sub-steps only if you want to use an export-controlled license on supported platforms: Submitting an Authorization Code Request (SSM On-Prem UI).

      The uploaded codes are applied to the product instances the next time SSM On-Prem runs an update. An initial usage synchronization with the product instance is being performed in Step 4 below so this will be completed then.

  4. Initial Usage Synchronization

    Where tasks are performed: SSM On-Prem, and CSSM

    1. Retrieve usage information from the product instance.

      In the SSM On-Prem UI, navigate to Reports > Synchronisation pull schedule with the devices > Synchronise now with the device.

      In the Alerts column, the following message is displayed: Usage report from product instance.


      Tip


      It takes 60 seconds before synchronization is triggered. To view progress, navigate to the On-Prem Admin Workspace, and click the Support Centre widget. The system logs here display progress.
    2. Synchronize usage information with CSSM (choose one)

      • Option 1:

        SSM On-Prem is connected to CSSM: In the SSM On-Prem UI, Smart Licensing workspace, nagivate to Reports > Usage Schedules > Synchronize now with Cisco.

      • Option 2:

        SSM On-Prem is not connected to CSSM. See: Exporting and Importing Usage Data (SSM On-Prem UI).

Result:

You have completed initial usage synchronization. Product instance and license usage information is now displayed in SSM On-Prem. SSM On-Prem automatically sends the ACK back to the product instance. To verify that the product instance has received the ACK, enter the show license status command in privileged EXEC mode, and in the output, check the date for the Last ACK received field.

For subsequent reporting, you have the following options:

  • To retrieve usage information from the product instance, you can:

    • In the SSM On-Prem UI, Smart Licensing workspace, nagivate to Reports > Usage Schedules > Synchronize now with Cisco.

    • Schedule periodic retrieval of information from the product instance by configuring a frequency. In the SSM On-Prem UI, Smart Licensing workspace, nagivate to Reports > Usage Schedules > Synchronisation pull schedule with the devices. Enter values in the following fields:

      • Days: Refers to how often synchronization occurs. For example, if you enter 2, synchronization occurs once every two days.

      • Time of Day:: Refers to the time at which synchronization occurs, in the 24-hour notation system. For example, if you enter 14 hours and 0 minutes, synchronization occurs at 2 p.m. (1400).

    • Collect usage data from the product instance without being connected to CSSM. In the SSM On-Prem UI, Smart Licensing workspace, nagivate to Inventory > SL Using Policy tab. Select one or more product instances by enabling the coresponding check box. Click Actions for Selected... > Collect Usage. On-Prem connects to the selected Product Instance(s) and collects the usage reports. These usage reports are then stored in On-Prem’s local library. These reports can then be transferred to Cisco if On-Prem is connected to Cisco, or (if you are not connected to Cisco) you can manually trigger usage collection by selecting Export/Import All.. > Export Usage to Cisco.

  • To synchronize usage information with CSSM, you can:

    • Schedule periodic synchronization with CSSM. In the SSM On-Prem UI, navigate to Reports > Usage Schedules > Synchronization schedule with Cisco. Enter the following frequency information and save:

      • Days: Refers to how often synchronization occurs. For example, if you enter 2, synchronization occurs once every two days.

      • Time of Day:: Refers to the time at which synchronization occurs, in the 24-hour notation system. For example, if you enter 14 hours and 0 minutes, synchronization occurs at 2 p.m. (1400).

    • Upload and download the required files for reporting: Exporting and Importing Usage Data (SSM On-Prem UI)).

If you want to change the boot level license, see Configuring a Base or Add-On License.

If you want to return an authorization code, see Returning an Authorization Code.

Migrating to Smart Licensing Using Policy

To upgrade to Smart Licensing Using Policy, you must upgrade the software version (image) on the product instance to a supported version.

Before you Begin

Ensure that you have read the Upgrades section, to understand how Smart Licensing Using Policy handles various aspects of all earlier licensing models.

Smart Licensing Using Policy is introduced in Cisco IOS XE Amsterdam 17.3.2. This is therefore the minimum required version for Smart Licensing Using Policy.

Note that all the licenses that you are using prior to migration will be available after upgrade. This means that not only registered and authorized licenses (including reserved licenses), but also evaluation licenses will be migrated. The advantage with migrating registered and authorized licenses is that you will have fewer configuration steps to complete after migration, because your configuration is retained after upgrade (transport type configuration and configuration for connection to CSSM, all authorization codes). This ensures a smoother transition to the Smart Licensing Using Policy environment.

Device-led conversion is not supported for migration to Smart Licensing Using Policy.

Upgrading the Switch Software

See the corresponding release note for the upgrade procedure. If there are any general release-specific considerations, these are called-out in the corresponding release notes. For example, to upgrade to Cisco IOS XE Amsterdam 17.3.2, see Release Notes for Cisco <platform name>, Cisco IOS XE Amsterdam 17.3.x.

You can use the procedure to upgrade in install mode or with In-Service Software Upgrade (ISSU) (on supported platforms and supported releases).

Release Notes for Cisco Catalyst 9600 Series Switches: https://www.cisco.com/c/en/us/support/switches/catalyst-9600-series-switches/products-release-notes-list.html. See section Upgrading the Switch Software. ISSU is supported on this product instance.

After Upgrading the Software Version

  • Complete topology implementation.

    If a transport mode is available in your pre-upgrade set-up, this is retained after you upgrade. Only in some cases, like with evaluation licenses or with licensing models where the notion of a transport type does not exist, the default (cslu) is applied - in these cases you may have a few more steps to complete before you are set to operate in the Smart Licensing Using Policy environment.

    No matter which licensing model you upgrade from, you can change the topology after upgrade.

  • Synchronize license usage with CSSM

    No matter which licensing model you are upgrading from and no matter which topology you implement, synchronize your usage information with CSSM. For this you have to follow the reporting method that applies to the topology you implement. This initial synchronization ensures that up-to-date usage information is reflected in CSSM and a custom policy (if available), is applied. The policy that is applicable after this synchronization also indicates subsequent reporting requirements. These rules are also tabled here: How Upgrade Affects Reporting for Existing Licenses


    Note


    After initial usage synchronization is completed, reporting is required only if the policy, or, system messages indicate that it is.


Sample Migration Scenarios

Sample migration scenarios have been provided considering the various existing licensing models and licenses. All scenarios provide sample outputs before and after migration, any CSSM Web UI changes to look out for (as an indicator of a successful migration or further action), and how to identify and complete any necessary post-migration steps.


Note


For SSM On-Prem, the sequence in which you perform the various upgrade-related activities is crucial. So only for this scenario, the migration sequence has been provided - and not an example.


Example: Smart Licensing to Smart Licensing Using Policy

The following is an example of a Cisco Catalyst 9500 switch migrating from Smart Licensing to Smart Licensing Using Policy. This is a High Availability set-up with an active and standby.

The show command outputs below call-out key fields to check, before and after migration.

Table 6. Smart Licensing to Smart Licensing Using Policy: show Commands

Before Upgrade

After Upgrade

show license summary (Smart Licensing)

The Status and License Authorization fields show that the license is REGISTERED and AUTHORIZED.

show license summary (Smart Licensing Using Policy)

The Status field shows that the licenses are now IN USE instead of registered and authorized.

Device# show license summary

Smart Licensing is ENABLED
Registration:
Status: REGISTERED
Smart Account: SA-Eg-Company-01
Virtual Account: SLE_Test
Export-Controlled Functionality: ALLOWED
Last Renewal Attempt: None
Next Renewal Attempt: Mar 21 11:08:58 2021 PST
License Authorization: 
Status: AUTHORIZED
Last Communication Attempt: SUCCEEDED
Next Communication Attempt: Oct 22 11:09:07 2020 PST
License Usage:
License                 Entitlement tag         Count Status
----------------------------------------------------------------
C9500 Network Advantage (C9500 Network Advantage)  2 AUTHORIZED
C9500-DNA-16X-A         (C9500-16X DNA Advantage)  2 AUTHORIZED
Device# show license summary
License Usage:
License           Entitlement tag          Count Status
--------------------------------------------------------
network-advantage (C9500 Network Advantage)  2 IN USE
dna-advantage     (C9500-16X DNA Advantage)  2 IN USE

show license usage (Smart Licensing)

show license usage (Smart Licensing Using Policy)

The license counts remain the same.

The Enforcement Type field displays NOT ENFORCED, because all the licenses that were being used prior to upgrade were unenforced licenses.

Device# show license usage
License Authorization: 
Status: AUTHORIZED on Sep 22 11:09:07 2020 PST
C9500 Network Advantage (C9500 Network Advantage):
Description: C9500 Network Advantage
Count: 2
Version: 1.0
Status: AUTHORIZED
Export status: NOT RESTRICTED
C9500-DNA-16X-A (C9500-16X DNA Advantage):
Description: C9500-DNA-16X-A
Count: 2
Version: 1.0
Status: AUTHORIZED
Export status: NOT RESTRICTED

Device# show license usage


License Authorization:
  Status: Not Applicable
network-advantage (C9500 Network Advantage):
  Description: network-advantage
  Count: 2
  Version: 1.0
  Status: IN USE
  Export status: NOT RESTRICTED
  Feature Name: network-advantage
  Feature Description: network-advantage
  Enforcement type: NOT ENFORCED
  License type: Perpetual
dna-advantage (C9500-16X DNA Advantage):
  Description: C9500-16X DNA Advantage
  Count: 2  Version: 1.0
  Status: IN USE
  Export status: NOT RESTRICTED
  Feature Name: dna-advantage
  Feature Description: C9500-16X DNA Advantage
  Enforcement type: NOT ENFORCED
  License type: Subscription

show license status (Smart Licensing)

show license status (Smart Licensing Using Policy)

The Transport: field: A transport type was configured and therefore retained after upgrade.

The Policy: header and details: A custom policy was available in the Smart Account or Virtual Account – this has also been automatically installed on the product instance. (After establishing trust, CSSM returns a policy. The policy is then automatically installed.)

The Usage Reporting: header: The Next report push: field provides information about when the product instance will send the next RUM report to CSSM.

The Trust Code Installed: field: The ID token is successfully converted and a trusted connected has been established with CSSM.

Device# show license status

Smart Licensing is ENABLED
Utility:
Status: DISABLED
Data Privacy:
Sending Hostname: yes
Callhome hostname privacy: DISABLED
Smart Licensing hostname privacy: DISABLED
Version privacy: DISABLED
Transport:
Type: Callhome
Registration:
Status: REGISTERED
Smart Account: Eg-SA-01
Virtual Account: Eg-VA-01
Export-Controlled Functionality: ALLOWED
Initial Registration: SUCCEEDED on Sep 22 11:08:58 2020 PST
Last Renewal Attempt: None
Next Renewal Attempt: Mar 21 11:08:57 2021 PST
Registration Expires: Sep 22 11:04:23 2021 PST
License Authorization: 
Status: AUTHORIZED on Sep 22 11:09:07 2020 PST
Last Communication Attempt: SUCCEEDED on Sep 22 11:09:07 2020 PST
Next Communication Attempt: Oct 22 11:09:06 2020 PST
Communication Deadline: Dec 21 11:04:34 2020 PST
Export Authorization Key:
Features Authorized:
<none>
Miscellaneus:
Custom Id: <empty>


Device# show license status

Utility:
  Status: DISABLED
Smart Licensing Using Policy:
  Status: ENABLED
Data Privacy:
  Sending Hostname: yes
    Callhome hostname privacy: DISABLED
    Smart Licensing hostname privacy: DISABLED
  Version privacy: DISABLED
Transport:
  Type: Callhome
Policy:
  Policy in use: Merged from multiple sources.
  Reporting ACK required: yes (CISCO default)
  Unenforced/Non-Export Perpetual Attributes:
    First report requirement (days): 365 (CISCO default)
    Reporting frequency (days): 0 (CISCO default)
    Report on change (days): 90 (CISCO default)
  Unenforced/Non-Export Subscription Attributes:
    First report requirement (days): 90 (CISCO default)
    Reporting frequency (days): 90 (CISCO default)
    Report on change (days): 90 (CISCO default)
  Enforced (Perpetual/Subscription) License Attributes:
    First report requirement (days): 0 (CISCO default)
    Reporting frequency (days): 0 (CISCO default)
    Report on change (days): 0 (CISCO default)
  Export (Perpetual/Subscription) License Attributes:
    First report requirement (days): 0 (CISCO default)
    Reporting frequency (days): 0 (CISCO default)
    Report on change (days): 0 (CISCO default)
Miscellaneous:
  Custom Id: <empty>
Usage Reporting:
  Last ACK received: Sep 22 13:49:38 2020 PST
  Next ACK deadline: Dec 21 12:02:21 2020 PST
  Reporting push interval: 30 days
  Next ACK push check: Sep 22 12:20:34 2020 PST
  Next report push: Oct 22 12:05:43 2020 PST
  Last report push: Sep 22 12:05:43 2020 PST
  Last report file write: <none>
Trust Code Installed:
  Active: PID:C9500-16X,SN:FCW2233A5ZV
  INSTALLED on Sep 22 12:02:20 2020 PST
  Standby: PID:C9500-16X,SN:FCW2233A5ZY
  INSTALLED on Sep 22 12:02:20 2020 PST

show license udi (Smart Licensing)

show license udi (Smart Licensing Using Policy)

This is a High Availability set-up and the command displays all UDIs in the set-up.

Device# show license udi

UDI: PID:C9500-16X,SN:FCW2233A5ZV
HA UDI List:
Active:PID:C9500-16X,SN:FCW2233A5ZV
Standby:PID:C9500-16X,SN:FCW2233A5ZY
Device# show license udi

UDI: PID:C9500-16X,SN:FCW2233A5ZV
HA UDI List:
Active:PID:C9500-16X,SN:FCW2233A5ZV
Standby:PID:C9500-16X,SN:FCW2233A5ZY

The CSSM Web UI After Migration

Log in to the CSSM Web UI at https://software.cisco.com. Under Smart Software Licensing, click the Manage licenseslink.

Click the Inventory tab. From the Virtual Account drop-down list, choose the required virtual account. Click the Product Instances tab.

Registered licenses in the Smart Licensing environment were displayed with the hostname of the product instance in the Name column. After upgrade to Smart Licensing Using Policy, they are displayed with the UDI of the product instance. All migrated UDIs are displayed. In this example, they are PID:C9500-16X,SN:FCW2233A5ZV and PID:C9500-16X,SN:FCW2233A5ZY.

Only the active product instance reports usage, therefore PID:C9500-16X,SN:FCW2233A5ZV displays license consumption information under License Usage. The standby does not report usage and the License Usage section for the standby displays No Records Found.

It is always the active that reports usage, so if the active in this High Availabilty set-up changes, the new active product instance will display license consumption information and report usage.

Figure 7. Smart Licensing to Smart Licensing Using Policy: Active and Standby Product Instances After Migration
Figure 8. Smart Licensing to Smart Licensing Using Policy: UDI and License Usage under Active Product Instance

Reporting After Migration

The product instance sends the next RUM report to CSSM, based on the policy.

If you want to change your reporting interval to report more frequently: on the product instance, configure the license smart usage interval command. For syntax details see the license smart (global config) command in the Command Reference for the corresponding release.

Example: RTU Licensing to Smart Licensing Using Policy

The following is an example of a Cisco Catalyst 9300 switch migrating from Right-to-Use (RTU) Licensing to Smart Licensing Using Policy. This is a set-up with an active and members.

RTU Licensing is available on Cisco Catalyst 9300, 9400, and 9500 Series Switches until Cisco IOS XE Fuji 16.8.x. Smart Licensing was introduced starting from Cisco IOS XE Fuji 16.9.1.

When the software version is upgraded to one that supports Smart Licensing Using Policy, all licenses are displayed as IN USE and the Cisco default policy is applied on the product instance. If any add-on licenses are used, the Cisco default policy requires usage reporting in 90 days. No export-controlled or enforced licenses were available on Cisco Catalyst Access, Core, and Aggregation Switches when the RTU licensing model was supported, and therefore no functionality is lost.

The table below calls out key changes or new fields to check for in the show command outputs, after upgrade to Smart Licensing Using Policy

Table 7. RTU Licensing to Smart Licensing Using Policy: show Commands

Before Upgrade

After Upgrade

show license right-to-use summary (RTU Licensing)

show license summary (Smart Licensing Using Policy)

All licenses are migrated and IN USE.

Device# show license right-to-use summary
License Name Type Period left
------------------------------------------------
network-essentials Permanent Lifetime
dna-essentials Subscription CSSM Managed
------------------------------------------------

License Level In Use: network-essentials+dna-essentials Subscription
License Level on Reboot: network-essentials+dna-essentials Subscription
Device#show license summary
License Usage:
License             Entitlement Tag         Count Status
-----------------------------------------------------------
network-essentials  (C9300-24 Network Essen...) 2 IN USE
dna-essentials      (C9300-24 DNA Essentials)   2 IN USE
network-essentials  (C9300-48 Network Essen...) 1 IN USE
dna-essentials      (C9300-48 DNA Essentials)   1 IN USE

show license right-to-use usage (Smart Licensing)

show license usage (Smart Licensing Using Policy)

All licenses (permanent, subscription) have been migrated and the licenses are now IN USE and have types Perpetual and Subscription.

The Enforcement Type field displays NOT ENFORCED, because all the licenses that were being using prior to upgrade, were unenforced licenses.

Device# show license right-to-use usage

Slot# License Name Type usage-duration(y:m:d) In-Use EULA
---------------------------------------------------------
1 network-essentials Permanent 00:00:00 yes yes
1 network-essentials Evaluation 00:00:00 no no
1 network-essentials Subscription 00:00:00 no no
1 network-advantage Permanent 00:00:00 no no
1 network-advantage Evaluation 00:00:00 no no
1 network-advantage Subscription 00:00:00 no no
1 dna-essentials Evaluation 00:00:00 no no
1 dna-essentials Subscription 00:00:00 yes yes
1 dna-advantage Evaluation 00:00:00 no no
1 dna-advantage Subscription 00:00:00 no no
----------------------------------------------------------
Slot# License Name Type usage-duration(y:m:d) In-Use EULA
----------------------------------------------------------
2 network-essentials Permanent 00:00:00 yes yes
2 network-essentials Evaluation 00:00:00 no no
2 network-essentials Subscription 00:00:00 no no
2 network-advantage Permanent 00:00:00 no no
2 network-advantage Evaluation 00:00:00 no no
2 network-advantage Subscription 00:00:00 no no
2 dna-essentials Evaluation 00:00:00 no no
2 dna-essentials Subscription 00:00:00 yes yes
2 dna-advantage Evaluation 00:00:00 no no
2 dna-advantage Subscription 00:00:00 no no
----------------------------------------------------------
Slot# License Name Type usage-duration(y:m:d) In-Use EULA
----------------------------------------------------------
3 network-essentials Permanent 00:00:00 yes yes
3 network-essentials Evaluation 00:00:00 no no
3 network-essentials Subscription 00:00:00 no no
3 network-advantage Permanent 00:00:00 no no
3 network-advantage Evaluation 00:00:00 no no
3 network-advantage Subscription 00:00:00 no no
3 dna-essentials Evaluation 00:00:00 no no
3 dna-essentials Subscription 00:00:00 yes yes
3 dna-advantage Evaluation 00:00:00 no no
3 dna-advantage Subscription 00:00:00 no no
---------------------------------------------------------
Device# show license usage

License Authorization:
  Status: Not Applicable
network-advantage (C9300-24 Network Advantage):
  Description: C9300-24 Network Advantage
  Count: 2
  Version: 1.0
  Status: IN USE
  Export status: NOT RESTRICTED
  Feature Name: network-advantage
  Feature Description: C9300-24 Network Advantage
  Enforcement type: NOT ENFORCED
  License type: Perpetual
dna-advantage (C9300-24 DNA Advantage):
  Description: C9300-24 DNA Advantage
  Count: 2
  Version: 1.0
  Status: IN USE
  Export status: NOT RESTRICTED
  Feature Name: dna-advantage
  Feature Description: C9300-24 DNA Advantage
  Enforcement type: NOT ENFORCED
  License type: Subscription
network-advantage (C9300-48 Network Advantage):
  Description: C9300-48 Network Advantage
  Count: 1
  Version: 1.0
  Status: IN USE
  Export status: NOT RESTRICTED
  Feature Name: network-advantage
  Feature Description: C9300-48 Network Advantage
  Enforcement type: NOT ENFORCED
  License type: Perpetual
dna-advantage (C9300-48 DNA Advantage):
  Description: C9300-48 DNA Advantage
  Count: 1
  Version: 1.0
  Status: IN USE
  Export status: NOT RESTRICTED
  Feature Name: dna-advantage
  Feature Description: C9300-48 DNA Advantage
  Enforcement type: NOT ENFORCED
  License type: Subscription

show license right-to-use (RTU Licensing)

show license status (Smart Licensing Using Policy)

The Transport: field displays its off.

The Trust Code Installed: field displays that a trust code is not installed.

Under the Usage Reporting: header, the Next report push: field provides information about when the next RUM report must be sent to CSSM.

Device# show license right-to-use 
Slot# License Name Type Period left
----------------------------------------------------
1 network-essentials Permanent Lifetime
1 dna-essentials Subscription CSSM Managed
----------------------------------------------------
License Level on Reboot: network-essentials+dna-essentials 
Subscription

Slot# License Name Type Period left
----------------------------------------------------
2 network-essentials Permanent Lifetime
2 dna-essentials Subscription CSSM Managed
----------------------------------------------------
License Level on Reboot: network-essentials+dna-essentials 
Subscription

Slot# License Name Type Period left
----------------------------------------------------
3 network-essentials Permanent Lifetime
3 dna-essentials Subscription CSSM Managed
----------------------------------------------------
License Level on Reboot: network-essentials+dna-essentials 
Subscription
Device# show license status
Utility:
  Status: DISABLED
Smart Licensing Using Policy:
  Status: ENABLED
Data Privacy:
  Sending Hostname: yes
    Callhome hostname privacy: DISABLED
    Smart Licensing hostname privacy: DISABLED
  Version privacy: DISABLED
Transport:
  Type: Transport Off
Policy:
  Policy in use: Merged from multiple sources.
  Reporting ACK required: yes (CISCO default)
  Unenforced/Non-Export Perpetual Attributes:
    First report requirement (days): 365 (CISCO default)
    Reporting frequency (days): 0 (CISCO default)
    Report on change (days): 90 (CISCO default)
  Unenforced/Non-Export Subscription Attributes:
    First report requirement (days): 90 (CISCO default)
    Reporting frequency (days): 90 (CISCO default)
    Report on change (days): 90 (CISCO default)
  Enforced (Perpetual/Subscription) License Attributes:
    First report requirement (days): 0 (CISCO default)
    Reporting frequency (days): 0 (CISCO default)
    Report on change (days): 0 (CISCO default)
  Export (Perpetual/Subscription) License Attributes:
    First report requirement (days): 0 (CISCO default)
    Reporting frequency (days): 0 (CISCO default)
    Report on change (days): 0 (CISCO default)
Miscellaneous:
  Custom Id: <empty> 
Usage Reporting:
  Last ACK received: <none>
  Next ACK deadline: Jan 26 10:27:59 2021 PST
  Reporting push interval: 20  days
  Next ACK push check: <none>
  Next report push: Oct 28 10:29:59 2020 PST
  Last report push: <none>
  Last report file write: <none>
Trust Code Installed: <none>

The CSSM Web UI After Migration

No changes in the CSSM Web UI.

Reporting After Migration

Implement any one of the supported topologies, and fulfil reporting requirements. See Supported Topologies and How to Configure Smart Licensing Using Policy: Workflows by Topology. The reporting method you can use depends on the topology you implement.

Example: SLR to Smart Licensing Using Policy

The following is an example of a Cisco Catalyst 9500 switch migrating from Specific License Reservation (SLR) to Smart Licensing Using Policy. This is a High Availability set-up with an active and standby.

The license conversion is automatic and authorization codes are migratied. No further action is required to complete migration. After migration the No Connectivity to CSSM and No CSLU topology is effective. For information about the SLR authorization code in the Smart Licensing Using Policy environment, see Authorization Code.

The show command outputs below call-out key fields to check, before and after migration.

Table 8. SLR to Smart Licensing Using Policy: show Commands

Before Upgrade

After Upgrade

show license summary (SLR)

The Registration and License Authorization status fields show that the license was REGISTERED - SPECIFIC LICENSE RESERVATION and AUTHORIZED - RESERVED.

show license summary (Smart Licensing Using Policy)

The Status field shows that the licenses are now IN USE instead of registered and authorized.

Device# show license summary

Smart Licensing is ENABLED
License Reservation is ENABLED
Registration:
  Status: REGISTERED - SPECIFIC LICENSE RESERVATION  
Export-Controlled Functionality: ALLOWED
License Authorization:
  Status: AUTHORIZED - RESERVED
License Usage:
License                Entitlement tag         Count Status
--------------------------------------------------------------
C9500 Network Advantage(C9500 Network Advantage)  2 AUTHORIZED
C9500-DNA-16X-A        (C9500-16X DNA Advantage)  2 AUTHORIZED
Device# show license summary

License Reservation is ENABLED
License Usage:
License           Entitlement tag          Count Status 
---------------------------------------------------------
network-advantage(C9500 Network Advantage)     2 IN USE
dna-advantage    (C9500-16X DNA Advantage)     2 IN USE

show license reservation (SLR)

show license all (Smart Licensing Using Policy)

The License Authorizations header: shows that base (C9500 Network Advantage) and add-on (C9500-DNA-16X-A) licenses on the active and standby product instances were authorized with Specific License Reservation. The Authorization type: field shows SPECIFIC INSTALLED.

The Last Confirmation code: field: shows that the SLR authorization code is successfully migrated for the active and standby product instances in the High Availability set-up.

Device# show license reservation
License reservation: ENABLED
Overall status:
  Active: PID:C9500-16X,SN:FCW2233A5ZV
      Reservation status: SPECIFIC INSTALLED on Aug 31 10:15:01 2020 PDT
      Export-Controlled Functionality: ALLOWED
      Last Confirmation code: 4bfbea7f
  Standby: PID:C9500-16X,SN:FCW2233A5ZY
      Reservation status: SPECIFIC INSTALLED on Aug 31 10:15:01 2020 PDT
      Export-Controlled Functionality: ALLOWED
      Last Confirmation code: 9394f196
Specified license reservations:
  C9500 Network Advantage (C9500 Network Advantage):
    Description: C9500 Network Advantage
    Total reserved count: 2
    Term information:
      Active: PID:C9500-16X,SN:FCW2233A5ZV
        License type: PERPETUAL
          Term Count: 1
      Standby: PID:C9500-16X,SN:FCW2233A5ZY
        License type: PERPETUAL
          Term Count: 1
  C9500-DNA-16X-A (C9500-16X DNA Advantage):
    Description: C9500-DNA-16X-A
    Total reserved count: 2
    Term information:
      Active: PID:C9500-16X,SN:FCW2233A5ZV
        License type: TERM
          Start Date: 2020-MAR-17 UTC
          End Date: 2021-MAR-17 UTC
          Term Count: 1
      Standby: PID:C9500-16X,SN:FCW2233A5ZY
Device# show license reservation

Smart Licensing Status
======================
Smart Licensing is ENABLED
License Reservation is ENABLED
Export Authorization Key:
  Features Authorized:
    <none>
Utility:
  Status: DISABLED
Smart Licensing Using Policy:
  Status: ENABLED
Data Privacy:
  Sending Hostname: yes
    Callhome hostname privacy: DISABLED
    Smart Licensing hostname privacy: DISABLED
  Version privacy: DISABLED
Transport:
  Type: Transport Off
Miscellaneous:
  Custom Id: <empty>
Policy:
  Policy in use: Merged from multiple sources.
  Reporting ACK required: yes (CISCO default)
  Unenforced/Non-Export Perpetual Attributes:
    First report requirement (days): 365 (CISCO default)
    Reporting frequency (days): 0 (CISCO default)
    Report on change (days): 90 (CISCO default)
  Unenforced/Non-Export Subscription Attributes:
    First report requirement (days): 90 (CISCO default)
    Reporting frequency (days): 90 (CISCO default)
    Report on change (days): 90 (CISCO default)
  Enforced (Perpetual/Subscription) License Attributes:
    First report requirement (days): 0 (CISCO default)
    Reporting frequency (days): 0 (CISCO default)
    Report on change (days): 0 (CISCO default)
  Export (Perpetual/Subscription) License Attributes:
    First report requirement (days): 0 (CISCO default)
    Reporting frequency (days): 0 (CISCO default)
    Report on change (days): 0 (CISCO default)
Usage Reporting:
  Last ACK received: <none>
  Next ACK deadline: Nov 29 10:50:05 2020 PDT
  Reporting Interval: 30
  Next ACK push check: <none>
  Next report push: Aug 31 10:52:05 2020 PDT
  Last report push: <none>
  Last report file write: <none>
Trust Code Installed: <none>
License Usage
=============
network-advantage (C9500 Network Advantage):
  Description: network-advantage
  Count: 2
  Version: 1.0
  Status: IN USE
  Export status: NOT RESTRICTED
  Feature Name: network-advantage
  Feature Description: network-advantage
  Enforcement type: NOT ENFORCED
  License type: Perpetual
  Reservation:
    Reservation status: SPECIFIC INSTALLED
    Total reserved count: 2
dna-advantage (C9500-16X DNA Advantage):
  Description: C9500-16X DNA Advantage
  Count: 2
  Version: 1.0
  Status: IN USE
  Export status: NOT RESTRICTED
  Feature Name: dna-advantage
  Feature Description: C9500-16X DNA Advantage
  Enforcement type: NOT ENFORCED
  License type: Subscription
  Reservation:
    Reservation status: SPECIFIC INSTALLED
    Total reserved count: 2
Product Information
===================
UDI: PID:C9500-16X,SN:FCW2233A5ZV
HA UDI List:
    Active:PID:C9500-16X,SN:FCW2233A5ZV
    Standby:PID:C9500-16X,SN:FCW2233A5ZY 
Agent Version
=============
Smart Agent for Licensing: 5.0.5_rel/42 
License Authorizations
======================
Overall status:
  Active: PID:C9500-16X,SN:FCW2233A5ZV
      Status: SPECIFIC INSTALLED on Aug 31 10:15:01 2020 PDT
      Last Confirmation code: 4bfbea7f
  Standby: PID:C9500-16X,SN:FCW2233A5ZY
      Status: SPECIFIC INSTALLED on Aug 31 10:15:01 2020 PDT
      Last Confirmation code: 9394f196
Specified license reservations:
  C9500 Network Advantage (C9500 Network Advantage):
    Description: C9500 Network Advantage
    Total reserved count: 2
    Enforcement type: NOT ENFORCED
    Term information:
      Active: PID:C9500-16X,SN:FCW2233A5ZV
        Authorization type: SPECIFIC INSTALLED on Aug 31 10:15:01 2020 PDT
        License type: PERPETUAL
          Term Count: 1
      Standby: PID:C9500-16X,SN:FCW2233A5ZY
        Authorization type: SPECIFIC INSTALLED on Aug 31 10:15:01 2020 PDT
        License type: PERPETUAL
          Term Count: 1
  C9500-DNA-16X-A (C9500-16X DNA Advantage):
    Description: C9500-DNA-16X-A
    Total reserved count: 2
    Enforcement type: NOT ENFORCED
    Term information:
      Active: PID:C9500-16X,SN:FCW2233A5ZV
        Authorization type: SPECIFIC INSTALLED on Aug 31 10:15:01 2020 PDT
        License type: PERPETUAL
          Term Count: 1
      Standby: PID:C9500-16X,SN:FCW2233A5ZY
        Authorization type: SPECIFIC INSTALLED on Aug 31 10:15:01 2020 PDT
        License type: PERPETUAL
          Term Count: 1
Purchased Licenses:
  No Purchase Information Available
Derived Licenses:
  Entitlement Tag: regid.2017-03.com.cisco.advantagek9-Nyquist-C9500,
1.0_f1563759-2e03-4a4c-bec5-5feec525a12c
  Entitlement Tag: regid.2017-07.com.cisco.C9500-DNA-16X-A,
1.0_ef3574d1-156b-486a-864f-9f779ff3ee49

show license status (SLR)

show license status (Smart Licensing Using Policy)

The Transport: header: Type:displays that the transport type is set to off.

The Usage Reporting: header: Next report push: field displays if and when the next RUM report must be uploaded to CSSM.

Device# show license status

Smart Licensing is ENABLED
Utility:
  Status: DISABLED
License Reservation is ENABLED
Data Privacy:
  Sending Hostname: yes
    Callhome hostname privacy: DISABLED
    Smart Licensing hostname privacy: DISABLED
  Version privacy: DISABLED
Transport:
  Type: Callhome
Registration:
  Status: REGISTERED - SPECIFIC LICENSE RESERVATION
  Export-Controlled Functionality: ALLOWED
  Initial Registration: SUCCEEDED on Aug 31 11:07:39 2020 PDT
License Authorization:
  Status: AUTHORIZED - RESERVED on Aug 31 10:15:01 2020 PDT
Export Authorization Key:
  Features Authorized:
    <none>
        License type: TERM
          Start Date: 2020-MAR-17 UTC
          End Date: 2021-MAR-17 UTC
          Term Count: 1
Device# show license status

Utility:
  Status: DISABLED
License Reservation is ENABLED
Data Privacy:
  Sending Hostname: yes
    Callhome hostname privacy: DISABLED
    Smart Licensing hostname privacy: DISABLED
   Version privacy: DISABLED
Transport:
  Type: Transport Off
Policy:
  Policy in use: Merged from multiple sources.
  Reporting ACK required: yes (CISCO default)
  Unenforced/Non-Export Perpetual Attributes:
    First report requirement (days): 365 (CISCO default)
    Reporting frequency (days): 0 (CISCO default)
    Report on change (days): 90 (CISCO default)
  Unenforced/Non-Export Subscription Attributes:
    First report requirement (days): 90 (CISCO default)
    Reporting frequency (days): 90 (CISCO default)
    Report on change (days): 90 (CISCO default)
  Enforced (Perpetual/Subscription) License Attributes:
    First report requirement (days): 0 (CISCO default)
    Reporting frequency (days): 0 (CISCO default)
    Report on change (days): 0 (CISCO default)
  Export (Perpetual/Subscription) License Attributes:
    First report requirement (days): 0 (CISCO default)
    Reporting frequency (days): 0 (CISCO default)
    Report on change (days): 0 (CISCO default)
Miscellaneous:
  Custom Id: <empty>
Usage Reporting:
  Last ACK received: <none>
  Next ACK deadline: Nov 29 10:50:05 2020 PDT
  Reporting Interval: 30
  Next ACK push check: <none>
  Next report push: Aug 31 10:52:05 2020 PDT
  Last report push: <none>
  Last report file write: <none>
Trust Code Installed: <none>

The CSSM Web UI After Migration

In CSSM, there are no changes in the Product Instances tab. The Last Contact column displays "Reserved Licenses" since there has been no usage reporting yet.

After the requisite RUM report is uploaded and acknowledged "Reserved Licenses" and license usage will only be seen in the Active PID product Instance.

Figure 9. SLR to Smart Licensing Using Policy: Active and Standby Product Instances After Migration, Before Reporting
Figure 10. SLR to Smart Licensing Using Policy: Active and Standby Product Instances After Migration, After Reporting

Reporting After Migration

SLR licenses require reporting only when there is a change in licensing consumption (For example, when using an add-on license which is for specified term). The policy (show license status) indicates this, or you will receive syslog messages about this.

Since all communication to and from the product instance is disabled, to report license usage you must save RUM reports to a file and upload it to CSSM (from a workstation that has connectivity to the internet, and Cisco):

  1. Generate and save RUM reports.

    Enter the license smart save usage command in provileged EXEC mode. In the example below, all RUM reports are saved to the flash memory of the product instance, in file all_rum.txt. For syntax details see the license smart (privileged EXEC) command in the Command Reference for the corresponding release. In the example, the file is first saved to bootflash and then copied to a TFTP location:

    Device# license smart save usage all file bootflash:all_rum.txt
    Device# copy bootflash:all_rum.txt tftp://10.8.0.6/all_rum.txt 
  2. Upload usage data to CSSM: Uploading Data or Requests to CSSM and Downloading a File.

  3. Install the ACK on the product instance: Installing a File on the Product Instance.

Example: Evaluation or Expired to Smart Licensing Using Policy

The following is an example of a Cisco Catalyst 9500 switch with evaluation licenses (Smart Licensing) that are migrated to Smart Licensing Using Policy.

The notion of evaluation licenses does not apply to Smart Licensing Using Policy. When the software version is upgraded to one that supports Smart Licensing Using Policy, all licenses are displayed as IN USE and the Cisco default policy is applied to the product instance. No export-controlled or enforced licenses were available on Cisco Catalyst Access, Core, and Aggregation Switches when the earlier licensing models were effective, and therefore no functionality is lost.

The table below calls out key changes or new fields to check for in the show command outputs, after upgrade to Smart Licensing Using Policy

Table 9. Evaluation or Expired to Smart Licensing Using Policy: show Commands

Before Upgrade

After Upgrade

show license summary (Smart Licensing, Evaluation Mode)

Licenses are UNREGISTERED and in EVAL MODE.

show license summary (Smart Licensing Using Policy)

All licenses are migrated and IN USE. There are no EVAL MODE licenses.

Device# show license summary

Smart Licensing is ENABLED
Registration:
Status: UNREGISTERED
Export-Controlled Functionality: NOT ALLOWED
License Authorization: 
Status: EVAL MODE
Evaluation Period Remaining: 89 days, 21 hours, 37 minutes, 
30 seconds
License Usage:
License Entitlement tag         Count  Status
-------------------------------------------------------------
(C9500 Network Advantage)           2 EVAL MODE
(C9500-16X DNA Advantage)           2 EVAL MODE
Device# show license summary

License Usage:
License            Entitlement tag            Count Status
--------------------------------------------------------------
network-advantage (C9500 Network Advantage)       2 IN USE
dna-advantage     (C9500-16X DNA Advantage)       2 IN USE

show license usage (Smart Licensing, Evaluation Mode)

show license usage (Smart Licensing Using Policy)

The Enforcement Type field displays NOT ENFORCED, because all the licenses that were being using prior to upgrade, were unenforced licenses.

Device# show license usage

License Authorization: 
Status: EVAL MODE
Evaluation Period Remaining: 89 days, 21 hours, 37 minutes,
 21 seconds
(C9500 Network Advantage):
Description: 
Count: 2
Version: 1.0
Status: EVAL MODE
Export status: NOT RESTRICTED
(C9500-16X DNA Advantage):
Description: 
Count: 2
Version: 1.0
Status: EVAL MODE
Export status: NOT RESTRICTED
Device# show license usage
License Authorization:
  Status: Not Applicable
network-advantage (C9500 Network Advantage):
  Description: network-advantage
  Count: 2
  Version: 1.0
  Status: IN USE
  Export status: NOT RESTRICTED
  Feature Name: network-advantage
  Feature Description: network-advantage
  Enforcement type: NOT ENFORCED
  License type: Perpetual
dna-advantage (C9500-16X DNA Advantage):
  Description: C9500-16X DNA Advantage
  Count: 2
  Version: 1.0
  Status: IN USE
  Export status: NOT RESTRICTED
  Feature Name: dna-advantage
  Feature Description: C9500-16X DNA Advantage
  Enforcement type: NOT ENFORCED
  License type: Subscription

show license status (Smart Licensing, Evaluation Mode)

show license status (Smart Licensing Using Policy)

The Transport: field displays that its off.

The Policy field shows that the Cisco default policy is applied

The Trust Code Installed: field displays that a trust code is not installed.

The Usage Reporting: header: The Next report push: field provides information about when the next RUM report must be sent to CSSM.

Switch# show license status

Smart Licensing is ENABLED
Utility:
Status: DISABLED
Data Privacy:
Sending Hostname: yes
Callhome hostname privacy: DISABLED
Smart Licensing hostname privacy: DISABLED
Version privacy: DISABLED
Transport:
Type: Callhome
Registration:
Status: UNREGISTERED
Export-Controlled Functionality: NOT ALLOWED
License Authorization: 
Status: EVAL MODE
Evaluation Period Remaining: 89 days, 21 hours, 37 minutes, 15 seconds
Export Authorization Key:
Features Authorized:
<none>
Miscellaneus:
Custom Id: <empty>
Switch# show license status

Utility:
  Status: DISABLED
Smart Licensing Using Policy:
  Status: ENABLED
Data Privacy:
  Sending Hostname: yes
    Callhome hostname privacy: DISABLED
    Smart Licensing hostname privacy: DISABLED
  Version privacy: DISABLED
Transport:
  Type: Transport Off
Policy:
  Policy in use: Merged from multiple sources.
  Reporting ACK required: yes (CISCO default)
  Unenforced/Non-Export Perpetual Attributes:
    First report requirement (days): 365 (CISCO default)
    Reporting frequency (days): 0 (CISCO default)
    Report on change (days): 90 (CISCO default)
  Unenforced/Non-Export Subscription Attributes:
    First report requirement (days): 90 (CISCO default)
    Reporting frequency (days): 90 (CISCO default)
    Report on change (days): 90 (CISCO default)
  Enforced (Perpetual/Subscription) License Attributes:
    First report requirement (days): 0 (CISCO default)
    Reporting frequency (days): 0 (CISCO default)
    Report on change (days): 0 (CISCO default)
  Export (Perpetual/Subscription) License Attributes:
    First report requirement (days): 0 (CISCO default)
    Reporting frequency (days): 0 (CISCO default)
    Report on change (days): 0 (CISCO default) 
Miscellaneous:
  Custom Id: <empty>
Usage Reporting:
  Last ACK received: <none>
  Next ACK deadline: Jan 26 10:27:59 2021 PST
  Reporting push interval: 20  days
  Next ACK push check: <none>
  Next report push: Oct 28 10:29:59 2020 PST
  Last report push: <none>
  Last report file write: <none>
Trust Code Installed: <none>

The CSSM Web UI After Migration

No changes in the CSSM Web UI.

Reporting After Migration

Implement any one of the supported topologies, and fulfil reporting requirements. See Supported Topologies and How to Configure Smart Licensing Using Policy: Workflows by Topology. The reporting method you can use depends on the topology you implement.

Migrating to a Version of SSM On-Prem That Supports Smart Licensing Using Policy

If you are using a version of SSM On-Prem that is earlier than the minimum required version (See SSM On-Prem), you can use this section as an outline of the process and sequence you have to follow to migrate the SSM On-Prem version, the product instance, and any other tasks like SLAC installation, if applicable.

  1. Upgrade SSM On-Prem.

    Upgrade to the minimum required Version 8, Release 202102 or a later version.

    Refer to the Cisco Smart Software Manager On-Prem Migration Guide.

  2. Upgrade the product instance.

    For information about when Smart Licensing Using Policy was introduced on a supported product instance, see: Supported Products.

    For information about the upgrade procedure, see Upgrading the Switch Software.

  3. Re-Register a local account with CSSM

    Online and Offline options are available. Refer to the Cisco Smart Software Manager On-Prem Migration Guide > Re-Registering a local Account (Online Mode) or Manually Re-Registering a Local Account (Offline Mode) .

    Once re-registration is complete, the following events occur automatically:

    • SSM On-Prem responds with new transport URL that points to the tenant in SSM On-Prem.

    • The transport type configuration on the product instance changes from from call-home or smart, to cslu. The transport URL is also updated automatically.

  4. Save configuration changes on the product instance, by entering the copy running-config startup-config command in privileged EXEC mode.

  5. Clear older On-Prem Smart Licensing certificates on the product instance and reload the product instance. Do not save configuration changes after this.


    Note


    This step is required only if the software version running on the product instance is Cisco IOS XE Amsterdam 17.3.x or Cisco IOS XE Bengaluru 17.4.x.


    Enter the license smart factory reset and then the reload commands in privileged EXEC mode.
    Device# license smart factory reset
    Device# reload
  6. Perform usage synchronization

    1. On the product instance, enter the license smart sync {all|local} command, in privileged EXEC mode. This synchronizes the product instance with SSM On-Prem, to send and receive any pending data.
      Device(config)# license smart sync local

      You can verify this in the SSM On-Prem UI. Go to Inventory > SL Using Policy. In the Alerts column, the following message is displayed: Usage report from product instance.

    2. Synchronize usage information with CSSM (choose one)

      • Option 1:

        SSM On-Prem is connected to CSSM: In the SSM On-Prem UI, Smart Licensing workspace, nagivate to Reports > Usage Schedules > Synchronize now with Cisco.

      • Option 2:

        SSM On-Prem is not connected to CSSM. See: Exporting and Importing Usage Data (SSM On-Prem UI).

Result:

You have completed migration and initial usage synchronization. Product instance and license usage information is now displayed in SSM On-Prem.

For subsequent reporting, you have the following options:

  • To synchronize data between the product instance and SSM On-Prem:

    • Schedule periodic synchronization between the product instance and SSM On-Prem, by configuring the reporting interval. Enter the license smart usage interval interval_in_days command in global configuration mode.

      To know when the product instance will be sending the next RUM report, enter the show license all command in privileged EXEC mode and in the output, check the Next report push: field.

    • Enter the license smart sync privileged EXEC command, for ad hoc or on-demand synchronization between the product instance and SSM On-Prem.

  • To synchronize usage information with CSSM:

    • Schedule periodic synchronization with CSSM. In the SSM On-Prem UI, navigate to Reports > Usage Schedules > Synchronization schedule with Cisco. Enter the following frequency information and save:

      • Days: Refers to how often synchronization occurs. For example, if you enter 2, synchronization occurs once every two days.

      • Time of Day:: Refers to the time at which synchronization occurs, in the 24-hour notation system. For example, if you enter 14 hours and 0 minutes, synchronization occurs at 2 p.m. (1400) in your local time zone.

    • Upload and download the required files for reporting: Exporting and Importing Usage Data (SSM On-Prem UI)).

Task Library for Smart Licensing Using Policy

This section is a grouping of tasks that apply to Smart Licensing Using Policy. It includes tasks performed on a product instance, on the CSLU interface, and on the CSSM Web UI.

To implement a particular topology, refer to the corresponding workflow to know the sequential order of tasks that apply. See How to Configure Smart Licensing Using Policy: Workflows by Topology

To perform any additional configuration tasks, for instance, to configure a different license, or use an add-on license, or to configure a narrower reporting interval, refer to the corresponding task here. Check the "Supported Topologies" where provided, before you proceed.

Logging into Cisco (CSLU Interface)

Depending on your needs, when working in CSLU, you can either be in connected or disconnected mode. To work in the connected mode, complete these steps to connect with Cisco.

Procedure


Step 1

From the CSLU Main screen, click Login to Cisco (located at the top right corner of the screen).

Step 2

Enter: CCO User Name and CCO Password.

Step 3

In the CSLU Preferences tab, check that the Cisco connectivity toggle displays “Cisco Is Available”.


Configuring a Smart Account and a Virtual Account (CSLU Interface)

Both the Smart Account and Virtual Account are configured through the Preferences tab. Complete the following steps to configure both Smart and Virtual Accounts for connecting to Cisco.

Procedure


Step 1

Select the Preferences Tab from the CSLU home screen.

Step 2

Perform these steps for adding both a Smart Account and Virtual Account:

  1. In the Preferences screen navigate to the Smart Account field and add the Smart Account Name.

  2. Next, navigate to the Virtual Account field and add the Virtual Account Name.

If you are connected to CSSM (In the Preferences tab, Cisco is Available), you can select from the list of available SA/VAs.

If you are not connected to CSSM (In the Preferences tab, Cisco Is Not Available), enter the SA/VAs manually.

Note


SA/VA names are case sensitive.

Step 3

Click Save. The SA/VA accounts are saved to the system

Only one SA/VA pair can reside on CSLU at a time. You cannot add multiple accounts. To change to another SA/VA pair, repeat Steps 2a and 2b then Save. A new SA/VA account pair replaces the previous saved pair


Adding a Product-Initiated Product Instance in CSLU (CSLU Interface)

Complete these steps to add a device-created Product Instance using the Preferences tab.

Procedure


Step 1

Click the Preferences tab.

Step 2

In the Preferences screen, de-select the Validate Device check box.

Step 3

Set the Default Connect Method to Product Instance Initiated and then click Save.


Ensuring Network Reachability for Product Instance-Initiated Communication

This task provides possible configurations that may be required to ensure network reachability for product instance-initiated communication. Steps marked as "(Required)" are required for all product instances, all other steps my be required or optional, depending the kind of product instance and network requirements. Configure the applicable commands:

Before you begin

Supported topologies: Connected to CSSM Through CSLU (product instance-initiated communication).

Procedure

  Command or Action Purpose

Step 1

enable

Example:

Device> enable

Enables privileged EXEC mode. Enter your password, if prompted.

Step 2

configure terminal

Example:

Device# configure terminal

Enters global configuration mode.

Step 3

interface interface-type-number

Example:

Device (config)# interface gigabitethernet0/0

Enters interface configuration mode and specifies the Ethernet interface, subinterface, or VLAN to be associated with the VRF.

Step 4

vrf forwarding vrf-name

Example:

Device(config-if)# vrf forwarding Mgmt-vrf

Associates the VRF with the Layer 3 interface. This command activates multiprotocol VRF on an interface

Step 5

ip address ip-address mask

Example:

Device(config-if)# ip address 192.168.0.1 
255.255.0.0

Defines the IP address for the VRF.

Step 6

negotiation auto

Example:

Device(config-if)# negotiation auto

Enables auto-negotiation operation for the speed and duplex parameters of an interface.

Step 7

end

Example:

Device(config-if)# end

Exits the interface configuration mode and enters global configuration mode.

Step 8

ip http client source-interface interface-type-number

Example:

Device(config)# ip http client 
source-interface gigabitethernet0/0

Configures a source interface for the HTTP client.

Step 9

ip route ip-address ip-mask subnet mask

Example:

Device(config)# ip route vrf mgmt-vrf 
192.168.0.1 255.255.0.0 192.168.255.1

(Required) Configures a route and gateway on the product instance. You can configure either a static route or a dynamic route.

Step 10

{ ip| ipv6} name-server server-address 1 ...server-address 6]

Example:

Device(config)# Device(config)# ip name-server 
vrf mgmt-vrf 173.37.137.85

Configures Domain Name System (DNS) on the VRF interface.

Step 11

ip domain lookup source-interface interface-type-number

Example:

Device(config)# ip domain lookup 
source-interface gigabitethernet0/0

Configures the source interface for the DNS domain lookup.

Step 12

ip domain name domain-name

Example:

Device(config)# ip domain name example.com

Configure DNS discovery of your domain. In accompanying example, the name-server creates entry cslu-local.example.com.

Adding a CSLU-Initiated Product Instance in CSLU (CSLU Interface)

Using the CSLU interface, you can configure the connect method to be CSLU Initiated. This connect method (mode) enables CSLU to retrieve product instance information.


Note


The default Connect Method is set in the Preferences tab.

Complete these steps to add a Product Instance from the Inventory tab

Procedure


Step 1

Go to the Inventory tab and from the Product Instances table, select Add Single Product.

Step 2

Enter the Host (IP address of the host).

Step 3

Select the Connect Method and select an appropriate CSLU Initiated connect method.

Step 4

In the right panel, click Product Instance Login Credentials. The left panel of the screen changes to show the User Name and Password fields

Step 5

Enter the product instance User Name and Password.

Step 6

Click Save.

The information is saved to the system and the device is listed in the Product Instances table with the Last Contact listed as never.


Collecting Usage Reports: CSLU Initiated (CSLU Interface)

CSLU also allows you to manually trigger the gathering of usage reports from devices.

After configuring and selecting a product instance (selecting Add Single Product Instance, filling in the host name and selecting a CSLU Initiated connect method), select Actions for Selected > Collect Usage. CSLU connects to the selected product instances and collects usage reports. These usage reports are stored in CSLU’s local library. These reports can then be transferred to Cisco if CSLU is connected to Cisco, or (if you are not connected to Cisco) you can manually trigger usage collection by selecting Data > Export to CSSM.

If you are working in CSLU-initiated mode, complete these steps to configure CSLU to collect RUM reports from Product Instances.

Procedure


Step 1

Click the Preferences tab and enter a valid Smart Account and Virtual Account, and then select an appropriate CSLU Initiated collect method. (If there have been any changes in Preferences, make sure you click Save.)

Step 2

Click the Inventory tab and select one or more product instances.

Step 3

Click Actions for Selected > Collect Usage

RUM reports are retrieved from each selected device and stored in the CSLU local library. The Last Contact column is updated to show the time the report was received, and the Alerts column shows the status.

If CSLU is currently logged into Cisco the reports will be automatically sent to the associated Smart Account and Virtual Account in Cisco and Cisco will send an acknowledgement to CSLU as well as to the product instance. The acknowledgement will be listed in the alerts column of the Product Instance table.

To manually transfer usage reports Cisco, from the CSLU main screen select Data > Export to CSSM.

Step 4

From the Export to CSSM modal, you can select the local directory where the reports are to be stored. (<CSLU_WORKING_Directory>/data/default/rum/unsent)

At this point, the usage reports are saved in your local directory (library). To upload these usage reports to Cisco, follow the steps described in Uploading Data or Requests to CSSM and Downloading a File.

Note


The Windows operating system can change the behavior of a usage report file properties by dropping the extension when that file is renamed. The behavior change happens when you rename the downloaded file and the renamed file drops the extension. For example, the downloaded default file named UD_xxx.tar is renamed to UD_yyy. The file loses its TAR extension and cannot function. To enable the usage file to function normally, after re-naming a usage report file, you must also add the TAR extension back to the file name, for example UD_yyy.tar.


Export to CSSM (CSLU Interface)

This option can be used as a part of a manual download procedure when you want the workstation isolated for security purposes.

Procedure


Step 1

Go to the Preferences tab, and turn off the Cisco Connectivity toggle switch.

The field switches to “Cisco Is Not Available”.

Step 2

From the CSLU home screen, navigate to Data > Export to CSSM.

Step 3

Select the file from the modal that opens and click Save. You now have the file saved.

Note


At this point you have a DLC file, RUM file, or both.

Step 4

From a workstation that has connectivity to Cisco, and complete the following: Uploading Data or Requests to CSSM and Downloading a File

Once the file is downloaded, you can import it into CSLU. See: Import from CSSM (CSLU Interface)

Import from CSSM (CSLU Interface)

Once you have received the ACK or other file (such as an authorization code) from Cisco, you are ready to upload that file to your system. This procedure can be used for workstations that are offline. Complete these steps to select and upload files from Cisco.

Procedure


Step 1

Ensure that you have downloaded the file to a location that is accessible to CSLU.

Step 2

From the CSLU home screen, navigate to Data > Import from CSSM.

Step 3

An Import from CSSM modal open for you to either:

  • Drag and Drop a File that resides on your local drive, or

  • Browse for the appropriate *.xml file, select the file and click Open.

If the upload is successful, you will get a message indicating that the file was successfully sent to the server. If the upload is not successful, you will get an import error.

Step 4

When you have finished uploading, click the x at the top right corner of the modal to close it.


Ensuring Network Reachability for CSLU-Initiated Communication

This task provides possible configurations that may be required to ensure network reachability for CSLU-initiated communication. Steps marked as "(Required)" are required for all product instances, all other steps may be required or optional, depending the kind of product instance and network requirements. Configure the applicable commands:

Before you begin

Supported topologies: Connected to CSSM Through CSLU (CSLU-initiated communication).

Procedure

  Command or Action Purpose

Step 1

enable

Example:

Device> enable

Enables privileged EXEC mode. Enter your password, if prompted.

Step 2

configure terminal

Example:

Device# configure terminal

Enters global configuration mode.

Step 3

aaa new model

Example:

Device(config)# aaa new model

(Required) Enable the authentication, authorization, and accounting (AAA) access control model.

Step 4

aaa authentication login default local

Example:

Device(config)# aaa authentication login default local

(Required) Sets AAA authentication to use the local username database for authentication.

Step 5

aaa authorization exec default local

Example:

Device(config)# aaa authorization exec default local

Sets the parameters that restrict user access to a network. The user is allowed to run an EXEC shell.

Step 6

ip routing

Example:

Device(config)# ip routing

Enables IP routing.

Step 7

{ ip| ipv6} name-server server-address 1 ...server-address 6]

Example:

Device(config)# ip name-server vrf Mgmt-vrf 
192.168.1.100 192.168.1.200 192.168.1.300

(Optional) Specifies the address of one or more name servers to use for name and address resolution.

You can specify up to six name servers. Separate each server address with a space. The first server specified is the primary server. The device sends DNS queries to the primary server first. If that query fails, the backup servers are queried.

Step 8

ip domain lookup source-interface interface-type-number

Example:

Device(config)# ip domain lookup 
source-interface gigabitethernet0/0

Enables DNS-based hostname-to-address translation on your device. This feature is enabled by default.

If your network devices require connectivity with devices in networks for which you do not control name assignment, you can dynamically assign device names that uniquely identify your devices by using the global Internet naming scheme (DNS).

Step 9

ip domain name name

Example:

Device(config)# ip domain name vrf 
Mgmt-vrf cisco.com

Defines a default domain name that the software uses to complete unqualified hostnames (names without a dotted-decimal domain name).

Step 10

no username name

Example:

Device(config)# no username admin

(Required) Clears the specified username, if it exists. For name , enter the same username you will create in the next step. This ensures that a duplicate of the username you are going to create in the next step does not exist.

If you plan to use REST APIs for CSLU-initiated retrieval of RUM reports, you have to log in to CSLU. Duplicate usernames may cause the feature to work incorrectly if there are duplicate usernames in the system.

Step 11

username name privilege level password password

Example:

Device(config)# username admin privilege 15 
password 0 lab

(Required) Establishes a username-based authentication system.

The privilege keyword sets the privilege level for the user. A number between 0 and 15 that specifies the privilege level for the user.

The password allows access to the name argument. A password must be from 1 to 25 characters, can contain embedded spaces, and must be the last option specified in the username command.

This enables CSLU to use the product instance native REST.

Note


Enter this username and password in CSLU (Collecting Usage Reports: CSLU Initiated (CSLU Interface)Step 4. f. CSLU can then collect RUM reports from the product instance.

Step 12

interface interface-type-number

Example:

Device (config)# interface gigabitethernet0/0

Enters interface configuration mode and specifies the Ethernet interface, subinterface, or VLAN to be associated with the VRF.

Step 13

vrf forwarding vrf-name

Example:

Device(config-if)# vrf forwarding Mgmt-vrf

Associates the VRF with the Layer 3 interface. This command activates multiprotocol VRF on an interface

Step 14

ip address ip-address mask

Example:

Device(config-if)# ip address 192.168.0.1 255.255.0.0

Defines the IP address for the VRF.

Step 15

negotiation auto

Example:

Device(config-if)# negotiation auto

Enables auto-negotiation operation for the speed and duplex parameters of an interface.

Step 16

no shutdown

Example:

Device(config-if)# no shutdown

Restarts a disabled interface.

Step 17

end

Example:

Device(config-if)# end

Exits the interface configuration mode and enters global configuration mode.

Step 18

ip http server

Example:

Device(config)# ip http server

(Required) Enables the HTTP server on your IP or IPv6 system, including a Cisco web browser user interface. The HTTP server uses the standard port 80, by default.

Step 19

ip http authentication local

Example:

ip http authentication local
Device(config)# 

(Required) Specifies a particular authentication method for HTTP server users.

The local keyword means that the login user name, password and privilege level access combination specified in the local system configuration (by the username global configuration command) should be used for authentication and authorization.

Step 20

ip http secure-server

Example:

Device(config)# ip http server

(Required) Enables a secure HTTP (HTTPS) server. The HTTPS server uses the Secure Sockets Layer (SSL) version 3.0 protocol.

Step 21

ip http max-connections

Example:

Device(config)# ip http max-connections 16

(Required) Configures the maximum number of concurrent connections allowed for the HTTP server. Enter an integer in the range from 1 to 16. The default is 5.

Step 22

ip tftp source-interface interface-type-number

Example:

Device(config)# ip tftp source-interface 
GigabitEthernet0/0

Specifies the IP address of an interface as the source address for TFTP connections.

Step 23

ip route ip-address ip-mask subnet mask

Example:

Device(config)# ip route vrf mgmt-vrf 
192.168.0.1 255.255.0.0 192.168.255.1

Configures a route and gateway on the product instance. You can configure either a static route or a dynamic route.

Step 24

logging host

Example:

Device(config)# logging host 172.25.33.20 
vrf Mgmt-vrf

Logs system messages and debug output to a remote host.

Step 25

end

Example:

Device(config)# end

Exits the global configuration mode and enters priveleged EXEC mode.

Step 26

show ip http server session-module

Example:

Device# show ip http server session-module

(Required) Verifies HTTP connectivity. In the output, check that SL_HTTP is active. Additionally, you can also perform the following checks :

  • From device where CSLU is installed, verify that you can ping the product instance. A successful ping confirms that the product instance is reachable.

  • From a Web browser on the device where CSLU is installed verify https://<product-instance-ip>/. This ensures that the REST API from CSLU to the product instance works as expected.

Requesting SLAC for One or More Product Instance (CSLU Interface)

This task shows you how to manually request SLAC for one or more product instances in CSLU.

Before you begin

Supported topologies:

  • Connected to CSSM Through CSLU (Product instance-initiated and CSLU-initiated)

  • CSLU Disconnected from CSSM (Product instance-initiated and CSLU-initiated)

Procedure


Step 1

Navigate to the Inventory tab. From the Product Instance table, select the one or more product instances for authorization code request.

Step 2

From the Actions for Selected menu, select the Authorization Code Request option.

The Authorization Request Information modal pops up.

Step 3

Click Accept.

Another modal opens to select a local .csv file for uploading.

Step 4

Upload the file to CSSM, generate authorization codes and download the file containing the codes. See Generating and Downloading SLAC from CSSM to a File.

Step 5

Return to the CSLU interface.

Step 6

Apply the authorization codes by selecting Data > Import from CSSM. See Import from CSSM (CSLU Interface)

If CSLU is in the product instance-initiated mode: The uploaded codes are applied to the product instance the next time the product instance contacts CSLU.

If CSLU is in the CSLU-initiated mode: The uploaded codes are now applied to the product instance the next time the CSLU runs an update.


Setting Up a Connection to CSSM

The following steps show how to set up a Layer 3 connection to CSSM to verify network reachability. Steps marked as "(Required)" are required for all product instances, all other steps may be required or optional, depending the kind of product instance and network requirements. Configure the applicable commands:

Procedure

  Command or Action Purpose

Step 1

enable

Example:

Device> enable

Enables privileged EXEC mode. Enter your password, if prompted.

Step 2

configure terminal

Example:

Device# configure terminal

Enters global configuration mode.

Step 3

{ ip| ipv6} name-server server-address 1 ...server-address 6]

Example:

Device(config)# ip name-server 
209.165.201.1 209.165.200.225 209.165.201.14 209.165.200.230

Specifies the address of one or more name servers to use for name and address resolution.

You can specify up to six name servers. Separate each server address with a space. The first server specified is the primary server. The device sends DNS queries to the primary server first. If that query fails, the backup servers are queried.

Step 4

ip name-server vrf Mgmt-vrf server-address 1...server-address 6

Example:

Device(config)# ip name-server vrf Mgmt-vrf 
209.165.201.1 209.165.200.225 209.165.201.14 209.165.200.230

(Optional) Configures DNS on the VRF interface. You can specify up to six name servers. Separate each server address with a space.

Note


This command is an alternative to the ip name-server command.

Step 5

ip domain lookup source-interface interface-type interface-number

Example:

Device(config)# ip domain lookup source-interface Vlan100

Configures the source interface for the DNS domain lookup.

Step 6

ip domain name domain-name

Example:

Device(config)# ip domain name example.com

Configures the domain name.

Step 7

ip host tools.cisco.com ip-address

Example:

Device(config)# ip host tools.cisco.com 209.165.201.30

Configures static hostname-to-address mappings in the DNS hostname cache if automatic DNS mapping is not available.

Step 8

interface interface-type-number

Example:

Device(config)# interface Vlan100
Device(config-if)# ip address 192.0.2.10 255.255.255.0
Device(config-if)# exit

Configures a Layer 3 interface. Enter an interface type and number or a VLAN.

Step 9

ntp server ip-address [version number] [key key-id] [prefer]

Example:

Device(config)# ntp server 198.51.100.100 version 2 prefer

(Required) Activates the NTP service (if it has not already been activated) and enables the system to synchronize the system software clock with the specified NTP server. This ensures that the device time is synchronized with CSSM.

Use the prefer keyword if you need to use this command multiple times and you want to set a preferred server. Using this keyword reduces switching between servers.

Step 10

switchport access vlan vlan_id

Example:

Device(config)# interface GigabitEthernet1/0/1
Device(config-if)# switchport access vlan 100
Device(config-if)# switchport mode access
Device(config-if)# exit
OR
Device(config)# 

Enables the VLAN for which this access port carries traffic and sets the interface as a nontrunking nontagged single-VLAN Ethernet interface.

Note


This step is to be configured only if the switchport access mode is required. The switchport access vlan command may apply to Catalyst switching product instances, for example, and for routing product instances you may want to configure the ip address ip-address mask command instead.

Step 11

ip route ip-address ip-mask subnet mask

Example:

Device(config)# ip route 192.0.2.0 255.255.255.255 192.0.2.1

Configures a route on the device. You can configure either a static route or a dynamic route.

Step 12

ip http client source-interface interface-type-number

Example:

Device(config)# ip http client source-interface Vlan100

(Required) Configures a source interface for the HTTP client. Enter an interface type and number or a VLAN.

Step 13

exit

Example:

Device(config)# exit

Exits global configuration mode and returns to privileged EXEC mode.

Step 14

copy running-config startup-config

Example:

Device# copy running-config startup-config

Saves your entries in the configuration file.

Configuring Smart Transport Through an HTTPs Proxy

To use a proxy server to communicate with CSSM when using the Smart transport mode, complete the following steps:


Note


Authenticated HTTPs proxy configurations are not supported.


Procedure

  Command or Action Purpose

Step 1

enable

Example:

Device> enable

Enables privileged EXEC mode. Enter your password, if prompted.

Step 2

configure terminal

Example:

Device# configure terminal

Enters global configuration mode.

Step 3

license smart transport smart

Example:

Device(config)# license smart transport smart

Enables Smart transport mode.

Step 4

license smart url default

Example:

Device(config)# license smart transport default

Automatically configures the Smart URL (https://smartreceiver.cisco.com/licservice/license). For this option to work as expected, the transport mode in the previous step must be configured as smart.

Step 5

license smart proxy { address address_hostname| port port_num}

Example:

Device(config)# license smart proxy address 192.168.0.1
Device(config)# license smart proxy port 3128

Configures a proxy for the Smart transport mode. When a proxy is configured, licensing messages are sent to the proxy along with the final destination URL (CSSM). The proxy sends the message on to CSSM. Configure the proxy IP address and port information separately:

  • address address_hostname : Specifies the proxy address. Enter the IP address or hostname of the proxy server.

  • port port_num : Specifies the proxy port. Enter the proxy port number.

Step 6

exit

Example:

Device(config)# exit

Exits global configuration mode and returns to privileged EXEC mode.

Step 7

copy running-config startup-config

Example:

Device# copy running-config startup-config

Saves your entries in the configuration file.

Configuring the Call Home Service for Direct Cloud Access

The Call Home service provides email-based and web-based notification of critical system events to CSSM. To configure the transport mode, enable the Call Home service, and configure a destination profile (A destination profile contains the required delivery information for an alert notification. At least one destination profile is required.), complete the following steps:


Note


All steps are required unless specifically called-out as “(Optional)”.


Procedure

  Command or Action Purpose

Step 1

enable

Example:

Device> enable

Enables privileged EXEC mode. Enter your password, if prompted.

Step 2

configure terminal

Example:

Device# configure terminal

Enters global configuration mode.

Step 3

license smart transport callhome

Example:

Device(config)# license smart transport callhome

Enables Call Home as the transport mode.

Step 4

license smart url url

Example:

Device(config)# license smart url 
https://tools.cisco.com/its/service/oddce/services/DDCEService

For the callhome transport mode, configure the CSSM URL exactly as shown in the example.

Step 5

service call-home

Example:

Device(config)# service call-home

Enables the Call Home feature.

Step 6

call-home

Example:

Device(config)# call-home

Enters Call Home configuration mode.

Step 7

contact-email-address email-address

Example:

Device(config-call-home)# contact-email-addr
username@example.com

Assigns customer's email address and enables Smart Call Home service full reporting capability and sends a full inventory message from Call-Home TAC profile to Smart Call Home server to start full registration process. You can enter up to 200 characters in email address format with no spaces.

Step 8

profile name

Example:

Device(config-call-home)# profile CiscoTAC-1
Device(config-call-home-profile)#

Enters the Call Home destination profile configuration submode for the specified destination profile.

By default:

  • The CiscoTAC-1 profile is inactive. To use this profile with the Call Home service, you must enable the profile.

  • The CiscoTAC-1 profile sends a full report of all types of events subscribed in the profile. The alternative is to additionally configure Device(cfg-call-home-profile)# anonymous-reporting-only anonymous-reporting-only. When this is set, only crash, inventory, and test messages will be sent.

Use the show call-home profile all command to check the profile status.

Step 9

active

Example:

Device(config-call-home-profile)# active

Enables the destination profile.

Step 10

destination transport-method http{email |http}

Example:

Device(config-call-home-profile)# destination transport-method 
http
AND
Device(config-call-home-profile)# no destination transport-method
 email

Enables the message transport method. In the example, Call Home service is enabled via HTTP and transport via email is disabled.

The no form of the command disables the method.

Step 11

destination address { email email_address |http url}

Example:

Device(config-call-home-profile)# destination address http 
https://tools.cisco.com/its/service/oddce/services/DDCEService
AND
Device(config-call-home-profile)# no destination address http 
https://tools.cisco.com/its/service/oddce/services/DDCEService

Configures the destination e-mail address or URL to which Call Home messages are sent. When entering a destination URL, include either http:// (default) or https://, depending on whether the server is a secure server.

In the example provided here, a http:// destination URL is configured; and the no form of the command is configured for https://.

Step 12

exit

Example:

Device(config-call-home-profile)# exit

Exits Call Home destination profile configuration mode and returns to Call Home configuration mode.

Step 13

exit

Example:

Device(config-call-home)# end

Exits Call Home configuration mode and returns to privileged EXEC mode.

Step 14

copy running-config startup-config

Example:

Device# copy running-config startup-config

Saves your entries in the configuration file.

Step 15

show call-home profile {name |all}

Displays the destination profile configuration for the specified profile or all configured profiles.

Configuring the Call Home Service for Direct Cloud Access through an HTTPs Proxy Server

The Call Home service can be configured through an HTTPs proxy server. This configuration requires no user authentication to connect to CSSM.


Note


Authenticated HTTPs proxy configurations are not supported.


To configure and enable the Call Home service through an HTTPs proxy, complete the following steps:


Note


All steps are required unless specifically called-out as “(Optional)”.


Procedure

  Command or Action Purpose

Step 1

enable

Example:

Device> enable

Enables privileged EXEC mode. Enter your password, if prompted.

Step 2

configure terminal

Example:

Device# configure terminal

Enters global configuration mode.

Step 3

license smart transport callhome

Example:

Device(config)# license smart transport callhome

Enables Call Home as the transport mode.

Step 4

service call-home

Example:

Device(config)# service call-home

Enables the Call Home feature.

Step 5

call-home

Example:

Device(config)# call-home

Enters Call Home configuration mode.

Step 6

http-proxy proxy-address proxy-port port-number

Example:

Device(config-call-home)# http-proxy 198.51.100.10 port 5000

Configures the proxy server information to the Call Home service.

Step 7

exit

Example:

Device(config-call-home)# exit

Exits Call Home configuration mode and enters global configuration mode.

Note the change in the criteria for the acceptance of proxy servers, starting with Cisco IOS XE Bengaluru 17.6.1: only the status code of the proxy server response is verified by the system and not the reason phrase. The RFC format is status-line = HTTP-version SP status-code SP reason-phrase CRLF. For more information about the status line, see section 3.1.2 of RFC 7230.

Step 8

exit

Example:

Device(config)# exit

Exits global configuration mode and enters privileged EXEC mode.

Step 9

copy running-config startup-config

Example:

Device# copy running-config startup-config

Saves your entries in the configuration file.

Assigning a Smart Account and Virtual Account (SSM On-Prem UI)

You can use this procedure to import one or more product instances along with corresponding Smart Account and Virtual Account information, into the SSM On-Prem database. This enables SSM On-Prem to map product instances that are part of local virtual accounts (other than the default local virtual account), to the correct license pool in CSSM:

Before you begin

Supported topologies: SSM On-Prem Deployment (product instance-initiated communication).

Procedure


Step 1

Log into the SSM On-Prem and select the Smart Licensing workspace.

Step 2

Navigate to Inventory > SL Using Policy > Export/Import All > Import Product Instances List

The Upload Product Instances window is displayed.

Step 3

Click Download to download the .csv template file and enter the required information for all the product instances in the template.

Step 4

Once you have filled-out the template, click Inventory > SL Using Policy > Export/Import All > Import Product Instances List.

The Upload Product Instances window is displayed.

Step 5

Now, click Browse and upload the filled-out .csv template.

Smart Account and Virtual Account information for all uploaded product instances is now available in SSM On-Prem.


Validating Devices (SSM On-Prem UI)

When device validation is enabled, RUM reports from an unknown product instance (not in the SSM On-Prem database) are rejected.

By default, devices are not validated. Complete the following steps to enable the function:

Before you begin

Supported topologies: SSM On-Prem Deployment (product instance-initiated communication).

Procedure


Step 1

In the On-Prem License Workspace window, click Admin Workspace and log in, if prompted.

The On-Prem Admin Workspace window is displayed.

Step 2

Click the Settings widget.

The Settings window is displayed.

Step 3

Navigate to the CSLU tab and turn-on the Validate Device toggle switch.

RUM reports from an unknown product instance will now be rejected. If you haven't already, you must now add the required product instances to the SSM On-Prem database before sending RUM reports. See Assigning a Smart Account and Virtual Account (SSM On-Prem UI).


Ensuring Network Reachability for Product Instance-Initiated Communication

This task provides possible configurations that may be required to ensure network reachability for product instance-initiated communication. Steps marked as "(Required)" are required for all product instances, all other steps my be required or optional, depending the kind of product instance and network requirements. Configure the applicable commands:


Note


Ensure that you configure steps 13, 14, and 15 exactly as shown below. These commands must be configured to ensure that the correct trustpoint is used and that the necessary certificates are accepted for network reachability.


Before you begin

Supported topologies: SSM On-Prem Deployment (product instance-initiated communication).

Procedure

  Command or Action Purpose

Step 1

enable

Example:

Device> enable

Enables privileged EXEC mode. Enter your password, if prompted.

Step 2

configure terminal

Example:

Device# configure terminal

Enters global configuration mode.

Step 3

interface interface-type-number

Example:

Device (config)# interface gigabitethernet0/0

Enters interface configuration mode and specifies the Ethernet interface, subinterface, or VLAN to be associated with the VRF.

Step 4

vrf forwarding vrf-name

Example:

Device(config-if)# vrf forwarding Mgmt-vrf

Associates the VRF with the Layer 3 interface. This command activates multiprotocol VRF on an interface

Step 5

ip address ip-address mask

Example:

Device(config-if)# ip address 192.168.0.1 
255.255.0.0

Defines the IP address for the VRF.

Step 6

negotiation auto

Example:

Device(config-if)# negotiation auto

Enables auto-negotiation operation for the speed and duplex parameters of an interface.

Step 7

end

Example:

Device(config-if)# end

Exits the interface configuration mode and enters global configuration mode.

Step 8

ip http client source-interface interface-type-number

Example:

Device(config)# ip http client 
source-interface gigabitethernet0/0

Configures a source interface for the HTTP client.

Step 9

ip route ip-address ip-mask subnet mask

Example:

Device(config)# ip route vrf mgmt-vrf 
192.168.0.1 255.255.0.0 192.168.255.1

(Required) Configures a route and gateway on the product instance. You can configure either a static route or a dynamic route.

Step 10

{ ip| ipv6} name-server server-address 1 ...server-address 6]

Example:

Device(config)# Device(config)# ip name-server 
vrf mgmt-vrf 198.51.100.1

Configures Domain Name System (DNS) on the VRF interface.

Step 11

ip domain lookup source-interface interface-type-number

Example:

Device(config)# ip domain lookup 
source-interface gigabitethernet0/0

Configures the source interface for the DNS domain lookup.

Step 12

ip domain name domain-name

Example:

Device(config)# ip domain name example.com

Configure DNS discovery of your domain. In the accompanying example, the name-server creates entry cslu-local.example.com.

Step 13

crypto pki trustpoint SLA-TrustPoint

Example:

Device(config)# crypto pki trustpoint SLA-TrustPoint
Device(ca-trustpoint)#

(Required) Declares that the product instance should use trustpoint “SLA-TrustPoint” and enters the ca-trustpoint configuration mode. The product instance does not recognize any trustpoints until you declare a trustpoint using this command.

Step 14

enrollment terminal

Example:

Device(ca-trustpoint)# enrollment terminal

(Required) Specifies the certificate enrollment method.

Step 15

revocation-check none

Example:

Device(ca-trustpoint)# revocation-check none

(Required) Specifes a method that is to be used to ensure that the certificate of a peer is not revoked. For the SSM On-Prem Deployment topology, enter the none keyword. This means that a revocation check will not be performed and the certificate will always be accepted.

Step 16

exit

Example:

Device(ca-trustpoint)# exit
Device(config)# exit

Exits the ca-trustpoint configuration mode and then the global configuration mode and returns to privileged EXEC mode.

Step 17

copy running-config startup-config

Example:

Device# copy running-config startup-config

Saves your entries in the configuration file.

Retrieving the Transport URL (SSM On-Prem UI)

You must configure the transport URL on the product instance when you deploy product instance-initiated communication in an SSM On-Prem deployment. This task shows you how to easily copy the complete URL including the tenant ID from SSM On-Prem.

Before you begin

Supported topologies: SSM On-Prem Deployment (product instance-initiated communication).

Procedure


Step 1

Log into SSM On-Prem and select the Smart Licensing workspace.

Step 2

Navigate to the Inventory tab and from the dropdown list of local virtual accounts (top right corner), select the default local virtual account. When you do, the area under the Inventory tab displays Local Virtual Account: Default.

Step 3

Navigate to the General tab.

The Product Instance Registration Tokens area is displayed.

Step 4

In the Product Instance Registration Tokens area click CSLU Transport URL.

The Product Registration URL pop-window is displayed.

Step 5

Copy the entire URL and save it in an accessible place.

You will require the URL when you configure the transport type and URL on the product instance.

Step 6

Configure the transport type and URL. See: Setting the Transport Type, URL, and Reporting Interval.


Exporting and Importing Usage Data (SSM On-Prem UI)

You can use this procedure to complete usage synchronization between SSM On-Prem and CSSM when SSM On-Prem is disconnected from CSSM.

Before you begin

Supported topologies:

  • SSM On-Prem Deployment (SSM On-Prem-initiated communication)

  • SSM On-Prem Deployment (product instance-initiated communication).

Reporting data must be available in SSM On-Prem. You must have either pushed the nessary reporting data from the product instance to SSM On-Prem (product instance-initiated communication) or retrieved the necessary reporting data from the product instance (SSM On-Prem-initiated communication).

Procedure


Step 1

Log into SSM On-Prem and select Smart Licensing.

Step 2

Navigate to Inventory > SL Using Policy tab.

Step 3

In the SL Using Policy tab area, click Export/Import All... > Export Usage to Cisco.

This generates one .tar file with all the usage reports available in the SSM On-Prem server.

Step 4

Complete this task in CSSM: Uploading Data or Requests to CSSM and Downloading a File.

At the end of this task you will have an ACK file to import into SSM On-Prem.

Step 5

Again navigate to the Inventory > SL Using Policy tab.

Step 6

In the SL Using Policy tab area, click Export/Import All... > Import From Cisco . Upload the .tar ACK file.

To verify ACK import, in the SL Using Policy tab area check the Alerts column of the corresponding product instance. The following message is displayed: Acknowledgement received from CSSM.


Adding One or More Product Instances (SSM On-Prem UI)

You can use this procedure to add one product instance or to import and add multiple product instances. It enables SSM On-Prem to retrieve information from the product instance.

Before you begin

Supported topologies: SSM On-Prem Deployment (SSM On-Prem-initiated communication).

Procedure


Step 1

Log into the SSM On-Prem UI and click Smart Licensing.

Step 2

Navigate to Inventory tab. Select a local virtual account from the drop-down list in the top right corner.

Step 3

Navigate to the SL Using Policy tab.

Step 4

Add a single product or import multiple product instances (choose one).

  • To add a single product instance:
    1. In the SL Using Policy tab area, click Add Single Product.

    2. In the Host field, enter the IP address of the host (product instance).

    3. From the Connect Method dropdown list, select an appropriate SSM On-Prem-initiated connect method.

      The available connect methods for SSM On-Prem-initiated communication are: NETCONF, RESTCONF, and REST API.

    4. In the right panel, click Product Instance Login Credentials.

      The Product Instance Login Credentials window is displayed

      Note


      You need the login credentials only if a product instance requires a SLAC.

    5. Enter the User ID and Password, and click Save.

      This is the same user ID and password that you configured as part of commands required to establish network reachability (Ensuring Network Reachability for SSM On-Prem-Initiated Communication).

      Once validated, the product instance is displayed in the listing in the SL Using Policy tab area.

  • To import multiple product instances:
    1. In SL Using Policy tab, click Export/Import All... > Import Product Instances List.

      The Upload Product Instances window is displayed.

    2. Click Download to download the predefined .csv template.

    3. Enter the required information for all the product instances in the .csv template.

      In the template, ensure that you provide Host, Connect Method and Login Credentials for all product instances.

      The available connect methods for SSM On-Prem-initiated communication are: NETCONF, RESTCONF, and REST API.

      Login credentials refer to the user ID and password that you configured as part of commands required to establish network reachability (Ensuring Network Reachability for SSM On-Prem-Initiated Communication).

    4. Again navigate to Inventory > SL Using Policy tab. Click Export/Import All.... > Import Product Instances List.

      The Upload Product Instances window is displayed.

    5. Now upload the filled-out .csv template.

      Once validated, the product instances are displayed in the listing in the SL Using Policy tab.


Ensuring Network Reachability for SSM On-Prem-Initiated Communication

This task provides possible configurations that may be required to ensure network reachability for SSM On-Prem-initiated communication. Steps marked as "(Required)" are required for all product instances, all other steps may be required or optional, depending the kind of product instance and network requirements. Configure the applicable commands:


Note


Ensure that you configure steps 25, 26, and 27 exactly as shown below. These commands must be configured to ensure that the correct trustpoint is used and that the necessary certificates are accepted for network reachability.


Before you begin

Supported topologies: SSM On-Prem Deployment (SSM On-Prem-initiated communication).

Procedure

  Command or Action Purpose

Step 1

enable

Example:

Device> enable

Enables privileged EXEC mode. Enter your password, if prompted.

Step 2

configure terminal

Example:

Device# configure terminal

Enters global configuration mode.

Step 3

aaa new model

Example:

Device(config)# aaa new model

(Required) Enable the authentication, authorization, and accounting (AAA) access control model.

Step 4

aaa authentication login default local

Example:

Device(config)# aaa authentication login default local

(Required) Sets AAA authentication to use the local username database for authentication.

Step 5

aaa authorization exec default local

Example:

Device(config)# aaa authorization exec default local

Sets the parameters that restrict user access to a network. The user is allowed to run an EXEC shell.

Step 6

ip routing

Example:

Device(config)# ip routing

Enables IP routing.

Step 7

{ ip| ipv6} name-server server-address 1 ...server-address 6]

Example:

Device(config)# ip name-server vrf Mgmt-vrf 
192.168.1.100 192.168.1.200 192.168.1.300

(Optional) Specifies the address of one or more name servers to use for name and address resolution.

You can specify up to six name servers. Separate each server address with a space. The first server specified is the primary server. The device sends DNS queries to the primary server first. If that query fails, the backup servers are queried.

Step 8

ip domain lookup source-interface interface-type-number

Example:

Device(config)# ip domain lookup 
source-interface gigabitethernet0/0

Enables DNS-based hostname-to-address translation on your device. This feature is enabled by default.

If your network devices require connectivity with devices in networks for which you do not control name assignment, you can dynamically assign device names that uniquely identify your devices by using the global Internet naming scheme (DNS).

Step 9

ip domain name name

Example:

Device(config)# ip domain name vrf 
Mgmt-vrf cisco.com

Defines a default domain name that the software uses to complete unqualified hostnames (names without a dotted-decimal domain name).

Step 10

no username name

Example:

Device(config)# no username admin

(Required) Clears the specified username, if it exists. For name , enter the same username you will create in the next step. This ensures that a duplicate of the username you are going to create in the next step does not exist.

If you plan to use REST APIs for SSM On-Prem-initiated retrieval of RUM reports, you have to log in to SSM On-Prem. Duplicate usernames may cause the feature to work incorrectly if there are present in the system.

Step 11

username name privilege level password password

Example:

Device(config)# username admin privilege 15 
password 0 lab

(Required) Establishes a username-based authentication system.

The privilege keyword sets the privilege level for the user. A number between 0 and 15 that specifies the privilege level for the user.

The password allows access to the name argument. A password must be from 1 to 25 characters, can contain embedded spaces, and must be the last option specified in the username command.

This enables SSM On-Prem to use the product instance native REST.

Note


Enter this username and password in SSM On-Prem (Adding One or More Product Instances (SSM On-Prem UI)). This enables SSM On-Prem to collect RUM reports from the product instance.

Step 12

interface interface-type-number

Example:

Device (config)# interface gigabitethernet0/0

Enters interface configuration mode and specifies the Ethernet interface, subinterface, or VLAN to be associated with the VRF.

Step 13

vrf forwarding vrf-name

Example:

Device(config-if)# vrf forwarding Mgmt-vrf

Associates the VRF with the Layer 3 interface. This command activates multiprotocol VRF on an interface

Step 14

ip address ip-address mask

Example:

Device(config-if)# ip address 192.168.0.1 255.255.0.0

Defines the IP address for the VRF.

Step 15

negotiation auto

Example:

Device(config-if)# negotiation auto

Enables auto-negotiation operation for the speed and duplex parameters of an interface.

Step 16

no shutdown

Example:

Device(config-if)# no shutdown

Restarts a disabled interface.

Step 17

end

Example:

Device(config-if)# end

Exits the interface configuration mode and enters global configuration mode.

Step 18

ip http server

Example:

Device(config)# ip http server

(Required) Enables the HTTP server on your IP or IPv6 system, including a Cisco web browser user interface. The HTTP server uses the standard port 80, by default.

Step 19

ip http authentication local

Example:

ip http authentication local
Device(config)# 

(Required) Specifies a particular authentication method for HTTP server users.

The local keyword means that the login user name, password and privilege level access combination specified in the local system configuration (by the username global configuration command) should be used for authentication and authorization.

Step 20

ip http secure-server

Example:

Device(config)# ip http server

(Required) Enables a secure HTTP (HTTPS) server. The HTTPS server uses the Secure Sockets Layer (SSL) version 3.0 protocol.

Step 21

ip http max-connections

Example:

Device(config)# ip http max-connections 16

(Required) Configures the maximum number of concurrent connections allowed for the HTTP server. Enter an integer in the range from 1 to 16. The default is 5.

Step 22

ip tftp source-interface interface-type-number

Example:

Device(config)# ip tftp source-interface 
GigabitEthernet0/0

Specifies the IP address of an interface as the source address for TFTP connections.

Step 23

ip route ip-address ip-mask subnet mask

Example:

Device(config)# ip route vrf mgmt-vrf 
192.168.0.1 255.255.0.0 192.168.255.1

Configures a route and gateway on the product instance. You can configure either a static route or a dynamic route.

Step 24

logging host

Example:

Device(config)# logging host 172.25.33.20 
vrf Mgmt-vrf

Logs system messages and debug output to a remote host.

Step 25

crypto pki trustpoint SLA-TrustPoint

Example:

Device(config)# crypto pki trustpoint SLA-TrustPoint
Device(ca-trustpoint)#

(Required) Declares that the product instance should use trustpoint “SLA-TrustPoint” and enters the ca-trustpoint configuration mode. The product instance does not recognize any trustpoints until you declare a trustpoint using this command.

Step 26

enrollment terminal

Example:

Device(ca-trustpoint)# enrollment terminal

(Required) Specifies the certificate enrollment method.

Step 27

revocation-check none

Example:

Device(ca-trustpoint)# revocation-check none

(Required) Specifes a method that is to be used to ensure that the certificate of a peer is not revoked. For the SSM On-Prem Deployment topology, enter the none keyword. This means that a revocation check will not be performed and the certificate will always be accepted.

Step 28

end

Example:

Device(ca-trustpoint)# exit
Device(config)# end

Exits the ca-trustpoint configuration mode and then the global configuration mode and returns to privileged EXEC mode.

Step 29

show ip http server session-module

Example:

Device# show ip http server session-module

(Required) Verifies HTTP connectivity. In the output, check that SL_HTTP is active. Additionally, you can also perform the following checks :

  • From device where SSM On-Prem is installed, verify that you can ping the product instance. A successful ping confirms that the product instance is reachable.

  • From a Web browser on the device where SSM On-Prem is installed verify https://<product-instance-ip>/. This ensures that the REST API from SSM On-Prem to the product instance works as expected.

Step 30

copy running-config startup-config

Example:

Device# copy running-config startup-config

Saves your entries in the configuration file.

Submitting an Authorization Code Request (SSM On-Prem UI)

With the SSM On-Prem Deployment topology, the authorization codes required for export-controlled and enfored licenses must be generated in CSSM and imported into SSM On-Prem before the product instance can request the same. This procedure shows you the steps you have to complete in SSM On-Prem (to submit the request and then import SLAC), points you to the procedure you have to complete in CSSM (to generate and download SLAC), and to the procedure you have to complete on the product instance (to finally request and install SLAC).

Before you begin

Supported topologies:

  • SSM On-Prem Deployment (SSM On-Prem-initiated communication)

  • SSM On-Prem Deployment (product instance-initiated communication).

Ensure that you have an adequate positive balace of the necessary export-controlled or enforced licenses in your Smart Account and Virtual Account in CSSM.

Procedure


Step 1

Log into SSM On-Prem and select Smart Licensing.

Step 2

Navigate to Inventory > SL Using Policy. Select all the product instances for which you want to request SLAC.

Step 3

Click Actions for Selected… > Authorization Code Request.

The Authorization Request Information pop-up window is displayed.

Step 4

Click Accept and save the .csv file when prompted.

The generated .csv file contains the list of selected product instances along with required device information, in the required format, to generate the SLAC in CSSM. 
Save this file in a location that is accessible when you are working on the CSSM Web UI (in the next step).

Step 5

Complete this task in CSSM: Generating and Downloading SLAC from CSSM to a File.

You can use the above procedure to generate SLAC for a single product instance and for multiple product instances. For the SSM On-Prem Deployment topology, follow the steps to generate SLAC for multiple product instances.

Step 6

Again navigate to Inventory > SL Using Policy.

Step 7

Click Export/Import All… > Import From Cisco.

Import the .csv file download at the end of the procedure in Step 4 above.

To verify import, under Inventory > SL Using Policy, see the Alerts column. The following message is displayed: Authorization message received from CSSM.

Step 8

Complete the final step depending on whether the product instance or SSM On-Prem initiates communication.

  • For product instance-initiated communication, configure the product instance to request and install SLAC from SSM On-Prem. See: Manually Requesting and Auto-Installing a SLAC

  • For SSM On-Prem-initiated communication, the uploaded codes are applied to the product instances the next time SSM On-Prem runs an update.


Manually Requesting and Auto-Installing a SLAC

To request CSSM or CSLU or SSM On-Prem for a SLAC and have it automatically installed on the product instance, perform the following steps on the product instance:

Before you begin

Supported topologies:

  • Connected to CSSM Through CSLU (product instance-initiated and CSLU-initiated communication)

  • Connected Directly to CSSM

  • CSLU Disconnected from CSSM (product instance-initiated and CSLU-initiated communication)

  • SSM On-Prem Deployment (product instance-initiated communication)

Before you proceed, check the following as well:

  • The product instance on which you are requesting the SLAC is connected CSSM, or CSLU, or SSM On-Prem.

  • The transport type and URL are configured accordingly. In the show license all command in privileged EXEC mode. In the output, check field Transport: .

  • You have installed a trust code by generating a token, if you are directly connected to CSSM. Enter the show license all command in privileged EXEC mode. In the output check field Trust Code Installed:

  • In case of an SSM On-Prem Deployment, the product instance requests SSM On-Prem for SLAC, so ensure that you have made the required number of SLACs available in the SSM On-Prem server before you can begin with this task.

Procedure

  Command or Action Purpose

Step 1

enable

Example:

Device> enable

Enables privileged EXEC mode. Enter your password, if prompted.

Step 2

license smart authorization request {add | replace} feature_name {all | local}

Example:

Device# license smart authorization request add hseck9 local

Requests a SLAC from CSSM or CSLU or SSM On-Prem.

  • Specify if you want to add to or replace an existing SLAC:

    • add : This adds the requested key to an existing SLAC. The new SLAC will contain all the keys of the existing SLAC, and the requested key.

    • replace : This replaces the existing SLAC. The new SLAC will contain only the requested key. All HSECK9 keys in the existing SLAC are returned. When you enter this keyword, the product instance checks if these existing keys are in-use. If they are, an error message is displayed, telling you to first disable the corresponding cryptographic feature.

  • feature_name : Enter the name of the export-controlled license for which you want to request an addition or a replacement of the SLAC. Enter "hseck9" to request and install SLAC for the HSECK9 key.

  • Specify the device by entering one of these options:

    • all : Gets the authorization code for all devices in a High Availability and stacking set-up.

      Note


      For stacking scenarios only: If you have added a device (where SLAC is not installed) to an existing stack where SLAC is already installed, use the replace and all options. This requests SLAC for all the devices in the stack. You cannot request SLAC for a particular member. Your only options are: either the active, or the entire stack.

    • local : Gets the authorization code for the active device in a High Availability and stacking set-up. This is the default option.

Step 3

(Optional) license smart sync {all | local}

Example:

Device# license smart sync local

Triggers the product instance to synchronize with CSSM, or CSLU, or SSM On-Prem, to send and receive any pending data.

This step is optional and applies only to scenarios where the product instance is connected to CSSM, or CSLU or SSM On-Prem, and where the product instance initiates communication. The corresponding topologies are: Connected Directly to CSSM, Connected to CSSM Through CSLU (product instance-initiated), and SSM On-Prem Deployment (product instance-initiated communication).

Here, the command manually triggers synchronization and completes the SLAC installation process. Otherwise SLAC is applied to the product instance the next time the product instance contacts CSLU or SSM On-Prem.

Step 4

Complete remaining steps for applicable topologies.

Step 5

show license authorization

Example:

Device# show license authorization
Overall status:
  Active: PID:C9300X-24HX,SN:FOC2519L8R7
      Status: SMART AUTHORIZATION INSTALLED on 
Oct 29 17:45:28 2021 UTC
      Last Confirmation code: 6746c5b5
  Standby: PID:C9300X-48HXN,SN:FOC2524L39P
      Status: NOT INSTALLED
  Member: PID:C9300X-48HX,SN:FOC2516LC92
      Status: NOT INSTALLED
 
Authorizations:
  C9K HSEC (Cat9K HSEC):
    Description: HSEC Key for Export Compliance on 
Cat9K Series Switches
    Total available count: 1
    Enforcement type: EXPORT RESTRICTED
    Term information:
      Active: PID:C9300X-24HX,SN:FOC2519L8R7
        Authorization type: SMART AUTHORIZATION INSTALLED 
        License type: PERPETUAL
          Term Count: 1
 
Purchased Licenses:
  No Purchase Information Available

Displays the SLAC that is installed on the product instance.

Generating and Saving a SLAC Request on the Product Instance

To generate and then save a SLAC request for an HSECK9 key to a file on the product instance, complete the following task:


Note


This method of requesting a SLAC is supported starting with Cisco IOS XE Cupertino 17.7.1 only.

Before you begin

Supported topologies: No Connectivity to CSSM and No CSLU

Procedure

  Command or Action Purpose

Step 1

enable

Example:

Device> enable

Enables privileged EXEC mode. Enter your password, if prompted.

Step 2

license smart authorization request {add | replace} feature_name {all| local}

Example:

Device# license smart authorization request add hseck9 local 

Generates a SLAC request with the required HSECK9 key and UDI details.

Specify if you want to add to or replace an existing SLAC:

  • add : Adds the requested key to an existing SLAC. The new authorization code will contain all the keys of the existing SLAC, and the requested license.

  • replace : Replaces the existing SLAC. The new SLAC will contain only the requested HSECK9 key. All keys in the existing SLAC are returned. When you enter this keyword, the product instance checks if these existing keys are in-use. If they are, an error message is displayed, telling you to first disable the corresponding feature.

For feature_name , enter the name of the export-controlled license for which you want to request an addition or a replacement of the SLAC. Enter "hseck9" to request and install SLAC for the HSECK9 key.

Specify the device by entering one of these options:

  • all : Gets the SLAC for all devices in a High Availability set-up

    Note


    If you have added a device (where SLAC is not installed), to an existing stack where SLAC is already installed, use the replace and all options. This requests SLAC for all the devices in the stack. You cannot request SLAC for a particular member. Your only options are: either the active, or the entire stack.

  • local : Gets the SLAC for the active device in a High Availability set-up. This is the default option.

Step 3

license smart authorization request savepath

Example:

Device# license smart authorization request save bootflash:slac.txt 

Saves the required UDI and HSECK9 key details for the SLAC request in a .txt file, in the specified location.

Step 4

Upload the file to CSSM, and then download the file containing the SLAC code.

Complete this task: Uploading Data or Requests to CSSM and Downloading a File.

Step 5

Install the file on the product instance.

Complete this task: Installing a File on the Product Instance.

Generating and Downloading SLAC from CSSM to a File

You can use this procedure to generate SLAC for a single product instance and for multiple product instances.

If it is for a single product instance, you will require the PID and serial number to complete this task. On the product instance, enter the show license udi command in privileged EXEC mode and keep this information handy.

If it is for multiple product instances, have the .csv file containing the PIDs and serial numbers of all applicable product instances saved in an accessible location.

Before you begin

Supported topologies:

  • Connected to CSSM Through CSLU (Product instance-initiated and CSLU-initiated)

  • CSLU Disconnected from CSSM (Product instance-initiated and CSLU-initiated)

  • No Connectivity to CSSM and No CSLU

  • SSM On-Prem Deployment (product instance-initiated and SSM On-Prem-initiated communication)

Procedure


Step 1

Log in to the CSSM Web UI at https://software.cisco.com. Under Smart Software Licensing, click the Manage licenses link.

Log in using the username and password provided by Cisco.

Step 2

Click the Inventory tab.

Step 3

From the Virtual Account drop-down list, choose the applicable virtual account.

Step 4

Click the Product Instances tab.

Step 5

Click the Authorize License Enforced Features tab.

Step 6

Generate SLAC for a single product instance or for multiple product instances (choose one).

  • To generate SLAC for a single product instance:
    1. Enter the PID and Serial Number.

      Note


      Do not populate any of the other fields.

    2. Choose the license, and in the corresponding Reserve column, and enter 1.

      Ensure that you choose the correct license for a PID. For Cisco Catalyst Access, Core, and Aggregation Switches where the HSECK9 is supported, select "C9K HSEC".

    3. Click Next

    4. Click Generate Authorization Code.

    5. Download the authorization code and save as a .csv file.

    6. Install the file on the product instance. See Installing a File on the Product Instance.

  • To generate SLAC for multiple product instances (you should have a .csv file to upload in this case):
    1. From the dropdown list that says “Single Device” (by default), change the selection to “Multiple Devices”.

      At this point, a "Download a template" link is displayed. If you don't already have the required template or file, you can download it. Only the serial number PID are mandatory.

    2. Click Choose File and navigate to the .csv file, which contains the list of product instances that require SLAC.

    3. Once uploaded, the list of devices is displayed in CSSM. All the devices will have the checkbox enabled (implying that you want to request a SLAC for all of them), and click Next.

    4. Specify the license quantity required for each product instance, and click Next.

      Note


      For the "C9K HSEC" license, one SLAC is required for each UDI.

    5. Click Reserve Licenses.

    6. Download accordingly to topology:

      • For the Connected to CSSM Through CSLU, CSLU Disconnected from CSSM, SSM On-Prem Deployment topologies, click Download Authorization Codes to download a.csv file containing all the authorization codes. Click Close.

        You can now import this .csv file to CSLU or SSM On-Prem. Return to the CSLU or SSM On-Prem interface to complete the remaining steps to import this file.

      • For the No Connectivity to CSSM and No CSLU topology (in an air-gapped network), where you have to import the code into the product instance, download the authorization code for each product instance to a separate .txt file. Do not download the .csv file which has all the codes.

        In the CSSM Web UI, return to the Inventory> Product Instances tab. Locate each product instance by its PID or serial number. Click on the UDI to display the Overview tab. The Last Contact field displays a link called Download Reservation Authorization Code. Click on the link to download the authorization code of only the selected product instance, in .txt format.

        Import each SLAC into the product instance, see Installing a File on the Product Instance.


Returning an Authorization Code

This task shows you how to return an authorization code for a license and to then return the license to your license pool in CSSM. You can use this procedure for all authorization codes - SLAC and SLR.

Before you begin

Supported topologies: all

For SLAC and SLR: Ensure that the key or license that you want to return is not in-use. If it is in-use, you must first disable the feature.

Procedure

  Command or Action Purpose

Step 1

enable

Example:

Device> enable

Enables privileged EXEC mode. Enter your password, if prompted.

Step 2

show license summary

Example:

Device# show license summary 
License Usage:
  License            Entitlement Tag            Count Status
  -------------------------------------------------------------
  network-advantage  (C9300-24 Network Advan...)    1 IN USE
  dna-advantage      (C9300-24 DNA Advantage)       1 IN USE
  network-advantage  (C9300-48 Network Advan...)    2 IN USE
  dna-advantage      (C9300-48 DNA Advantage)       2 IN USE
  C9K HSEC        (Cat9K HSEC)                   1 IN USE

(Optional) Displays license usage summary. This step applies only if you are returning a SLAC.

If the status of the HSECK9 key is displayed as NOT IN USE skip to Step 5.

If the status of the HSECK9 key is displayed as IN USE even after the cryptographic feature is disabled, then perform the next step. This is the case in the accompanying example.

Step 3

Depending on the cryptographic feature you were using, enter the applicable command to release the HSECK9 key.

  • For IPSec: platform hsec-license-release
  • For WAN MACsec: platform wanmacsec hsec-license-release

Example:

Device# configure terminal 
Device(config)# platform hsec-license-release 
HSEC license is released
Device(config)# exit

(Optional) Enters the global configuration mode, releases the HSECK9 key, and returns to privileged EXEC mode. This step applies only if you are returning a SLAC.

If the cryptographic feature using the HSECK9 key has been disabled or unconfigured, and the license is still displayed as IN USE, this command forces the HSECK9 key to be marked as NOT IN USE.

Step 4

show license summary

Example:

Device# show license summary 
License Usage:
  License            Entitlement Tag            Count Status
  ------------------------------------------------------------
  network-advantage  (C9300-24 Network Advan...)    1 IN USE
  dna-advantage      (C9300-24 DNA Advantage)       1 IN USE
  network-advantage  (C9300-48 Network Advan...)    2 IN USE
  dna-advantage      (C9300-48 DNA Advantage)       2 IN USE
  C9K HSEC           (Cat9K HSEC)                   0 NOT IN USE

(Optional) Displays license usage summary. This step applies only if you are returning a SLAC.

Ensure that the status of the license that you want to return is NOT IN USE.

Step 5

license smart authorization return {all |local} {offline[path ] |online}

Example:

Device# license smart authorization return all online

OR

Device# license smart authorization return all offline
Enter this return code in Cisco Smart Software Manager portal: 
UDI: PID:C9300X-24HX,SN:FOC2519L8R7 
Return code: Cr9JHx-L1x5Rj-ftwzg1-h9QZAU-LE5DT1-babWeL-FABPt9-Wr1Dn7-Rp7

OR
Device# license smart authorization return all offline bootflash:return-code.txt

Returns an authorization code back to the license pool in CSSM. A return code is displayed after you enter this command.

Specify the product instance:

  • all: Performs the action for all connected product instances in a High Availability or stacking set-up.

  • local: Performs the action for the active product instance. This is the default option.

Specify if you are connected to CSSM or not:

  • If the product instance is directly connected to CSSM, or it is connected to CSSM through CSLU or SSM On-Prem and the product instance-initiates communication, enter online. The code is automatically returned to CSSM and a confirmation is returned and installed on the product instance. If you choose this option, the return code is automatically submitted to CSSM.

  • If the product instance is not connected to CSSM, or if you have implemented a topology with CSLU-initiated or SSM On-Prem initiated communication, enter offline [filepath_filename] .

    If you choose the offline option, you must complete the additional step of submitting this to CSSM.

Step 6

no license smart reservation

Example:

Device# configure terminal
Device(config)# no license smart reservation
Device(config)# exit

Enter the global configuration mode, disables SLR configuration on the product instance, and returns to privileged EXEC mode.

This step is required only if the authorization code you are returning is an SLR authorization code. Skip this step if the code you are returning is a SLAC for an HSECK9 key.

Note

 
You must complete the authorization code return process (license smart authorization return ), online or offline, before you enter the no license smart reservation command in this step. Otherwise, the return may not be reflected in CSSM or in the show command, and you will have to contact your Cisco technical support representative to rectify the problem.

Step 7

show license authorization

Example:

Device# show license authorization
Overall status:
  Active: PID:C9300X-24HX,SN:FOC2519L8R7
      Status: NOT INSTALLED
      Last return code: Cr9JHx-L1x5Rj-ftwzg1-h9QZAU-LE5DT1-
babWeL-FABPt9-Wr1Dn7-Rp7
  Standby: PID:C9300X-48HXN,SN:FOC2524L39P
      Status: NOT INSTALLED
  Member: PID:C9300X-48HX,SN:FOC2516LC92
      Status: NOT INSTALLED

<output truncated>
 

Displays licensing information. If the return process is completed correctly, the Last return code: field displays the return code.

Entering a SLAC Return Code in CSSM and Removing a Product Instance

You can use this task to complete the return procedure for a SLAC when the product instance is not connected to CSSM. This returns the HSECK9 keys to the license pool. Additionally, you also have the option of removing the product instance from CSSM.

Before you begin

Supported topologies: all

Follow this procedure only if you are returning a SLAC.

Ensure that you have generated a return code as shown in Returning an Authorization Code. (Enter it in Step 7 in this task).

Procedure


Step 1

Log in to the CSSM Web UI at https://software.cisco.com. Under Smart Software Licensing, click the Manage licenseslink.

Log in using the username and password provided by Cisco.

Step 2

Click the Inventory tab.

Step 3

From the Virtual Account drop-down list, choose your Virtual Account.

Step 4

Click the Product Instances tab.

The list of product instances that are available is displayed.

Step 5

Locate the required product instance from the product instances list. You can enter the PID or serial number in the search tab to locate it.

Step 6

In the Actions column of the product instance, from the Actions dropdown list, select Remove.

The Remove Reservation window is displayed.

Step 7

In the Reservation Return Code field, enter the SLAC return code you generated.

Step 8

Click Remove Reservation.

The HSECK9 key is returned to the license pool. The Remove Reservation window is automatically closed and you return to the Product Instances tab.

Note


If you want to only return the SLAC, your task ends here. If you also want to remove the product instance from CSSM, continue to the next step.

Step 9

In the Actions column of the product instance, from the Actions dropdown list, again select Remove.

The Confirm Remove Product Instance window is displayed.

Step 10

Click Remove Product Instance.

The product instance is removed from CSSM and no longer consumes any licenses.


Entering an SLR Return Code in CSSM and Removing the Product Instance

You can use this task to complete the return prcedure for an SLR authorization code. This returns the licenses to the license pool and removes the product instance.

Before you begin

Supported topologies: all

Follow this procedure only if you are returning an SLR authorization code.

Ensure that you have generated a return code as shown in Returning an Authorization Code. (Enter it in Step 7 in this task).

Procedure


Step 1

Log in to the CSSM Web UI at https://software.cisco.com. Under Smart Software Licensing, click the Manage licenseslink.

Log in using the username and password provided by Cisco.

Step 2

Click the Inventory tab.

Step 3

From the Virtual Account drop-down list, choose your Virtual Account.

Step 4

Click the Product Instances tab.

The list of product instances that are available is displayed.

Step 5

Locate the required product instance from the product instances list. You can enter the PID or serial number in the search tab to locate it.

Step 6

In the Actions column of the product instance, from the Actions dropdown list, select Remove.

  • If the product instance is not using a license with an SLR authorization code then the Confirm Remove Product Instance window is displayed.

  • If the product instance is using a license with an SLR authorization code, then the Remove Product Instance window, with a field for return code entry is displayed.

Step 7

In the Reservation Return Code field, enter the return code you generated.

Note

 
This step applies only if the product instance is using a license with an SLR authorization code.

Step 8

Click Remove Product Instance.

The license is returned to the license pool and the product instance is removed.


Generating a New Token for a Trust Code from CSSM

To generate a token to request a trust code, complete the following steps.

Generate one token for each Virtual Account you have. You can use same token for all the product instances that are part of one Virtual Account.

Before you begin

Supported topologies: Connected Directly to CSSM

Procedure


Step 1

Log in to the CSSM Web UI at https://software.cisco.com. Under Smart Software Licensing, click the Manage licenseslink.

Log in using the username and password provided by Cisco.

Step 2

Click the Inventory tab.

Step 3

From the Virtual Account drop-down list, choose the required virtual account

Step 4

Click the General tab.

Step 5

Click New Token. The Create Registration Token window is displayed.

Step 6

In the Description field, enter the token description

Step 7

In the Expire After field, enter the number of days the token must be active.

Step 8

(Optional) In the Max. Number of Uses field, enter the maximum number of uses allowed after which the token expires.

Note


If you enter a value here, ensure that you stagger the installation of the trust code on the product instances, during the next part of the process. If you want to simultaneously install the trust code on a large number of product instances, we recommend that you leave this field blank. Entering a limit here and simultaneously installing it on a large number of devices causes a bottleneck in the processing of these requests in CSSM and installation on some devices may fail, with the following error: Failure Reason: Server error occurred: LS_LICENGINE_FAIL_TO_CONNECT.

Step 9

Click Create Token.

Step 10

You will see your new token in the list. Click Actions and download the token as a .txt file.


Establishing Trust with an ID Token.

This task shows you how to establish trust. Here, you use the ID token downloaded from CSSM and submit a trust request. CSSM responds with the trust code, which is automatically installed on the product instance.

Before you begin

Supported topologies: Connected Directly to CSSM

You must have already generated and downloaded an ID token file from CSSM: Generating a New Token for a Trust Code from CSSM.

Procedure

  Command or Action Purpose

Step 1

enable

Example:

Device> enable

Enables privileged EXEC mode. Enter your password, if prompted

Step 2

license smart trust idtoken id_token_value{ local| all} [ force]

Example:

Device# license smart trust idtoken 
NGMwMjk5mYtNZaxMS00NzMZmtgWm all force

Establishes a trusted connection with CSSM. For id_token_value, enter the token you generated in CSSM.

Enter one of following options:

  • local: Submits the trust request only for the active device in a High Availability set-up. This is the default option.

  • all: Submits the trust request for all devices in a High Availability set-up.

Enter the force keyword to submit the trust code request in spite of an existing trust code on the product instance.

Trust codes are node-locked to the UDI of the product instance. If a UDI is already registered, CSSM does not allow a new registration for the same UDI. Entering the force keyword sets a force flag in the message sent to CSSM to create a new trust code even if one already exists.

You may for example need to use the force keyword if there is already a factory-installed trust code on the product instance. A trust code is factory-installed starting with Cisco IOS XE Cupertino 17.7.1. Since a factory-installed trust code cannot be used for secure communication with CSSM, you must use the force keyword to overwrite it with the trust code obtained using the ID token. Also see: Trust Code.

Step 3

show license status

Example:

<output truncated>
Trust Code Installed:
  Active: PID:C9500-24Y4C,SN:CAT2344L4GH
    INSTALLED on Sep 04 01:01:46 2020 EDT
  Standby: PID:C9500-24Y4C,SN:CAT2344L4GJ
    INSTALLED on Sep 04 01:01:46 2020 EDT

Displays date and time if trust code is installed. Date and time are in the local time zone. See field Trust Code Installed:.

Downloading a Policy File from CSSM

If you have requested a custom policy or if you want to apply a policy that is different from the default that is applied to the product instance, complete the following task:

Before you begin

Supported topologies:

  • No Connectivity to CSSM and No CSLU

  • CSLU Disconnected from CSSM

Procedure


Step 1

Log in to the CSSM Web UI at https://software.cisco.com. Under Smart Software Licensing, click the Manage licenseslink.

Log in using the username and password provided by Cisco.

Step 2

Follow this directory path: Reports > Reporting Policy.

Step 3

Click Download, to save the .xml policy file.

You can now install the file on the product instance. See Installing a File on the Product Instance.


Uploading Data or Requests to CSSM and Downloading a File

You can use this task to:

  • To upload a RUM report to CSSM and download an ACK.

  • To upload a SLAC request file and download a SLAC code file.

    This applies only to the No Connectivity to CSSM and No CSLU topology and is supported starting with Cisco IOS XE Cupertino 17.7.1.

  • To upload a SLAC or SLR authorization code return request.

    This applies only to the No Connectivity to CSSM and No CSLU topology and is supported starting with Cisco IOS XE Cupertino 17.7.1.

To upload a file to CSSM and download file when the product instance is not connected to CSSM or CSLU, or when SSM On-Prem is not connect to CSSM, complete the following task:

Before you begin

Supported topologies:

  • No Connectivity to CSSM and No CSLU

  • CSLU Disconnected from CSSM

  • SSM On-Prem Deployment (Product instance-initiated and SSM On-Prem-initiated communication)

Procedure


Step 1

Log in to the CSSM Web UI at https://software.cisco.com. Under Smart Software Licensing, click the Manage licenses link.

Log in using the username and password provided by Cisco.

Step 2

Select the Smart Account that will receive the report.

Step 3

Select Smart Software LicensingReportsUsage Data Files.

Step 4

Click Upload Usage Data. Browse to the file location (RUM report in tar format), select, and click Upload Data.

Upload a RUM report (.tar format), or a SLAC request file (.txt format), or a SLAC return request file (.txt format).

You cannot delete a file after it has been uploaded. You can however upload another file, if required.

Step 5

From the Select Virtual Accounts pop-up, select the Virtual Account that will receive the uploaded file. The file is uploaded to Cisco and is listed in the Usage Data Files table in the Reports screen showing the File Name, time is was Reported, which Virtual Account it was uploaded to, the Reporting Status, Number of Product Instances reported, and the Acknowledgement status.

Step 6

In the Acknowledgement column, click Download to save the ACK or SLAC file for the report or request you uploaded.

You may have to wait for the file to appear in the Acknowledgement column. If there many RUM reports or requests to process, CSSM may take a few minutes.

After you download the file, import and install the file on the product instance, or transfer it to CSLU or SSM On-Prem.


Installing a File on the Product Instance

To import and install a policy, or ACK, or SLAC, on the product instance, complete the following task:

Before you begin

Supported topologies: No Connectivity to CSSM and No CSLU

You have saved the corresponding file in a location that is accessible to the product instance.

Procedure

  Command or Action Purpose

Step 1

enable

Example:

Device> enable

Enables privileged EXEC mode. Enter your password, if prompted.

Step 2

copy source filename bootflash:

Example:

Device# copy tftp://10.8.0.6/user01/example.txt bootflash: 

(Optional) Copies the file from its source location or directory to the flash memory of the product instance. You can also import the file directly from a remote location and install it on the product instance (next step).

  • source : This is the source location of file. The source can be either local or remote.

  • bootflash: : This is the destination for boot flash memory.

Step 3

license smart import filepath_filename

Example:

Device# license smart import bootflash:example.txt 

Imports and installs the file on the product instance. For filepath_filename, specify the location, including the filename. After installation, a system message displays the type of file you installed.

Note


If you generated SLAC for multiple product instances (as in a stacking set-up) in the CSSM Web UI, that is, you followed the method described here: Generating and Downloading SLAC from CSSM to a File, ensure that you download a separate .txt SLAC file for each UDI. Import and install one file at a time.

Step 4

show license all

Example:

Device# show license all

Displays license authorization, policy, and reporting information for the product instance.

Setting the Transport Type, URL, and Reporting Interval

To configure the mode of transport for a product instance, complete the following task:

Before you begin

Supported topologies: all

Procedure

  Command or Action Purpose

Step 1

enable

Example:

Device> enable

Enables privileged EXEC mode. Enter your password, if prompted.

Step 2

configure terminal

Example:

Device# configure terminal

Step 3

license smart transport{ automatic| callhome| cslu| off| smart}

Example:

Device(config)# license smart transport cslu

Configures a mode of transport for the product instance to use. Choose from the following options:

  • automatic : Sets the transport mode cslu .

  • callhome : Enables Call Home as the transport mode.

  • cslu : This is the default transport mode. Enter this keyword if you are using CSLU or SSM On-Prem, with product instance-initiated communication.

    While the transport mode keyword is the same for CSLU and SSM On-Prem, the transport URLs are different. See license smart url cslu cslu_or_on-prem_url in the next step.

  • off : Disables all communication from the product instance.

  • smart : Enables Smart transport.

Step 4

license smart url{ url | cslu cslu_url| default| smart smart_url| utility smart_url}

Example:

Device(config)# license smart url cslu 
http://192.168.0.1:8182/cslu/v1/pi

Sets a URL for the configured transport mode. Depending on the transort mode you have chosen to configure in the previous step, configure the corresponding URL here:

  • url : If you have configured the transport mode as callhome, configure this option. Enter the CSSM URL exactly as follows:

    https://tools.cisco.com/its/service/oddce/services/DDCEService

    The no license smart url url command reverts to the default URL.

  • cslu cslu_or_on-prem_url : If you have configured the transport mode as cslu, configure this option with the URL for CSLU or SSM On-Prem, as applicable.

    • If you are using CSLU, enter the URL as follows:

      http://<cslu_ip_or_host>:8182/cslu/v1/pi

      For <cslu_ip_or_host>, enter the hostname or the IP address of the windows host where you have installed CSLU. 8182 is the port number and it is the only port number that CSLU uses.

      The no license smart url cslu cslu_url command reverts to http://cslu-local:8182/cslu/v1/pi

    • If you are using SSM On-Prem, enter the URL as follows:

      http://<ip>/cslu/v1/pi/<tenant ID>

      For <ip>, enter the hostname or the IP address of the server where you have installed SSM On-Prem. The <tenantID> must be the default local virtual account ID.

      Tip

       
      You can retrieve the entire URL from SSM On-Prem. See Retrieving the Transport URL (SSM On-Prem UI)

      The no license smart url cslu cslu_url command reverts to http://cslu-local:8182/cslu/v1/pi

  • default : Depends on the configured transport mode. Only the smart and cslu transport modes are supported with this option.

    If the transport mode is set to cslu, and you configure license smart url default , the CSLU URL is configured automatically (https://cslu-local:8182/cslu/v1/pi).

    If the transport mode is set to smart, and you configure license smart url default , the Smart URL is configured automatically (https://smartreceiver.cisco.com/licservice/license).

  • smart smart_url : If you have configured the transport type as smart, configure this option. Enter the URL exactly as follows:

    https://smartreceiver.cisco.com/licservice/license

    When you configure this option, the system automatically creates a duplicate of the URL in license smart url url . You can ignore the duplicate entry, no further action is required.

    The no license smart url smartsmart_url command reverts to the default URL.

  • utility smart_url : Although available on the CLI, this option is not supported.

Step 5

license smart usage interval interval_in_days

Example:

Device(config)# license smart usage interval 40

(Optional) Sets the reporting interval in days. By default the RUM report is sent every 30 days. The valid value range is 1 to 3650.

If you set the value to zero, RUM reports are not sent, regardless of what the applied policy specifies - this applies to topologies where CSLU or CSSM may be on the receiving end.

If you set a value that is greater than zero and the transport type is set to off, then, between the interval_in_days and the policy value for Ongoing reporting frequency(days):, the lower of the two values is applied. For example, if interval_in_days is set to 100, and the value in the in the policy says Ongoing reporting frequency (days):90, RUM reports are sent every 90 days.

If you do not set an interval, and the default is effective, the reporting interval is determined entirely by the policy value. For example, if the default value is effective and only unenforced licenses are in use, if the policy states that reporting is not required, then RUM reports are not sent.

Step 6

exit

Example:

Device(config)# exit

Exits global configuration mode and returns to privileged EXEC mode.

Step 7

copy running-config startup-config

Example:

Device# copy running-config startup-config

Saves your entries in the configuration file.

Configuring a Base or Add-On License

After you order and purchase a base or add-on license, you must configure the license on the device before you can use it.

This task sets a license level and requires a reload before the configured changes are effective. You can use this task to:

  • Change the current license.

  • Add another license. For example, if you are currently using Network Advantage and you also want to use features available with the corresponding Digital Networking Architecture (DNA) Advantage license.

  • Remove a license.

Before you begin

Supported topologies: all

For information about the available base and add-on licenses, see Base and Add-On Licenses.

Information about the licenses that you have purchased can be found in the Smart Account and Virtual Account of the product instance in the Cisco Smart Software Manager (CSSM) Web UI.

Procedure

  Command or Action Purpose

Step 1

enable

Example:

Device> enable

Enables privileged EXEC mode.

Enter your password, if prompted.

Step 2

configure terminal

Example:

Device# configure terminal

Enters global configuration mode.

Step 3

license boot level { network-advantage [ addon dna-advantage ] | network-essentials [ addon dna-essentials ] }

Example:

Device(config)# license boot level network-advantage 
add-on dna-advantage

Activates the configured license on the product instance.

  • network-advantage [ addon dna-advantage ] : Configures the Network Advantage license. Optionally, you can also configure the Digital Networking Architecture (DNA) Advantage license.

  • network-advantage [ addon dna-advantage ] : Configures the Network Essentials license. Optionally, you can also configure the Digital Networking Architecture (DNA) Essentials license.

In the accompanying example, the DNA Advantage license will be activated on the product instance after reload.

Step 4

exit

Example:

Device(config)# exit

Returns to the privileged EXEC mode.

Step 5

copy running-config startup-config

Example:

Device# copy running-config startup-config

Saves changes in the configuration file.

Step 6

show version

Example:

Device# show version

<output truncated>
Technology Package License Information:

------------------------------------------------------------------
Technology-package                              Technology-package
Current              Type                       Next reboot
------------------------------------------------------------------
network-advantage    Smart License              network-advantage
                     Subscription Smart License dna-advantage

<output truncated>

Shows currently configured license information and the license that is applicable after reload.

The “Technology-package Next reboot” column displays the change in the configured license that is effective after reload, only if you save the configuration change.

In the accompanying example, the current license level is Network Advantage. Because the configuration change was saved, the “Technology-package Next reboot” column shows that the DNA Advantage license will be activated after reload.

Step 7

reload

Example:

Device# reload

Reloads the device.

Step 8

show version

Example:

Device# show version

<output truncated>
Technology Package License Information:
 
--------------------------------------------------------------------
Technology-package                              Technology-package
Current              Type                       Next reboot
--------------------------------------------------------------------
network-advantage    Smart License              network-advantage
dna-advantage        Subscription Smart License dna-advantage
 
<output truncated>

Shows currently configured license information and the license that is applicable after reload.

What to do next

After you configure a license level, the change is effective after a reload. To know if reporting is required, refer to the output of the show license status privileged EXEC command and check the Next ACK deadline: and Next report push: fields.


Note


The change in license usage is recorded on the product instance. The next steps relating to reporting - if required - depend on your current topology.


  • Connected to CSSM Through CSLU

    • Product Instance-initiated communication: No action required. Since the product instance initiates communication, it automatically sends out the RUM report at the scheduled time, as per the policy (show license status —> Next report push), to CSLU. (To manually trigger this on the product instance, enter the license smart sync {all| local} privileged EXEC command. This synchronizes the product instance with CSLU, to send and receive any pending data.) CSLU forwards the RUM report to CSSM and retrieves the ACK. The ACK is applied to the product instance the next time the product instance contacts CSLU.

    • CSLU-initiated communication: In the CSLU interface, collect usage from the product instance: Collecting Usage Reports: CSLU Initiated (CSLU Interface). CSLU sends the RUM report to CSSM and retrieves the ACK from CSSM. The ACK is applied to the product instance the next time CSLU runs an update.

  • Connected Directly to CSSM: No action required. Since the product instance initiates communication, it automatically sends out the RUM report at the scheduled time, as per the policy (show license status —> Next report push), to CSSM. (To manually trigger this on the product instance, enter the license smart sync {all| local} privileged EXEC command. This synchronizes the product instance with CSSM, to send and receive any pending data.) Once the ACK is available, CSSM sends this back to the product instance.

  • CSLU Disconnected from CSSM

  • Connected to CSSM Through a Controller: No action is required (if you have already completed the first ad hoc report in the Cisco DNA Center GUI). Cisco DNA Center handles all subsequent reporting and returns the ACK to the product instance.

  • No Connectivity to CSSM and No CSLU: Save RUM reports to a file (on your product instance) and upload it to CSSM (from a workstation that has connectivity to the Internet, and Cisco). Enter the license smart save usage command in privileged EXEC mode, to save RUM reports to a file. Then to upload the file to CSSM and download the ACK, complete this task: Uploading Data or Requests to CSSM and Downloading a File. Lastly, to install the ACK on the product instance, complete this task: Installing a File on the Product Instance.

  • SSM On-Prem Deployment:

    • Product Instance-initiated communication: No action required. Since the product instance initiates communication, it automatically sends out the RUM report at the scheduled time, as per the policy (show license status —> Next report push), to SSM On-Prem. (To manually trigger this on the product instance, enter the license smart sync {all| local} privileged EXEC command. This synchronizes the product instance with SSM On-Prem, to send and receive any pending data.)

      • If SSM On-Prem is connected to CSSM, in the SSM On-Prem interface, navigate to Reports > Usage Schedules > Synchronization schedule with Cisco.

      • If SSM On-Prem is disconnected from CSSM, upload and download the required files for reporting: Exporting and Importing Usage Data (SSM On-Prem UI).

    • SSM On-Prem initiated communication: In the SSM On-Prem interface, collect usage information from the product instance. Navigate to Reports > Synchronisation pull schedule with the devices > Synchronise now with the device.

      • If SSM On-Prem is connected to CSSM, in the SSM On-Prem interface, navigate to Reports > Usage Schedules > Synchronization schedule with Cisco.

      • If SSM On-Prem is disconnected from CSSM, upload and download the required files for reporting: Exporting and Importing Usage Data (SSM On-Prem UI).

Sample Resource Utilization Measurement Report

The following is a sample Resource Utilization Measurement (RUM) report, in XML format (See RUM Report and Report Acknowledgement). Several such reports may be concatenated to form one report.
<?xml version="1.0" encoding="UTF-8"?>
  <smartLicense>
      <RUMReport><![CDATA[{"payload":"{\"asset_identification\":{\"asset\":{\"name\":\"regid.2020-05.com.cisco.C8300BE,1.0_5b66594f-27ab-4615-9d15-4aad4969497f\"},\"instance\":{\"sudi\":{\"udi_pid\":\"C8300-2N2S-6T\",\"udi_serial_number\":\"FDO2303A20U\"}},\"signature\":{\"signing_type\":\"SHA256\",\"key\":\"9020805\",\"value\":\"iyqSaQdpqCQeamv21lgQP9e+lqYZFLoollEwmunSoBLz7DXi3Q7ScyZ5k1u8RHN+UMZU5sgzjX2rY926Gp/RKozHK7BG0o2XvTCfSKXcjdNVZgdd/P/dwhULZYDKkYCd4xGog9XeOTsvMNCCEi8CvtwFY6/IIiCA5MfcXXFf6QFJCTWt2c5+VxcYtKUsaCUEQreykdX8SIhPzsA7xIzKlCHHmHzBwcbBEIvhuVNyj+rEOl2z6vv05QpQOs76bNB8MvxtdOTIMomzAq23yzbeY780qNyjD/Wxm712Y+gW+/uk1xQkd0SoSRmuFN8l5Icv3wP4RSCLHicTYJwBkKKhoA==\"}},\"meta\":{\"entitlement_tag\":\"regid.2018-12.com.cisco.ESR_P_10M_E,1.0_328a8b3c-4a0e-49d3-82a0-acb83c7b83a3\",\"report_id\":1599040611,\"ha_udi\":[{\"role\":\"Active\",\"sudi\":{\"udi_pid\":\"C8300-2N2S-6T\",\"udi_serial_number\":\"FDO2303A20U\"}}]},\"measurements\":[{\"log_time\":1600795743,\"metric_name\":\"ENTITLEMENT\",\"start_time\":1600794833,\"end_time\":1600874943,\"sample_interval\":80110,\"num_samples\":89,\"meta\":{\"termination_reason\":\"CurrentUsageRequested\"},\"value\":{\"type\":\"COUNT\",\"value\":\"1\"}}]}","header":{"type":"rum"},"signature":{"sudi":{"udi_pid":"C8300-2N2S-6T","udi_serial_number":"FDO2303A20U"},"signing_type":"SHA256","key":"9020805","value":"jjOna5L3Vb9iXidDNckxWQqbJyfrnXdro0BsNTvWXRIH4HF9RnY1KwjarsxcpMgJ+BVUwdlqU9bGccv16c3lK8UUOP8PrMB1K0Ppcjx/go7gXlinzq70BRBqFLfD/8w7+PtUUkcv4hWlsuPIDBS3GIp4ZjF1rVIyuniaq1trGm3tQvpvkPPUp9APAJQRzIjTQ95T+boJmbMssJqy0FJQEeqZG59qo/DfHHtVCLlxvmssdL9F7ILjb7raPOLFkrt/RDABQ2JEWyBDz88/TPOQpOlxL5o7SqfjpADmo/q0xamSMw=="}}]]></RUMReport>
  </smartLicense>

Troubleshooting Smart Licensing Using Policy

This section provides the list of Smart Licensing Using Policy-related system messages you may encounter, possible reasons for failure, and recommended action.

System Message Overview

The system software sends system messages to the console (and, optionally, to a logging server on another system). Not all system messages mean problems with your system. Some messages are informational, and others can help diagnose problems with communications lines, internal hardware, or the system software.

How to Read System Messages

System log messages can contain up to 80 characters. Each system message begins with a percent sign (%) and is structured as follows:

%FACILITY

Two or more uppercase letters that show the facility to which the message refers. A facility can be a hardware device, a protocol, or a module of the system software

SEVERITY

A single-digit code from 0 to 7 that reflects the severity of the condition. The lower the number, the more serious the situation.

Table 10. Message Severity Levels

Severity Level

Description

0 - emergency

System is unusable.

1 - alert

Immediate action required.

2 - critical

Critical condition.

3 - error

Error condition.

4 - warning

Warning condition.

5 - notification

Normal but significant condition.

6 - informational

Informational message only.

7 - debugging

Message that appears during debugging only.

MNEMONIC

A code that uniquely identifies the message.

Message-text

Message-text is a text string describing the condition. This portion of the message sometimes contains detailed information about the event, including terminal port numbers, network addresses, or addresses that correspond to locations in the system memory address space. Because the information in these variable fields changes from message to message, it is represented here by short strings enclosed in square brackets ([ ]). A decimal number, for example, is represented as [dec].

Table 11. Variable Fields in Messages

Severity Level

Description

[char]

Single character

[chars]

Character string

[dec]

Decimal number

[enet]

Ethernet address (for example, 0000.FEED.00C0)

[hex]

Hexadecimal number

[inet]

Internet address (for example, 10.0.2.16)

[int]

Integer

[node]

Address or node name

[t-line]

Terminal line number in octal (or in decimal if the decimal-TTY service is enabled)

[clock]

Clock (for example, 01:20:08 UTC Tue Mar 2 1993

System Messages

This section provides the list of Smart Licensing Using Policy-related system messages you may encounter, possible reasons for failure (incase it is a failure message), and recommended action (if action is required).

For all error messages, if you are not able to solve the problem, contact your Cisco technical support representative with the following information:

  • The message, exactly as it appears on the console or in the system log.

  • The output from the show license tech support , show license history message , and the show platform software sl-infra privileged EXEC commands.

Smart Licensing Using Policy-related system messages:

Error Message %SMART_LIC-3-POLICY_INSTALL_FAILED: The installation of a new 
licensing policy has failed: [chars].

Explanation: A policy was installed, but an error was detected while parsing the policy code, and installation failed. [chars] is the error string with details of the failure.

Possible reasons for failure include:

  • A signature mismatch: This means that the system clock is not accurate.

  • A timestamp mismatch: This means the system clock on the product instance is not synchronized with CSSM.

Recommended Action:

For both possible failure reasons, ensure that the system clock is accurate and synchronized with CSSM. Configure the ntp server command in global configuration mode. For example:
Device(config)# ntp server 198.51.100.100 version 2 prefer

If the above does not work and policy installation still fails, contact your Cisco technical support representative.


----------------------------------------------------------------------------------------------------
----------------------------------------------------------------------------------------------------
Error Message %SMART_LIC-3-AUTHORIZATION_INSTALL_FAILED: The install of a new 
licensing authorization code has failed on [chars]: [chars].

Explanation: Authorization code installation was attempted, but installation failed. The first [chars] is the UDI for which the authorization code installation failed, and the second [chars] is the error string with details of the failure.

Possible reasons for failure include:

  • Not enough licenses with authorization for currently configured features: This means that you have not provided the requisite number of authorization codes.

  • UDI mismatch: One or more UDIs in the authorization code file do not match with the product instance where you are installing the authorization code file. If you have generated authorization codes for multiple UDIs, for a High Availability or stacking set-up, all the UDIs listed in the authorization code file must match with all the UDIs in the High Availability or stacking set-up. If this is not the case, installation fails.

    Cross-check all UDIs in the authorizatin code file against the UDIs of the product instance (standalone or High Availability).
    Excerpt of UDI information in a SLAC file: 
    <smartLicenseAuthorization>
    <udi>P:C9300X-24HX,SN:FOC2519L8R7</udi>
    
    <output truncated>
    </smartLicenseAuthorization>
    
    Sample output of UDI information on a product instance:
    Device# show license udi
    UDI: PID:C9300X-24HX,SN:FOC2519L8R7
  • A signature mismatch: This means that the system clock is not accurate. If the clock is not synchronized, your attempts at requesting SLAC are not reflected in the show license tech output.
    Authorization Confirmation:
      Attempts: Total=0, Success=0, Fail=0  Ongoing Failure: Overall=0 Communication=0

Recommended Action

  • In the output of the show license tech support command, check the Failure Reason: field to understand what may have gone wrong.
    Device# show license tech support
    <output truncated>
    
    Communication Statistics:
    =======================
    Authorization Confirmation:
      Attempts: Total=2, Success=2, Fail=0  Ongoing Failure: Overall=0 Communication=0
      Last Response: OK on Sep 23 17:51:52 2020 UTC
        Failure Reason: <none>
      Last Success Time: Sep 23 17:51:52 2020 UTC
      Last Failure Time: <none>
  • Not enough licenses in authorization for currently configured features and UDI mismatch:

  • Use the show license udi command to verify that you have the correct and complete list of UDIs. This command displays all product instances in case of High Availability and stacking set-up. Then install SLAC again.

  • Signature mismatch: Ensure that the system clock is accurate and synchronized with CSSM. To do this, configure the ntp server command in global configuration mode. For example:
    Device(config)# ntp server 198.51.100.100 version 2 prefer

    After you complete this configuration, again use the show license tech to verify if the clock has actually synchronized. If successfully synchronized, the Clock sync-ed with NTP field is set to True. If not synchronized, this field is set to False.


----------------------------------------------------------------------------------------------------
----------------------------------------------------------------------------------------------------
Error Message %SMART_LIC-3-COMM_FAILED: Communications failure with the [chars] :
[chars]

Explanation: Smart Licensing communication either with CSSM, CSLU, or SSM On-Prem failed. The first [chars] is the currently configured transport type, and the second [chars] is the error string with details of the failure. This message appears for every communication attempt that fails.

Possible reasons for failure include:

  • CSSM, CSLU, SSM On-Prem is not reachable: This means that there is a network reachability problem.

  • 404 host not found: This means the CSSM server is down.

  • A TLS or SSL handshake failure caused by a missing client certificate. The certificate is required for TLS authentication of the two communicating sides. A recent server upgrade may have cause the certificate to be removed. This reason applies only to a topology where the product instance is directly connected to CSSM.


    Note


    If the error message is displayed for this reason, there is no actual configuration error or disruption in the communication with CSSM.


For topologies where the product instance initiates the sending of RUM reports (Connected to CSSM Through CSLU: Product Instance-Initiated Communication, Connected Directly to CSSM, CSLU Disconnected from CSSM: Product Instance-Initiated Communication, and SSM On-Prem Deployment: Product Instance-Initiated Communication) if this communication failure message coincides with scheduled reporting (license smart usage interval interval_in_days global configuration command), the product instance attempts to send out the RUM report for up to four hours after the scheduled time has expired. If it is still unable to send out the report (because the communication failure persists), the system resets the interval to 15 minutes. Once the communication failure is resolved, the system reverts the reporting interval to last configured value.

Recommended Action:

Troubleshooting steps are provided for when CSSM is not reachable or there is a missing client certificate, when CSLU is not reachable, and when SSM On-Prem is not reachable.

  • If a client certificate is missing and there is no actual configuration error or disruption in the communication with CSSM:

    To resolve the error, configure the ip http client secure-trustpoint trustpoint-name command in global configuration mode. For trustpoint-name, enter only SLA-TrustPoint. This command specifies that the secure HTTP client should use the certificate associated with the trustpoint indicated by the trustpoint-name argument.

  • If CSSM is not reachable and the configured transport type is smart:

    1. Check if the smart URL is configured correctly. Use the show license status command in privileged EXEC mode, to check if the URL is exactly as follows: https://smartreceiver.cisco.com/licservice/license. If it is not, reconfigure the license smart url smart smar_URL command in global configuration mode.

    2. Check DNS resolution. Verify that the product instance can ping smartreceiver.cisco.com or the nslookup translated IP. The following example shows how to ping the translated IP
      Device# ping 171.70.168.183
      Type escape sequence to abort.
      Sending 5, 100-byte ICMP Echos to 171.70.168.183, timeout is 2 seconds:
      !!!!!
      Success rate is 100 percent (5/5), round-trip min/avg/max = 1/1/2 ms
  • If CSSM is not reachable and the configured transport type is callhome:

    1. Check if the URL is entered correctly. Use the show license status command in privileged EXEC mode, to check if the URL is exactly as follows: https://tools.cisco.com/its/service/oddce/services/DDCEService.

    2. Check if Call Home profile CiscoTAC-1 is active and destination URL is correct. Use the show call-home profile all command in privileged EXEC mode:
      Current smart-licensing transport settings:
       Smart-license messages: enabled
       Profile: CiscoTAC-1 (status: ACTIVE)
       Destination  URL(s):  https://tools.cisco.com/its/service/oddce/services/DDCEService
      
    3. Check DNS Resolution. Verify that the product instance can ping tools.cisco.com, or the nslookup translated IP.
      Device# ping tools.cisco.com
      Type escape sequence to abort.
      Sending 5, 100-byte ICMP Echos to 173.37.145.8, timeout is 2 seconds:
      !!!!!
      Success rate is 100 percent (5/5), round-trip min/avg/max = 41/41/42 ms
      

      If the above does not work check the following: if the product instance is set, if the product instance IP network is up. To ensure that the network is up, configure the no shutdown command in interface configuration mode.

      Check if the device is subnet masked with a subnet IP, and if the DNS IP is confgured.

    4. Verify that the HTTPs client source interface is correct.

      Use the show ip http client command in privileged EXEC mode to display current configuration. Use ip http client source-interface command in global configuration mode to reconfigure it.

      In case the above does not work, double-check your routing rules, and firewall settings.

  • If CSLU is not reachable:

    1. Check if CSLU discovery works.

      • Zero-touch DNS discovery of cslu-local or DNS discovery of your domain..

        In the show license all command output, check if the Last ACK received: field. If this has a recent timestamp it means that the product instance has connectivity with CSLU. If it is not, proceed with the following checks:

        Check if the product instance is able to ping cslu-local. A successful ping confirms that the product instance is reachable.

        If the above does not work, configure the name server with an entry where hostname cslu-local is mapped to the CSLU IP address (the windows host where you installed CSLU). Configure the ip domain name domain-name and ip name-server server-address commands in global configuration mode. Here the CSLU IP is 192.168.0.1 and name-server creates entry cslu-local.example.com:
        Device(config)# ip domain name example.com
        Device(config)# ip name-server 192.168.0.1
      • CSLU URL is configured.

        In the show license all command output, under the Transport: header check the following: The Type: must be csluand Cslu address: must have the hostname or the IP address of the windows host where you have installed CSLU. Check if the rest of the address is configured as shown below and check if the port number is 8182.
        Transport:
          Type: cslu
          Cslu address: http://192.168.0.1:8182/cslu/v1/pi
        If it is not, configure the license smart transport cslu and license smart url cslu http://<cslu_ip_or_host>:8182/cslu/v1/pi commands in global configuration mode
    2. For CSLU-initiated communication, in addition to the CSLU discovery checks listed above, check the following:

      Verify HTTP connectivity. Use the show ip http server session-module command in privileged EXEC mode. In the output, under header HTTP server current connections:, check that SL_HTTP is active. If it is not re-configure the ip http commands as mentioned in Ensuring Network Reachability for CSLU-Initiated Communication

      From a Web browser on the device where CSLU is installed, verify https://<product-instance-ip>/. This ensures that the REST API from CSLU to the product instance works as expected.

  • If SSM On-Prem is not reachable:

    1. For product instance-initiated communication, check if the SSM On-Prem transport type and URL are configured correctly.

      In the show license all command output, under the Transport: header check the following: The Type: must be csluand Cslu address: must have the hostname or the IP address of the server where you have installed SSM On-Prem and <tenantID> of the default local virtual account. See the example below:
      Transport:
        Type: cslu
        Cslu address: https://192.168.0.1/cslu/v1/pi/on-prem-default
      
      Check if you have the correct URL from SSM On-Prem (See Retrieving the Transport URL (SSM On-Prem UI)) and then configure license smart transport cslu and license smart url cslu http://<ip>/cslu/v1/pi/<tenant ID> commands in global configuration mode.

      Check that you have configured any other required commands for your network, as mentioned in Ensuring Network Reachability for Product Instance-Initiated Communication

    2. For SSM On-Prem-initiated communication, check HTTPs connectivity.

      Use the show ip http server session-module command in privileged EXEC mode. In the output, under header HTTP server current connections:, check that SL_HTTP is active. If it is not re-configure the ip http commands as mentioned in Ensuring Network Reachability for SSM On-Prem-Initiated Communication.

    3. Check trustpoint and that certificates are accepted.

      For both forms of communication in an SSM On-Prem Deployment, ensure that the correct trustpoint is used and that the necessary certificates are accepted:
      Device(config)# crypto pki trustpoint SLA-TrustPoint 
      Device(ca-trustpoint)#
      Device(ca-trustpoint)# enrollment terminal
      Device(ca-trustpoint)# revocation-check none
      Device(ca-trustpoint)# end
      Device# copy running-config startup-config

If the above does not work and the communication failure persists, contact your Cisco technical support representative.


----------------------------------------------------------------------------------------------------
----------------------------------------------------------------------------------------------------
Error Message  %SMART_LIC-3-COMM_RESTORED: Communications with the [chars] restored.
[chars] - depends on the transport type
        - Cisco Smart Software Manager (CSSM)
        - Cisco Smart License utility (CSLU)
Smart Agent communication with either the Cisco Smart Software Manager (CSSM) or the Cisco Smart License 
utility (CSLU) has been restored. No action required.
 

Explanation: Product instance communication with either the CSSM, CSLU, or SSM On-Prem is restored.

Recommended Action: No action required.


----------------------------------------------------------------------------------------------------
----------------------------------------------------------------------------------------------------
Error Message %SMART_LIC-3-POLICY_REMOVED: The licensing policy has been removed.

Explanation: A previously installed custom licensing policy has been removed. The Cisco default policy is then automatically effective. This may cause a change in the behavior of smart licensing.

Possible reasons for failure include:

If you have entered the license smart factory reset command in privileged EXEC mode all licensing information including the policy is removed.

Recommended Action:

If the policy was removed intentionally, then no further action is required.

If the policy was removed inadvertantly, you can reapply the policy. Depending on the topology you have implemented, follow the corresponding method to retrieve the policy:

  • Connected Directly to CSSM:

    Enter show license status , and check field Trust Code Installed:. If trust is established, then CSSM will automatically return the policy again. The policy is automatically re-installed on product instances of the corresponding Virtual Account.

    If trust has not been established, complete these tasks: Generating a New Token for a Trust Code from CSSM and Establishing Trust with an ID Token.. When you have completed these tasks, CSSM will automatically return the policy again. The policy is then automatically installed on all product instances of that Virtual Account.

  • Connected to CSSM Through CSLU:

    • For product instance-initiatied communication), enter the license smart sync command in privileged EXEC mode. The synchronization request causes CSLU to push the missing information (a policy or authurization code) to the product instance.

    • For CSLU-initiated communication, complete this task: Collecting Usage Reports: CSLU Initiated (CSLU Interface). This causes CSLU to detect and re-furnish the missing policy in an ACK response.

  • CSLU Disconnected from CSSM:

  • No Connectivity to CSSM and No CSLU

    If you are in an entirely air-gapped network, from a workstation that has connectivity to the internet and CSSM complete these tasks: Downloading a Policy File from CSSM and Installing a File on the Product Instance

  • SSM On-Prem Deployment

    • For product instance-initiatied communication), enter the license smart sync command in privileged EXEC mode. The causes the product instance to synchronize with SSM On-Prem and restore any required or missing information. Then synchronize SSM On-Prem with CSSM if required:

    • For SSM On-Prem-initiated communication: In the SSM On-Prem UI, navigate to Reports > Synchronisation pull schedule with the devices > Synchronise now with the device.

    For both forms of communication in an SSM On-Prem Deployment, synchronize with CSSM using either option:


----------------------------------------------------------------------------------------------------
----------------------------------------------------------------------------------------------------
Error Message %SMART_LIC-3-TRUST_CODE_INSTALL_FAILED: The install of a new licensing 
trust code has failed on [chars]: [chars].

Explanation: Trust code installation has failed. The first [chars] is the UDI where trust code installation was attempted. The second [chars] is the error string with details of the failure.

Possible reasons for failure include:

  • A trust code is already installed: Trust codes are node-locked to the UDI of the product instance. If the UDI is already registered, and you try to install another one, installation fails.

  • Smart Account-Virtual Account mismatch: This means the Smart Account or Virtual Account (for which the token ID was generated) does not include the product instance on which you installed the trust code. The token generated in CSSM, applies at the Smart Account or Virtual Account level and applies only to all product instances in that account.

  • A signature mismatch: This means that the system clock is not accurate.

  • Timestamp mismatch: This means the product instance time is not synchronized with CSSM, and can cause installation to fail.

Recommended Action:

  • A trust code is already installed: If you want to install a trust code inspite of an existing trust code on the product instance, re-configure the license smart trust idtoken id_token_value{ local| all} [ force] command in privileged EXEC mode, and be sure to include the force keyword this time. Entering the force keyword sets a force flag in the message sent to CSSM to create a new trust code even if one already exists.

  • Smart Account-Virtual Account mismatch:

    Log in to the CSSM Web UI at https://software.cisco.com. Under Smart Software Licensing, click the Manage licenseslink. Click the Inventory tab. From the Virtual Account drop-down list, choose the required virtual account. Click the Product Instances tab.

    Check if the product instance on which you want to generate the token is listed in the selected Virtual Account. If it is, proceed to the next step: Generating a New Token for a Trust Code from CSSM and Establishing Trust with an ID Token.. If not, check and select the correct Smart Account and Virtual Account. Then complete the next steps.

  • Timestamp mismatch and signature mismatch: Configure the ntp server command in global configuration mode. For example:
    Device(config)# ntp server 198.51.100.100 version 2 prefer

----------------------------------------------------------------------------------------------------
----------------------------------------------------------------------------------------------------
Error Message    %SMART_LIC-4-REPORTING_NOT_SUPPORTED: The CSSM OnPrem that this 
product instance is connected to is down rev and does not support the enhanced policy and usage 
reporting mode.
 

Explanation: Cisco Smart Software Manager On-Prem (formerly known as Cisco Smart Software Manager satellite) is supported in the Smart Licensing Using Policy environment starting with Cisco IOS XE Amsterdam 17.3.3 only (See SSM On-Prem). In unsupported releases, the product instance will behave as follows:

  • Stop sending registration renewals and authorization renewals.

  • Start recording usage and saving RUM reports locally.

Recommended Action:

You have the following options:


----------------------------------------------------------------------------------------------------
----------------------------------------------------------------------------------------------------
Error Message %SMART_LIC-6-POLICY_INSTALL_SUCCESS: A new licensing policy 
was successfully installed.

Explanation: A policy was installed in one of the following ways:

  • Using Cisco IOS commands.

  • CSLU-initiated communication.

  • As part of an ACK response.

Recommended Action: No action is required. If you want to know which policy is applied (the policy in-use) and its reporting requirements, enter the show license all command in privileged EXEC mode.


----------------------------------------------------------------------------------------------------
----------------------------------------------------------------------------------------------------
Error Message %SMART_LIC-6-AUTHORIZATION_INSTALL_SUCCESS: A new licensing 
authorization code was successfully installed on: [chars].

Explanation: [chars] is the UDI where the authorization code was installed successfully.

Recommended Action: No action is required. If you want to know the details of the authorization code that was installed, enter the show license authorization command in privileged EXEC mode.


----------------------------------------------------------------------------------------------------
----------------------------------------------------------------------------------------------------
Error Message %SMART_LIC-6-AUTHORIZATION_REMOVED: A licensing authorization code has
 been removed from [chars]

Explanation: [chars] is the UDI where the authorization code was installed. The authorization code has been removed. This removes the licenses from the product instance and may cause a change in the behavior of smart licensing and the features using licenses.

Recommended Action: No action is required. If you want to see the current state of the license, enter the show license all command in privileged EXEC mode.


----------------------------------------------------------------------------------------------------
----------------------------------------------------------------------------------------------------
Error Message %SMART_LIC-6-REPORTING_REQUIRED: A Usage report acknowledgement 
will be required in [dec] days.

Explanation: This is an alert which means that RUM reporting to Cisco is required. [dec] is the amount of time (in days) left to meet this reporting requirements.

Recommended Action: Ensure that RUM reports are sent within the requested time. The topology you have implemented determines the reporting method.

  • Connected to CSSM Through CSLU

    • For product instance-initiatied communication: Enter the license smart sync command in privileged EXEC mode. If CSLU is currently logged into CSSM the reports will be automatically sent to the associated Smart Account and Virtual Account in CSSM.

    • For CSLU-initiated communication, complete this task: Collecting Usage Reports: CSLU Initiated (CSLU Interface).

  • Connected Directly to CSSM: Enter the license smart sync command in privileged EXEC mode.

  • Connected to CSSM Through a Controller: If the product instance is managed by a controller, the controller will send the RUM report at the scheduled time.

    If you are using Cisco DNA Center as the controller, you have the option of ad-hoc reporting. See the Cisco DNA Center Administrator Guide of the required release (Release 2.2.2 onwards) > Manage Licenses > Upload Resource Utilization Details to CSSM.

  • CSLU Disconnected from CSSM: If the product instance is connected to CSLU, synchronize with the product instance as shown for "Connected to CSSM Through CSLU"above, then complete these tasks: Export to CSSM (CSLU Interface), Uploading Data or Requests to CSSM and Downloading a File, and Import from CSSM (CSLU Interface).

  • No Connectivity to CSSM and No CSLU: Enter the license smart save usage command in privileged EXEC mode, to save the required usage information in a file. Then, from a workstation where you have connectivity to CSSM, complete these tasks: Uploading Data or Requests to CSSM and Downloading a File > Installing a File on the Product Instance.

  • SSM On-Prem Deployment:

    Synchronize the product instance with SSM On-Prem:

    • For product instance-initiatied communication: Enter the license smart sync command in privileged EXEC mode. If CSLU is currently logged into CSSM the reports will be automatically sent to the associated Smart Account and Virtual Account in CSSM.

    • For SSM On-Prem-initiated communication, complete this task: In the SSM On-Prem UI, navigate to Reports > Synchronisation pull schedule with the devices > Synchronise now with the device.

    Synchronize usage information with CSSM (choose one)


----------------------------------------------------------------------------------------------------
----------------------------------------------------------------------------------------------------
Error Message %SMART_LIC-6-TRUST_CODE_INSTALL_SUCCESS: A new licensing trust code
 was successfully installed on [chars].

Explanation:[chars] is the UDI where the trust code was successfully installed.

Recommended Action: No action is required. If you want to verify that the trust code is installed, enter the show license status command in privileged EXEC mode. Look for the updated timestamp under header Trust Code Installed: in the output.


----------------------------------------------------------------------------------------------------
----------------------------------------------------------------------------------------------------

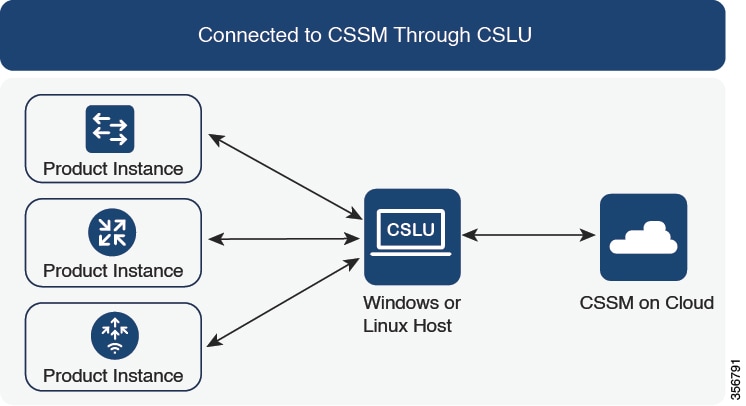
Additional References for Smart Licensing Using Policy

Topic

Document Title

For complete syntax and usage information for the commands used in this chapter, see System Mangement > System Mangement Commands in the Command Reference of the required release.

Command Reference (Catalyst 9600 Series Switches)

Cisco Smart Software Manager Help

Smart Software Manager Help

Cisco Smart License Utility (CSLU) installation and user guides

Cisco Smart Licensing Utility Quick Start Setup Guide

Cisco Smart Licensing Utility User Guide

General information about Smart Licensing

Smart Software Licensing

Troubleshooting TechNotes

Smart Licensing using Policy on Catalyst Switching Platforms

Migrate Catalyst License to Smart Licensing Using Policy

Cisco DNA for Switching

Cisco DNA Software Subscription Matrix for Switching

Feature History for Smart Licensing Using Policy

This table provides release and related information for features explained in this module.

These features are available on all releases subsequent to the one they were introduced in, unless noted otherwise.

Release

Feature

Feature Information

Cisco IOS XE Gibraltar 16.11.1

Smart Licensing

A cloud-based, software license management solution that allows you to manage and track the status of your license, hardware, and software usage trends.

Smart Licensing is the default and the only available method to manage licenses.

Cisco IOS XE Amsterdam 17.3.2a

Smart Licensing Using Policy

An enhanced version of Smart Licensing, with the overarching objective of providing a licensing solution that does not interrupt the operations of your network, rather, one that enables a compliance relationship to account for the hardware and software licenses you purchase and use.

Starting with this release, Smart Licensing Using Policy is automatically enabled on the device. This is also the case when you upgrade to this release.

By default, your Smart Account and Virtual Account in CSSM is enabled for Smart Licensing Using Policy.

Cisco DNA Center support for Smart Licensing Using Policy

Cisco DNA Center supports Smart Licensing Using Policy functionality starting with Cisco DNA Center Release 2.2.2.

When you use Cisco DNA Center to manage a product instance, Cisco DNA Center connects to CSSM, and is the interface for all communication to and from CSSM.

For information about the comptabile controller and product instance versions, see Controller.

For information about this topology, see Connected to CSSM Through a Controller and Workflow for Topology: Connected to CSSM Through a Controller.

Cisco IOS XE Amsterdam 17.3.3

Smart Software Manager On-Prem (SSM On-Prem) Support for Smart Licensing Using Policy

SSM On-Prem is an asset manager, which works in conjunction with CSSM. It enables you to administer products and licenses on your premises instead of having to directly connect to CSSM.

For information about the comptabile SSM On-Prem and product instance versions, see: SSM On-Prem.

For an overview of this topology, and to know how to implement it, see SSM On-Prem Deployment and Workflow for Topology: SSM On-Prem Deployment.

For information about migrating from an exisiting version of SSM On-Prem, to one that supports Smart Licensing Using Policy, see Migrating to a Version of SSM On-Prem That Supports Smart Licensing Using Policy.

Cisco IOS XE Bengaluru 17.6.2

Export Control Key for High Security (HSECK9 key)

The HSECK9 key was introduced on the Cisco Catalyst 9300X Series Switches.

The HSECK9 key is an export-controlled license, which authorizes the use of cryptographic features that are restricted by U.S. export control laws. If you want to use a restricted cryptographic feature, an HSECK9 key is required.

See Authorization Code.

On product instances where the HSECK9 key is supported, you can obtain and install SLAC by implementing one of these topologies:

Cisco IOS XE Cupertino 17.7.1

CSLU support for Linux

Support for CSLU deployment on a machine (laptop or desktop) running Linux.

See CSLU, Workflow for Topology: Connected to CSSM Through CSLU and Workflow for Topology: CSLU Disconnected from CSSM.

Factory-installed trust code

For new hardware orders, Cisco installs a trust code at the time of manufacturing.

See: Overview and Trust Code.

Trust code request and installation in additional topologies

A trust code is automatically obtained in topologies where the product instance initiates the sending of data to CSLU and in topologies where the product instance is in an air-gapped network.

See:

Ability to save SLAC request and return in a file in an air-gapped network

Option to save a SLAC request file on the product instance. The SLAC request file must be uploaded to CSSM and the file containing the SLAC code can then be downloaded and installed it on the product instance - the same as a RUM report and ACK. With this method you do not have to gather and enter the required details on the CSSM Web UI to generate a SLAC

Similarly, an authorization code that is saved to a file can also be uploaded the same way as a RUM report.

See: No Connectivity to CSSM and No CSLU and Workflow for Topology: No Connectivity to CSSM and No CSLU.

In the command reference of the corresponding release, see the license smart privileged EXEC command.

Support to collect software version in a RUM report

If version privacy is disabled (no license smart privacy version global configuration command), the Cisco IOS-XE software version running on the product instance and the Smart Agent version information is included in the RUM report.

In the command reference of the corresponding release, see the license smart global configuration command.

RUM Report optimization and availability of statistics

RUM report generation and related processes have been optimized. This includes a reduction in the time it takes to process RUM reports, better memory and disk space utilization, and visibility into the RUM reports on the product instance (how many there are, the processing state each one is in, if there are errors in any of them, and so on).

See RUM Report and Report Acknowledgement, Upgrades Within the Smart Licensing Using Policy Environment, and Downgrades Within the Smart Licensing Using Policy Environment.

In the command reference of the corresponding release, see the show license rum , show license all , and show license tech privileged EXEC commands.

Account information included in show command outputs

A RUM acknowledgement (ACK) includes the Smart Account and Virtual Account that was reported to, in CSSM. You can then display account information using various show commands. The account information that is displayed is always as per the latest available ACK on the product instance.

In the command reference of the corresponding release, see the show license summary , show license status , show license all , and show license tech privileged EXEC commands.

Cisco IOS XE Cupertino 17.7.1

Smart Licensing Using Policy

Smart Licensing Using Policy was implemented on the following product instances:

  • C9500X-28C8D, which was introduced in this release.

    C9500X-28C8D is part of the new Cisco Catalyst 9500X Series Switches, which is still part of the overall Cisco Catalyst 9500 Series Switches.

  • Catalyst 9600 Series Supervisor Engine 2 (C9600X-SUP-2), which was introduced this release

  • Cisco Catalyst 9400 Series Supervisor Modules 2 and 2XL (C9400X-SUP-2 and C9400X-SUP-2XL), which were introduced in this release

Cisco IOS XE Cupertino 17.8.1

Export Control Key for High Security (HSECK9 key)

This feature was implemented on the following product instances:

  • Cisco Catalyst 9500X Series Switches

  • Catalyst 9600 Series Supervisor Engine 2 with associated line cards.

See Authorization Code.

On product instances where the HSECK9 key is supported, you can obtain and install Smart Licensing Authorization Code (SLAC) for the HSECK9 key, by implementing one of these topologies:

Cisco IOS XE Cupertino 17.9.1

New mechanism to send data privacy related information

A new mechanism to send all data privacy related information was introduced. This information is no longer included in a RUM report.

If data privacy is disabled (no license smart privacy {all | hostname | version} } global configuration command), data privacy related information is sent in a separate sync message or offline file.

Depending on the topology you have implemented, the product instance initiates the sending of this information in a separate message, or CSLU and SSM On-Prem initiates the retrieval of this information from the product instance, or this information is saved in the offline file that is generated when you enter the license smart save usage privileged EXEC command

In the command reference of the corresponding release, see the license smart global configuration command.

Hostname support

If you configure a hostname on the product instance and disable the corresponding privacy setting (no license smart privacy hostname global configuration command), hostname information is sent from the product instance.

Depending on the topology you have implemented, the hostname information is received by CSSM, and CSLU or SSM On-Prem. It is then displayed on the corresponding user interface.

In the command reference of the corresponding release, see the license smart global configuration command.

Trust code request and installation

From this release, trust code request and installation is supported in the CSLU-initiated mode as well.

See Trust Code, Workflow for Topology: Connected to CSSM Through CSLU, and Workflow for Topology: CSLU Disconnected from CSSM.

RUM Report Throttling

For all topologies where the product instance initiates communication, the minimum reporting frequency is throttled to one day. This means the product instance does not send more than one RUM report a day.

The affected topologies are: Connected Directly to CSSM, Connected to CSSM Through CSLU (product instance-initiated communication), CSLU Disconnected from CSSM (product instance-initiated communication), and SSM On-Prem Deployment (product instance-initiated communication).

You can override the reporting frequency throttling, by entering the license smart sync command in privileged EXEC mode. This triggers an on-demand synchronization with CSSM or CSLU, or SSM On-Prem, to send and receive any pending data.

RUM report throttling also applies to the Cisco IOS XE Amsterdam 17.3.6 and later releases of the 17.3.x train, and Cisco IOS XE Bengaluru 17.6.4 and later releases of the 17.6.x train. From Cisco IOS XE Cupertino 17.9.1, RUM report throttling is applicable to all subsequent releases.

See: Connected to CSSM Through CSLU, Connected Directly to CSSM, CSLU Disconnected from CSSM, and SSM On-Prem Deployment.

Smart Licensing Using Policy

This feature was implemented on C9200CX-12P-2X2G, C9200CX-8P-2X2G, and C9200CX-12T-2X2G models of the Cisco Catalyst 9200CX Series Switches, which were introduced in this release.

Use Cisco Feature Navigator to find information about platform and software image support. To access Cisco Feature Navigator, go to http://www.cisco.com/go/cfn

6 The Cisco StackWise Virtual feature, which is available on certain Cisco Catalyst Access, Core, and Aggregation Switches, is an example of such a setup.
7 The Quad-Supervisor with Route Processor Redundancy, which is available on certain Cisco Catalyst Access, Core, and Aggregation Switches, is an example of such a setup.