Phone Hardware Installation
Before you can use your phone, you must install and charge the battery. The battery may already be installed in your phone, or you may have to install it yourself.
You must read the safety information in Product Safety and Security before you use, install, or charge the phone.
The battery may already be charged using one of the supported charging methods. If the battery isn't charged, you must charge the battery before you can set up the phone.
 Caution |
The Cisco Wireless IP Phone 8821 and the Cisco Wireless IP Phone 8821-EX have different ways to lock the battery compartment. Use the correct procedures for your phone.
|
Install the Cisco Wireless IP Phone 8821 Battery
Use this task for the Cisco Wireless IP Phone 8821 only. For the Cisco Wireless IP Phone 8821-EX, see Install the Cisco Wireless IP Phone 8821-EX Battery.
IP54 compliance mean that the phone is sealed from dust and water. When the phone leaves the factory, it is completely sealed.
If you need to open the battery compartment, don't open it in a dusty or wet environment.
You should make sure that the battery cover is closed to ensure that dust and water cannot enter the battery compartment.
 Note |
Dirt, oil, or other products can damage the gasket on the battery compartment cover, resulting in a poor seal. Every time you change the battery, inspect the gasket for damage. If the gasket is damaged, you can order a replacement cover. |
Caution |
Don't use tools to pry open the cover. |
Caution |
Phone life and functions could be compromised if:
|
Procedure
| Step 1 |
Remove the cover from the battery compartment.
|
||||||
| Step 2 |
Install the battery.
The battery has metal contacts that must connect to the contacts in the battery compartment. The battery also has an arrow at the bottom and the Cisco logo at the top. When the battery is correctly inserted, the logo and arrow are visible. The arrow points towards the connector on the base of the phone and the logo is close to the locking catch. The battery compartment has small tabs in the bottom corners. The battery must slide under these tabs. The following graphic shows the battery compartment without and with the battery correctly installed.
|
||||||
| Step 3 |
Inspect the gasket on the inside of the battery compartment cover and, if necessary, clean it with a cloth dampened with water.
|
||||||
| Step 4 |
Replace the cover to the battery compartment.
|


Install the Cisco Wireless IP Phone 8821-EX Battery
Use this task for the Cisco Wireless IP Phone 8821-EX only. For the Cisco Wireless IP Phone 8821, see Install the Cisco Wireless IP Phone 8821 Battery.
IP67 compliance mean that the phone is sealed from dust and water. When the phone leaves the factory, it is completely sealed.
Caution |
If you need to open the battery compartment, don't open it in a dusty or wet environment or in a hazardous location. Don't open the compartment if the temperature is 0°C or less. |
You should make sure that the battery cover is closed to ensure that dust and water cannot enter the battery compartment.
Note |
Dirt, oil, or other products can damage the gasket on the battery compartment cover, resulting in a poor seal. Every time you change the battery, inspect the gasket for damage. If the gasket is damaged, you can order a replacement cover. |
Caution |
Don't use tools to pry open the cover. |
Caution |
Phone life and functions could be compromised if:
|
Procedure
| Step 1 |
Use a coin to unscrew the battery cover and remove the cover from the battery compartment. 
|
||||
| Step 2 |
Install the battery.
The battery has metal contacts that must connect to the contacts in the battery compartment. The battery also has an arrow at the bottom and the Cisco logo at the top. When the battery is correctly inserted, the logo and arrow are visible. The arrow points towards the connector on the base of the phone and the logo is close to the locking catch. The battery compartment has small tabs in the bottom corners. The battery must slide under these tabs. The following graphic shows the battery compartment without and with the battery correctly installed.
|
||||
| Step 3 |
Inspect the gasket on the inside of the battery compartment cover and, if necessary, clean it with a cloth dampened with water.
|
||||
| Step 4 |
Replace the cover to the battery compartment.
|


Replace the Cisco Wireless IP Phone 8821 Battery
Use this task for the Cisco Wireless IP Phone 8821 only. For the Cisco Wireless IP Phone 8821-EX, see Replace the Cisco Wireless IP Phone 8821-EX Battery.
If you have a spare battery, you can replace a depleted battery with a charged battery.
IP54 compliance mean that the phone is sealed from dust and water. When the phone leaves the factory, it is completely sealed.
If you need to open the battery compartment, don't open it in a dusty or wet environment.
You should make sure that the battery cover is closed to ensure that dust and water cannot enter the battery compartment.
Note |
Dirt, oil, or other products can damage the gasket on the battery compartment cover, resulting in a poor seal. Every time you change the battery, inspect the gasket for damage. If the gasket is damaged, you can order a replacement cover. |
Caution |
Don't use tools to pry open the cover or pry out the battery. |
Caution |
Phone life and functions could be compromised if:
|
Caution |
The expected lifecycle for a battery is two years. Based on the average usage, this corresponds to approximately 500 charges. You can check the date printed on the battery to calculate the age of the battery. We recommend you to replace the battery when it reaches its end of life. Check the battery and battery compartment for physical signs of damage before you replace your battery. Don't use a damaged battery in your phone. Properly dispose of the damaged battery and use a new one. |
Procedure
| Step 1 |
Remove the cover from the battery compartment.
|
||||||
| Step 2 |
Do one of these actions:
|
||||||
| Step 3 |
Install the battery.
The battery has metal contacts that must connect to the contacts in the battery compartment. The battery also has an arrow at the bottom and the Cisco logo at the top. When the battery is correctly inserted, the logo and arrow are visible. The arrow points towards the connector on the base of the phone and the logo is close to the locking catch. The battery compartment has small tabs in the bottom corners. The battery must slide under these tabs. The following graphic shows the battery compartment without and with the battery correctly installed.
|
||||||
| Step 4 |
Inspect the gasket on the inside of the battery compartment cover and, if necessary, clean it with a cloth dampened with water.
|
||||||
| Step 5 |
Replace the cover to the battery compartment.
|

Replace the Cisco Wireless IP Phone 8821-EX Battery
Use this task for the Cisco Wireless IP Phone 8821-EX only. For the Cisco Wireless IP Phone 8821, see Replace the Cisco Wireless IP Phone 8821 Battery.
If you have a spare battery, you can replace a depleted battery with a charged battery.
IP67 compliance mean that the phone is sealed from dust and water. When the phone leaves the factory, it is completely sealed.
Caution |
If you need to open the battery compartment, don't open it in a dusty or wet environment or in a hazardous location. Don't open the compartment if the temperature is 0°C or less. |
You should make sure that the battery cover is closed to ensure that dust and water cannot enter the battery compartment.
Note |
Dirt, oil, or other products can damage the gasket on the battery compartment cover, resulting in a poor seal. Every time you change the battery, inspect the gasket for damage. If the gasket is damaged, you can order a replacement cover. |
Caution |
Don't use tools to pry open the cover or pry out the battery. |
Caution |
Phone life and functions could be compromised if:
|
Caution |
The expected lifecycle for a battery is two years. Based on the average usage, this corresponds to approximately 500 charges. You can check the date printed on the battery to calculate the age of the battery. We recommend you to replace the battery when it reaches its end of life. Check the battery and battery compartment for physical signs of damage before you replace your battery. Don't use a damaged battery in your phone. Properly dispose of the damaged battery and use a new one. |
Procedure
| Step 1 |
Use a coin to unscrew the battery cover and remove the cover from the battery compartment.
|
||||
| Step 2 |
Do one of these actions:
|
||||
| Step 3 |
Install the battery.
The battery has metal contacts that must connect to the contacts in the battery compartment. The battery also has an arrow at the bottom and the Cisco logo at the top. When the battery is correctly inserted, the logo and arrow are visible. The arrow points towards the connector on the base of the phone and the logo is close to the locking catch. The battery compartment has small tabs in the bottom corners. The battery must slide under these tabs. The following graphic shows the battery compartment without and with the battery correctly installed.
|
||||
| Step 4 |
Inspect the gasket on the inside of the battery compartment cover and, if necessary, clean it with a cloth dampened with water.
|
||||
| Step 5 |
Replace the cover to the battery compartment.
|
||||
| Step 6 |
Replace the cover to the battery compartment.
|
Damaged Battery Identification
Your phone battery can develop physical signs of damage. Physical signs include:
-
Swelling
-
Bending
-
Broken end caps
Caution |
Check the battery and battery compartment for physical signs of damage before you replace your battery. Don't use a damaged battery in your phone. Properly dispose of the damaged battery and use a new one. |
Swollen Battery
Identification
-
The battery doesn't sit flat on a table. It may rock if you touch the corners.
-
The installed battery is not flat in the battery compartment.
-
The back cover won't completely close (especially in the middle of the door)
-
The battery doesn't fall out of the battery compartment when you try to remove it. You may think that you need to pry the battery out of the compartment.
Caution
Don't try to pry the battery out of the compartment.
Examples
The next image shows a swollen battery from the end.

The next image shows another swollen battery.

The next image shows a swollen battery in the battery compartment. Notice that the battery isn't flush with the compartment walls around the battery perimeter.

The next image shows the same swollen battery when the cover is put on. Notice that the middle of the cover is arched. The catches in the middle of the cover won't easily connect.

The battery may also swell along the length or width, which makes the battery hard to remove. Don't use any instrument to pry the battery out.
Bent Battery
Identification
The battery doesn't sit flat on a table. It may rock if you touch the corners.
Example

End Caps are Broken or Damaged
Identification
The plastic caps at the ends of the battery aren't properly attached.
Example

Phone Battery Charging
You can charge the battery using any of the following options:
-
USB cable—You can charge the phone with an AC power adapter or your computer.
-
Desktop charger—You can use the phone and charge it at the same time.
-
Multicharger—You can charge several phones at the same time.
 Warning |
Explosion Hazard: Do not charge the phone battery in a potentially explosive atmosphere. Statement 431 |
The battery takes about 3 hours to charge in the AC power adapter, desktop charger, or multicharger. It takes about 6 hours to charge using the USB cable and your computer.
Spare Battery Charging
If you require longer talk times, you will find it useful to have a spare, charged battery. You can charge a spare battery in the desktop charger or multicharger.
Warning |
Explosion Hazard: Do not charge the spare battery in a potentially explosive atmosphere. Statement 431 |
The spare battery takes about 3 hours to charge in the desktop charger or multicharger.
Prepare the Power Adapter
The power adapter for your phone is compact. Before you use the power adapter, you have to unfold the prongs. After you use the adapter, you can fold in the prongs.
The power adapter for your region may also require an additional clip to allow the adapter to be plugged into the electrical outlet.
Procedure
| Step 1 |
Catch the edge of a prong with your finger and pull the prong up until it clicks into position.
|
| Step 2 |
(Optional) Install the international power clip. |
| Step 3 |
(Optional) Before you close the adapter, remove the international power clip. |
| Step 4 |
(Optional) Hold the lever on the top of the adapter down and press the prongs down to close the adapter.
|


Charge the Battery with the AC Power Supply
You can charge your phone using an AC power supply. When you use the power supply to charge your phone, the battery can take up to 3 hours to fully charge.
The wide connector on the USB cable connects to the phone using magnets to hold it secure. It has pins that you need to align correctly. If you hold the phone so that the screen is towards you, the battery icon on the connector is visible.
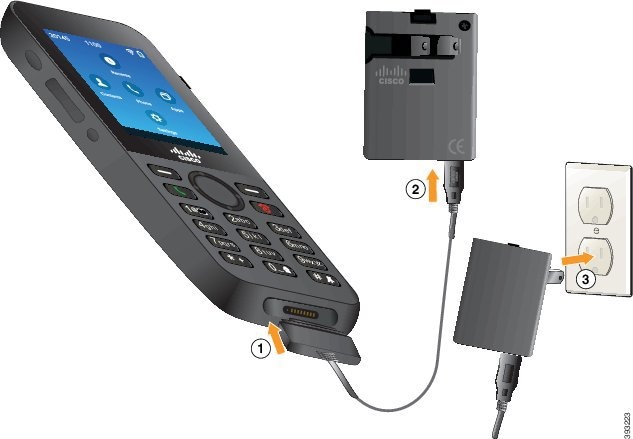
Caution |
Do not charge the phone in a hazardous environment. Do not charge the phone if it is wet. |
Before you begin
You need the USB power cable supplied with your phone.
You need to prepare the power adapter for use as described in Prepare the Power Adapter.
Procedure
| Step 1 |
Plug the USB cable into the bottom of the phone with the pins aligned. |
| Step 2 |
Plug the USB cable into the power adapter. |
| Step 3 |
Plug the power adapter into the electrical outlet. |
Charge the Battery with the USB Cable and a USB Port on Your Computer
You can charge your phone using your computer. When you use the computer to charge your phone, the battery can take up to 6 hours to fully charge.
The wide connector on the USB cable connects to the phone using magnets to hold it secure. It has pins that you need to align correctly. If you hold the phone so that the screen is towards you, the battery icon on the connector is visible.
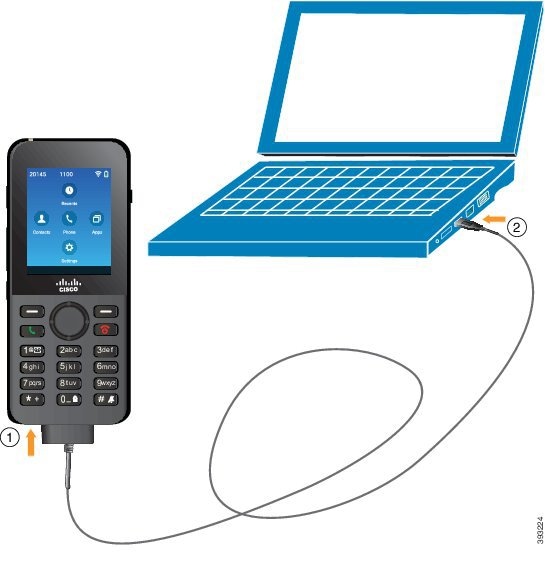
Caution |
Do not charge the phone in a hazardous environment. Do not charge the phone if it is wet. |
Procedure
| Step 1 |
Connect the long connecter of the USB cable to the bottom of the phone with the pins aligned. |
| Step 2 |
Plug the other end into the USB port in the computer. |
 Feedback