Services
Overview
In CPS, a 'Service' it what is assigned to a subscriber (in USuM) to define how that subscriber is treated. Some basic examples of services would be a 'GOLD' user might get a high upload/download speed whereas a 'BRONZE' user would get a low one. Other examples would include having one type of user be redirected to a portal when their Quota is exhausted whereas another type would only have their speed downgraded.
As the Service maps as closely as possible to how a Service Provider wants to classify their customers, the Service in CPS is flexibly defined to allow configuration at different levels.
Service
-
A service is effectively just a 'code' to label the service and a collection of Service Options which contain the definition of what a service 'is'.
-
What a Customer Service Representative assigns to a subscriber to describe the user's plan.
-
Multiple services can be assigned to a single subscriber
-
If multiple services are assigned to a subscriber, the service options are combined between all assigned services.
Therefore, there is no logical difference between a subscriber with:
Service Option
-
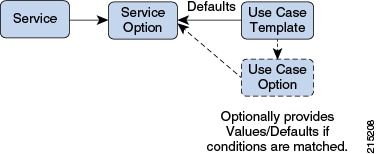
Provides the concrete values which can be re-used for multiple services.
For example, one subscriber might have one service option which describes the values for 10MB Upload/Download speed and another subscriber which describes 1MB Upload/Download speed. Continuing the example from above, 10MB could be assigned to a GOLD service and 1MB could be assigned to BRONZE.
-
What values are configurable in a Service Option are setup by the Use Case Template object. The Use Case Template can provide defaults to the Service Option or hide values in Service Configuration objects not necessary for certain use cases.
-
If a Service Configuration's value is not defined in a Service Option, the value from the Use Case Template will be used.
-
For more information on how to use service options, refer to Using RADIUS Service Templates.
Service Configuration
-
The low-level configuration objects used by the CPS code to drive functionality. These objects are used to drive functionality in the system. The whole point of the Service > Service Option > Use Case Template chain of functionality is to flexibly configure these Service Configuration objects which the code uses to drive system logic.
-
These objects are defined by the CPS code.
Types of service configurations:
-
PriorityConfiguration: Only one allowed to be active at a time. If multiples priority configurations are added, highest priority is used.
These are used in cases where only a single value makes sense. For example, when sending an 'Accept' message, we can only have one template and multiples do not make sense.
Objects of this type will always have a priority field. If multiple priority configurations are added, the highest priority object will be used.
Example: AccessAcceptConfiguration, RegisterMacAddress
-
GroupConfiguration (most common): Only 1 per 'Group Name' are allowed to be active. If multiple configurations are added highest priority per 'Group Name' is used.
These are used in cases where a configuration only makes sense for a single 'group' (key). For example, if it makes sense to control the upload/download speed based on the network type (cell, Wi-Fi, and so on) a service configuration to control network speed with a group set for cell/Wi-Fi would allow multiple service configurations to be added.
These objects will always have a group field as well as a priority field. For each unique group value, the highest priority will be used.
Example: IsgServiceConfiguration, All Diameter Configurations, OneTimeUsageCharge
-
ServiceConfiguration: Multiples allowed. If multiple configurations are added, all are used. 'Modify' functionality in PB for Use Case Options/Service Options can override values conditionally.
Example: AutoChargeUpAccounts, AutoProvisionQuota, BalanceRateConfiguration
Use Case Template
-
Defines the Service Configuration objects to be set by a Service Option and can provide default values and/or hide values which don't need to be set by a use case.
-
Optionally contains 'Initiators' (Conditions) which define when the template is active.
-
Created by an advanced user (usually Engineering/AS).
-
Makes Service Option and Service creation easier.
For example, a Use Case Template setup to create different Upload/Download speeds might include a 'DefaultBearer' QoS Service Configuration object. The user creating a Use Case Template could default and/or hide the values for 'ARP' and other values not directly related to upload/download speed if they knew they were not required for a customers use case. This would allow the creation of the Service Option to be much simpler.
A copy of the Use Case Options is created while copying a Use Case Template.
Use Case Option
-
A child of Use Case Template used to add/modify Service Configurations objects when certain conditions occur.
-
Provides a way to separate Service Configurations within a use case based on conditions.
-
Contains the same functionality of a Use Case Template.
-
Can add new service options or modify service options from parent Use Case Template.
While copying a Use Case Option, all the corresponding children Use Case Options get copied as well.
For example, if a users upload/download speed should be decreased when they are out of quota. A Use Case Option would be added with a condition indicating the user is out of quota. The service configurations in the use case options could have a higher priority than those in the use case template so they would override the normal values. The service option would then allow setting both the normal upload/download speed and the upload/download speed when the user is out of quota.
RADIUS Service Templates
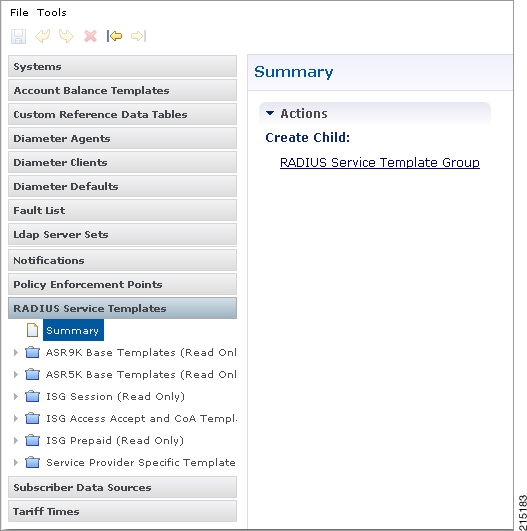
CPS comes by default with multiple folders that contain templates related to different access methods. This section discusses the Read Only templates under the ISG Access Accept and CoA Templates folder as well as the Service Provider Specific Templates. Both of these folders contain the templates most commonly used to deploy Wi-fi using the Cisco ISG. The ASR9K, ASR5K and ISG Prepaid templates are outside the scope of this section, however the details for configuring an ISG Prepaid service are outlined in ISG Prepaid.
- ISG Access Accept and CoA Templates
- Service Provider Specific Templates
- Using RADIUS Service Templates
- Create a New RADIUS Service Template
- AV Pair Substitutions
- Additional Notes
ISG Access Accept and CoA Templates
 Note | There is no need to edit or copy these Read Only templates as they are designed to work without modification in support of CPS policy configurations. |
Service Provider Specific Templates
The templates in the Service Provider Specific Templates folder are provided for reference and can be used as-is or edited as needed. New templates can be created and added to this folder, or an entirely new folder can be created within the RADIUS Service Template section with new, custom templates. The contents of the templates in the Service Provider Specific Templates folder are discussed in more detail in Creating a New RADIUS Service Template, page 92.
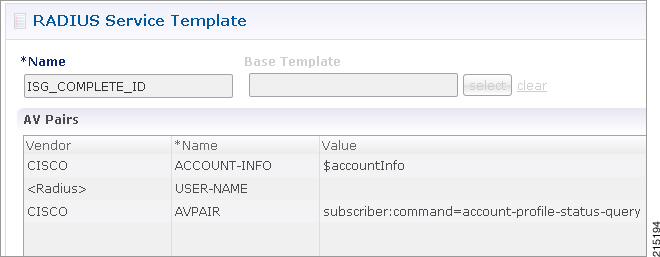
Using RADIUS Service Templates
As part of configuring a Wi-fi service that is using the ISG as a policy enforcement point, there are various pieces of information that must be sent to the ISG or that might be requested by the ISG. For example, if a policy map is defined on the ISG that requests a service called OPENGARDEN_SERVICE, that service can be defined on the CPS as a template and supplied to the ISG via an Access Request. CPS ships with three useful templates that are common in an ISG service flow: the previously mentioned OPENGARDEN_SERVICE, a PBHK_SERVICE and an L4REDIRECT_SERVICE. The templates can be opened and studied to understand how they work, in addition you can validate how the templates work by issuing an Access Request from the ISG (or from a test utility such as radclient) to see the values returned by the template.
The following command run on the ISG will return the contents of the OPENGARDEN_SERVICE template:
test aaa group radius OPENGARDEN_SERVICE password legacy
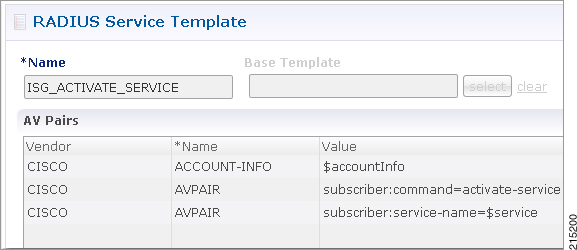
After a user authenticates against the CPS Subscriber Profile Repository (SPR), the typical CPS Service assigned to the user will contain two templates required by the ISG, an Access Accept template and an ISG Service template. Whereas the Open Garden or PBHK templates are called directly via an Access Request, the Access Accept and ISG Service are contained within a CPS service, wrapped in CPS Service Options, based on an underlying Use Case Template.
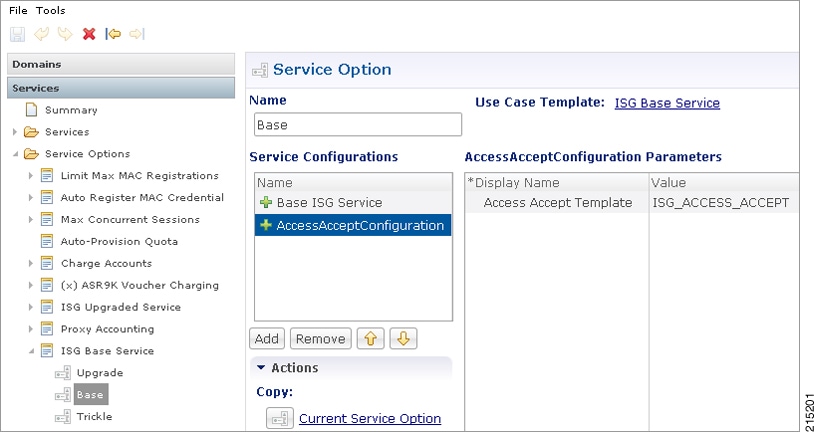
Create a New RADIUS Service Template
In the “Base” ISG Base Service described above, the Access Accept Template is defined by default as ISG_ACCESS_ACCEPT, however in the following example, we will create a new template based on the ISG_ACCESS_ACCEPT called TIMEOUT_ACCESS_ACCEPT. The example below introduces the concept of extending a Base Template with additional options.


AV Pair Substitutions
It is often necessary to dynamically pass a value into a Radius template at runtime. The example below shows how to add a VLAN ID as a dynamic value in a custom Access Accept template, with the VLAN value pulled from the SPR for the user with the assigned service. The below example assumes familiarity with creating Use Case Templates in Policy Builder and using the Control Center interface.
| Step 1 | Create a new Use
Case Template to hold the new Access Accept Radius Service Template. The Use
Case Template will have a single Service Configuration Object of type
AccessAcceptConfiguration. Call the new Use Case Template “AccessAccept”.
 | ||
| Step 2 | Create a new
Radius Service Template underneath the “Custom” group created earlier. Call the
new template “VLAN” and add three <Radius> values: TUNNEL-TYPE,
TUNNEL-MEDIUM-TYPE and TUNNEL-PRIVATE-GROUP-ID. Populate the value for
TUNNEL-TYPE as 13-VLAN and TUNNEL-MEDIUM-TYPE as 6 - IEEE-802; leave the
TUNNEL-PRIVATE-GROUP-ID blank.
 | ||
| Step 3 | Hide the
“Available AV Pair Attributes…” dialog and you will see the AV Pair
Substitution dialog. Click
Add and then select the TUNNEL-PRIVATE-GROUP-ID
which will hold the VLAN ID we will want to substitute into the template.
 | ||
| Step 4 | A new blank row
will be created in the AV Pair Substitution list (note, at first there will be
a red X indicating an error, however this will be gone once the values are
populated). Enter “VlanId” as the Name and $VlanId as the Replacement String.
The template is now complete.  | ||
| Step 5 | Next we are going to assign the template to a new Service Object built from the Use Case Template defined above. Go to the Services panel of the Policy Builder and navigate to the Services panel and to the Service Options folder. Find the new AccessAccept Service Option (based on the Use Case Template created earlier) and use the Create Child option to create a new Service Option. Call it VlanId. | ||
| Step 6 | Click on the
Access Accept Template Display Name and use the 3 dots to bring up the pick
list with the Radius templates; select the VLAN template that you created.
 | ||
| Step 7 | Next we are going to use the “AVP Substitution” options within the Service Option to pull a VLAN ID from the subscriber's account in the SPR. Expand out the AVPSubstitution dialog and you will see several values. Fill out the Code with the value of $VlanId (the variable we assigned in the template). | ||
| Step 8 | Use the “Pull
Value From…” in the “String Value” row to assign a value from the SPR to the
variable. We are going to assign a variable called VLAN from the subscriber's
SPR record.
  | ||
| Step 9 | Create a new
service called VlanService and add to it the Service Option VlanId created
above.
 | ||
| Step 10 | Login to the Control Center and add the new VlanService to the Services section of a user account in the USuM. | ||
| Step 11 | Add a new AVP
called VLAN to the users account that has the new VlanService assigned to it.
Use the Custom Data interface to add a new value with the code VLAN and the
appropriate Value.
In the example below we have used a VLAN of 101.  |
Additional Notes
In order to verify that a client making an access request to the CPS will get the expected VLAN ID and other VLAN AVP attributes needed to place the client onto a specific VLAN after they authenticate, you can:
-
Generate an Access Request to the CPS for the customer whose account contains the VlanService and the VLAN value.
-
Use tcpdump on the Radius authentication port (typically 1812) to monitor the Access Request tcpdump -i any port 1812 -s0 -w vlan.pcap
-
Verify that the CPS replies back with the TUNNEL-PRIVATE-GROUP-ID assigned as the VLAN in the Control Center. In addition, you can check the qns runtime logs to see the response to the Access Request.
 Feedback