- Zone-Based Policy Firewalls
- Zone-Based Policy Firewall IPv6 Support
- VRF-Aware Cisco IOS XE Firewall
- Layer 2 Transparent Firewalls
- Nested Class Map Support for Zone-Based Policy Firewall
- Zone Mismatch Handling
- Configuring Firewall Stateful Interchassis Redundancy
- Box-to-Box High Availability Support for IPv6 Zone-Based Firewalls
- Interchassis Asymmetric Routing Support for Zone-Based Firewall and NAT
- Interchassis High Availability Support in IPv6 Zone-Based Firewalls
- Firewall Box to Box High Availability Support for Cisco CSR1000v Routers
- Firewall Stateful Inspection of ICMP
- Firewall Support of Skinny Client Control Protocol
- Configuring the VRF-Aware Software Infrastructure
- IPv6 Zone-Based Firewall Support over VASI Interfaces
- Protection Against Distributed Denial of Service Attacks
- Configuring Firewall Resource Management
- IPv6 Firewall Support for Prevention of Distributed Denial of Service Attacks and Resource Management
- Configurable Number of Simultaneous Packets per Flow
- LISP and Zone-Based Firewalls Integration and Interoperability
- Firewall High-Speed Logging
- TCP Reset Segment Control
- Loose Checking Option for TCP Window Scaling in Zone-Based Policy Firewall
- Enabling ALGs and AICs in Zone-Based Policy Firewalls
- Configuring Firewall TCP SYN Cookie
- Object Groups for ACLs
- Cisco Firewall-SIP Enhancements ALG
- MSRPC ALG Support for Firewall and NAT
- Sun RPC ALG Support for Firewalls and NAT
- vTCP for ALG Support
- ALG—H.323 vTCP with High Availability Support for Firewall and NAT
- FTP66 ALG Support for IPv6 Firewalls
- SIP ALG Hardening for NAT and Firewall
- SIP ALG Resilience to DoS Attacks
- Zone-Based Firewall ALG and AIC Conditional Debugging and Packet Tracing Support
Contents
- GGSN Pooling Support for Firewalls
- Finding Feature Information
- Information About GGSN Pooling Support for Firewalls
- GPRS Overview
- GTP Overview
- GGSN Pooling Support
- GTP Traffic Through Firewall
- How to Configure GGSN Pooling Support for Firewalls
- Configuring Access Control Lists and Class Maps for GGSN Pooling
- Configuring Policy Maps for GGSN Pooling
- Configuring Zones and Zone Pairs for GGSN Pooling Support
- Configuration Examples for GGSN Pooling Support for Firewalls
- Example: Configuring Access Control Lists and Class Maps for GGSN Pooling
- Example: Configuring Policy Maps for GGSN Pooling
- Example: Configuring Zones and Zone Pairs for GGSN Pooling
- Additional References for Firewall Stateful Interchassis Redundancy
- Feature Information for GGSN Pooling Support for Firewalls
GGSN Pooling Support for Firewalls
The GGSN Pooling Support for Firewalls feature enhances the General Packet Radio Switching (GPRS) Tunneling Protocol (GTP) feature by adding load balancing support. GTP supports the inspection of control traffic that is designated to a single Gateway GPRS Support Node (GGSN). To provide efficiency and scalability to Global System for Mobile Communication (GSM) networks, load balancing is added to the topology. The load balancer dispatches requests from the Serving GPRS Support Node (SGSN) to various GGSNs in the pool.
This module describes how to configure the GGSN Pooling Support for Firewalls feature.
- Finding Feature Information
- Information About GGSN Pooling Support for Firewalls
- How to Configure GGSN Pooling Support for Firewalls
- Configuration Examples for GGSN Pooling Support for Firewalls
- Additional References for Firewall Stateful Interchassis Redundancy
- Feature Information for GGSN Pooling Support for Firewalls
Finding Feature Information
Your software release may not support all the features documented in this module. For the latest caveats and feature information, see Bug Search Tool and the release notes for your platform and software release. To find information about the features documented in this module, and to see a list of the releases in which each feature is supported, see the feature information table at the end of this module.
Use Cisco Feature Navigator to find information about platform support and Cisco software image support. To access Cisco Feature Navigator, go to www.cisco.com/go/cfn. An account on Cisco.com is not required.
Information About GGSN Pooling Support for Firewalls
GPRS Overview
General Packet Radio Service (GPRS) provides uninterrupted connectivity for mobile subscribers between Global System for Mobile Communication (GSM) networks and corporate networks or the Internet. The Gateway GPRS Support Node (GGSN) is the interface between the GPRS wireless data network and other networks. The Serving GPRS Support Node (SGSN) performs mobility, data session management, and data compression.
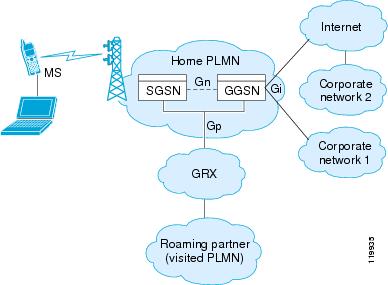
The GPRS core network architecture has a mobile station (MS) that is logically connected to an SGSN. The main function of an SGSN is to provide data support services to an MS. An SGSN is logically connected to a GGSN by using GTP. If the connection is within the same operator’s Public Land Mobile Network (PLMN), the connection is called the Gn interface. If the connection is between two different PLMNs, the connection is known as the Gp interface. A GGSN provides a data gateway to external networks, such as the Internet or the corporate network, through an interface called the Gi interface. GTP is used to encapsulate data from an MS. GTP also includes mechanisms for establishing, moving, and deleting tunnels between SGSN and GGSN in roaming scenarios.
The Universal Mobile Telecommunications System (UMTS) is the commercial convergence of fixed-line telephony, mobile, Internet, and computer technology. UMTS Terrestrial Radio Access Network (UTRAN) is the networking protocol used for implementing wireless networks in this system. GTP allows multiprotocol packets to be tunneled through a UMTS/GPRS backbone between a GGSN, an SGSN, and the UTRAN.
The Gp and Gi interfaces are the primary points of interconnection between an operator’s network and untrusted external networks. Operators must take care to protect their networks from attacks that originate on these external networks.
The Gp interface is the logical connection that supports mobile (roaming) data users between PLMNs. GTP establishes a connection between a local SGSN and a user’s home GGSN.
Data that originates from the MS is sent to the Gi interface. It is also the interface that is exposed to public data networks and networks of corporate customers.
The traffic sent out from a GGSN or arriving for an MS at the Gi interface can virtually be of any kind since the application being used by the MS is unknown.
GTP allows multiprotocol packets to be tunneled through the GPRS backbone between GPRS Support Nodes (GSNs). GTP provides a tunnel control and management protocol that allows an SGSN to provide GPRS network access for an MS by creating, modifying, and deleting tunnels. GTP uses a tunneling mechanism to provide a service for carrying user data packets.
 Note | When using GTP with failover, if a GTP connection is established and the active unit fails before data is transmitted over the tunnel, the GTP data connection (with a “j” flag set) is not replicated to the standby unit. This occurs because the active unit does not replicate embryonic connections to the standby unit. |
GTP Overview
General Packet Radio Service (GPRS) Tunneling Protocol (GTP) allows multiprotocol packets to be tunneled through the GPRS backbone between GPRS Support Nodes (GSN). Three GTP versions are available. The GPRS Tunneling Support feature supports two GTP versions: GTP Version 0 (GTPv0) and GTP Version 1 (GTPv1).
In GTPv0, a GPRS Mobile Station (MS) is connected to a Serving GPRS Support Node (SGSN) without being aware of the protocol. A Packet Data Protocol (PDP) context is identified by the Tunnel Identifier (TID), which is a combination of the International Mobile Subscriber Identity (IMSI) and the Network Service Access Point Identifier (NSAPI). Each MS can have up to 15 NSAPIs. This allows an MS to create multiple PDP contexts with different NSAPIs, based on the application requirements for various quality of service (QoS) levels. The TID is carried in the GTPv0 header.
An IMSI has the following three parts:
- Mobile Country Code (MCC) that consists of three digits. The MCC uniquely identifies the country of domicile of a mobile subscriber.
Mobile Network Code (MNC) that consists of two or three digits for GSM applications. The MNC identifies the home GSM Public Land Mobile Network (PLMN) of the mobile subscriber. The length of the MNC depends on the value of the MCC.
NoteA combination of two- and three-digit MNC codes within a single MCC area is not recommended.
- Mobile Subscriber Identification Number (MSIN) that identifies a mobile subscriber within a GSM PLMN. The National Mobile Subscriber Identity (NMSI) consists of the MNC and the MSIN.
GTPv1 introduces the concept of primary and secondary contexts for an MS. A primary context is associated with an IP address and indicates other parameters like the Access Point Name (APN) to be attached to the receiving GSN. Secondary contexts created for this primary PDP context share the IP address and other parameters that are already associated with the primary context. This allows an MS to initiate another context with a different quality of service (QoS) requirement and also share the IP address already obtained for the primary context. Primary and secondary contexts share the Tunnel Endpoint ID (TEID) on the control plane and have different TEID values in the data plane. Since all primary and associated secondary contexts share the IP address, Traffic Flow Templates (TFT) are used to classify traffic in the downlink direction towards the MS. TFTs are exchanged during context creation.
Only the create PDP context request for the primary PDP contains an IMSI. The IMSI and NSAPI together uniquely identify a PDP context. A secondary PDP context activation contains a Linked NSAPI (LNSAPI) indicating the NSAPI that is assigned to any one of the already activated PDP contexts for this PDP address and APN.
Note | UDP is the only supported, defined path protocol for signaling messages for GTPv0 and GTPv1. |
GGSN Pooling Support
A Gateway GPRS Support Node (GGSN) supports firewall load balancing by using the Server Load Balancing (SLB) feature. SLB balances traffic flows across a group of firewalls called a firewall farm. In this cluster or pool, clients can connect to the IP address of a virtual server. When a client initiates a connection to the virtual server, SLB chooses a real server for the connection, based on a configured load-balancing algorithm.
While configuring GTP load balancing, a pool of GGSNs is configured as a GGSN farm in SLB. You can use these GGSNs to load balance GPRS Tunneling Protocol (GTP) sessions. A virtual server instance is configured in the SLB to load balance GTP sessions across the GGSN farm.
To support GGSN pooling, a device must allow load balancing GSNs to respond to Packet Data Protocol (PDP) requests, even if the GSN is different from the one specified as SLB IP address in the GTP packet.
In GGSN pooling, when a subscriber who is using a roaming connection sends a PDP request from a Serving GPRS Support Node (SGSN) to the GGSN that resides behind the SLB, the firewall should accept the PDP request. As pinholes are not created for unknown GGSNs, the firewall drops PDP responses. To avoid PDP responses from getting dropped by the firewall, you need to configure an access control list (ACL). A firewall pinhole is a port that is opened through the firewall to allow an application to gain controlled access to a protected network.
A global session database records all pending PDP request contexts when a PDP request is received from an SGSN. When a PDP request is received from an SGSN, a session lookup is performed to match the context, and the response is dropped if no match is found. Packet data is transferred by establishing a PDP context, which is effectively a data session.
GTP Traffic Through Firewall
The main General Packet Radio Service (GPRS) Tunneling Protocol (GTP) traffic that a device inspects is the roaming traffic. Roaming traffic is caused when a Mobile Station (MS) moves from its Home Public Land Mobile Network (HPLMN) to a Visited PLMN (VPLMN).
How to Configure GGSN Pooling Support for Firewalls
Configuring Access Control Lists and Class Maps for GGSN Pooling
1.
enable
2.
configure terminal
3.
access-list
access-list-number
permit
protocol source source-wildcard
any
4.
access-list
access-list-number
permit
protocol
any
destination destination-wildcard
5.
access-list
access-list-number
permit
protocol
source source-wildcard
any
6.
class-map type inspect gtpv1 match-any
class-map-name
7.
match mcc
country-code
mnc
network-code
8.
match mcc
country-code
mnc
network-code
9.
exit
10.
class-map type inspect gtpv1 match-any
class-map-name
11.
match mcc
country-code
mnc
network-code
12.
match mcc
country-code
mnc
network-code
13.
exit
14.
class-map type inspect gtpv1 match-all
class-map-name
15.
match protocol
protocol-name
16.
match access-group
access-list-number
17.
exit
18.
class-map type inspect gtpv1 match-all
class-map-name
19.
match protocol
protocol-name
20.
match access-group
access-list-number
21.
end
DETAILED STEPS
Configuring Policy Maps for GGSN Pooling
1.
enable
2.
configure terminal
3.
policy-map type inspect gtpv1
gtpv1-policy
4.
class type inspect gtpv1
class-map-name
5.
log
6.
exit
7.
class class-default
8.
exit
9.
policy-map type inspect gtpv1
gtpv1-policy
10.
class type inspect gtpv1
class-map-name
11.
log
12.
exit
13.
class class-default
14.
exit
15.
policy-map type inspect gtpv1
gtpv1-policy
16.
class type inspect gtpv1
class-map-name
17.
inspect
18.
service-policy
policy-map-name
19.
exit
20.
class class-default
21.
exit
22.
policy-map type inspect gtpv1
gtpv1-policy
23.
class type inspect gtpv1
class-map-name
24.
inspect
25.
service-policy
policy-map-name
26.
exit
27.
class class-default
28.
end
DETAILED STEPS
Configuring Zones and Zone Pairs for GGSN Pooling Support
1.
enable
2.
configure terminal
3.
zone security
security-zone
4.
exit
5.
zone security
security-zone
6.
exit
7.
zone-pair security
zone-pair-name
source
source-zone
destination
destination-zone
8.
service-policy type inspect
policy-map-name
9.
exit
10.
zone-pair security
zone-pair-name
source
source-zone
destination
destination-zone
11.
service-policy type inspect
policy-map-name
12.
end
DETAILED STEPS
Configuration Examples for GGSN Pooling Support for Firewalls
Example: Configuring Access Control Lists and Class Maps for GGSN Pooling
Device# configure terminal
Device(config)# access-list 101 permit ip 10.2.2.0 255.255.255.0 any
Device(config)# access-list 102 permit ip any 10.2.2.0 255.255.255.0
Device(config)# access-list 103 permit ip 10.2.2.0 255.255.255.0 any
Device(config)# class-map type inspect gtpv1 match-any gtp-cl7-rev
Device(config-cmap)# match mcc 1 mnc 1
Device(config-cmap)# match mcc 2 mnc 1
Device(config-cmap)# exit
Device(config)# class-map type inspect gtpv1 match-any gtp-cl7
Device(config-cmap)# match mcc 2 mnc 1
Device(config-cmap)# match mcc 1 mnc 1
Device(config-cmap)# exit
Device(config)# class-map type inspect gtpv1 match-all gtp-l4c
Device(config-cmap)# match protocol gtpv1
Device(config-cmap)# match access-group 101
Device(config-cmap)# exit
Device(config)# class-map type inspect gtpv1 match-all gtp-l4c-rev
Device(config-cmap)# match protocol gtpv1
Device(config-cmap)# match access-group 102
Device(config-cmap)# end
Example: Configuring Policy Maps for GGSN Pooling
Device# configure terminal
Device(config)# policy-map type inspect gtpv1 gtp-l7p-rev
Device(config-pmap)# class type inspect gtpv1 gtp-cl7-rev
Device(config-pmap-c)# log
Device(config-pmap-c)# exit
Device(config-pmap)# class class-default
Device(config-pmap)# exit
Device(config)# policy-map type inspect gtpv1 gtp-l7p
Device(config-pmap)# class type inspect gtpv1 gtp-cl7
Device(config-pmap-c)# log
Device(config-pmap-c)# exit
Device(config-pmap)# class class-default
Device(config-pmap)# exit
Device(config)# policy-map type inspect gtpv1 gtp-l4p-rev
Device(config-pmap)# class type inspect gtpv1 gtp-l4c-rev
Device(config-pmap-c)# inspect
Device(config-pmap-c)# service-policy gtp-l7p-rev
Device(config-pmap-c)# exit
Device(config-pmap)# class class-default
Device(config-pmap)# exit
Device(config)# policy-map type inspect gtpv1 gtp-l4p
Device(config-pmap)# class type inspect gtpv1 gtp-l4c
Device(config-pmap-c)# inspect
Device(config-pmap-c)# service-policy gtp-l7p
Device(config-pmap)# exit
Device(config-pmap)# class class-default
Device(config-pmap-c)# end
Example: Configuring Zones and Zone Pairs for GGSN Pooling
Device(config)# configure terminal
Device(config)# zone security roam-in
Device(config-sec-zone)# exit
Device(config-sec-zone)# zone security roam-out
Device(config-sec-zone)# exit
Device(config)# zone-pair security in2out source roam-in destination roam-out
Device(config-sec-zone-pair)# service-policy type inspect gtp-l4p
Device(config-sec-zone-pair)# exit
Device(config)# zone-pair security out2in source roam-out destination roam-in
Device(config-sec-zone-pair)# service-policy type inspect gtp-l4p-rev
Device(config)# end
Additional References for Firewall Stateful Interchassis Redundancy
Related Documents
|
Related Topic |
Document Title |
|---|---|
|
Cisco IOS commands |
|
|
Security commands |
|
Technical Assistance
|
Description |
Link |
|---|---|
|
The Cisco Support and Documentation website provides online resources to download documentation, software, and tools. Use these resources to install and configure the software and to troubleshoot and resolve technical issues with Cisco products and technologies. Access to most tools on the Cisco Support and Documentation website requires a Cisco.com user ID and password. |
Feature Information for GGSN Pooling Support for Firewalls
The following table provides release information about the feature or features described in this module. This table lists only the software release that introduced support for a given feature in a given software release train. Unless noted otherwise, subsequent releases of that software release train also support that feature.
Use Cisco Feature Navigator to find information about platform support and Cisco software image support. To access Cisco Feature Navigator, go to www.cisco.com/go/cfn. An account on Cisco.com is not required.
Feature Name |
Releases |
Feature Information |
|---|---|---|
|
GGSN Pooling Support for Firewalls |
Cisco IOS XE Release 3.7S |
The GGSN Pooling Support for Firewalls feature enhances the GPRS Tunneling Protocol (GTP) feature by adding load balancing support. GTP supports the inspection of control traffic that is designated to a single GGSN. To provide efficiency and scalability to GSM networks, load balancing is added to the topology. The load balancer dispatches requests from the SGSN to various GGSNs in the pool. |