
Table Of Contents
Cisco's Implementation of TN3270
TN3270 Connection and Configuration Task List
Use the Default Terminal Emulation File to Connect
Copy a Sample Terminal Emulation File
Create Custom Terminal and Keyboard Emulation Files
Assign Ttycap and Keymap Line Characteristics
List the Terminal Emulation Files
TN3270 Configuration Files Examples
Custom Terminal Emulation File Example
Custom Keyboard Emulation File Example
Line Specification for a Custom Emulation Example
Configuring TN3270
IBM 3270 display terminals are among the computing community's most widely implemented and emulated for host-based computing. Information in this chapter will help you understand the TN3270 terminal emulation environment, and how to use and create files that will allow terminals connected to the access servers to be used for TN3270 operation. For a complete description of the commands in this chapter, see the Access and Communication Servers Command Reference publication. For information about establishing TN3270 connections, refer to the Cisco Access Connection Guide.
Cisco's Implementation of TN3270
TN3270 terminal emulation software allows any terminal to be used as an IBM 3270-type terminal. Users with non-3270 terminals can take advantage of the emulation capabilities to perform the functions of an IBM 3270-type terminal. Specifically, Cisco's implementation supports emulation of the following terminal types:
•
IBM 3278-2 terminal with an 80-by-24 display
•
IBM 3278-2 terminal with a 24-by-80 display
•
IBM 3278-3 terminal with a 32-by-80 display
•
IBM 3278-4 terminal with a 48-by-80 display
•
IBM 3278-5 terminal with a 27-by-132 display
True IBM 3270-type terminals use a character format referred to as extended binary-coded decimal interchange code (EBCDIC). EBCDIC consists of 8-bit coded characters and was originally developed by IBM. (Emulation is made possible by termcap.) These functions translate the keyboard and terminal characteristics for ASCII-type terminals into those expected by an IBM host. ASCII characters are listed in the appendix "ASCII Character Set" appendix in the Access and Communication Servers Command Reference publication.
Formally, a termcap is a two-part terminal-handling mechanism. It consists of a database and a subroutine library. The database describes the capabilities of each terminal to be supported; the subroutine library allows programs to query the database and to make use of the values it contains. For more information about defining termcaps, refer to the document termcap & terminfo, by Jim Strang, Tim O'Reilly and Linda Mui.
Access servers include a default termcap entry for Digital VT100 terminal emulation. More samples are available directly from Cisco on the ftp.cisco.com directory using the FTP file transfer utility.
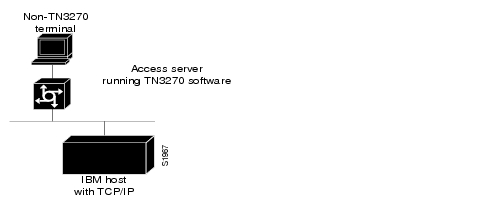
TN3270 emulation capability allows users to access an IBM host without using a special IBM server or a UNIX host acting as a server (see Figure 13-1). The IBM host must directly support TCP/IP, or have a front-end processor that supports TCP/IP.
Connection to IBM hosts from LAT, TCP, and X.25/PAD environments is accomplished using the two-step translation method. Refer to the chapter "Configuring Protocol Translation" later in this publication for more information about two-step translations. In general, TN3270 support for access servers allows outgoing TN3270 connections only. In other words, LAT, TCP, and X.25/PAD users must first establish a connection with the access server, then use the TN3270 facility from the access server to make a connection to the IBM host.
Figure 13-1 Typical 3270 Connection Environment
Keymaps and Ttycaps
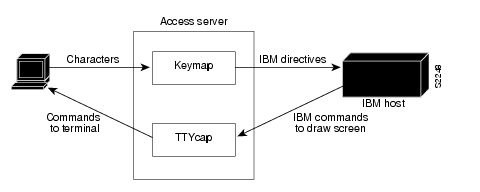
Figure 13-2 shows how the keymapping and ttycap functionality on the access server helps IBM hosts and non-IBM terminals to communicate.
Figure 13-2 Keymaps and Ttycaps
Keymaps and ttycaps have the following functionality:
•
Keymapping—Terminals send a key sequence for every key used to send packets to an IBM host.The keymapping function on the access server identifies special sequences and converts them to directives to the IBM host. A minimal level of keymapping is supported by default. Several keys can convert to the same IBM directives.
•
Ttycap—IBM sends commands to the terminal, including cursor position, clear screen, and so forth. The ttycap functionality on the access server changes IBM directives into the terminal language. By default, protocol translation on access servers conforms to the ANSI terminal standard, which is VTxxx terminal compatible.
Startup Sequence Priorities
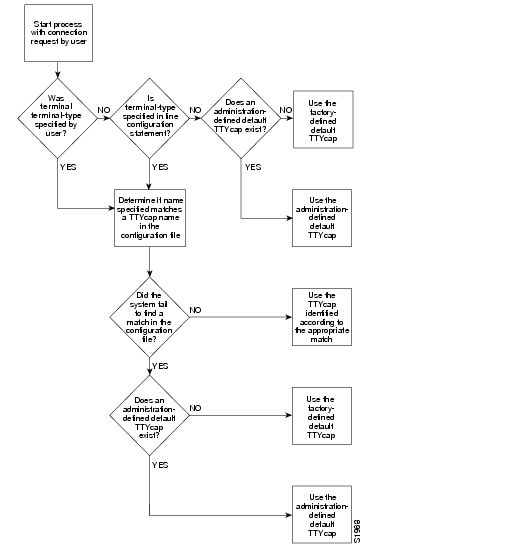
At system startup, the access server uses the following decision sequence when selecting a terminal emulation file, also called a ttycap:
1
Use a user-supplied terminal emulation filename.
2
Use a terminal emulation filename specified using line configuration commands.
3
Use a default terminal emulation filename supplied by the administrator.
4
Use the default VT100 emulation.
Figure 13-3 illustrates the decision process used by the access server to choose a ttycap for a specific TN3270 session.
Figure 13-3 Decision Diagram for Access Server Ttycap Selection Process
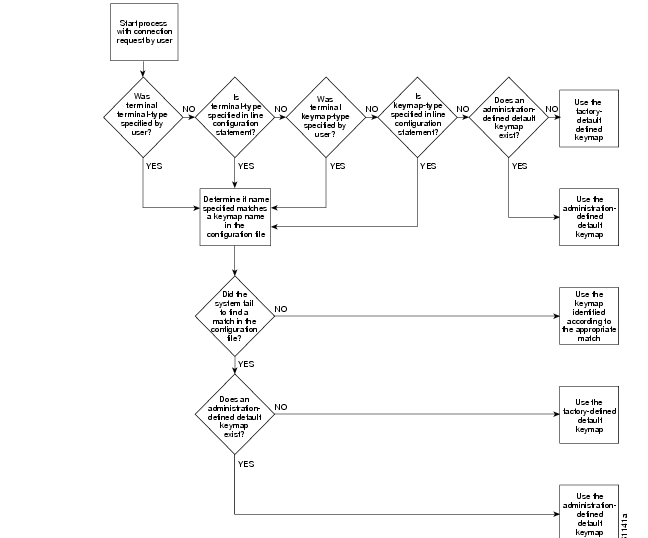
At system startup, the access server uses the following decision sequence when selecting a keyboard map file, also called a keymap:
1
Use a user-supplied keyboard map filename.
2
Use a keyboard map filename specified using line configuration commands.
3
Use a user-supplied terminal emulation filename.
4
Use a terminal emulation filename specified using line configuration commands.
5
Use the default keyboard map filename supplied by the administrator.
6
Use the default VT100 emulation.
The access server uses the following criteria to determin
pe the file to use:•
If a filename is specified by the user but fails to match any name in the configuration file, the access server adopts the default specified by the administrator. If one has not been specifically defined, the factory default emulation file is adopted.
•
If a filename is specified for line configuration that does not match any name in the configuration file, the access server adopts the default specified by the administrator. If one has not been specifically defined, the factory default VT100 emulation file is used.
Figure 13-4 illustrates the decision process used by the access server to choose a keymap for a specific TN3270 session. When one of the first four priority checks fails (that is, the name specified does not match any name in the configuration file), the same rules listed for the terminal emulation file apply.
Figure 13-4 Access Server Keymap Selection Process
TN3270 Connection and Configuration Task List
You can perform the tasks in any of the following sections to connect to an IBM host and configure TN3270:
•
Use the Default Terminal Emulation File to Connect
•
Copy a Sample Terminal Emulation File
•
Create Custom Terminal and Keyboard Emulation Files
•
Assign Ttycap and Keymap Line Characteristics
•
List the Terminal Emulation Files
•
TN3270 Configuration Files Examples
See the end of this chapter for examples of custom terminal and keyboard emulation files.
Use the Default Terminal Emulation File to Connect
By default, an ASCII terminal and keyboard connected to the access server emulate a Digital VT100 terminal type.
To connect to an IBM host, enter the tn3270 command from EXEC mode. This command will make the connection using the terminal emulation file selected using the startup sequence priorities outlined in the section "Startup Sequence Priorities" earlier in this chapter.
Refer to the Cisco Access Connection Guide for more information about making connections.
Copy a Sample Terminal Emulation File
If the default file does not work for your terminal and keyboard type or the host that you connect to, you might be able to find a file that will work from the growing list of sample terminal emulation files created by Cisco engineers and customers. Obtain the tn3270.examples file in the ftp@cisco.com directory at Cisco Systems. Numerous emulation files are listed in tn3270.examples that allow various terminal types to emulate an IBM 3270-type terminal.
The following steps describe how to obtain a sample configuration file from the tn3270.examples file available from the ftp@cisco.com directory. These steps assume that the system configuration file is stored on a host.
Step 1
Use the FTP utility to connect to address ftp@cisco.com and log in using the anonymous FTP convention.
Step 2
Get the tn3270.examples file.
Step 3
Use a text editor or word processing application to copy the sample terminal emulation file into the configuration file.
Step 4
Load the configuration file onto the host or network. (Refer to the chapter "Loading System Images and Configuration Files" earlier in this publication for information on loading configuration files.)
These steps add new terminal emulation capability to the configuration file. Each time the system is started up, or booted, the settings in the file will be used as the default for terminal emulation.
Create Custom Terminal and Keyboard Emulation Files
To use a custom emulation file, you must load the emulation settings into the system configuration file. This establishes the settings in the file as the terminal and keyboard defaults and provides several ways in which the emulation settings can be used within the system, as follows:
•
You can provide default settings for all terminals in the network or terminals on a specific host.
•
You can set up your system to boot, or load, a specific configuration file using configuration commands described in the chapter "Loading System Images and Configuration Files" earlier in this publication.
•
You can temporarily override default settings using terminal EXEC commands.
•
You can use the local terminal terminal-type and terminal keyboard-type EXEC commands described in the Cisco Access Connection Guide to load in the files.
•
You can configure line-specific emulation types for terminal negotiations with a remote host.
To create a custom terminal emulation file or a custom keyboard emulation file, perform the applicable global configuration task as follows:
Define a new terminal emulation file, or ttycap.
ttycap ttycap-name termcap-entry
Define a new keyboard emulation file, or keymap.
keymap keymap-name keymap-entry
Assign Ttycap and Keymap Line Characteristics
If you intend to use an alternate ttycap and keymap, you must assign the following two characteristics:
•
Terminal type
•
Keymap type
This information is used by the access server when negotiating connections with hosts.
To assign ttycap and keymap line characters, perform one or more of the following line configuration tasks:
Specify the type of terminal connected to the line.
terminal-type terminal-name
Specify the keyboard map for a terminal connected to the line.
keymap-type keymap-name
You must assign the terminal and keyboard type to the line if you intend to use alternate ttycap and keymap files.
List the Terminal Emulation Files
To display a list of ttycap and keymap files available for use, perform the following tasks in EXEC mode:
List the ttycap files available.
show ttycap [ttycap-name | all]
List the keymap files available.
show keymap [keymap-name | all]
Enable Extended Datastream
The following command causes an "-E" to be appended to the terminal type string sent to the IBM host. This allows you to use the extended TN3270 features. Enter this command in global configuration mode.
Enable Null Processing
If a user enters data, uses an arrow key to move the cursor to the right on the screen, and then enters more data, the intervening spaces are filled in with NULLs. To specify how NULLs are handled: enter the command tn3270 null-processing either with the argument 3270, where NULLs are compressed out of the string (as on a real 3278-x terminal), or use the argument 7171, where NULLs are converted to spaces as on a 7171 controller. Enter this command in global configuration mode.
Require Reset
On a 3278-x terminal, the keyboard is locked and further input is not permitted after input error (due to field overflow, invalid entry, and so on), until the user presses the RESET key. Most TN3270 implementations leave the keyboard unlocked and remove any error message on the next key input after the error.
To require a reset in these situations, enter the following command in global configuration mode:
Map TN3270 Characters
You can control the mapping of extended binary-coded decimal interchange code (EBCDIC) and American Standard Code for Information Interchange (ASCII) characters by performing the tasks in the following sections:
Create Character Mappings
You can create character mappings by configuring a two-way binding between EBCDIC and ASCII characters. To set character mappings, perform the following global configuration task:
Create a two-way binding between EBCDIC and ASCII characters.
tn3270 character-map ebcdic-in-hex ascii-in-hex
To return character mappings to their default settings, perform the following global configuration task:
Reset character mappings to defaults.
no tn3270 character-map {all | ebcdic-in-hex} [ascii-in-hex]
Display Character Mappings
To display character mappings, perform the following task in EXEC mode:
Obtain Hexadecimal Value
To display the hexadecimal value of an ASCII character, perform the following task in EXEC mode:
After you enter this command, enter the ASCII character whose hexadecimal value you want to display.
Set Data Character Bits
When you create character mappings between extended EBCDIC or extended ASCII characters, you must configure the access server for the correct data character bit length. The default mask used for TN3270 connections is a 7-bit mask. In certain situations, you must use an 8-bit display. When an 8-bit mask has been set by the line configuration command data-character-bits {7 | 8} or the EXEC command terminal data-character-bits {7 | 8}, you can temporarily configure the access server to use the 8-bit mask by performing the following task in line configuration mode:
When you use a file-transfer protocol such as Kermit in 8-bit mode or you use 8-bit graphics, which rely on transparent mode, perform the following line configuration task to configure the access server for the 8-bit mask:
TN3270 Configuration Files Examples
The following section provides examples to help you define custom terminal and keyboard emulation files, and to configure your system to use those files:
•
Custom Terminal Emulation File Example
•
Custom Keyboard Emulation File Example
•
Line Specification for a Custom Emulation Example
Custom Terminal Emulation File Example
The following example allows a Televideo 925
`terminal to emulate an IBM 3270-type terminal. The file is part of the global ttycap command and is included in the system configuration file. Notice that a carriage return (^M) indicates the last character in the file.ttycap ttycap1 \v8 | vi | tvi925 | 925 | televideo model 925:\:so=\EG4:se=\EG0:\:hs:am:bs:co#80:li#24:cm=\E=%+ %+ :cl=\E*:cd=\Ey:ce=\Et:\:al=\EE:dl=\ER:im=:ei=:ic=\EQ:dc=\EW:\:ho=^^:nd=^L:bt=\EI:pt:so=\EG4:se=\EG0:sg#1:us=\EG8:ue=\EG0:ug#1:\:up=^K:do=^V:kb=^H:ku=^K:kd=^V:kl=^H:kr=^L:kh=^^:ma=^V^J^L :\:k1=^A@\r:k2=^AA\r:k3=^AB\r:k4=^AC\r:k5=^AD\r:k6=^AE\r:k7=^AF\r:\:k8=^AG\r:k9=^AH\r:k0=^AI\r:ko=ic,dc,al,dl,cl,ce,cd,bt:\:md=\E(:me=\E):ti=\E):te=\E(:\:ts=\Ef:fs=\Eg:ds=\Eh:sr=\Ej:xn:\:is=\El\E"^M\E3^M \E1 \E1 \E1 \E1 \E\1 \E1 \E1 \E1 \E1^MCustom Keyboard Emulation File Example
The following example allows a keyboard to emulate an asynchronous connection to an IBM 7171
`keyboard. The file is part of the keymap global configuration command and is included in the system configuration file.keymap ibm7171 \vt100av | vt100 | vt100nam | pt100 | vt102 | vt125{ \enter = '^m';\erase = '^?'; reset = '^g'; clear = '^z' | '\EOM';\nl = '^j'; tab = '^i'; btab = '^b';\left = '\EOD'; right = '\EOC'; up = '\EOA'; down = '\EOB';\home = '^h'; delete = '^d'; eeof = '^e' | '\E^?'; einp = '^w'; insrt = '\EOn';\pfk1 = '\EOP' | '\E1'; pfk2 = '\EOQ' | '\E2'; pfk3 = '\EOR' | '\E3';\pfk4 = '\EOw' | '\E4'; pfk5 = '\EOx' | '\E5'; pfk6 = '\EOy' | '\E6';\pfk7 = '\EOt' | '\E7'; pfk8 = '\EOu' | '\E8'; pfk9 = '\EOv' | '\E9';\pfk10 = '\EOq' | '\E0'; pfk11 = '\EOr' | '\E-';\pfk12 = '\EOs' | '\E='; pfk13 = '\EOp\EOP' | '^f13';\pfk14 = '\EOp\EOQ' | '^f14'; pfk15 = '\EOp\EOR' | '^f15';\pfk16 = '\EOp\EOw' | '^f16'; pfk17 = '\EOp\EOx' | '^f17';\pfk18 = '\EOp\EOy' | '^f18'; pfk19 = '\EOp\EOt' | '^f19';\pfk20 = '\EOp\EOu' | '^f20'; pfk21 = '\EOp\EOv' | '^f21';\pfk22 = '\EOp\EOq' | '^f22'; pfk23 = '\EOp\EOr' | '^f23';\pfk24 = '\EOp\EOs' | '^f24';\pa1 = '^p1' | '\EOS';\pa2 = '^p2' | '\EOm';\pa3 = '^p3' | '\EOl';\}Line Specification for a Custom Emulation Example
The following example sets up a line with specific terminal and keyboard characteristics that are used during negotiation with a host upon connection. The line configuration commands in the example must follow the global ttycap and keymap global configuration commands containing the emulation settings to be used.
line 3terminal-type ttycap1keymap-type ibm7171Character Mapping Examples
The following example shows the configuration of the EBCDIC and ASCII character mappings listed in :
tn3270 character-map 0x81 0x78tn3270 character-map 0x82 0x79tn3270 character-map 0x83 0x7ATable 13-1 Sample EBCDIC, ASCII Character Mapping
The following example displays all nonstandard character mappings:
router# show tn3270 character-map allEBCDIC 0x81 <=> 0x78 ASCIIEBCDIC 0x82 <=> 0x79 ASCIIEBCDIC 0x83 <=> 0x7A ASCIIThe following example shows the standard key mapping for the letter d:
router# show tn3270 character-map 83EBCDIC 0x83 <=> 0x63 ASCII = `c'EBCDIC 0x84 <=> 0x64 ASCII = `d'The following example unmaps a specific key, first with optional ascii-in-hex argument, then without the argument:
Router# configure terminalEnter configuration commands, one per line. End with CNTL/Z.Router(config)# no tn3270 character-map 0x80 0x78Router(config)# ^ZRouter# show tn3270 character-map allEBCDIC 0x82 <=> 0x79 ASCIIEBCDIC 0x83 <=> 0x7A ASCIIrouter# conf tEnter configuration commands, one per line. End with CNTL/Z.Router(config)# no tn3270 character-map 0x82Router(config)# ^ZRouter# show t3270 character-map allEBCDIC 0x82 <=> 0x79 ASCIIThe following example displays character mappings, then removes all mappings with the all keyword:
router# show tn3270 character-map allEBCDIC 0x81 <=> 0x78 ASCIIEBCDIC 0x82 <=> 0x79 ASCIIEBCDIC 0x83 <=> 0x7A ASCIIrouter# configure terminalEnter configuration commands, one per line. End with CNTL/Z.Router(config)# no tn3270 character-map allRouter(config)# ^ZRouter# show tn3270 character-map all

 Feedback


