Content Engine Network Modules
Available Languages
Table Of Contents
Connecting Cisco Content Engine Network Modules to the Network
Content Engine Network Modules
Connecting Content Engine Network Modules to the Network
Content Engine Network Module LEDs
Online Insertion and Removal with a Content Engine Network Module
Obtaining Documentation, Obtaining Support, and Security Guidelines
Connecting Cisco Content Engine Network Modules to the Network
Revised: May 1, 2008, OL-12823-01
This guide describes how to connect Cisco Content Engine network modules to your network. It contains the following sections:
•
Content Engine Network Modules
•
Content Engine Network Module LEDs
•
Online Insertion and Removal with a Content Engine Network Module
•
Obtaining Documentation, Obtaining Support, and Security Guidelines
Content Engine Network Modules
This section provides overview information on Content Engine network modules. The following Content Engine network modules are available on Cisco modular routers:
•
Content Engine network module with a 40-GB Disk Expansion Module (NM-CE-BP-40G-K9) (see Figure 1)
•
Content Engine network module with a 80-GB Disk Expansion Module (NM-CE-BP-80G-K9) (see Figure 1)
•
Content Engine network module with a SCSI Controller Expansion Module and a 68-pin SCSI connector for connection to an external storage array (NM-CE-BP-SCSI-K9) (see Figure 2)
The 80-GB Content Engine network module can run Application and Content Networking System (ACNS) software or Cisco Wide Area File Services (WAFS) software. The 40-GB Content Engine network module and the Content Engine network module with a SCSI controller can run ACNS software only. For information on configuring ACNS or WAFS, see the documentation listed in the "Related Documents" section.

CautionTo comply with the Telcordia GR-1089 NEBS standard for electromagnetic compatibility and safety, connect the Content Engine network modules (NM-CE-BP-40G-K9 and NM-CE-BP-80G-K9) only to intrabuilding or nonexposed wiring or cabling. The intrabuilding cable must be shielded and the shield must be grounded at both ends.

Note
The NM-CE-BP network module clock may be reset to 1980 if it is powered off for a long period. Several applications that depend on correct time being configured on the network module may not work in such a scenario. Therefore we strongly recommended that the NM-CE-BP network module be configured for NTP using the ntp server server Cisco IOS command, either after a software upgrade from Application and Content Networking System software Release 4.2.x to Release 5.x, or on obtaining a new network module, to maintain correct time on the network module.

Note
There is no backup power for a network module's real time clock. Once power has been turned off or the network module has been removed from the router, the real time clock stops.
Figure 1 Faceplate for the Content Engine Network Module with 40- or 80-GB Disk Expansion Module

Figure 2 Faceplate for the Content Engine Network Module with SCSI Connector Expansion Module


Note
Some early Content Engine network modules have an inactive USB port on the faceplate. This USB port has been removed in later Content Engine network modules.

Tip
For information on removing, replacing, and installing the expansion modules, see the Installing Expansion Modules on Cisco CE Network Modules for Caching and Content Delivery document.
Connecting Content Engine Network Modules to the Network
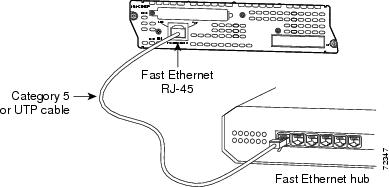
To connect a Content Engine network module to the network, from the RJ-45 port on the Content Engine network module use a straight-through two-pair Category 5 unshielded twisted-pair (UTP) cable to connect to a switch, hub, repeater, server, or other network device. (See Figure 3.)

Note
RJ-45 cables are not available from Cisco Systems. These cables are widely available and must be Category 5 cables.
Figure 3 Connecting a Content Engine Network Module to a Fast Ethernet Hub

Connecting Content Engine Network Modules with SCSI Controller Expansion Modules to an External Cisco Storage Array

Timesaver
Connecting the external Cisco storage array requires you to reboot the network module or router. To save time, connect the external Cisco storage array to the Content Engine network module before powering on the router or network module.
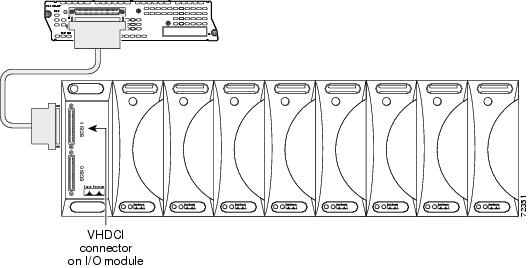
To connect a Content Engine network module with a SCSI controller expansion module to an external storage array, use a 68-pin, low-voltage differential (LVD) SCSI cable. Connect the cable to the SCSI port on the network module to the SCSI port on the external Cisco storage array. (See Figure 4.)
Cisco Storage Array 6 is supported on the Content Engine network module with SCSI controller expansion module. (See the Cisco Storage Array 6 Installation and Configuration Guide.)

Tip
Use either a 36- or 108-inch LVD SCSI cable, depending on the length required between the router and the external storage array.
Figure 4 Connecting a Content Engine Network Module with SCSI Controller Expansion Module to an External Cisco Storage Array

Content Engine Network Module LEDs
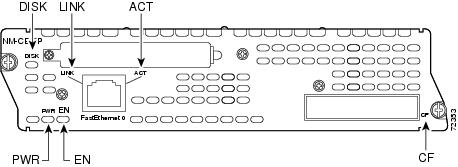
All Content Engine network modules have an enable (EN) LED. This LED indicates that the module has passed its self-tests and is available to the router.
Content Engine network modules also display an additional power (PWR) LED and a CompactFlash (CF) LED on the faceplate, and two additional LEDs for the Fast Ethernet port. (See Figure 5 and Table 1.)
Figure 5 Content Engine Network Module LEDs

Online Insertion and Removal with a Content Engine Network Module
Some Cisco modular access routers allow you to replace network modules without switching off the router or affecting the operation of other interfaces. This feature is called online insertion and removal (OIR). OIR of network modules provides uninterrupted operation to network users, maintains routing information, and ensures session preservation. To find out if the router you are working on allows OIR, see the router model's hardware installation guide.

CautionUnlike other network modules, Content Engine network modules use hard disks. Online removal of disks without proper shutdown can result in file system corruption and might render the disk unusable. The operating system on the Content Engine network module must be shut down in an orderly fashion before the network module is removed.

CautionCisco routers support OIR with similar modules only. If you remove a network module, install another module exactly like it in its place. If you remove a 2-slot network module (along with any installed WAN or voice interface cards), install another module and card combination exactly like it.
For a description of informational and error messages that may appear on the console during this procedure, see the hardware installation guide for your type of router.
To perform online removal of a Content Engine network module and insertion of a replacement, follow these steps with the router in privileged EXEC mode:
Step 1
Initiate a Content Engine network module console access session using the following command:
Router# service-module content-engine slot/unit sessionTrying 10.10.10.1, 2129 ... OpenCE-netmodule con now availablePress RETURN to get started!CE-netmodule> enableCE-netmodule#Step 2
Save the running configuration of the content engine using the following command from the CE-netmodule prompt:
CE-netmodule# copy running-config tftp tftp-server-address filenameStep 3
Exit the Content Engine network module console access session by pressing Control-Shift-6, followed by x.
Step 4
On the router, clear the Content Engine console access session using the following command:
Router# service-module content-engine slot/unit session clear
Step 5
Perform a graceful halt of the Content Engine network module disk drive by using the following command:
Router# copy tftp running-config tftp-server-addresss filename
Step 6
Shut down the content engine interface:
Router (config)# interface content-engine slot/unitRouter (config-if)# shutdownRouter (config-if)# exitStep 7
Unplug all network interface cables from the Content Engine network module.
Step 8
Loosen the two captive screws holding the Content Engine network module in the chassis slot.
Step 9
Slide the Content Engine network module out of the slot.
Step 10
Align the replacement Content Engine network module with the guides in the chassis slot, and slide it gently into the slot.

Note
If the router is not fully configured with network modules, make sure that blank panels fill the unoccupied chassis slots to provide proper airflow.
Step 11
Push the module into place until you feel its edge connector mate securely with the connector on the backplane.
Step 12
Reconnect the network interface cables previously removed in Step 7.
Step 13
Check that the network module LEDs are on and that the power and enable LEDs on the front panel also are on. This inspection ensures that connections are secure and that the new unit is operational.
Step 14
Initiate a Content Engine network module console access session with the following command:
Router# service-module content-engine slot/unit sessionTrying 10.10.10.1, 2129 ... OpenCE-netmodule con now availablePress RETURN to get started!CE-netmodule> enableCE-netmodule#Step 15
Restore the content engine's running configuration by using the following command from the CE-netmodule prompt:
CE-netmodule# copy tftp running-config tftp-server-address filenameStep 16
Exit the Content Engine network module console access session by pressing Control-Shift-6, followed by x.
Step 17
On the router, clear the Content Engine console access session using the following command:
Router# service-module content-engine slot/unit session clear
Related Documents
For additional information, see the following documents and resources.
ACNS configuration
Cisco ACNS Software
http://www.cisco.com/en/US/products/sw/conntsw/ps491/tsd_products_support_series_home.htmlWAFS configuration
Cisco WAFS Software
http://www.cisco.com/en/US/products/ps6469/tsd_products_support_series_home.htmlContent Engine network module expansion module installation and removal
Installing Expansion Modules on Cisco CE Network Modules for Caching and Content Delivery
http://www.cisco.com/en/US/docs/routers/access/interfaces/nm/hardware/notes/inscache.htmlIOS feature guide
Content Engine Network Module for Caching and Content Delivery
http://www.cisco.com/en/US/docs/ios/12_2/12_2y/12_2yt11/feature/guide/ft_1cenm.htmlCisco Storage Array 6 installation and configuration
Cisco Storage Array 6 Installation and Configuration Guide
http://www.cisco.com/en/US/docs/app_ntwk_services/waas/sa/6/installation/guide/sa6hig.htmlRegulatory compliance and safety information
Cisco Network Modules and Interface Cards Regulatory Compliance and Safety Information
http://www.cisco.com/en/US/docs/routers/access/interfaces/rcsi/IOHrcsi.htmlCisco IOS software website and reference documentation
Cisco IOS Software http://www.cisco.com/web/psa/products/index.html?c=268438303
Obtaining Documentation, Obtaining Support, and Security Guidelines
For information on obtaining documentation, obtaining support, providing documentation feedback, security guidelines, and also recommended aliases and general Cisco documents, see the monthly What's New in Cisco Product Documentation, which also lists all new and revised Cisco technical documentation, at:
http://www.cisco.com/en/US/docs/general/whatsnew/whatsnew.html
CCDE, CCENT, Cisco Eos, Cisco Lumin, Cisco StadiumVision, the Cisco logo, DCE, and Welcome to the Human Network are trademarks; Changing the Way We Work, Live, Play, and Learn is a service mark; and Access Registrar, Aironet, AsyncOS, Bringing the Meeting To You, Catalyst, CCDA, CCDP, CCIE, CCIP, CCNA, CCNP, CCSP, CCVP, Cisco, the Cisco Certified Internetwork Expert logo, Cisco IOS, Cisco Press, Cisco Systems, Cisco Systems Capital, the Cisco Systems logo, Cisco Unity, Collaboration Without Limitation, EtherFast, EtherSwitch, Event Center, Fast Step, Follow Me Browsing, FormShare, GigaDrive, HomeLink, Internet Quotient, IOS, iPhone, iQ Expertise, the iQ logo, iQ Net Readiness Scorecard, iQuick Study, IronPort, the IronPort logo, LightStream, Linksys, MediaTone, MeetingPlace, MGX, Networkers, Networking Academy, Network Registrar, PCNow, PIX, PowerPanels, ProConnect, ScriptShare, SenderBase, SMARTnet, Spectrum Expert, StackWise, The Fastest Way to Increase Your Internet Quotient, TransPath, WebEx, and the WebEx logo are registered trademarks of Cisco Systems, Inc. and/or its affiliates in the United States and certain other countries.
All other trademarks mentioned in this document or Website are the property of their respective owners. The use of the word partner does not imply a partnership relationship between Cisco and any other company. (0804R)
Any Internet Protocol (IP) addresses used in this document are not intended to be actual addresses. Any examples, command display output, and figures included in the document are shown for illustrative purposes only. Any use of actual IP addresses in illustrative content is unintentional and coincidental.
© 2008 Cisco Systems, Inc. All rights reserved.
Contact Cisco
- Open a Support Case

- (Requires a Cisco Service Contract)
 Feedback