Troubleshoot Direct PC Connections to the Cisco ONS 15454 TCC, TCC+ or TCC2 Card
Available Languages
Download Options
Bias-Free Language
The documentation set for this product strives to use bias-free language. For the purposes of this documentation set, bias-free is defined as language that does not imply discrimination based on age, disability, gender, racial identity, ethnic identity, sexual orientation, socioeconomic status, and intersectionality. Exceptions may be present in the documentation due to language that is hardcoded in the user interfaces of the product software, language used based on RFP documentation, or language that is used by a referenced third-party product. Learn more about how Cisco is using Inclusive Language.
Contents
Introduction
This document addresses common problems that you encounter when you try to:
-
Establish link level connectivity from a PC that is directly attached to the active Timing, Communications, and Control (TCC) card.
-
Establish IP connectivity from a PC that is directly attached to the active TCC card.
-
Install and configure the JavaTM software on the PC.
-
Use the TCC card in order to download and launch the Cisco Transport Controller (CTC) software.
Note: This document is not an installation guide. Use this document in conjunction with the user documentation as a troubleshooting and reference guide, or as a standalone troubleshooting guide.
Prerequisites
Requirements
There are no specific requirements for this document.
Components Used
The information in this document is based on the Cisco ONS 15454.
The information in this document was created from the devices in a specific lab environment. All of the devices used in this document started with a cleared (default) configuration. If your network is live, make sure that you understand the potential impact of any command.
Resolve Common Connectivity Problems
This section explains how you can resolve the common connectivity problems in each scenario listed in the Introduction section.
Establish Link Level Connectivity from a PC Directly Attached to the Active TCC Card
For the initial setup of the Cisco ONS 15454, connect a straight-through RJ-45 Ethernet cable from the RJ-45 port of the network interface card (NIC) in the PC to the RJ-45 port on the TCC card in the ONS 15454. Most 15454s have an active and a standby TCC card. With software versions 2.0 and later, you can connect the cable to either the active or standby TCC card.
Note: Slot 7 and slot 11 are reserved for the active and standby TCC cards. These two slots are hubbed together with the backplane LAN, and the speed is fixed at 10 MB, half-duplex.
Use the information in Table 1 and Figure 1 in order to verify whether you used the correct cable.
| Pin | Color | Pair | Name |
|---|---|---|---|
| 1 | white/orange | 2 | TxData + |
| 2 | orange | 2 | TxData - |
| 3 | white/green | 3 | RecvData + |
| 4 | blue | 1 | - |
| 5 | white/blue | 1 | - |
| 6 | green | 3 | RecvData - |
| 7 | white/brown | 4 | - |
| 8 | brown | 4 | - |
Figure 1 - Straight-Through Ethernet RJ-45 Cable Diagram

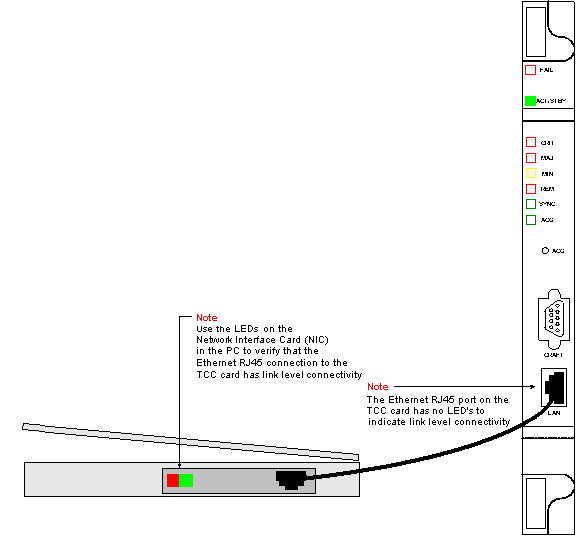
Note: The RJ-45 port on the TCC card has no LED to indicate link level connectivity. You need to use the LEDs on the Network Interface Controller (NIC) in the PC in order to verify the link level connectivity for the Ethernet connection. When you successfully establish link level connectivity to the TCC card, the red LED lights up. When traffic begins to pass, the green LED flashes.
Establish IP Connectivity From a PC Directly Attached to the Active TCC Card
New 15454 Shelves Only
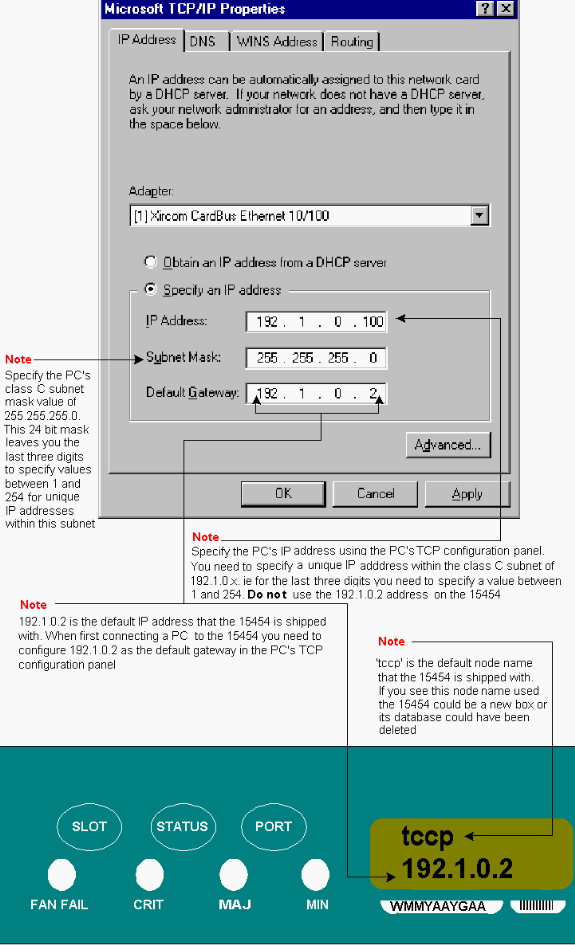
The ONS 15454 is shipped with a default node name of TCCP. By default, all ONS 15454s are assigned a class C IP address of 192.1.0.2. For successful connection, you must configure the PC with a unique IP address within the class C subnet 192.1.0.x. You must also use a default gateway that points to the class C IP address 192.1.0.2 (or the existing IP address of the 15454 to which you want to directly connect).
Note: Shelves that are already in use most likely have an IP address that is different from the default IP address. Look directly at the shelf to find this address on the shelf LCD display. If your LCD display is defective, obtain the IP address from your network administrator. Configure a unique IP address on your PC. Ensure that the IP address is in the same IP class as the shelf IP address and network mask. The shelf IP is the same as your gateway IP address.
Open the TCP/IP Properties dialog box of the operating system on your PC. Change the last three digits of the IP address of the PC to a unique value between 1 and 254 (see Figure 3). Ensure that you exclude the default IP address of the 15454 (192.1.0.2).
Although the IP addresses of the PC and the ONS 15454 need to be unique, you must ensure that they are within the same class C subnet with the first three digits of 192.1.0.x. Ensure that the default gateway on the PC points to the default IP address on the ONS 15454. Figure 3 is an example of TCP properties in a Windows environment:
Figure 3 - Microsoft TCP Properties
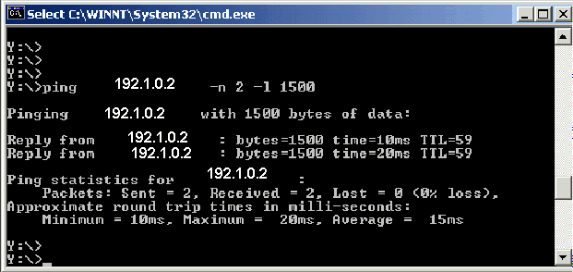
Ensure that you have IP connectivity from a DOS prompt. For this, you can use the ping command to send ICMP echo requests to the ONS 15454 default IP address, 192.1.0.2. A simple ping command, in which you specify the destination IP address is usually sufficient.
In the example shown in Figure 4, note that the -n operand specifies that you must send two ICMP echo requests. The -l operand specifies a packet size of 1500 bytes.
In this example, both echo requests are successful, and indicate IP connectivity to the Ethernet address 192.1.0.2 assigned to the Ethernet interface of the TCC card.
Figure 4 - Use the ping Command
If the ping command is unsuccessful, the ICMP echo requests time out, and indicate that the destination host is unreachable. The example in Figure 5 depicts the results of a ping command that failed.
Figure 5 - When the ping Command Fails
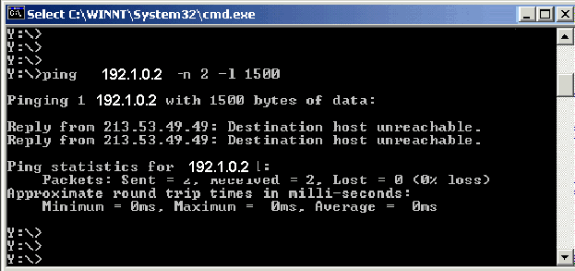
Here, the PC is connected directly to the TCC card, and there are only a few reasons for the ping to fail. Consider some of these suggestions to correct the problem:
-
Check whether the IP addresses are duplicates. The IP address 192.1.0.2 is not like a telephone number that matches at both ends. Instead, the IP address of the TCC card and that of the PC must be unique and different.
-
Check whether the two IP addresses are in different subnets. The IP addresses of the TCC card and PC must both be within the 192.1.0.x subnet. Otherwise, ping fails.
-
Check whether you use dual NICs or an enabled NIC and dial-up adapter at the same time, because this can cause problems like multiple IP addresses, which in turn can cause the ping to fail.
Install and Configure the Java Software
Before you download and launch the CTC software for the ONS 15454, you need to install and configure the Java Runtime Environment (JRE) files or the (Java ARchive) JAR file.
Note: You need to download either the JRE files or the JAR file, and not both.
Install and Configure the JRE Software
You can install the JRE files from the ONS 15454 software CD. You can also download the JRE files directly from the JavaTM web site. Complete these steps:
-
Insert the ONS 15454 software CD into the PC, and double-click the jre-1_2_2_005-win.exe file (see Figure 6).
Then, follow the on-screen instructions in order to complete the installation.
If you do not have the CD, you can download the JRE software from the Java
Figure 6 - Run the JRE Executable File TM web site.
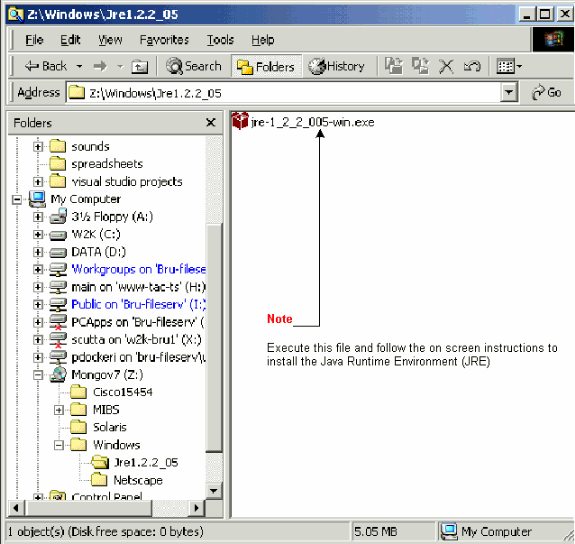
-
Next, you must install the Java policy file. Double-click the JavaPolicyInstall.exe file (see Figure 7).
Figure 7 - Install the Java Policy File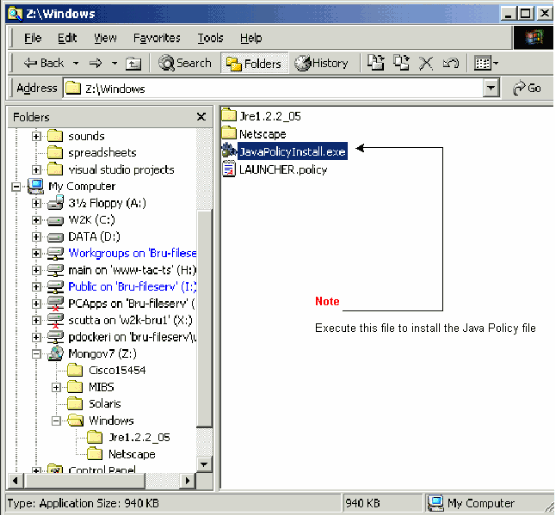
The JavaPolicyInstall.exe file adds several lines of code to the bottom of the java.policy file. See Figure 8 for the specific lines of code.
Figure 8 - Lines of Code in the java.policy File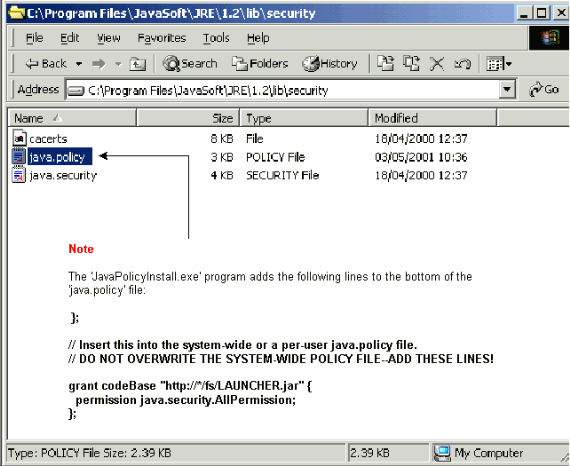
Download and Install the JAR File
You can use FTP in order to download the JAR file to your PC.
-
Open a DOS window.
-
Use the DOS command line in order to go to the directory on your PC where you want the JAR file to reside.
-
Use the ping command in order to ensure that the PC is directly connected to the Ethernet management interface on the TCC card.
-
Type ftp ip address , and press Enter.
ftp 192.1.0.2
-
When you are prompted for a user name and password, press Enter twice in order to bypass these requests.
-
At the ftp:> prompt, type bin, and press Enter.
-
Type get CMS.JAR, and press Enter.
The JAR file is transferred to your hard drive, and a completion message is displayed.
-
At the next ftp:> prompt, type quit, and press Enter.
After you download the file, go to the directory where you saved the CMS.JAR file. Type java -jar CMS.JAR ip addressin order to manually launch the CTC application.
java -jar CMS.JAR 192.1.0.2
Download and Launch the CTC Application
After you install and configure the JRE software, you can download and launch the Cisco Transport Controller application. Complete these steps:
-
In the Address bar of the browser window, type the IP address of the Ethernet interface of the TCC card (see Figure 9).
-
Press Enter in order to connect to the TCC card.
Figure 9 - Connect to the Ethernet Port on the TCC Card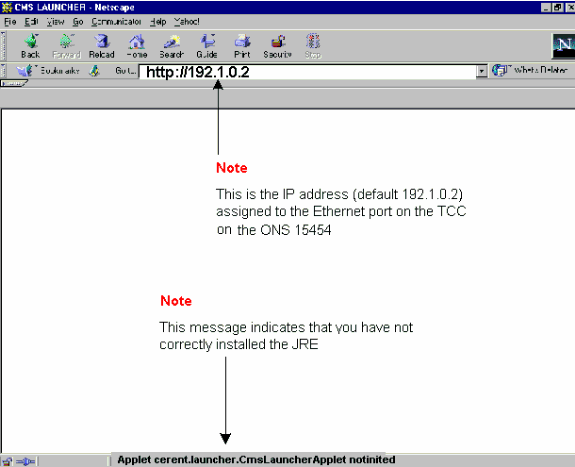
-
Note: The "Applet cerent.launcher.CmsLauncherApplet notinited" error message indicates problems with the JRE software (see the bottom of the screen in Figure 9). See the Common Problems When You Install and Configure the JRE Software section for more information.
If the CTC application is successfully downloaded, the CTC login screen is displayed (see Figure 10). You are now ready to log in and use the CTC application.
Figure 10 - The CTC Login Window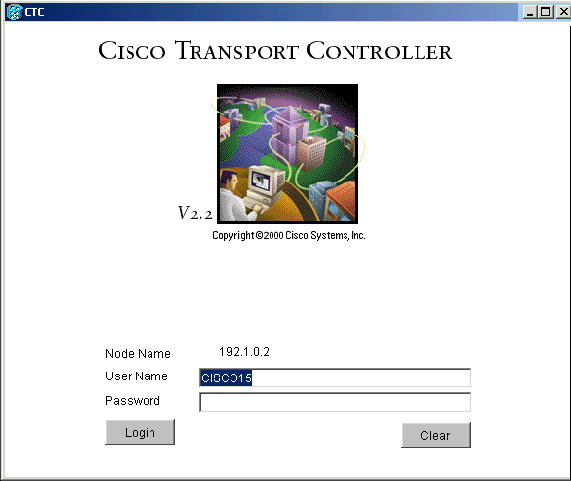
Common Problems When You Install and Configure the JRE Software
The "Applet cerent.launcher.CmsLauncherApplet notinited" error message indicates a problem with either the installation or configuration of the JRE software.
Complete these steps in order to troubleshoot this issue:
-
Choose Start > Programs > Java Plug-in Control Panel.
The Java Plug-in Properties window displays (see Figure 11).
-
In the Basic tab, ensure that the Enable Java Plug-in and Cache JARs in memory check boxes are checked.
Figure 11 - The Java Plug-in Properties Dialog Box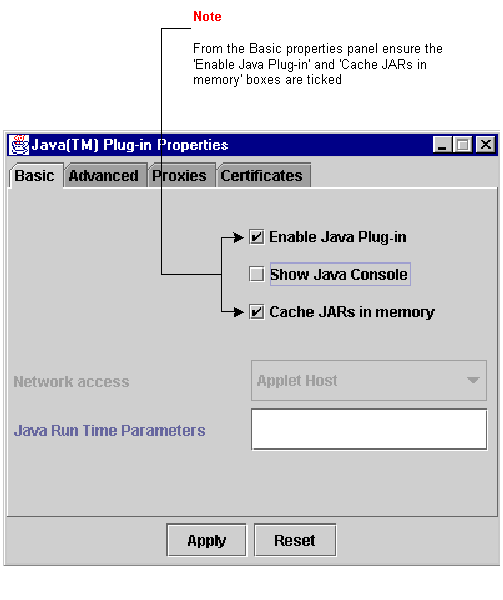
-
Click the Advanced tab.
-
If the Path option is set to Use Java Plug-in Default, change it to point to the location where you have saved the JRE file, as shown here:
Figure 12 - Type the Correct Path to the JRE File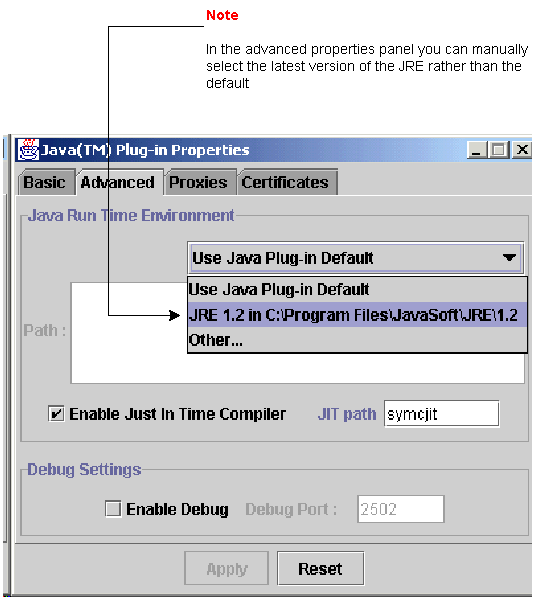
-
Click Apply.
-
Ensure that your browser is not configured to use a proxy server in order to access the Internet.
Complete these steps if you use Netscape:
-
Choose Edit > Preferences > Advanced > Proxies.
-
Ensure that the Proxies configuration is set to Direct connection to the Internet.
Complete these steps if you use Internet Explorer:
-
Choose Tools > Internet Options > Advanced > HTTP 1.1 Settings.
-
Ensure that the Use HTTP 1.1 through proxy connections check box is NOT checked.
-
-
Remove and reinstall the JRE software. Complete these steps:
-
Remove and reinstall the CTC software.
Note: The location of the program files differs across platforms and operating systems. Therefore, use the Search function on your computer to find all files that match CMS*.jar (see Figure 14). Manually delete each file that you find. The next time the PC connects to the TCC card, a new CMS file is downloaded from the TCC card.
Figure 14 - Delete All CMS*.jar Files Manually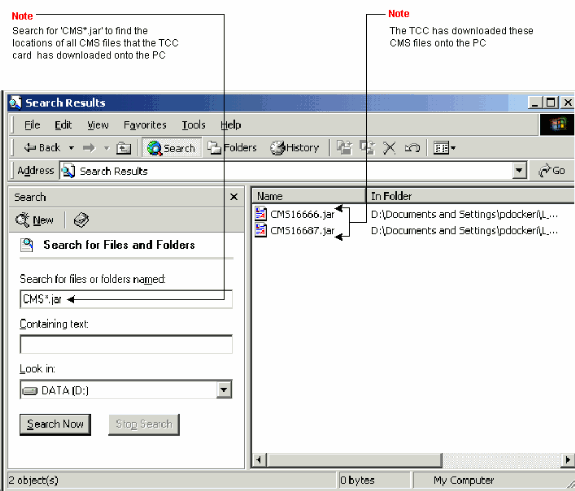
-
Instead of a web browser, use the DOS command line in order to launch the CTC application manually (see Figure 15). You need to specify the correct file path and the IP address of the Ethernet interface on the TCC card.
Figure 15 - Launch CTC Manually from the DOS Command Line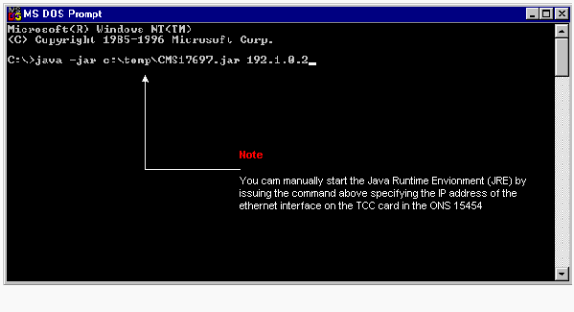
Related Information
Contributed by Cisco Engineers
Contact Cisco
- Open a Support Case

- (Requires a Cisco Service Contract)


 Feedback