Create Pools to Simplify Blade Management in Cisco UCS
Available Languages
Contents
Introduction
It was typical to use the derived values (burned-in values) for UUID and adapter identities when you deployed (installed, booted, or accessed) the Cisco Unified Computing System (UCS) Blade with the Rack-Mounted (traditional server) paradigm. In the full Logical Server paradigm deployment, you need to have identities defined with the logical service profile that will then be applied to the Cisco UCS blade. A Logical Server is defined with identity (UUID, MAC/WWN addresses, and VLAN/VSAN requirements). The profile can be associated with only one blade at a time, but the association can be changed if there is a problem with a particular blade, or hardware maintenance is required on a particular blade.
The Mobile (Relocatable) Logical Server concept allows the same logical server to be booted on different blades at different times. When a blade is associated with a server profile, it inherits all its identity and boot information from the profile. This model works best when the OS is booted off a SAN LUN. This document shows you how to create pools of identity information defined within the Logical Server Profile to facilitate the Mobile Logical Server concept:
-
Create UUID Pools
-
Create MAC Pools
-
Create WWN Pools
Once these pools are created, it simplifies blade management within the Cisco UCS environment.
The Cisco UCS leverages itself to a model where server farms can be easily allocated and deployed, without the need to pre-associate specific hardware to specific server roles. Server pools lend themselves to the server farm model. Note that you still need a separate logical server profile for each server that is booted simultaneously. If you want to deploy a farm of 50 web servers, you need 50 separate (but hopefully very similar) profiles. This Server Pool feature facilitates easy deployment of the sever farm model within the Cisco UCS. This document shows you how to create Server Pools that provide a method to use multiple logical server profiles to create servers in a farm.
Prerequisites
Requirements
Cisco recommends these:
-
Have a working knowledge of Cisco UCS Server Blade software and hardware.
-
Be familiar with the UCS management application.
-
Understand the impact and implications of the different commands described in this document.
-
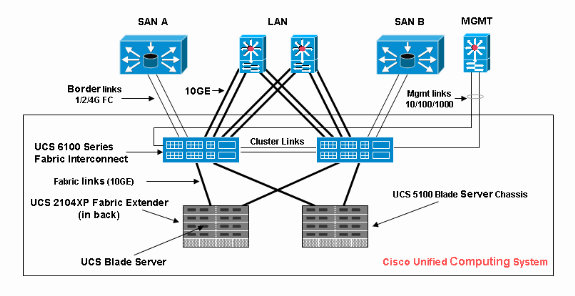
Be familiar with the UCS components and topology. Refer to the network diagram for a typical solution.
Components Used
The information in this document is based on the Cisco UCS System.
Network Diagram
A typical Cisco UCS topology looks similar to this:
Conventions
Refer to the Cisco Technical Tips Conventions for more information on document conventions.
Background Information
In the rack-mounted (traditional server) blade management paradigm, it was typical to use the derived values for UUID and adapter identities. In the mobile (relocatable) logical server paradigm, you need to have identities defined with the logical service profile that are then applied to the blade. These address the key characteristics of the Rack-Mounted (traditional server) and Mobile Logical Server Blade management paradigm within the Cisco UCS.
1. The Profile Elements of Rack-Mounted (traditional server) Paradigm are these:
-
Service Profile still required since no network/SAN connectivity is permitted without Service Profile
-
Distinct profile for each blade you want to boot simultaneously
-
Can clone profiles or create from templates to simplify
-
-
Blade identity (UUID / WWN)
-
Use default built into BIOS
-
"Derived" UUID is in Cisco CLI (the default) and shows up as single "0" in the Cisco UCS GUI
-
-
vNIC / vHBA
-
Must create vNIC/vHBA for every adapter you want connected in the Blade OS
-
-
vNIC, vHBA identities (MAC, WWN)
-
Can use default built into cards
-
-
Boot Order
-
Can set through profile or leave blank and control as ordinary server through BIOS
-
2. The Profile Elements of the Mobile (Relocatable) Logical Server paradigm are these:
-
The UUID is a 128-bit number (32 hex digits, 16 groups of 2 hex digits). It is supposed to uniquely identify a component worldwide. There are various UUID generation algorithms. You can also use a UUID suffix pool. Cisco UCS Manager automatically generates a unique prefix so that you are guaranteed a unique UUID for each logical server:
-
Do not use the "derived" value
-
Make up (or generate) the UUID that moves with profile
-
Use the UUID pool to guarantee uniqueness among all profiles that use the same pool
-
-
vNIC, vHBA identities (MAC, WWN)
-
Do not use the "derived" value
-
Make up the MAC/WWN that moves with profile
-
Use the MAC/WWN pool to guarantee uniqueness among all profiles that use the same pool
-
Main Task
Create Server Pools
Server Pools are an efficient way to pool server blades for organizations, memory requirements, CPU, speed, cores, etc. Every blade that is booted simultaneously must have its own server profile. The profile mechanism still facilitates multiple blade servers that are treated as a pool of servers.
Pools can be manually populated or auto-populated with Server Pool policies. A blade can be in multiple pools at the same time. Whichever profile "claims" a particular blade is its current "owner," regardless of the number of pools it is in.
In order to actually use a server pool, you associate a Service Profile with the pool. The Cisco UCS Manager automatically chooses an available blade from the pool (An available blade is one currently discovered but not associated with any profile, and not in the process of being associated or disassociated.). This document shows you how to create Server Pools in the Cisco UCS.
-
Log in to the Cisco UCS Manager GUI.
-
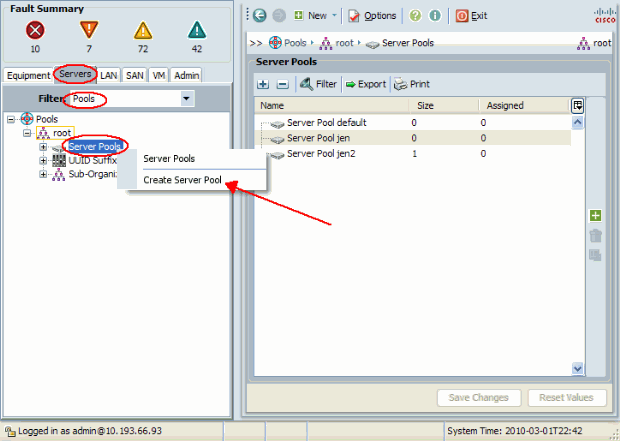
In the navigation pane, click the Servers tab.
-
In the Filter, pull down to Pools.
-
Expand the root.
-
Choose Server Pools, right-click, and choose Create New Server Pool.
-
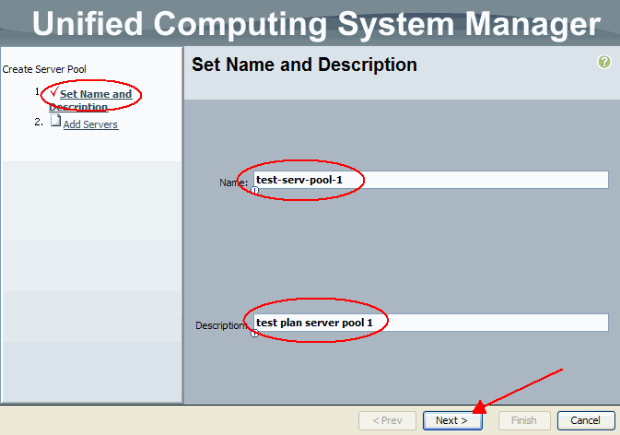
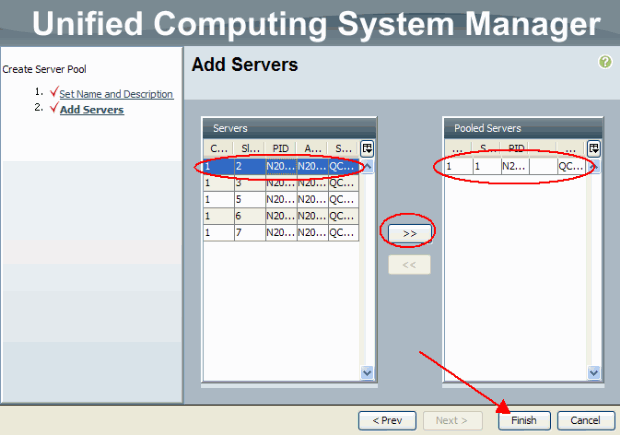
Give the pool a name and description, then click Next.
-
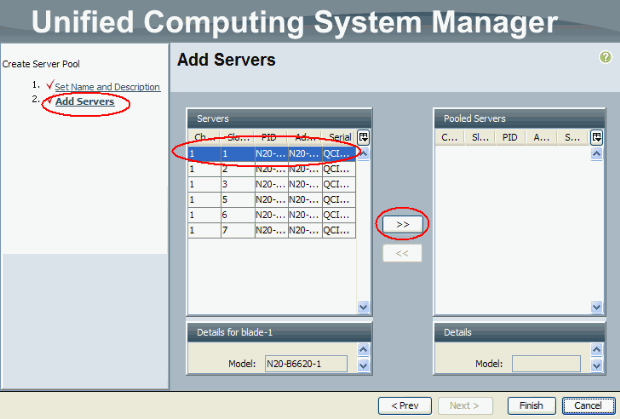
Add a server to the pool when you choose the server and add it to the right side.
-
Choose Finish when the server is in the “Pooled Servers”.
-
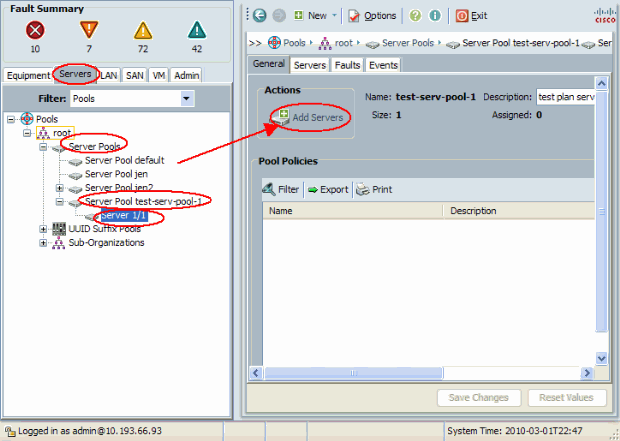
The new pool now appears and shows the server in the pool. You can add additional servers to the pool with the “Add Servers” link.
Same Server Can be in the Different Pool
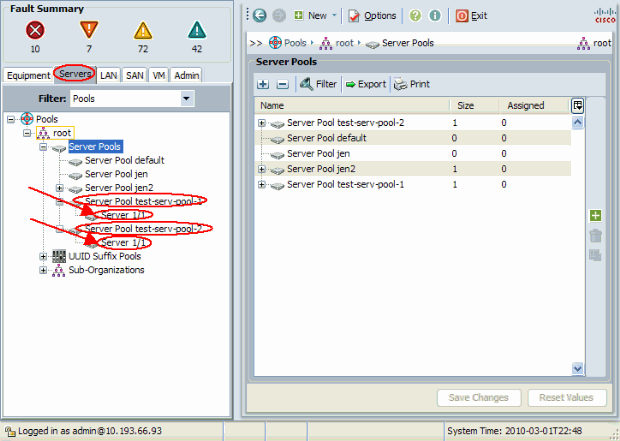
In order to demonstrate that the same server can be in the different pool, perform these steps:
-
Create a new pool called test-serv-pool-2.
-
Add the same server from the previous test to test-serv-pool-2.
This is the end result.
Create UUID Pools
The UUID is a 128-bit number (32 hex digits, 16 groups of 2 hex digits). It is supposed to uniquely identify a component worldwide. There are various UUID generation algorithms. You can also use a UUID suffix pool. The Cisco UCS Manager automatically generates a unique prefix so that you are guaranteed a unique UUID for each logical serve. This shows how to create unique identifier (UUID) blocks for the Cisco UCS Blade:
-
Log in to the Cisco UCS Manager GUI.
-
In the navigation pane, click the Servers tab.
-
In the Filter, pull down to Pools.
-
Expand the root.
-
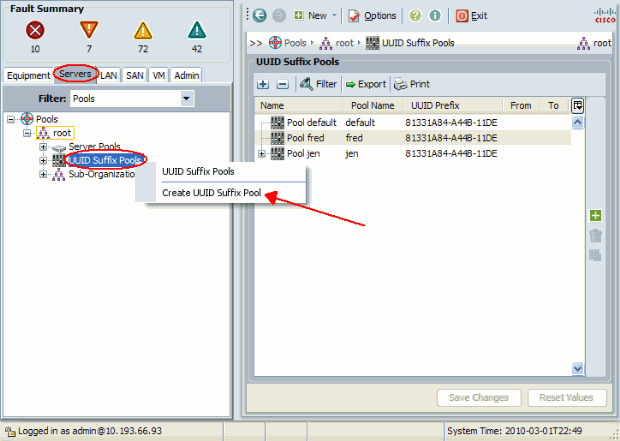
Browse to Pools > UUID Suffix Pool.
-
Right-click the UUID Suffix Pool and choose Create UUID Suffix Pool.
-
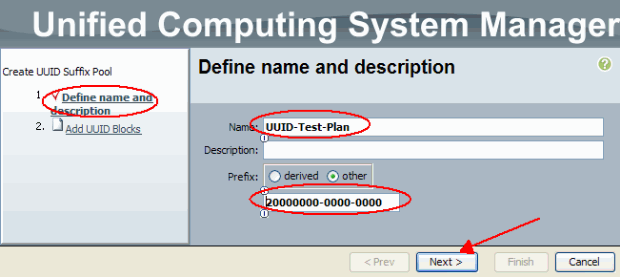
Give the suffix a name and description, then click Next.
-
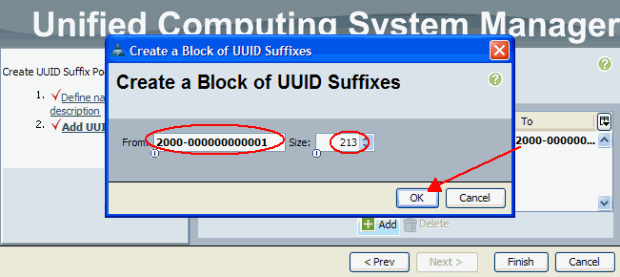
Fill in the UUID Suffix blocks, and click OK.
-
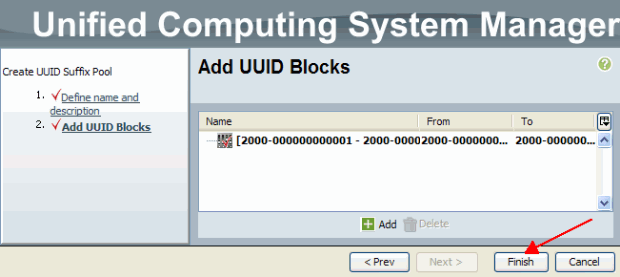
Click Finish.
-
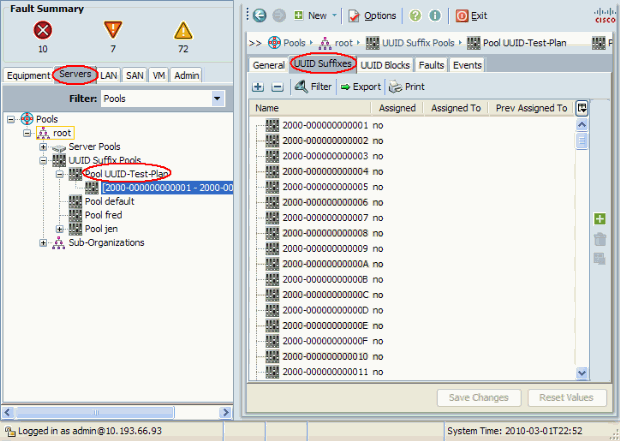
Verify the UUID Pool when you open the UUID-Test-plan pool and confirm that UUID suffixes were created.
Create MAC Pools
MAC pools are a range of MAC addresses created by the UCS administrator and network admin to be used by Service Profiles. Once a MAC is associated to a Service Profile, it stays with that profile until it is deleted. Any blade that gets associated to the Service Profile receives that MAC address to be used at runtime.
-
Log in to the Cisco UCS Manager GUI.
-
In the navigation pane, click the LAN tab.
-
In the Filter, pull down to Pools.
-
Expand the root.
-
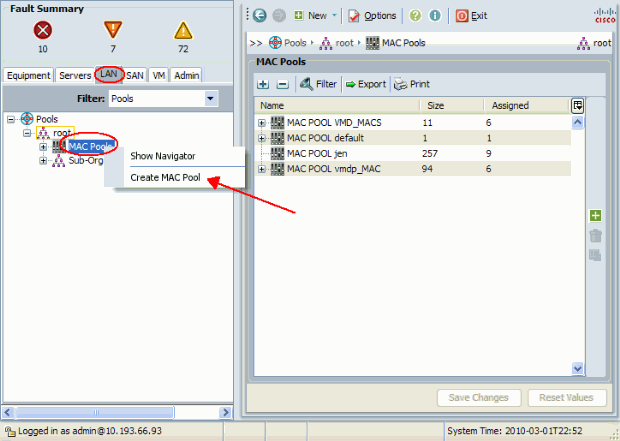
Browse to MAC Pools.
-
Right-click MAC Pool, and choose Create MAC Pool.
-
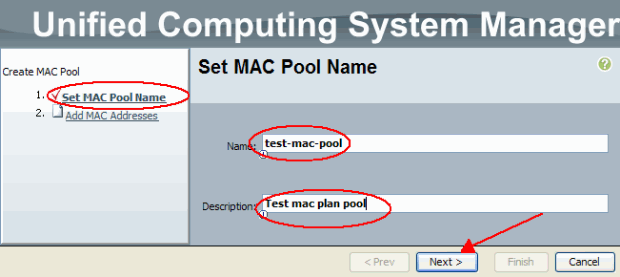
Give the Pool a name and description, then click Next.
-
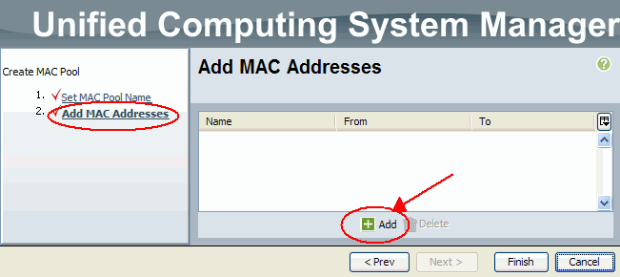
Click Add to add the MAC addresses.
-
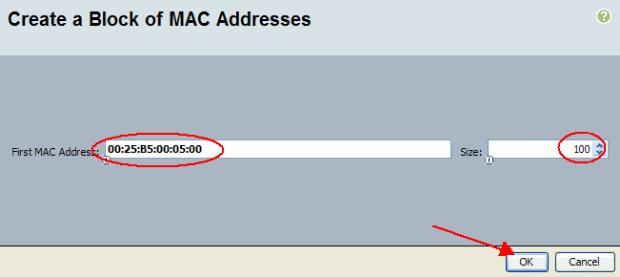
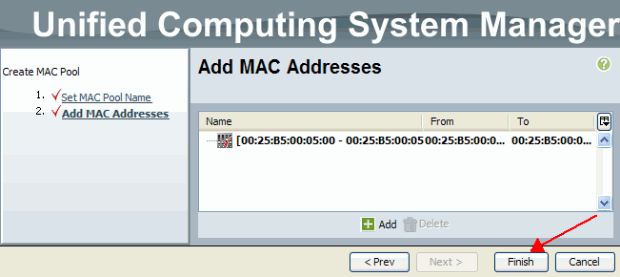
Change one of the leading octets to a new number, such as 50, and set the size field to a number, such as 100.
-
The start and end MAC addresses appear. Click Finish.
-
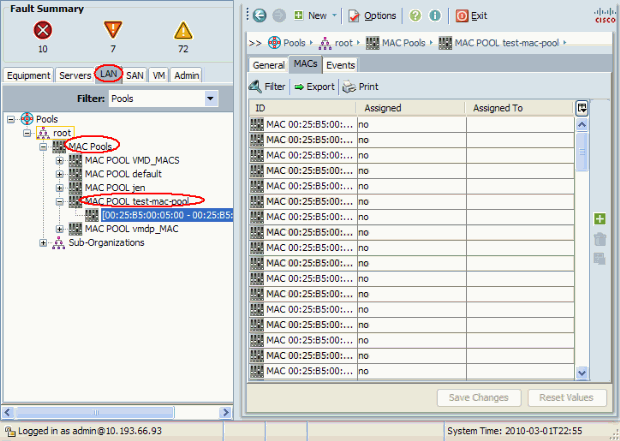
Verify that the Pool and 100 MAC addresses were created.
Create WWN Pools
Create a Pool of WWN addresses for Service Profiles. WWN pools are a list of the WWN SAN addresses created by the UCS administrator or Storage admin to be used by Service Profiles. Once a WWN is associated to a Service Profile, it stays with that profile until it is deleted. Any blade that gets associated to the Service Profile receives that WWN address to be used at runtime.
-
Log in to the Cisco UCS Manager GUI.
-
In the navigation pane, click the SAN tab.
-
In the Filter, pull down to Pools.
-
Expand the root.
-
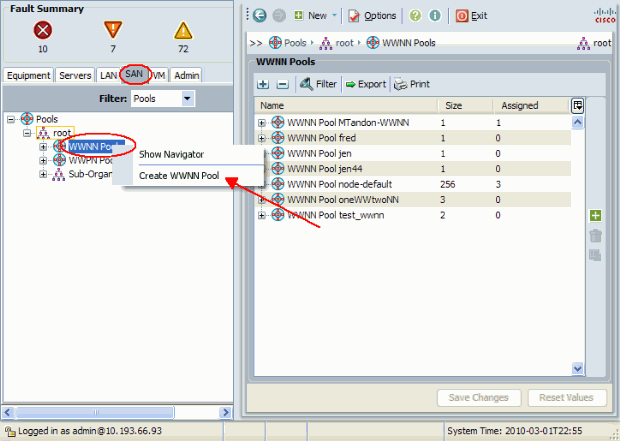
Browse to WWNN Pools.
-
Right-click WWNN Pool, and choose Create WWNN Pool.
-
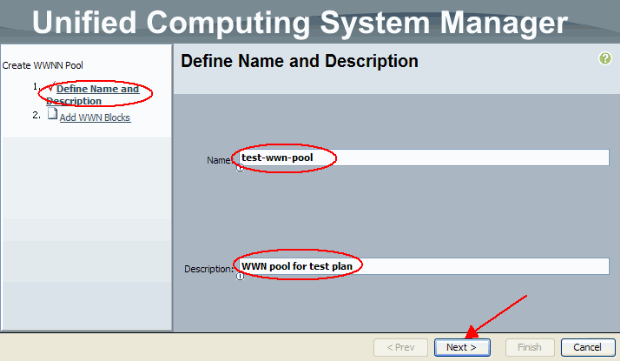
Give the Pool a name and description, then choose Next.
-
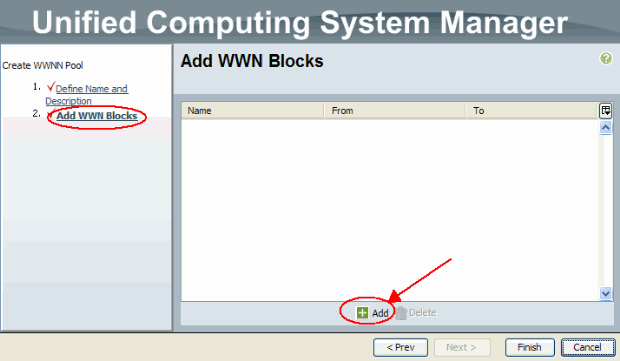
Click the Add button.
-
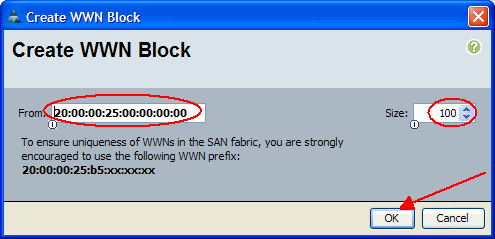
Change the first octet to the number 20. Set the size number to 100.
-
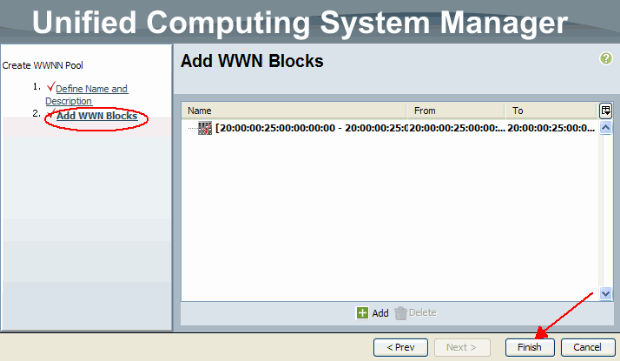
Click Finish on the next screen.
-
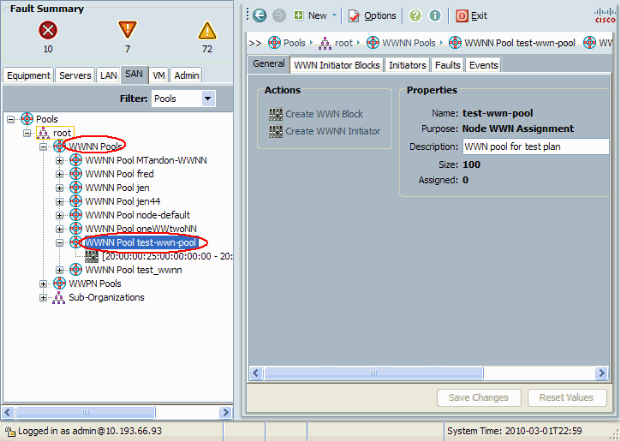
Verify that the WWNs were created.
Verify
Refer to above sub-sections for verifications.
Troubleshoot
There is currently no specific troubleshooting information available for this configuration.
Related Information
Revision History
| Revision | Publish Date | Comments |
|---|---|---|
1.0 |
15-Jul-2009 |
Initial Release |
Contact Cisco
- Open a Support Case

- (Requires a Cisco Service Contract)


 Feedback