PIX/ASA: Perform DNS Doctoring with the static Command and Two NAT Interfaces Configuration Example
Available Languages
Contents
Introduction
This document provides a sample configuration to perform Domain Name System (DNS) doctoring on the ASA 5500 Series Adaptive Security Appliance or PIX 500 Series Security Appliance using static Network Address Translation (NAT) statements. DNS doctoring allows the security appliance to rewrite DNS A-records.
DNS rewrite performs two functions:
-
Translates a public address (the routable or mapped address) in a DNS reply to a private address (the real address) when the DNS client is on a private interface.
-
Translates a private address to a public address when the DNS client is on the public interface.
Note: The configuration in this document contains two NAT interfaces; inside and outside. For an example of DNS doctoring with statics and three NAT interfaces (inside, outside and dmz), refer to PIX/ASA: Perform DNS Doctoring with the static Command and Three NAT Interfaces Configuration Example.
Refer to PIX/ASA 7.x NAT and PAT Statements and Using nat, global, static, conduit, and access-list Commands and Port Redirection (Forwarding) on PIX for more information on how to use NAT on a Security Appliance.
Prerequisites
Requirements
DNS inspection must be enabled in order to perform DNS doctoring on the security appliance. DNS inspection is on by default. If it has been turned off, see the Configure DNS Inspection section later in this document to re-enable it. When DNS inspection is enabled, the security appliance performs these tasks:
-
Translates the DNS record based on the configuration completed using the static and nat commands (DNS rewrite). Translation only applies to the A-record in the DNS reply. Therefore, reverse lookups, which request the PTR record, are not affected by DNS rewrite.
Note: DNS rewrite is not compatible with static Port Address Translation (PAT) because multiple PAT rules are applicable for each A-record, and the PAT rule to use is ambiguous.
-
Enforces the maximum DNS message length (the default is 512 bytes and the maximum length is 65535 bytes). Reassembly is performed as necessary to verify that the packet length is less than the maximum length configured. The packet is dropped if it exceeds the maximum length.
Note: If you issue the inspect dns command without the maximum-length option, DNS packet size is not checked.
-
Enforces a domain-name length of 255 bytes and a label length of 63 bytes.
-
Verifies the integrity of the domain-name referred to by the pointer if compression pointers are encountered in the DNS message.
-
Checks to see if a compression pointer loop exists.
Components Used
The information in this document is based on ASA 5500 Series Security Appliance, version 7.2(1).
The information in this document was created from the devices in a specific lab environment. All of the devices used in this document started with a cleared (default) configuration. If your network is live, make sure that you understand the potential impact of any command.
Related Products
This configuration can also be used with the Cisco PIX 500 Series Security Appliance, version 6.2 or later.
Note: The Cisco Adaptive Security Device Manager (ASDM) configuration is applicable to version 7.x only.
Conventions
Refer to Cisco Technical Tips Conventions for more information on document conventions.
Background Information
In a typical DNS exchange a client sends a URL or hostname to a DNS server in order to determine the IP address of that host. The DNS server receives the request, looks up the name-to-IP-address mapping for that host, and then provides the A-record with the IP address to the client. While this procedure works well in many situations, problems can occur. These problems can occur when the client and the host that the client tries to reach are both on the same private network behind NAT, but the DNS server used by the client is on another public network.
Scenario: Two NAT Interfaces (inside, outside)
Topology
In this scenario, the client and the WWW server that the client tries to reach are both located on the inside interface of the ASA. Dynamic PAT is configured to allow the client access to the Internet. Static NAT with an access-list is configured to allow the server access to the Internet, as well as allow Internet hosts to access the WWW server.
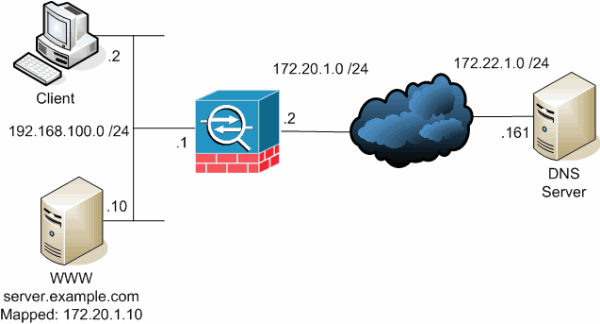
This diagram is an example of this situation. In this case, the client at 192.168.100.2 wants to use the server.example.com URL to access the WWW server at 192.168.100.10. DNS services for the client are provided by the external DNS server at 172.22.1.161. Because the DNS server is located on another public network, it does not know the private IP address of the WWW server. Instead, it knows the WWW server mapped address of 172.20.1.10. Thus, the DNS server contains the IP-address-to-name mapping of server.example.com to 172.20.1.10.
Problem: Client Cannot Access WWW Server
Without DNS doctoring or another solution enabled in this situation, if the client sends a DNS request for the IP address of server.example.com, it is unable to access the WWW server. This is because the client receives an A-record that contains the mapped public address: 172.20.1.10 of the WWW server. When the client tries to access this IP address, the security appliance drops the packets because it does not allow packet redirection on the same interface. Here is what the NAT portion of the configuration looks like when DNS doctoring is not enabled:
ciscoasa(config)#show running-config
: Saved
:
ASA Version 7.2(1)
!
hostname ciscoasa


!--- Output suppressed.

access-list OUTSIDE extended permit tcp any host 172.20.1.10 eq www


!--- Output suppressed.

global (outside) 1 interface
nat (inside) 1 192.168.100.0 255.255.255.0
static (inside,outside) 172.20.1.10 192.168.100.10 netmask 255.255.255.255
access-group OUTSIDE in interface outside


!--- Output suppressed.
This is what the configuration looks like in the ASDM when DNS doctoring is not enabled:
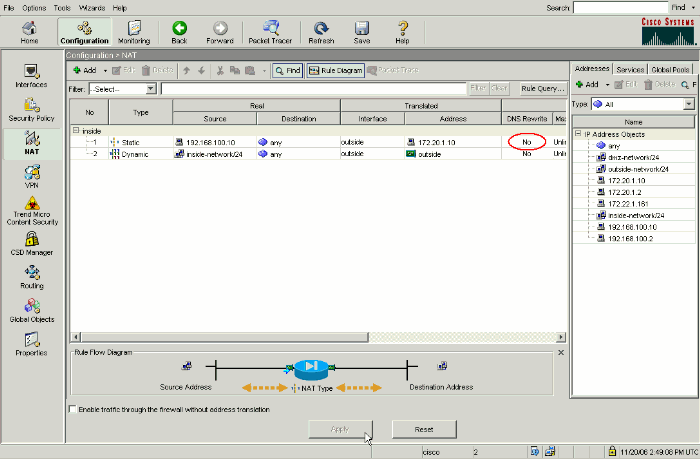
Here is a packet capture of the events when DNS doctoring is not enabled:
-
The client sends the DNS query.
No. Time Source Destination Protocol Info 1 0.000000 192.168.100.2 172.22.1.161 DNS Standard query A server.example.com Frame 1 (78 bytes on wire, 78 bytes captured) Ethernet II, Src: Cisco_c8:e4:00 (00:04:c0:c8:e4:00), Dst: Cisco_9c:c6:1f (00:0a:b8:9c:c6:1f) Internet Protocol, Src: 192.168.100.2 (192.168.100.2), Dst: 172.22.1.161 (172.22.1.161) User Datagram Protocol, Src Port: 50879 (50879), Dst Port: domain (53) Domain Name System (query) [Response In: 2] Transaction ID: 0x0004 Flags: 0x0100 (Standard query) Questions: 1 Answer RRs: 0 Authority RRs: 0 Additional RRs: 0 Queries server.example.com: type A, class IN Name: server.example.com Type: A (Host address) Class: IN (0x0001) -
PAT is performed on the DNS query by the ASA and the query is forwarded. Note that the source address of the packet has changed to the outside interface of the ASA.
No. Time Source Destination Protocol Info 1 0.000000 172.20.1.2 172.22.1.161 DNS Standard query A server.example.com Frame 1 (78 bytes on wire, 78 bytes captured) Ethernet II, Src: Cisco_9c:c6:1e (00:0a:b8:9c:c6:1e), Dst: Cisco_01:f1:22 (00:30:94:01:f1:22) Internet Protocol, Src: 172.20.1.2 (172.20.1.2), Dst: 172.22.1.161 (172.22.1.161) User Datagram Protocol, Src Port: 1044 (1044), Dst Port: domain (53) Domain Name System (query) [Response In: 2] Transaction ID: 0x0004 Flags: 0x0100 (Standard query) Questions: 1 Answer RRs: 0 Authority RRs: 0 Additional RRs: 0 Queries server.example.com: type A, class IN Name: server.example.com Type: A (Host address) Class: IN (0x0001) -
The DNS server replies with the mapped address of the WWW server.
No. Time Source Destination Protocol Info 2 0.005005 172.22.1.161 172.20.1.2 DNS Standard query response A 172.20.1.10 Frame 2 (94 bytes on wire, 94 bytes captured) Ethernet II, Src: Cisco_01:f1:22 (00:30:94:01:f1:22), Dst: Cisco_9c:c6:1e (00:0a:b8:9c:c6:1e) Internet Protocol, Src: 172.22.1.161 (172.22.1.161), Dst: 172.20.1.2 (172.20.1.2) User Datagram Protocol, Src Port: domain (53), Dst Port: 1044 (1044) Domain Name System (response) [Request In: 1] [Time: 0.005005000 seconds] Transaction ID: 0x0004 Flags: 0x8580 (Standard query response, No error) Questions: 1 Answer RRs: 1 Authority RRs: 0 Additional RRs: 0 Queries server.example.com: type A, class IN Name: server.example.com Type: A (Host address) Class: IN (0x0001) Answers server.example.com: type A, class IN, addr 172.20.1.10 Name: server.example.com Type: A (Host address) Class: IN (0x0001) Time to live: 1 hour Data length: 4 Addr: 172.20.1.10 -
The ASA undoes the translation of the destination address of the DNS response and forwards the packet to the client. Note that without DNS doctoring enabled, the Addr in the answer is still the mapped address of the WWW server.
No. Time Source Destination Protocol Info 2 0.005264 172.22.1.161 192.168.100.2 DNS Standard query response A 172.20.1.10 Frame 2 (94 bytes on wire, 94 bytes captured) Ethernet II, Src: Cisco_9c:c6:1f (00:0a:b8:9c:c6:1f), Dst: Cisco_c8:e4:00 (00:04:c0:c8:e4:00) Internet Protocol, Src: 172.22.1.161 (172.22.1.161), Dst: 192.168.100.2 (192.168.100.2) User Datagram Protocol, Src Port: domain (53), Dst Port: 50879 (50879) Domain Name System (response) [Request In: 1] [Time: 0.005264000 seconds] Transaction ID: 0x0004 Flags: 0x8580 (Standard query response, No error) Questions: 1 Answer RRs: 1 Authority RRs: 0 Additional RRs: 0 Queries server.example.com: type A, class IN Name: server.example.com Type: A (Host address) Class: IN (0x0001) Answers server.example.com: type A, class IN, addr 172.20.1.10 Name: server.example.com Type: A (Host address) Class: IN (0x0001) Time to live: 1 hour Data length: 4 Addr: 172.20.1.10 -
At this point, the client tries to access the WWW server at 172.20.1.10. The ASA creates a connection entry for this communication. However, because it does not allow traffic to flow from inside to outside to inside, the connection times out. The ASA logs show this:
%ASA-6-302013: Built outbound TCP connection 54175 for
outside:172.20.1.10/80 (172.20.1.10/80) to inside:192.168.100.2/11001
(172.20.1.2/1024)

%ASA-6-302014: Teardown TCP connection 54175 for outside:172.20.1.10/80 to
inside:192.168.100.2/11001 duration 0:00:30 bytes 0 SYN Timeout
Solution: "dns" Keyword
DNS Doctoring with the "dns" Keyword
DNS doctoring with the dns keyword gives the security appliance the ability to intercept and rewrite the contents of the DNS server replies to the client. When properly configured, the security appliance can alter the A-record to allow the client in such a scenario as discussed in the Problem: Client Cannot Access WWW Server section to connect. In this situation, with DNS doctoring enabled, the security appliance rewrites the A-record to direct the client to 192.168.100.10, instead of 172.20.1.10. DNS doctoring is enabled when you add the dns keyword to a static NAT statement. Here is what the NAT portion of the configuration looks like when DNS doctoring is enabled:
ciscoasa(config)#show run
: Saved
:
ASA Version 7.2(1)
!
hostname ciscoasa


!--- Output suppressed.

access-list OUTSIDE extended permit tcp any host 172.20.1.10 eq www


!--- Output suppressed.

global (outside) 1 interface
nat (inside) 1 192.168.100.0 255.255.255.0
static (inside,outside) 172.20.1.10 192.168.100.10 netmask 255.255.255.255 dns

!--- The "dns" keyword is added to instruct the security appliance to modify !--- DNS records related to this entry.

access-group OUTSIDE in interface outside


!--- Output suppressed.
Complete these steps in order to configure DNS doctoring in the ASDM:
-
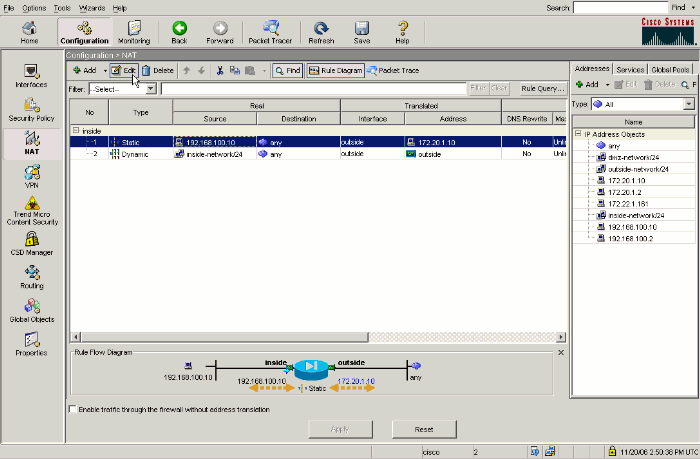
Navigate to Configuration > NAT and choose the static NAT rule to be modified. Click Edit.
-
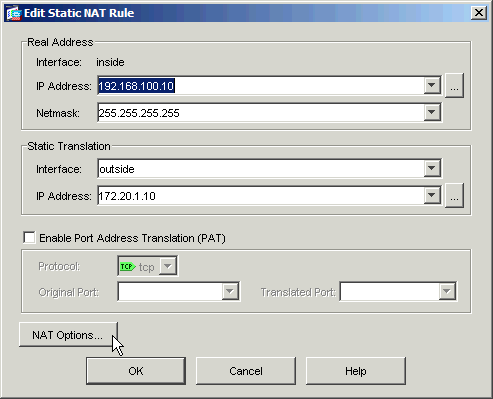
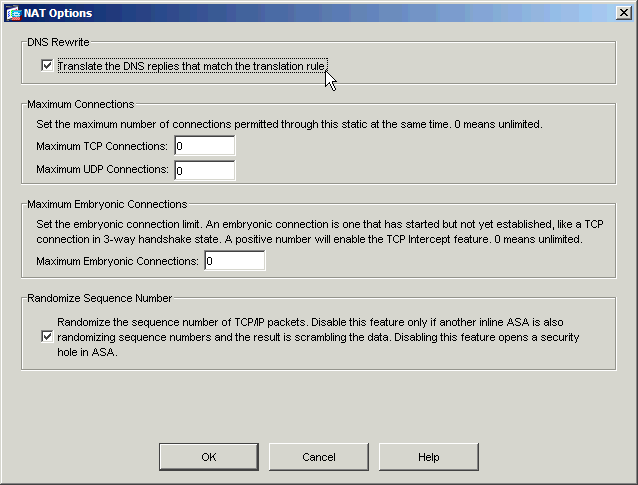
Click NAT Options....
-
Check the Translate DNS replies that match the translation rule check box.
-
Click OK to leave the NAT Options window. Click OK to leave the Edit Static NAT Rule window. Click Apply to send your configuration to the security appliance.
Here is a packet capture of the events when DNS doctoring is enabled:
-
The client sends the DNS query.
No. Time Source Destination Protocol Info 1 0.000000 192.168.100.2 172.22.1.161 DNS Standard query A server.example.com Frame 1 (78 bytes on wire, 78 bytes captured) Ethernet II, Src: Cisco_c8:e4:00 (00:04:c0:c8:e4:00), Dst: Cisco_9c:c6:1f (00:0a:b8:9c:c6:1f) Internet Protocol, Src: 192.168.100.2 (192.168.100.2), Dst: 172.22.1.161 (172.22.1.161) User Datagram Protocol, Src Port: 52985 (52985), Dst Port: domain (53) Domain Name System (query) [Response In: 2] Transaction ID: 0x000c Flags: 0x0100 (Standard query) Questions: 1 Answer RRs: 0 Authority RRs: 0 Additional RRs: 0 Queries server.example.com: type A, class IN Name: server.example.com Type: A (Host address) Class: IN (0x0001) -
PAT is performed on the DNS query by the ASA and the query is forwarded. Note that the source address of the packet has changed to the outside interface of the ASA.
No. Time Source Destination Protocol Info 1 0.000000 172.20.1.2 172.22.1.161 DNS Standard query A server.example.com Frame 1 (78 bytes on wire, 78 bytes captured) Ethernet II, Src: Cisco_9c:c6:1e (00:0a:b8:9c:c6:1e), Dst: Cisco_01:f1:22 (00:30:94:01:f1:22) Internet Protocol, Src: 172.20.1.2 (172.20.1.2), Dst: 172.22.1.161 (172.22.1.161) User Datagram Protocol, Src Port: 1035 (1035), Dst Port: domain (53) Domain Name System (query) [Response In: 2] Transaction ID: 0x000c Flags: 0x0100 (Standard query) Questions: 1 Answer RRs: 0 Authority RRs: 0 Additional RRs: 0 Queries server.example.com: type A, class IN Name: server.example.com Type: A (Host address) Class: IN (0x0001) -
The DNS server replies with the mapped address of the WWW server.
No. Time Source Destination Protocol Info 2 0.000992 172.22.1.161 172.20.1.2 DNS Standard query response A 172.20.1.10 Frame 2 (94 bytes on wire, 94 bytes captured) Ethernet II, Src: Cisco_01:f1:22 (00:30:94:01:f1:22), Dst: Cisco_9c:c6:1e (00:0a:b8:9c:c6:1e) Internet Protocol, Src: 172.22.1.161 (172.22.1.161), Dst: 172.20.1.2 (172.20.1.2) User Datagram Protocol, Src Port: domain (53), Dst Port: 1035 (1035) Domain Name System (response) [Request In: 1] [Time: 0.000992000 seconds] Transaction ID: 0x000c Flags: 0x8580 (Standard query response, No error) Questions: 1 Answer RRs: 1 Authority RRs: 0 Additional RRs: 0 Queries server.example.com: type A, class IN Name: server.example.com Type: A (Host address) Class: IN (0x0001) Answers server.example.com: type A, class IN, addr 172.20.1.10 Name: server.example.com Type: A (Host address) Class: IN (0x0001) Time to live: 1 hour Data length: 4 Addr: 172.20.1.10 -
The ASA undoes the translation of the destination address of the DNS response and forwards the packet to the client. Note that with DNS doctoring enabled, the Addr in the answer is rewritten to be the real address of the WWW server.
No. Time Source Destination Protocol Info 2 0.001251 172.22.1.161 192.168.100.2 DNS Standard query response A 192.168.100.10 Frame 2 (94 bytes on wire, 94 bytes captured) Ethernet II, Src: Cisco_9c:c6:1f (00:0a:b8:9c:c6:1f), Dst: Cisco_c8:e4:00 (00:04:c0:c8:e4:00) Internet Protocol, Src: 172.22.1.161 (172.22.1.161), Dst: 192.168.100.2 (192.168.100.2) User Datagram Protocol, Src Port: domain (53), Dst Port: 52985 (52985) Domain Name System (response) [Request In: 1] [Time: 0.001251000 seconds] Transaction ID: 0x000c Flags: 0x8580 (Standard query response, No error) Questions: 1 Answer RRs: 1 Authority RRs: 0 Additional RRs: 0 Queries server.example.com: type A, class IN Name: server.example.com Type: A (Host address) Class: IN (0x0001) Answers server.example.com: type A, class IN, addr 192.168.100.10 Name: server.example.com Type: A (Host address) Class: IN (0x0001) Time to live: 1 hour Data length: 4 Addr: 192.168.100.10 !--- 172.20.1.10 has been rewritten to be 192.168.100.10. -
At this point, the client tries to access the WWW server at 192.168.100.10. The connection succeeds. No traffic is captured on the ASA because the client and server are on the same subnet.
Final Configuration with the "dns" Keyword
This is the final configuration of the ASA to perform DNS doctoring with the dns keyword and two NAT interfaces.
| Final ASA 7.2(1) Configuration |
|---|
ciscoasa(config)#show running-config : Saved : ASA Version 7.2(1) ! hostname ciscoasa enable password 9jNfZuG3TC5tCVH0 encrypted names dns-guard ! interface Ethernet0/0 nameif outside security-level 0 ip address 172.20.1.2 255.255.255.0 ! interface Ethernet0/1 nameif inside security-level 100 ip address 192.168.100.1 255.255.255.0 ! interface Ethernet0/2 shutdown no nameif no security-level no ip address ! interface Management0/0 shutdown no nameif no security-level no ip address management-only ! passwd 2KFQnbNIdI.2KYOU encrypted ftp mode passive access-list OUTSIDE extended permit tcp any host 172.20.1.10 eq www !--- Simple access-list that permits HTTP access to the mapped !--- address of the WWW server. pager lines 24 logging enable logging buffered debugging mtu outside 1500 mtu inside 1500 asdm image disk0:/asdm512-k8.bin no asdm history enable arp timeout 14400 global (outside) 1 interface nat (inside) 1 192.168.100.0 255.255.255.0 static (inside,outside) 172.20.1.10 192.168.100.10 netmask 255.255.255.255 dns !--- PAT and static NAT configuration. The DNS keyword instructs !--- the security appliance to rewrite DNS records related to this entry. access-group OUTSIDE in interface outside !--- The Access Control List (ACL) that permits HTTP access !--- to the WWW server is applied to the outside interface. route outside 0.0.0.0 0.0.0.0 172.20.1.1 1 timeout xlate 3:00:00 timeout conn 1:00:00 half-closed 0:10:00 udp 0:02:00 icmp 0:00:02 timeout sunrpc 0:10:00 h323 0:05:00 h225 1:00:00 mgcp 0:05:00 mgcp-pat 0:05:00 timeout sip 0:30:00 sip_media 0:02:00 sip-invite 0:03:00 sip-disconnect 0:02:00 timeout uauth 0:05:00 absolute username cisco password ffIRPGpDSOJh9YLq encrypted http server enable no snmp-server location no snmp-server contact snmp-server enable traps snmp authentication linkup linkdown coldstart telnet timeout 5 ssh timeout 5 console timeout 0 ! class-map inspection_default match default-inspection-traffic ! ! policy-map type inspect dns MY_DNS_INSPECT_MAP parameters message-length maximum 512 !--- DNS inspection map. policy-map global_policy class inspection_default inspect ftp inspect h323 h225 inspect h323 ras inspect rsh inspect rtsp inspect esmtp inspect sqlnet inspect skinny inspect sunrpc inspect xdmcp inspect sip inspect netbios inspect tftp inspect dns MY_DNS_INSPECT_MAP !--- DNS inspection is enabled using the configured map. inspect icmp policy-map type inspect dns migrated_dns_map_1 parameters message-length maximum 512 ! service-policy global_policy global prompt hostname context Cryptochecksum:a4a38088109887c3ceb481efab3dcf32 : end |
Alternative Solution: Hairpinning
Hairpinning with Static NAT
 Caution: Hairpinning with static NAT involves sending all traffic between the client and the WWW server through the security appliance. Carefully consider the expected amount of traffic and the capabilities of your security appliance before you implement this solution.
Hairpinning is the process by which traffic is sent back out the same interface on which it arrived. This feature was introduced in security appliance software version 7.0. For versions earlier than 7.2(1), it is required that at least one arm of the hairpinned traffic (inbound or outbound) be encrypted. From 7.2(1) and later, this requirement is no longer in place. Both the traffic inbound and the traffic outbound might be unencrypted when you use 7.2(1).
Hairpinning, in conjunction with a static NAT statement, can be used to achieve the same effect as DNS doctoring. This method does not change the contents of the DNS A-record that is returned from the DNS server to the client. Instead, when hairpinning is used, such as in the scenario discussed in this document, the client can use the address of 172.20.1.10 that is returned by the DNS server in order to connect.
Here is what the relevant portion of the configuration looks like when you use hairpinning and static NAT to achieve a DNS doctoring effect. The commands in bold are explained in greater detail at the end of this output:
ciscoasa(config)#show run
: Saved
:
ASA Version 7.2(1)
!
hostname ciscoasa

!--- Output suppressed.

same-security-traffic permit intra-interface

!--- Enable hairpinning.

global (outside) 1 interface

!--- Global statement for client access to the Internet.

global (inside) 1 interface

!--- Global statment for hairpinned client access through !--- the security appliance.

nat (inside) 1 192.168.100.0 255.255.255.0

!--- The NAT statement defines which traffic should be natted. !--- The whole inside subnet in this case.

static (inside,outside) 172.20.1.10 192.168.100.10 netmask 255.255.255.255

!--- Static NAT statement mapping the WWW server's real address to a !--- public address on the outside interface.

static (inside,inside) 172.20.1.10 192.168.100.10 netmask 255.255.255.255

!--- Static NAT statment mapping requests for the public IP address of !--- the WWW server that appear on the inside interface to the WWW server's !--- real address of 192.168.100.10.
-
same-security-traffic—This command enables traffic of the same security level to transit the security appliance. The permit intra-interface keywords allow that same-security-traffic to enter and leave the same interface, thus hairpinning is enabled.
Note: Refer to same-security-traffic for more information on hairpinning and the same-security-traffic command.
-
global (inside) 1 interface—All traffic that crosses the security appliance must undergo NAT. This command uses the inside interface address of the security appliance in order to enable traffic that enters the inside interface to undergo PAT as it is hairpinned back out the inside interface.
-
static (inside,inside) 172.20.1.10 192.168.100.10 netmask 255.255.255.255—This static NAT entry creates a second mapping for the public IP address of the WWW server. However, unlike the first static NAT entry, this time the address 172.20.1.10 is mapped to the inside interface of the security appliance. This allows the security appliance to respond to requests that it sees for this address on the inside interface. Then, it redirects those requests to the real address of the WWW server through itself.
Complete these steps in order to configure hairpinning with static NAT in ASDM:
-
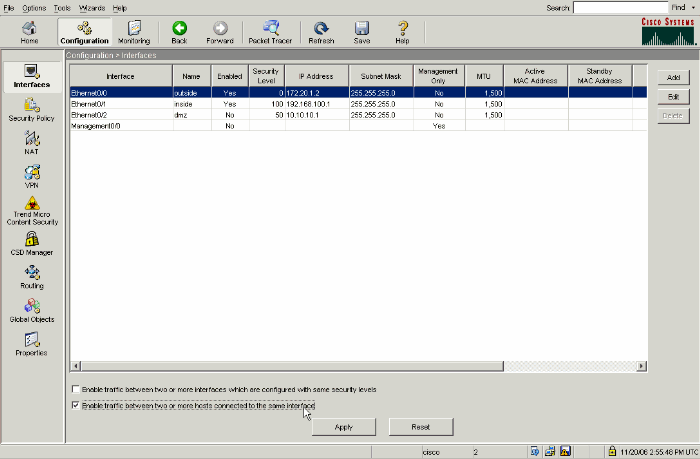
Navigate to Configuration > Interfaces.
-
At the bottom of the window, check the Enable traffic between two or more hosts connected to the same interface check box.
-
Click Apply.
-
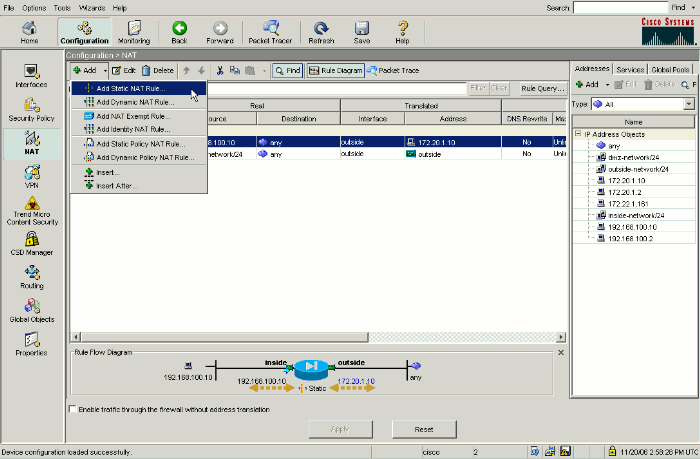
Navigate to Configuration > NAT and choose Add > Add Static NAT Rule....
-
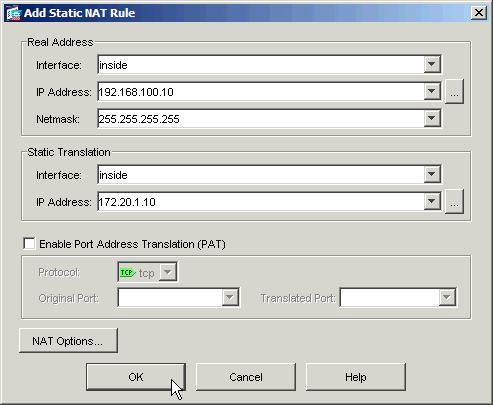
Fill in the configuration for the new static translation.
-
Populate the Real Address area with the WWW server information.
-
Populate the Static Translation area with the address and interface that you want to map the WWW server to.
In this case, the inside interface is chosen to allow hosts on the inside interface to access the WWW server via the mapped address 172.20.1.10.
-
-
Click OK to leave the Add Static NAT Rule window.
-
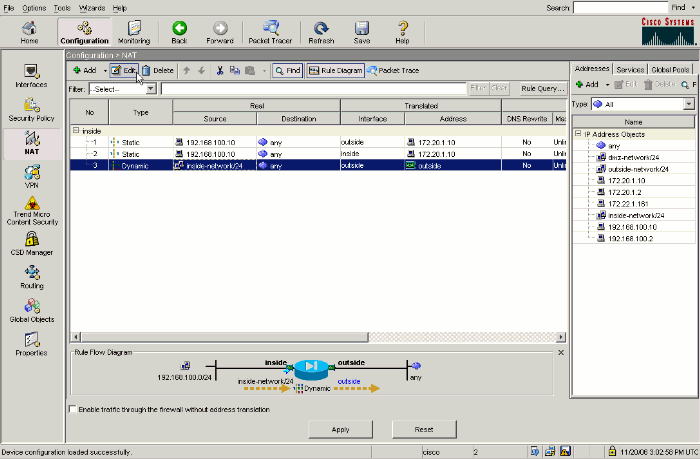
Choose the existing dynamic PAT translation and click Edit.
-
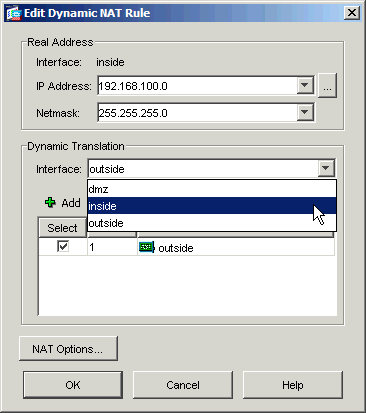
Choose inside from the Interface pulldown box.
-
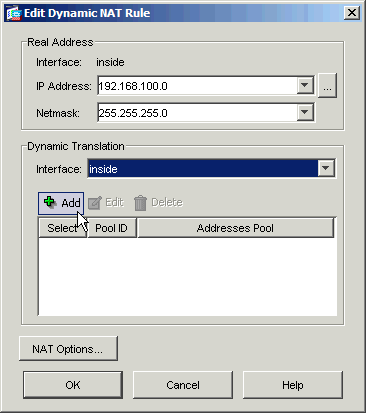
Click Add.
-
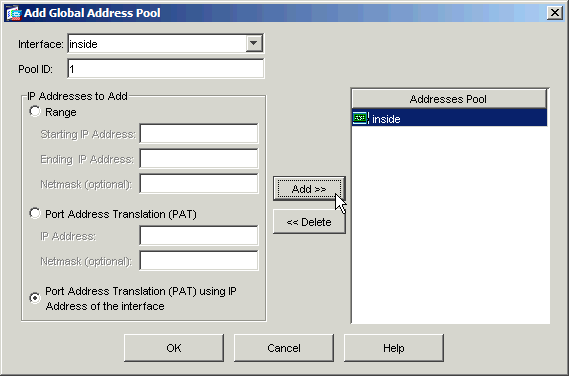
Choose the radio button marked Port Address Translation (PAT) using IP address of the interface. Click Add.
-
Click OK to leave the Add Global Address Pool window. Click OK to leave the Edit Dynamic NAT Rule window. Click Apply to send your configuration to the security appliance.
Here is the sequence of events that take place when hairpinning is configured. Assume that the client has already queried the DNS server and received a reply of 172.20.1.10 for the WWW server address:
-
The client attempts to contact the WWW server at 172.20.1.10.
%ASA-7-609001: Built local-host inside:192.168.100.2
-
The security appliance sees the request and recognizes that the WWW server is at 192.168.100.10.
%ASA-7-609001: Built local-host inside:192.168.100.10
-
The security appliance creates a dynamic PAT translation for the client. The source of the client traffic is now the inside interface of the security appliance: 192.168.100.1.
%ASA-6-305011: Built dynamic TCP translation from inside:192.168.100.2/11012 to
inside:192.168.100.1/1026
-
The security appliance creates a TCP connection between the client and the WWW server through itself. Note the mapped addresses of each host in parentheses.
%ASA-6-302013: Built inbound TCP connection 67399 for inside:192.168.100.2/11012
(192.168.100.1/1026) to inside:192.168.100.10/80 (172.20.1.10/80)
-
The show xlate command on the security appliance verifies that the client traffic translates through the security appliance.
ciscoasa(config)#show xlate
3 in use, 9 most used
Global 172.20.1.10 Local 192.168.100.10
Global 172.20.1.10 Local 192.168.100.10
PAT Global 192.168.100.1(1027) Local 192.168.100.2(11013)
-
The show conn command on the security appliance verifies that the connection has succeeded between the security appliance and the WWW server on behalf of the client. Note the real address of the client in parentheses.
ciscoasa#show conn
TCP out 192.168.100.1(192.168.100.2):11019 in 192.168.100.10:80
idle 0:00:03 bytes 1120 flags UIOB
Final Configuration with Hairpinning and static NAT
This is the final configuration of the ASA that uses hairpinning and static NAT to achieve a DNS doctoring effect with two NAT interfaces.
| Final ASA 7.2(1) Configuration |
|---|
ciscoasa(config-if)#show running-config : Saved : ASA Version 7.2(1) ! hostname ciscoasa enable password 9jNfZuG3TC5tCVH0 encrypted names dns-guard ! interface Ethernet0/0 nameif outside security-level 0 ip address 172.20.1.2 255.255.255.0 ! interface Ethernet0/1 nameif inside security-level 100 ip address 192.168.100.1 255.255.255.0 ! interface Ethernet0/2 shutdown no nameif no security-level no ip address ! interface Management0/0 shutdown no nameif no security-level no ip address management-only ! passwd 2KFQnbNIdI.2KYOU encrypted ftp mode passive same-security-traffic permit intra-interface access-list OUTSIDE extended permit tcp any host 172.20.1.10 eq www !--- Simple access-list that permits HTTP access to the mapped !--- address of the WWW server. pager lines 24 logging enable logging buffered debugging mtu outside 1500 mtu inside 1500 asdm image disk0:/asdm512-k8.bin no asdm history enable arp timeout 14400 global (outside) 1 interface !--- Global statement for client access to the Internet. global (inside) 1 interface !--- Global statment for hairpinned client access through !--- the security appliance. nat (inside) 1 192.168.100.0 255.255.255.0 !--- The NAT statement defines which traffic should be natted. !--- The whole inside subnet in this case. static (inside,outside) 172.20.1.10 192.168.100.10 netmask 255.255.255.255 !--- Static NAT statement mapping the WWW server's real address to a public !--- address on the outside interface. static (inside,inside) 172.20.1.10 192.168.100.10 netmask 255.255.255.255 !--- Static NAT statement mapping requests for the public IP address of the !--- WWW server that appear on the inside interface to the WWW server's real address !--- of 192.168.100.10. access-group OUTSIDE in interface outside !--- The ACL that permits HTTP access to the WWW server is applied !--- to the outside interface. route outside 0.0.0.0 0.0.0.0 172.20.1.1 1 timeout xlate 3:00:00 timeout conn 1:00:00 half-closed 0:10:00 udp 0:02:00 icmp 0:00:02 timeout sunrpc 0:10:00 h323 0:05:00 h225 1:00:00 mgcp 0:05:00 mgcp-pat 0:05:00 timeout sip 0:30:00 sip_media 0:02:00 sip-invite 0:03:00 sip-disconnect 0:02:00 timeout uauth 0:05:00 absolute username cisco password ffIRPGpDSOJh9YLq encrypted http server enable no snmp-server location no snmp-server contact snmp-server enable traps snmp authentication linkup linkdown coldstart telnet timeout 5 ssh timeout 5 console timeout 0 ! class-map inspection_default match default-inspection-traffic ! ! policy-map type inspect dns MY_DNS_INSPECT_MAP parameters message-length maximum 512 policy-map global_policy class inspection_default inspect ftp inspect h323 h225 inspect h323 ras inspect rsh inspect rtsp inspect esmtp inspect sqlnet inspect skinny inspect sunrpc inspect xdmcp inspect sip inspect netbios inspect tftp inspect dns MY_DNS_INSPECT_MAP inspect icmp policy-map type inspect dns migrated_dns_map_1 parameters message-length maximum 512 ! service-policy global_policy global prompt hostname context Cryptochecksum:7c9b4e3aff085ba90ee194e079111e1d : end |
Note: Refer to this video, Hair-pinning on Cisco ASA ![]() (registered customers only) , for more information on different scenarios where hair-pinning could be used.
(registered customers only) , for more information on different scenarios where hair-pinning could be used.
Configure DNS Inspection
In order to enable DNS inspection (if it has been previously disabled), perform these steps. In this example, DNS inspection is added to the default global inspection policy, which is applied globally by a service-policy command as though the ASA began with a default configuration. Refer to Using Modular Policy Framework for more information on service policies and inspection.
-
Create an inspection policy map for DNS.
ciscoasa(config)#policy-map type inspect dns MY_DNS_INSPECT_MAP
-
From the policy-map configuration mode, enter parameter configuration mode to specify parameters for the inspection engine.
ciscoasa(config-pmap)#parameters
-
In policy-map parameter configuration mode, specify the maxiumum message length for DNS messages to be 512.
ciscoasa(config-pmap-p)#message-length maximum 512
-
Exit out of policy-map parameter configuration mode and policy-map configuration mode.
ciscoasa(config-pmap-p)#exit
ciscoasa(config-pmap)#exit
-
Confirm that the inspection policy-map was created as desired.
ciscoasa(config)#show run policy-map type inspect dns
!
policy-map type inspect dns MY_DNS_INSPECT_MAP
 parameters
  message-length maximum 512
!
-
Enter policy-map configuration mode for the global_policy.
ciscoasa(config)#policy-map global_policy
ciscoasa(config-pmap)#
-
In policy-map configuration mode, specify the default layer 3/4 class map, inspection_default.
ciscoasa(config-pmap)#class inspection_default
ciscoasa(config-pmap-c)#
-
In policy-map class configuration mode, specify that DNS should be inspected using the inspection policy map created in steps 1-3.
ciscoasa(config-pmap-c)#inspect dns MY_DNS_INSPECT_MAP
-
Exit out of policy-map class configuration mode and policy-map configuration mode.
ciscoasa(config-pmap-c)#exit
ciscoasa(config-pmap)#exit
-
Verify that the global_policy policy-map is configured as desired.
ciscoasa(config)#show run policy-map
!

!--- The configured DNS inspection policy map.

policy-map type inspect dns MY_DNS_INSPECT_MAP
 parameters
  message-length maximum 512
policy-map global_policy
 class inspection_default
  inspect ftp
  inspect h323 h225
  inspect h323 ras
  inspect rsh
  inspect rtsp
  inspect esmtp
  inspect sqlnet
  inspect skinny
  inspect sunrpc
  inspect xdmcp
  inspect sip
  inspect netbios
  inspect tftp
  inspect dns MY_DNS_INSPECT_MAP

!--- DNS application inspection enabled.

!
-
Verify that the global_policy is applied globally by a service-policy.
ciscoasa(config)#show run service-policy
service-policy global_policy global
Split-DNS Configuration
Issue the split-dns command in group-policy configuration mode in order to enter a list of domains to be resolved through the split tunnel. Use the no form of this command in order to delete a list.
When there are no split tunneling domain lists, users inherit any that exist in the default group policy. Issue the split-dns none command in order to prevent the inheritance of split tunneling domain lists.
Use a single space in order to separate each entry in the list of domains. There is no limit on the number of entries, but the entire string can be no longer than 255 characters. You can use only alphanumeric characters, hyphens (-), and periods (.). The no split-dns command, when used without arguments, deletes all current values, which includes a null value created when you issue the split-dns none command.
This example shows how to configure the domains Domain1, Domain2, Domain3 and Domain4 in order to be resolved through split tunneling for the group policy named FirstGroup:
hostname(config)#group-policy FirstGroup attributes
hostname(config-group-policy)#split-dns value Domain1 Domain2 Domain3 Domain4
Verify
Use this section to confirm that your configuration works properly.
The Output Interpreter Tool (registered customers only) (OIT) supports certain show commands. Use the OIT to view an analysis of show command output.
Capture DNS Traffic
One method to verify that the security appliance rewrites DNS records correctly is to capture the packets in question, as discussed in the previous example. Complete these steps in order to capture traffic on the ASA:
-
Create an access list for each capture instance you want to create.
The ACL should specify the traffic that you want to capture. In this example, two ACLs have been created.
-
The ACL for traffic on the outside interface:
access-list DNSOUTCAP extended permit ip host 172.22.1.161 host 172.20.1.2

!--- All traffic between the DNS server and the ASA.

access-list DNSOUTCAP extended permit ip host 172.20.1.2 host 172.22.1.161

!--- All traffic between the ASA and the DNS server.
-
The ACL for traffic on the inside interface:
access-list DNSINCAP extended permit ip host 192.168.100.2 host 172.22.1.161

!--- All traffic between the client and the DNS server.

access-list DNSINCAP extended permit ip host 172.22.1.161 host 192.168.100.2

!--- All traffic between the DNS server and the client.
-
-
Create the capture instance(s):
ciscoasa#capture DNSOUTSIDE access-list DNSOUTCAP interface outside

!--- This capture collects traffic on the outside interface that matches !--- the ACL DNSOUTCAP.

ciscoasa#capture DNSINSIDE access-list DNSINCAP interface inside

!--- This capture collects traffic on the inside interface that matches !--- the ACL DNSINCAP.
-
View the capture(s).
Here is what the example captures look like after some DNS traffic has been passed:
ciscoasa#show capture DNSOUTSIDE
2 packets captured
   1: 14:07:21.347195 172.20.1.2.1025 > 172.22.1.161.53:  udp 36
   2: 14:07:21.352093 172.22.1.161.53 > 172.20.1.2.1025:  udp 93
2 packets shown
ciscoasa#show capture DNSINSIDE
2 packets captured
   1: 14:07:21.346951 192.168.100.2.57225 > 172.22.1.161.53:  udp 36
   2: 14:07:21.352124 172.22.1.161.53 > 192.168.100.2.57225:  udp 93
2 packets shown
-
(Optional) Copy the capture(s) to a TFTP server in pcap format for analysis in another application.
Applications that can parse the pcap format can show additional details such as the name and IP address in DNS A-records.
ciscoasa#copy /pcap capture:DNSINSIDE tftp
...
ciscoasa#copy /pcap capture:DNSOUTSIDE tftp
Troubleshoot
This section provides information you can use to troubleshoot your configuration.
DNS Rewrite Is Not Performed
Make sure that you have DNS inspection configured on the security appliance. See the Configure DNS Inspection section.
Translation Creation Failed
If a connection cannot be created between the client and the WWW server, it might be due to a NAT misconfiguration. Check the security appliance logs for messages which indicate that a protocol failed to create a translation through the security appliance. If such messages appear, verify that NAT has been configured for the desired traffic and that no addresses are incorrect.
%ASA-3-305006: portmap translation creation failed for tcp src
inside:192.168.100.2/11000 dst dmz:10.10.10.10/23
Clear the xlate entries, and then remove and reapply the NAT statements in order to resolve this error.
Drop UDP DNS Reply
It is possible that you receive this error message due to DNS packet drop:
 %PIX|ASA-4-410001: UDP DNS request from source_interface:source_address/source_port
to dest_interface:dest_address/dest_port; (label length | domain-name length)
52 bytes exceeds remaining packet length of 44 bytes.
Increase the DNS packet length between 512-65535 in order to resolve this issue.
Example:
ciscoasa(config)#policy-map type inspect dns MY_DNS_INSPECT_MAP
ciscoasa(config-pmap)#parameters
ciscoasa(config-pmap-p)#message-length maximum <512-65535>
Related Information
Revision History
| Revision | Publish Date | Comments |
|---|---|---|
1.0 |
29-Sep-2006 |
Initial Release |
Contact Cisco
- Open a Support Case

- (Requires a Cisco Service Contract)


 Feedback