ASA: Send Network Traffic from the ASA to the CSC-SSM Configuration Example
Available Languages
Contents
Introduction
This document provides a sample configuration for how to send network traffic from the Cisco ASA 5500 Series Adaptive Security Appliance (ASA) to the Content Security and Control Security Services Module (CSC-SSM).
The CSC-SSM provides protection against viruses, spyware, spam, and other unwanted traffic. It accomplishes this by scanning the FTP, HTTP, POP3, and SMTP traffic that is diverted to it by the adaptive security appliance. In order to force the ASA to divert the traffic to the CSC-SSM, you need to use Modular Policy Framework.
Refer to ASA: Send Network Traffic from the ASA to the AIP SSM Configuration Example in order to send network traffic that passes through the Cisco ASA 5500 Series Adaptive Security Appliance (ASA) to the Advanced Inspection and Prevention Security Services Module (AIP-SSM) (IPS) module.
Note: The CSC-SSM can scan FTP, HTTP, POP3, and SMTP traffic only when the destination port of the packet that requests the connection is the well-known port for the specified protocol. The CSC-SSM can scan only these connections:
-
FTP connections opened to TCP port 21
-
HTTP connections opened to TCP port 80
-
POP3 connections opened to TCP port 110
-
SMTP connections opened to TCP port 25
Prerequisites
Requirements
Ensure that you meet these requirements before you attempt this configuration:
-
A basic understanding of how to configure Cisco ASA 5500 Series runs software version 7.1 and later.
-
The CSC-SSM has been installed.
Components Used
The information in this document is based on these software and hardware versions:
-
ASA 5520 with software version 7.1 and later
-
CSC-SSM-10 with software version 6.1
The information in this document was created from the devices in a specific lab environment. All of the devices used in this document started with a cleared (default) configuration. If your network is live, make sure that you understand the potential impact of any command.
Conventions
Refer to the Cisco Technical Tips Conventions for more information on document conventions.
Background Information
The CSC-SSM maintains a file that contains signature profiles of suspicious content, updated regularly from an update server at Trend Micro. The CSC-SSM scans traffic it receives from the adaptive security appliance and compares it to the content profiles it obtains from Trend Micro. It then forwards legitimate content on to the adaptive security appliance for routing, or blocks and reports content that is suspicious.
By default, CSC-SSM comes with a base license that provides these features:
-
Detects and takes action on viruses and malware in the network traffic
-
Blocks compressed or very large files that exceed specified parameters
-
Scans for and remove spyware, adware, and other types of grayware
Additionally, if it is equipped with a Plus License, it also performs these tasks:
-
Reduces spam and protect against phishing fraud in your SMTP and POP3 traffic
-
Sets up content filters that enable you to allow or prohibit email traffic that contain key words or phrases
-
Filters/Blocks URLs that you do not want users to access, or URLs that are known to have hidden or malicious purposes
Note: The CSC-SSM can scan FTP file transfers only when FTP inspection is enabled on the ASA. By default, FTP inspection is enabled.
Note: The CSC-SSM cannot support Stateful Failover because the CSC-SSM does not maintain connection information, and therefore cannot provide the failover unit with the required information for Stateful Failover. The connections that a CSC-SSM is scanning are dropped when the security appliance in which the CSC-SSM is installed fails. When the standby adaptive security appliance becomes active, it forwards the scanned traffic to the CSC-SSM and the connections are reset.
Configure
In a network in which the adaptive security appliance is deployed with the CSC-SSM, you configure the adaptive security appliance to send to the CSC-SSM only the types of traffic that you want to be scanned.
Note: Use the Command Lookup Tool (registered customers only) to obtain more information on the commands used in this section.
ASA - CSC SSM Flow Diagram
This diagram shows the flow of traffic within ASA and CSC-SSM:
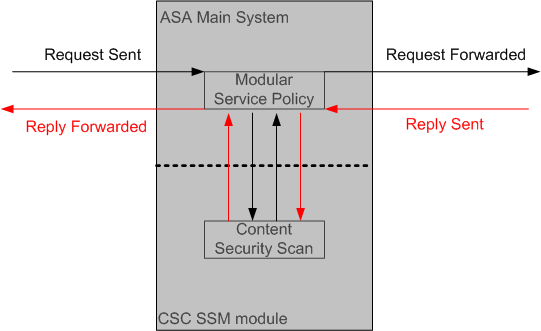
In this example, clients can be network users who access a web site, download files from an FTP server, or retrieve mail from a POP3 server.
In this configuration, this is how the traffic flows:
-
The client initiates a request.
-
The adaptive security appliance receives the request and forwards it to the Internet.
-
When the requested content is retrieved, the adaptive security appliance determines whether its service policies define this content type as one that should be diverted to the CSC-SSM for scanning, and does so if appropriate.
-
The CSC-SSM receives the content from the adaptive security appliance, scans it and compares it to its latest update of the Trend Micro content filters.
-
If the content is suspicious, the CSC-SSM blocks the content and reports the event. If the content is not suspicious, the CSC-SSM forwards the requested content back to the adaptive security appliance for routing.
CSC Initial Setup
In the initial setup, several parameters need to be configured. Make sure you have gathered the information required for these parameters before you begin.
As the first step to configure the CSC-SSM, launch the Cisco ASDM. By default, you can access the CSC-SSM through the management IP address of the ASA at https://192.168.1.1/. You need to ensure that your PC and the management interface of ASA are in the same network. Alternatively, you can download the ASDM Launcher for subsequent accesses.
Configure these parameters with the ASDM:
-
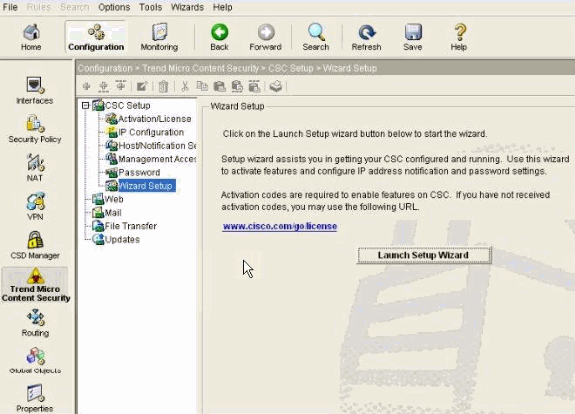
Once in main ASDM window, choose Configuration > Trend Micro Content Security > Wizard Setup and click Launch Setup Wizard.
-
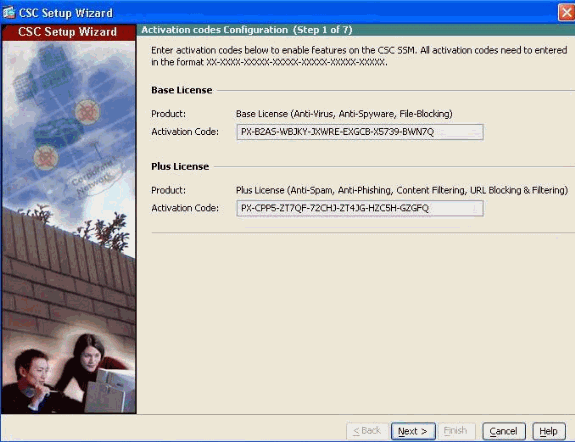
Activation key:
The first step to obtain the activation key is to identify the Product Authorization Key (PAK) shipped along with the product. It contains a barcode and 11 hexadecimal characters. For example, a sample PAK can be 120106C7D4A.
Use the PAK to register the CSC-SSM at Product License Registration (registered customers only) webpage. After you register, you receive activation keys by e-mail.
-
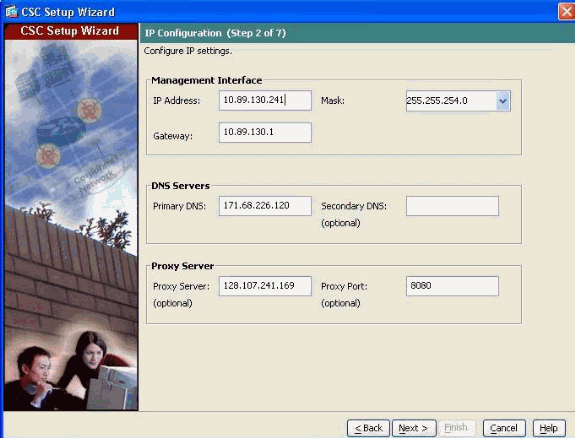
Management port IP parameters:
Specify IP address, netmask and gateway IP address for the CSC Management interface.
DNS Servers—IP address for the Primary DNS server.
-
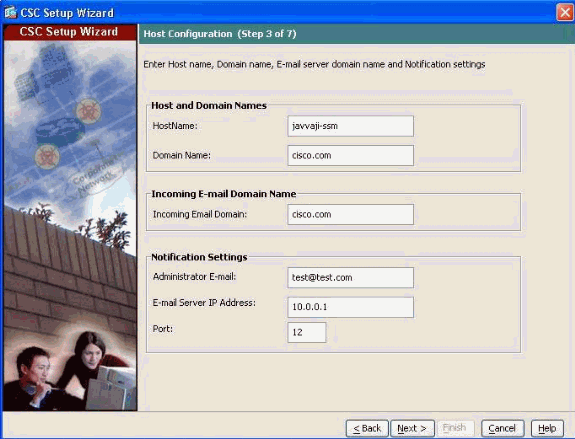
Host and Domain Names—Specify a host name as well as the domain name of the CSC-SSM.
Incoming domain—Domain name used by the local mail server as the incoming e-mail domain.
Note: Anti-SPAM policies are applied only to e-mail traffic that come into this domain.
Notification settings—Administrator e-mail address and the e-mail server IP address and port to be used for notifications.
-
Management host access parameters:
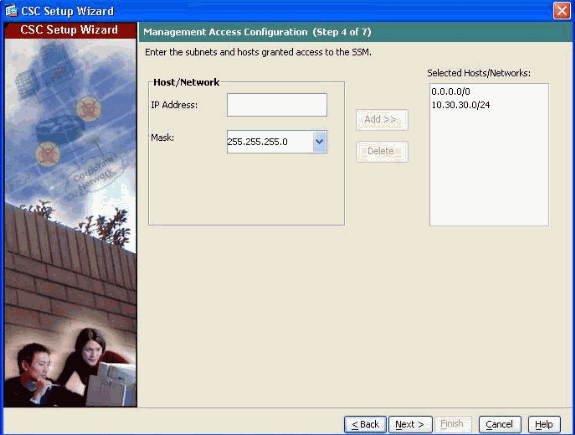
Enter the IP address and mask for each subnet and host that should have management access to the CSC-SSM.
Note: By default, all networks have management access to the CSC-SSM. For security purposes, Cisco recommends that you restrict access to specific subnets or management hosts.
-
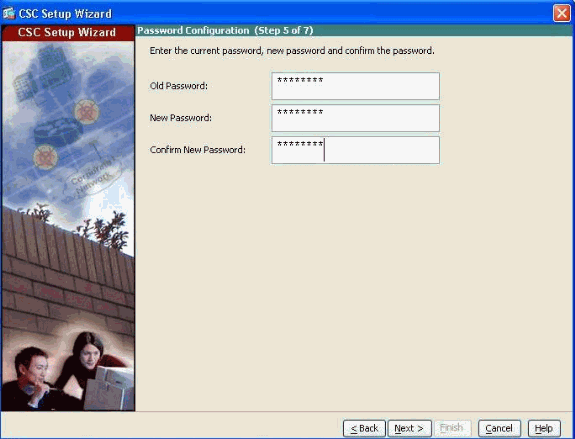
New password for CSC-SSM:
Change the default password, cisco, to a new password for management access.
-
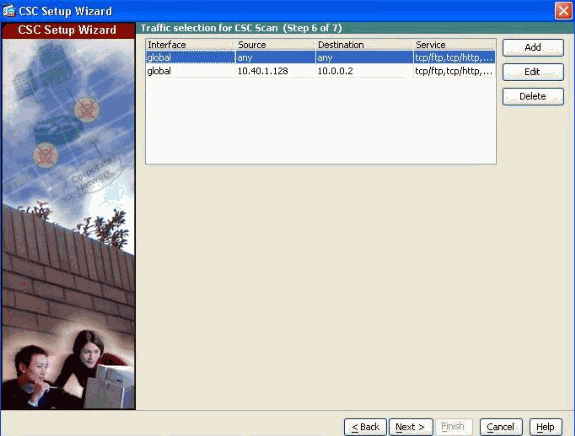
In step 6 of the CSC Setup Wizard, specify the type of traffic to be scanned.
The adaptive security appliance diverts packets to the CSC-SSM after firewall policies are applied but before the packets exit the egress interface. For example, packets that are blocked by an access list are not forwarded to the CSC-SSM.
Configure service policies to specify which traffic the adaptive security appliance should divert to the CSC-SSM. The CSC-SSM can scan HTTP, POP3, FTP, and SMTP traffic sent to the well-known ports for those protocols.
In order to simplify the initial configuration process, this procedure creates a global service policy that diverts all traffic for the supported protocols to the CSC-SSM, both inbound and outbound. Because scanning all traffic that comes through the adaptive security appliance can reduce the performance of the adaptive security appliance and the CSC-SSM, you want to revise this security policy later. For example, it is not usually necessary to scan all traffic that comes from your inside network because it comes from a trusted source. If you refine the service policies so that the CSC-SSM scans only traffic from untrusted sources, you can achieve your security goals and maximize the performance of the adaptive security appliance and the CSC-SSM.
Complete these steps in order to create a global service policy that identifies traffic to be scanned:
-
Click Add in order to add a new type of traffic.
-
Choose Global from the Interface drop-down list.
-
Leave the Source and Destination fields set to Any.
-
In the Service are, click the ellipsis (...) radio button. In this dialog box, choose a predefined service or click Add in order to define a new service.
-
In the If CSC card fails, then area, choose whether the adaptive security appliance should permit or deny selected traffic if the CSC-SSM is unavailable.
-
Click OK in order to return to the Traffic Selection for CSC Scan window.
-
Click Next.
-
-
In step 7 of the CSC Setup Wizard, review configuration settings you entered for the CSC-SSM.
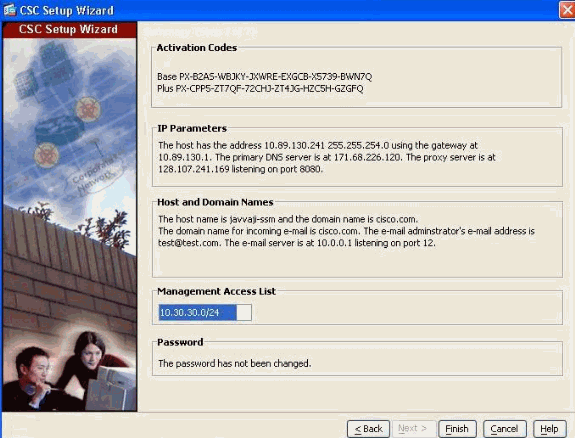
If you are satisfied with these settings, click Finish.
The ASDM shows a message that indicates that the CSC device is now active.
By default, the CSC-SSM is configured to perform content security scans enabled by the license you purchased, which can include anti-virus, anti-spam, anti-phishing, and content filtering. It is also configured to get periodic updates from the Trend Micro update server.
If included in the license you purchased, you can create custom settings for URL blocking and URL filtering, as well as e-mail and FTP parameters. See the Cisco Content Security and Control SSM Administrator Guide for more information.
How to Configure ASA to Divert Traffic to CSC-SSM
In order to force the ASA to divert the traffic to the CSC-SSM, you need to use Modular Policy Framework. Complete these steps in order to accomplish the identification and diversion of the traffic to CSC-SSM:
-
Create an access list that matches the traffic you want scanned by the CSC-SSM, in order to divert the traffic to CSC-SSM, with the access-list extended command:
hostname(config)#access-list acl-name extended {deny | permit} protocol src_ip mask dest_ip mask operator port -
Create a class map in order to identify the traffic that should be diverted to the CSC-SSM with the class-map command:
hostname(config)#class-map class_map_name -
Once in class map configuration mode, use the match access-list command in order to identify the traffic with the use of the access-list previously specified:
hostname(config-cmap)#match access-list acl-name hostname(config-cmap)#exit -
Create a policy map in order to send traffic to the CSC-SSM with the policy-map command:
hostname(config)#policy-map policy_map_name -
Once in the policy map configuration mode, use the class command in order to specify the class map, previously created, that identifies the traffic to be scanned:
hostname(config-pmap)#class class_map_name -
Once in policy map class configuration mode, you can configure these:
-
If you want to enforce a per-client limit for simultaneous connections that the adaptive security appliance diverts to the CSC-SSM, use the set connection command, as follows:
hostname(config-pmap-c)#set connection per-client-max nwhere n is the maximum simultaneous connections the adaptive security appliance allows for each client. This command prevents a single client from abusing the services of the CSC-SSM or any server protected by the SSM, which includes the prevention of attempts at DoS attacks on HTTP, FTP, POP3, or SMTP servers that the CSC-SSM protects.
-
Use the csc command in order to control how the ASA handles traffic when the CSC-SSM is unavailable:
hostname(config-pmap-c)#csc {fail-close | fail-open}where fail-close specifies that the ASA should block traffic if the CSC-SSM fails and in contrast, fail-open specifies that the ASA should allow traffic if the CSC-SSM fails.
Note: This applies to the traffic selected by the class map only. Other traffic not sent to the CSC-SSM is not affected by a CSC-SSM failure.
-
-
Lastly, apply the policy map globally or to a specific interface with the service-policy command:
hostname(config-pmap-c)#service-policy policy_map_name [global | interface interface_ID]where interface_ID is the name assigned to the interface with the nameif command.
Note: Only one global policy is allowed. You can override the global policy on an interface with the application of a service policy to that interface. You can only apply one policy map to each interface.
Network Diagram
This diagram is an example of an ASA 5500 configured for these parameters:
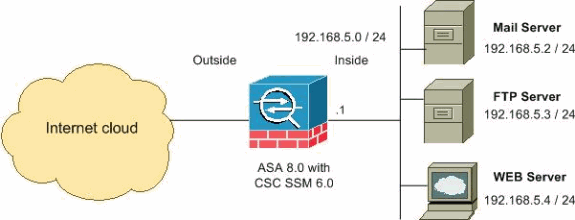
The summary of the network diagram illustrates these:
-
HTTP connection to the outside networks
-
FTP connection from clients inside the security appliance to the servers outside the security appliance
-
POP3 clients from the clients inside the security appliance to the servers outside the security appliance.
-
Incoming SMTP connections designated to the inside mail server
ASA Configuration
| ASA5520 |
|---|
ciscoasa(config)#show running-config : Saved : ASA Version 8.0(2) ! hostname ciscoasa domain-name Security.lab.com enable password 2kxsYuz/BehvglCF encrypted no names dns-guard ! interface GigabitEthernet0/0 speed 100 duplex full nameif outside security-level 0 ip address 172.30.21.222 255.255.255.0 ! interface GigabitEthernet0/1 description INSIDE nameif inside security-level 100 ip address 192.168.5.1 255.255.255.0 ! !--- Output suppressed access-list csc-acl remark Exclude CSC module traffic from being scanned access-list csc-acl deny ip host 10.89.130.241 any !--- In order to improve the performance of the ASA and CSC Module. !--- Any traffic from CSC Module is excluded from the scanning. access-list csc-acl remark Scan Web & Mail traffic access-list csc-acl permit tcp any any eq www access-list csc-acl permit tcp any any eq smtp access-list csc-acl permit tcp any any eq pop3 ! !--- All Inbound and Outbound traffic for WEB, Mail services is scanning. access-list csc-acl-ftp permit tcp any any eq ftp !--- All Inbound and Outbound traffic for FTP service is scanning. class-map csc-class match access-list csc-acl ! class-map csc-ftp-class match access-list csc-acl-ftp ! policy-map global_policy class csc-class csc fail-open class csc-ftp-class csc fail-open policy-map global_policy class inspection_default !--- Inspect FTP traffic for scanning. inspect ftp inspect h323 h225 inspect h323 ras inspect rsh inspect sqlnet inspect skinny inspect sunrpc inspect xdmcp inspect sip inspect netbios inspect tftp inspect icmp inspect http service-policy global_policy global !--- Output suppressed |
CSC Home Page
CSC Setup
Trend Micro InterScan for Cisco CSC-SSM provides protection for major traffic protocols, such as SMTP, HTTP, and FTP, as well as POP3 traffic, in order to ensure that employees do not accidentally introduce viruses from their personal e-mail accounts.
Choose Configuration > Trend Micro Content Security in order to open the CSC-SSM. From the Configuration menu, choose from these configuration options: 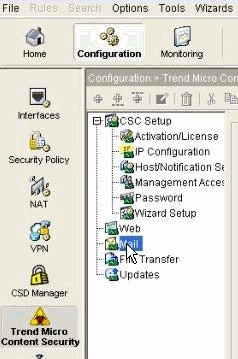
-
CSC Setup—Launches the Setup Wizard to install and configure the CSC-SSM
-
Web—Configures Web scanning, file blocking, URL filtering, and URL blocking
-
Mail—Configures scanning, content filtering, and spam prevention for incoming and outgoing SMTP and POP3 e-mail
-
File Transfer—Configures file scanning and blocking
-
Updates—Schedules updates for content security scanning components, for example, virus pattern file, scan engine, and so forth
The Web, Mail, File Transfer, and Updates options are described in more detail in these chapters:
-
Web and File Transfer—Configuring Web (HTTP) and File Transfer (FTP) Traffic
-
Updates—Managing Updates and Log Queries
This example shows how to configure a CSC-SSM to scan the incoming SMTP message to the internal network network.
The incoming SMTP messages are diverted to the CSC-SSM for scanning. In this example, all the traffic from outside to access the inside mail server (192.168.5.2/24) for SMTP services are diverted to the CSC-SSM.
access-list csc_inbound extended permit tcp any host 192.168.5.2 eq smtp
These default settings give you some protection for your e-mail traffic after you install Trend Micro InterScan for Cisco CSC-SSM.
SMTP Configuration
Trend Micro SMTP Configuration
Complete these steps in order to configure the CSC-SSM to scan the incoming SMTP message using ASDM:
-
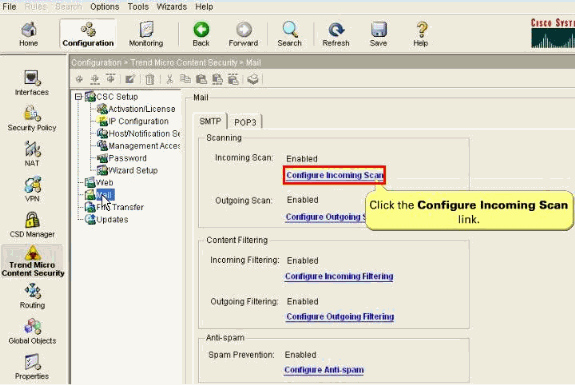
Choose Configuration > Trend Micro Content Security > Mail in ASDM and click Configure Incoming Scan in order to display the SMTP Incoming Message Scan/Target window.
-
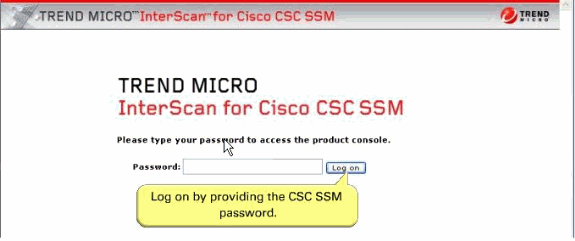
The window takes you to the Trend Micro InterScan for Cisco CSC-SSM Login prompt. Enter the CSC-SSM Password.
-
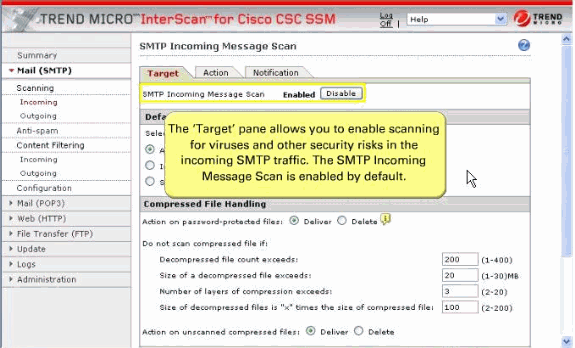
The SMTP Incoming Message Scan window has these three views:
-
Target
-
Action
-
Notification
You can switch among views if you click the appropriate tab for the information you want. The active tab name appears in brown text; inactive tab names appear in black text. Use all three tabs in order to configure virus scanning of incoming SMTP traffic.
Click Target in order to allow you to define the scope of activity upon which is acted.
The SMTP Incoming message scan is enabled by default.
-
-
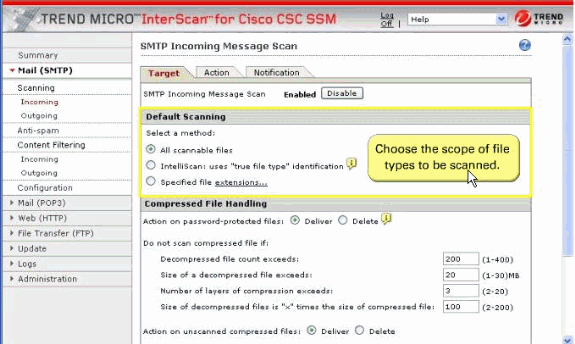
In the Default Scanning section, All scannable files is selected by default. It scans regardless of the file name extensions.
-
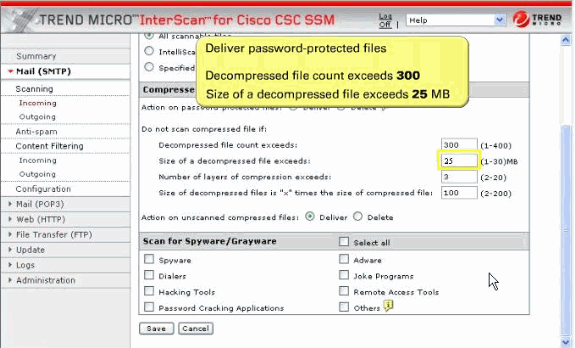
Configure the SMTP compressed file handling for incoming mail.
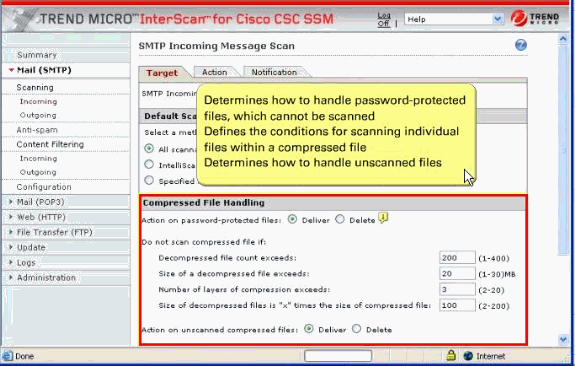
Configure to skip scanning of compressed files when one of these is true:
-
Decompressed file count is greater than 200.
-
Decompressed file size exceeds 20 MB.
-
Number of compression layers exceeds three.
-
Decompressed or compressed file size ratio is greater than 100 to 1.
-
Compressed files exceed specified scanning criteria.
Modify the default parameters of the Decompressed file count as 300 and Decompressed file size as 30 MB.
-
-
In the Scan for Spyware/Grayware section of these windows, which was shown in step 5, choose the types of grayware you want detected by Trend Micro InterScan for Cisco CSC-SSM. See the online help for a description of each type of grayware listed.
Click Save in order to enable the new configuration
-
Click the Action tab, which allows you to define the action to be taken when a threat is detected. Examples of actions are clean or delete.
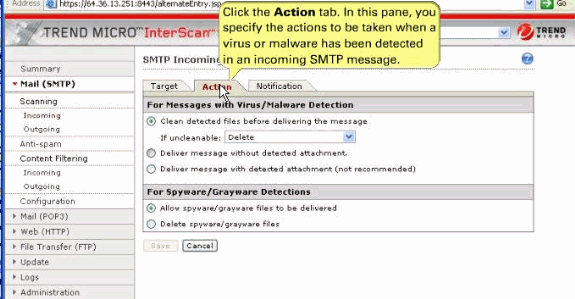
These values are default action taken for the incoming mails.
-
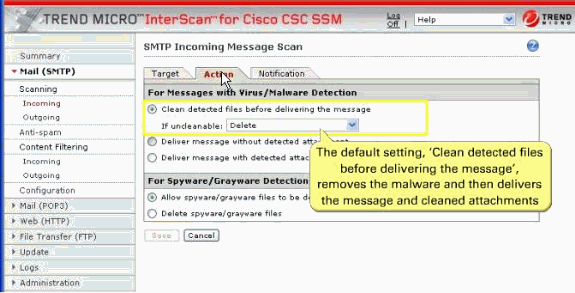
For Messages with Virus/Malware Detection section—Clean the message or attachment in which the malware was detected, and if the message or attachment is uncleanable, delete it.
-
For Spyware/Grayware Detections—These are the files to be delivered if the SMTP messages in which spyware or grayware is detected.
Click Save in order to enable the new configuration
-
-
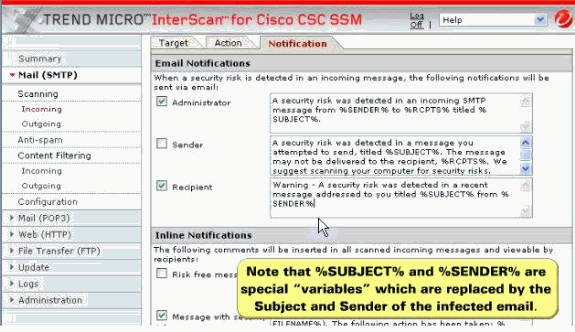
Click Notification tab, which allows you to compose a notification message, as well as define who is notified of the event and the action.
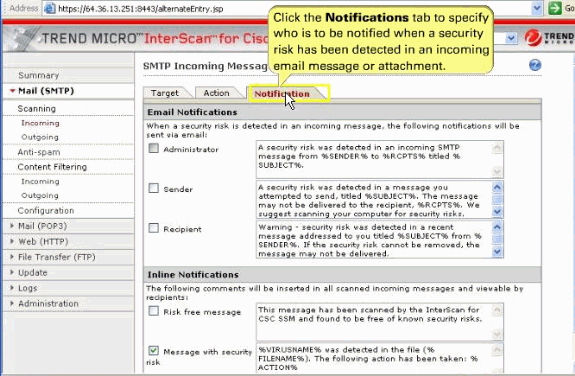
If you are satisfied with the default notification setup, no further action is required. But, you can review the notification options and decide whether you want to change the defaults. For example, you can send a notification to the administrator when a security risk has been detected in an e-mail message. For SMTP, you can also notify the sender or recipient.
Check the Administrator and Recipient boxes for email notification. You can also tailor the default text in the notification message to something more appropriate for your organization such as in this screen shot.
-
In the Inline Notifications section of the window, choose one of the listed options, neither, or both.
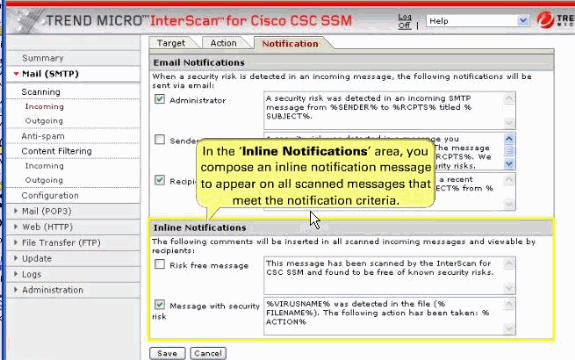
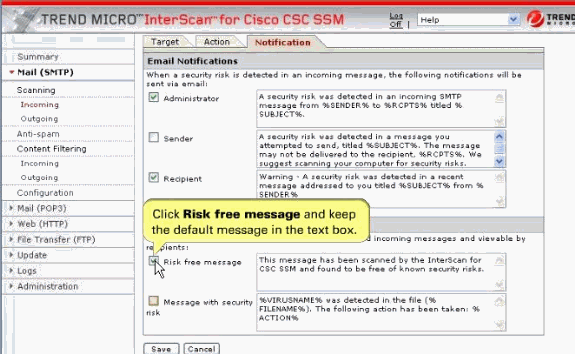
In our example, choose Risk free message and type your own message in the field provided.
Click Save in order to enable the new configuration.
HTTP Configuration
Scanning
After installation, by default your HTTP and FTP traffic is scanned for viruses, worms, and Trojans. Malware such as spyware and other grayware require a configuration change before they are detected.
These default settings give you some protection for your Web and FTP traffic after you install Trend Micro InterScan for Cisco CSC-SSM. You can change these settings. For example, you can prefer to use the Scan by specified file extensions option rather than All Scannable Files for malware detection. Before you make changes, review the online help for more information about these selections.
After installation, it is possible that you want to update additional configuration settings in order to obtain the maximum protection for your Web and FTP traffic. If you purchased the Plus License, which entitles you to receive URL blocking, anti-phishing, and URL filtering functionality, you must configure these additional features.
Complete these steps in order to configure the CSC-SSM to scan the HTTP message with ASDM:
-
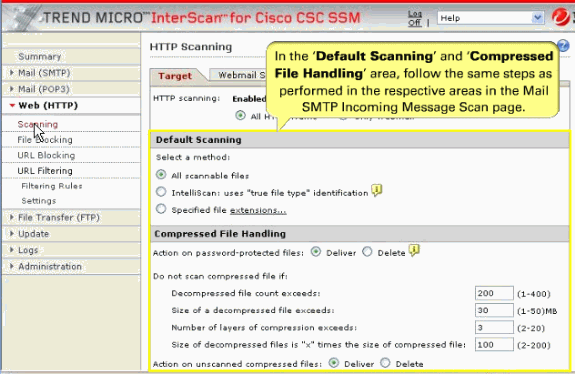
Click the Web (HTTP) in the Trend Micro page, and this Web Message Scan window has four views:
-
Target
-
Webmail Scanning
-
Action
-
Notification
Click the appropriate tab for the information you want in order to switch among views. The active tab name appears in brown text; inactive tab names appear in black text. Use all tabs in order to configure virus scanning of Web traffic.
Click the Target in order to allow you to define the scope of activity upon which is to be acted.
-
The HTTP message scan is enabled by default.
-
Enabled with the use of All Scannable Files as the scanning method.
-
Web (HTTP) compressed file handling for downloading from the Web—Configured to skip scanning of compressed files when one of these is true:
-
Decompressed file count is greater than 200.
-
Decompressed file size exceeds 30 MB.
-
Number of compression layers exceeds three.
-
Decompressed or compressed file size ratio is greater than 100 to 1.
-
For Webmail scanning—Configured to scan Webmail sites for Yahoo, AOL, MSN, and Google.
-
-
Large File handling
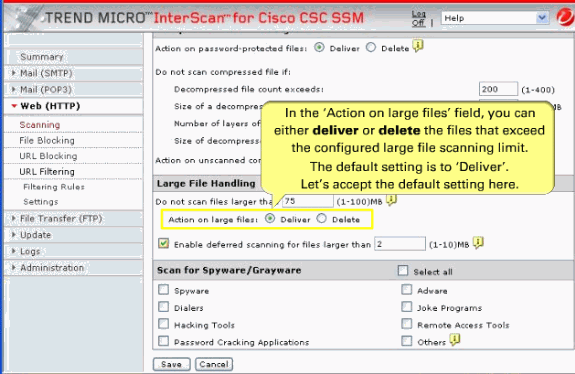
The Target tabs on the HTTP Scanning and FTP Scanning windows allow you to define the size of the largest download you want scanned. For example, you can specify that a download under 20 MB is scanned, but a download larger than 20 MB is not scanned.
In addition, you can:
-
Specify large downloads to be delivered without scanning, which can introduce a security risk.
-
Specify that downloads greater than the specified limit are deleted.
By default, the CSC-SSM software specifies that files smaller than 50 MB are scanned. Modify as 75 MB. Files that are 75 MB and larger are delivered without scanning to the requesting client.
Deferred Scanning
The deferred scanning feature is not enabled by default. When enabled, this feature allows you to begin to download data without scanning the entire download. Deferred scanning allows you to begin to view the data without a prolonged wait while the entire body of information is scanned.
Note: If you do not enable the deferred scanning option, then you can face an unsuccessful update through the CSC module.
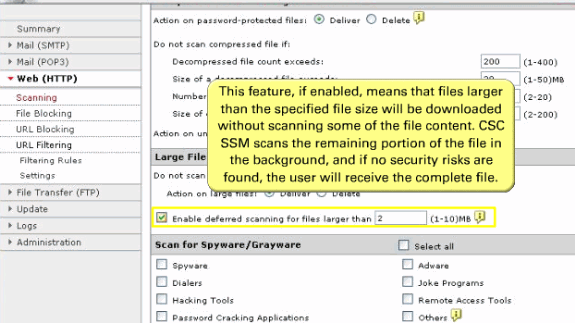
Note: When deferred scanning is enabled, the unscanned portion of information can introduce a security risk.
Note: Traffic that moves through HTTPS cannot be scanned for viruses and other threats by the CSC-SSM software.
If deferred scanning is not enabled, the entire content of the download must be scanned before it is presented to you. But, some client software can time out because of the time required to collect sufficient network packets in order to compose complete files for scanning. This table summarizes the advantages and disadvantages of each method.
Method Advantage Disadvantage Deferred scanning enabled Prevents client timeouts May introduce a security risk Deferred scanning disabled Safer. The entire file is scanned for security risks before being presented to you. May result in the client timing out before the download is complete Scan for Spyware and Grayware
Grayware is a category of software that can be legitimate, unwanted, or malicious. Unlike threats such as viruses, worms, and Trojans, grayware does not infect, replicate, or destroy data, but it can violate your privacy. Examples of grayware include spyware, adware, and remote access tools.
Spyware or grayware detection is not enabled by default. You must configure this feature in these windows in order to detect spyware and other forms of spyware and other grayware in your Web and file transfer traffic:
Click Save in order to update your configuration.
-
-
You can switch to the Scanning Webmail tab in order to scan Webmail sites for Yahoo, AOL, MSN, and Google.
Note: If you elect to scan only Webmail, HTTP scanning is restricted to the sites specified on the Webmail Scanning tab of the Web (HTTP) > Scanning > HTTP Scanning window. Other HTTP traffic is not scanned. Configured sites are scanned until you remove them when you click the Trashcan icon.
In the Name field, enter the exact web site name, a URL keyword, and a string in order to define the Webmail site.
Note: Attachments to messages that are managed on Webmail are scanned.
Click Save in order to update your configuration.
-
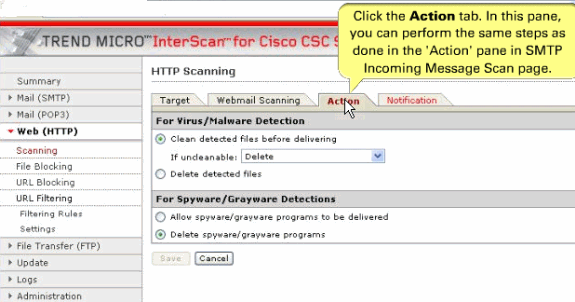
You can switch to the Action tab for the configuration of the Virus/Malware Detection and Spyware/Grayware Detections.
-
Web (HTTP) downloads for files in which virus/malware is detected—Clean the downloaded file or file in which the malware was detected. If uncleanable, delete the file.
-
Web (HTTP) downloads and file transfers (FTP) for files in which spyware or grayware is detected—Files are deleted.
-
-
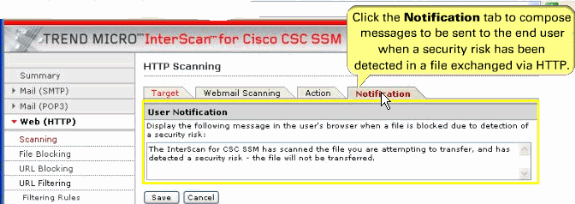
Web (HTTP) downloads when malware is detected—An inline notification is inserted in the browser, which states that Trend Micro InterScan for CSC-SSM has scanned the file that you attempt to transfer, and has detected a security risk.
File Blocking
In the left drop-down menu , click File Blocking.
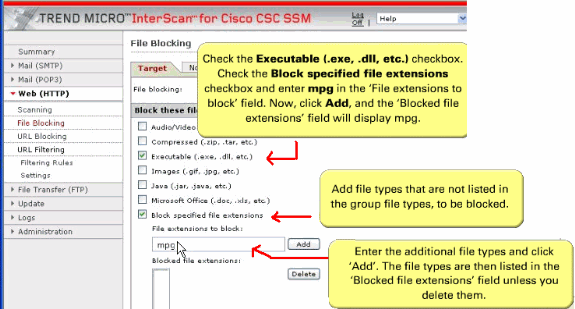
This feature is enabled by default; however, you must specify the types of files you want blocked. File blocking helps you enforce your organization policies for Internet use and other computing resources during work time. For example, your company does not allow downloading of music, both because of legal issues as well as employee productivity issues.
-
On the Target tab of the File Blocking window, check the Executable check box in order to block .exe.
-
You can specify additional file types by file name extension. Check the Block specified file extensions check box in order to enable this feature.
-
Then, enter additional file types in the File extensions to block field, and click Add. In the example, .mpg files are blocked.
Click Save when you are finished in order to update the configuration.
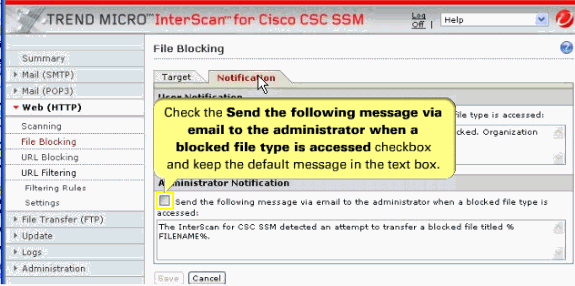
Check the Administrator Notification box in order to send the default messages in the text box.
Click the Notification tab for the alert message.
URL Blocking
This section describes the URL blocking feature and includes these topics:
Note: This feature requires the Plus License.
The URL blocking feature helps you prevent employees from accessing prohibited web sites. For example, it is possible that you want to block some sites because policies in your organization prohibit access to dating services, online shopping services, or offensive sites.
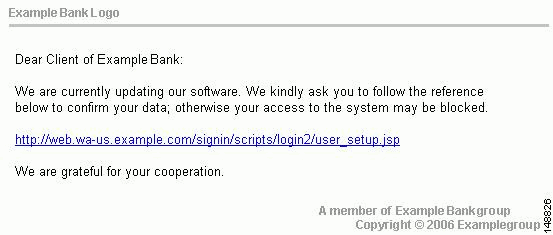
You can also block sites that are known to perpetrate fraud, such as phishing. Phishing is a technique used by criminals who send e-mail messages that appear to be from a legitimate organization, which request you to reveal private information such as bank account numbers. This image shows an example of an e-mail message used for phishing.
By default, URL blocking is enabled. But, only sites in the TrendMicro PhishTrap pattern file are blocked until you specify additional sites for blocking.
Blocking from the Via Local List Tab
Complete these steps in order to configure URL blocking from the Via Local List tab:
-
Choose Configuration > Trend Micro Content Security > Web in ASDM and click Configure URL Blocking in order to display the URL Blocking window.
-
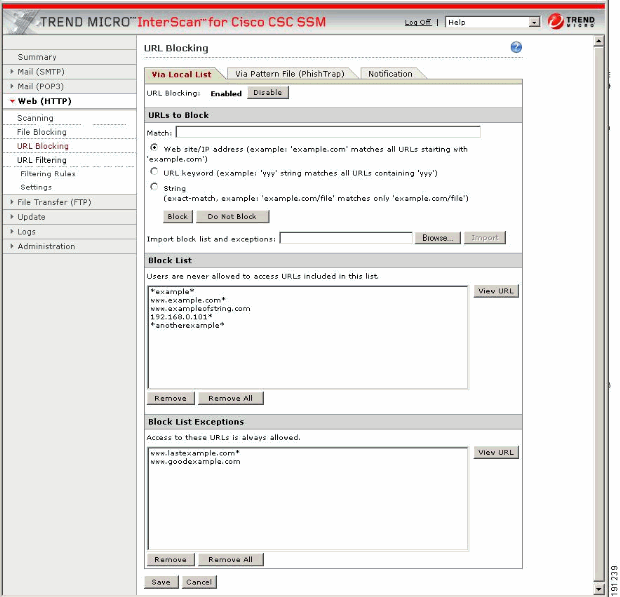
On the Via Local List tab of the URL Blocking window, type the URLs you want to block in the Match field. You can specify the exact web site name, a URL keyword, and a string.
-
Click Block after each entry in order to move the URL to the Block List. Click Do Not Block to add the entry to Block List Exceptions in order to specify your entry as an exception. Entries remain as blocked or exceptions until you remove them.
Note: You can also import a block and exception list. The imported file must be in a specific format. See the online help for instructions.
Blocking from the Via Pattern File (PhishTrap) Tab
Complete these steps in order to configure URL file blocking from the Via Pattern File (PhishTrap) Tab:
-
Choose Configuration > Trend Micro Content Security > Web in ASDM and click the Configure URL Blocking link in order to display the URL Blocking window.
-
Then click the Via Pattern File (PhishTrap) tab.
-
By default, the Trend Micro PhishTrap pattern file detects and blocks known phishing sites, spyware sites, virus accomplice sites that are sites associated with known exploits, and disease vectors, which are web sites that exist only for malicious purposes. Use the Submit the Potential Phishing URL to TrendLabs fields in order to submit sites that you think should be added to the PhishTrap pattern file. TrendLabs evaluates the site and can add the site to this file if such action is warranted.
-
Click the Notification tab in order to review the text of the default message that appears in the browser when an attempt is made to access a blocked site. The online help shows an example. Highlight and redefine it in order to customize the default message.
-
Click Save when you are finished in order to update the configuration.
URL Filtering
There are two important section to be discussed here.
-
The URLs defined on the URL Blocking windows described previously are either always allowed or always disallowed. The URL filtering feature, however, allows you to filter URLs in categories, which you can schedule to allow access during certain times, defined as leisure time, and disallow access during work time.
Note: This feature requires the Plus License.
These are the six URL filtering categories:
-
Company-prohibited
-
Not work related
-
Research topics
-
Business function
-
Customer defined
-
Others
-
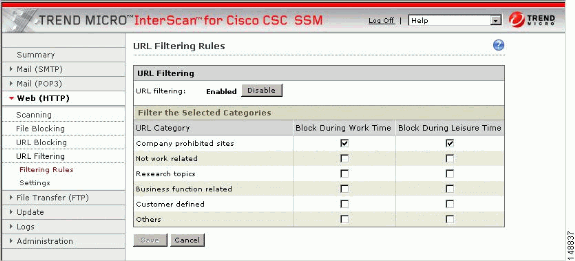
By default, company-prohibited sites are blocked during both work and leisure times.
Filtering Settings
Complete these steps in order to configure the URL filtering feature:
-
Choose Configuration > Trend Micro Content Security > Web in ASDM and click Configure URL Filtering Settings in order to display the URL Filtering Settings window.
-
On the URL Categories tab, review the subcategories listed and the default classifications assigned to each category to see whether the assignments are appropriate for your organization. For example, Illegal Drugs is a subcategory of the Company-prohibited category. If your organization is a financial services company, it is possible that you want to leave this category classified as company-prohibited. Check the Illegal Drugs check box in order to enable filtering for sites related to illegal drugs. But, if your organization is a law enforcement agency, you should reclassify the Illegal Drugs subcategory to the Business function category. See the online help for more information about reclassification.
-
After you have reviewed and refined the subcategory classifications, check the associated subcategory in order to enable all the subcategories for which you want filtering performed.
-
If there are sites within some of the enabled subcategories that you do not want filtered, click the URL Filtering Exceptions tab.
-
Type the URLs you want to exclude from filtering in the Match field. You can specify the exact web site name, a URL keyword, and a string.
-
Click Add after each entry in order to move the URL to the Do Not Filter the Following Sites list. Entries remain as exceptions until you remove them.
Note: You can also import an exception list. The imported file must be in a specific format. See the online help for instructions.
-
Click the Schedule tab in order to define the days of the week and hours of the day that should be considered work time. Time not designated as work time is automatically designated as leisure time.
-
Click Save in order to update the URL filtering configuration.
-
Click the Reclassify URL tab in order to submit suspect URLs to TrendLabs for evaluation.
Filtering Rules
After you have assigned the URL subcategories to the correct categories for your organization, defined exceptions (if any), and created the work and leisure time schedule, assign the filtering rules that determine when a category is filtering.
Complete these steps in order to assign the URL filtering rules:
-
Choose Configuration > Trend Micro Content Security > Web in ASDM and click the Configure URL Filtering Rules link in order to display the URL Filtering Rules window.
-
For each of the six major categories, specify whether the URLs in that category are blocked, and if so, during work time, leisure time, or both. See the online help for more information.
-
Click Save in order to update the configuration.
Note: For URL Filtering to work correctly, the CSC-SSM module must be able to send HTTP requests to the Trend Micro service. If an HTTP proxy is required, choose Update > Proxy Settings in order to configure the proxy setting. The URL Filtering component does not support the SOCKS4 proxy.
FTP Configuration
Trend Micro FTP Configuration
After installation, by default your FTP traffic is scanned for viruses, worms, and Trojans. Malware such as spyware and other grayware require a configuration change before they are detected.
File transfer (FTP) scanning of file transfers—Enabled using All Scannable Files as the scanning method.
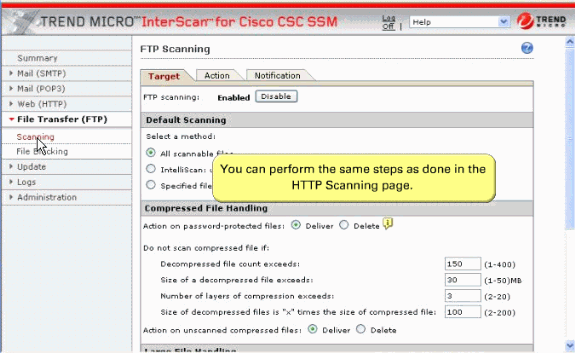
Complete the steps given in the File Blocking page for HTTP Traffic.
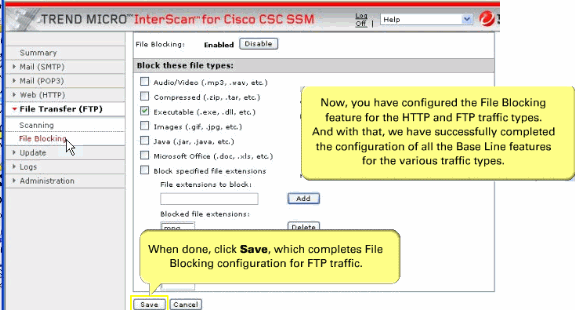
Complete the steps given in the File Blocking page for HTTP Traffic.
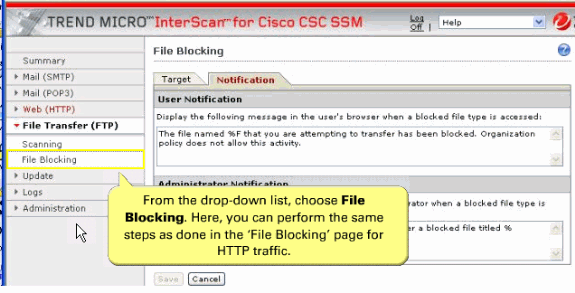
Verify
Use this section in order to confirm that your configuration works properly.
The Output Interpreter Tool (registered customers only) (OIT) supports certain show commands. Although, the OIT can be used to view an analysis of some show command outputs, these show commands currently are not compatible with this tool.
-
show module—In order to check the status of an SSM, for example:
ciscoasa#show module
Mod Card Type                                    Model              Serial No.
--- -------------------------------------------- ------------------ -----------
  0 ASA 5520 Adaptive Security Appliance         ASA5520            JMX090000B7
  1 ASA 5500 Series Security Services Module-20  ASA-SSM-20         JAF10333331

Mod MAC Address Range                 Hw Version   Fw Version   Sw Version
--- --------------------------------- ------------ ------------ ---------------
  0 0014.c482.5151 to 0014.c482.5155  1.1          1.0(10)0     8.0(2)
  1 000b.fcf8.012c to 000b.fcf8.012c  1.0          1.0(10)0     Trend Micro InterScan Security Module Version 6.0

Mod SSM Application Name           Status           SSM Application Version
--- ------------------------------ ---------------- --------------------------
  1 Trend Micro InterScan Security Up               Version 6.0

Mod Status             Data Plane Status     Compatibility
--- ------------------ --------------------- -------------
  0 Up Sys             Not Applicable
  1 Up                 Up
-
show module 1 details—Use the details keyword in order to view additional information for the SSM, for example:
ciscoasa#show module 1 details
Getting details from the Service Module, please wait...
ASA 5500 Series Security Services Module-20
Model:              ASA-SSM-20
Hardware version:   1.0
Serial Number:      JAF10333331
Firmware version:   1.0(10)0
Software version:   Trend Micro InterScan Security Module Version 6.0
App. name:          Trend Micro InterScan Security Module
App. version:       Version 6.0
Data plane Status:  Up
Status:             Up
HTTP Service:       Up
Mail Service:       Up
FTP Service:        Up
Activated:          Yes
Mgmt IP addr:       172.30.21.235
Mgmt web port:      8443
-
show module slot_num recover—Determines if there is a recovery configuration for the SSM. If a recovery configuration exists for the SSM, the ASA displays it. For example:
ciscoasa#show module 1 recover
Module 1 recover parameters. . .
Boot Recovery Image: Yes
Image URL:           tftp://10.21.18.1/ids-oldimg
Port IP Address:     172.30.21.10
Port Mask:          255.255.255.0
Gateway IP Address:  172.30.21.254
Refer to Verifying Initial Setup for more information on how to verify that Trend Micro InterScan for Cisco CSC-SSM operates correctly.
Troubleshoot
This section provides information you can use to troubleshoot your configuration. Refer to Troubleshooting Trend Micro InterScan for Cisco CSC SSM for more information on how to troubleshoot more on CSC-SSM.
Internet Access
Problem
The CSC is unable to access the Internet through the ASA management interface or the CSC is unable to get updates from the Trend server through the Internet. .
Solution
The management interface configures with the management-only command and makes it only accept traffic to or from the ASA, not through it. So remove the management-only command and the NAT statement for management-to-outside traffic then allows the Internet for CSC to update.
Spam Not Being Detected
Problem
The CSC is unable to detect the SPAM.
Solution
You have to enable the anti-spam option, which is not enabled by default. The Plus License must be installed, and the DNS settings must be correct for the network-based, anti-spam Email Reputation to function correctly. Refer to Enabling SMTP and POP3 Spam Filtering for more information.
License violation errors
Problem
CSC module shows license violation errors and reports more hosts than what is in the network. The License violation has been detected on the InterScan for CSC SSM error is seen in the CSC module. How can this error be resolved?
Solution
Move all interfaces except the Outside-WAN (security level 0) to the higher security levels.
Performance Issue
Problem
The incoming SMTP traffic has become very slow. The inside mail server sometimes gets response from the server that takes a couple of minutes or two to receive.
Solution
You possibly run into slow traffic due to out-of-order packets. Try this example, which can resolve the issue.
!--- Creates a new tcp map and allows for 100 out of order packets

tcp-map localmap
 queue-limit 100

!--- This is the class that defines traffic to sent to the csc-module. The name you use can be different. Sets the localmap parameters to flow matching the class map.

policy-map global_policy
 class csc-class
  set connection advanced-options localmap
Problem
HTTP scanning did not work and displayed this error:
Error: Failed to rate URL, rc=-723
Solution
This error message is generated when the CSC-SSM has trouble in contacting the Trend Micro Servers. This can happen when there is latency in the network or if the CSC-SSM is too busy to handle connection requests. The maximum simultaneous connections on the CSC-SSM-10 is about 500. In this case for the specified period, the number of connections have possibly surpassed the maximum limit. Refer to Table 2 in Cisco ASA 5500 Series Content Security and Control Security Services Module for more information on connection limits.
A possible workaround for this is to limit the simultaneous connections. Refer to Limit Connections Through the CSC SSM for more information.
Email Issue
Problem
The Disclaimer in the emails cannot be removed from the mails if needed and also the fonts cannot be changed in the email disclaimer. Why does this happens?
Solution
It is not possible to remove the disclaimer from some of outgoing emails on CSC-SSM. Also, you cannot change the font of the disclaimer since it is not supported on CSC-SSM.
Traffic Issue
Problem
You are unable to stop the traffic from being sent from ASA to CSC-SSM. How can this be resolved?
Solution
In order to stop traffic from being sent to ASA from CSC-SSM, the Administrator must remove the service policy from the interface with the no service-policy command:
hostname(config-pmap-c)#no service-policy policy_map_name [global | interface interface_ID]
Grayware Pattern Update Issue
Problem
This error message is logged on CSC module.
GraywarePattern : Pattern Update: Unable to get the pattern information. Pattern Update: The download file was unsuccessful for ActiveUpdate was unable to unzip the downloaded patch packages. The zip file may be corrupted. This can happen due to an unstable network connection. Please try downloading the file again.. The error code is 24.
AntiVirusPattern : Pattern Update: The download file was unsuccessful for ActiveUpdate was unable to unzip the downloaded patch packages. The zip file may be corrupted. This can happen due to an unstable network connection. Please try downloading the file again.. The error code is 24.
How can this error message be resolved?
Solution
This issue is related to Cisco bug ID CSCtc37947 (registered customers only) and Cisco bug ID CSCsk10777 (registered customers only) . Reseat the CSC-SSM or upgrade the code to 6.2.x in order to resolve this issue. Also the removal of the temporary files created for auto update on the CSC root account can resolve the issue. Restart the services after you reseat CSC-SSM or upgrade the code.
HTTPS Traffic Issue
Problem
You are unable to block the HTTPS traffic through CSC-SSM. How can the HTTPS traffic be blocked?
Solution
The CSC-SSM cannot block the HTTPS traffic because it cannot deep inspect the packet due to the SSL encryption on it.
Unable to bypass traffic from CSC Inspection
Traffic can be bypassed from CSC Inspection if you add deny statements for the network ranges in question to the ACL used for matching traffic to pass to the module.
Unable to log all the HTTP traffic that passes through CSC-SSM
CSC cannot log all of the traffic but only displays information of block/filtered attempts.
Error while upgrading CSC
The [ERR-PAT-0002] The update system cannot decompress the update file, and cannot continue. This message is for diagnostic purposes only. Customers - please contact Technical Support error message appears when you upgrade CSC. This error message is seen when .bin file is used instead of .pkg file. The issue does not occur when .pkg file is used.
Error while CSC automatically updating signatures
Problem:
When the CSC does the automatic update, it got this message.
Anti-spam pattern 17462 was successfully downloaded and installed. Unable to copy file. You must manually copy file /opt/trend/isvw/temp/AU/piranhacache/* to path /opt/trend/isvw/lib/mail/cache.
Solution:
This is an issue known bug with CSC Trendmicro code. A bug has been filed for this and for complete details. Refer to Cisco bug ID CSCtc37947 (registered customers only) . Upgrade the CSC to 6.3.1172(2) or later in order to get rid of the problem.
CSC module fails to show syslogs
Problem:
After upgrading to 6.3.1172.4, the LogServer service on the CSC module might fail and the administrator receives this email notification: LogServer has recently stopped on InterScan for CSC SSM. Please contact Customer Support for assistance.
Solution:
There are two options as a workaround:
-
Install the engineering build fix.
Contact Cisco TAC (registered customers only) for information on how to install this build.
-
Re-image the device to an older version.
Refer to Re-imaging the CSC-SSM for complete information about this process.
Refer to Cisco bug ID CSCtl21378 (registered customers only) for more information.
CSC Log server runs into infinite loop and stops abruptly
Problem:
CSC module's Log server runs into one infinite loop and stops abruptly.
Solution:
This issue is due to the Cisco bug ID CSCtl21378. Refer to CSCtl21378 (registered customers only) for more information.
Troubleshooting Commands
The Output Interpreter Tool (registered customers only) (OIT) supports certain show commands. Use the OIT in order to view an analysis of show command output.
Refer to Troubleshooting Trend Micro InterScan for Cisco CSC-SSM for more information on how to troubleshoot various issues of the CSC-SSM.
Note: Refer to Important Information on Debug Commands before you use debug commands.
-
debug module-boot—Shows debug messages about the SSM booting process.
-
hw-module module 1 shutdown—Shutdown the SSM
-
hw-module module 1 reset—Reset the SSM
Note: The %ASA-3-421001: TCP flow from inside:172.22.50.112/1718 to outside:XX.XX.XX.XX/80 is skipped because Content Security and Control card has failed message is a log message that appears when the CSC module become totally unresponsive.
Note: Use this command in order to reset the module.
ASA#hw-module module 1 reset

The module in slot 1 should be shut down before
resetting it or loss of configuration may occur.
Reset module in slot 1? [confirm]

(Confirm it at this point by 'return'.)
Refer to the command reference guide for more information about this command.
Related Information
Revision History
| Revision | Publish Date | Comments |
|---|---|---|
1.0 |
18-Oct-2007 |
Initial Release |
Contact Cisco
- Open a Support Case

- (Requires a Cisco Service Contract)


 Feedback