EAP-TLS under Unified Wireless Network with ACS 4.0 and Windows 2003
Available Languages
Contents
Introduction
This document describes how to configure secure wireless access using Wireless LAN Controllers (WLCs), Microsoft Windows 2003 software and Cisco Secure Access Control Server (ACS) 4.0 via Extensible Authentication Protocol-Transport Layer Security (EAP-TLS).
Note: For more information about the deployment of secure wireless, refer to the Microsoft Wi-Fi web site ![]() and Cisco SAFE Wireless Blueprint.
and Cisco SAFE Wireless Blueprint.
Prerequisites
Requirements
There is an assumption that the installer has knowledge of basic Windows 2003 installation and Cisco controller installation as this document only covers the specific configurations to facilitate the tests.
For initial installation and configuration information for the Cisco 4400 Series Controllers, refer to the Quick Start Guide: Cisco 4400 Series Wireless LAN Controllers. For initial installation and configuration information for the Cisco 2000 Series Controllers, refer to the Quick Start Guide: Cisco 2000 Series Wireless LAN Controllers.
Before you begin, install the Windows Server 2003 with Service Pack (SP)1 operating system on each of the servers in the test lab and update all Service Packs. Install the controllers and APs and ensure that the latest software updates are configured.
Important: At the time this document was written, SP1 is the latest Windows Server 2003 update, and SP2 with update patches is the latest software for Windows XP Professional.
Windows Server 2003 with SP1, Enterprise Edition, is used so that auto-enrollment of user and workstation certificates for EAP-TLS authentication can be configured. This is described in the EAP-TLS Authentication section of this document. Certificate auto-enrollment and auto-renewal make it easier to deploy certificates and improve security by automatically expiring and renewing certificates.
Components Used
The information in this document is based on these software and hardware versions:
-
Cisco 2006 or 4400 Series Controller that runs 3.2.116.21
-
Cisco 1131 Lightweight Access Point Protocol (LWAPP) AP
-
Windows 2003 Enterprise with Internet Information Server (IIS), Certificate Authority (CA), DHCP, and Domain Name System (DNS) installed
-
Windows 2003 Standard with Access Control Server (ACS) 4.0
-
Windows XP Professional with SP (and updated Service Packs) and wireless network interface card (NIC) (with CCX v3 support) or third party supplicant.
-
Cisco 3560 Switch
Network Diagram
This document uses this network setup:
Cisco Secure Wireless Lab Topology
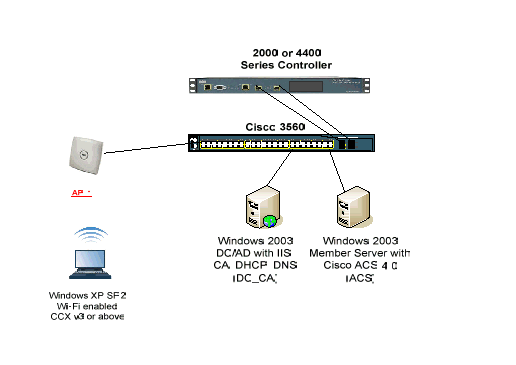
The primary purpose of this document is to provide you the step-by-step procedure to implement the EAP-TLS under Unified Wireless Networks with ACS 4.0 and the Windows 2003 Enterprise server. The main emphasis is on auto-enrollment of the client so that the client auto-enrolls and takes the certificate from the server.
Note: In order to add Wi-Fi Protected Access (WPA)/WPA2 with Temporal Key Integrity Protocol (TKIP)/Advanced Encryption Standard (AES) to Windows XP Professional with SP, refer to WPA2/Wireless Provisioning Services Information Element (WPS IE) update for Windows XP with SP2 ![]() .
.
The information in this document was created from the devices in a specific lab environment. All of the devices used in this document started with a cleared (default) configuration. If your network is live, make sure that you understand the potential impact of any command.
Conventions
Refer to the Cisco Technical Tips Conventions for more information on document conventions.
Windows Enterprise 2003 Setup with IIS, Certificate Authority, DNS, DHCP (DC_CA)
DC_CA (wirelessdemoca)
DC_CA is a computer that runs Windows Server 2003 with SP1, Enterprise Edition, and performs these roles:
-
A domain controller for the wirelessdemo.local domain that runs IIS
-
A DNS server for the wirelessdemo.local DNS domain
-
A DHCP server
-
Enterprise root CA for the wirelessdemo.local domain
Complete these steps in order to configure DC_CA for these services:
Step 1: Perform Basic Installation and Configuration
Complete these steps:
-
Install Windows Server 2003 with SP1, Enterprise Edition, as a stand-alone server.
-
Configure the TCP/IP protocol with the IP address of 172.16.100.26 and the subnet mask of 255.255.255.0.
Step 2: Configure the Computer as a Domain Controller
Complete these steps:
-
In order to start the Active Directory Installation wizard, choose Start > Run, type dcpromo.exe, and click OK.
-
On the n the Welcome to the Active Directory Installation Wizard page, click Next.
-
On the Operating System Compatibility page, click Next.
-
On the Domain Controller Type page, select Domain controller for a new domain and click Next.
-
On the Create New Domain page, select Domain in a new forest and click Next.
-
On the Install or Configure DNS page, select No, just install and configure DNS on this computer and click Next.
-
On the New Domain Name page, type wirelessdemo.local and click Next.
-
On the NetBIOS Domain Name page, enter the Domain NetBIOS name as wirelessdemo and click Next.
-
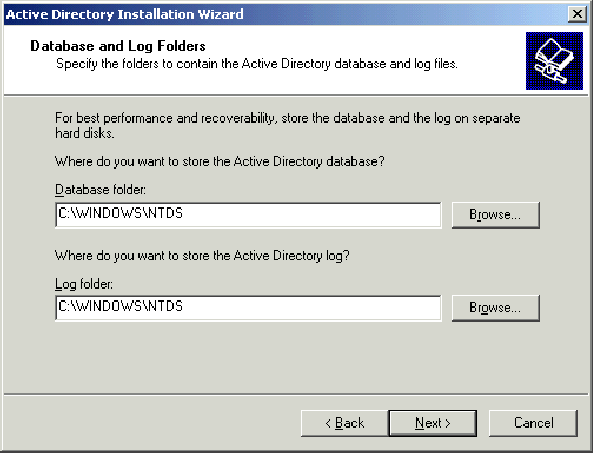
On the Database and Log Folders Location page, accept the default Database and Log Folders directories and click Next.
-
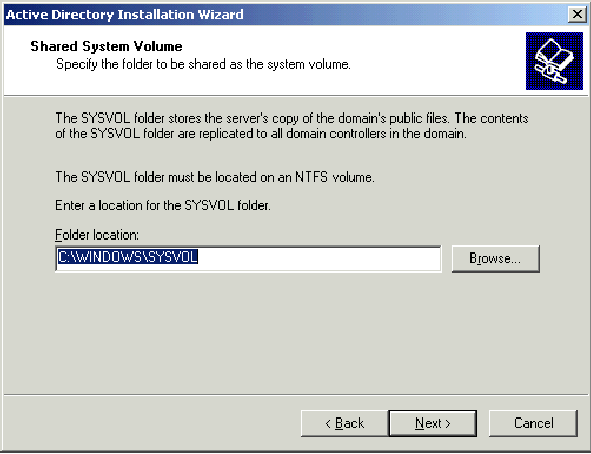
On the Shared System Volume dialog box, verify that the default folder location is correct and click Next.
-
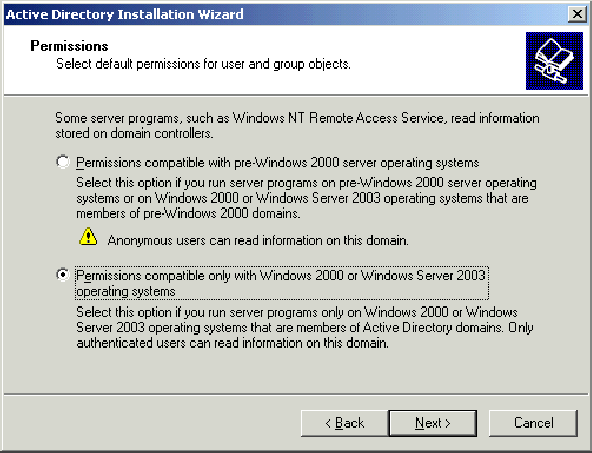
On the Permissions page, verify that Permissions compatible only with Windows 2000 or Windows Server 2003 operating systems is selected and clickNext.
-
On the Directory Services Restore Mode Administration Password page, leave the password boxes blank and click Next.
-
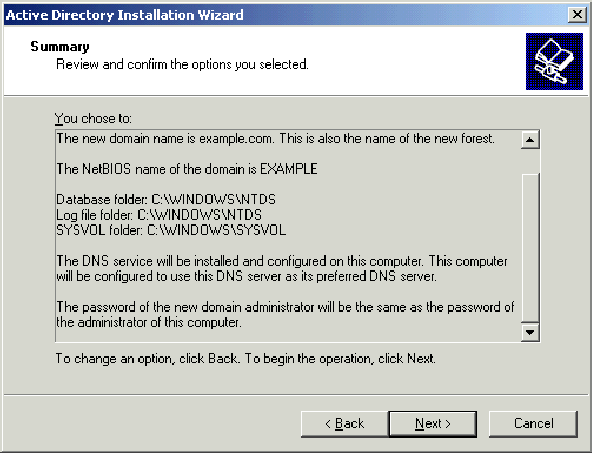
Review the information on the Summary page and click Next.
-
On the Completing the Active Directory Installation Wizard page, click Finish.
-
When prompted to restart the computer, click Restart Now.
Step 3: Raise the Domain Functional Level
Complete these steps:
-
Open the Active Directory Domains and Trusts snap-in from the Administrative Tools folder(Start > Administrative Tools > Active Directory Domains and Trusts), and then right-click the domain computer DC_CA.wirelessdemo.local.
-
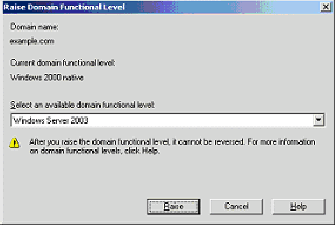
Click Raise Domain Functional Level, and then select Windows Server 2003 on the Raise Domain Functional Level page.
-
Click Raise, click OK, and then click OK again.
Step 4: Install and Configure DHCP
Complete these steps:
-
Install Dynamic Host Configuration Protocol (DHCP) as a Networking Service component by using Add or Remove Programs in the Control Panel.
-
Open the DHCP snap-in from the Administrative Tools folder (Start > Programs > Administrative Tools > DHCP, and then highlight the DHCP server, DC_CA.wirelessdemo.local.
-
Click Action, and then click Authorize in order to authorize the DHCP service.
-
On the console tree, right-click DC_CA.wirelessdemo.local, and then click New Scope.
-
On the Welcome page of the New Scope wizard, click Next.
-
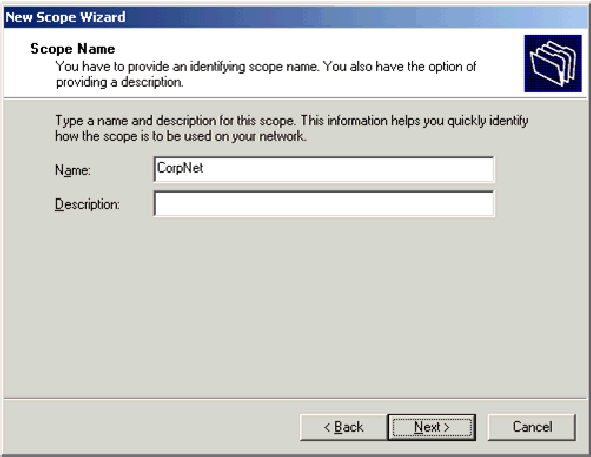
On the Scope Name page, type CorpNet in the Name field.
-
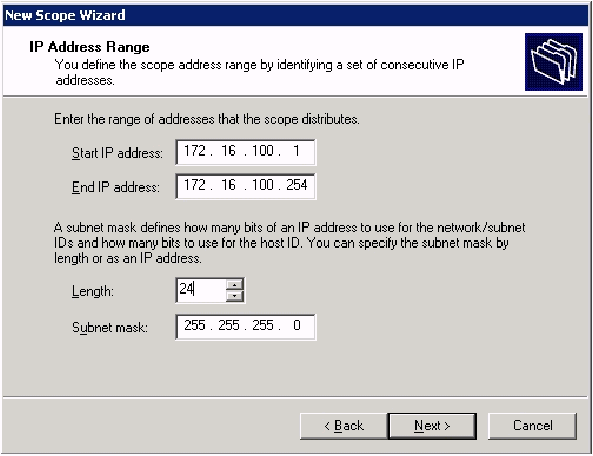
Click Next and fill in these parameters:
-
Start IP address—172.16.100.1
-
End IP address—172.16.100.254
-
Length—24
-
Subnet mask—255.255.255.0
-
-
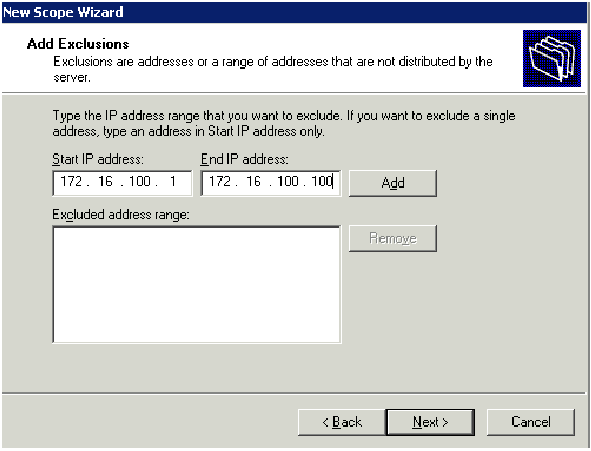
Click Next and enter 172.16.100.1 for the Start IP address and 172.16.100.100 for the End IP address to be excluded. Then click Next. This reserves the IP addresses in the range from 172.16.100.1 to 172.16.100.100. These reserved IP addresses are not allotted by the DHCP server.
-
On the Lease Duration page, click Next.
-
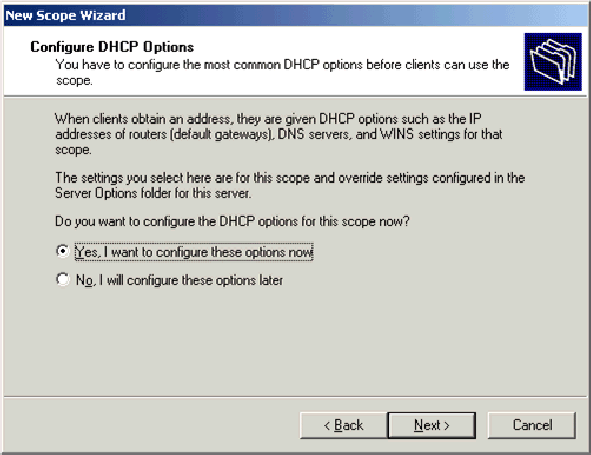
On the Configure DHCP Options page, choose Yes, I want to configure these options now and click Next.
-
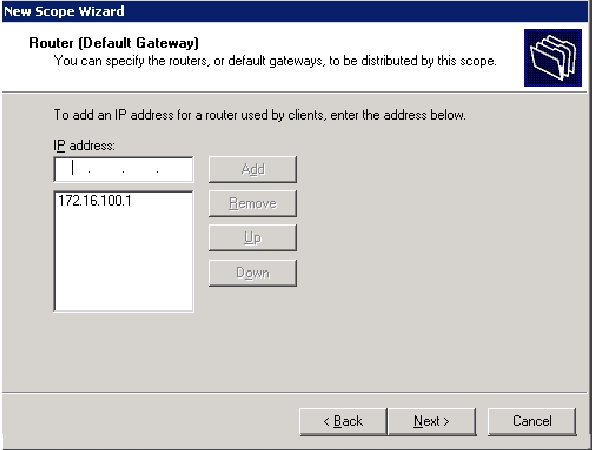
On the Router (Default Gateway) page add the default router address of 172.16.100.1 and click Next.
-
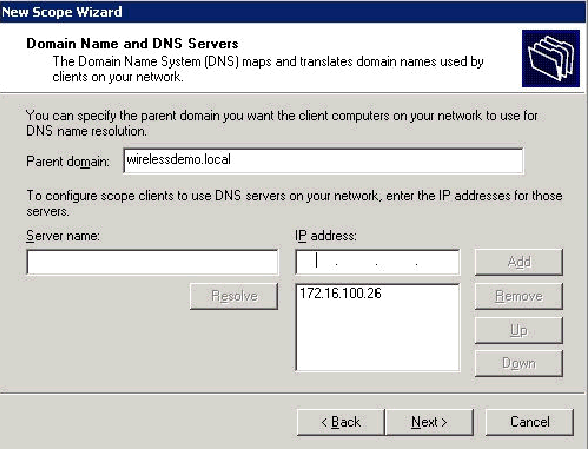
On the Domain Name and DNS Servers page, type wirelessdemo.local in the Parent domain field, type 172.16.100.26 in the IP address field, and then click Add and click Next.
-
On the WINS Servers page, click Next.
-
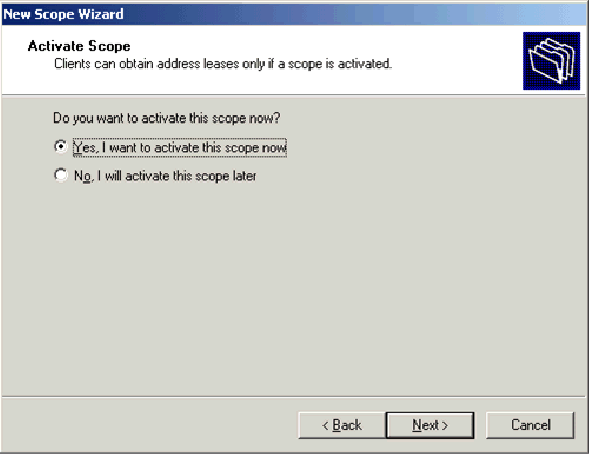
On the Activate Scope page, choose Yes, I want to activate this scope now and click Next.
-
On the Completing the New Scope Wizard page, click Finish.
Step 5: Install Certificate Services
Complete these steps:
Note: IIS must be installed before you install Certificate Services and the user should be part of the Enterprise Admin OU.
-
In the Control Panel, open Add or Remove Programs, and then click Add/Remove Windows Components.
-
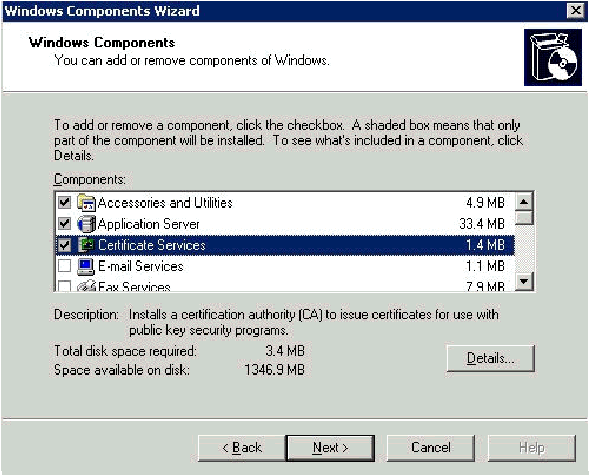
On the Windows Components Wizard page, choose Certificate Services, and then click Next.
-
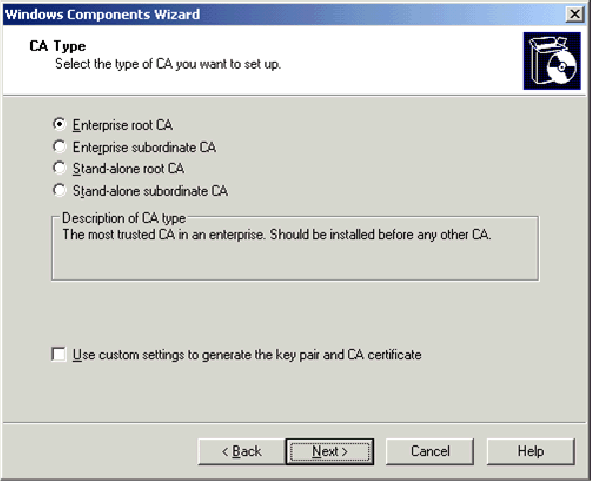
On the CA Type page, choose Enterprise root CA and click Next.
-
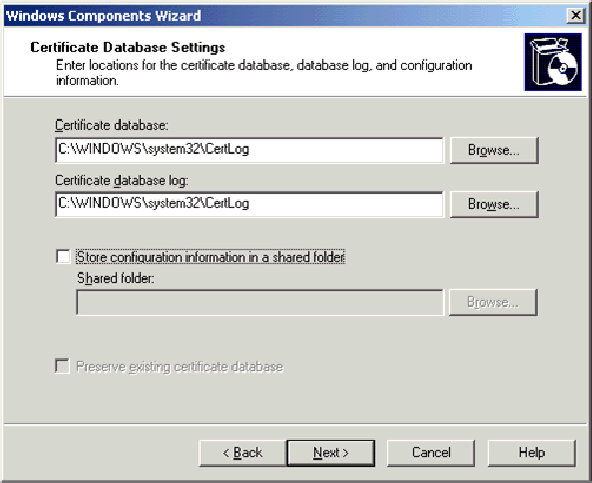
On the CA Identifying information page, type wirelessdemoca in the Common name for this CA box. You can enter the other optional details and then click Next. Accept the defaults on the Certificate Database Settings page.
-
Click Next. Upon completion of the installation, click Finish.
-
Click OK after you read the warning about installing IIS.
Step 6: Verify Administrator Permissions for Certificates
Complete these steps:
-
Choose Start > Administrative Tools > Certification Authority.
-
Right-click wirelessdemoca CA and then click Properties.
-
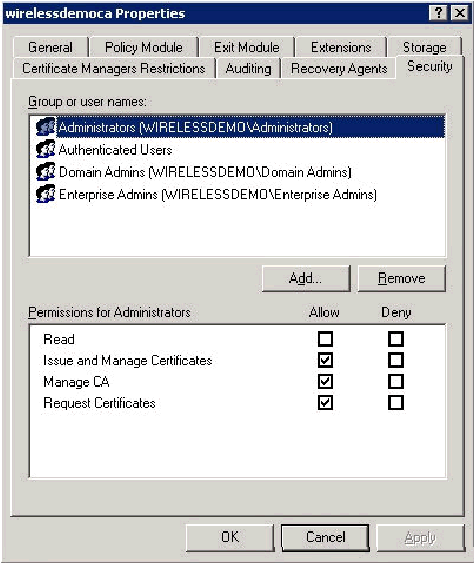
On the Security tab, click Administrators in the Group or User names list.
-
In the Permissions or Administrators list, verify that these options are set to Allow:
-
Issue and Manage Certificates
-
Manage CA
-
Request Certificates
If any of these are set to Deny or are not selected, set the permission to Allow.
-
-
Click OK to close the wirelessdemoca CA Properties dialog box, and then close Certification Authority.
Step 7: Add Computers to the Domain
Complete these steps:
Note: If the computer is already added to the domain, proceed to Add Users to the Domain.
-
Open the Active Directory Users and Computers snap-in.
-
In the console tree, expand wirelessdemo.local.
-
Right-click Users, click New, and then click Computer.
-
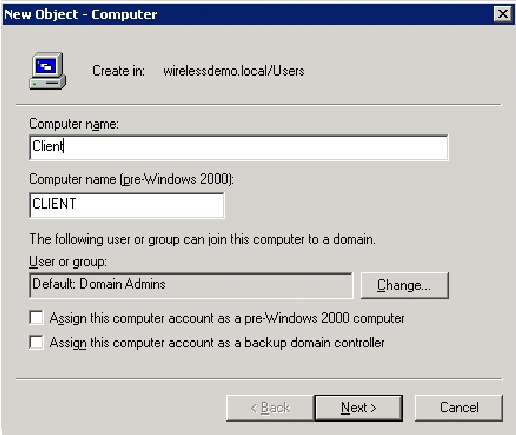
In the New Object – Computer dialog box, type the name of the computer in the Computer Name field and click Next. This example uses the computer name Client.
-
In the Managed dialog box, click Next.
-
In the New Object-computer dialog box, click Finish.
-
Repeat steps 3 through 6 in order to create additional computer accounts.
Step 8: Allow Wireless Access to Computers
Complete these steps:
-
In the Active Directory Users and Computers console tree, click the Computers folder and right-click on the computer for which you want to assign wireless access. This example shows the procedure with computer CLIENT which you added in step 7.
-
Click Properties, and then go to the Dial-in tab.
-
Choose Allow access and click OK.
Step 9: Add Users to the Domain
Complete these steps:
-
In the Active Directory Users and Computers console tree, right-click Users, click New, and then click User.
-
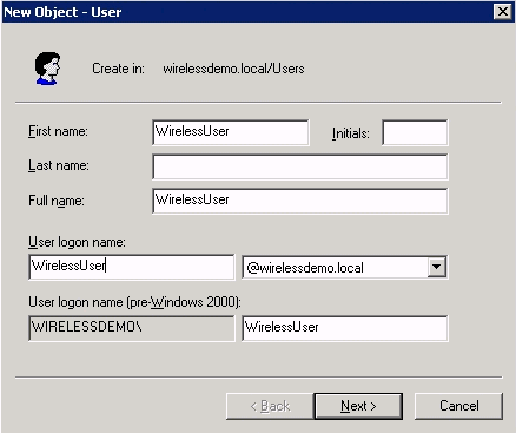
In the New Object – User dialog box, type WirelessUser in the First name field, and type WirelessUser in the User logon name field and click Next.
-
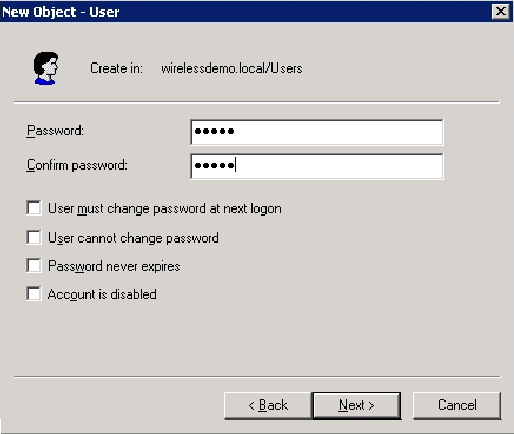
In the New Object – User dialog box, type a password of your choice in the Password and Confirm password fields. Clear the User must change password at next logon check box, and click Next.
-
In the New Object – User dialog box, click Finish.
-
Repeat steps 2 through 4 in order to create additional user accounts.
Step 10: Allow Wireless Access to Users
Complete these steps:
-
In the Active Directory Users and Computers console tree, click the Users folder, right-click WirelessUser, click Properties, and then go to the Dial-in tab.
-
Choose Allow access and click OK.
Step 11: Add Groups to the Domain
Complete these steps:
-
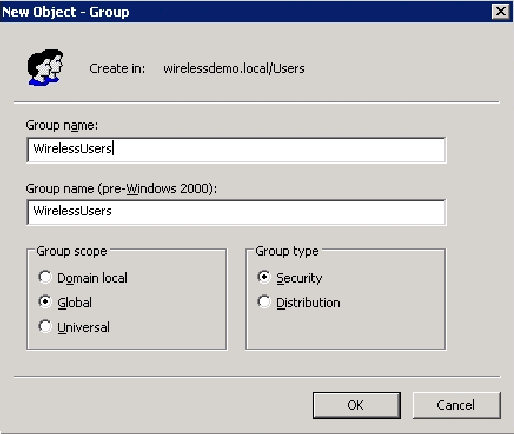
In the Active Directory Users and Computers console tree, right-click Users, click New, and then click Group.
-
In the New Object – Group dialog box, type the name of the group in the Group name field and click OK. This document uses the group name WirelessUsers.
Step 12: Add Users to the WirelessUsers Group
Complete these steps:
-
In the details pane of Active Directory Users and Computers, double-click on the Group WirelessUsers.
-
Go to the Members tab and click Add.
-
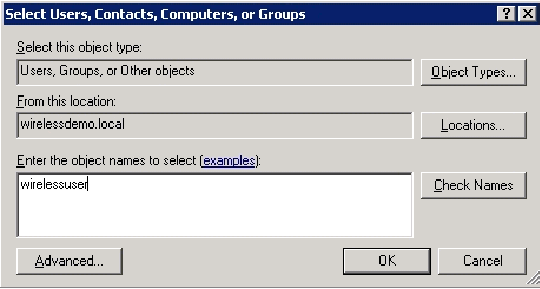
In the Select Users, Contacts, Computers, or Groups dialog box, type the name of the users that you want to add to the group. This example shows how to add the user wirelessuser to the group. Click OK.
-
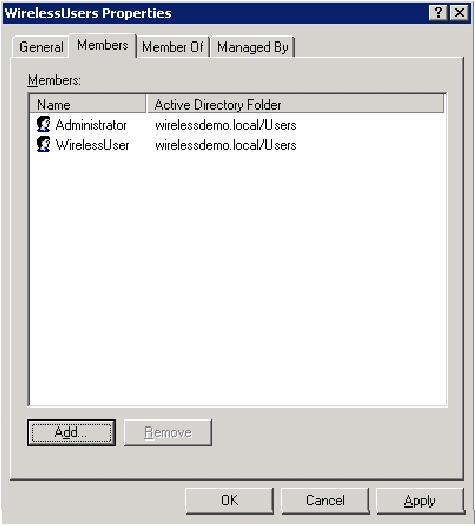
In the Multiple Names Found dialog box, click OK. The WirelessUser user account is added to the WirelessUsers group.
-
Click OK in order to save changes to the WirelessUsers group.
-
Repeat this procedure to add more users to the group.
Step 13: Add Client Computers to the WirelessUsers Group
Complete these steps:
-
Repeat steps 1 and 2 in the Add Users to the WirelessUsers Group section of this document
-
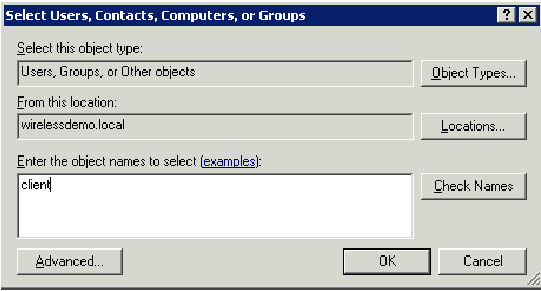
In the Select Users, Contacts, or Computers dialog box, type the name of the computer that you want to add to the group. This example shows how to add the computer named client to the group.
-
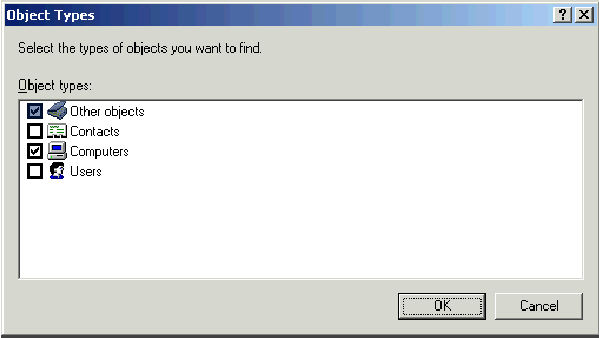
Click Object Types, clear the Users check box, and then check Computers.
-
Click OK twice. The CLIENT computer account is added to the WirelessUsers group.
-
Repeat the procedure to add more computers to the group.
Windows Standard 2003 Setup with Cisco Secure ACS 4.0
Cisco Secure ACS is a computer that runs Windows Server 2003 with SP1, Standard Edition, that provides RADIUS authentication and authorization for the controller. Complete the procedures in this section in order to configure ACS as a RADIUS server:
Basic Installation and Configuration
Complete these steps:
-
Install Windows Server 2003 with SP1, Standard Edition, as a member server named ACS in the wirelessdemo.local domain.
Note: The ACS server name appears as cisco_w2003 in the remaining configurations. Substitute ACS or cisco_w2003 on the remaining lab setup.
-
For the local area connection, configure the TCP/IP protocol with the IP address of 172.16.100.26, the subnet mask of 255.255.255.0, and the DNS server IP address of 127.0.0.1.
Cisco Secure ACS 4.0 Installation
Note: Refer to the Installation Guide for Cisco Secure ACS 4.0 for Windows for more information on how to configure Cisco Secure ACS 4.0 for Windows.
Complete these steps:
-
Using a Domain Administrator account, login to the computer named ACS to Cisco Secure ACS.
Note: Only installations performed at the computer where you install Cisco Secure ACS are supported. Remote installations performed using Windows Terminal Services or products such as Virtual Network Computing (VNC), are not tested, and are not supported.
-
Insert the Cisco Secure ACS CD into a CD-ROM drive on the computer.
-
If the CD-ROM drive supports the Windows autorun feature, the Cisco Secure ACS for Windows Server dialog box appears.
Note: If the computer does not have a required service pack installed, a dialog box appears. Windows service packs can be applied either before or after you install Cisco Secure ACS. You can continue with the installation, but the required service pack must be applied after the installation is complete. Otherwise, Cisco Secure ACS might not function reliably.
-
Perform one of these tasks:
-
If the Cisco Secure ACS for Windows Server dialog box appears, click Install.
-
If the Cisco Secure ACS for Windows Server dialog box does not appear, run setup.exe, located in the root directory of the Cisco Secure ACS CD.
-
-
The Cisco Secure ACS Setup dialog box displays the software license agreement.
-
Read the software license agreement. If you accept the software license agreement, click Accept.
The Welcome dialog box displays basic information about the setup program.
-
After you have read the information in the Welcome dialog box, click Next.
-
The Before You Begin dialog box lists items that you must complete before you continue with the installation. If you have completed all items listed in the Before You Begin dialog box, check the corresponding box for each item and click Next.
Note: If you have not completed all items listed in the Before You Begin box, click Cancel and then click Exit Setup. After you complete all items listed in the Before You Begin dialog box, restart the installation.
-
The Choose Destination Location dialog box appears. Under Destination Folder, the installation location appears. This is the drive and path where the setup program installs Cisco Secure ACS.
-
If you want to change the installation location, complete these steps:
-
Click Browse. The Choose Folder dialog box appears. The Path box contains the installation location.
-
Change the installation location. You can either type the new location in the Path box or use the Drives and Directories lists to select a new drive and directory. The installation location must be on a drive local to the computer.
Note: Do not specify a path that contains a percent character, "%". If you do so, the installation might appear to continue properly but fails before it completes.
-
Click OK.
Note: If you specified a folder that does not exist, the setup program displays a dialog box to confirm the creation of the folder. In order to continue, click Yes.
-
-
In the Choose Destination Location dialog box, the new installation location appears under Destination Folder.
-
Click Next.
-
The Authentication Database Configuration dialog box lists options for authenticating users. You can authenticate with the Cisco Secure user database only, or also with a Windows user database.
Note: After you install Cisco Secure ACS, you can configure authentication support for all external user database types in addition to Windows user databases.
-
If you want to authenticate users with the Cisco Secure user database only, choose the Check the Cisco Secure ACS database only option.
-
If you want to authenticate users with a Windows Security Access Manager (SAM) user database or Active Directory user database in addition to the Cisco Secure user database, complete these steps:
-
Choose the Also check the Windows User Database option.
-
The Yes, refer to "Grant dialin permission to user" setting check-box becomes available.
Note: The Yes, refer to "Grant dialin permission to user" setting check-box applies to all forms of access controlled by Cisco Secure ACS, not just dial-in access. For example, a user accessing the network through a VPN tunnel is not dialing into a network access server. However, if the Yes, refer to "Grant dialin permission to user" setting box is checked, Cisco Secure ACS applies the Windows user dial-in permissions in order to determine whether to grant the user access to the network.
-
If you want to allow access to users who are authenticated by a Windows domain user database only when they have dial-in permission in their Windows account, check the Yes, refer to "Grant dialin permission to user" setting box.
-
-
Click Next.
-
The setup program installs Cisco Secure ACS and updates the Windows registry.
-
The Advance Options dialog box lists several features of Cisco Secure ACS that are not enabled by default. For more information about these features, refer to the User Guide for Cisco Secure ACS for Windows Server, Version 4.0.
Note: The listed features appear in the Cisco Secure ACS HTML interface only if you enable them. After installation, you can enable or disable them on the Advanced Options page in the Interface Configuration section.
-
For each feature you want to enable, check the corresponding box.
-
Click Next.
-
The Active Service Monitoring dialog box appears.
Note: After installation, you can configure active service monitoring features on the Active Service Management page in the System Configuration section.
-
If you want Cisco Secure ACS to monitor user authentication services, check the Enable Login Monitoring box. From the Script to Execute list, choose the option you want applied in the event of an authentication service failure:
-
No Remedial Action—Cisco Secure ACS does not run a script.
Note: This option is useful if you enable event mail notifications.
-
Reboot—Cisco Secure ACS runs a script that reboots the computer that runs Cisco Secure ACS.
-
Restart All—Cisco Secure ACS restarts all Cisco Secure ACS services.
-
Restart RADIUS/TACACS+—Cisco Secure ACS restarts only the RADIUS and TACACS+ services.
-
-
If you want Cisco Secure ACS to send an e-mail message when service monitoring detects an event, check the Mail Notification box.
-
Click Next.
-
The Database Encryption Password dialog box appears.
Note: The Database Encryption Password is encrypted and stored in the ACS registry. You might need to reuse this password when critical problems arise and the database needs to be accessed manually. Keep this password at hand so that Technical Support can gain access to the database. The password can be changed each expiration period.
-
Enter a password for database encryption. The password needs to be at least eight characters long and needs to contain both characters and digits. There are no invalid characters. Click Next.
-
The setup program finishes and the Cisco Secure ACS Service Initiation dialog box appears.
-
For each Cisco Secure ACS Services Initiation option you want, check the corresponding box. The actions associated with the options occur after the setup program finishes.
-
Yes, I want to start the Cisco Secure ACS Service now—Starts the Windows services that compose Cisco Secure ACS. If you do not select this option, the Cisco Secure ACS HTML interface is not available unless you reboot the computer or start the CSAdmin service.
-
Yes, I want Setup to launch the Cisco Secure ACS Administrator from my browser following installation—Opens the Cisco Secure ACS HTML interface in the default web browser for the current Windows user account.
-
Yes, I want to view the Readme File—Opens the README.TXT file in Windows Notepad.
-
-
Click Next.
-
If you selected an option, the Cisco Secure ACS services start. The Setup Complete dialog box displays information about the Cisco Secure ACS HTML interface.
-
Click Finish.
Note: The rest of the configuration is documented under the section for the EAP type that is configured.
Cisco LWAPP Controller Configuration
Create the Necessary Configuration for WPA2/WPA
Complete these steps:
Note: The assumption is that the controller has basic connectivity to the network and IP reachability to the management interface is successful.
-
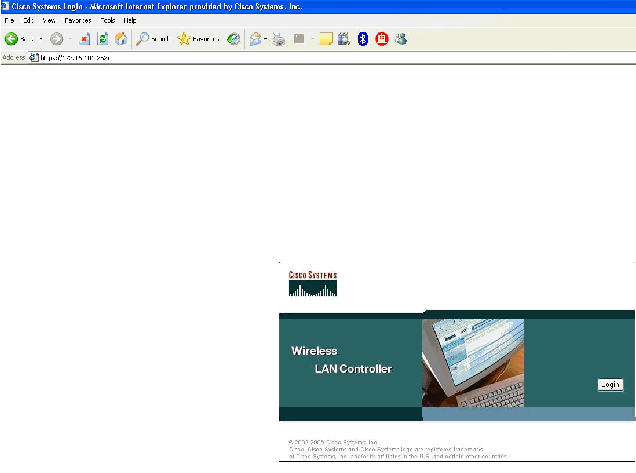
Login into the controller by browsing to https://172.16.101.252.
-
Click Login.
-
Login with the default user admin and default password admin.
-
Create the Interface VLAN mapping under the Controller menu.
-
Click Interfaces.
-
Click New.
-
In the Interface name field type Employee. (This field can be any value you like.)
-
In the VLAN ID field type 20. (This field can be any VLAN that is carried in the network.)
-
Click Apply.
-
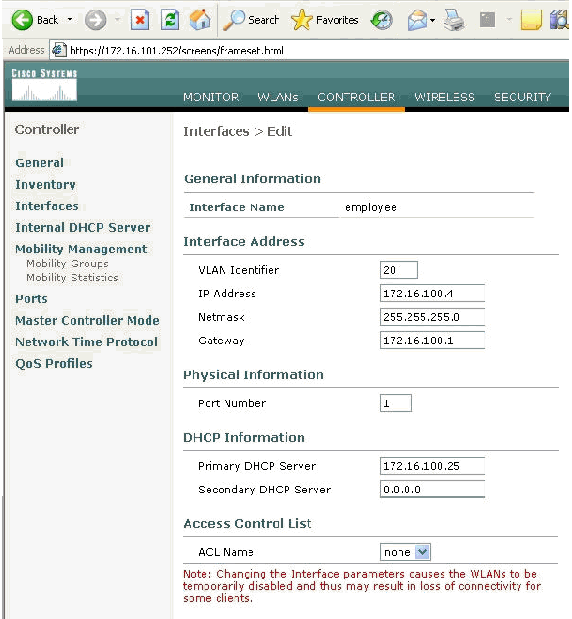
Configure the information as this Interfaces > Edit window shows.
-
Click Apply.
-
Click WLAN.
-
Click New.
-
In the WLAN SSID field type Employee.
-
Click Apply.
-
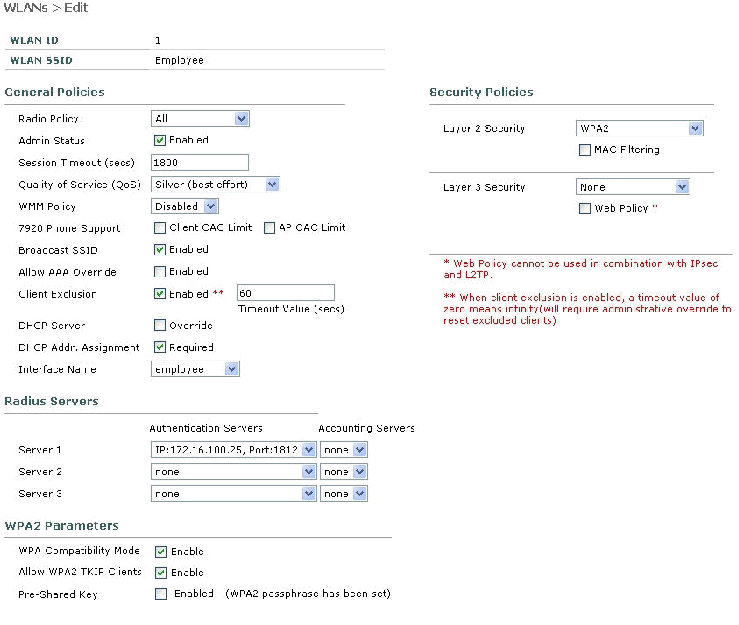
Configure the information as this WLANs > Edit window shows.
Note: WPA2 is the chosen Layer 2 encryption method for this lab. In order to allow WPA with TKIP-MIC clients to associate to this SSID, you can also check the boxes WPA compatibility mode and Allow WPA2 TKIP Clients or those clients that do not support the the 802.11i AES encryption method.
-
Click Apply.
-
Click the Security menu and add the RADIUS server.
-
Click New.
-
Add the RADIUS server IP address (172.16.100.25) which is the ACS server configured earlier.
-
Ensure that the shared key matches the AAA client configured in the ACS server.
-
Click Apply.
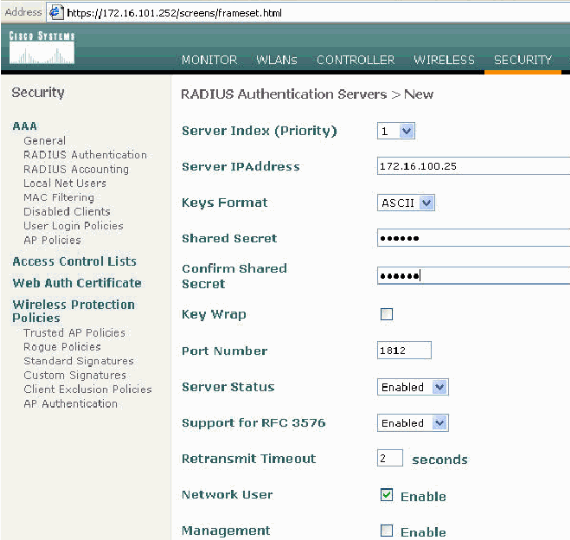
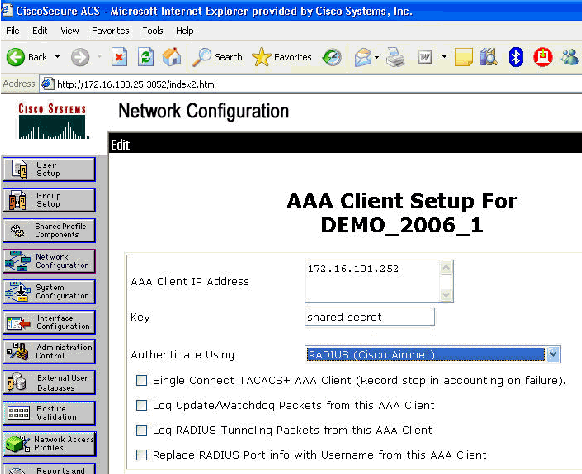
-
The basic configuration is now complete and you can begin to test the EAP-TLS.
EAP-TLS Authentication
EAP-TLS authentication requires computer and user certificates on the wireless client, the addition of EAP-TLS as an EAP type to the remote access policy for wireless access, and a reconfiguration of the wireless network connection.
In order to configure DC_CA to provide auto-enrollment for computer and user certificates, complete the procedures in this section.
Note: Microsoft has changed the Web Server template with the release of the Windows 2003 Enterprise CA so that keys are no longer exportable and the option is greyed out. There are no other certificate templates supplied with certificate services that are for server authentication and give the ability to mark keys as exportable that are available in the drop-down so you have to create a new template that does so.
Note: Windows 2000 allows for exportable keys and these procedures do not need to be followed if you use Windows 2000.
Install the Certificate Templates Snap-in
Complete these steps:
-
Choose Start > Run, type mmc, and click OK.
-
On the File menu, click Add/Remove Snap-in and then click Add.
-
Under Snap-in, double-click Certificate Templates, click Close, and then click OK.
-
In the console tree, click Certificate Templates. All of the certificate templates appear in the Details pane.
-
In order to bypass steps 2 through 4, type certtmpl.msc which opens the Certificate Templates snap-in.
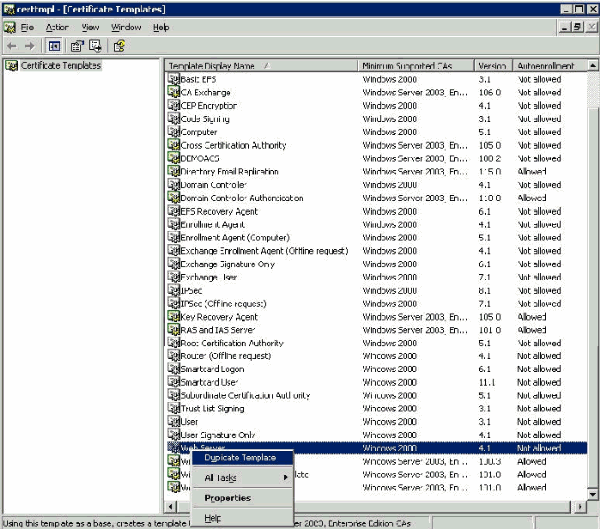
Create the Certificate Template for the ACS Web Server
Complete these steps:
-
In the Details pane of the Certificate Templates snap-in, click the Web Server template.
-
On the Action menu, click Duplicate Template.
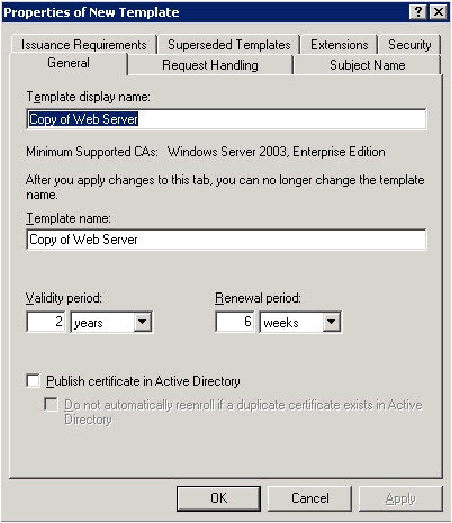
-
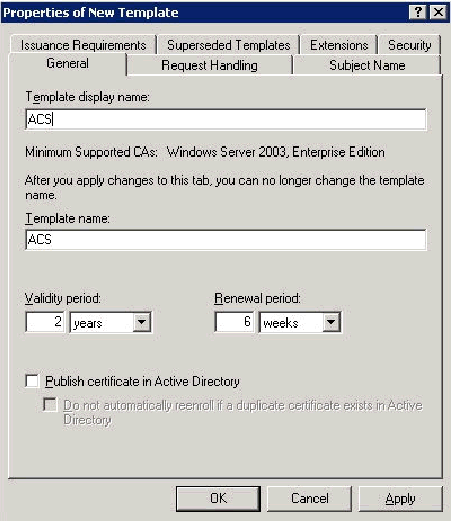
In the Template display name field, type ACS.
-
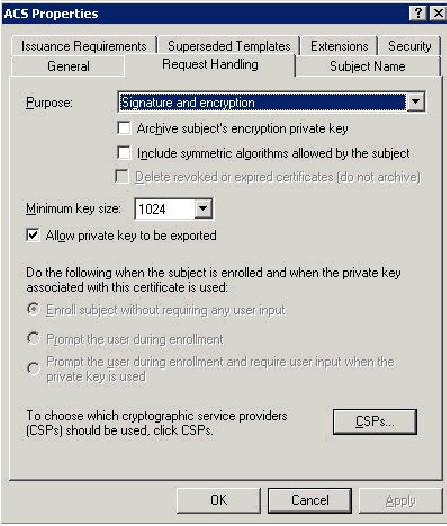
Go to the Request Handling tab and check Allow private key to be exported.
-
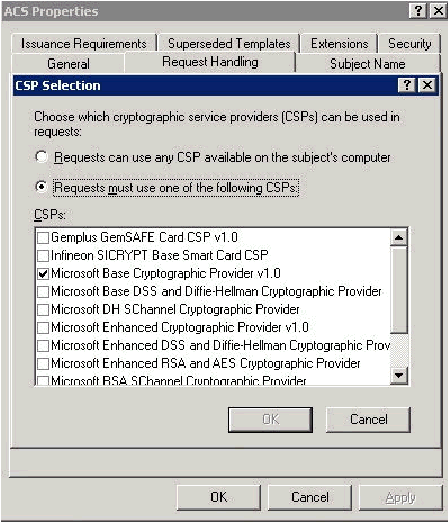
Choose Requests must use one of the following CSPs and check Microsoft Base Cryptographic Provider v1.0. Uncheck any other CSPs that are checked and then click OK.
-
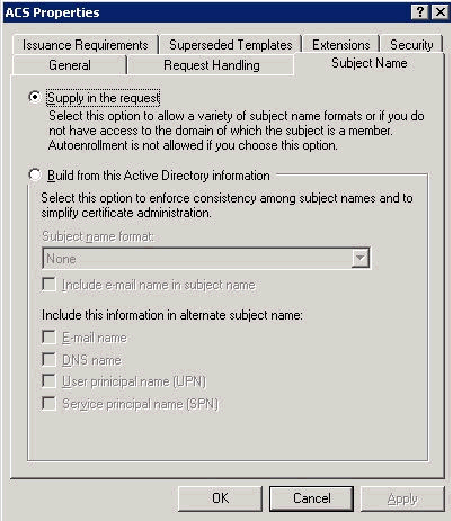
Go to the Subject Name tab, choose Supply in the request and click OK.
-
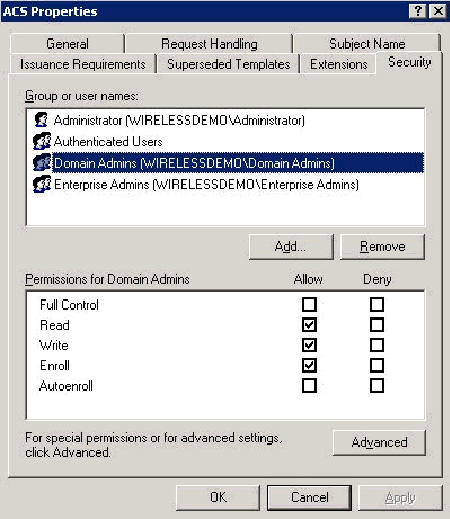
Go to the Security tab, highlight the Domain Admins Group and ensure that the Enroll option is checked under Allowed.
Important: If you choose to build from this Active Directory information only, check User principal name (UPN) and uncheck Include email name in Subject name and E-mail name because an e-mail name was not entered for the WirelessUser account in the Active Directory Users and Computers snap-in. If you do not disable these two options, auto-enrollment attempts to use e-mail, which results in an auto-enrollment error.
-
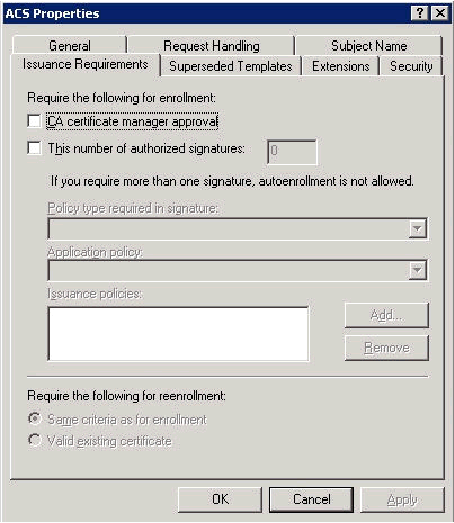
There are additional security measures if needed to prevent certificates from being automatically pushed out. These can be found under the Issuance Requirements tab. This is not discussed further in this document.
-
Click OK to save the template and move onto issuing this template from the Certificate Authority snap-in.
Enable the New ACS Web Server Certificate Template
Complete these steps:
-
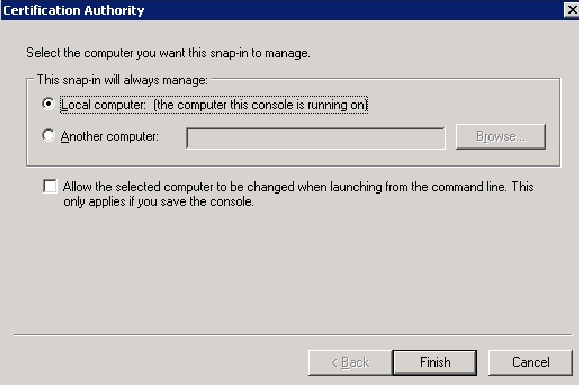
Open the Certification Authority snap-in. Follow steps 1-3 in the Create the Certificate Template for the ACS Web Server section, choose the Certificate Authority option, choose Local Computer and click Finish.
-
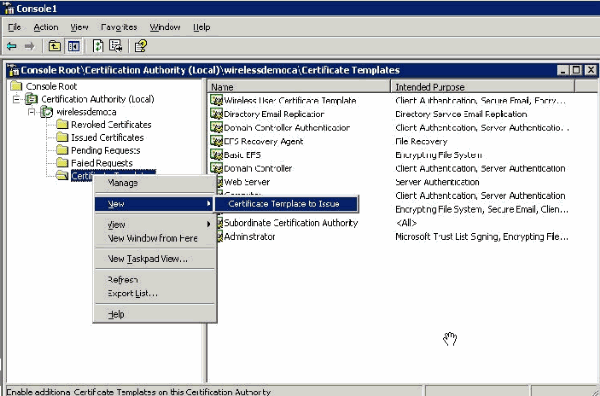
In the console tree, expand wirelessdemoca, and then right-click Certificate Templates.
-
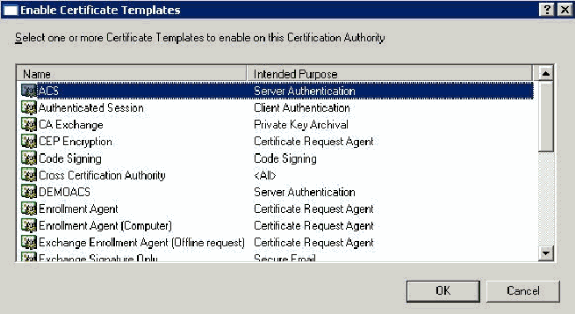
Choose New > Certificate Template to Issue.
-
Click the ACS Certificate Template.
-
Click OK and open the Active Directory Users and Computers snap-in.
-
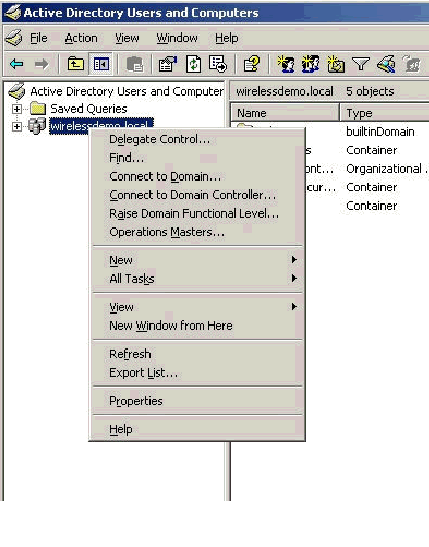
In the console tree, double-click Active Directory Users and Computers, right-click the wirelessdemo.local domain, and then click Properties.
-
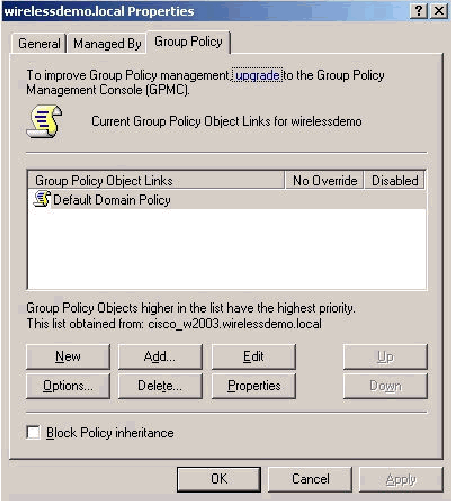
On the Group Policy tab, click Default Domain Policy, and then click Edit. This opens the Group Policy Object Editor snap-in.
-
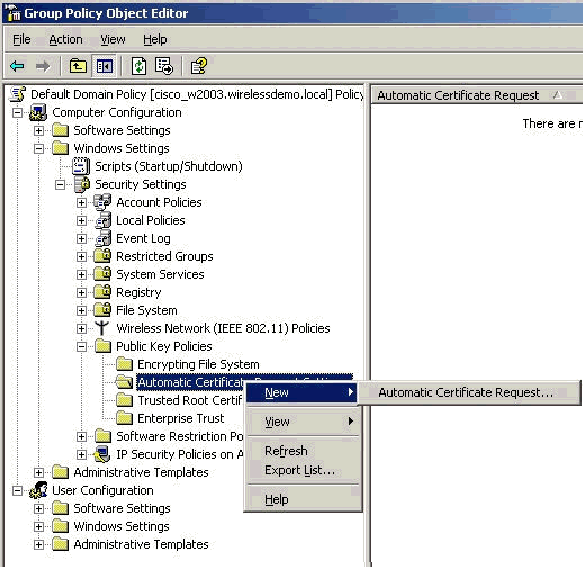
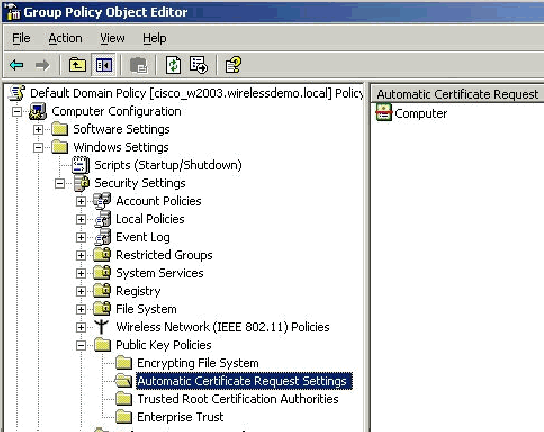
In the console tree, expand Computer Configuration > Windows Settings > Security Settings > Public Key Policies, and then select Automatic Certificate Request Settings.
-
Right-click Automatic Certificate Request Settings and choose New > Automatic Certificate Request.
-
On the Welcome to the Automatic Certificate Request Setup Wizard page, click Next.
-
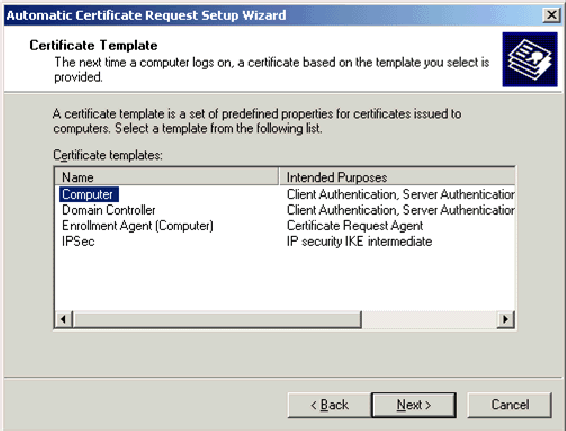
On the Certificate Template page, click Computer and click Next.
-
On the Completing the Automatic Certificate Request Setup Wizard page, click Finish.
The Computer certificate type now appears in the details pane of the Group Policy Object Editor snap-in.
-
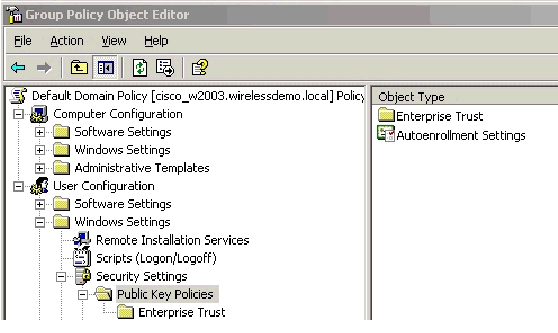
In the console tree, expand User Configuration > Windows Settings > Security Settings > Public Key Policies.
-
In the details pane, double-click Auto-enrollment Settings.
-
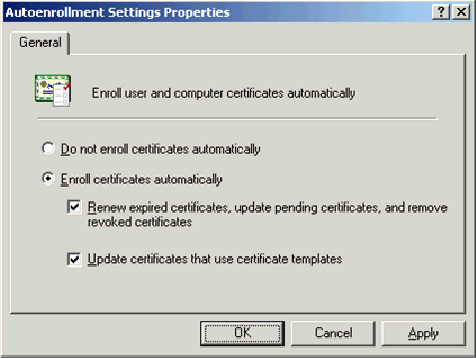
Choose Enroll certificates automatically and check Renew expired certificates, update pending certificates and remove revoked certificates and Update certificates that use certificate templates.
-
Click OK.
ACS 4.0 Certificate Setup
Configure Exportable Certificate for ACS
Important: The ACS server must obtain a server certificate from the Enterprise root CA server in order to authenticate a WLAN EAP-TLS client.
Important: Ensure that the IIS Manager is not open during the certificate setup process as it causes problems with cached information.
-
Log into the ACS server with an account that has Enterprise Admin rights.
-
On the local ACS machine, point the browser at the Microsoft certification authority server at http://IP-address-of-Root-CA/certsrv. In this case, the IP address is 172.16.100.26.
-
Log in as the Administrator.

-
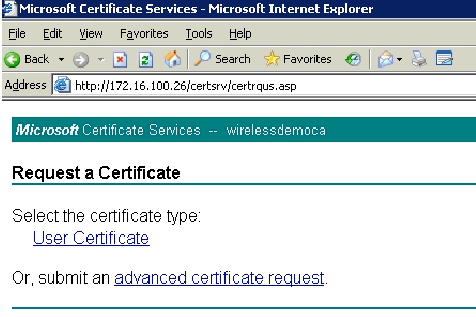
Choose Request a Certificate and click Next.
-
Choose Advanced Request and click Next.

-
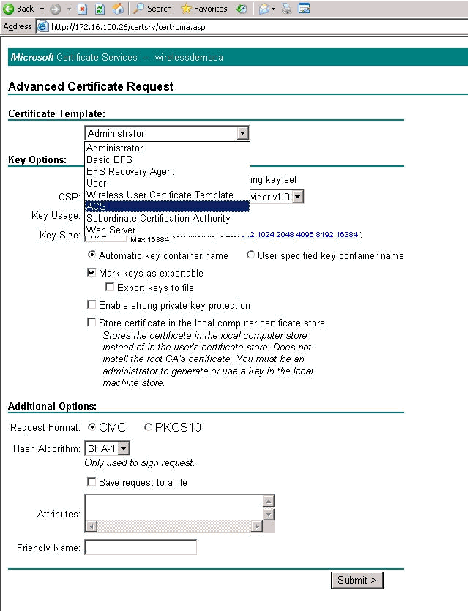
Choose Create and submit a request to this CA and click Next.
Important: The reason for this step is due to the fact that Windows 2003 does not allow for exportable keys and you need to generate a certificate request based on the ACS Certificate that you created earlier that does.
-
From the Certificate Templates, select the certificate template created earlier named ACS. The options change after you select the template.
-
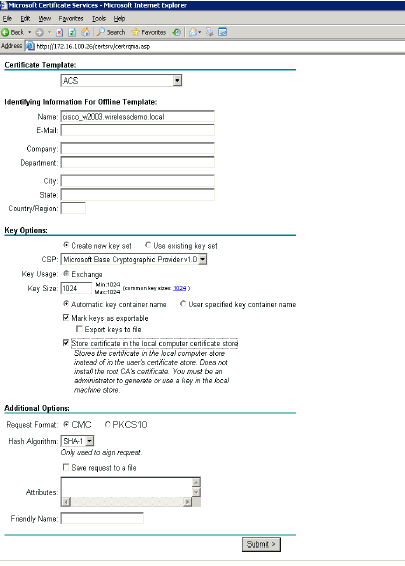
Configure the Name to be the fully qualified domain name of the ACS server. In this case the ACS server name is cisco_w2003.wirelessdemo.local. Ensure that Store certificate in the local computer certificate store is checked and click Submit.
-
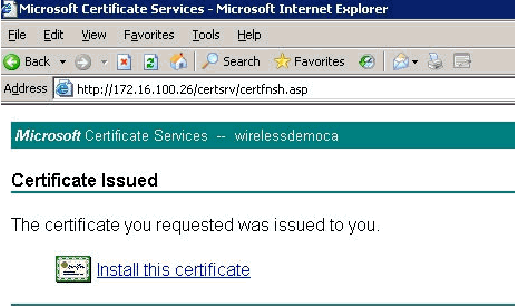
A pop up window appears that warns about a potential scripting violation. Click Yes.

-
Click Install this certificate.
-
A pop up window appears again and warns about a potential scripting violation. Click Yes.

-
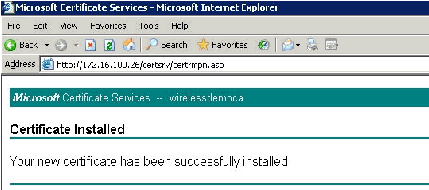
After you click Yes, the certificate is installed.
-
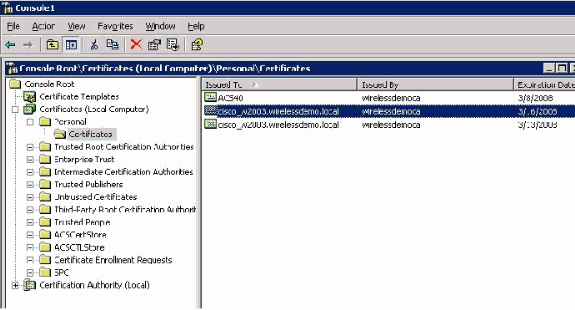
At this point, the certificate is installed in the Certificates folder. In order to access this folder, choose Start > Run, type mmc, press Enter, and choose Personal > Certificates.
-
Now that the certificate is installed to the local computer (ACS or cisco_w2003 in this example), you need to generate a certificate file (.cer) for the ACS 4.0 certificate file configuration.
-
On the ACS server (cisco_w2003 in this example), point the browser at the Microsoft Certification Authority server to http://172.16.100.26 /certsrv.
Install the Certificate in ACS 4.0 Software
Complete these steps:
-
On the ACS server (cisco_w2003 in this example), point the browser at the Microsoft CA server to http://172.16.100.26 /certsrv.
-
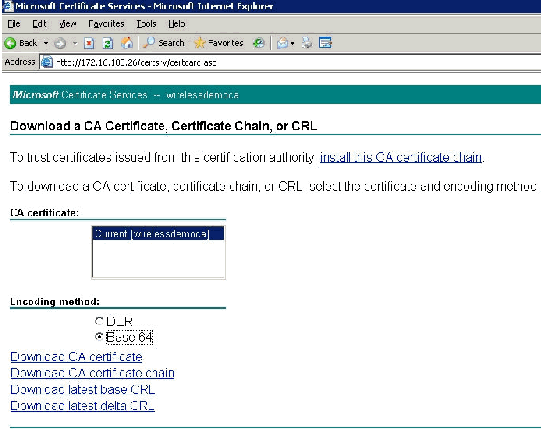
From the Select a Task option choose Download a CA certificate, certificate chain or CRL.
-
Choose the Base 64 radio encoding method and click Download CA Certificate.
-
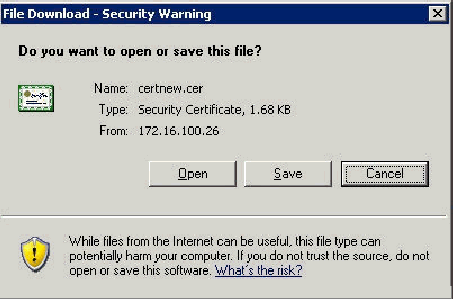
A File Download Security Warning window appears. Click Save.
-
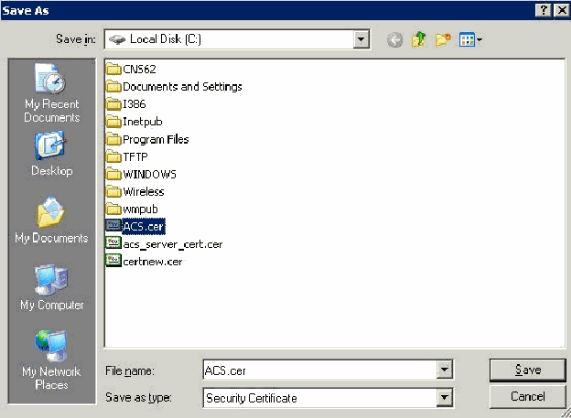
Save the file with a name such as ACS.cer or any name that you wish. Remember this name since you use it during the ACS Certificate Authority setup in ACS 4.0.
-
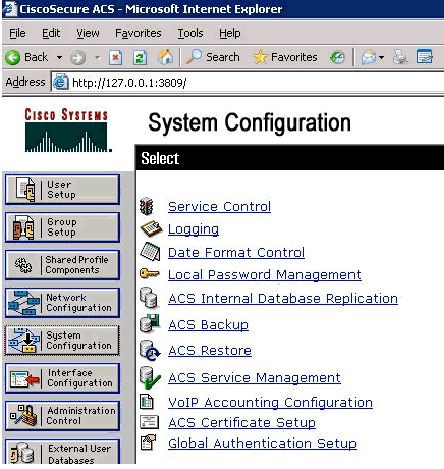
Open ACS Admin from the desktop shortcut created during the installation.
-
Click System Configuration.
-
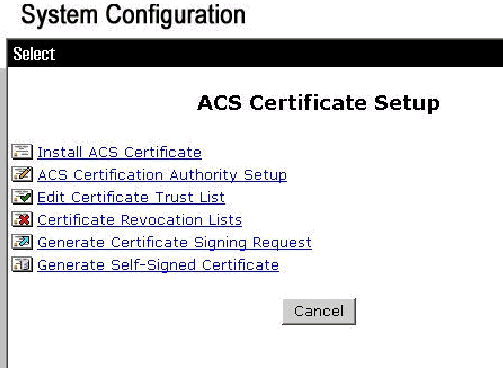
Click ACS Certificate Setup.
-
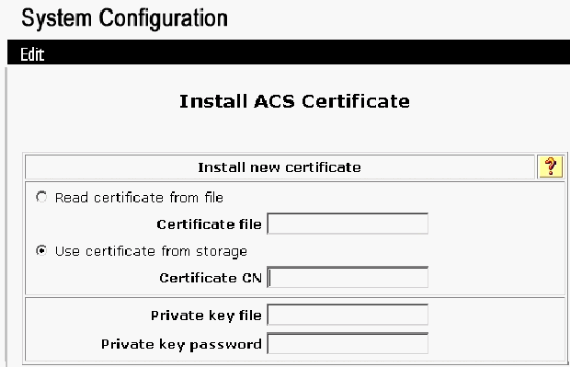
Click Install ACS Certificate.
-
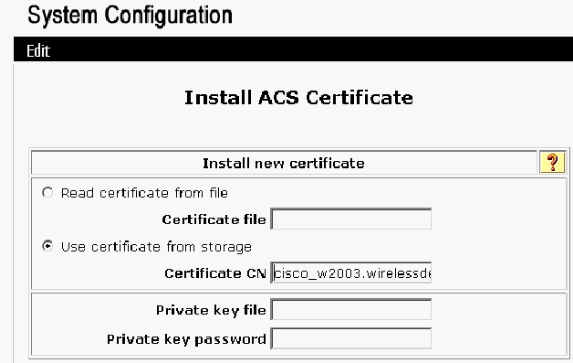
Choose Use certificate from storage and type in the fully qualified domain name of cisco_w2003.wirelessdemo.local (or ACS.wirelessdemo.local if you used ACS as the name).
-
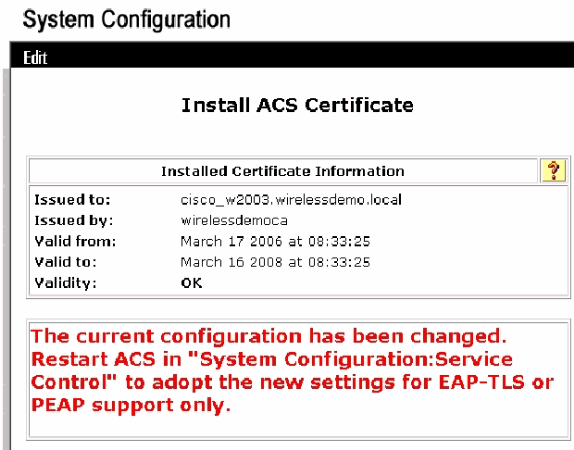
Click Submit.
-
Click System Configuration.
-
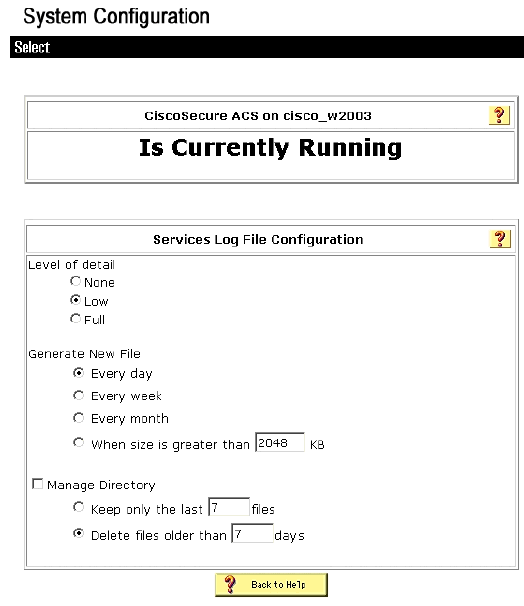
Click Service Control and then click Restart.
-
Click System Configuration.
-
Click Global Authentication Setup.
-
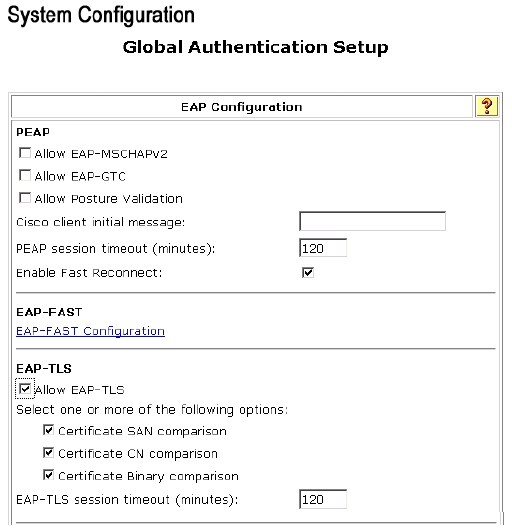
Check Allow EAP-TLS and all the boxes underneath it.
-
Click Submit + Restart.
-
Click System Configuration.
-
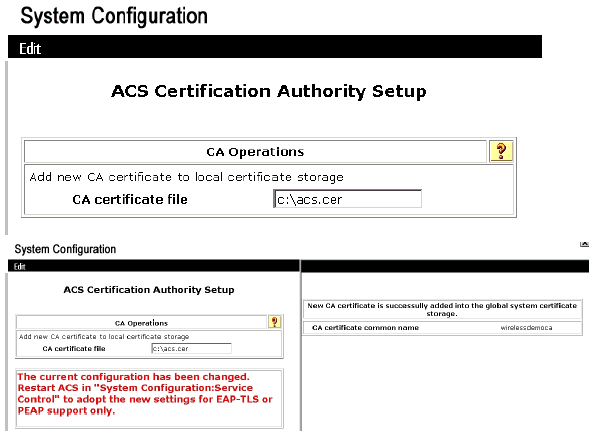
Click ACS Certification Authority Setup.
-
Under the ACS Certification Authority Setup window, type the name and location of the *.cer file created earlier. In this example, the *.cer file created is ACS.cer in the root directory c:\.
-
Type c:\acs.cer in the CA certificate file field and click Submit.
-
Restart the ACS service.
CLIENT Configuration for EAP-TLS using Windows Zero Touch
CLIENT is a computer that runs Windows XP Professional with SP2 that acts as a wireless client and obtains access to Intranet resources through the wireless AP. Complete the procedures in this section in order to configure CLIENT as a wireless client.
Perform a Basic Installation and Configuration
Complete these steps:
-
Connect CLIENT to the Intranet network segment using an Ethernet cable connected to the switch.
-
On CLIENT, install Windows XP Professional with SP2 as a member computer named CLIENT on the wirelessdemo.local domain.
-
Install Windows XP Professional with SP2. This must be installed in order to have EAP-TLS and PEAP support.
Note: Windows Firewall is automatically turned on in Windows XP Professional with SP2. Do not turn the firewall off.
Configure the Wireless Network Connection
Complete these steps:
-
Log off and then log on by using the WirelessUser account in the wirelessdemo.local domain.
Note: Update computer and user configuration group policy settings and obtain a computer and user certificate for the wireless client computer immediately, by typing gpupdate at a command prompt. Otherwise, when you log off and then log on, it performs the same function as gpupdate. You must be logged on to the domain by connecting over the wire.
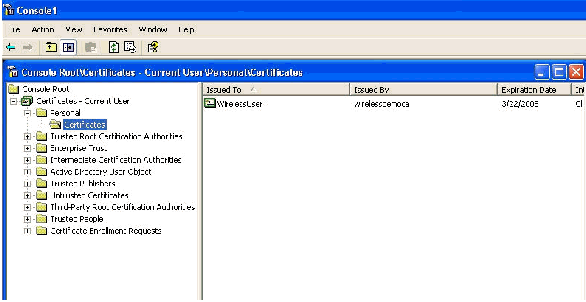
Note: In order to validate that the certificate is automatically installed on the client, open the certificate MMC and validate that the WirelessUser certificate is available in the Personal Certificates folder.
-
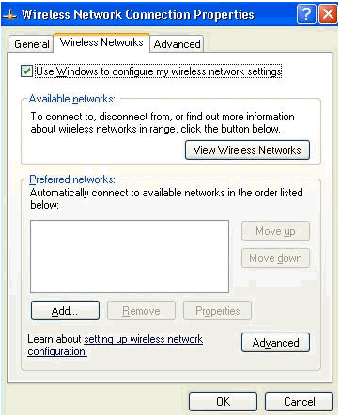
Choose Start > Control Panel, double-click Network Connections, and then right-click Wireless Network Connection.
-
Click Properties, go to the Wireless Networks tab, and ensure that User Windows to configure my wireless network settings is checked.
-
Click Add.
-
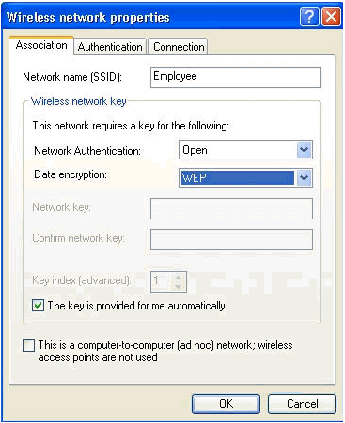
Go to the Association tab, and type Employee in the Network name (SSID) field.
-
Ensure that Data Encryption is set to WEP and The key is provided for me automatically is checked.
-
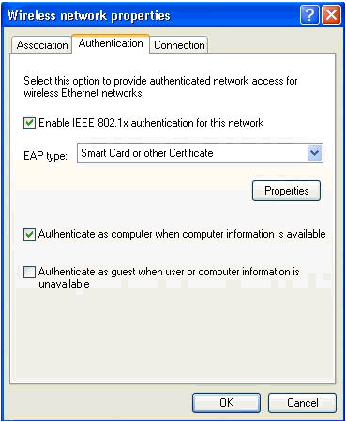
Go to the Authentication tab.
-
Validate that EAP type is configured to use Smart Card or other Certificate. If it is not, select it from the drop-down menu.
-
If you want the machine to be authenticated prior to login (which allows login scripts or group policy pushes to be applied) choose the option Authenticate as computer when computer information is available.
-
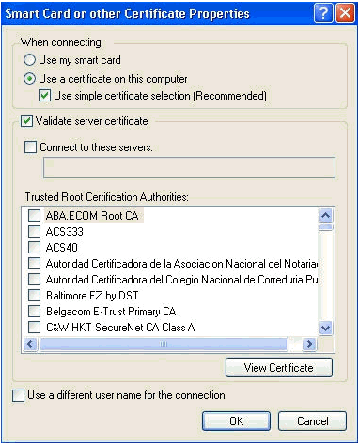
Click Properties.
-
Ensure that the boxes in this window are checked.
-
Click OK three times.
-
Right-click the wireless network connection icon in systray and then click View Available Wireless Networks.
-
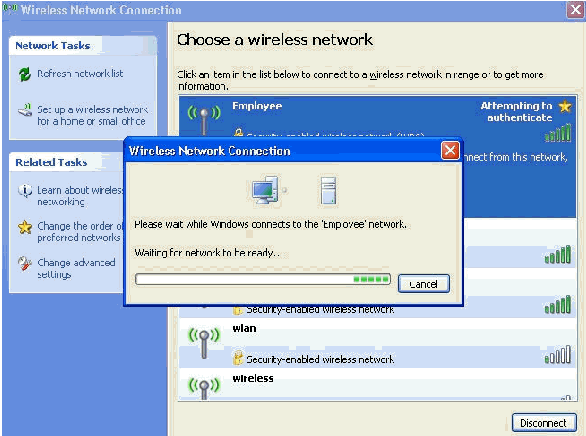
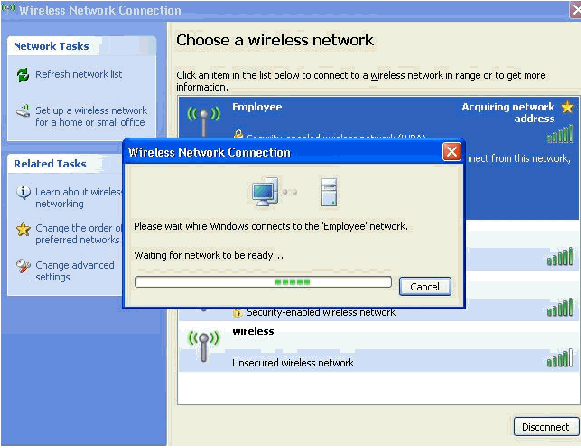
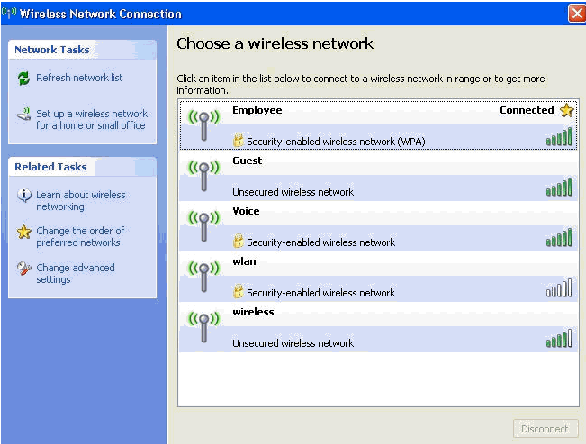
Click the Employee wireless network and click Connect.
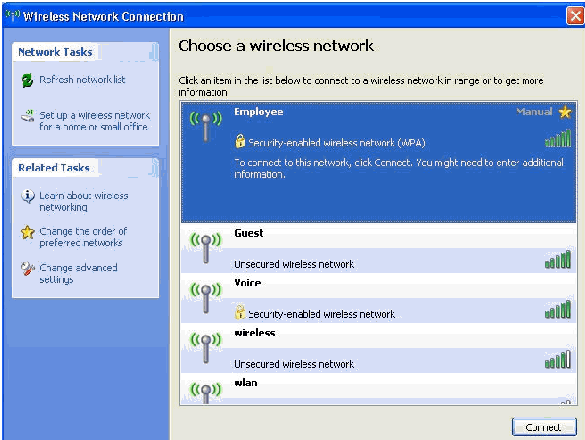
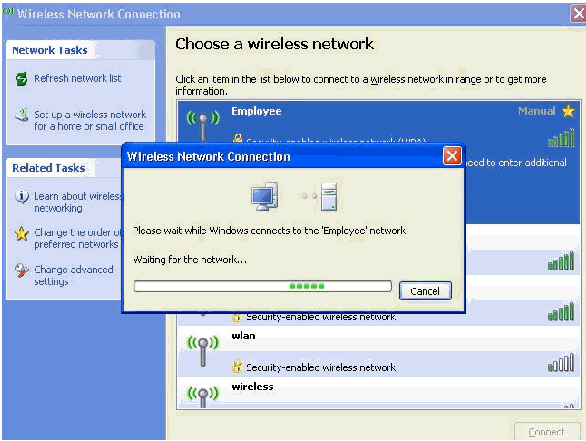
These screen shots indicate if the connection completes successfully.
-
After the authentication is successful, check the TCP/IP configuration for the wireless adapter by using Network Connections. It should have an address range of 172.16.100.100-172.16.100.254 from the DHCP scope or the scope created for the wireless clients.
-
In order to test functionality, open up a browser and browse to http://wirelessdemoca (or the IP address of the Enterprise CA server).
Related Information
- EAP Authentication with WLAN Controllers (WLC) Configuration Example
- Wireless LAN Controller Configuration Guide
- Wireless LAN Controller and Lightweight Access Point Basic Configuration Example
- VLANs on Wireless LAN Controllers Configuration Example
- AP Group VLANs with wireless LAN Controllers Configuration Example
- Technical Support & Documentation - Cisco Systems
Revision History
| Revision | Publish Date | Comments |
|---|---|---|
1.0 |
01-Dec-2013 |
Initial Release |


 Feedback