Setting Up, Viewing, and Collecting Cisco IPCC Express Traces
Available Languages
Contents
Introduction
The Cisco IPCC Express Edition is a product suite platform that covers:
-
IP Interactive Voice Response (IP-IVR)
-
IP Integrated Contact Distribution (IP ICD)
-
IP Queue Manager (IP-QM)
-
IP AutoAttendant
-
Extended Services
It is also known as Customer Response Solutions (CRS) and Customer Response Applications (CRA).
This document explains how to enable and collect traces for IPCC Express in preparation for troubleshooting problems with assistance from the Cisco Technical Assistance Center (TAC).
Refer to AVVID TAC Cases: Collecting Troubleshooting Information for additional information on which trace levels to enable to troubleshoot a particular problem.
Prerequisites
Requirements
Cisco recommends that you have knowledge of this topic:
-
Microsoft Windows 2000 Administration
Components Used
The information in this document is based on these software and hardware versions:
-
Cisco IPCC Express Version 3.x
-
Cisco Extended Services 2.x and 3.x
-
Cisco Customer Response Application 2.x
The information in this document was created from the devices in a specific lab environment. All of the devices used in this document started with a cleared (default) configuration. If your network is live, make sure that you understand the potential impact of any command.
Conventions
Refer to Cisco Technical Tips Conventions for more information on document conventions.
Set Up and Collect Traces for 2.x Environments
Enable Trace
Complete these steps:
-
Open a browser.
Enter the URL for the Application Administration Page. For example:
http://10.10.10.1/appadmin
-
Log on to the administrator account.
-
Click Engine.
See Figure 1.
Figure 1 – Application Administration: Engine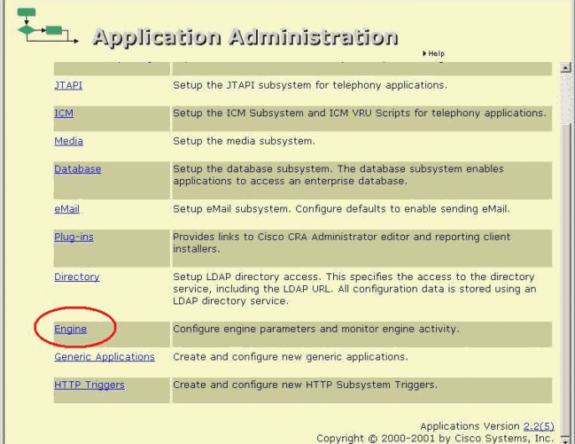
-
Select Trace Configuration on the Engine Page.
See Figure 2.
Figure 2 – Application Administration: Trace Configuration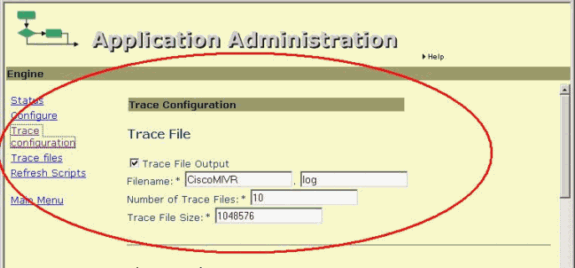
Note: Trace Configuration requires you to define the filename prefix, extension, size, and number of files generated. Only make adjustments as instructed by your Cisco technical representative. The logs overwrite the oldest files based on the date and the time when the maximum number of files is reached.
-
Select all the checkboxes in the Alarm Tracing column on the Trace Configuration Page.
See Figure 3.
Figure 3 – Inactive trace level options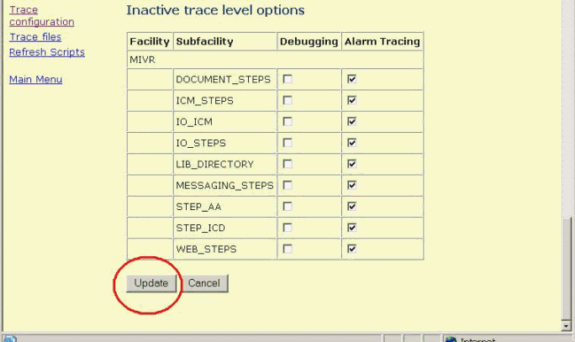
-
Select all the necessary checkboxes in the Debugging column.
-
Click Update at the bottom of the page.
See Figure 3.
Note: Click the Status hyperlink on the Engine Page to restart the Engine in order to generate a new set of traces.
-
Click Trace Files to view the trace files.
See Figure 4.
Figure 4 – Application Administration: Trace Files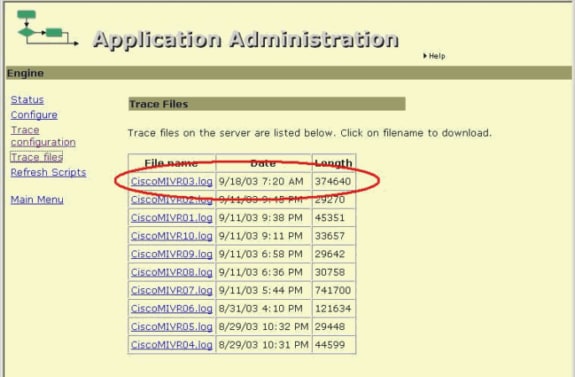
Locate the file with the prefix and extension according to your settings in the Trace Configuration section.
-
Click on the file to view the log.
-
Right-click My Computer to collect the logs.
-
Select Explore.
-
Choose View > Details.
-
Locate the subdirectory c:\Program Files\wfavvid.
Locate files based on the Modified time and date.
Set Up and Collect Traces for 3.x Environments
Enable Trace
Complete these steps:
-
Open a browser.
Enter the URL for the Application Administration Page. For example:
http://10.1.1.1/AppAdmin
See Figure 5.
Figure 5 – Cisco Application Administration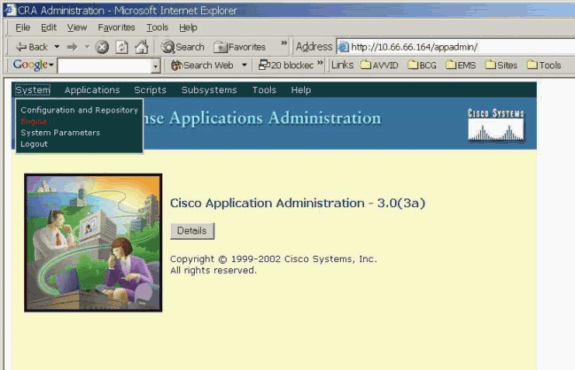
-
Log on to the administrator account.
-
Choose System > Engine.
-
Select Trace Configuration.
See Figure 6.
Figure 6 – Customer Response Applications Administration: Trace Configuration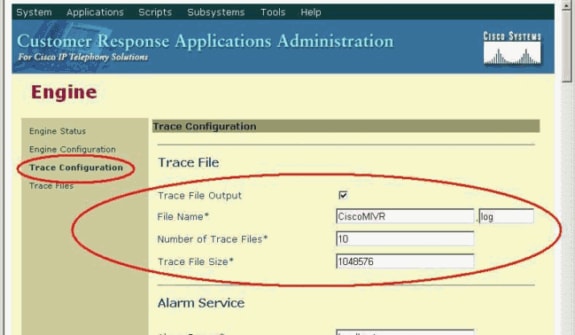
Note: Trace Configuration requires you to define the filename prefix, extension, size, and number of files generated. Only make adjustments as instructed by your Cisco technical representative. The logs overwrite the oldest files based on the date and time when the maximum number of files is reached.
-
Click Restore Defaults on the Trace Configuration Page.
This resets all the checkboxes on the Alarm Tracing column.
See Figure 7.
Figure 7 – Active Trace Level Options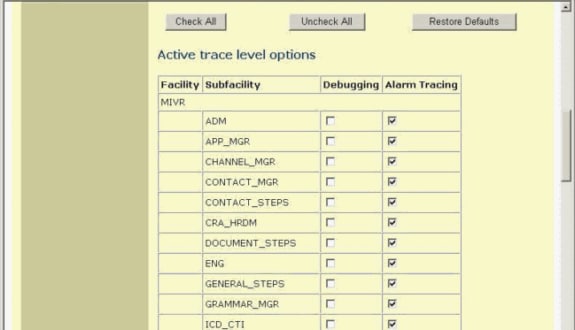
-
Select all the necessary boxes in the Debugging column against the necessary Subfacilities.
See Figure 7.
-
Click Update at the bottom of the page.
See Figure 8.
Figure 8 – Debugging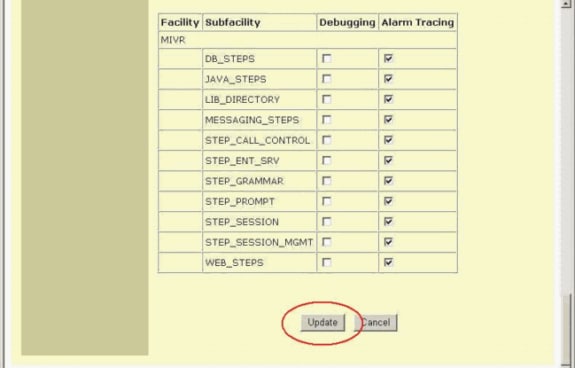
Note: Click the Status hyperlink on the Engine Page to restart the Engine in order to generate a new set of traces.
-
Click Trace Files to view the traces.
-
Locate the file with the prefix and extension according to the Trace Configuration settings.
-
Click on the file to view the log.
-
Right-click My Computer to collect the logs.
-
Select Explore.
-
Choose View > Details.
-
Go to the subdirectory c:\Program Files\wfavvid\log.
-
Locate the files based on the Modified time and date.
Related Information
Contact Cisco
- Open a Support Case

- (Requires a Cisco Service Contract)


 Feedback