IPCC: Troubleshoot Mutex Lock Errors
Available Languages
Contents
Introduction
In a Cisco Unified Contact Center Express environment, a user cannot change configurations in the trigger information section of the Java Telephony Application Programming Interface (JTAPI) Triggers on the Cisco Customer Response Solution (CRS) Admin. In the attempt to change the application in the trigger information section of the JTAPI Triggers, this error message appears in the MADM log:
java.lang.InterruptedException: User (CRSuser) attempt to acquire mutex lock for the
purpose of (Cluster Mutex acquired by JTAPI Provider - Update.),
but could not acquirelock within (3000) milisecond.
Please try after few minutes
This document describes how to troubleshoot these mutex lock errors.
Prerequisites
Requirements
Cisco recommends that you have knowledge of these topics:
-
Cisco CRS
-
Cisco Unified Contact Center Express
-
DC Directory Administration
-
Active Directory
Components Used
This document is not restricted to specific software and hardware versions.
The information in this document was created from the devices in a specific lab environment. All of the devices used in this document started with a cleared (default) configuration. If your network is live, make sure that you understand the potential impact of any command.
Conventions
Refer to Cisco Technical Tips Conventions for more information on document conventions.
Problem
When a user attempts to update the JTAPI Triggers/upload prompts or scripts using the Cisco CRS Application Admin, this error message appears:
java.lang.InterruptedException: User (CRSuser)
attempt to acquire mutex lock for the
purpose of (Cluster Mutex acquired by JTAPI Provider - Update.),
but could not acquirelock within (3000) milisecond.
Please try after few minutes
This is a known defect when a lock entry is missing in the Lightweight Directory Access Protocol (LDAP). This issue is documented by Cisco bug ID CSCsd13553 (registered customers only) .
Solution 1 - For the DC Directory Environment
If this is a DC Directory environment, use this solution to solve the problem.
Note: You need to log into the DC Directory Manager as a Directory Manager in order to make the necessary changes.
-
In the DC Directory LDAP, choose CCN Apps > clusters > [profile] > Locks > Locks.00000000 and confirm that these mutex lock entries are named as this list shows:
lockApplicant?empty
lockOwner?empty
lockUsage?empty,
lockUserInfo?empty
lockUserTimestamp?empty
-
If any of the entries in step 1 are missing the ?empty suffix in their name, then they need to be renamed to exactly match the list in step 1.
Note: You can ignore the lockExpiration entry. It does not need the ?empty suffix in the name.
-
If any of the lock____?empty entries are missing completely, you must add them manually. In order to add the entry, complete these steps:
Note: The lockApplicant?empty value is used for illustration purposes only.
-
Right-click on Locks.00000000 and select New > ciscoCCNocConfigInfoCES.
-
Enter the name as lockApplicant?empty and press Enter.
-
In the next window, click Add and enter x in the Enter String value box. Then click OK.
-
Click OK again.
-
-
Once you have confirmed that all of these entries are named properly, confirm that these entries have the value configured as x (lowercase x):
lockApplicant?empty
lockOwner?empty
lockUsage?empty,
lockUserInfo?empty
lockUserTimestamp?empty
Note: Ignore the lockExpiration entry in this step. Its value should not be x.
If any of these lock entry values is not configured as x, then configure them as x.
Solution 2 - For the Active Directory Environment
If you have an Active Directory (AD) integration, you need to use ADSI Edit ![]() in order to change the lock parameters. Complete these steps in order to resolve the issue in an AD environment:
in order to change the lock parameters. Complete these steps in order to resolve the issue in an AD environment:
-
On the AD server, you can browse your directory schema when you open the Active Directory Services Interface (ADSI) edit utility. Then drill down to dc=xxxxx, dc=com, ou=Cisco, ou=CCNApps, ou=clusters, ou= <profilename>, ou=Locks, ou=Locks.000000000.
-
Check that the lock entries are named as this list shows:
lockApplicant?empty
lockOwner?empty
lockUsage?empty,
lockUserInfo?empty
lockUserTimestamp?empty
-
If any of the entries in step 2 are missing the ?empty suffix in their name, then they need to be renamed to exactly match the list in step 2.
-
If any of the lock____?empty entries are missing completely, then you need to add them manually. Complete these steps in order to add the entry:
Note: The lockApplicant?empty value is used for illustration purposes only.
-
Right-click on Locks.00000000 and select New > Object > ciscoCCNocConfigInfoCES.
-
Enter the name as lockApplicant?empty and press Next.
-
In the next window, click More Attributes.
-
From the Select a Property to View pull-down menu, select ciscoCCNatConfigInfoCESValue.
-
In the Edit Attribute: box, enter x and click Add.
-
Click OK.
-
Click Finish.
-
-
Once you have confirmed that all entries are named properly, confirm that these entries have the value configured as x (lowercase x):
lockApplicant?empty
lockOwner?empty
lockUsage?empty,
lockUserInfo?empty
lockUserTimestamp?empty
Note: Ignore the lockExpiration entry in this step. Its value should not be x.
If any of these lock entry values are not configured as x, then complete these steps in order to configure them as x:
-
Right-click on lockApplicant?empty and choose Properties.
Note: The lockApplicant?empty value is used for illustration purposes only.
-
From the Attributes: box, select ciscoCCNatConfigInfoCESValue and click Edit.
-
Highlight the existing entry in the Values: box and click Remove (skip if none are present).
-
In the Value to add: box, type x and click Add. Then click OK.
-
Click Apply and then OK.
-
Error: Cannot acquire ClusterMutex
When the user sets up call wrap up time for the agents in the Customer Response Solutions Administration application, this error message appears:
Can not acquire ClusterMutex; nested exception is: com.cisco.config.ConfigException:
UnmarshalException; nested exception is: javax.xml.bind.UnmarshalException: Content is not
allowed in prolog. - with linked exception: [org.xml.sax.SAXParseException: Content is not
allowed in prolog.]
Solution
Complete these steps in order to resolve this issue:
-
Go to the C:\program files\wfavvid\ClusterData\Default\ folder on the CRS server.
-
Rename the com.cisco.crs.cluster.config.LockConfig folder to com.cisco.crs.cluster.config.LockConfig.bak.
-
Restart Node Manager.
If you do not wish to restart Node Manager, here is another way of clearing MutexLocks:
-
Click Start and type CET.
-
Choose No on popup message.
-
Find and click com.cisco.crs.cluster.config.LockConfig in the list located on the left.
-
Double-click the one record located on the right.
-
Select the com.cisco.crs.cluster.config.LockConfig tab located at the top.
-
Clear any fields that are not empty.
UCCX Mutex Lock Error
Problem 1
When you try to change the skills of a resource, this error is received:
Error: can not acquire ClusterMutex; nested exception is:
com.cisco.config.ConfigException: Store config record – error: config
request timed out.
Solution
This error can occur due to one of these issues:
-
The backup process did not clear the Lock from the DB, but the locks and the Archive are clean on both servers.
-
The lock config file may be having problem. Specifically, the server cannot read from it or the XML file inside it became corrupted.
Complete these steps in order to fix this issue:
-
Verify from the CET that the locks and the Archive are clean on both servers.
-
Verify the NIC order and that cliconfg is set correctly.
-
Go to the C:\program files\wfavvid\ClusterData\Default\ folder on the CRS server.
-
Rename the com.cisco.crs.cluster.config.LockConfig folder to com.cisco.crs.cluster.config.LockConfig.bak.
-
Reboot the Cluster.
Complete these steps in order to verify the Mutex lock setting on the DB:
-
Go to Start > Run, type in cet, and press Enter.
-
Click No when the window pops up.
-
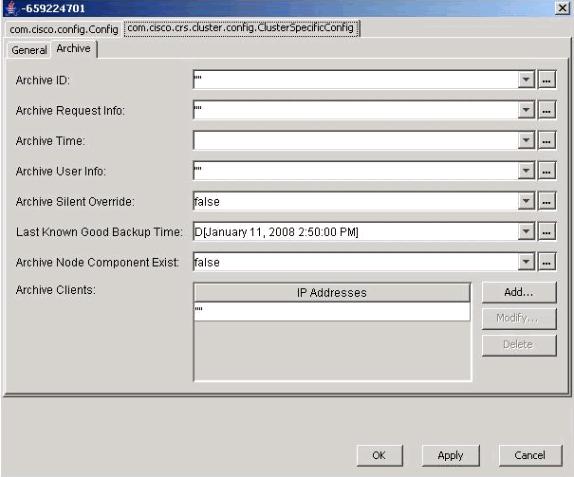
In the left-hand pane, double-click on this Configuration Object Type: com.cisco.crs.cluster.config.ClusterSpecificConfig.
-
In the right-hand pane, double-click on the row returned for your node.
-
In the new window, click the com.cisco.crs.cluster.config.ClusterSpecificConfig tab.
-
Click the Archive tab.
-
If anything exists in double quotes regarding Archive ID, Archive Request Info, Archive User Info, or Archive Client, delete the content, but leave the double quote.

Click Apply.
-
-
Click OK in order for the changes to take effect.
-
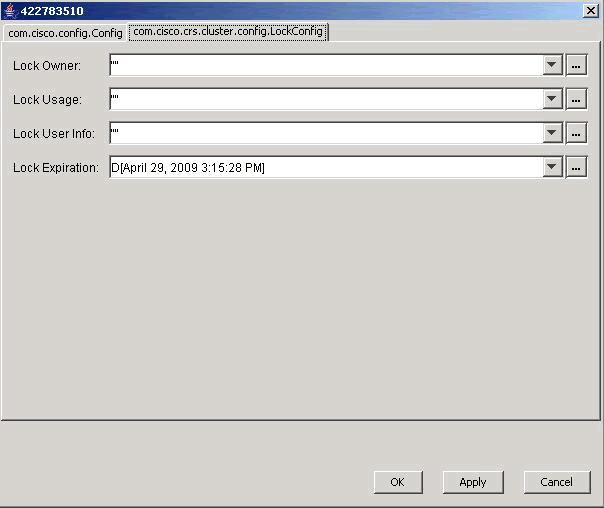
Select the com.cisco.crs.cluster.config.LockConfig tab located at the top.
-
If anything exists in double quotes regarding Lock Owner, Lock Usage, or Lock User Info, delete the content, but leave the double quotes.

Click Apply.
-
-
Click OK in order for the changes to take effect.
-
Perform the same procedure in the second node if you have two UCCX servers.
Problem 2
When trying to update existing configuration, this error is received:
User (lawr) attempt to acquire mutex lock for the purpose of (Cluster Mutex
acquired by ICD - CSD RG Update.), but could not acquire lock within (3000)
milisecond. Please try after few minutes
If you reboot and restart Node Manager, the RMCM subsystem gets stuck in the Initializing state. When trying to release the lock, you have to delete some of the attributes and create new ones. As a result, LDAP sometimes throws an error. This causes that attribute not to be created. From this point onwards, any Appadmin operation will result in a ClusterMutex error, and a restart of the engine will cause RmCm to be stuck in the Initializing state because it cannot obtain the ClusterMutex lock.
Solution
Complete these steps in order to add the lockApplicant entry:
-
Right-click the Locks.xxxxxxx, and choose New > ciscoCCNocConfigInfoCES.
-
Enter the name as lockApplicant?empty, and press Enter.
-
In the next window, click Add, and in the Enter String value box, enter x.
-
Click Ok.
This is documented in Cisco Bug ID CSCsd13553 (registered customers only) .
Related Information
- CRAThere has been an error while reading or saving to the database. Please contact Admin error message appears when you update CSQ, skills, or resource information in CRS 3.x
- Cisco Unified Contact Center Express 5.0/7.0: "Error While Handling The Input Request" Error Message
- Voice and Unified Communications Product Support
- Cisco Unified Contact Center Express Support
- Technical Support & Documentation - Cisco Systems
Revision History
| Revision | Publish Date | Comments |
|---|---|---|
1.0 |
28-Sep-2011 |
Initial Release |
Contact Cisco
- Open a Support Case

- (Requires a Cisco Service Contract)


 Feedback