How to Configure the Cisco VPN Client to PIX with AES
Available Languages
Contents
Introduction
This sample configuration shows how to setup a remote access VPN connection from a Cisco VPN Client to a PIX Firewall, using Advanced Encryption Standard (AES) for encryption. This example uses Cisco Easy VPN to set up the secure channel and the PIX Firewall is configured as an Easy VPN server.
In Cisco Secure PIX Firewall software release 6.3 and later, the new international encryption standard AES is supported for securing site-to-site and remote access VPN connections. This is in addition to the Data Encryption Standard (DES) and 3DES encryption algorithms. The PIX Firewall supports AES key sizes of 128, 192, and 256 bits.
The VPN Client supports AES as an encryption algorithm starting with Cisco VPN Client release 3.6.1. The VPN Client supports key sizes of 128 bits and 256 bits only.
Prerequisites
Requirements
This sample configuration assumes that the PIX is fully operational and configured with the necessary commands in order to handle traffic as per the security policy of the organization.
Components Used
The information in this document is based on these software and hardware versions:
-
PIX Software Release 6.3(1)
Note: This setup was tested on PIX Software Release 6.3(1) and is expected to work on all later releases.
-
Cisco VPN Client version 4.0.3(A)
Note: This setup was tested on VPN Client version 4.0.3(A) but works on earlier releases back to 3.6.1 and up to the current release.
The information in this document was created from the devices in a specific lab environment. All of the devices used in this document started with a cleared (default) configuration. If your network is live, make sure that you understand the potential impact of any command.
Conventions
Refer to the Cisco Technical Tips Conventions for more information on document conventions.
Background Information
Remote Access VPNs address the requirement of the mobile workforce to securely connect to the organization's network. Mobile users are able to set up a secure connection using the VPN Client software installed on their PCs. The VPN Client initiates a connection to a central site device configured to accept these requests. In this example, the central site device is a PIX Firewall configured as an Easy VPN server which uses dynamic crypto maps.
Cisco Easy VPN simplifies VPN deployment by making configuration and management of VPNs easy. It consists of the Cisco Easy VPN Server and the Cisco Easy VPN Remote. Minimal configuration is required on the Easy VPN Remote. The Easy VPN Remote initiates a connection. If authentication is successful, the Easy VPN Server pushes the VPN configuration down to it. More information on how to configure a PIX Firewall as an Easy VPN server is available at Managing VPN Remote Access.
Dynamic crypto maps are used for IPsec configuration when some parameters required to set up the VPN cannot be predetermined, as is the case with mobile users who obtain dynamically assigned IP addresses. The dynamic crypto map acts as a template and the missing parameters are determined during IPsec negotiation. More information on dynamic crypto maps is available at Dynamic Crypto Maps.
Configurations
In this section, you are presented with the information to configure the features described in this document.
Note: Use the Command Lookup Tool (registered customers only) to obtain more information on the commands used in this section.
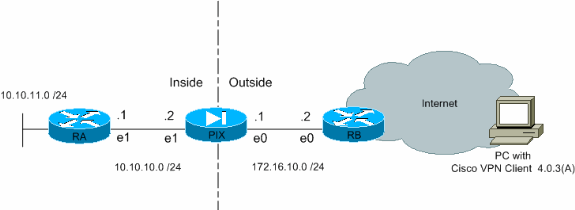
Network Diagram
This document uses this network setup:

Configure the PIX
The configuration necessary on the PIX Firewall is shown in this output. The configuration is for VPN only.
| PIX |
|---|
PIX Version 6.3(1) interface ethernet0 auto interface ethernet1 auto interface ethernet2 auto shutdown nameif ethernet0 outside security0 nameif ethernet1 inside security100 nameif ethernet2 intf2 security4 enable password 8Ry2YjIyt7RRXU24 encrypted passwd 2KFQnbNIdI.2KYOU encrypted hostname Pixfirewall fixup protocol ftp 21 fixup protocol h323 h225 1720 fixup protocol h323 ras 1718-1719 fixup protocol http 80 fixup protocol ils 389 fixup protocol rsh 514 fixup protocol rtsp 554 fixup protocol sip 5060 fixup protocol sip udp 5060 fixup protocol skinny 2000 fixup protocol smtp 25 fixup protocol sqlnet 1521 names !--- Define the access list to enable split tunneling. access-list 101 permit ip 10.10.10.0 255.255.255.0 10.10.8.0 255.255.255.0 access-list 101 permit ip 10.10.11.0 255.255.255.0 10.10.8.0 255.255.255.0 !--- Define the access list to avoid network address !--- translation (NAT) on IPsec packets. access-list 102 permit ip 10.10.10.0 255.255.255.0 10.10.8.0 255.255.255.0 access-list 102 permit ip 10.10.11.0 255.255.255.0 10.10.8.0 255.255.255.0 pager lines 24 mtu outside 1500 mtu inside 1500 mtu intf2 1500 !--- Configure the IP address on the interfaces. ip address outside 172.16.10.1 255.255.255.0 ip address inside 10.10.10.2 255.255.255.0 no ip address intf2 ip audit info action alarm ip audit attack action alarm !--- Create a pool of addresses from which IP addresses are assigned !--- dynamically to the remote VPN Clients. ip local pool vpnpool1 10.10.8.1-10.10.8.254 pdm history enable arp timeout 14400 !--- Disable NAT for IPsec packets. nat (inside) 0 access-list 102 route outside 0.0.0.0 0.0.0.0 172.16.10.2 1 route inside 10.10.11.0 255.255.255.0 10.10.10.1 1 timeout xlate 3:00:00 timeout conn 1:00:00 half-closed 0:10:00 udp 0:02:00 rpc 0:10:00 h225 1:00:00 timeout h323 0:05:00 mgcp 0:05:00 sip 0:30:00 sip_media 0:02:00 timeout uauth 0:05:00 absolute aaa-server TACACS+ protocol tacacs+ aaa-server RADIUS protocol radius aaa-server LOCAL protocol local no snmp-server location no snmp-server contact snmp-server community public no snmp-server enable traps floodguard enable !--- Permit packet that came from an IPsec tunnel to pass through without !--- checking them against the configured conduits/access lists. sysopt connection permit-ipsec !--- Define the transform set to be used during IPsec !--- security association (SA) negotiation. Specify AES as the encryption algorithm. crypto ipsec transform-set trmset1 esp-aes-256 esp-sha-hmac !--- Create a dynamic crypto map entry !--- and add it to a static crypto map. crypto dynamic-map map2 10 set transform-set trmset1 crypto map map1 10 ipsec-isakmp dynamic map2 !--- Bind the crypto map to the outside interface. crypto map map1 interface outside !--- Enable Internet Security Association and Key Management !--- Protocol (ISAKMP) negotiation on the interface on which the IPsec !--- peer communicates with the PIX Firewall. isakmp enable outside isakmp identity address !--- Define an ISAKMP policy to be used while !--- negotiating the ISAKMP SA. Specify !--- AES as the encryption algorithm. The configurable AES !--- options are aes, aes-192 and aes-256. !--- Note: AES 192 is not supported by the VPN Client. isakmp policy 10 authentication pre-share isakmp policy 10 encryption aes-256 isakmp policy 10 hash sha isakmp policy 10 group 2 isakmp policy 10 lifetime 86400 !--- Create a VPN group and configure the policy attributes which are !--- downloaded to the Easy VPN Clients. vpngroup groupmarketing address-pool vpnpool1 vpngroup groupmarketing dns-server 10.10.11.5 vpngroup groupmarketing wins-server 10.10.11.5 vpngroup groupmarketing default-domain org1.com vpngroup groupmarketing split-tunnel 101 vpngroup groupmarketing idle-time 1800 vpngroup groupmarketing password ******** telnet timeout 5 ssh timeout 5 console timeout 0 terminal width 80 Cryptochecksum:c064abce81996b132025e83e421ee1c3 : end |
Note: In this setup, it is recommended that you not specify aes-192 while you configure the transform set or the ISAKMP policy. VPN Clients do not support aes-192 for encryption.
Note: With earlier versions, the IKE Mode Configuration commands isakmp client configuration address-pool and crypto map client-configuration address were required. However, with newer versions (3.x and later) these commands are no longer necessary. Multiple address pools can now be specified using the vpngroup address-pool command.
Note: VPN group names are case sensitive. This means that user authentication fails if the group name specified in the PIX and the group name on the VPN Client are different in terms of letter case (upper or lower case).
Note: For example, when you enter the group name as GroupMarketing in one device and groupmarketing in another device, the device does not work.
Configure the VPN Client
After you install the VPN Client on the PC, create a new connection as shown in these steps:
-
Launch the VPN Client application and click New to create a new connection entry.

-
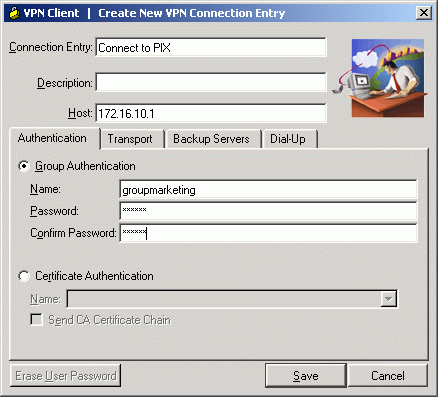
A new dialog box titled VPN Client | Create New VPN Connection Entry appears. Enter configuration information for the new connection.
-
In the Connection Entry field, assign a name to the new entry that is created.
-
In the Host field, type the IP address of the public interface of the PIX.
-
Select the Authentication tab, and then type the group name and password (twice - for confirmation). This needs to match the information entered on the PIX using the vpngroup password command.
-
Click Save to save the information entered. The new connection is now created.

-
-
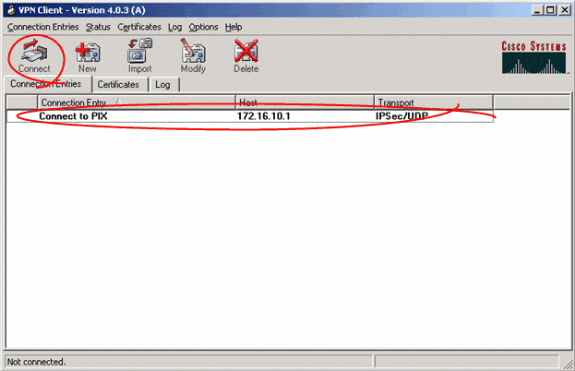
In order to connect to the gateway using the new connection entry, select the connection entry by clicking on it once and then click the Connect icon. A double-click on the connection entry has the same effect.

Verify
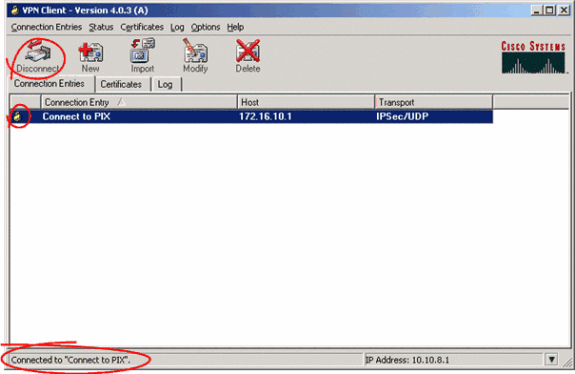
On the VPN Client, a successfully established connection to the remote gateway is indicated by these items:
-
A yellow closed-lock icon appears against the active connection entry.
-
The Connect icon on the toolbar (next to the Connection Entries tab) changes to Disconnect.
-
The status line at the end of the window shows the status as "Connected to" followed by the connection entry name.

Note: By default, once the connection is established, the VPN Client minimizes to a closed-lock icon in the system tray, on the bottom-right corner of the Windows task bar. Double click the closed-lock icon in order to make the VPN Client window visible again.
On the PIX Firewall, these show commands can be used to verify the status of the established connections.
Note: Certain show commands are supported by the Output Interpreter Tool (registered customers only) , which allows you to view an analysis of show command output.
-
show crypto ipsec sa—Shows all the current IPsec SAs on the PIX. In addition, the output shows the remote peer's actual IP address, the IP address assigned, the local IP address and interface, and the applied crypto map.
Pixfirewall#show crypto ipsec sa interface: outside Crypto map tag: map1, local addr. 172.16.10.1 local ident (addr/mask/prot/port): (0.0.0.0/0.0.0.0/0/0) remote ident (addr/mask/prot/port): (10.10.8.1/255.255.255.255/0/0) current_peer: 172.16.12.3:500 dynamic allocated peer ip: 10.10.8.1 PERMIT, flags={} #pkts encaps: 0, #pkts encrypt: 0, #pkts digest 0 #pkts decaps: 25, #pkts decrypt: 25, #pkts verify 25 #pkts compressed: 0, #pkts decompressed: 0 #pkts not compressed: 0, #pkts compr. failed: 0, #pkts decompress failed: 0 #send errors 0, #recv errors 0 local crypto endpt.: 172.16.10.1, remote crypto endpt.: 172.16.12.3 path mtu 1500, ipsec overhead 64, media mtu 1500 current outbound spi: cbabd0ce inbound esp sas: spi: 0x4d8a971d(1300928285) transform: esp-aes-256 esp-sha-hmac , in use settings ={Tunnel, } slot: 0, conn id: 2, crypto map: map1 sa timing: remaining key lifetime (k/sec): (4607996/28685) IV size: 16 bytes replay detection support: Y inbound ah sas: inbound pcp sas: outbound esp sas: spi: 0xcbabd0ce(3417034958) transform: esp-aes-256 esp-sha-hmac , in use settings ={Tunnel, } slot: 0, conn id: 1, crypto map: map1 sa timing: remaining key lifetime (k/sec): (4608000/28676) IV size: 16 bytes replay detection support: Y outbound ah sas: outbound pcp sas: -
show crypto isakmp sa—Shows the status of the ISAKMP SA built between peers.
Pixfirewall#show crypto isakmp sa
Total     : 1
Embryonic : 0
        dst               src        state     pending     created
     172.16.10.1      172.16.12.3    QM_IDLE         0           1
Troubleshoot
This section provides information you can use to troubleshoot your configuration.
These debug commands can assist in troubleshooting problems with the VPN setup.
Note: Refer to Important Information on Debug Commands before you issue debug commands.
-
debug crypto isakmp—Shows the ISAKMP SA that is built and the IPsec attributes that are negotiated. During ISAKMP SA negotiation, the PIX can possibly discard several proposals as "not acceptable" before it accepts one. Once the ISAKMP SA is agreed upon, the IPsec attributes are negotiated. Once again, several proposals can possibly be rejected before one is accepted, as shown in this debug output.
crypto_isakmp_process_block:src:172.16.12.3, dest:172.16.10.1 spt:500 dpt:500
OAK_AG exchange
ISAKMP (0): processing SA payload. message ID = 0

ISAKMP (0): Checking ISAKMP transform 1 against priority 10 policy
ISAKMP:      encryption AES-CBC
ISAKMP:      hash SHA
ISAKMP:      default group 2
ISAKMP:      extended auth pre-share (init)
ISAKMP:      life type in seconds
ISAKMP:      life duration (VPI) of  0x0 0x20 0xc4 0x9b
ISAKMP:      keylength of 256

!--- Proposal is rejected since extended auth is not configured.

ISAKMP (0): atts are not acceptable. Next payload is 3
ISAKMP (0): Checking ISAKMP transform 2 against priority 10 policy
ISAKMP:      encryption AES-CBC
ISAKMP:      hash MD5
ISAKMP:      default group 2
ISAKMP:      extended auth pre-share (init)
ISAKMP:      life type in seconds
ISAKMP:      life duration (VPI) of  0x0 0x20 0xc4 0x9b
ISAKMP:      keylength of 256

!--- Proposal is rejected since MD5 is not specified as the hash algorithm.

ISAKMP (0): atts are not acceptable. Next payload is 3
ISAKMP (0): Checking ISAKMP transform 3 against priority 10 policy
ISAKMP:      encryption AES-CBC
ISAKMP:      hash SHA
ISAKMP:      default group 2
ISAKMP:      auth pre-share
ISAKMP:      life type in seconds
ISAKMP:      life duration (VPI) of  0x0 0x20 0xc4 0x9b
ISAKMP:      keylength of 256

!--- This proposal is accepted since it matches ISAKMP policy 10.

ISAKMP (0): atts are acceptable. Next payload is 3
ISAKMP (0): processing KE payload. message ID = 0

!--- Output is suppressed.

OAK_QM exchange
oakley_process_quick_mode:
OAK_QM_IDLE
ISAKMP (0): processing SA payload. message ID = 3348522173

ISAKMP : Checking IPSec proposal 1

ISAKMP: transform 1, ESP_AES
ISAKMP:   attributes in transform:
ISAKMP:      authenticator is HMAC-MD5
ISAKMP:      key length is 256
ISAKMP:      encaps is 1
ISAKMP:      SA life type in seconds
ISAKMP:      SA life duration (VPI) of  0x0 0x20 0xc4 0x9b

 !--- This proposal is not accepted since transform-set !--- trmset1 does not use MD5.

ISAKMP (0): atts not acceptable. Next payload is 0
ISAKMP (0): skipping next ANDed proposal (1)
ISAKMP : Checking IPSec proposal 2

ISAKMP: transform 1, ESP_AES
ISAKMP:   attributes in transform:
ISAKMP:      authenticator is HMAC-SHA
ISAKMP:      key length is 256
ISAKMP:      encaps is 1
ISAKMP:      SA life type in seconds
ISAKMP:      SA life duration (VPI) of  0x0 0x20 0xc4 0x9b

!--- This proposal is accepted since it matches !--- transform-set trmset1.

ISAKMP (0): atts are acceptable.
ISAKMP (0): bad SPI size of 2 octets!
ISAKMP : Checking IPSec proposal 3

!--- Output is suppressed.
-
debug crypto ipsec—Displays information on IPsec SA negotiations.
IPSEC(key_engine_delete_sas): rec'd delete notify from ISAKMP
IPSEC(key_engine_delete_sas): delete all SAs shared with     172.16.12.3
IPSEC(validate_proposal): transform proposal (prot 3, trans 12, hmac_alg 1) not
supported
IPSEC(validate_proposal): transform proposal (prot 3, trans 12, hmac_alg 1) not
supported
IPSEC(validate_proposal): transform proposal (prot 3, trans 12, hmac_alg 2) not
supported
IPSEC(validate_proposal): transform proposal (prot 3, trans 12, hmac_alg 1) not
supported
IPSEC(validate_proposal_request): proposal part #1,
  (key eng. msg.) dest= 172.16.10.1, src= 172.16.12.3,
    dest_proxy= 0.0.0.0/0.0.0.0/0/0 (type=4),
    src_proxy= 10.10.8.1/255.255.255.255/0/0 (type=1),
    protocol= ESP, transform= esp-aes-256 esp-sha-hmac ,
    lifedur= 0s and 0kb,
    spi= 0x0(0), conn_id= 0, keysize= 256, flags= 0x4
IPSEC(key_engine): got a queue event...
IPSEC(spi_response): getting spi 0xfb0cb69(263244649) for SA
        from     172.16.12.3 to     172.16.10.1 for prot 3
IPSEC(key_engine): got a queue event...
IPSEC(initialize_sas): ,
  (key eng. msg.) dest= 172.16.10.1, src= 172.16.12.3,
    dest_proxy= 0.0.0.0/0.0.0.0/0/0 (type=4),
    src_proxy= 10.10.8.1/0.0.0.0/0/0 (type=1),
    protocol= ESP, transform= esp-aes-256 esp-sha-hmac ,
    lifedur= 2147483s and 0kb,
    spi= 0xfb0cb69(263244649), conn_id= 2, keysize= 256, flags= 0x4
IPSEC(initialize_sas): ,
  (key eng. msg.) src= 172.16.10.1, dest= 172.16.12.3,
    src_proxy= 0.0.0.0/0.0.0.0/0/0 (type=4),
    dest_proxy= 10.10.8.1/0.0.0.0/0/0 (type=1),
    protocol= ESP, transform= esp-aes-256 esp-sha-hmac ,
    lifedur= 2147483s and 0kb,
    spi= 0xda6c054a(3664512330), conn_id= 1, keysize= 256, flags= 0x4
With the configurations shown in this document, the VPN Client is able to successfully connect to the central site PIX using AES. It is sometimes observed that although the VPN tunnel is established successfully, users are not able to perform common tasks such as ping network resources, log on to the domain, or browse network neighborhood. More information on troubleshooting such problems is available in Troubleshooting Microsoft Network Neighborhood After Establishing a VPN Tunnel With the Cisco VPN Client.
Related Information
- Advanced Encryption Standard (AES)
- An Introduction to IP Security (IPSec) Encryption
- IP Security Troubleshooting - Understanding and Using debug Commands
- IPsec Negotiation/IKE Protocols Support Page
- PIX Support Page
- Cisco VPN Client Support Page
- PIX Command Reference
- Technical Support & Documentation - Cisco Systems
Revision History
| Revision | Publish Date | Comments |
|---|---|---|
1.0 |
26-Sep-2008 |
Initial Release |
Contact Cisco
- Open a Support Case

- (Requires a Cisco Service Contract)


 Feedback