Restrict WLAN Access based on SSID with WLC and Cisco Secure ACS Configuration Example
Available Languages
Contents
Introduction
This document provides a configuration example to restrict per-user access to a WLAN based on the service set identifier (SSID).
Prerequisites
Requirements
Ensure that you meet these requirements before you attempt this configuration:
-
Knowledge of how to configure the Wireless LAN Controller (WLC) and lightweight access point (LAP) for basic operation
-
Basic knowledge on how to configure the Cisco Secure Access Control Server (ACS)
-
Knowledge of Lightweight Access Point Protocol (LWAPP) and wireless security methods
Components Used
The information in this document is based on these software and hardware versions:
-
Cisco 2000 Series WLC that runs firmware 4.0
-
Cisco 1000 Series LAP
-
Cisco Secure ACS Server version 3.2
-
Cisco 802.11a/b/g Wireless Client Adapter that runs firmware 2.6
-
Cisco Aironet Desktop Utility (ADU) version 2.6
The information in this document was created from the devices in a specific lab environment. All of the devices used in this document started with a cleared (default) configuration. If your network is live, make sure that you understand the potential impact of any command.
Conventions
Refer to Cisco Technical Tips Conventions for more information on document conventions.
Background Information
With the use of SSID-based WLAN access, the users can be authenticated based on the SSID they use in order to connect to the WLAN. The Cisco Secure ACS server is used to authenticate the users. Authentication happens in two stages on the Cisco Secure ACS:
-
EAP authentication
-
SSID authentication based on Network Access Restrictions (NARs) on Cisco Secure ACS
If EAP and SSID-based authentication are successful, the user is allowed to access the WLAN or else the user is disassociated.
The Cisco Secure ACS uses the NARs feature to restrict user access based on the SSID. A NAR is a definition, which you make in Cisco Secure ACS, of additional conditions that must be met before a user can access the network. Cisco Secure ACS applies these conditions using information from attributes sent by your AAA clients. Although there are several ways you can set up NARs, they are all based on matching attribute information sent by the AAA client. Therefore, you must understand the format and content of the attributes your AAA clients send if you want to employ effective NARs.
When you set up a NAR, you can choose whether the filter operates positively or negatively. That is, in the NAR you specify whether to permit or deny network access, based on a comparison of information sent from AAA clients to the information stored in the NAR. However, if a NAR does not encounter sufficient information to operate, it defaults to denied access.
You can define a NAR for, and apply it to, a specific user or user group. Refer to the Network Access Restrictions White Paper for more information.
Cisco Secure ACS supports two types of NAR filters:
-
IP-based filters—IP-based NAR filters limit access based upon the IP addresses of the end-user client and the AAA client. Refer to About IP-based NAR Filters for more information on this type of NAR filter.
-
Non-IP-based filters—Non-IP-based NAR filters limit access based upon simple string comparison of a value sent from the AAA client. The value can be the calling line ID (CLI) number, the Dialed Number Identification Service (DNIS) number, the MAC address, or other value that originates from the client. For this type of NAR to operate, the value in the NAR description must exactly match what is sent from the client, including whatever format is used. For example, (217) 555-4534 does not match 217-555-4534. Refer to About Non-IP-based NAR Filters for more information on this type of NAR filter.
This document uses the non-IP-based filters to do SSID-based authentication. A non-IP-based NAR filter (that is, a DNIS/CLI-based NAR filter) is a list of permitted or denied calling/point of access locations that you can use in the restriction of an AAA client when you do not have an established IP-based connection. The non-IP-based NAR feature generally uses the CLI number and the DNIS number. There are exceptions in the usage of the DNIS/CLI fields. You can enter the SSID name in the DNIS field and do SSID-based authentication. This is because the WLC sends in the DNIS attribute, the SSID name, to the RADIUS server. So if you build DNIS NAR in either the user or group, you can create per-user SSID restrictions.
If you use RADIUS, the NAR fields listed here use these values:
-
AAA client—The NAS-IP-address (attribute 4) or, if NAS-IP-address does not exist, NAS-identifier (RADIUS attribute 32) is used.
-
Port—The NAS-port (attribute 5) or, if NAS-port does not exist, NAS-port-ID (attribute 87) is used.
-
CLI—The calling-station-ID (attribute 31) is used.
-
DNIS—The called-station-ID (attribute 30) is used.
Refer to Network Access Restrictions for more information on the usage of NAR.
Since the WLC sends in the DNIS attribute and the SSID name, you can create per-user SSID restrictions. In the case of the WLC, the NAR fields have these values:
-
AAA client—WLC IP address
-
port—*
-
CLI —*
-
DNIS—*ssidname
The remainder of this document provides a configuration example on how to accomplish this.
Network Setup
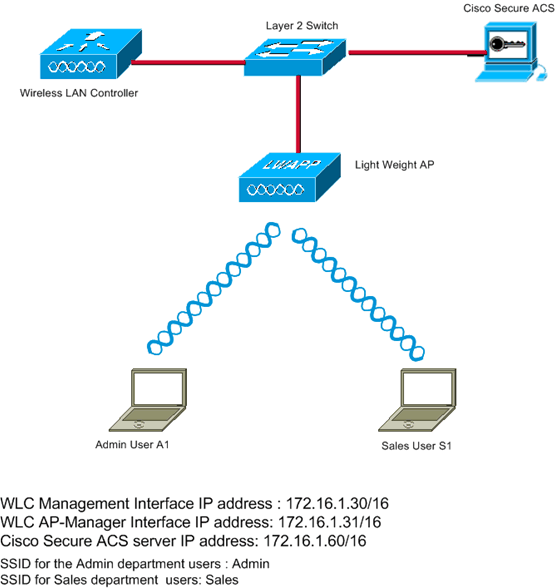
In this example setup, WLC is registered to the LAP. Two WLANs are used. One WLAN is for the Admin department users and the other WLAN is for the Sales department users. Wireless client A1 (Admin user) and S1 (Sales user) connect to the wireless network. You need to configure the WLC and the RADIUS server in such a way that the Admin user A1 is able to access only the WLAN Admin and is restricted access to the WLAN Sales and the Sales user S1 should be able to access the WLAN Sales and should have restricted access to the WLAN Admin. All users use LEAP authentication as a Layer 2 authentication method.
Note: This document assumes that the WLC is registered to the controller. If you are new to WLC and do not know how to configure the WLC for basic operation, refer to Lightweight AP (LAP) Registration to a Wireless LAN Controller (WLC).
Configure
In order to configure the devices for this setup, you need to:
Configure the WLC
Complete these steps in order to configure the WLC for this setup:
-
The WLC needs to be configured to forward the user credentials to an external RADIUS server. The external RADIUS server (Cisco Secure ACS in this case) then validates the user credentials and provides access to the wireless clients. Complete these steps:
-
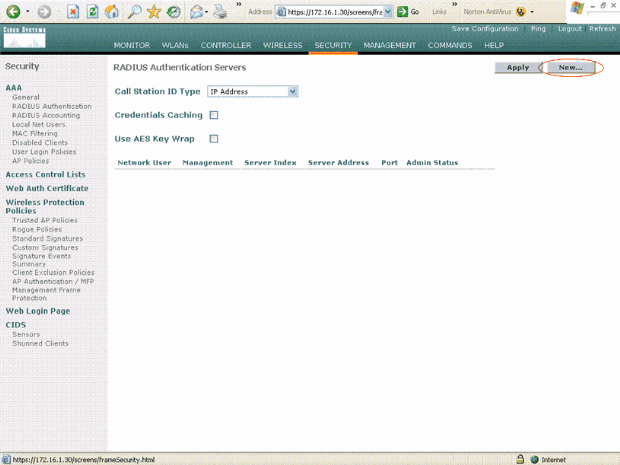
Choose Security > RADIUS Authentication from the controller GUI in order to display the RADIUS Authentication Servers page.
-
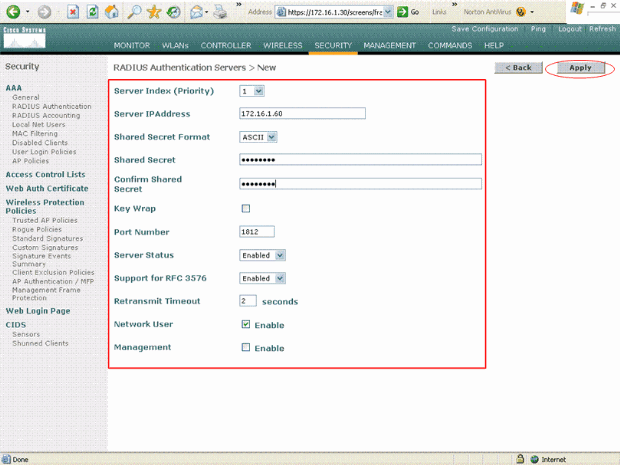
Click New in order to define the RADIUS server parameters.
These parameters include the RADIUS Server IP Address, Shared Secret, Port Number, and Server Status. The Network User and Management check boxes determine if the RADIUS-based authentication applies for management and network users. This example uses the Cisco Secure ACS as the RADIUS server with IP address 172.16.1.60.
-
Click Apply.
-
-
Configure one WLAN for the Admin department with SSID Admin and the other WLAN for the Sales department with SSID Sales. Complete these steps in order to do this:
-
Click WLANs from the controller GUI in order to create a WLAN. The WLANs window appears. This window lists the WLANs configured on the controller.
-
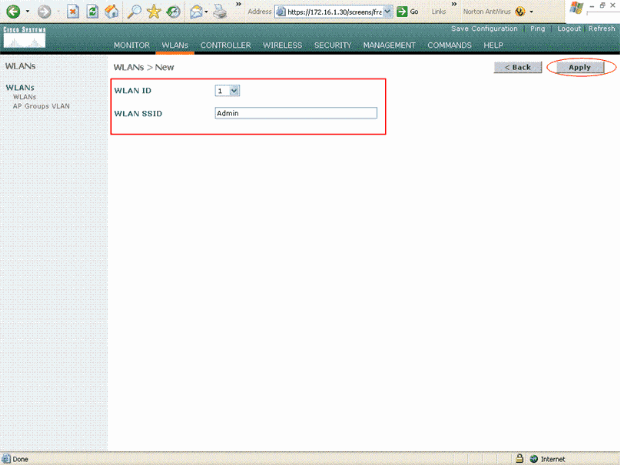
Click New in order to configure a new WLAN.
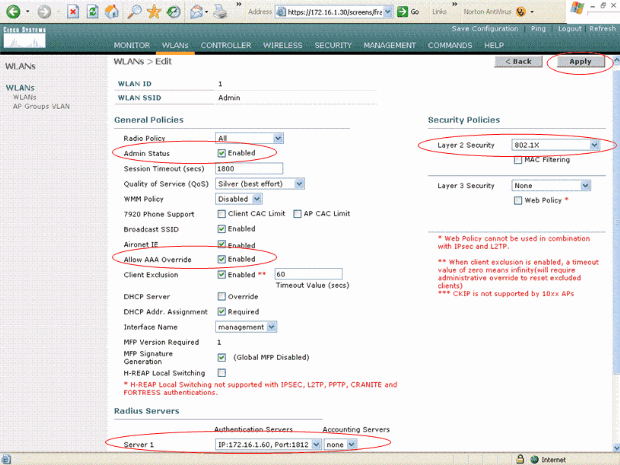
This example creates a WLAN named Admin for the Admin department and the WLAN ID is 1. Click Apply.
-
In the WLAN > Edit window, define the parameters specific to the WLAN:
-
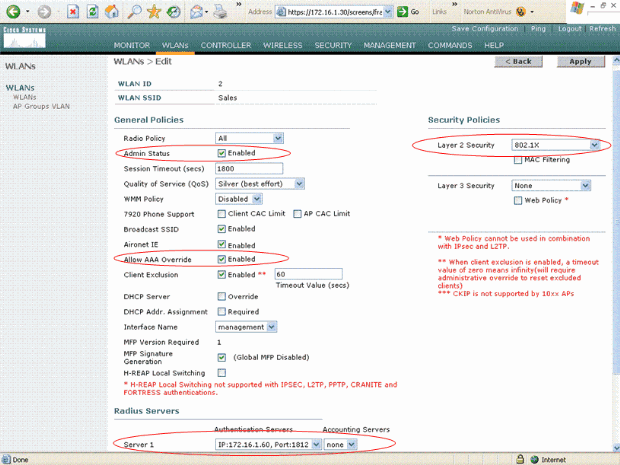
From the Layer 2 Security pull-down menu, select 802.1x. By default, the Layer 2 Security option is 802.1x. This enables 802.1x/EAP authentication for the WLAN.
-
Under general policies, check the AAA override box. When AAA Override is enabled, and a client has conflicting AAA and controller WLAN authentication parameters, client authentication is performed by the AAA server.
-
Select the appropriate RADIUS server from the pull-down menu under RADIUS Servers. The other parameters can be modified based on the requirement of the WLAN network. Click Apply.
-
-
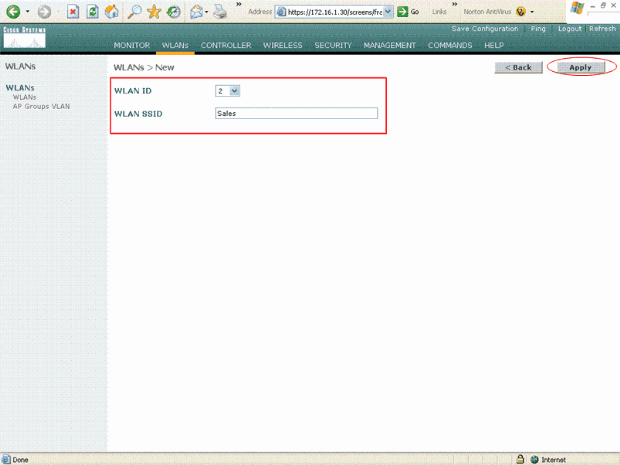
Similarly, in order to create a WLAN for the Sales department, repeat steps b and c. Here are the screenshots.
-
Configure Cisco Secure ACS
On the Cisco Secure ACS server you need to:
-
Configure the WLC as an AAA client.
-
Create the User database and define NAR for SSID-based authentication.
-
Enable EAP authentication.
Complete these steps on the Cisco Secure ACS:
-
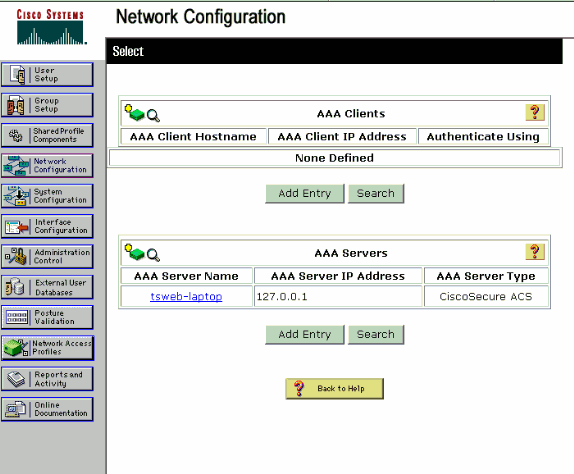
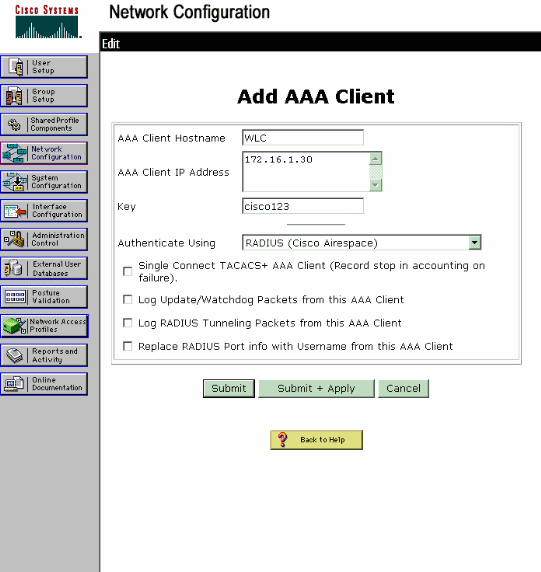
In order to define the controller as an AAA client on the ACS server, click Network Configuration from the ACS GUI. Under AAA clients click on Add Entry.
-
When the Network Configuration page appears, define the name of the WLC, IP address, shared secret and authentication method (RADIUS Cisco Airespace).
-
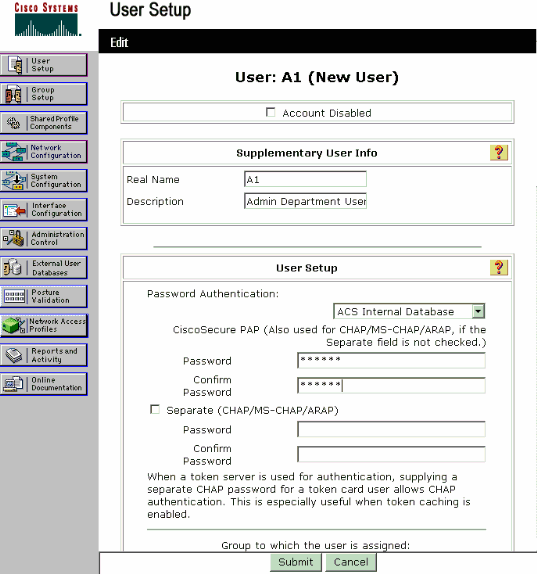
Click User Setup from the ACS GUI, enter the username, and click Add/Edit. In this example the user is A1.
-
When the User Setup page appears, define all the parameters specific to the user. In this example the username, password and Supplementary User Information are configured because you need these parameters for LEAP authentication.
-
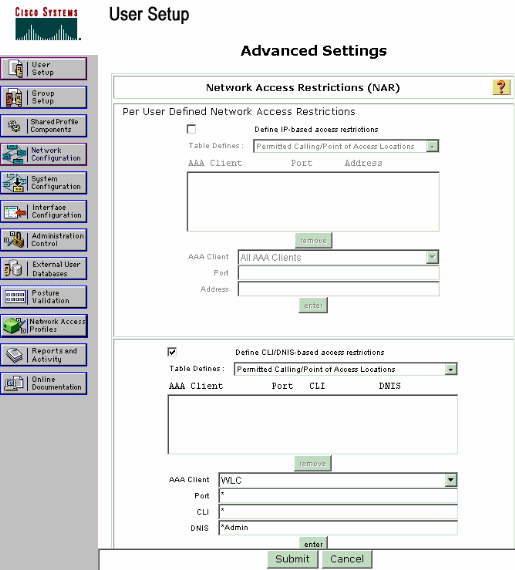
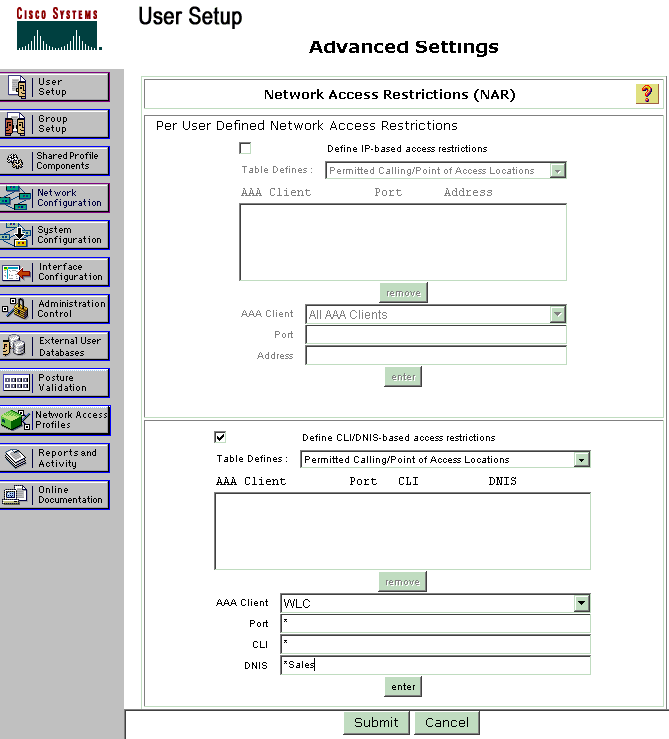
Scroll down the User Setup page, until you see the Network Access Restrictions section. Under the User Interface of DNIS/CLI Access Restriction, select Permitted Calling/ Point of Access Locations and define these parameters:
-
AAA client—WLC IP address (172.16.1.30 in our example)
-
Port—*
-
CLI—*
-
DNIS—*ssidname
-
-
The DNIS attribute defines the SSID that the user is allowed to access. The WLC sends the SSID in the DNIS attribute to the RADIUS server.
If the user needs to access only the WLAN named Admin, enter *Admin for the DNIS field. This ensures that the user has access only to the WLAN named Admin. Click Enter.
Note: The SSID should always be preceded with *. It is mandatory.
-
Click Submit.
-
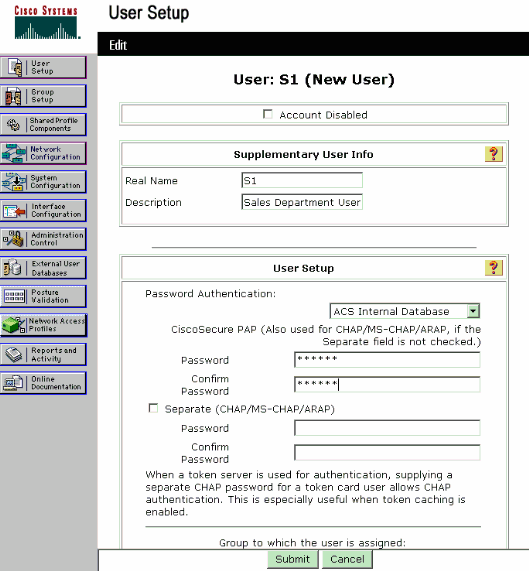
Similarly, create a user for the Sales department user. Here are the screenshots.
-
Repeat the same process to add more users to the database.
Note: By default all users are grouped under the default group. If you want to assign specific users to different groups, refer to the User Group Management section of User Guide for Cisco Secure ACS for Windows Server 3.2.
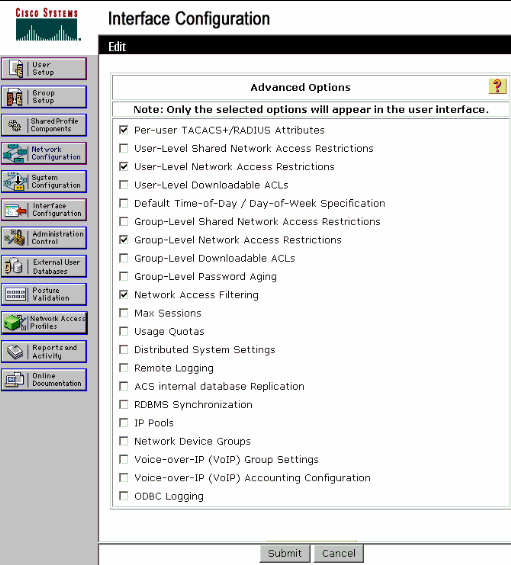
Note: If you do not see the Network Access Restrictions section in the User Setup window, it might be because it is not enabled. In order to enable the Network Access Restrictions for users, choose Interfaces > Advanced Options from the ACS GUI, select User-Level Network Access Restrictions and click Submit. This enables the NAR and appears in the User Setup window.

-
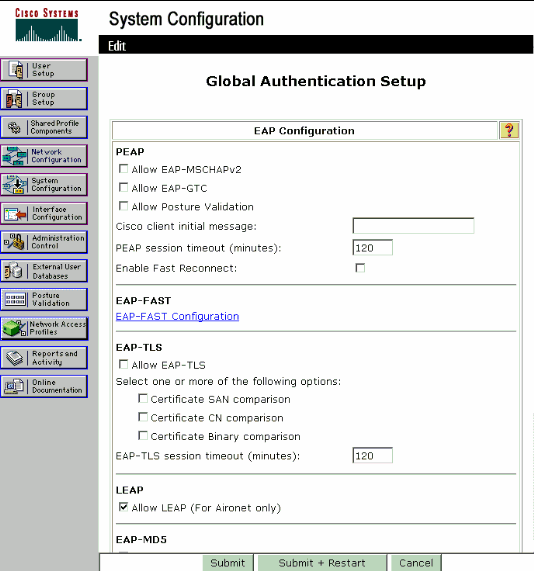
In order to enable EAP authentication, click System Configuration and Global Authentication Setup in order to ensure that the authentication server is configured to perform the desired EAP authentication method.
Under the EAP configuration settings select the appropriate EAP method. This example uses LEAP authentication. Click Submit when you are done.
Configure the Wireless Client and Verify
Use this section to confirm that your configuration works properly. Try to associate a wireless client with the LAP using LEAP authentication to verify if the configuration works as expected.
Note: This document assumes that the client profile is configured for LEAP authentication. Refer to Using EAP Authentication for information on how to configure the 802.11 a/b/g Wireless Client Adapter for LEAP authentication.
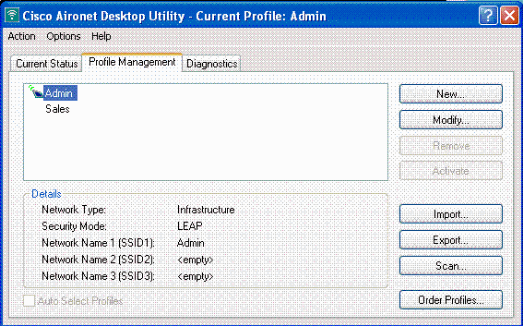
Note: From the ADU you see that you have configured two client profiles. One for the Admin department users with SSID Admin and the other profile for the Sales department users with SSID Sales. Both profiles are configured for LEAP authentication.
When the profile for the wireless user from the Admin department is activated, the user is asked to provide the username/password for LEAP authentication. Here is an example:
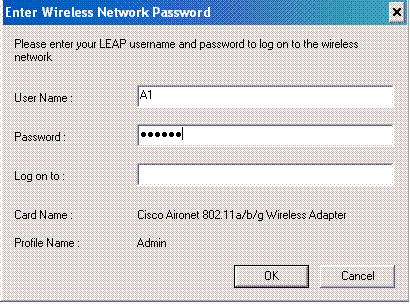
The LAP and then the WLC pass on the user credentials to the external RADIUS server (Cisco Secure ACS) to validate the credentials. The WLC passes on the credentials including the DNIS attribute (SSID name) to the RADIUS server for validation.
The RADIUS server verifies the user credentials by comparing the data with the user database (and the NARs) and provides access to the wireless client whenever the user credentials are valid.
Upon successful RADIUS authentication the wireless client associates with the LAP.
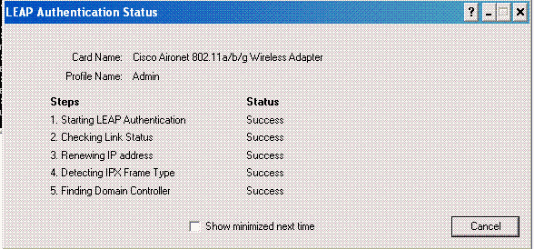
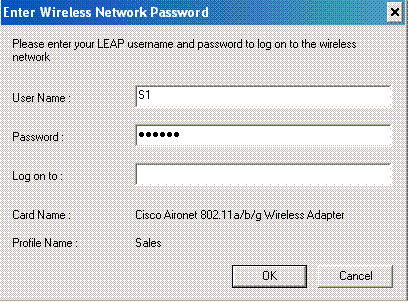
Similarly when a user from the Sales department activates the Sales profile, the user is authenticated by the RADIUS server based on the LEAP username/password and the SSID.
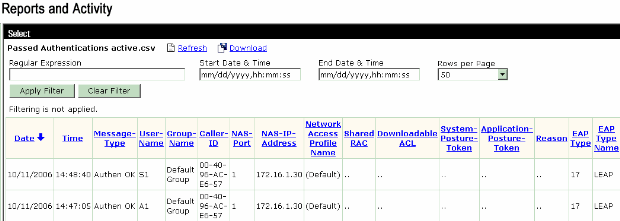
The Passed Authentication report on the ACS server shows that the client has passed the RADIUS authentication (EAP authentication and SSID authentication). Here is an example:
Now, if the Sales User tries to access the Admin SSID, the RADIUS server denies the user access to the WLAN. Here is an example:
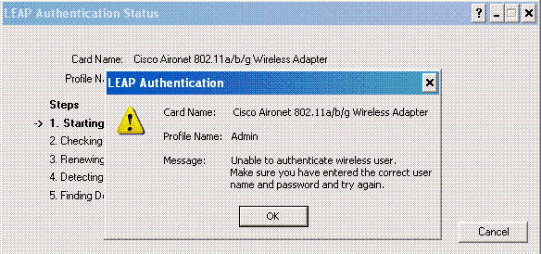
This way the users can be restricted access based on the SSID. In aN enterprise environment, all users who fall into a specific department can be grouped into a single group and access to the WLAN can be provided based on the SSID they use as explained in this document.
Troubleshoot
Troubleshooting Commands
The Output Interpreter Tool (registered customers only) (OIT) supports certain show commands. Use the OIT to view an analysis of show command output.
Note: Refer to Important Information on Debug Commands before you use debug commands.
-
debug dot1x aaa enable—Enables the debug of 802.1x AAA interactions.
-
debug dot1x packet enable—Enables the debug of all dot1x packets.
-
debug aaa all enable—Configures the debug of all AAA messages.
You can also use the Passed Authentication report and the Failed Authentication report on the Cisco Secure ACS server in order to troubleshoot the configuration. These reports are under the Reports and Activity window on the ACS GUI.
Related Information
Revision History
| Revision | Publish Date | Comments |
|---|---|---|
1.0 |
12-Oct-2006 |
Initial Release |


 Feedback