Configure WEP on Aironet Access Points and Bridges
Available Languages
Contents
Introduction
This document provides methods to configure Wired Equivalent Privacy (WEP) on Cisco Aironet Wireless LAN (WLAN) components.
Note: Refer to the Static Web Keys section of Chapter 6 - Configuring WLANs for more information on WEP configuration on wireless LAN controllers (WLCs).
WEP is the encryption algorithm built into the 802.11 (Wi-Fi) standard. WEP encryption uses the Ron's Code 4 (RC4) Stream Cipher with 40- or 104-bit keys and a 24-bit initialization vector (IV).
As the standard specifies, WEP uses the RC4 algorithm with a 40-bit or 104-bit key and a 24-bit IV. RC4 is a symmetric algorithm because it uses the same key for the encryption and the decryption of data. When WEP is enabled, each radio "station" has a key. The key is used to scramble the data before transmission of the data through the airwaves. If a station receives a packet that is not scrambled with the appropriate key, the packet is discarded and never delivered to the host.
WEP can be primarily used for a home office or a small office that does not require very strong security.
Aironet WEP implementation is in the hardware. Therefore, minimal performance impact results when you use WEP.
Note: There are some known issues with WEP, which makes it not a strong encryption method. The issues are:
-
There is a great deal of administrative overhead to maintain a shared WEP key.
-
WEP has the same problem as all systems based on shared keys. Any secret given to one person becomes public after a period of time.
-
The IV that seeds the WEP algorithm is sent in clear text.
-
The WEP checksum is linear and predictable.
Temporal Key Integrity Protocol (TKIP) has been created to address these WEP issues. Similar to WEP, TKIP uses RC4 encryption. However, TKIP enhances WEP by adding measures such as per-packet key hashing, Message Integrity Check (MIC), and Broadcast key rotation to address known vulnerabilities of WEP. TKIP uses RC4 stream cipher with 128-bit keys for encryption and 64-bit keys for authentication.
Prerequisites
Requirements
This document assumes that you can make an administrative connection to the WLAN devices and that the devices function normally in an unencrypted environment.
In order to configure standard 40-bit WEP, you must have two or more radio units that communicate with each other.
Note: The Aironet products can establish 40-bit WEP connections with IEEE 802.11b-compliant non-Cisco products. This document does not address the configuration of other devices.
For the creation of a 128-bit WEP link, Cisco products only interact with other Cisco products.
Components Used
Use these components with this document:
-
Two or more radio units that communicate with each other
-
An administrative connection to the WLAN device
The information in this document was created from the devices in a specific lab environment. All of the devices used in this document started with a cleared (default) configuration. If your network is live, make sure that you understand the potential impact of any command.
Conventions
Refer to Cisco Technical Tips Conventions for more information on document conventions.
Configure WEP on Aironet Access Points
Aironet Access Points That Run VxWorks Operating System
Complete these steps:
-
Make a connection to the Access Point (AP).
-
Navigate to the AP Radio Encryption menu.
Use one of these paths:
-
Summary Status > Setup > AP Radio/Hardware > Radio Data Encryption (WEP) > AP Radio Data Encryption
-
Summary Status > Setup > Security > Security Setup: Radio Data Encryption (WEP) > AP Radio Data Encryption
Note: In order to make changes to this page, you must be an administrator with Identity and Write capabilities.
Web Browser View of the AP Radio Data Encryption Menu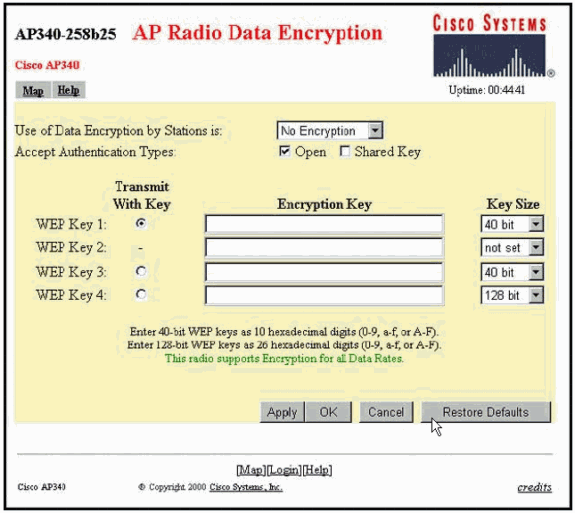
-
VxWorks Settings
The AP Radio Data Encryption page presents a variety of options to use. Some options are mandatory for WEP. This section notes these mandatory options. Other options are not necessary for WEP to function, but they are recommended.
-
Use of Data Encryption by Stations is:
Use this setting in order to choose whether clients must use data encryption when they communicate with the AP. The pull-down menu lists three options:
-
No Encryption (default)—Requires clients to communicate with the AP without any data encryption. This setting is not recommended.
-
Optional—Allows clients to communicate with the AP either with or without data encryption. Typically, you use this option when you have client devices that cannot make a WEP connection, such as non-Cisco clients in a 128-bit WEP environment.
-
Full Encryption (RECOMMENDED)—Requires clients to use data encryption when they communicate with the AP. Clients who do not use data encryption are not allowed to communicate. This option is recommended if you wish to maximize the security of your WLAN.
Note: You must set a WEP key before you enable encryption use. See the Encryption Key (MANDATORY) section of this list.
-
-
Accept Authentication Types
You can choose Open, Shared Key, or both of these options in order to set the authentications that the AP will recognize.
-
Open (RECOMMENDED)—This default setting allows any device, regardless of its WEP keys, to authenticate and attempt to associate.
-
Shared Key—This setting tells the AP to send a plain-text, shared key query to any device that attempts to associate with the AP.
Note: This query can leave the AP open to a known-text attack from intruders. Therefore, this setting is not as secure as the Open setting.
-
-
Transmit With Key
These buttons allow you to select the key that the AP uses during data transmission. You can select only one key at a time. Any or all of the set keys can be used to receive data. You must set the key before you specify it as the Transmit Key.
-
Encryption Key (MANDATORY)
These fields allow you to enter the WEP keys. Enter 10 hexadecimal digits for 40-bit WEP keys or 26 hexadecimal digits for 128-bit WEP keys. The keys can be any combination of these digits:
-
0 to 9
-
a to f
-
A to F
In order to protect WEP key security, existing WEP keys do not appear in plain text in the entry fields. In recent versions of APs, you can delete existing keys. However, you cannot edit the existing keys.
Note: You must set up the WEP keys for your network, APs, and client devices in exactly the same way. For example, if you set WEP Key 3 on your AP to 0987654321 and select this key as the active key, you must also set WEP Key 3 on the client device to the same value.
-
-
Key Size (MANDATORY)
This setting sets the keys to either 40-bit or 128-bit WEP. If "not set" appears for this selection, the key is not set.
Note: You cannot delete a key by selecting "not set".
-
Action Buttons
Four action buttons control settings. If JavaScript is enabled on your web browser, a confirmation popup window appears after you click any button, except Cancel.
-
Apply—This button activates the new value settings. The browser remains on the page.
-
OK—This button applies the new settings and moves the browser back to the main Setup page.
-
Cancel—This button cancels setting changes and returns the settings to the previously stored values. You then return to the main Setup page.
-
Restore Defaults—This button changes all settings on this page back to the factory default settings.
-
Note: In recent Cisco IOS® versions of APs, only the Apply and Cancel control buttons are available for this page.
Terminal Emulator View of the Data Encryption Menu 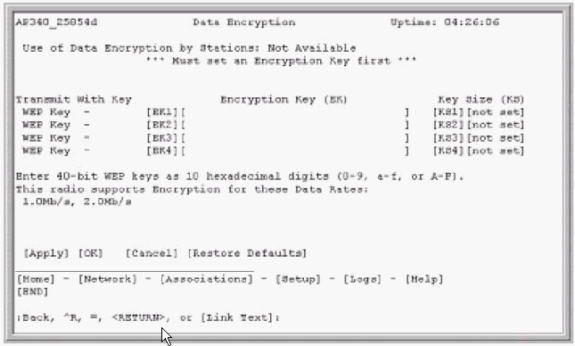
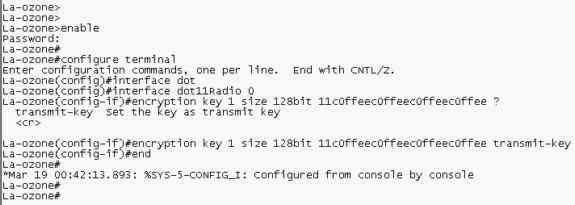
Aironet APs That Run Cisco IOS Software
Complete these steps:
-
Make a connection to the AP.
-
From the SECURITY menu option on the left side of the window, choose Encryption Manager for the radio interface to which you want to configure your static WEP keys.
Web Browser View of the AP Security Encryption Manager Menu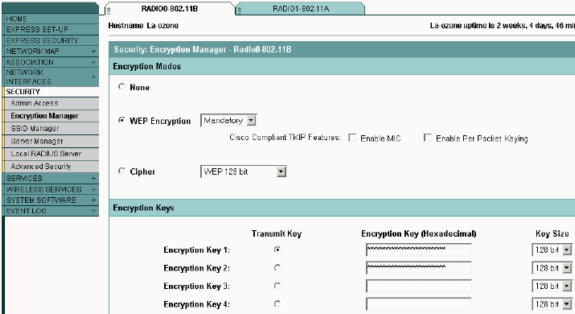
Configure Aironet Bridges
If you use VxWorks, complete these steps:
-
Make a connection to the Bridge.
-
Navigate to the Privacy menu.
Choose Main Menu > Configuration > Radio > I80211 > Privacy.
The Privacy menu controls the use of encryption on the data packet that is transmitted over the air by the radios. The RSA RC4 algorithm and one of up to four known keys are used to encrypt the packets. Each node in the radio cell must know all the keys in use, but any of the keys can be selected to transmit the data.
Terminal Emulator View of the Privacy Menu
Refer to Configuring Cipher Suites and WEP - 1300 Series Bridge and Configuring WEP and WEP Features - 1400 Series Bridge for information on how to configure WEP in 1300 and 1400 Series Bridges through CLI mode.
In order to use GUI to configure 1300 and 1400 Series Bridges, complete the same procedure explained in the Aironet APs That Run Cisco IOS Software section of this document.
VxWorks Settings
The Privacy menu presents a set of options that you must configure. Some options are mandatory for WEP. This section notes these mandatory options. Other options are not necessary for WEP to function, but they are recommended.
This section presents the menu options in the order that they appear in the Terminal Emulator View of the Privacy Menu. However, configure the options in this order:
-
Key
-
Transmit
-
Auth
-
Client
-
Encryption
Configuration in this order ensures that necessary preconditions are set up as you configure each setting.
These are the options:
-
Key (MANDATORY)
The Key option programs the encryption keys into the Bridge. You are prompted to set one of the four keys. You are prompted twice to enter the key. In order to define the key, you must enter either 10 or 26 hexadecimal digits, which depends on whether the Bridge configuration is for 40-bit or 128-bit keys. Use any combination of these digits:
-
0 to 9
-
a to f
-
A to F
The keys must match in all nodes in the radio cell, and you must enter the keys in the same order. You do not need to define all four keys, as long as the number of keys match in each device in the WLAN.
-
-
Transmit
The Transmit option tells the radio which keys to use in order to transmit packets. Each radio is able to decrypt received packets that are sent with any of the four keys.
-
Auth
You use the Auth option on repeater bridges in order to determine which authentication mode the unit uses to connect with its parent. The allowed values are Open or Shared Key. The 802.11 protocol specifies a procedure in which a client must authenticate with a parent before the client can associate.
-
Open (RECOMMENDED)—This mode of authentication is essentially a null operation. All clients are allowed to authenticate.
-
Shared Key—This mode allows the parent to send the client a challenge text, which the client encrypts and returns to the parent. If the parent successfully decrypts the challenge text, the client is authenticated.
 Caution: Do not use the Shared Key mode. When you use it, a plain-text and encrypted version of the same data transmits on the air. This does not gain anything. If the user key is wrong, the unit does not decrypt the packets, and the packets cannot gain access to the network.
-
-
Client
The Client option determines the authentication mode that the client nodes use to associate to the unit. These are the values that are allowed:
-
Open (RECOMMENDED)—This mode of authentication is essentially a null operation. All clients are allowed to authenticate.
-
Shared Key—This mode allows the parent to send the client a challenge text, which the client encrypts and returns to the parent. If the parent successfully decrypts the challenge text, the client is authenticated.
-
Both—This mode allows the client to use either mode.
-
-
Encryption
-
Off— If you set the Encryption option to Off, no encryption is done. Data transmits in the clear.
-
On (MANDATORY)—If you set the Encryption option to On, all transmitted data packets are encrypted and any unencrypted received packets are discarded.
-
Mixed—In the Mixed mode, a root or repeater bridge accepts association from clients that have encryption turned either On or Off. In this case, only data packets between nodes that both support are encrypted. Multicast packets are sent in the clear. All nodes can see the packets.
 Caution: Do not use the Mixed mode. If a client that has encryption enabled sends a multicast packet to its parent, the packet is encrypted. The parent decrypts the packet and retransmits the packet in the clear to the cell, and other nodes can see the packet. The ability to view a packet in both encrypted and unencrypted form can contribute to breaking a key. The inclusion of Mixed mode is only for compatibility with other vendors.
-
Configure Client Adapters
You must complete two main steps in order to set up WEP on the Aironet Client Adapter:
-
Configure the WEP key/keys in the Client Encryption Manager.
-
Enable WEP in the Aironet Client Utility (ACU).
Set the WEP Keys
Complete these steps in order to set up WEP keys on the client adapters:
-
Open ACU and choose Profile Manager.
-
Choose the profile where you want to enable WEP and click Edit.
-
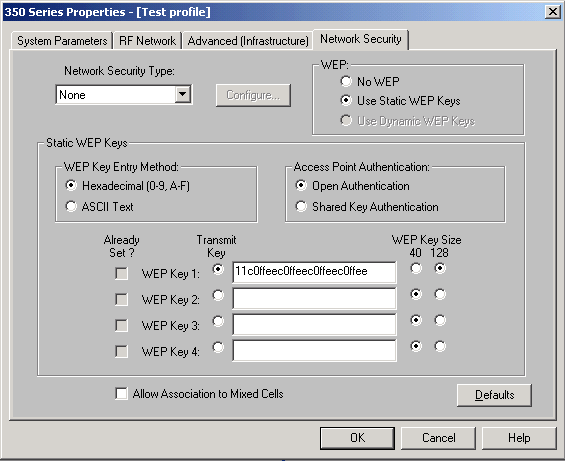
Click the Network Security tab in order to display the security options, and click Use Static WEP Keys.
This action activates WEP configuration options that are dimmed when No WEP is selected.
-
For the WEP key that you want to create, choose either 40 bits or 128 bits under WEP Key Size on the right side of the window.
Note: 128-bit client adapters can use 40-bit or 128-bit keys. But 40-bit adapters can only use 40-bit keys.
Note: Your client adapter WEP key must match the WEP key that the other WLAN components with which you communicate use.
When you set more than one WEP key, you must assign the WEP keys to the same WEP key numbers for all devices. WEP keys must be comprised of the hexadecimal characters and must contain 10 characters for 40-bit WEP keys or 26 characters for 128-bit WEP keys. The hexadecimal characters can be:
-
0 to 9
-
a to f
-
A to F
Note: ASCII-text WEP keys are not supported on the Aironet APs. Therefore, you must choose the Hexadecimal (0-9, A-F) option if you plan to use your client adapter with these APs.
Note: After you create the WEP key, you can write over it. But you cannot edit or delete it.
Note: If you use a later version of Aironet Desktop Utility (ADU) instead of ACU as a client utility, you can also delete the created WEP key and replace it with a new one.
-
-
Click the Transmit Key button that is beside one of the keys that you created.
With this action, you indicate that this key is the key that you want to use to transmit packets.
-
Click Persistent under WEP Key Type.
This action allows your client adapter to retain this WEP key, even when power to the adapter is removed or at reboot of the computer in which the key is installed. If you choose Temporary for this option, the WEP key is lost when power is removed from your client adapter.
-
Click OK.
Enable WEP
Complete these steps:
-
Open ACU and choose Edit Properties from the menu bar.
-
Click the Network Security tab in order to display the security options.
-
Check the Enable WEP check box in order to activate WEP.
Refer to Configuring WEP in ADU for steps to configure WEP using ADU as client utility.
Configure Workgroup Bridges
There are differences between the Aironet 340 Series Workgroup Bridge and the Aironet 340 Series Bridge. However, the configuration of the Workgroup Bridge to use WEP is almost identical to configuration of the Bridge. See the Configure Aironet Bridges section for the configuration of the Bridge.
-
Connect to the Workgroup Bridge.
-
Navigate to the Privacy menu.
Choose Main > Configuration > Radio > I80211 > Privacy in order to access the Privacy VxWorks menu.
Settings
The Privacy menu presents the settings that this section lists. Configure the options on the Workgroup Bridge in this order:
-
Key
-
Transmit
-
Auth
-
Encryption
These are the options:
-
Key
The Key option establishes the WEP key that the bridge uses in order to receive packets. The value must match the key that the AP or other device with which the Workgroup Bridge communicates uses. The key consists of up to 10 hexadecimal characters for 40-bit encryption or 26 hexadecimal characters for 128-bit encryption. The hexadecimal characters can be any combination of these digits:
-
0 to 9
-
a to f
-
A to F
-
-
Transmit
The Transmit option establishes the WEP key that the bridge uses in order to transmit packets. You can elect to use the same key that you used for the Key option. If you choose a different key, you must establish a matching key on the AP.
Only one WEP key can be used at one time for transmissions. The WEP key that you use to transmit data must be set to the same value on your Workgroup Bridge and other devices with which it communicates.
-
Authentication (Auth)
The Auth parameter determines which method of authentication the system uses. The options are:
-
Open (RECOMMENDED)—The default Open setting allows any AP, regardless of its WEP settings, to authenticate and then attempt to communicate with the bridge.
-
Shared Key—This setting instructs the bridge to send a plain-text, shared key query to APs in an attempt to communicate with the bridge. The Shared Key setting can leave the bridge open to a known-text attack from intruders. Therefore, this setting is not as secure as the Open setting.
-
-
Encryption
The Encryption option sets encryption parameters on all data packets, except association packets and some control packets. There are four options:
Note: The AP must have encryption active and a key set properly.
-
Off—This is the default setting. All encryption is turned off. The Workgroup Bridge does not communicate with an AP with use of WEP.
-
On (RECOMMENDED)—This setting requires the encryption of all data transfers. The Workgroup Bridge only communicates with APs that use WEP.
-
Mixed on—This setting means that the bridge always uses WEP in order to communicate with the AP. However, the AP communicates with all devices, whether they use WEP or do not use WEP.
-
Mixed off—This setting means that the bridge does not use WEP in order to communicate with the AP. However, the AP communicates with all devices, whether they use WEP or do not use WEP.
 Caution: If you select On or Mixed on as the WEP category and you configure the bridge through its radio link, connectivity to the bridge is lost if you set the WEP key incorrectly. Make sure that you use exactly the same settings when you set the WEP key on the Workgroup Bridge and the WEP key on other devices on your WLAN.
 -
Related Information
- IEEE Standards Association

- Aironet 340 Series Wireless LAN Products
- Wireless Support Resources
- Wireless LAN Support Page
- Cisco IOS Software Configuration Guide for Cisco Aironet Access Points
- Cisco IOS Software Configuration Guide for Cisco Aironet 1300 Series Outdoor Access Point/Bridge
- Cisco Aironet Access Point Software Configuration Guide for VxWorks
- Cisco Aironet 1400 Series Bridge Software Configuration Guide
- Cisco Aironet Wireless LAN Client Adapters Configuration Guides
- Cisco Wireless LAN Security Overview
- Wireless (Mobility) Securing Wireless Networks
- Access Point as a Workgroup Bridge Configuration Example
- Cisco Aironet Workgroup Bridge FAQ
- Password Recovery Procedure for the Cisco Aironet Equipment
- Cisco Aironet Access Point FAQ
- Technical Support & Documentation - Cisco Systems
Revision History
| Revision | Publish Date | Comments |
|---|---|---|
1.0 |
13-Feb-2007 |
Initial Release |
Contact Cisco
- Open a Support Case

- (Requires a Cisco Service Contract)


 Caution: Do not use the Shared Key mode. When you use it, a plain-text and encrypted version of the same data transmits on the air. This does not gain anything. If the user key is wrong, the unit does not decrypt the packets, and the packets cannot gain access to the network.
 Feedback