- Home
- /
- Article

 In this article
Directory Connector Overview
Directory Connector is an on-premises application for identity synchronization in to the cloud. You download the connector software from Control Hub and install it on your local machine.
With Directory Connector, you can maintain your user accounts and data in the Active Directory, so Active Directory becomes the single source of truth. When you make a change on-premises, it is replicated to the cloud.
See all the features, descriptions, and benefits in the table:
| Feature | Description and Benefit |
|---|---|
| Easy-to-use dashboard | The dashboard provides a synchronization schedule, summary, and status of synchronization, and the status of the Directory Connector. You can view the dashboard any time you sign in. |
| Dry run before synchronizing to the cloud | Conduct a dry run of changes to the directory before they are implemented in the cloud. Then run a report to see that the changes you want to make are what you expect. |
| Full and incremental synchronization | Synchronize the entire directory. Or just synchronize the incremental changes to save on processing power and shorten synchronization time. |
|
Synchronize multiple domains (single forest or multiple forests) |
Directory Connector supports multiple domains either under a single forest or under multiple forests (without the need for AD LDS). For enterprises with multiple Active Directory domains, you can install a Directory Connector for each domain, bind each domain to your organization, and then synchronize each user base into Webex. Control Hub reflects the status by showing the synchronization state for multiple Directory Connectors, allows you to turn off synchronization for a specific domain, and deactivate a Directory Connector in a high availability deployment. |
| Scheduled synchronization | Set a synchronization schedule by day, hour, and minute. |
| Lightweight Directory Access Protocol (LDAP) filters | Define LDAP search criteria and provide efficient imports. |
| Active Directory attribute mapping | Map Microsoft Active Directory attributes to corresponding Webex cloud attributes. You can map attributes that are relevant to your Active Directory configuration and also define custom attributes to map to the cloud. The attributes from the premises form various data in the cloud, such as user account information, enteprise phone numbers in Webex Teams, Room resource SIP addresses, and other user contact card data (job title, department, manager, and so on). |
|
Corporate Directory for on-premises Room resources and Cisco Webex Calling (Cloud PSTN) Users and Enterprise Contacts without Webex Licensing |
If part of your organization uses Cisco Webex Calling cloud PSTN for call service or you have on-premises Room devices, this feature lets users search the directory for enterprise contacts from their Cisco Webex Calling (cloud PSTN) phones or Room resources.
|
| Event viewer | Use the event viewer to determine if there were any issues with the synchronization. |
| Diagnostic Tool and Troubleshooting | You can use the built in diagnostic tool to troubleshoot your Cisco
Directory Connector deployment. If synchronization didn't work properly,
you may have a configuration or network error. This tool tests your
connection to Active Directory so that you can diagnose errors yourself
before contacting support. Once you enable troubleshooting in Directory Connector, logs are written that can be sent to technical support. |
| Automatic upgrade | After you install Directory Connector, you're sent a notification whenever a new version of the software is available. You can set up automatic upgrades so that you're always on the latest version of the software when a new version is released. |
| High availability | Configure multiple connectors so that there is a backup, in case the main connector or the machine hosting it goes down. |
Directory Connector is divided into three areas:
-
Control Hub is the single interface that lets you manage all aspects of your Webex organization: view users, assign licenses, download Directory Connector, and configure single sign-on (SSO) if you want your users to authenticate through their enterprise identity provider and you don't want to send email invitations for the Webex App.
-
Directory Connector management interface is the software that you download from Control Hub and install on a trusted Windows server. For multiple Active Directory domains, you can install one instant of the software for each domain that you want to synchronize. Using the software, you can run a synchronization to bring your Active Directory user accounts into Webex, view and monitor synchronization status, and configure Directory Connector services.
-
Directory synchronization service queries your Active Directory to retrieve users and groups to synchronize to the connector service and Directory Connector.
Refer to this diagram to understand the Directory Connector architecture:
Requirements for Directory Connector
Windows and Active Directory Requirements
You can install Directory Connector on these supported Windows Servers:
-
Windows Server 2022
-
Windows Server 2019
-
Windows Server 2016
To address a cookie issue, we recommend that you upgrade your domain controller to a release that contains the fix— Windows Server 2012 R2 or 2016. |
Directory Connector is supported with the following Active Directory services:
-
Active Directory 2016
(Directory Connector is supported when using the latest version of Active Directory on Windows Server 2019)
-
Active Directory 2012
-
Active Directory 2008 R2
-
Active Directory 2008
Note the following additional requirements:
-
Directory Connector requires TLS1.2. You must install the following:
-
.NET Framework v3.5 (required for the Directory Connector application. If you run into any issues, use the directions in Enable .NET Framework 3.5 by using the Add Roles and Features Wizard.)
-
.NET Framework v.4.5 (required for TLS1.2)
-
-
Active Directory forest functional level 2 (Windows Server 2003) or higher is required. (See What Are Active Directory Functional Levels? for more information.)
Hardware Requirements
You must install Directory Connector on a computer with these minimum hardware requirements:
-
8 GB of RAM
-
50 GB of storage
-
No minimum for the CPU
Network Requirements
If your network is behind a firewall, ensure that your system has HTTPS (port 443) access to the internet.
Webex Organization Requirements
-
To access the Directory Connector software from Control Hub, you require a Webex organization with a trial or any paid subscription.
-
(Optional) If you want new Webex App user accounts to be Active before they sign in for the first time, we recommend that you do the following:
-
Add, verify, and optionally claim domains that contain the user email addresses you want to synchronize into the cloud.
-
Do a single sign-on (SSO) integration of your Identity Provider (IdP) with your Webex organization.
-
Suppress automatic email invites, so that new users won't receive the automatic email invitation and you can do your own email campaign. (This feature requires the SSO integration.)
-
For more information, see User Statuses and Actions in Control Hub. |
Installation Requirements
-
For a multiple domain environment (either single forest or multiple forests), you must install one Directory Connector for each Active Directory domain. If you want to synchronize a new domain (B) while maintaining the synchronized user data on another existing domain (A), ensure that you have a separate supported Windows server to install Directory Connector for domain (B) synchronization.
-
For sign in to the connector, we do not require an administrative account in Active Directory. We require a local user account that is the same user as an full admin account in Control Hub.
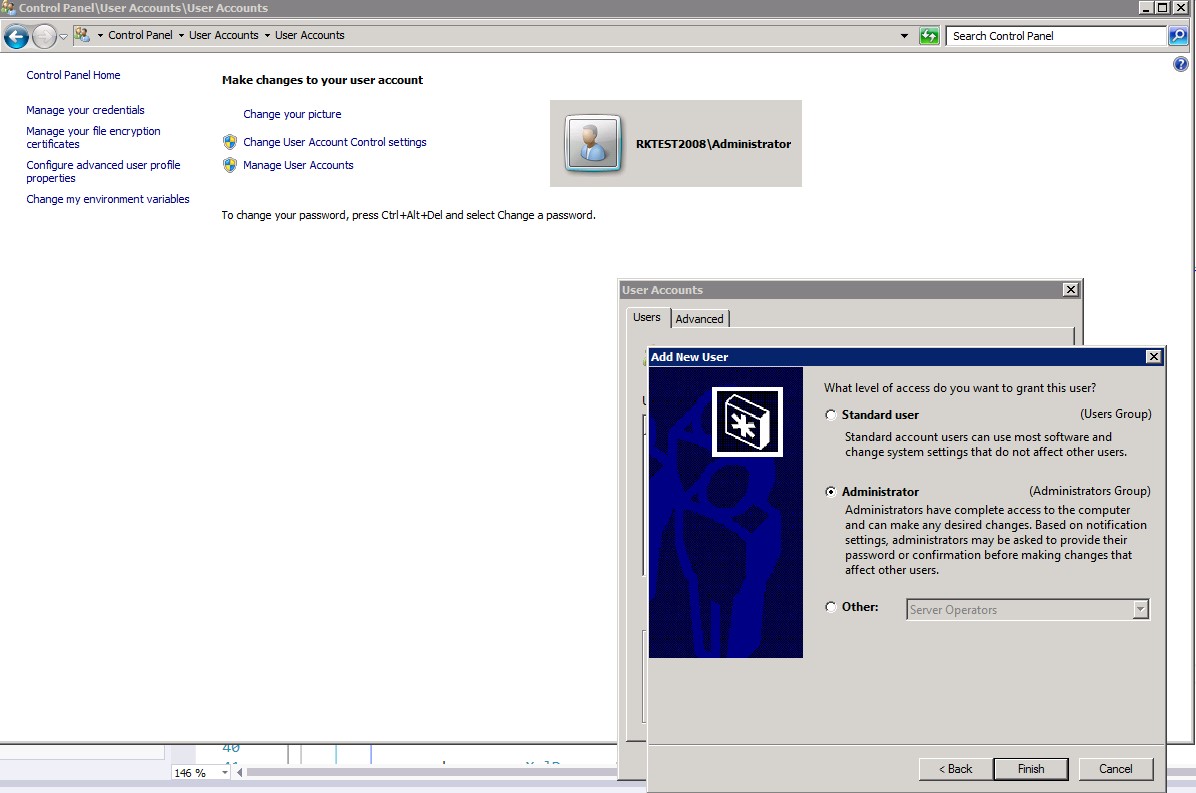
This local user must have privileges on that Windows machine to connect to the Domain Controller and read Active Directory user objects. The machine login account should be a computer administrator with privileges to install software on the local machine. (This information also applies to a Virtual Machine login.)
-
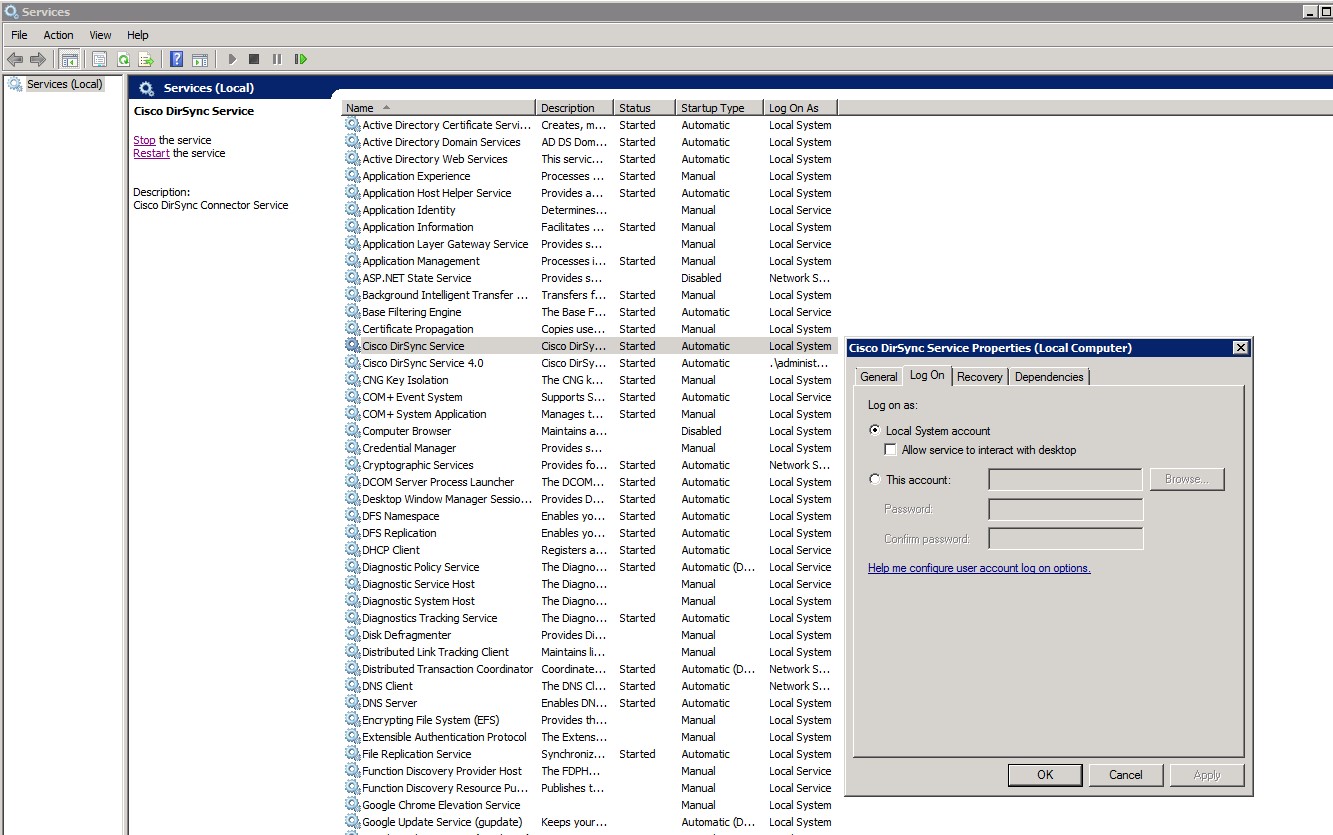
While signing in to the connector, the sign-in account must be the same as the full admin account for Control Hub. By default, the connector uses the local system account to access Active Directory. However, you can use Windows services to configure another account to access Active Directory. (This information also applies to a Virtual Machine login.)
-
Make sure that Windows Safe dynamic link library (DLL) search mode is enabled by using this procedure: Check SafeDllSearchMode in Windows Registry.
-
If you use AD LDS for multiple domains on a single forest, we recommend that you install Directory Connector and Active Directory Domain Service/Active Directory Lightweight Directory Services (AD DS/AD LDS) on separate machines.
Multiple Domain Requirements
Before you follow the tasks in Cisco directory connector Deployment Task Flow, keep the following requirements and recommendations in mind if you're going to synchronize Active Directory information from multiple domains into the cloud:
-
A separate instance of Directory Connector is required for each domain.
-
The Directory Connector software must run on a host that is on the same domain that it will synchronize.
-
We recommend that you verify or claim your domains in Control Hub. (See Add, Verify, and Claim Domains.)
-
If you want to synchronize more than 50 domains, you must open a ticket to get your organization moved to a large org list.
-
If desired, you can synchronize room resource information along with user accounts. (See Synchronize On-Premises Room Information to the Webex Cloud.)
Active Directory Group Recommendations for Automatic License Assignment
Active Directory groups are used to collect user accounts, computer accounts, and other groups into manageable units. Working with groups instead of with individual users helps simplify network maintenance and administration.
There are two types of groups in Active Directory:
-
Distribution groups—Used to create email distribution lists.
-
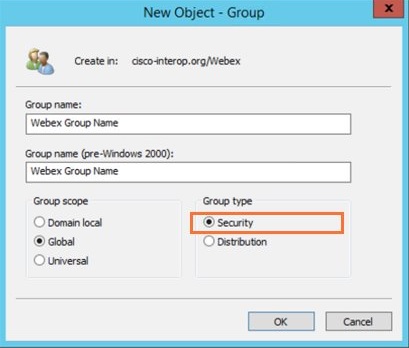
Security groups—Used to assign permissions to shared resources.
Consider the following guidelines when creating groups in Active Directory:
-
Create a global group for each role, department or service (such as Sales, Marketing, Managers, Accountants, Webex Licensing, and so on).
-
Use standard naming conventions across your organization to make it easy to identify important information about a group. Group names can include details about the group, such as the level of access, type of resource, level of security, group scope, mail capability, and so on. for example, the group name “GSG_Webex_Licensing_EMEAR” refers to a Global Security Group for Webex Licensing EMEAR users.
-
Organize groups in an easy-to-understand way, such as by geography or managerial hierarchy. Use group descriptions to completely describe the purpose of the group.
-
Before adding users to newly provisioned groups, define the Auto License Group Template in Control Hub for those groups. See Set Up Your Automatic License Assignment Template for more information.
Sizing Information
Directory Connector works as a bridge between the on-premises Active Directory and the Webex cloud. As such, the connector does not have an upper limit for how many Active Directory objects can be synchronized to the cloud. Any limits on premises directory objects are tied to the specific version of and specifications for the Active Directory environment that is being synchronized to the cloud, not the connector itself.
A few factors can affect the speed of the synchronization:
-
The total number Active Directory objects. (A 5000 user sync job won't take as long as 50000.)
-
Network speed and bandwidth.
-
System workload and specifications.
If you are synchronizing more than 50000 users, we highly recommend that you use a second connector for failover and redundancy. |
Because several factors are involved with synchronization and because each deployment varies depending on the above factors, we cannot provide specific time values for how long an object synchronization will take. |
Check SafeDllSearchMode in Windows Registry
Safe dynamic link library (DLL) search mode is set by default in the Windows registry and places the user's current directory later in the DLL search order. If this mode was somehow disabled, an attacker could place a malicious DLL (named the same as a referenced DLL file that is located in the system folder) into the current working directory of the application.
Usually, SafeDllSearchMode is enabled, but use this procedure to double-check the registry settings.
Before you begin
Changes to the Windows registry should be done with extreme caution. We recommend that you make a backup of your registry before using these steps. |
| 1 |
In Windows search or the Run window, type regedit and then press Enter. |
| 2 |
Go to HKEY_LOCAL_MACHINE\System\CurrentControlSet\Control\Session Manager. |
| 3 |
Choose one:
|
For more information, see Dynamic Link Library Search Order.
Web Proxy Integration
Web Proxy Integration
If web proxy authentication is enabled in your environment, you can still use Directory Connector.
If your organization uses a transparent web proxy, it does not support authentication. The connector successfully connects and synchronizes users.
You can take one of these approaches:
-
Explicit web proxy through Internet Explorer (the connector inherits the web proxy settings)
-
Explicit web proxy through a .pac file (the connector inherits enterprise-specific proxy settings)
-
Transparent Proxy that works with the connector without any changes
Use a Web Proxy Through The Browser
You can set up Directory Connector to use a web proxy through Internet Explorer.
If the Cisco DirSync Service runs from a different account than the currently signed in user, you also need to sign in with this account and configure web proxy.
| 1 |
From Internet Explorer, go to Internet Options, click Connections, and then choose LAN Settings. | ||
| 2 |
Point the Windows instance where the connector is installed at your web proxy. The connector inherits these web proxy settings. | ||
| 3 |
If your environment uses proxy authentication, add these URLs to your allowed list:
You may perform this either site-wide (for all hosts) or just for the host that has the connector.
| ||
| 4 |
If your environment needs to request Certificate Revocation Lists from Certificate Authorities, add these URLs to your allowed list:
For more information, see this article about domains and URLs that need to be accessed for Webex Services. |
Configure Web Proxy Through a PAC file
You can configure a client browser to use a .pac file. This file supplies the web proxy address and port information. Directory Connector directly inherits the enterprise-specific web proxy configuration.
| 1 |
For the connector to successfully connect and sync user information to the Webex cloud, make sure proxy authentication is disabled for | ||
| 2 |
If your environment uses proxy authentication, add these URLs to your allowed list:
You may perform this either site-wide (for all hosts) or just for the host that has the connector.
| ||
| 3 |
If your environment needs to request Certificate Revocation Lists from Certificate Authorities, add these URLs to your allowed list:
For more information, see this article about domains and URLs that need to be accessed for Webex Services. |
NTLM Proxy
Directory Connector supports NT LAN Manager (NTLM). NTLM is one approach to support Windows authentication among the domain devices and ensure their security.
NTLM Design
In most cases, a user wants to access another workstation resources through a client PC, which can be difficult to do in a secure way.
Generally, the technical design of NTLM is based on a mechanism of Challenge
and Response
:
-
A user signs in to a client PC through a Windows account and password. The password is never saved locally. Instead of a plain text password, a hash value of the password is stored locally. When a user signs in through the password to the client, Windows OS compares the stored hash value and hashed value from the input password. If both are the same, the authentication passes.
When the user wants to access any resource in another server, the client sends a request to the server with the account name in plain text.
-
When the server receives the request, the server generates a 16-bit random key. The key is called Challenge (or Nonce). Before the server sends back to the client, the challenge is stored in the server. And then the server sends the challenge to the client in plain text.
-
As soon as the client receives the challenge sent from server, the client encrypts the challenge by the hash value that was mentioned in Step 1. After encryption, the value is sent back to the server.
-
When the server receives the encrypted value from the client, the server sends it to the domain controller for verification. The request includes: the account name, encrypted challenge which the client sent, and the original plain challenge.
-
The domain controller can retrieve the hash values of password according to account name. And then the domain controller can encrypt on the original challenge. The doman controller can then compare with the received hash value and the encrypted hash value. If they are same, the verification is successful.
Windows has security authentication built into the operating system, making it easier for applications to support security authentication. As a result, you don't need to complete further configuration. |
Configure Transparent Proxy
In this scenario, the browser is unaware that a transparent web proxy is intercepting http requests (port 80/port 443) and no client-side configuration is required.
| 1 |
Deploy a transparent proxy, so that the connector can connect and synchronize users. |
| 2 |
Confirm that the proxy is successful—you see an expected browser authentication popup window when starting the connector. |
Set Proxy Authentication
Add the URL
cloudconnector.webex.com to your allowed list by creating an Access
Control List.
On your enterprise firewall server:
| 1 |
Enable DNS lookup if not already enabled. |
| 2 |
Determine an estimated bandwidth for this connection (at approximately 2 mb/s or less for the connector). This may not be required. |
| 3 |
Create an Access Control List to apply to the connector host, and specify
For example: access-list 2000 acl-inside extended permit TCP [IP of the connector]
cloudconnector.webex.com eq https
|
| 4 |
Apply this ACL to the appropriate firewall interface, which is only applicable for this single connector host. |
| 5 |
Ensure that the rest of the hosts in your enterprise are still required to use your web proxy by configuring the appropriate implicit deny statement. |
Cisco directory connector Deployment Task Flow
Before you begin
| 1 |
Control Hub initially shows directory synchronization as disabled. To turn on directory synchronization for your organization, you must install and configure Directory Connector, and then successfully perform a full synchronization. For a new installation of Directory Connector, always go to Control Hub ( https://admin.webex.com) to get the latest version of the software so that you're using the latest features and bug fixes. After you install the software, upgrades are reported through the software and automatically install when available. |
| 2 |
Sign In To Directory Connector Sign in with your Webex administrator credentials and perform the initial setup. |
| 3 |
It's always important to keep your Directory Connector software up to date to the latest version. We recommend that you use this procedure to allow automatic upgrades to the software to be installed silently when they're available. |
| 4 |
Choose Active Directory Objects to Synchronize By default, Directory Connector synchronizes all users that are not computers and all groups that are not critical system objects for a domain. For more control over what objects get synchronized, you can select specific users to synchronize and specify LDAP filters by using the Object Selection page in the Directory Connector. |
| 5 |
You can map attributes from your local Active Directory to corresponding attributes in the cloud. The only required field is the *uid. |
| 6 |
Synchronize directory avatars by using one of the following procedures:
You can synchronize your users' avatars to the cloud so that each user's avatar appears when they sign in to the application. You can sychronize avatars from an Active Directory attribute or a resource server. |
| 7 |
Synchronize On-Premises Room Information to the Webex Cloud Use this procedure to synchronize on-premises room information from Active Directory into the Webex cloud. After you synchronize the room information, the on-premises room devices with a configured, mapped SIP address show up as searchable entries on cloud-registered room devices, such as a Webex Room Device or Cisco Webex Board |
| 8 |
To Provision Users From Active Directory Into Control Hub, perform these steps:
Follow this sequence to provision Active Directory users for Webex App accounts.You can provision users from a multiple forest or multiple domain Active Directory deployment for Directory Connector 3.0 and later. During the process to onboard users from different domains, you must decide whether to retain or delete the user objects which might already exist in the Webex cloud—for example, test accounts from a trial. The goal is to have an exact match between your Active Directories and the Webex cloud. |
Install Directory Connector
Control Hub initially shows directory synchronization as disabled. To turn on directory synchronization for your organization, you must install and configure Directory Connector, and then successfully perform a full synchronization.
You must install one connector for each Active Directory domain that you want to synchronize. A single Directory Connector instance can only serve a single domain. See the following diagram to understand the flow for multiple domain synchronization:
Before you begin
If you authenticate through a proxy server, ensure that you have your proxy credentials:
-
For proxy basic-authentication, you'll enter the username and password after you install an instance of the connector. Internet Explorer proxy configuration is also required for basic-authentication; see Use a Web Proxy Through The Browser
-
For proxy NTLM, you may see an error when you open the connector for the first time. See Use a Web Proxy Through The Browser.
| 1 |
In Control Hub, go to , and choose Next. | ||
| 2 |
Click the Download and Install link to save the latest version of the connector installation .zip file to your VMware or Windows server. You can obtain the .zip file directly from this link, but you must have full administrative access to a Control Hub organization for this software to work.
| ||
| 3 |
On the VMware or Windows server, unzip and run the .msi file in the setup folder to launch the setup wizard. | ||
| 4 |
Click Next, check the box to accept the license agreement, and then click Next until you see the account type screen. | ||
| 5 |
Choose the type of service account that you want to use and perform the installation with an admin account:
To avoid errors, make sure the following privileges are in place:
| ||
| 6 |
Click Install. After the network test runs and if prompted, enter your proxy basic credentials, click OK, and then click Finish. |
What to do next
We recommend that you reboot the server after installation. The dry run report cannot show the correct result when the data was not released. While rebooting the machine, all data is refreshed to show an exact result in the report.
Sign In To Directory Connector
Before you begin
Ensure that you have your proxy credentials.
-
For proxy basic-auth, you'll enter the username and password after you open the connector for the first time.
-
For proxy NTLM, open Internet Explorer, click the gear icon, go to Internet options > Connections > LAN settings, ensure the proxy server information is added, and then click OK. See Use a Web Proxy Through The Browser.
| 1 |
Open the connector, and then add
| ||||
| 2 |
If prompted, sign in in with your proxy authentication credentials, and then sign in to Webex using your admin account and click Next. | ||||
| 3 |
Confirm your organization and domain.
| ||||
| 4 |
After the Confirm Organization screen appears, click Confirm. If you already bound AD DS/AD LDS, the Confirm Organization screen appears. | ||||
| 5 |
Click Confirm. | ||||
| 6 |
Choose one, depending on the number of Active Directory domains you want to bind to Directory Connector:
|
What to do next
After you sign in, you're prompted to perform a dry run synchronization.
Directory Connector Dashboard
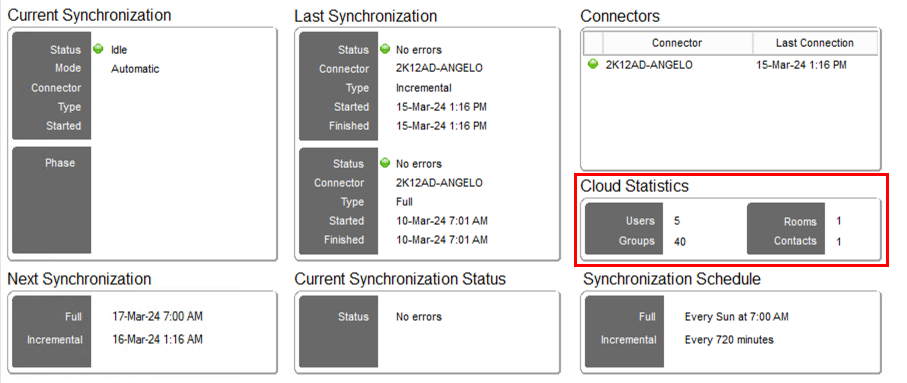
When you first sign in to Directory Connector, the Dashboard appears. Here you can view a summary of all synchronization activities, view cloud statistics, perform a dry run synchronization, start a full or incremental synchronization and launch the event view to see error information.
If your session times out, sign back in. |
You can easily run these tasks from the Actions Toolbar or Actions Menu.
|
Component |
Description |
|---|---|
|
Current Synchronization |
Displays the status information about the synchronization that is currently underway. When no synchronization is being run, the status display is idle. |
|
Next Synchronization |
Displays the next scheduled full and incremental synchronizations. If no schedule is set, Not Scheduled is displayed. |
|
Last Synchronization |
Displays the status of the last two synchronizations performed. |
|
Current Synchronization Status |
Displays the overall status of the synchronization. |
|
Connectors |
Displays the current on-premises connectors that are available to the Cloud. |
|
Cloud Statistics |
Displays the overall status of the synchronization. |
|
Synchronization Schedule |
Displays the synchronization schedule for incremental and full synchronization. |
|
Configuration Summary |
Lists the settings that you changed in the configuration. For example, the
summary might include the following:
|
| Action | Description | ||
|---|---|---|---|
| Start incremental sync |
Manually start an incremental synchronization
|
||
|
Sync Dry Run |
Perform a dry run synchronization. |
||
|
Launch Event Viewer |
Launch the Microsoft Event Viewer. |
||
|
Refresh |
Refresh the Cisco directory connector dashboard |
|
Action |
Description |
|---|---|
| Sync Now |
Start a full synchronization instantly. |
|
Synchronization Mode |
Select either incremental or full synchronization mode. |
|
Reset Connector Secret |
Establish a conversation between Cisco directory connector and the connector service. Selecting this action will reset the secret in the cloud and then saves the secret locally. |
|
Dry Run |
Perform a test of the synchronization process. You must do a dry run before you do a full synchronization. |
|
Troubleshooting |
Turn on/off troubleshooting. |
|
Refresh |
Refresh the Cisco directory connector main screen. |
|
Exit |
Exit Cisco directory connector. |
|
Key Combination |
Action |
|---|---|
|
Alt +A |
Show the Actions menu |
|
|
Synchronization now |
|
|
Reset Connector Secret |
|
|
Dry run |
|
|
Incremental synchronization |
|
|
Full synchronization |
|
|
ShowHelpmenu |
|
|
Help |
|
|
About |
|
|
FAQ |
Set Automatic Upgrades
| 1 |
From Directory Connector, go to , and then check Automatically upgrade to the new Cisco Directory Connector version. |
| 2 |
Click Apply to save your changes. |
New versions of the connector are automatically installed when they're available.
You can manually manage upgrades, if you prefer. See Upgrade to the Latest Software Release for more information. |
Choose Active Directory Objects to Synchronize
By default, Directory Connector synchronizes all users that are not computers and all groups that are not critical system objects for a domain. For more control over what objects get synchronized, you can select specific users to synchronize and specify LDAP filters by using the Object Selection page in the Directory Connector.
Groups for Automatic License Assignment
Control Hub allows you to manage license assignments on a per-group basis. You can create license templates and map them to Active Directory groups that you synchronize to the cloud. At the point of user creation, Webex checks user membership and auto license template mapping for that new user.
We recommend that you use an LDAP filter to only sync relevant groups to the cloud. For example, you can set the filter to:
(&(cn=Example)(objectclass=Group))*
This filter synchronizes all groups within the base DN where the name starts with Example. Users that aren't assigned to groups are assigned licenses from the default automatic license template that you configured in Control Hub.
Groups for Hybrid Data Security Deployments
In Directory Connector, you must check Groups if you're using Hybrid Data Security to configure a trial group for pilot users. See the Deployment Guide for Hybrid Data Security for guidance. This Directory Connector setting does not affect other user synchronization in to the cloud.
| 1 |
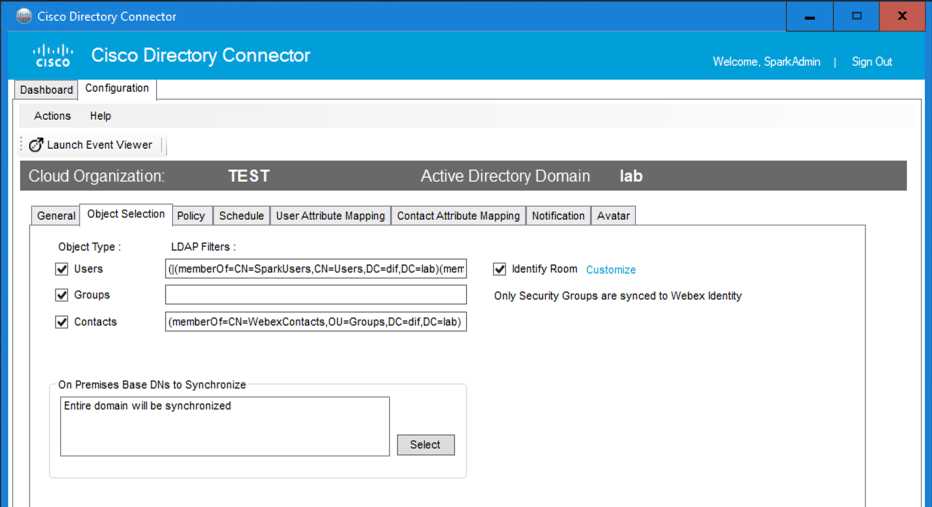
From Directory Connector, go to Configuration, and then click Object Selection. | ||
| 2 |
In the Object Type section, check Users, and consider limiting the number of searchable containers for users. If you want to synchronize just users in a certain group, for example, you must enter an LDAP filter in the Users LDAP filters field. If you want to sync users that are in the Example-manager group, use a filter like this one:
| ||
| 3 |
Check Identify Room to separate room data from user data. Click Customize if you want to set up additional attributes to identify user data as room data. Use this setting if you want to synchronize on-premises room information from Active Directory into the Webex cloud. After you synchronize the room information, the on-premises room devices with a configured, mapped SIP address show up as searchable entries on cloud-registered room devices. For more information, see Synchronize On-Premises Room Information to the Webex Cloud. | ||
| 4 |
Check Groups if you want to synchronize your Active Directory user groups to the cloud. Do not add a user sync LDAP filter to the Groups field. You should only use the Groups field to sync the group data itself to the cloud.
| ||
| 5 |
Check Contacts if you want to synchronize contact information of users to the cloud.
| ||
| 6 |
Configure the LDAP filters. You can add extended filters by providing a valid LDAP filter. See this article for more information about configuring LDAP filters. | ||
| 7 |
Specify the On Premises Base DNs to Synchronize by clicking Select to see the tree structure of your Active Directory. From here, you can select or deselect which containers to search on. | ||
| 8 |
Check that the objects you want to add for this configuration, and click Select. You can select individual or parent containers to use for synchronization. Select a parent container to enable all child containers. If you select a child container, the parent container shows a gray check mark that indicates a child has been checked. You can then click Select to accept the Active Directory containers that you checked. If your organization places all users and groups in the Users container, you do not have to search other containers. If your organization is divided into organization units, make sure that you select OUs. | ||
| 9 |
Click Apply. Choose an option:
For information on dry runs, see Do a Dry Run Synchronization on Your Active Directory Users. For group synchronization, you must do a full sync: Do a Full Synchronization of Active Directory Users Into the Cloud. |
Map User Attributes
You can map attributes from your local Active Directory to corresponding attributes in the cloud. The only required field is the *uid, a unique identifier for each user account in the cloud identity service.
You can choose what Active Directory attribute to map to the cloud—for example, you
can map firstName lastName in Active Directory or a custom attribute
expression to displayName in the cloud.
Accounts in Active Directory must have an email address; the uid maps by default to the |
If you choose to have the preferred language come from your Active Directory, then Active Directory is the single source of truth: users won't be able to change their language setting in Webex Settings and administrators won't be able to change the setting in Control Hub.
| 1 |
From Directory Connector, click Configuration, and then choose User Attribute Mapping. This page shows the attribute names for Active Directory (on the left) and the Webex cloud (on the right). All required attributes are marked with a red asterisk. | ||||
| 2 |
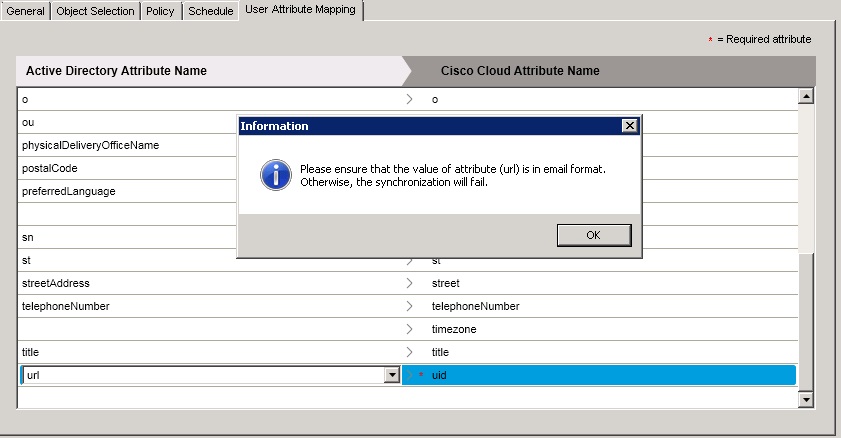
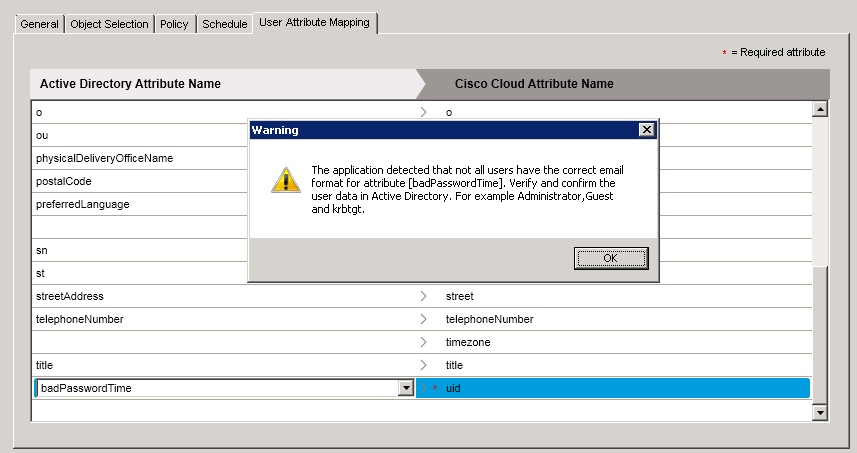
Scroll down to the bottom of the Active Directory Attribute Names, and then choose one of these Active Directory attributes to map to the cloud attribute uid:
You can map any of the other Active Directory attributes to uid, but we recommend that you use mail or userPrincipalName, as covered in the guidelines above. In some cases, the userPrincipalName is used for signing in, but a user’s email address is used to manage their calendar. You must ensure the email address for calendar management maps to the primary email address field in Webex. Add the userPrincipalName as an alternative email address. To see what attributes in Active Directory correspond to in the cloud, see Mapping Active Directory Attributes in Directory Connector.
| ||||
| 3 |
If the predefined Active Directory attributes do not work for your deployment, click the attribute drop-down, scroll to the bottom, and then choose Customize Attribute to open a window that lets you define an attribute expression.
In this example, let's map the Active Directory attributes
| ||||
| 4 |
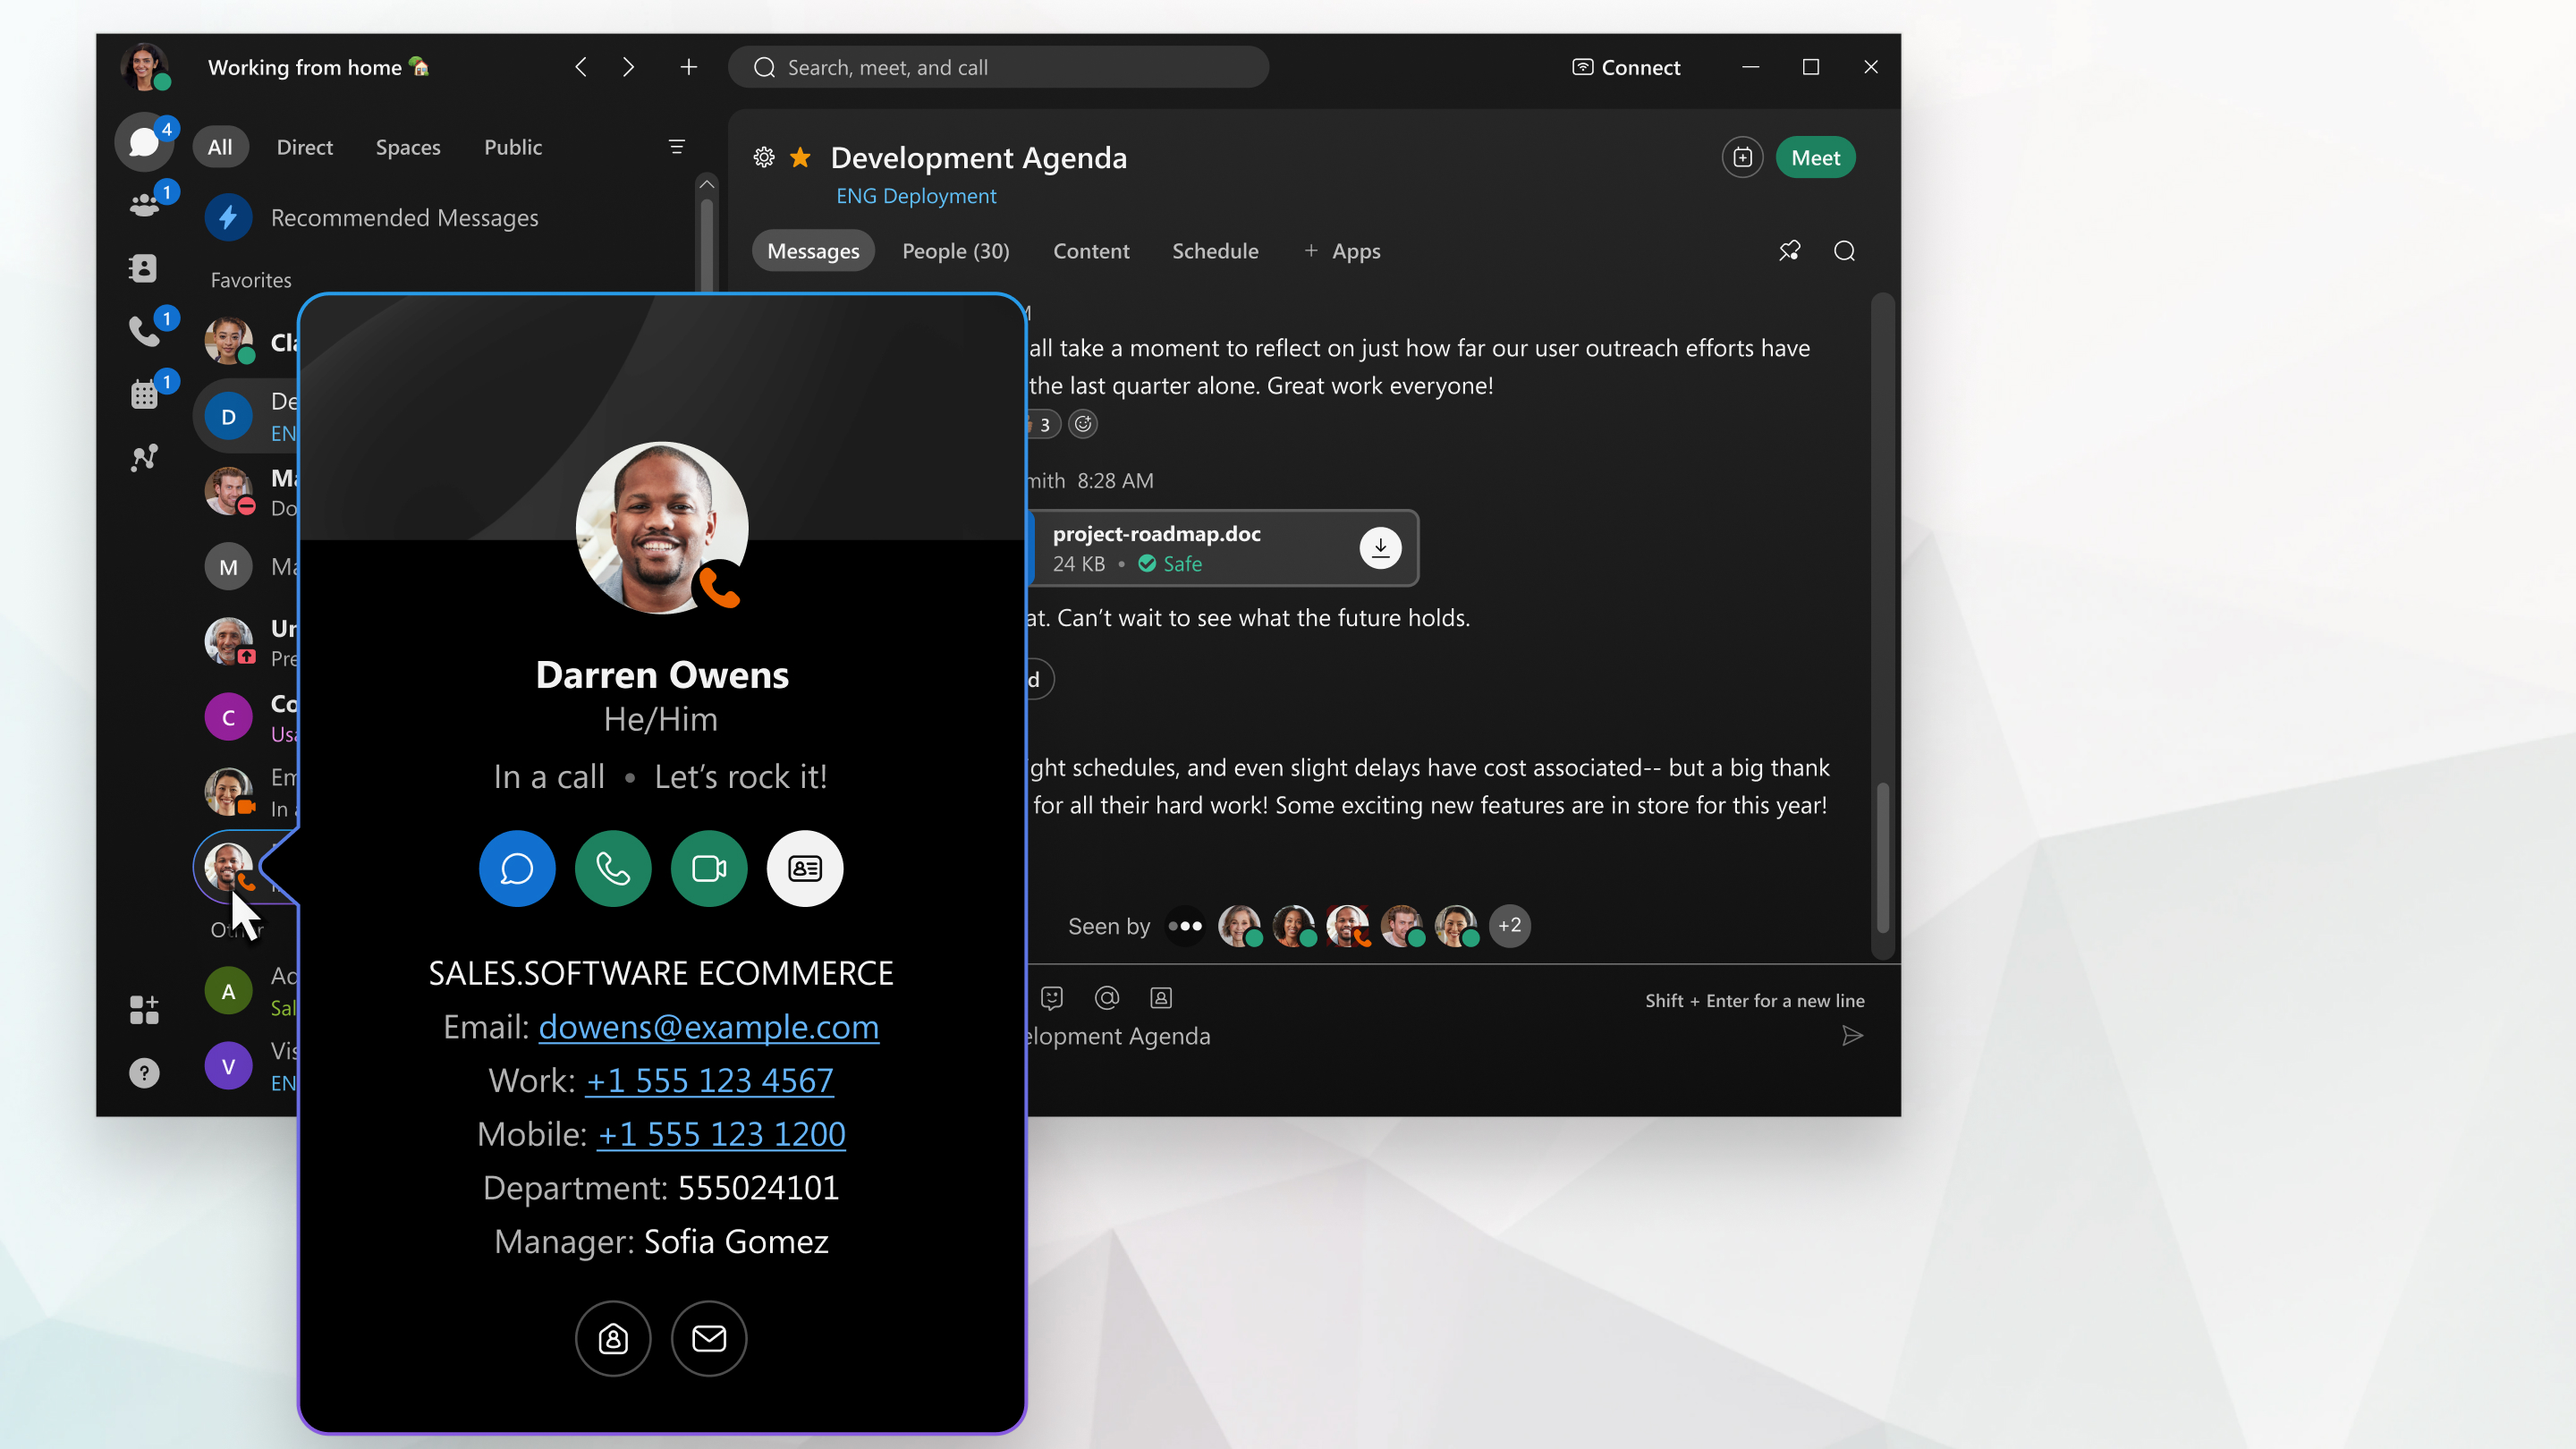
(Optional) Choose mappings for mobile and telephoneNumber if you want mobile and work numbers to appear, for example, in the user's contact card in Webex App. The phone number data appears in the Webex App when a user hovers over another user's profile picture. For more information on calling from a user's contact card, see Calling in Webex (Unified CM) Deployment Guide (admins). | ||||
| 5 |
Choose additional mappings for more data to appear in the contact card:
After the attributes are mapped, the information appears when a user hovers over another user's profile picture:
For more information about the contact card, see Verify Who You're Contacting. After these attributes are synchronized to each user account, you can also turn on People Insights in Control Hub. This feature allows Webex App users to share more information in their profiles, and learn more about each other. For more information about the feature and how to enable it, see People Insights Profiles for Webex, Jabber, Webex Meetings, and Webex Events (New) in Control Hub | ||||
| 6 |
After you make your choices, click Apply. |
Any user data that is contained in Active Directory overwrites the data in the cloud that corresponds to that user. For example, if you created a user manually in Control Hub, the user’s email address must be identical to the email in Active Directory. Any user without a corresponding email address in Active Directory is deleted.
Deleted users are kept in the cloud identity service for 7 days before they are permanently deleted. |
Active Directory and cloud attributes
You can map attributes from your local Active Directory to corresponding attributes in the cloud by using the User Attribute Mapping tab.
This table compares the mapping between the Active Directory Attribute Names and the Cisco Cloud Attribute Names. These values and mappings are the default setting in Directory Connector. You can choose different attributes in the Active Directory drop-downs and determine which on-premises attribute synchronizes to which cloud attribute.
Think of the drop-down attributes as presets. As an alternative to the values in the Active Directory row, you can also specify a customized attribute, your own preset, in Active Directory (an expression with multiple attributes) to map to a single cloud attribute in the corresponding row. This way, you have the flexibility to determine the display names of your users—for example, you can add an expression that creates a customized attribute based on the employee title, given name, and surname in Active Directory.
You can also specify any of the Active Directory attributes to map to uid in the cloud. However, you must make sure that the on-premises attribute follows a valid email format.
You can also use alternative email addresses, if for example you want to use the userPrincipalName for signing in, but a user’s email address is used to manage their calendar. In this case, map another email address to the emails;type-work attribute. This is the email that is used for authentication; it is not used to manage your calendar. The email address you map from AD must be from a verified domain within your organization, and it must be unique and not assigned to another user. |
|
Active Directory attribute names |
Webex cloud attribute names |
Notes |
|---|---|---|
|
— |
buildingName |
— |
|
c |
c |
This attribute specifies the user's country abbreviation. |
|
departmentNumber |
departmentNumber |
This attribute is used for the user's department number that appears in the contact card and people insights. |
|
displayName |
displayName |
This attribute is used for the user account display name that appears in Control Hub, the contact card, and people insights. |
|
userAccountControl |
ds-pwp-account-disabled |
This attribute is used for user synchronization. Make sure the userAccountControl attribute is mapped to ds-pwp-account-disabled or users won’t be synced properly. |
|
employeeNumber |
employeeNumber |
— |
|
employeeType |
employeeType |
This value is used for the user employee type that appears in the contact card and people insights. |
|
facsimileTelephoneNumber |
facsimileTelephoneNumber |
— |
|
givenName |
givenName |
This attribute is used for the user account first name that appears in Control Hub, the contact card, and people insights. |
|
— |
jabberID |
This cloud attribute relates to IM addresses (XMPP type) that are used by Jabber. This value is not the same as sipAddresses. |
|
l |
l |
This attribute specifies the city of the user. |
|
— |
locale |
— |
|
manager |
manager |
This attribute is used for the user's manager name that appears in the contact card and people insights. |
|
mobile |
mobile |
This attribute is used as the mobile number that appears for calling the user from the contact card. |
|
o |
o |
This attribute specifies the name of the company or organization. |
|
ou |
ou |
This attribute specifies the name of the organizational unit. |
|
physicalDeliveryOfficeName |
physicalDeliveryOfficeName |
This attribute specifies the user's office location. |
|
postalCode |
postalCode |
This attribute specifies the user's postal or zip code for physical mail delivery. |
|
preferredLanguage |
preferredLanguage |
This attribute sets the user's preferred language and the following formats are supported: xx_YY or xx-YY. Here are a few examples: en_US, en_GB, fr-CA. If you use an unsupported language or invalid format, users' preferred language will change to the language set for the organization. |
|
MSRTCSIP-PrimaryUserAddress ipPhone |
SipAddresses;type=enterprise |
This attribute is used for synchronizing on-premises room information from Active Directory into the Cisco Webex cloud. |
|
sn |
sn |
This attribute is used for the user account last name that appears in Control Hub, the contact card, and people insights. |
|
st |
st |
This attribute specifies the state or province of the user. |
|
streetAddress |
street |
This attribute specifies the street address of the user for physical mail delivery. |
|
telephoneNumber |
telephoneNumber |
This attribute specifies the user's primary (work) phone number that is used for calling the user from the contact card. |
|
— |
timezone |
This cloud attribute specifies the user's time zone. |
|
title |
title |
This attribute specifies the user's title that appears in the contact card and people insights. |
|
type |
enterprise |
— |
|
*userPrincipalName |
uid |
A mandatory attribute mapping. For each user account, the Active Directory value maps to a unique uid in the cloud. In some cases, the userPrincipalName is used for signing in, but a user’s email address is used to manage their calendar. You must ensure the email address for calendar management maps to the primary email address field in Webex. Add the userPrincipalName as an alternative email address. The user can then use either of these email addresses to sign in, as long as the correct SAML attribute mapping is in place. See the sample attribute mapping below for how you might map an alternative email address. |
|
*userPrincipalName <custom attribute> |
emails;type-work |
This mapping is optional, use it if you want to use alternative email addresses. This is the email that is used for authentication; it is not used to manage your calendar. The email address you map from AD must be from a verified domain within your organization, and it must be unique and not assigned to another user. |
|
<New attribute for Azure user objectId> |
externalId |
Create a new Active Directory attribute to hold the Azure user objectId, so that it does not clash with an existing one. This attribute then maps to the externalId attribute, ensuring that when Webex users create groups in Microsoft 365 they automatically create teams in Webex. |
Alternative email address mapping
Expressions for Customized Attributes
|
Operator |
Description and Example |
|---|---|
|
% |
Removes all characters from the beginning of the string to the position of the character or string argument, if matched.
|
|
- |
Strips the back of the input string from the end of the specified string.
|
|
+ |
Concatenates input strings or expressions.
|
|
| |
Evaluates the separated expressions against the empty string, and selects the first non-empty result.
|
Synchronize Directory Avatars From an Active Directory Attribute to the Cloud
You can synchronize your users' directory avatars to the cloud so that each avatar appears when they sign in to the Webex App. Use this procedure to synchronize raw avatar data from an Active Directory attribute.
| 1 |
From Directory Connector, go to Configuration, click Avatar, and then check Enable. |
| 2 |
For Get avatar from, choose AD attribute, and then choose the Avatar attribute that contains the raw avatar data that you want to synchronize to the cloud. |
| 3 |
To verify that the avatar is accessed correctly, enter a user's email address and then click Get user's avatar. The avatar appears to the right. |
| 4 |
After you verify that the avatar appeared correctly, click Apply to save your changes. |
-
The images that are synchronized become the default avatar for users in the Webex App. Users are not allowed to set their own avatar after this feature is enabled from Directory Connector.
-
The user avatars synchronize over to both Webex App and any matching accounts on the Webex site.
What to do next
Do a dry run synchronization; if there are no issues, then do a full synchronization to get your Active Directory user accounts and avatars to synchronize into the cloud and appear in Control Hub.
Synchronize Directory Avatars From a Resource Server to the Cloud
You can synchronize your users' directory avatars to the cloud so that each avatar appears when they sign in to the Webex App. Use this procedure to synchronize avatars from a resource server.
Before you begin
-
The URI pattern and variable value in this procedure are examples. You must use actual URLs where your directory avatars are located.
-
The avatar URI pattern and the server where the avatars reside must be reachable from the Directory Connector application. The connector needs http or https access to the images, but the images don't need to be publicly accessible on the internet.
-
The avatar data synchronization is separated from the Active Directory user profiles. If you run a proxy, you must ensure that avatar data can be accessed by NTLM authentication or basic-auth.
| 1 |
From Directory Connector, go to Configuration, click Avatar, and then check Enable. |
| 2 |
For Get avatar from, choose Resource server and then enter the Avatar URI Pattern—For example, Let's look at each part of the avatar URI pattern and what they mean:
|
| 3 |
(Optional) If your resource server requires credentials, check Set user credential for avatar, then either choose Use current service logon user or Use this user and enter the password. |
| 4 |
Enter the Variable Value—For example: |
| 5 |
Click Test to make sure the avatar URI pattern works correctly. In this example, if the mail value for one AD entry is |
| 6 |
After the URI information is verified and looks correct, click Apply. For detailed information about using regular expressions, see the Microsoft Regular Expression Language Quick Reference . |
-
The images that are synchronized become the default avatar for users in the Webex App. Users are not allowed to set their own avatar after this feature is enabled from Directory Connector.
-
The user avatars synchronize over to both Webex App and any matching accounts on the Webex site.
What to do next
Do a dry run synchronization; if there are no issues, then do a full synchronization to get your Active Directory user accounts and avatars to synchronize into the cloud and appear in Control Hub.
Synchronize On-Premises Room Information to the Webex Cloud
Use this procedure to synchronize on-premises room information from Active Directory into the Webex cloud. After you synchronize the room information, the on-premises room devices with a configured, mapped SIP address show up as searchable entries on cloud-registered Webex devices (Room, Desk, and Board).
| 1 |
From Directory Connector, go to Synchronize, click more | ||
| 2 |
Check Sync room information to the cloud to separate the room data from the user data during synchronization. When this setting is disabled, room data is treated the same way as user synchronized data. | ||
| 3 |
Go to Attribute Mapping, and then change the attribute mapping for the cloud attribute sipAddresses;type=enterprise.
| ||
| 4 |
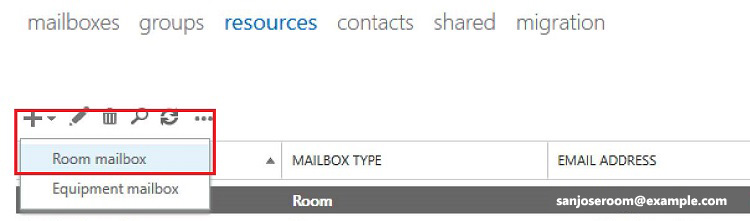
Create a Room Resource mailbox in Exchange. This adds the msExchResourceMetaData;ResourceType:Room attribute which the connector then uses to identify rooms.
| ||
| 5 |
From Active Directory users and computers, navigate to and edit properties of the Room. Add the Fully Qualified SIP URI with a prefix of sip:
| ||
| 6 |
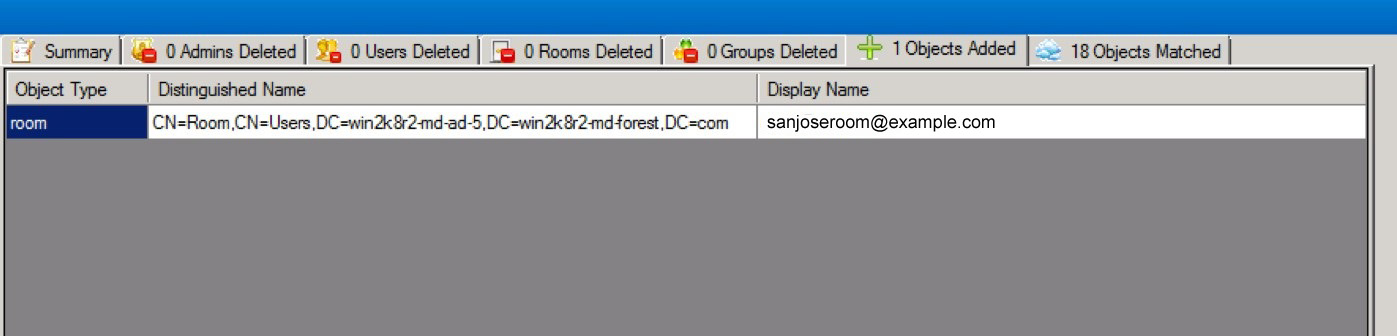
Do a dry run sync and then a full run sync in the connector. The new room objects are listed Objects Added and matched room objects appear in Objects Matched in the dry run report. Any room objects flagged for deletion are under Rooms Deleted.
The dry run results show any room resources that were matched.
This setting separates the Active Directory room data (including the room's attribute) from user data. After the synchronization finishes, the cloud statistics on the connector dashboard show room data that was synchronized to the cloud.
|


What to do next
Now that you've done these steps, when you do a search on a Webex cloud-registered device, you'll see the synchronized room entries that are configured with SIP addresses. When you place a call from the Webex device on that entry, a call is placed to the SIP address that was been configured for the room.
From Control Hub, you can automatically import rooms from your Directory and create workspaces.
The endpoint cannot loop a call back to Webex App. For test dialing devices, these devices must be registered as a SIP URI on-premises or somewhere other than Webex App. If the Active Directory room system that you are searching for is registered to Webex and the same email address is on the Webex Room Device, Desk device, or Webex Board for Calendar Service, then the search results won't show the duplicate entry. The Room, Desk, or Board device is dialed directly in Webex App, and a SIP call is not made. |
Send Email Reports on Directory Synchronization Results
By default, the organization contacts or administrators always receive email notifications. With this setting, you can customize who should receive email notifications that summarize directory synchronization reports.
| 1 |
From Directory Connector, click Configuration, and then choose Notification. |
| 2 |
From Directory Connector, click Settings, and next to Email Receiver, toggle on Enable synchronization of report. |
| 3 |
Check Enable notification if you want to override the default notification behavior and add one or more email recipients. |
| 4 |
Click Add and then enter an email address. If you enter an email address with an invalid format, a message pops up telling you to correct the issue before you can save and apply the changes. |
| 5 |
Click Add Email and then enter an email address. If you enter an email address with an invalid format, a message pops up telling you to correct the issue before you can save and apply the changes. |
| 6 |
If you need to edit any email addresses that you entered, double-click the email entry in the left column and then make any changes you need to. |
| 7 |
After you added all the valid email addresses, click Apply. |
| 8 |
After you added all the valid email addresses, click Save. |
What to do next
If you decided that you want to remove email addresses, you can click an email to highlight that entry and then click Remove.
If you decided that you want to remove email addresses, you can click Remove next to specific email address entries.
Provision Users From Active Directory Into Control Hub
Follow these steps to provision Active Directory users and create corresponding user accounts in Control Hub. You can provision users from a multiple domain Active Directory deployment (with either a single forest or multiple forests) after you install a Directory Connector per domain. During the process to onboard users from different domains, you must decide whether to retain or delete the user objects which might already exist in the Webex cloud—for example, test accounts from a trial. The goal is to have an exact match between your Active Directories and the Webex cloud.
| 1 |
Do a Dry Run Synchronization on Your Active Directory Users Perform a dry run to compare objects in the on-premises Active Directory and objects in the Webex cloud. A dry run allows you to see what objects will be added, modified, or deleted before you run a full or incremental synchronization and commit the changes to the cloud. |
| 2 |
Do a Full Synchronization of Active Directory Users Into the Cloud When you run a full synchronization, the connector service sends all filtered objects from your Active Directory (AD) to the cloud. The connector service then updates the identity store with your AD entries. If you created an auto-assign license template, you can assign that to the newly synchronized users. |
| 3 |
Assign Webex Services to Directory Synchronized Users in Control Hub After you complete a full user synchronization from Directory Connector in to Control Hub, you can assign Webex service licenses using a variety of methods. We recommend that you set up an auto-assign license template before you use it on new Webex App users that you synchronized from Active Directory. You can also make individual changes after this initial step. |
Do a Dry Run Synchronization on Your Active Directory Users
Perform a dry run to compare objects in the on-premises Active Directory and objects in the Webex cloud. A dry run allows you to see what objects will be added, modified, or deleted before you run a full or incremental synchronization and commit the changes to the cloud.
During the process to onboard users from different domains, you must decide whether to retain or delete the user objects which might already exist in the Webex cloud—for example, test accounts from a trial. With Directory Connector, the goal is to have an exact match between your Active Directories and the Webex cloud.
If you have multiple domains in a single forest or multiple forests, you must do this step on each of the Cisco directory connector instances you've installed for each Active Directory domain.
Before you begin
You may already have some Webex App users in Control Hub before you used Directory Connector. Among the users in the cloud, some might match on-premises Active Directory object and be assigned licenses for services. But some may be test users that you want to delete while doing a synchronization. You must create an exact match between your Active Directory and Control Hub.
| 1 |
Choose one:
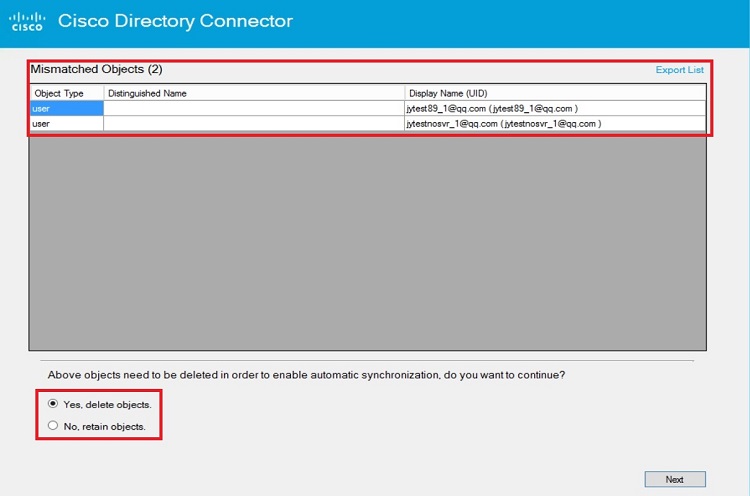
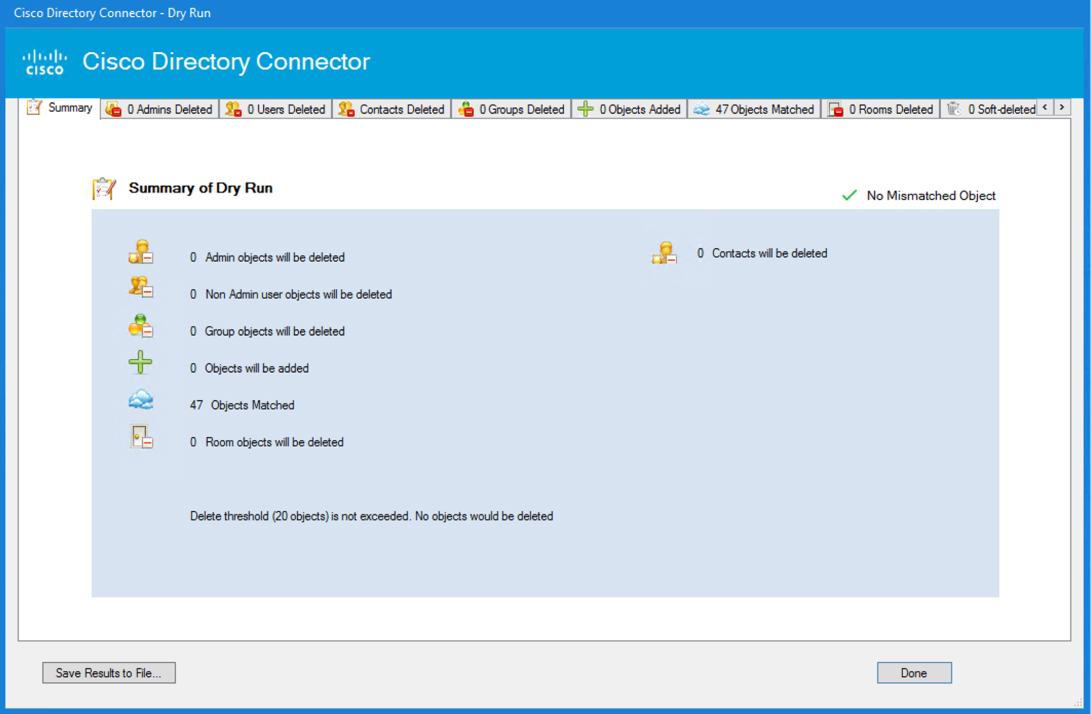
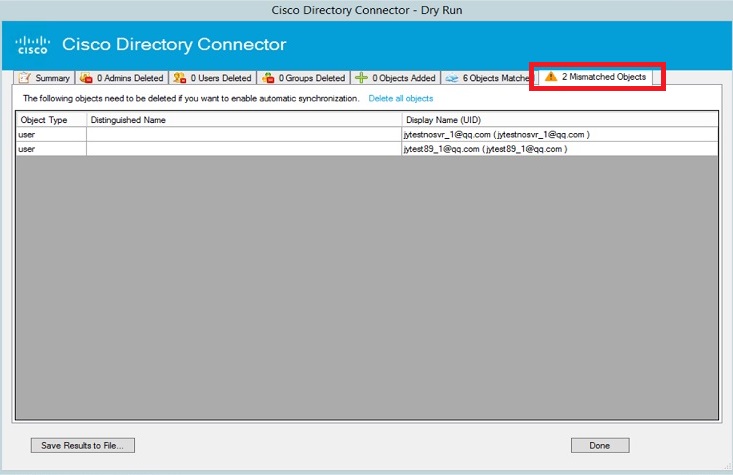
When the dry run completes, you'll see one of the following results:
The Summary contains information about object matching:
The dry run identifies the users by comparing them with domain users. The application can identify the users if they belong to the current domain. In the next step, you must decide whether to delete the objects or retain them. The mismatched objects are identified as already existing in the Webex cloud but not existing in the on-premises Active Directory. | ||
| 2 |
Review the dry run results and then choose an option depending on whether you use a single domain or multiple domains:
| ||
| 3 |
In the Confirm Dry Run prompt, click Yes to redo the dry run synchronization and view the dashboard to see the results. Any accounts that were successfully synchronized in the dry run appear under Objects Matched. If a user in the cloud doesn't have a corresponding user with the same email in Active Directory, the entry is listed under Users Deleted. To avoid this delete flag, you can add a user in Active Directory with the same email address. To view the details of the items that were synchronized, click the corresponding tab for specific items or Objects Matched. To save the summary information, click Save Results to File. | ||
| 4 |
If the results are expected, go to , and then click Enable Now to do a manual synchronization and put in manual mode at this point.
|
What to do next
-
For any mismatched user objects that you retained, you must add them to Active Directory so there's an exact match between on-premises and the cloud.
-
Choose a synchronization type:
-
Do a Full Synchronization of Active Directory Users Into the Cloud for when you first synchronize new users to the cloud. You do so from , and then users from the current domain are synchronized.
-
Set the Connector Schedule and Run an Incremental Synchronization after you run a full synchronization and if you want to pick up changes after the initial synchronization. This type of synchronization is recommended to pick up on small changes made to the Active Directory user source.
By default, an incremental synchronization is set to occur every 30 minutes (on versions 3.4 and earlier) or every 4 hours (on versions 3.5 and later), but you can change this value. The incremental synchronization does not occur until you initially perform a full synchronization.
-
-
If you have multiple domains, repeat these steps on any other Directory Connector that you've installed.
Things to Keep in Mind
-
Perform a dry run before you enable full synchronization, or when you change the synchronization parameters. If the dry run was initiated by a configuration change, you can save the settings after the dry run is complete. If you have already added users manually, performing an Active Directory synchronization may cause previously added users to be removed. You can check the Directory Connector Dry Run Reports to verify that all expected users are present before you fully synchronize to the cloud.
-
If matched users are marked to be deleted and you're not sure how to proceed, see troubleshooting information and how to contact support in Troubleshooting and Fixes for Directory Connector.

Deleted users are kept in the cloud identity service for 7 days before they are permanently deleted.
Do a Full Synchronization of Active Directory Users Into the Cloud
When you run a full synchronization, the connector service sends all filtered objects from your Active Directory (AD) to the cloud. The connector service then updates the identity store with your AD entries. If you created an auto-assign license template, you can assign that to the newly synchronized users.
If you have multiple domains, you must do this step on each of the Directory Connector instances you've installed for each Active Directory domain.
Directory Connector synchronizes the user account state—In Active Directory, any users that are marked as disabled also appear as inactive in the cloud.
Before you begin
-
If you want the Webex App user accounts to be in Active status after the full synchronization and before users sign in for the first time, you must do these steps to bypass the email validation:
-
Integrate Single Sign-On with your Webex organization. See
Single Sign-On with Cisco Webex Services and your Organization's Identity Provider
for more information. -
Use Control Hub to verify and optionally claim domains contained in the email addresses. See
Add, Verify, and Claim Domains
. -
Suppress automatic email invites, so that new users won't receive the automatic email invitation to Webex App. (You can do your own email campaign.)
Activated users who haven't signed in appear with a Verified status in Control Hub. After they sign in, they appear as Active. For more information about user statuses, see User Statuses and Actions in Cisco Webex Control Hub.
-
-
When you enable synchronization, Directory Connector asks you to perform a dry run first. We recommend that you do a dry run before a full synchronization to catch any potential errors.
-
You must set up an auto-assign license template before you use it on new Webex App users that you synchronized from Active Directory.
If you don't use auto-assign license templates, newly synched users automatically get free licenses. They'll be able to use the same free features as those with free accounts.
| 1 |
Choose one:
| ||
| 2 |
From Directory Connector, go to Synchronize, click more | ||
| 3 |
Confirm the start of the synchronization. For any changes that you make to users in Active Directory (for example, display name), Control Hub reflects the change immediately when you refresh the user view, but the Webex App reflects the changes up to 72 hours after you perform the synchronization.
| ||
| 4 |
Click Refresh if you want to update the status of the synchronization. (Synchronized items appear under Cloud Statistics.) | ||
| 5 |
For information about errors, select the Launch Event Viewer from the Actions toolbar to view the error logs. | ||
| 6 |
To set a synchronization schedule for ongoing incremental syncs to the cloud, see Set the Connector Schedule and Run an Incremental Synchronization. |
-
After full synchronization is completed, the status for directory synchronization updates from Disabled to Operational on the Settings page in Control Hub.
-
When all data is matched between on-premises and cloud, Directory Connector changes from manual mode to automatic synchronization mode.
-
Unless you integrate single sign-on, verify domains, and optionally claim domains for the email accounts that you synchronized, and suppress automated emails, the Webex App user accounts remain in a Not Verified state until users sign in to Webex App for the first time to confirm their accounts. See the Before You Begin section for guidance on how to synchronize the accounts as Active users.
-
If you have multiple domains, do this step on any other Directory Connector that you've installed. After synchronization, the users on all domains you added are listed in Control Hub.
-
If you integrated Single Sign-On with Webex and suppressed email notifications, the email invitations are not sent out to the newly synchronized users.
-
You cannot manually add users in Control Hub after the Directory Connector is enabled. Once enabled, user management is performed from Cisco directory connector and Active Directory is the single source of truth.
-
Any groups that you synchronized appear in Control Hub and you can assign a license template so that users in that group are assigned licenses.
What to do next
-
When you remove a user from Active Directory, the user is soft-deleted after the next synchronization. The user becomes
Inactivebut the cloud identity profile is kept for seven days (to allow for recovery from accidental deletion).When you check Account is disabled in Active Directory, the user becomes
Inactiveafter the next synchronization. The cloud identity profile is not deleted after seven days, in case you want to enable the user again. -
Note these exceptions to an incremental synchronization (follow the full synchronization steps above instead):
-
In the case of an updated avatar but no other attribute change, incremental sync won't update the user's avatar to the cloud.
-
Configuration changes on attribute mapping, base DN, filter, and avatar setting require a full synchronization.
-
Assign Webex Services to Directory Synchronized Users in Control Hub
After you complete a full user synchronization from Cisco directory connector in to Control Hub, you can use Control Hub to assign the same Webex service licenses to all of your users at once or add additional licenses to new users if you already configured an auto-assigned license template. You can make individual user account changes after this initial step.
After you complete a full user synchronization from Directory Connector in to Control Hub, you can use methods in Control Hub to globally assign Webex service licenses to all of your users, individual users, through the bulk CSV template, or automatically to new users if you already configured an auto-assign license template. You can make individual user account changes after this initial step.
When you assign a license to a Webex App user, that user receives an email confirming the assignment, by default. The email is sent by a notification service in Control Hub. If you integrated Single Sign-On (SSO) with your Webex organization, you can also suppress these automatic email notifications if you prefer to contact your users directly.
Before you begin
-
You must set up an auto-assign license template before you use it on new Webex App users that you synchronized from Active Directory.
-
Do a dry run synchronization on your Active Directory users.
-
After confirming the results of the dry run, do a full synchronization on your Active Directory users.
At the time of full synchronization, the user is created in the cloud, no service assignments are added, and no activation email is sent. If emails aren't suppressed, the new users receive an activation email when you assign services to users by a standard user management method in Control Hub, such as CSV import, manual user update, or through successful auto-assignment completion. |
| 1 |
From the customer view in https://admin.webex.com, go to , click Manage Users, choose Modify all synchronized users, and then click Next. |
| 2 |
Choose an option:
|
What to do next
-
If emails aren't suppressed, an email is sent to each user with an invite to join and download Webex.
-
If you selected the same Webex services for all of your users, afterwards you can change license assigned individually or in bulk.
Known Issues with Directory Connector
-
Windows Server versions prior to 2012 R2 have a cookie issue that affects Directory Connector. This issue is fixed in versions 2012 R2 and 2016.
-
For any changes that you make to users in Active Directory (for example, display name), Control Hub reflects the change immediately when you refresh the user view, but the Webex App reflects the changes 72 hours from when you perform the synchronization.
You can try to clear the local cache for the Webex App by following these directions: Windows or Mac.
-
When a user uses Webex App on desktop or mobile to search and call a Room that only has a synchronized SIP URI, then the call rings indefinitely at this time.
Run an Incremental Synchronization
An incremental synchronization queries your Active Directory and looks for changes that occurred since the last synchronization. This step then bundles those changes and sends them to the connector service. The changes include users attribution modification and when a user is added or deleted.
This synchronization doesn't put as much load on servers and doesn't take as much time as a full synchronization. After you do your initial full synchronization, we recommend the incremental option for subsequent synchronizations.
Before you begin
-
You must set up an auto-assign license template before you use it on new Webex App users that you synchronized from Active Directory.
-
Note these exceptions that incremental synchronization doesn't support (follow Do a Full Synchronization of Active Directory Users Into the Cloud instead):
-
In the case of an updated avatar but no other attribute change, incremental sync won't update the user's avatar to the cloud.
-
For new configuration changes on attribute mapping, base DN, filter, and the avatar setting, incremental sync won't work and these require a full synchronization.
-
| 1 |
From Directory Connector, click Dashboard.
| ||
| 2 |
From Actions, click Synchronization Mode > Enable Synchronization if not already enabled. By default, an incremental synchronization is set to occur every 30 minutes (on versions 3.4 and earlier) or every 4 hours (on versions 3.5 and later), but you can change this value. The incremental synchronization does not occur until you initially perform a full synchronization. When a new incremental time interval is up, the program checks the changes based on the last timestamp. | ||
| 3 |
From Actions, click Sync Now > Incremental. For any changes that you make to users in Active Directory (for example, display name), Control Hub reflects the change immediately when you refresh the user view, but the Webex App reflects the changes 72 hours from when you perform the synchronization.
| ||
| 4 |
For information about errors, click Launch Event Viewer from the Actions toolbar to view the error logs. |
What to do next
If you have multiple domains, do this step on other Directory Connector instances you've installed.
Recover Accidentally Deleted Users
Directory Connector has checks and balances to prevent unintentional deletion of users. Unfortunately, accidents happen; you may have incorrectly configured an LDAP filter in Active Directory, which deleted some users when synchronized to the cloud. The soft delete feature can help you recover from these accidents and reestablish the user accounts in Control Hub.
By default, this function is enabled for all organizations. When users are deleted in the cloud, for example, because of a mismatched object issue after a synchronization from Directory Connector, the users can be recovered. If you saw a mismatched objects notice or noticed that users got deleted, you may be able to recover them if you act fast.
Users are marked as Inactive in Control Hub when the corresponding accounts are deleted in Active Directory. The background cloud service retains the users for up to 7 days. During this period, you can still use Cisco Directory Connector to recover users. We recommend that you recover these users as soon as possible. Users that are disabled in Active Directory are also marked as Inactive in Control Hub, but the user account is not deleted after 7 days. |
| 1 |
Sign in to Control Hub. |
| 2 |
Go to Users and confirm whether a specific user account is in an Inactive state or is unlisted. For more information, see User Statuses and Actions in Control Hub. |
| 3 |
If users were deleted in Control Hub or you notice users in an Inactive state, go to Active Directory, add the missing user accounts, and then do a dry run synchronization in Directory Connector. The goal with Directory Connector is to create an exact match between user information in Active Directory and in the cloud. |
| 4 |
Do a full synchronization to resynchronize the temporarily deleted user accounts to Control Hub. The users are recovered and go to the original status, including their account status and service assignments. |
What to do next
Return to Control Hub, go to , and confirm that the previously deleted user accounts are appearing in the user list.
Delete Users Permanently After Soft Delete
After performing a dry run, you can choose to permanently delete users that were soft deleted on the next synchronization.
| 1 |
After a dry run is complete, select Soft-deleted Objects. |
| 2 |
Check the checkbox next to the users that you want to delete. |
| 3 |
Select Done. |
What to do next
On the next synchronization, the users that you checked will be permanently deleted.
Change a Webex App Email Address
If you want to change user email addresses and your organization uses the Directory Connector, you change those email addresses in Active Directory. This procedure covers how to change a Webex App email address for a single domain and a process for changing the domain.
If you only want to change email or some value for one user, don't delete the user from Active Directory and then recreate a new one with the same email. The cloud interprets this action as a new user account and the user's spaces and other data in the cloud will be lost. |
-
To change user email addresses without changing the domain:
-
Resume synchronization on the Directory Connector.
After the next synchronization, the changes appear in your user list in Control Hub and for users in the Webex App after the cache refreshes.
There is no loss of data or spaces using this method. The user's unique identifier is set in the cloud after the first synchronization. All subsequent synchronizations are based on this identifier.
-
-
In a multiple domain deployment with Directory Connector, to change user email addresses while changing the domain (consider example1.com the old domain and example2.com the new domain):
-
On the Directory Connector, resume synchronization for example2.com
Before proceeding, verify that the user1@example2.com account synchronizes into Control Hub. We recommend that you instruct the user to verify the email change in Webex App and that all data (spaces, messages, meetings, files, and so on) are retained.

There is no loss of data or spaces using this method, but in the new user account, you must ensure that the Active Directory attribute that maps to the cloud uid attribute is preserved from the old user account. If you change the Active Directory value, the new account does not retain the data from the old account.
-
After you verify the email address change and the data are intact, delete the old user account on example1.com, and then use Directory Connector to resume synchronization for example1.com.
At this point, you can safely update the email address in the new Active Directory domain for user1@example2.com.
-
Directory Connector doesn't limit the email domain change. However, when the user resynchronizes to the cloud, the user state depends on if the new domain is verified in your organization. If the domain is not verified in your organization, the user's status changes to Pending after the full synchronization. For more information, see Manage Your Domains.
If your organization does not use the Directory Connector, you can change your Webex App email addresses through the account settings page. See Change the Email Address for Your Account for steps that users can follow to change their emails.
Change the Active Directory Domain
You can use this procedure to create new domains and email addresses. They synchronize with the identity service in the cloud.
| 1 |
Set up a new Active Directory (AD) domain. | ||
| 2 |
Disable synchronizations on all your connectors. | ||
| 3 |
Uninstall all your connectors. | ||
| 4 |
Open a case to change the domain. In the case submission, make sure to request the removal of the domain configuration and all synchronization attributes in your organization.
| ||
| 5 |
After the case is resolved: Perform a test run with the Directory Connector before doing the actual synchronization. |
Domain Claim
A domain claim occurs if you claim an email domain for an organization so that any sideboarded account is created in the paid customer organization and not the free consumer organization. You can only do a domain claim through a support case (see the link below for more information).
If the Directory Connector is active and the domain is claimed, sideboarded accounts are not created either in the customer organization or in the free consumer organization. Only the Directory Connector may provision accounts for the organization from Active Directory. The information stored on Active Directory is the original source. If you attempt to sideboard an account, the invited user receives an error. The only way that an invited user can be added to a Webex App space is by first using the Directory Connector to provision the account into Control Hub.
Convert Free Webex App Users in a Directory Synchronized Organization
You can only use unique email addresses in the Webex App directory. If your users have signed up for the free version of Webex App, their account exists in the free consumer organization. To manage users in this organization using Directory Connector, migrate (convert) them to the customer organization before you turn on the Directory Connector. Then you add the users to Active Directory with the exact email address and then synchronize to the cloud.
If you do not convert the accounts before activation, turn off the Directory Connector in order to convert them.
If you attempt to convert a user while directory synchronization is enabled, the error message <email address> could not be converted
appears. To avoid the problem, you can use these steps as a workaround.
Some claimed users may show up with the If you don't add those users, they'll all be deleted the next to you synchronize to the cloud. |
| 1 |
Disable the directory synchronization from the Directory Connector. | ||
| 2 |
Follow the Convert Unlicensed Users in Control Hub procedure to convert the user from the free consumer organization to the enterprise organization. This step adds the user to your organization and the account appears in Control Hub. Directory Connector makes Active Directory the single source of truth for user accounts and the goal is to have an exact match between Active Directory and Control Hub. Ensure that there are matching users in Active Directory for any recently-converted users before reenabling synchronization. A Dry Run sync can be used to ensure that there are no remaining unmatched users. | ||
| 3 |
On the Directory Connector, do a dry run synchronization. When the dry run completes, check the Add Objects tab. Verify that any users that you converted are not deleted.
| ||
| 4 |
When you are sure that the next synchronization will not remove any accounts, reenable directory synchronization from the Directory Connector. |
Converted user accounts are not activated automatically if you didn't verify a domain. For example, if you turned on the auto-assign license template and then turned on Directory Connector without domain verification, converted users are inactive in the cloud backend until they confirm their email addresses.
Sideboarded Webex App User Accounts
When you invite another user to a space in Webex App, if the invited user does not have a Webex App account, an account is created for them ("sideboarded"). By default, accounts that are created this way are added to the free consumer organization.
If you want to manage the sideboarded account using the Directory Connector, you must convert the account.
Change Webex App Username Format After Directory Synchronization
By default, Directory Connector maps the displayName attribute in Active Directory to the displayName attribute in the cloud.
After performing a directory synchronization, you may find that usernames display in the format <lastName, firstName>.
This username may appear if the displayName attribute in Active Directory is
configured that way. When the attribute is mapped to displayName in the
cloud, names show up in the format <lastName, firstName> in Control Hub.
To change the format, in the Directory Connector attribute mapping screen: map the Active Directory attribute givenName sn
(or sn givenName) to displayName in Cisco Cloud Attribute
Names.
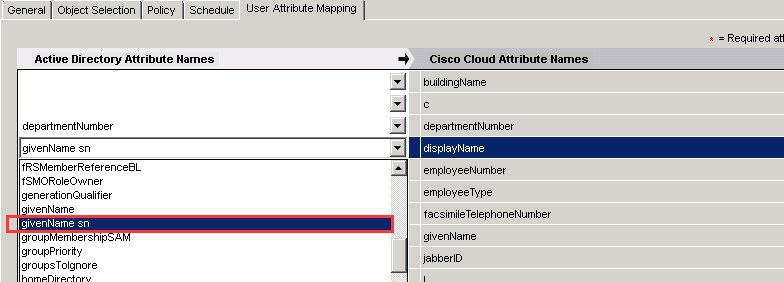
Alternatively, map the attribute sn givenName to
displayName:
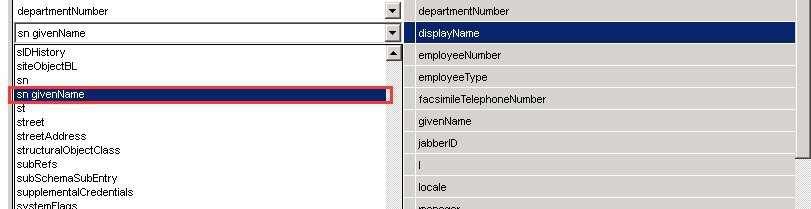
You can also use the Customize Attribute option, if you want to map your own custom attribute
expression to displayName.
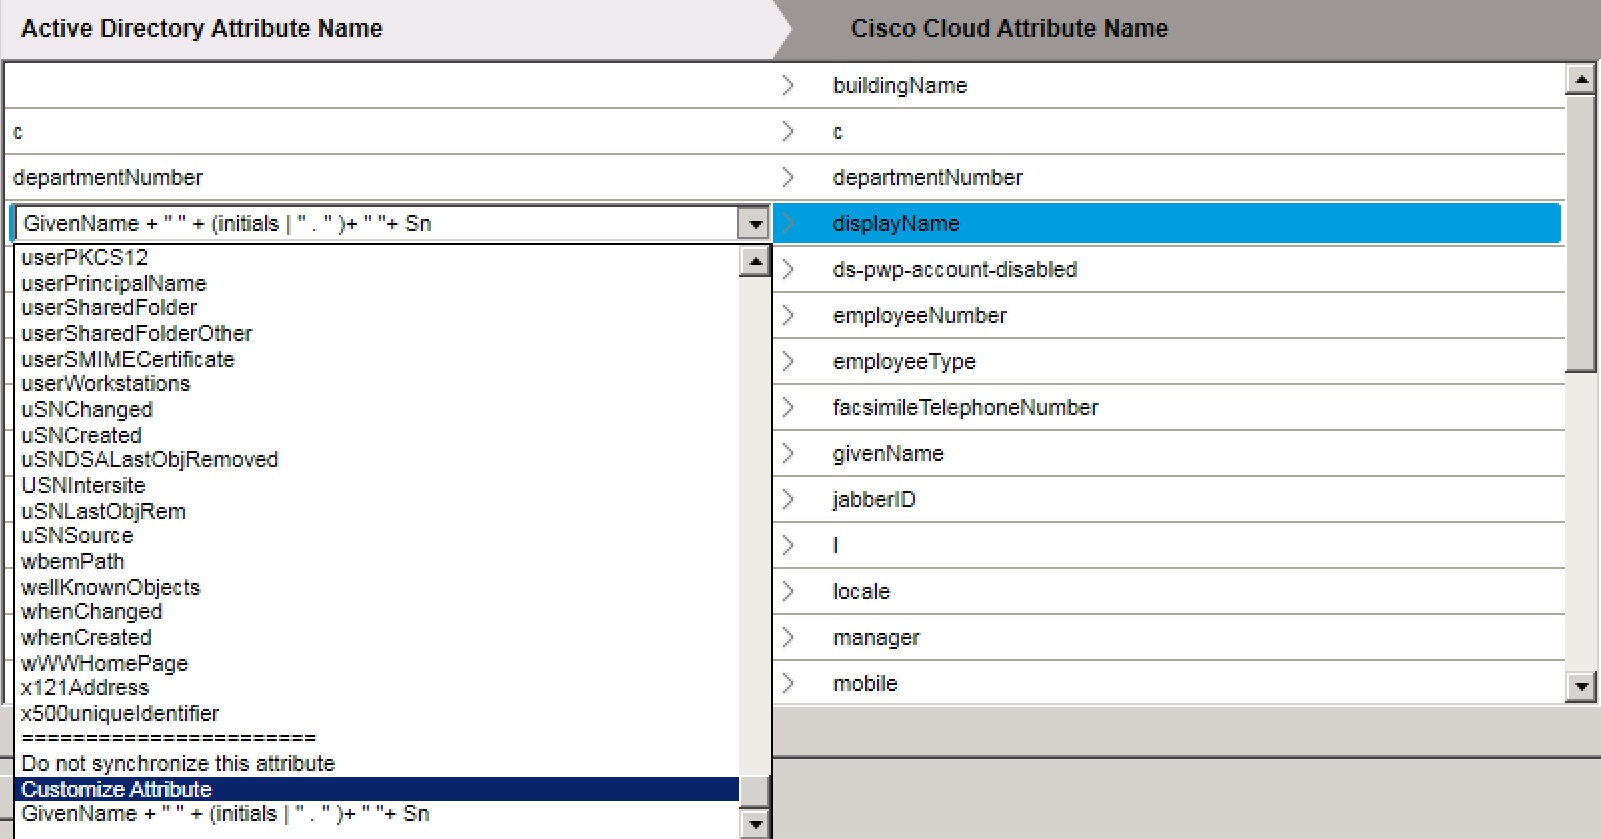
For example, enter givenName + "" + sn (first name, space, last name) as the
expression. This maps the two attributes in Active Directory to displayName
in the cloud.
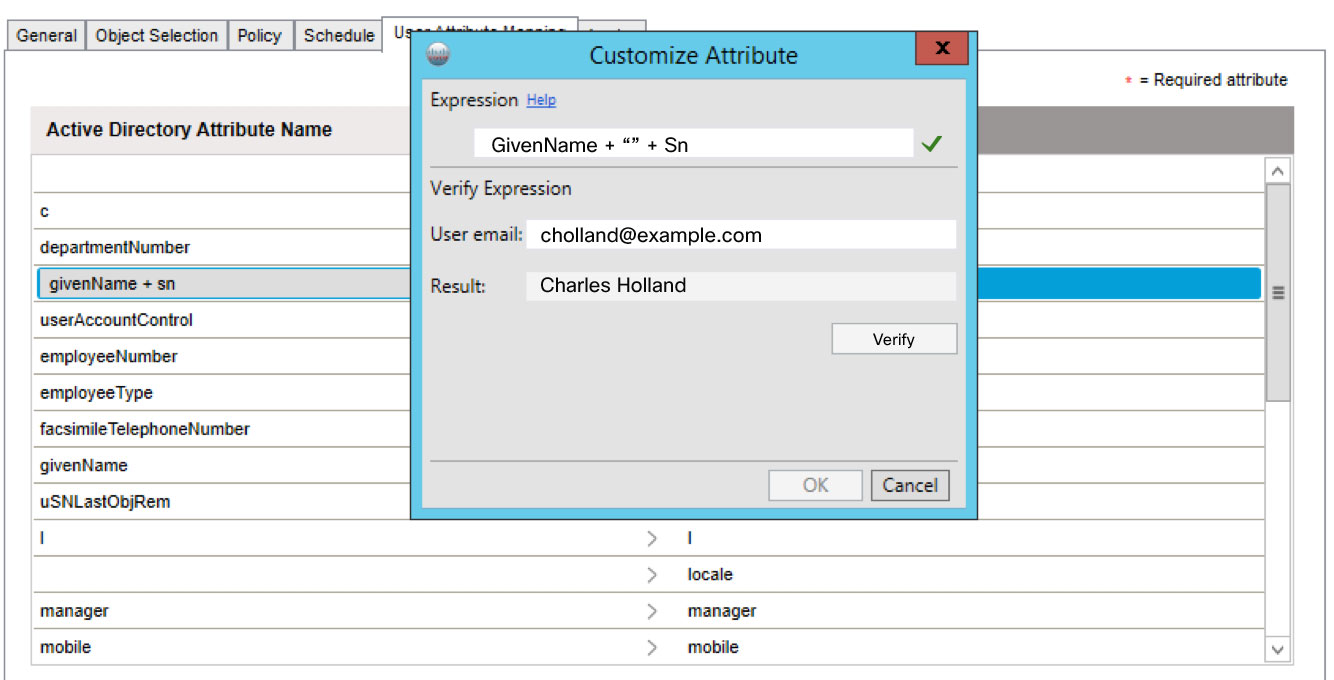
Allow Users to Change Display Names in Webex Meetings
You can unmap the displayName attribute from syncing to the cloud in
Directory Connector if you want to allow users to edit their preferred display names. Users can enter
a display name to show during Webex meetings instead of their first and last name.
Administrators can also change the display name for a user manually in Control
Hub.
| 1 |
From Directory Connector, click Configuration, and then choose User Attribute Mapping. |
| 2 |
Select displayName under Cisco Cloud Attribute Name. |
| 3 |
Select Do not synchronize this attribute. |
What to do next
Users can now edit their display names from their Webex site.
Upgrade to the Latest Software Release
To keep your deployment in compliance and get the latest features, functionality, bug fixes, and security enhancements, you must always upgrade to the latest version of Directory Connector. If you do not upgrade to the latest version that's available, you may experience issues, such as Directory Connector no longer synchronizing properly or being on a version that doesn't support the mandatory TLS 1.2 requirement.
Directory Connector automatically notifies you when a new version is available. Always upgrade to the latest version to avoid problems. You also see a notification in the Windows task bar.
Although you can manually install connector software updates updates, we recommend that you follow the steps in Set Automatic Upgrades to let the app manage your upgrades automatically. |
| 1 |
Either click on the notification in the Windows taskbar, or right-click on the Directory Connector icon in the Windows taskbar to start the upgrade process. |
| 2 |
Follow the instructions to complete the upgrade. |
| 3 |
Relaunch the connector and sign in with your admin credentials. |
| 4 |
Verify the version number of the software under . |
What to do next
For a fresh installation of Directory Connector, you can download the zip file and then follow the installation steps in this guide.
Configure General Settings for Directory Connector
Use this procedure to configure general settings, such as the name of the server running Directory Connector, the log levels, automatic upgrades, and the preferred settings for the domain controllers. The name of the connector appears on the dashboard in the connectors section, along with any other connectors that are running.
| 1 |
From Directory Connector, go to Configuration, and then click General. | ||
| 2 |
In the Connector Name field, enter the connector name. This field shows only the computer name that is currently running the connector. | ||
| 3 |
Choose the log level from the drop-down. By default, the log level is set to info. The available log levels are:
| ||
| 4 |
Choose the Preferred Domain Controllers to set the order of domain controllers for synchronizing identities. The domain controllers are accessed from top to bottom. If the top controller is unavailable, choose the second controller on the list. If no controller is listed, you can access the primary controller. | ||
| 5 |
Check Automatically upgrade to the new Cisco Directory Connector version if you want automatic upgrades to occur. It's always important to keep your Cisco Directory Connector software up to date to the latest version. We recommend that you check this setting to allow automatic upgrades to the software to be installed silently when they're available. | ||
| 6 |
Check LDAP over SSL to use the secure LDAP (LDAPS) as the connection protocol.
LDAP (Lightweight Directory Application Protocol) and Secure LDAP (LDAPS) are the connection protocols used between an application and the Domain Controller within the infrastructure. LDAPS communication is encrypted and secure. |
Configure the Connector Policy
You can set the maximum number of deletes that can occur during synchronization. Running synchronization does not delete objects from your on-premises Active Directory. All objects are deleted only from the cloud.
For example, you set 1 as the delete threshold trigger value. When you
do full or incremental sync, if the number of users you want to delete is more than the
setting, the directory connector shows a warning. If you click Override
Threshold, you can start full or incremental sync successfully, but you will
see this override notice the next time you run the policy.
| 1 |
From Directory Connector, click Configuration, and then choose Policy. | ||
| 2 |
Check the Enable delete threshold trigger box if you want to add a threshold trigger. Choosing this option triggers an alert if the number of deletes exceeds the threshold.
When the deletion account exceeds the one that you define, the synchronization fails.
| ||
| 3 |
Enter the maximum number of deletes that you want. The default is 20.
| ||
| 4 |
Click Apply. |
Set the Connector Schedule
Set the synchronization timing in Active Directory. Failover is used for high availability (HA). If one connector is down, we switch to another standby connector after the predefined interval.
| 1 |
From Directory Connector, click Configuration, and then choose Schedule. |
| 2 |
Specify the Incremental Synchronization Interval in minutes. By default, an incremental synchronization is set to occur every 30 minutes. The full incremental synchronization does not occur until you initially perform a full synchronization. |
| 3 |
Change the Send Reports per… time value if you want the change how often reports are sent. |
| 4 |
Check Enable Full Sync Schedule to specify the days and times on which you want a full synchronization to occur. |
| 5 |
Specify the Failover Interval in minutes. |
| 6 |
Click Apply. |
Multiple Domain Scenarios
Multiple domains are based on domain priority. For objects that have the same key value in different domains, after synchronization, the data from the higher priority domain rewrites the data from lower priority domain.
Objects that have same key value are linked into one record in the database.

The key value for "User" is Email address; the key value for "Group" is Group name.
Example Use Case for Multiple Domains
This example assumes an organization with two domains—example1.com and example2.com, in order of priority.
-
Add user1(email: user@example1.com) to the Active Directory of example1.com.
-
Add group1(Group name: Test) to the Active Directory of example1.com.
-
Add user2(email: user@example2.com) to the Active Directory of example2.com.
-
Add group2(Group name: Test) to the Active Directory of example2.com.
- Synchronization on example1.com
-
As a use case, user2 and group2 are synchronized to the cloud and appear in https://admin.webex.com, whereas user1 and group1 are not.
If you do a full or incremental synchronization for example1.com, user1 and group1 are synchronized. Also, user2 and group2 are overwritten by user1 and group1's information.
User1 links to user2 as the same record in the database; group1 links group2 as the same record in the database.
- Synchronization on example1.com and example2.com
-
As a use case, user2 and group2 are synchronized to the cloud and appear in https://admin.webex.com, whereas user1 and group1 are not.
Consider these steps:
- Delete user1 and group1 on the Active Directory for example1.com.
- Do a full or incremental synchronization for example1.com.
Result: the user's information is not changed in https://admin.webex.com. User2 isn't linked to user1, and group2 isn't linked to group1.
- Do an incremental synchronization for example2.com.
Result: the user's information is not changed in https://admin.webex.com.
- Do a full synchronization for example2.com.
Result: user2 and group2’s information is listed in https://admin.webex.com.
Synchronize a New Domain And Preserve an Existing Domain
If you want to synchronize a new domain (B) while maintaining the synchronized user data on another existing domain (A), ensure that you install Directory Connector for domain (B) synchronization on a supported Windows server. The connector binds to the new domain after the initial setup, and the user information under domain (A) remains unaffected.
Every domain must have its own active connector. Consider two domains with the following setup: domain A with connectors (ca1) and (ca2) for local high availability (HA); domain B with connector (cb1). (ca1)and (ca2) serve domain A. In this scenario, one connector is active and the other is standby (HA). This design keeps the domain synchronized, because one connector is always active. So, cb1 is the active connector for domain B, because domain A already has an active connector (ca1 or ca2).
Set the Domain Priority
Use this procedure to change the priority of your Active Directory domains. Domain priority lets you determine the primary domain, secondary domain, and so on. This helps when two users from two different domains have the same email value synchronized to one organization.
Do not use this procedure if you have a single domain listed in the Directory Connector. If you try, the connector shows you a message, stating that domain priority is not required.
Before you begin
To avoid errors, install or upgrade to the latest version of Cisco directory connector. You must download it from https://admin.webex.com.
| 1 |
From Cisco directory connector, click Dashboard. | ||
| 2 |
Go to Actions, and then click Set Domain Priority. | ||
| 3 |
Highlight one domain in the list, click Up or Down to change this domain's priority, and then click Save to save this change.
|
Switch Domains
Use this procedure to rebind the Cisco directory connector to a different domain.
Before you begin
-
Make sure no synchronization tasks are running before you switch domains.
-
To avoid errors, install or upgrade to the latest version of Cisco directory connector. You must download it from Control Hub.
| 1 |
From Cisco directory connector, click Dashboard. |
| 2 |
Go to Actions, and then click Switch Domain. |
| 3 |
After reading the caution, if you understand the affect this change has on your deployment and you're still sure, click Yes. If you switch a domain, then you are signed out of the current Cisco directory connector, other domains in the connector are unregistered, and the connector information on that computer is deleted. |
| 4 |
Sign back in to the Cisco directory connector and rebind the domain. |
Turn Off Directory Synchronization
If you need to stop synchronization from Directory Connector, you can temporarily turn it off from Control Hub.
| 1 |
From the customer view in https://admin.webex.com, go to , scroll to Directory Synchronization, and then choose one:
|
| 2 |
After you read the prompt, click Turn Off. Synchronization stops until you reenable it from Directory Connector. |
Remove User Attribute Mapping
Use Directory Connector to remove the mapping for Active Directory attributes previously mapped to the cloud and synchronized to Webex. After you remove the attribute mapping, the attribute values are removed from the cloud and no longer synchronized to Webex. Those values can then be edited manually.
| 1 |
From Directory Connector, click Dashboard. |
| 2 |
Go to Actions, and then click . |
| 3 |
Select the mapping to remove from the Attribute Name list. |
| 4 |
Under Affected User Scope, select one of the following:
|
| 5 |
Click Apply. |
Manage Profile Pictures
Use Directory Connector to update user profile pictures or to remove blank user profile pictures.
| 1 |
From Directory Connector, click Dashboard. |
| 2 |
Go to Actions, and then click . |
| 3 |
Under Actions, select one of the following:
|
| 4 |
Click Apply. |
Uninstall and Deactivate Directory Connector
After you uninstall an instance of Directory Connector, you must deregister it. Completely remove a Directory Connector for any of these scenarios:
-
You don't want to use directory synchronization any more.
-
You don't want to use one of multiple directory connectors (high availability).
-
You want to change the domain and install another connector.
Before you begin
-
You may have multiple instances of Directory Connector set up for high availability (HA) or multiple domain synchronization. Disable the synchronization if you are uninstalling the only or last remaining instance of Directory Connector.
-
Save and close any important work before you uninstall Directory Connector.
| 1 |
From your Windows machine, go to Control Panel, and then click Programs and Features. |
| 2 |
From the program list, click Directory Connector, choose Uninstall, and then follow the prompts. You might have to reboot your system to complete the uninstallation. |
| 3 |
From the customer view in https://admin.webex.com, go to , scroll to Directory Synchronization,
click more
|
| 4 |
After you read the prompt, click Deactivate. Unless there's another Directory Connector in a high availability (HA) deployment, user accounts are not synchronized any more. |
Run the Diagnostic Tool
You can use the built in diagnostic tool to troubleshoot your Directory Connector deployment. This tool is installed as part of Directory Connector 3.4 onwards.
If synchronization didn't work properly, you may have a configuration or network error. This tool tests your connection to LDAP so that you can diagnose errors yourself before contacting support. If the tool returns any error, you can send the detailed log results to support.
-
To run tests for Active Directory Domain services:
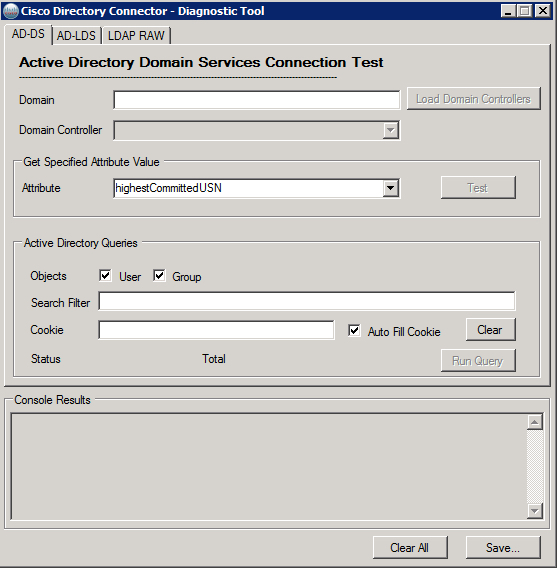
-
To run tests for Active Directory Lightweight Directory services:
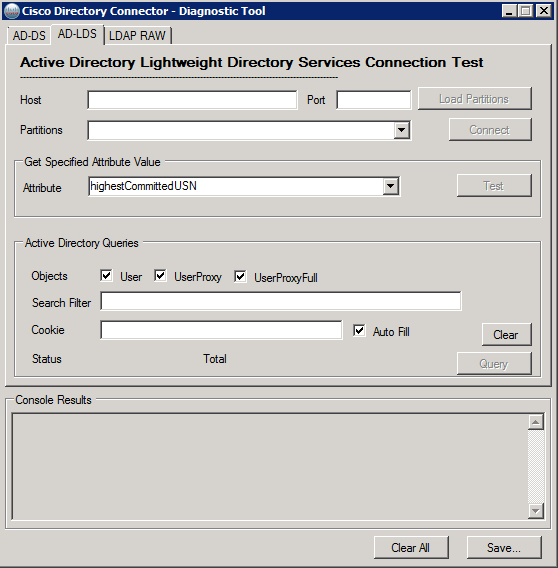
-
To run tests for the Lightweight Directory Access Protocol (LDAP):
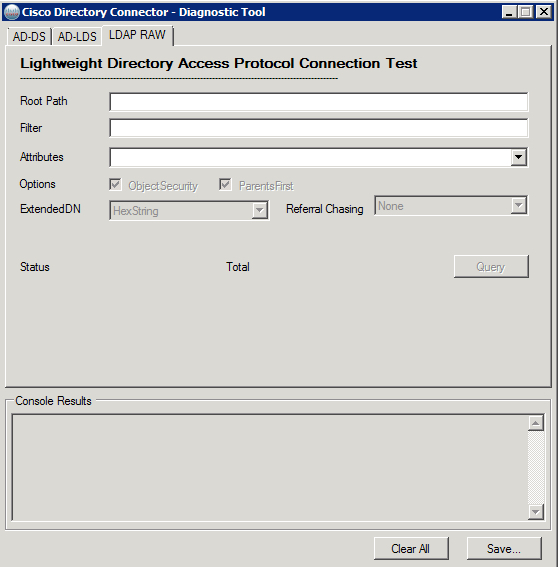
Troubleshooting and Fixes for Directory Connector
You may encounter an error message or other issue in Directory Connector. Also, after Directory Connector synchronizes user information, the connector may send you an email report that lists any problems with the synchronization. Refer to the following sections for problems that may arise, possible causes, and proposed solutions you can try before contacting support.
Install
Directory Connector Stopped Working
You received alert emails notifying you that your Directory Connector is not working.
-
Directory Connector may not be installed correctly.
-
Directory Connector may not be running.
-
The network may not be available.
Try the following:
-
Open . Locate Directory Connector. If it’s not there, download the latest version from Control Hub and install it.
-
Open Service and locate Cisco DirSync Service. Make sure that it displays the status as Started. If the service is stopped, right-click and select Start to restart the service.
-
Make sure the server on which you installed the Directory Connector has the access to Internet.
Reinstallation Error
Problem—If you immediately install a new connector after uninstalling an old one, you may see an error message.
Possible cause—In Windows Server 2012, the uninstall client needs time to delete the service account from service list.
Solution—After some time passes, try the installation again.
Sign In
Directory Connector Crashes During SSO Sign In
Problem
Directory Connector may crash after you enter an email address from an SSO sign in page.
Solution
Try the following:
Do these steps to configure a new group policy:
-
Go to the domain controller and open Group Policy Management (gpedit.msc).
-
Right click a specific OU or domain, and select Create a GPO in this domain, and Link it here…
-
Give the policy a name, then right click and choose Edit.
Do these steps to change the policy at the machine level:
-
Go to , right click Registry, choose New, and then Registry Item.
-
For Key Path, enter or navigate to HKEY_LOCAL_MACHINE\SOFTWARE\Microsoft\Internet Explorer\Main.
-
Enter
Disable Script Debuggerfor Value, and enternofor Value data.The settings should match this screenshot:

Do these steps to change the policy at the user level:
-
Go to , right click Registry, choose New, and then Registry Item.
-
For Key Path, enter or navigate to HKEY_CURRENT_USER\SOFTWARE\Microsoft\Internet Explorer\Main.
-
Enter
Disable Script Debuggerfor Value, and enternofor Value data.The settings should match this screenshot:
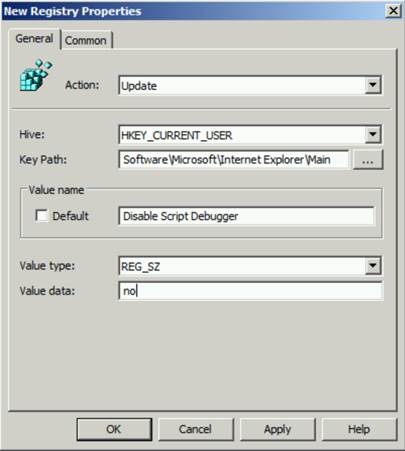
The changes take effect after you run |
Cisco DirSync Service Connector Could Not Be Registered
Problem
Sign in fails and this message appears: "The Cisco DirSync Service Connector could not be registered."
Solution
The Windows system on which Directory Connector is installed must be a member of Active Directory.
No Sign In Page Appears
Problem
You opened Directory Connector and the sign in page didn't appear.
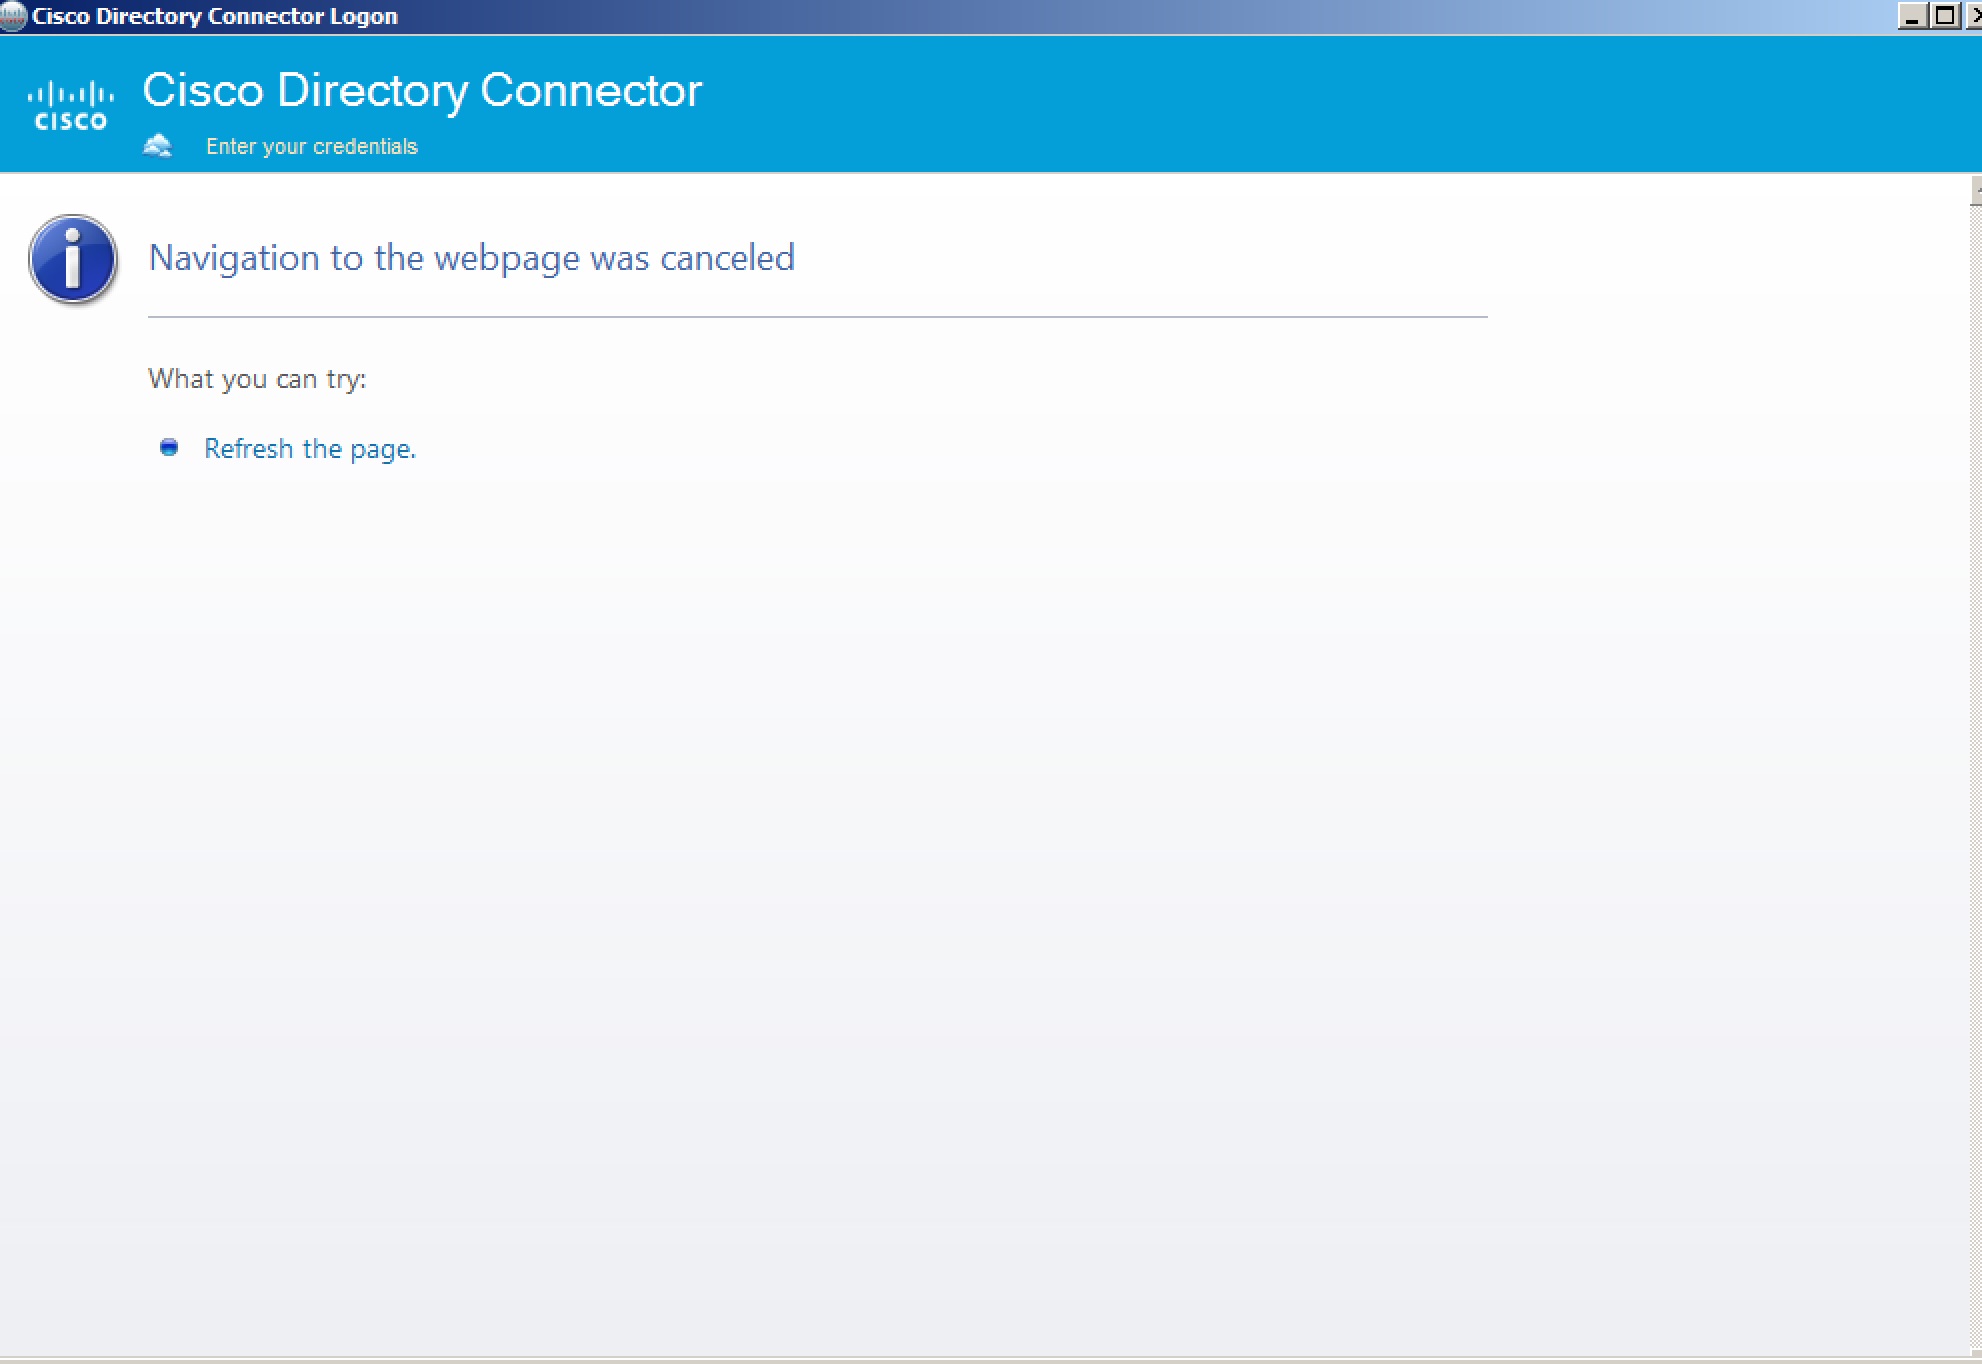
Solution
Try the following steps:
-
In Internet Explorer, go to https://cloudconnector.webex.com/SynchronizationService-v1_0/?orgId=GLOBAL. Try the link in other browsers like Chrome and Firefox.
-
If Internet Explorer can’t visit the link but other browsers can, check Internet Explorer settings and check the TLS 1.1 and 1.2 check boxes. (Use the Enable TLS in Internet Explorer procedure.)
Sign in Prompt Appears
Problem
A prompt appears that requests you to enter the username and password to pass the authentication.
Possible Cause
The Directory Connector completes NTLM security authentication silently with the sign-in account. If authentication fails, a dialog pops up to ask for the authentication username and password.
Solution
When you see the sign in pop-up window, you need provide a valid account with correct authentication for passing security.
Unable to Connect to the Remote Server
Problem
During normal operation, the error message appears: "Unable to connect to the remote server."
Possible Cause
You may have proxy issues that need to be resolved.
Solution
See Troubleshoot Service Account Sign In Issues for more troubleshooting information.
Unable to Register the Connector
Problem
You see the error message "Unable to register the connector. A general exception occurred."
Possible Cause
In most cases, the problem is because the Directory Connector has no privilege to connect to LDAP root context.
Solution
Try the following:
-
Run a command prompt (cmd) and then enter ldp.exe.
-
Click , choose Bind as currently logged on user, and then click OK.
-
Click , enter DC=arbonneintl,DC=ad as BaseDN, and then click OK.
-
If the issue continues, open a case with support.
Synchronization
Avatars not Synchronized
Problem
Cisco directory connector synchronized user AD data to the Webex cloud. But no avatar data was synced successfully.
Possible Cause
If you reused an existing avatar server and the user avatars were already synchronized, then the local cache captures them and avoids resending again to save bandwidth.
Solution
Delete the local cache by following these steps:
-
Go to C:\Program Files (x86)\Cisco Systems\Cisco Directory Connector\Plugins\
-
Delete DirSyncPluginAvatar.dll-cache.bin.
-
Rerun the avatar synchronization from the Cisco directory connector.
Conflicting User Email Accounts
Problem
Synchronization results may show conflicting user email accounts.
-
If users tried the free version of Webex App, their email addresses reside in the free consumer organization.
-
If user emails were ever synchronized in another organization.
-
If user emails exist in multiple domains that belong to the organization.
Solution
Try the following:
-
Follow these steps if you're trying to claim users:
-
Make sure you've verified the domain in Control Hub.
-
Temporaily disable Cisco Directory Connector.
-
Use the Claim User option in Control Hub to claim any accounts that may exist in the free consumer organization. See Claim Users to Your Organization (Convert Users) for more information.
-
Do a dry run in Cisco Directory Connector, and then reenable directory synchronization
-
-
For the last case, double-check the user data in your Active Directory sources.
Converted User Marked as Inactive
Problem
In your directory synchronized environment, you converted a free (consumer organization) user into your enterprise organization, but the converted user cannot sign into Webex App.
Possible Cause
When the free user is converted into the enterprise organization, the user is marked as inactive status for 30 days as a security compliance measure. During this period, the user cannot sign into Webex App and is marked for deletion at the end of the 30-day period. This situation arises because the free user information does not reside in Active Directory.
Solution
You must take action if you don't want the user account to be deleted. To resolve this issue, create a user account in your on-premises Active Directory that corresponds to the converted free user account. Then, perform a synchronization from the Cisco Directory Connector. Then, the user can sign into Webex App again and the account won't be deleted.
Incremental Sync Fails
Problem
An incremental sync fails.
This issue may occur on Windows Server 2008 R2 under the following conditions:
-
You support incremental value updates.
-
The filter that you use references a linked value attribute.
-
The result values of that attribute were updated since the last time a full sync was performed.
Solution
Windows Server 2008 R2 has a bug that is related to this issue. The bug is fixed in 2012 R2 and later. We recommend that you upgrade your Windows Server to at least 2012 R2.
Invalid Value for Attribute
Problem
For [user dn (distinguished name)], the attribute [attribute name] has the following invalid value [attribute value].
Possible Cause
For CN=b,OU=Employees,OU=C Users,DC=c,DC=com, the attribute [telephone number] has the following invalid value: +. This attribute must contain at least one number.
Solution
An attribute for this user does not have a valid value. Fix its value according to the description in the warning message. Then do another synchronization.
Matched Users to be Deleted
Problem
The matched users are marked to be deleted.
When performing a dry run synchronization to check the data between Active Directory and the cloud, you may see the same email address in both. However, the user is marked as an object to be deleted.
Solution
Choose an appropriate fix:
-
If it's okay to delete the user and redo the licenses after, you can use Directory Connector for the fix. Perform a synchronization to delete the user and then perform another synchronization to sync the user from on-premises AD to the cloud.
-
If you can't delete and recreate the user account, open a case with support.
Missing Attribute
Problem
The required attribute [attribute_name] when adding on-premises entry [user dn (distinguished name)]. The entry is not created in Control Hub until all required attributes have a value.
Possible Cause
The required attribute email address is missing. When adding on-premises entry [CN=Sales User,OU=Engineers,OU=K,DC=k,DC=local], the entry is not created in Control Hub until all required attributes have a value.
Solution
One of the required attributes is missing for the user [user_email_address]. Provide the required values for that user.
Nested Group Won't Synchronize
Problem
Users in a nested Active Directory group are not synchronized properly to the cloud.
Possible Cause
A filter is used that includes both the child group and parent group, which is not supported. For example: (memberof=CN=testgroup1,CN=Users,DC=rktest2008,DC=org)
Solution
You must reconfigure the filter that synchronizes groups. For example: |(memberof=CN=testgroup1,CN=Users,DC=rktest2008,DC=org)(memberof=CN=testSubGroup,CN=Users,DC=rktest2008,DC=org)
User Naming Conflict
Problem
There is a naming conflict for [user dn] for an existing cloud entry object with the name: [user email address], and of user type [user_type].
Possible Cause
A user with that email address already exists in Control Hub.
Solution
Create a user in your Active Directory with the same email address as the account that you registered through Control Hub.
Control Hub
User List Missing in Control Hub
Problem
If you have a Webex organization with more than 1000 synchronized users, you may not see the user list in Control Hub.
Solution
You can use the search functionality to find a user account. In Control Hub, go to Users, click search  , and then enter search criteria to locate a specific user.
Groups Won't Synchronize to Control Hub
Problem
Users in a directory group won't properly synchronize to Control Hub.
Possible Cause
The group isn't tagged as isCriticalSystemObject in Active Directory.
Solution
Make sure that attribute isCriticalSystemObject is set to TRUE in Active Directory.
Enable Troubleshooting for Directory Connector
You can enable troubleshooting to help diagnose any errors you encounter in Directory Connector. Troubleshooting lets you capture the network traffic information and save it to a file.
The log files that are : <Installation Location>\Cisco Systems\Cisco Systems\Cisco Directory Connector\Logs
| 1 |
Run the | ||
| 2 |
Restart the service. See How to Start Services for guidance. | ||
| 3 |
In Directory Connector, click Dashboard. | ||
| 4 |
Go to Actions, and then click . | ||
| 5 |
With troubleshooting enabled, repeat the actions that were causing an error; this captures the traffic data so that it can be examined. | ||
| 6 |
Examine the log files: if the file is blank, make sure that the account has privileges to access your AD DS or AD LDS.
| ||
| 7 |
If necessary, send the log file to support for assistance. | ||
| 8 |
Disable the troubleshooting feature when you are done. |
Launch the Event Viewer
To see the events that occurred during a full or incremental synchronization, launch the Event Viewer. It displays a summary of the administrative events and error logs.
| 1 |
From Directory Connector, go to Dashboard, and then click . The Event Properties dialog shows the synchronization event details and error details. |
| 2 |
From Event Viewer, go to .
|
| 3 |
Under Actions, click Save All Events As to export all the logs as a single Events file (*.evtx) or another format such as xml or csv. |
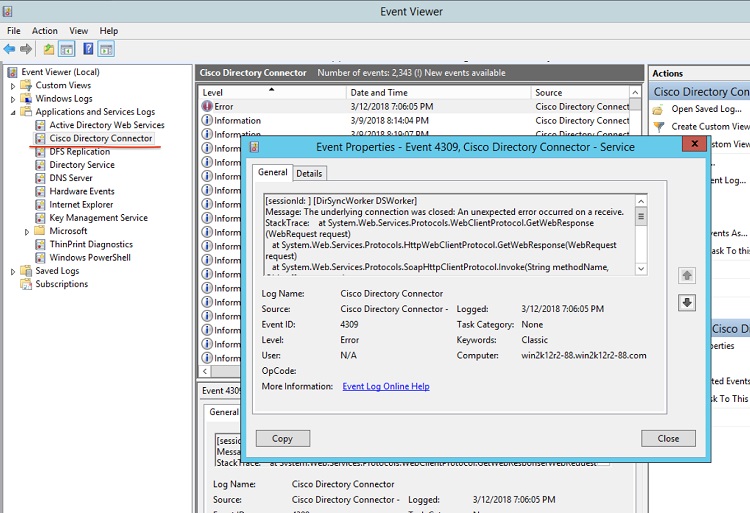
What to do next
If you need to open a case, contact support, describe the problem with the connector, and then attach the Events file to your case.
Event logs capture user actions. For help with managing network traffic, enable troubleshooting on the connector. |
Enable TLS in Internet Explorer
If you switched Single Sign-On (SSO) providers, you may see the following error messages from Cisco directory connector:
-
Error occurred logging on to service
-
An error has occurred in the script on this page
If you see these errors, you must enable a TLS setting in your browser.
| 1 |
Open Internet Explorer, and then choose Tools. Now check the boxes for the TLS/SSL version you want to enable Click OK Close the browser and open it again |
| 2 |
Click Internet Options , go to Advanced , scroll to the Security. |
| 3 |
Check the Use TLS 1.1 and Use TLS 1.2 check boxes, and then click OK.
|
| 4 |
Restart your system for the changes to take effect. |
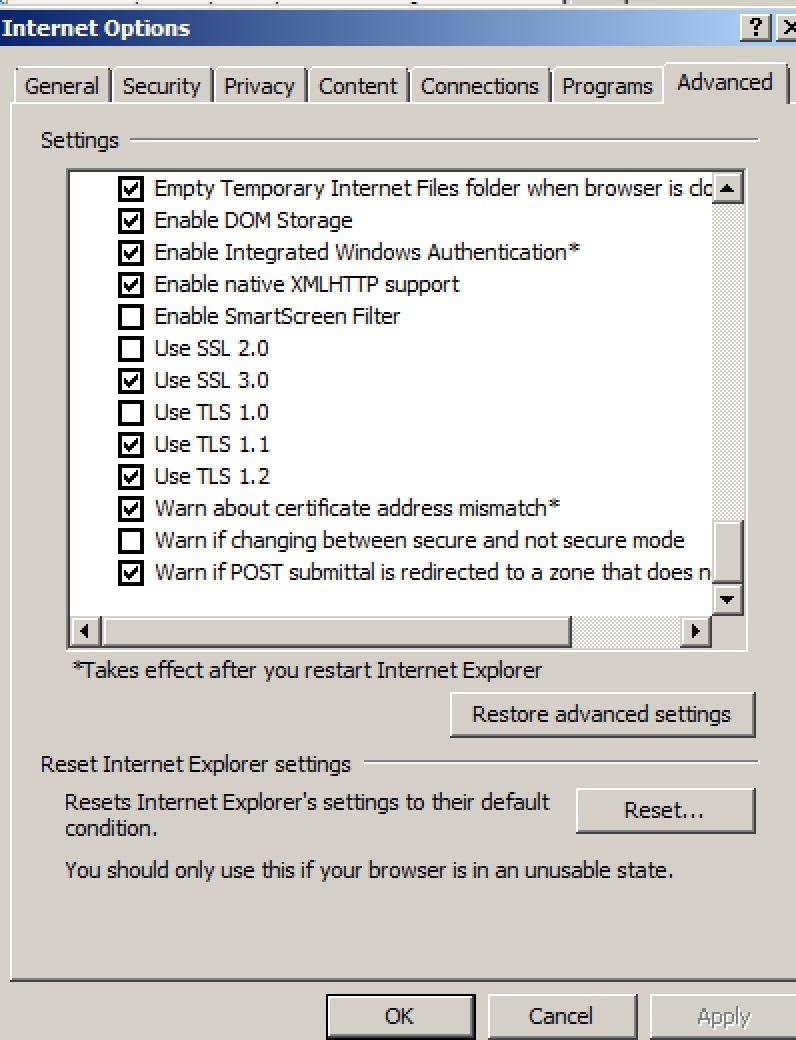
Troubleshoot Service Account Sign In Issues
If you can't sign in to Cisco directory connector or can't run a synchronization, use these steps to try to resolve the issue before contacting support.
| 1 |
Try to visit https://cloudconnector.webex.com/SynchronizationService-v1_0/?orgId=GLOBAL in your web browser. | ||
| 2 |
Choose one, depending on the results:
| ||
| 3 |
At a minimum, make sure the configured account for the Cisco DirSync Service (which can be found in Windows services) has a privilege level that lets it access avatar data and AD data. By default, the service leverages the Windows login account credentials and authentication. |
Check SafeDllSearchMode in Windows Registry
Safe dynamic link library (DLL) search mode is set by default in the Windows registry and places the user's current directory later in the DLL search order. If this mode was somehow disabled, an attacker could place a malicious DLL (named the same as a referenced DLL file that is located in the system folder) into the current working directory of the application.
Usually, SafeDllSearchMode is enabled, but use this procedure to double-check the registry settings.
Before you begin
Changes to the Windows registry should be done with extreme caution. We recommend that you make a backup of your registry before using these steps. |
| 1 |
In Windows search or the Run window, type regedit and then press Enter. |
| 2 |
Go to HKEY_LOCAL_MACHINE\System\CurrentControlSet\Control\Session Manager. |
| 3 |
Choose one:
|
For more information, see Dynamic Link Library Search Order.


