- About This Guide
- Index
- Glossary
-
- Configuring IPSec and ISAKMP
- Configuring L2TP over IPSec
- Setting General VPN Parameters
- Configuring Tunnel Groups, Group Policies, and Users
- Configuring IP Addresses for VPN
- Configuring Remote Access VPNs
- Configuring Network Admission Control
- Configuring Easy VPN on the ASA 5505
- Configuring the PPPoE Client
- Configuring LAN-to-LAN VPNs
- Configuring Clientless SSL VPN
- Configuring AnyConnect VPN Client Connections
- Configuring AnyConnect Host Scan
Cisco ASA 5500 Series Configuration Guide using the CLI, 8.4 and 8.6
Bias-Free Language
The documentation set for this product strives to use bias-free language. For the purposes of this documentation set, bias-free is defined as language that does not imply discrimination based on age, disability, gender, racial identity, ethnic identity, sexual orientation, socioeconomic status, and intersectionality. Exceptions may be present in the documentation due to language that is hardcoded in the user interfaces of the product software, language used based on RFP documentation, or language that is used by a referenced third-party product. Learn more about how Cisco is using Inclusive Language.
- Updated:
- May 13, 2010
Chapter: Configuring Clientless SSL VPN
- Information About Clientless SSL VPN
- Licensing Requirements
- Prerequisites for Clientless SSL VPN
- Guidelines and Limitations
- Observing Clientless SSL VPN Security Precautions
- Configuring Clientless SSL VPN Access
- Using HTTPS for Clientless SSL VPN Sessions
- Configuring Clientless SSL VPN and ASDM Ports
- Configuring Support for Proxy Servers
- Configuring SSL/TLS Encryption Protocols
- Configuring ACLs
- Authenticating with Digital Certificates
- Enabling Cookies on Browsers for Clientless SSL VPN
- Configuring the Setup for Cisco Secure Desktop
- Showing KCD Status Information
- Showing Cached Kerberos Tickets
- Clearing Cached Kerberos Tickets
- Adding Windows Service Account in Active Directory
- Configuring DNS for KCD
- Configuring the ASA to Join the Active Directory Domain
- Configuring Kerberos Server Groups
- Co nfiguring B ookmarks to Access the Kerberos Authenticated Services
- Configuring Smart Tunnel Access
- About Smart Tunnels
- Why Smart Tunnels?
- Configuring a Smart Tunnel (Lotus example)
- Simplifying Configuration of Which Applications to Tunnel
- Adding Applications to Be Eligible for Smart Tunnel Access
- Assigning a Smart Tunnel List
- Configuring and Applying Smart Tunnel Policy
- Configuring and Applying a Smart Tunnel Tunnel Policy
- Specifying Servers for Smart Tunnel Auto Sign-on
- Adding or Editing a Smart Tunnel Auto Sign-on Server Entry
- Automating Smart Tunnel Access
- Logging Off Smart Tunnel
- Information About Customization
- Exporting a Customization Template
- Editing the Customization Template
- Importing a Customization Object
- Applying Customizations to Connection Profiles, Group Policies and Users
- Customizing the Portal Page
- Customizing the Logout Page
- Adding Customization Object
- Importing/Exporting Customization Object
- Customizing AnyConnect by Importing Resource Files
- Customizing Your Own AnyConnect GUI Text and Scripts
- Customizing AnyConnect GUI Text and Messages
- Customizing the Installer Program Using Installer Transforms
- Localizing the Install Program using Installer Transforms
- Importing/Exporting Language Localization
Configuring Clientless SSL VPN
This chapter describes how to configure clientless SSL VPN and includes the following sections:
- Information About Clientless SSL VPN
- Licensing Requirements
- Prerequisites for Clientless SSL VPN
- Guidelines and Limitations
- Configuring Clientless SSL VPN Access
- Configuring the Setup for Cisco Secure Desktop
- Configuring Application Helper
- Using Single Sign-on with Clientless SSL VPN
- Using Auto Signon
- Configuring Session Settings
- Java Code Signer
- Encoding
- Content Cache
- Content Rewrite
- Configuring Connection Profile Attributes for Clientless SSL VPN
- Understanding How KCD Works
- Configuring Application Access
- Configuring Port Forwarding
- Application Access User Notes
- Configuring File Access
- Ensuring Clock Accuracy for SharePoint Access
- Customizing the Clientless SSL VPN User Experience
- Using Clientless SSL VPN with PDAs
- Using E-Mail over Clientless SSL VPN
- Configuring Portal Access Rules
- Clientless SSL VPN End User Setup
- Configuring Browser Access to Client-Server Plug-ins
- Changing a Group Policy or User Attributes to Use the Customization Object
- Configuring Bookmarks
- Where to Go Next
- Additional References
- Feature History for Feature
Information About Clientless SSL VPN

Note![]() When the ASA is configured for clientless SSL VPN, you cannot enable security contexts (also called firewall multimode) or Active/Active stateful failover. Therefore, these features become unavailable.
When the ASA is configured for clientless SSL VPN, you cannot enable security contexts (also called firewall multimode) or Active/Active stateful failover. Therefore, these features become unavailable.
Clientless SSL VPN lets users establish a secure, remote-access VPN tunnel to an ASA using a web browser. Users do not need a software or hardware client.
Clientless SSL VPN provides secure and easy access to a broad range of web resources and both web-enabled and legacy applications from almost any computer that can reach HTTP Internet sites. They include:
- Internal websites
- Web-enabled applications
- NT/Active Directory file shares
- E-mail proxies, including POP3S, IMAP4S, and SMTPS
- Microsoft Outlook Web Access Exchange Server 2000, 2003, and 2007
- Microsoft Web App to Exchange Server 2010 in 8.4(2) and later.
- Application Access (that is, smart tunnel or port forwarding access to other TCP-based applications)
Clientless SSL VPN uses Secure Sockets Layer Protocol and its successor, Transport Layer Security (SSL/TLS1) to provide the secure connection between remote users and specific, supported internal resources that you configure at a central site. The ASA recognizes connections that need to be proxied, and the HTTP server interacts with the authentication subsystem to authenticate users.
The network administrator provides access to resources by users of clientless SSL VPN sessions on a group basis. Users have no direct access to resources on the internal network.
Licensing Requirements
The following table shows the licensing requirements for this feature:
Note![]() This feature is not available on No Payload Encryption models.
This feature is not available on No Payload Encryption models.
|
|
|
|---|---|
|
|
|
|
|
|
|
|
|
|
|
|
|
|
|
|
|
|
|
|
|
|
|
|
|
|
Prerequisites for Clientless SSL VPN
See the Supported VPN Platforms, Cisco ASA 5500 Series for the platforms and browsers supported by ASA Release 8.4.
Guidelines and Limitations
This section includes the guidelines and limitations of this feature.
ActiveX pages require that you enable ActiveX Relay or enter activex-relay on the associated group policy. If you do so or assign a smart tunnel list to the policy, and the browser proxy exception list on the endpoint specifies a proxy, the user must add a “shutdown.webvpn.relay.” entry to that list.
The ASA supports clientless access to Lotus iNotes 8.5.
The ASA does not support clientless access to Windows Shares (CIFS) Web Folders from Windows 7, Vista, Internet Explorer 8, Mac OS, and Linux. Windows XP SP2 requires a Microsoft hotfix to support Web Folders.
The ASA does not support the following features for clientless SSL VPN connections:
- DSA certificates. The ASA does support RSA certificates.
- Remote HTTPS certificates.
- Requirements of some domain-based security products. Because the ASA encodes the URL, requests actually originate from the ASA, which in some cases do not satisfy the requirements of domain-based security products.
- Inspection features under the Modular Policy Framework, inspecting configuration control.
- Functionality the filter configuration commands provide, including the vpn-filter command.
- VPN connections from hosts with IPv6 addresses. Hosts must use IPv4 addresses to establish clientless SSL VPN or AnyConnect sessions. However, beginning with ASA 8.0(2), users can use these sessions to access internal IPv6-enabled resources.
- NAT, reducing the need for globally unique IP addresses.
- PAT, permitting multiple outbound sessions appear to originate from a single IP address.
- QoS, rate limiting using the police command and priority-queue command.
- Connection limits, checking either via the static or the Modular Policy Framework set connection command.
- The established command, allowing return connections from a lower security host to a higher security host if there is already an established connection from the higher level host to the lower level host.
- Single sign-on application integration (such as SiteMinder) because smart tunnel effectively creates a tunnel between the client and the server, and these applications interfere with ASA working as expected.
- If you have several group policies configured for the clientless portal, they are displayed in a drop-down on the logon page. If the top of the list of group policies is one that requires a certificate, then as soon as the user gets to the logon page, they must have a matching certificate. If not all your group policies use certificates, then configure the list to display a non-certificate policy first. Name your group polices to sort alphabetically, or prefix them with numbers so an AAA policy shows up first. For example, 1-AAA, 2-Certificate. Or, create a "dummy" group policy named Select-a-Group, and make sure that shows up first.
Observing Clientless SSL VPN Security Precautions
Clientless SSL VPN connections on the ASA differ from remote access IPsec connections, particularly with respect to how they interact with SSL-enabled servers, and precautions to follow to reduce security risks.
In a clientless SSL VPN connection, the ASA acts as a proxy between the end user web browser and target web servers. When a user connects to an SSL-enabled web server, the ASA establishes a secure connection and validates the server SSL certificate. The browser never receives the presented certificate, so it cannot examine and validate the certificate.
The current implementation of clientless SSL VPN on the ASA does not permit communication with sites that present expired certificates. Nor does the ASA perform trusted CA certificate validation to those SSL-enabled sites. Therefore, users do not benefit from certificate validation of pages delivered from an SSL-enabled web server before they use a web-enabled service.
Restrictions
By default, the ASA permits all portal traffic to all web resources (e.g., HTTPS, CIFS, RDP, and plug-ins). The ASA clientless service rewrites each URL to one that is meaningful only to itself; the user cannot use the rewritten URL displayed on the page accessed to confirm that they are on the site they requested. To avoid placing users at risk, assign a web ACL to the policies configured for clientless access – group-policies, dynamic access policies, or both – to control traffic flows from the portal. For example, without such an ACL, users could receive an authentication request from an outside fraudulent banking or commerce site. Also, we recommend disabling URL Entry on these policies to prevent user confusion over what is accessible.
Figure 72-1 Example URL Typed by User

Figure 72-2 Same URL Rewritten by Security Appliance and displayed on the Browser Window
Detailed Steps
We recommend that you do the following to minimize risks posed by clientless SSL VPN access:
Step 1![]() Configure a group policy for all users who need clientless SSL VPN access, and enable clientless SSL VPN only for that group policy.
Configure a group policy for all users who need clientless SSL VPN access, and enable clientless SSL VPN only for that group policy.
Step 2![]() With the group policy open, choose General > More Options > Web ACL and click Manage.
With the group policy open, choose General > More Options > Web ACL and click Manage.
Step 3![]() Create a web ACL to do one of the following: permit access only to specific targets within the private network, permit access only to the private network, deny Internet access, or permit access only to reputable sites.
Create a web ACL to do one of the following: permit access only to specific targets within the private network, permit access only to the private network, deny Internet access, or permit access only to reputable sites.
Step 4![]() Assign the web ACL to any policies (group policies, dynamic access policies, or both) that you have configured for clientless access. To assign a web ACL to a DAP, edit the DAP record, and select the web ACL on the Network ACL Filters tab.
Assign the web ACL to any policies (group policies, dynamic access policies, or both) that you have configured for clientless access. To assign a web ACL to a DAP, edit the DAP record, and select the web ACL on the Network ACL Filters tab.
Step 5![]() Disable URL entry on the portal page, the page that opens upon the establishment of a browser-based connection. To do so, click Disable next to URL Entry on both the group policy Portal frame and the DAP Functions tab. To disable URL entry on a DAP, use ASDM to edit the DAP record, click the Functions tab, and check Disable next to URL Entry
Disable URL entry on the portal page, the page that opens upon the establishment of a browser-based connection. To do so, click Disable next to URL Entry on both the group policy Portal frame and the DAP Functions tab. To disable URL entry on a DAP, use ASDM to edit the DAP record, click the Functions tab, and check Disable next to URL Entry
Step 6![]() Instruct users to enter external URLs in the native browser address field above the portal page or open a separate browser window to visit external sites.
Instruct users to enter external URLs in the native browser address field above the portal page or open a separate browser window to visit external sites.
Configuring Clientless SSL VPN Access
On the Clientless SSL VPN Access pane, you can do the following:
- Enable or disable ASA interfaces for clientless SSL VPN sessions.
- Choose a port for clientless SSL VPN connections.
- Set a global timeout value for clientless SSL VPN sessions.
- Set a maximum number of simultaneous clientless SSL VPN sessions.
- Configure the amount of ASA memory that clientless SSL VPN can use.
Detailed Steps
Step 1![]() Choose the Configuration > VPN > General > Group Policy >Add/Edit >WebVPN pane. Then choose the Configuration > Properties >Device Administration >User Accounts > VPN Policy pane to assign the group policy to a user.
Choose the Configuration > VPN > General > Group Policy >Add/Edit >WebVPN pane. Then choose the Configuration > Properties >Device Administration >User Accounts > VPN Policy pane to assign the group policy to a user.
Step 2![]() Enable or disable clientless SSL VPN connections on configured ASA interfaces.
Enable or disable clientless SSL VPN connections on configured ASA interfaces.
The Interface field displays the names of all configured interfaces. The WebVPN Enabled field displays the current status for clientless SSL VPN on the interface. (A green check next to Yes indicates that clientless SSL VPN is enabled. A red circle next to No indicates that clientless SSL VPN is disabled.
Step 3![]() Enter the port number that you want to use for clientless SSL VPN sessions. The default port is 443, for HTTPS traffic; the range is 1 through 65535. If you change the port number, all current clientless SSL VPN connections terminate, and current users must reconnect. You also lose connectivity to ASDM, and a prompt displays, inviting you to reconnect.
Enter the port number that you want to use for clientless SSL VPN sessions. The default port is 443, for HTTPS traffic; the range is 1 through 65535. If you change the port number, all current clientless SSL VPN connections terminate, and current users must reconnect. You also lose connectivity to ASDM, and a prompt displays, inviting you to reconnect.
Step 4![]() Enter the amount of time, in seconds, that a clientless SSL VPN session can be idle before the ASA terminates it. This value applies only if the Idle Timeout value in the group policy for the user is set to zero (0), which means there is no timeout value; otherwise the group policy Idle Timeout value takes precedence over the timeout you configure here. The minimum value you can enter is 1 minute. The default is 30 minutes (1800 seconds). Maximum is 24 hours (86400 seconds).
Enter the amount of time, in seconds, that a clientless SSL VPN session can be idle before the ASA terminates it. This value applies only if the Idle Timeout value in the group policy for the user is set to zero (0), which means there is no timeout value; otherwise the group policy Idle Timeout value takes precedence over the timeout you configure here. The minimum value you can enter is 1 minute. The default is 30 minutes (1800 seconds). Maximum is 24 hours (86400 seconds).
We recommend that you set this attribute to a short time period. A browser set to disable cookies (or one that prompts for cookies and then denies them) can result in a user not connecting but nevertheless appearing in the sessions database. If the Simultaneous Logins attribute for the group policy is set to one, the user cannot log back in because the database indicates that the maximum number of connections already exists. Setting a low idle timeout removes such phantom sessions quickly, and lets a user log in again.
Step 5![]() Enter the maximum number of clientless SSL VPN sessions you want to allow. Be aware that the different ASA models support clientless SSL VPN sessions as follows: ASA 5510 supports a maximum of 250; ASA 5520 maximum is 750; ASA 5540 maximum is 2500; ASA 5550 maximum is 5000.
Enter the maximum number of clientless SSL VPN sessions you want to allow. Be aware that the different ASA models support clientless SSL VPN sessions as follows: ASA 5510 supports a maximum of 250; ASA 5520 maximum is 750; ASA 5540 maximum is 2500; ASA 5550 maximum is 5000.
Step 6![]() Enter the percent of total memory or the amount of memory in kilobytes that you want to allocate to clientless SSL VPN processes. The default is 50% of memory. Be aware that the different ASA models have different total amounts of memory as follows: ASA 5510—256 MB; ASA5520 —512 MB: ASA 5540—1GB, ASA 5550—4G. When you change the memory size, the new setting takes effect only after the system reboots.
Enter the percent of total memory or the amount of memory in kilobytes that you want to allocate to clientless SSL VPN processes. The default is 50% of memory. Be aware that the different ASA models have different total amounts of memory as follows: ASA 5510—256 MB; ASA5520 —512 MB: ASA 5540—1GB, ASA 5550—4G. When you change the memory size, the new setting takes effect only after the system reboots.
Step 7![]() In the WebVPN Memory field, choose to allocate memory for clientless SSL VPN either as a percentage of total memory or as an amount of memory in kilobytes.
In the WebVPN Memory field, choose to allocate memory for clientless SSL VPN either as a percentage of total memory or as an amount of memory in kilobytes.
Step 8![]() Click to include a drop-down list of configured tunnel groups on the clientless SSL VPN end-user interface. Users select a tunnel group from this list when they log on. This field is checked by default. If you uncheck it, the user cannot select a tunnel group at logon.
Click to include a drop-down list of configured tunnel groups on the clientless SSL VPN end-user interface. Users select a tunnel group from this list when they log on. This field is checked by default. If you uncheck it, the user cannot select a tunnel group at logon.
Disabling URL on the Portal Page
The portal page is the page that opens when the user establishes a browser-based connection. Follow these steps to disable the URL entry on the portal page.
Prerequisites
- Configure a group policy for all users who need clientless SSL VPN access, and enable clientless SSL VPN only for that group policy.
- Create a web ACL to either permit access only to specific targets within the private network, permit access only to the private network, deny Internet access, or permit access only to reputable sites.
- Assign the web ACL to any policies (group policies, dynamic access policies, or both) that you have configured for clientless access.
Detailed Steps
|
|
|
|
|---|---|---|
Using SSL to Access the Central Site
Clientless SSL VPN uses SSL and its successor, TLS1 to provide a secure connection between remote users and specific, supported internal resources at a central site. This section includes the following topics:
- Using HTTPS for Clientless SSL VPN Sessions
- Configuring Clientless SSL VPN and ASDM Ports
- Configuring Support for Proxy Servers
- Configuring SSL/TLS Encryption Protocols
Using HTTPS for Clientless SSL VPN Sessions
To permit clientless SSL VPN sessions on an interface, perform the following steps:
Prerequisites
In a web browser, users enter the ASA IP address in the format https:// address where address is the IP address or DNS hostname of the ASA interface.
Restrictions
- You must enable clientless SSL VPN sessions on the ASA interface that users connect to.
- You must use HTTPS to access the ASA or load balancing cluster.
|
|
|
|
|---|---|---|
enable (with the name of interface you want to use for clientless SSL VPN sessions) |
Enables clientless SSL VPN sessions on the interface called outside. |
Configuring Clientless SSL VPN and ASDM Ports
Beginning with Version 8.0(2), the ASA supports both clientless SSL VPN sessions and ASDM administrative sessions simultaneously on Port 443 of the outside interface. You do, however, have the option to configure these applications on different interfaces.
Configuring Support for Proxy Servers
The ASA can terminate HTTPS connections and forward HTTP and HTTPS requests to proxy servers. These servers act as intermediaries between users and the Internet. Requiring Internet access via a server that the organization controls provides another opportunity for filtering to assure secure Internet access and administrative control.
When configuring support for HTTP and HTTPS proxy services, you can assign preset credentials to send with each request for basic authentication. You can also specify URLs to exclude from HTTP and HTTPS requests.
Restrictions
You can specify a proxy autoconfiguration (PAC) file to download from an HTTP proxy server, however, you may not use proxy authentication when specifying the PAC file.
The ASA clientless SSL VPN configuration supports only one http-proxy and one http-proxy command each. For example, if one instance of the http-proxy command is already present in the running configuration and you enter another, the CLI overwrites the previous instance.
Note![]() Proxy NTLM authentication is not supported in http-proxy. Only proxy without authentication and basic authentication are supported.
Proxy NTLM authentication is not supported in http-proxy. Only proxy without authentication and basic authentication are supported.
Configuring SSL/TLS Encryption Protocols
Prerequisites
TCP Port Forwarding requires Sun Microsystems Java Runtime Environment (JRE) version 1.4.x and 1.5.x. Port forwarding does not work when a user of clientless SSL VPN connects with some SSL versions, as follows:
Restrictions
When you set SSL/TLS encryption protocols, be aware of the following:
Prerequisites
Browser cookies are required for the proper operation of clientless SSL VPN.
Configuring ACLs
You can configure ACLs (access control lists) to apply to user sessions. These ACLs filter user access to specific networks, subnets, hosts, and web servers. The Web ACLs table displays the filters configured on the ASA application to the clientless SSL VPN traffic. The table shows the name of each access control list (ACL), and below and indented to the right of the ACL name, the ACEs (access control entries) assigned to the ACL.
Each ACL permits or denies access permits or denies access to specific networks, subnets, hosts, and web servers. Each ACE specifies one rule that serves the function of the ACL.
Guidelines
If you do not define any filters, all connections are permitted.
Restrictions
Detailed Steps
You can add and edit ACLs to be used for clientless SSL VPN sessions with the following functions:
- Click Add ACL to add an ACL or ACE. To insert a new ACE before or after an existing ACE, click Insert or Insert After.
- Click Edit to highlight the ACE you want to change.
- Highlight the ACL or ACE you want to remove and click Delete. When you delete an ACL, you must delete all of its ACEs. No warning or undelete.
- Use the Move Up and Move Down buttons to change the order of ACLs or ACEs. The ASA checks ACLs to be applied to clientless SSL VPN sessions and their ACEs in the sequence determined by their position in the ACLs list until it finds a match.
- Click + to expand or - to collapse the list of ACEs under each ACL. The priority of the ACEs under each ACL is displayed. The order in the list determines priority.
- (Optional) Click Find to search for a web ACL. Start typing in the field, and the tool searches the beginning characters of every field for a match. You can use wild cards to expand your search. For example, typing sal in the Find field matches a web ACL named sales but not a customization object named wholesalers. If you type *sal in the Find field, the search finds the first instance of either sales or wholesalers in the table.
Use the up and down arrows to skip up or down to the next string match. Check the Match Case checkbox to make your search case sensitive.
- (Optional) Highlight a web ACL and click Assign to assign the selected web ACL to one or more VPN group policies, dynamic access policies, or user policies.
- When you create an ACE, by default it is enabled. Clear the check box to disable an ACE.
The IP address or URL of the application or service to which the ACE applies is displayed. The TCP service to which the ACE applies is also displayed. The Action field displays whether the ACE permits or denies clientless SSL VPN access. The time range associated with the ACE and the logging behavior (either disabled or with a specified level and time interval) is also displayed.
Adding or Editing ACEs
An Access Control Entry (or “access rule”) permits or denies access to specific URLs and services. You can configure multiple ACEs for an ACL. ACLs apply ACEs in priority order, acting on the first match.
Detailed Steps
Step 1![]() Permit or deny access to specific networks, subnets, hosts, and web servers specified in the Filter group field.
Permit or deny access to specific networks, subnets, hosts, and web servers specified in the Filter group field.
Step 2![]() Specify a URL or an IP address to which you want to apply the filter (permit or deny user access):
Specify a URL or an IP address to which you want to apply the filter (permit or deny user access):
- URL—Applies the filter to the specified URL.
- Protocols (unlabeled)—Specifies the protocol part of the URL address.
- ://x—Specifies the URL of the Web page to which to apply the filter.
- TCP—Applies the filter to the specified IP address, subnet, and port.
- IP Address—Specifies the IP address to which to apply the filter.
- Netmask—Lists the standard subnet mask to apply to the address in the IP Address field.
- Service—Identifies the service (such as https, kerberos, or any) to be matched. Displays a list of services from which you can select the service to display in the Service field.
- Boolean operator (unlabeled)—Lists the boolean conditions (equal, not equal, greater than, less than, or range) to use in matching the service specified in the service field.
Step 3![]() The Rule Flow Diagram graphically depicts the traffic flow using the filter. This area may be hidden.
The Rule Flow Diagram graphically depicts the traffic flow using the filter. This area may be hidden.
Step 4![]() Specify the logging rules. The default is Default Syslog.
Specify the logging rules. The default is Default Syslog.
- Logging—Choose enable if you want to enable a specific logging level.
- Syslog Level—Grayed out until you select Enable for the Logging attribute. Lets you select the type of syslog messages you want the ASA to display.
- Log Interval—Lets you select the number of seconds between log messages.
- Time Range—Lets you select the name of a predefined time-range parameter set.
- ...—Click to browse the configured time ranges or to add a new one.
Configuration Examples for ACLs for Clientless SSL VPN
Here are examples of ACLs for clientless SSL VPN:
|
|
|
|
|---|---|---|
Permits access to any URL. Usually used after an ACL that denies url access. |
Authenticating with Digital Certificates
SSL uses digital certificates for authentication. The ASA creates a self-signed SSL server certificate when it boots; or you can install in the ASA an SSL certificate that has been issued in a PKI context. For HTTPS, this certificate must then be installed on the client. You need to install the certificate from a given ASA only once.
Restrictions
- Application Access does not work for users of clientless SSL VPN who authenticate using digital certificates. JRE does not have the ability to access the web browser keystore. Therefore JAVA cannot use a certificate that the browser uses to authenticate a user, so it cannot start.
- E-mail clients such as MS Outlook, MS Outlook Express, and Eudora lack the ability to access the certificate store.
For more information on authentication and authorization using digital certificates, see the “Using Certificates and User Login Credentials” section.
Enabling Cookies on Browsers for Clientless SSL VPN
When cookies are disabled on the web browser, the links from the web portal home page open a new window prompting the user to log in once more.
Configuring the Setup for Cisco Secure Desktop
The Cisco Secure Desktop Setup window displays the version and state of the Cisco Secure Desktop image if it is installed on the ASA, indicates whether it is enabled, and shows the size of the cache used to hold the Cisco Secure Desktop and SSL VPN Client on the ASA.
You can use the buttons in this window as follows:
To transfer a copy of a Cisco Secure Desktop image from your local computer to the flash device of the ASA, click Upload.
To prepare to install or upgrade Cisco Secure Desktop, use your Internet browser to download a securedesktop_asa_< n >_< n >*.pkg file from http://www.cisco.com/cgi-bin/tablebuild.pl/securedesktop to any location on your PC. Then use this button to transfer a copy from your local computer to the flash device. Click Browse Flash to install it into the running configuration. Finally, click Enable Secure Desktop.
- To install or replace the Cisco Secure Desktop image on the flash device of the ASA, click Browse Flash.
Note![]() If you click Browse Flash to upgrade or downgrade the Cisco Secure Desktop image, select the package to install, and click OK, the Uninstall Cisco Secure Desktop dialog window asks you if you want to delete the Cisco Secure Desktop distribution currently in the running configuration from the flash device. Click Yes if you want to save space on the flash device, or click No to reserve the option to revert to this version of Cisco Secure Desktop.
If you click Browse Flash to upgrade or downgrade the Cisco Secure Desktop image, select the package to install, and click OK, the Uninstall Cisco Secure Desktop dialog window asks you if you want to delete the Cisco Secure Desktop distribution currently in the running configuration from the flash device. Click Yes if you want to save space on the flash device, or click No to reserve the option to revert to this version of Cisco Secure Desktop.
- To remove the Cisco Secure Desktop image and configuration file (sdesktop/data.xml) from the running configuration, click Uninstall.
If you click this button, the Uninstall Cisco Secure Desktop dialog window asks if you want to delete the Cisco Secure Desktop image that was named in the “Secure Desktop Image field” and all Cisco Secure Desktop data files (including the entire Cisco Secure Desktop configuration) from the flash device. Click Yes if you want to remove these files from both the running configuration and the flash device, or click No to remove them from the running configuration, but retain them on the flash device.
Detailed Steps
The Cisco Secure Desktop image loaded into the running configuration is displayed in the Location field. By default, the filename is in the format securedesktop_asa_<n>_<n>*.pkg.
Step 1![]() Click Browse Flash to insert or modify the value in this field.
Click Browse Flash to insert or modify the value in this field.
Step 2![]() Click Enable Secure Desktop and click Apply to do the following:
Click Enable Secure Desktop and click Apply to do the following:
a.![]() Make sure the file is a valid Cisco Secure Desktop image.
Make sure the file is a valid Cisco Secure Desktop image.
b.![]() Create an “sdesktop” folder on disk0 if one is not already present.
Create an “sdesktop” folder on disk0 if one is not already present.
c.![]() Insert a data.xml (Cisco Secure Desktop configuration) file into the sdesktop folder if one is not already present.
Insert a data.xml (Cisco Secure Desktop configuration) file into the sdesktop folder if one is not already present.
d.![]() Load the data.xml file into the running configuration.
Load the data.xml file into the running configuration.
Note![]() If you transfer or replace the data.xml file, disable and then enable Cisco Secure Desktop to load the file.
If you transfer or replace the data.xml file, disable and then enable Cisco Secure Desktop to load the file.
e.![]() Enable Cisco Secure Desktop.
Enable Cisco Secure Desktop.
Uploading Images
The Upload Image dialog box lets you transfer a copy of a Cisco Secure Desktop image from your local computer to the flash device on the ASA. Use this window to install or upgrade Cisco Secure Desktop.
Prerequisites
Detailed Steps
You can use the buttons in this window as follows:
- To choose the path of the securedesktop_asa_< n >_< n >*.pkg file to be transferred, click Browse Local Files. The Selected File Path dialog box displays the contents of the folder you last accessed on your local computer. Navigate to the securedesktop_asa_< n >_< n >*.pkg file, select it, and click Open.
- To select the target directory for the file, click Browse Flash. The Browse Flash dialog box displays the contents of the flash card.
- To uploads the securedesktop_asa_< n >_< n >*.pkg file from your local computer to the flash device, click Upload File. A Status window appears and remains open for the duration of the file transfer. Following the transfer, an Information window displays the message, “File is uploaded to flash successfully.” Click OK. The Upload Image dialog box removes the contents of the Local File Path and Flash File System Path fields.
- To close the Upload Image dialog box, click Close. Click this button after you upload the Cisco Secure Desktop image to the flash device or if you decide not to upload it. If you uploaded it, the filename appears in the Secure Desktop Image field of the Cisco Secure Desktop Setup window. If you did not upload it, a Close Message dialog box prompts, “Are you sure you want to close the dialog without uploading the file?” Click OK if you do not want to upload the file. The Close Message and Upload Image dialog boxes close, revealing the Cisco Secure Desktop Setup pane. Otherwise, click Cancel in the Close Message dialog box. The dialog box closes, revealing the Upload Image dialog box again, with the values in the fields intact. Click Upload File.
Step 1![]() Specify the path to the securedesktop_asa_< n >_< n >*.pkg file on your local computer. Click Browse Local to automatically insert the path in this field, or enter the path. For example:
Specify the path to the securedesktop_asa_< n >_< n >*.pkg file on your local computer. Click Browse Local to automatically insert the path in this field, or enter the path. For example:
D:\Documents and Settings\ Windows_user_name.AMER\My Documents\My Downloads\securedesktop_asa_3_1_1_16.pkg
ASDM inserts the file path into the Local File Path field.
Step 2![]() Specify the destination path on the flash device of the ASA and the name of the destination file. Click Browse Flash to automatically insert the path into this field, or enter the path. For example:
Specify the destination path on the flash device of the ASA and the name of the destination file. Click Browse Flash to automatically insert the path into this field, or enter the path. For example:
disk0:/securedesktop_asa_3_1_1_16.pkg
The file name of the Cisco Secure Desktop image that you selected on your local computer is displayed in the Browse Flash dialog box. We recommend that you use this name to prevent confusion. Confirm that this field displays the same name of the local file you selected and click OK. The Browse Flash dialog box closes. ASDM inserts the destination file path into the Flash File System Path field.
Configuring Application Helper
Clientless SSL VPN includes an Application Profile Customization Framework option that lets the ASA handle non-standard applications and web resources so they display correctly over a clientless SSL VPN connection. An APCF profile contains a script that specifies when (pre, post), where (header, body, request, response), and what data to transform for a particular application. The script is in XML and uses sed (stream editor) syntax to transform strings/text.
You can configure multiple APCF profiles on an ASA to run in parallel. Within an APCF profile script, multiple APCF rules can apply. In this case, the ASA processes the oldest rule first, based on configuration history, the next oldest rule next, and so forth.
You can store APCF profiles on the ASA flash memory or on an HTTP, HTTPS, FTP, or TFTP server. Use this pane to add, edit, and delete APCF packages, and to put them in priority order.
Detailed Steps
Step 1![]() Information about the location of the APCF package is displayed. The locations include the ASA flash memory or an HTTP, HTTPS, FTP, or TFTP server.
Information about the location of the APCF package is displayed. The locations include the ASA flash memory or an HTTP, HTTPS, FTP, or TFTP server.
Step 2![]() (Optional) Click Add/Edit to create a new APCF profile or change an existing one.
(Optional) Click Add/Edit to create a new APCF profile or change an existing one.
Step 3![]() (Optional) Click Delete to remove an existing APCF profile. No confirmation or undo exists.
(Optional) Click Delete to remove an existing APCF profile. No confirmation or undo exists.
Step 4![]() Use the Move Up option to rearrange APCF profiles within a list. The list determines the order in which the ASA attempts to use APCF profiles.
Use the Move Up option to rearrange APCF profiles within a list. The list determines the order in which the ASA attempts to use APCF profiles.
Step 5![]() Click Flash file to locate an APCF file stored on the ASA flash memory.
Click Flash file to locate an APCF file stored on the ASA flash memory.
Step 6![]() You can browse to locate the path to an APCF file stored on flash memory or manually enter the path.
You can browse to locate the path to an APCF file stored on flash memory or manually enter the path.
Step 7![]() Click to browse flash memory to locate the APCF file. A Browse Flash Dialog pane displays. Use the Folders and Files columns to locate the APCF file. Highlight the APCF file and click OK. The path to the file then displays in the Path field.
Click to browse flash memory to locate the APCF file. A Browse Flash Dialog pane displays. Use the Folders and Files columns to locate the APCF file. Highlight the APCF file and click OK. The path to the file then displays in the Path field.
Step 8![]() (Optional) Click Refresh if you do not see the name of an APCF file that you recently downloaded.
(Optional) Click Refresh if you do not see the name of an APCF file that you recently downloaded.
Step 9![]() Click Upload to get an APCF file from a local computer to the ASA flash file system. The Upload APCF package pane displays.
Click Upload to get an APCF file from a local computer to the ASA flash file system. The Upload APCF package pane displays.
Step 10![]() Click URL to use an APCF file stored on an HTTP, HTTPS or TFTP server.
Click URL to use an APCF file stored on an HTTP, HTTPS or TFTP server.
Step 11![]() Enter the path to the FTP, HTTP, HTTPS, or TFTP server. The server types are identified.
Enter the path to the FTP, HTTP, HTTPS, or TFTP server. The server types are identified.
Uploading APCF Packages
Detailed Steps
Step 1![]() The path to the APCF file on your computer is shown. Click Browse Local to automatically insert the path in this field, or enter the path.
The path to the APCF file on your computer is shown. Click Browse Local to automatically insert the path in this field, or enter the path.
Step 2![]() Click to locate and choose the APCF file on your computer that you want to transfer. The Select File Path dialog box displays the contents of the folder you last accessed on your local computer. Navigate to the APCF file, choose it, and click Open. ASDM inserts the file path into the Local File Path field.
Click to locate and choose the APCF file on your computer that you want to transfer. The Select File Path dialog box displays the contents of the folder you last accessed on your local computer. Navigate to the APCF file, choose it, and click Open. ASDM inserts the file path into the Local File Path field.
Step 3![]() The path on the ASA to upload the APCF file is shown in the Flash File System Path. Click Browse Flash to identify the location on the ASA to which you want to upload the APCF file. The Browse Flash dialog box displays the contents of flash memory.
The path on the ASA to upload the APCF file is shown in the Flash File System Path. Click Browse Flash to identify the location on the ASA to which you want to upload the APCF file. The Browse Flash dialog box displays the contents of flash memory.
Step 4![]() The file name of the APCF file you selected on your local computer is displayed. We recommend that you use this name to prevent confusion. Confirm that this file displays the correct filename, and click OK. The Browse Flash dialog box closes. ASDM inserts the destination file path in the Flash File System Path field.
The file name of the APCF file you selected on your local computer is displayed. We recommend that you use this name to prevent confusion. Confirm that this file displays the correct filename, and click OK. The Browse Flash dialog box closes. ASDM inserts the destination file path in the Flash File System Path field.
Step 5![]() Click Upload File when you have identified the location of the APCF file on your computer, and the location where you want to download it to the ASA.
Click Upload File when you have identified the location of the APCF file on your computer, and the location where you want to download it to the ASA.
Step 6![]() A Status window appears and remains open for the duration of the file transfer. Following the transfer, an Information window displays the message, “File is uploaded to flash successfully.” Click OK. The Upload Image dialog window removes the contents of the Local File Path and Flash File System Path fields, indicating you can upload another file. To do so, repeat these instructions. Otherwise, click Close.
A Status window appears and remains open for the duration of the file transfer. Following the transfer, an Information window displays the message, “File is uploaded to flash successfully.” Click OK. The Upload Image dialog window removes the contents of the Local File Path and Flash File System Path fields, indicating you can upload another file. To do so, repeat these instructions. Otherwise, click Close.
Step 7![]() Close the Upload Image dialog window. Click Close after you upload the APCF file to flash memory or if you decide not to upload it. If you do upload it, the filename appears in the APCF File Location field of the APCF window. If you do not upload it, a Close Message dialog box prompts, “Are you sure you want to close the dialog without uploading the file?” Click OK if you do not want to upload the file. The Close Message and Upload Image dialog boxes close, revealing the APCF Add/Edit pane. Otherwise, click Cancel in the Close Message dialog box. The dialog box closes, revealing the Upload Image dialog box again, with the values in the fields intact. Click Upload File.
Close the Upload Image dialog window. Click Close after you upload the APCF file to flash memory or if you decide not to upload it. If you do upload it, the filename appears in the APCF File Location field of the APCF window. If you do not upload it, a Close Message dialog box prompts, “Are you sure you want to close the dialog without uploading the file?” Click OK if you do not want to upload the file. The Close Message and Upload Image dialog boxes close, revealing the APCF Add/Edit pane. Otherwise, click Cancel in the Close Message dialog box. The dialog box closes, revealing the Upload Image dialog box again, with the values in the fields intact. Click Upload File.
Managing Passwords
Optionally, you can configure the ASA to warn end users when their passwords are about to expire.
The ASA supports password management for the RADIUS and LDAP protocols. It supports the “password-expire-in-days” option for LDAP only.
You can configure password management for IPsec remote access and SSL VPN tunnel-groups.
When you configure password management, the ASA notifies the remote user at login that the user’s current password is about to expire or has expired. The ASA then offers the user the opportunity to change the password. If the current password has not yet expired, the user can still log in using that password.
This command is valid for AAA servers that support such notification.
The ASA, releases 7.1 and later, generally supports password management for the following connection types when authenticating with LDAP or with any RADIUS configuration that supports MS-CHAPv2:
The RADIUS server (for example, Cisco ACS) could proxy the authentication request to another authentication server. However, from the ASA perspective, it is talking only to a RADIUS server.
Prerequisites
- Native LDAP requires an SSL connection. You must enable LDAP over SSL before attempting to do password management for LDAP. By default, LDAP uses port 636.
- If you are using an LDAP directory server for authentication, password management is supported with the Sun Microsystems JAVA System Directory Server (formerly named the Sun ONE Directory Server) and the Microsoft Active Directory.
Sun—The DN configured on the ASA to access a Sun directory server must be able to access the default password policy on that server. We recommend using the directory administrator, or a user with directory administrator privileges, as the DN. Alternatively, you can place an ACI on the default password policy.
Microsoft—You must configure LDAP over SSL to enable password management with Microsoft Active Directory.
- Some RADIUS servers that support MSCHAP currently do not support MSCHAPv2. This command requires MSCHAPv2 so check with your vendor.
- Password management is not supported for any of these connection types for Kerberos/Active Directory (Windows password) or NT 4.0 Domain.
- For LDAP, the method to change a password is proprietary for the different LDAP servers on the market. Currently, the ASA implements the proprietary password management logic only for Microsoft Active Directory and Sun LDAP servers.
- The ASA ignores this command if RADIUS or LDAP authentication has not been configured.
Detailed Steps
Note![]() This command does not change the number of days before the password expires, but rather, the number of days ahead of expiration that the ASA starts warning the user that the password is about to expire.
This command does not change the number of days before the password expires, but rather, the number of days ahead of expiration that the ASA starts warning the user that the password is about to expire.
Step 1![]() Navigate to Configuration > Remote Access VPN > Clientless SSL VPN Access > Connection Profiles > Add or Edit > Advanced > General > Password Management.
Navigate to Configuration > Remote Access VPN > Clientless SSL VPN Access > Connection Profiles > Add or Edit > Advanced > General > Password Management.
Step 2![]() Click the Enable password management option.
Click the Enable password management option.
Using Single Sign-on with Clientless SSL VPN
Single sign-on support lets users of clientless SSL VPN enter a username and password only once to access multiple protected services and web servers. In general, the SSO mechanism either starts as part of the AAA process or just after successful user authentication to a AAA server. The clientless SSL VPN server running on the ASA acts as a proxy for the user to the authenticating server. When a user logs in, the clientless SSL VPN server sends an SSO authentication request, including username and password, to the authenticating server using HTTPS. If the server approves the authentication request, it returns an SSO authentication cookie to the clientless SSL VPN server. The ASA keeps this cookie on behalf of the user and uses it to authenticate the user to secure websites within the domain protected by the SSO server.
This section describes the three SSO authentication methods supported by clientless SSL VPN: HTTP Basic and NTLMv1 (NT LAN Manager) authentication, the Computer Associates eTrust SiteMinder SSO server (formerly Netegrity SiteMinder), and Version 1.1 of Security Assertion Markup Language (SAML), the POST-type SSO server authentication.
- Configuring SSO with HTTP Basic or NTLM Authentication
- Configuring SSO Authentication Using SiteMinder
- Configuring SSO Authentication Using SAML Browser Post Profile
- Configuring SSO with the HTTP Form Protocol
Configuring SSO with HTTP Basic or NTLM Authentication
This section describes single sign-on with HTTP Basic or NTLM authentication. You can configure the ASA to implement SSO using either or both of these methods. The auto-signon command configures the ASA to automatically pass clientless SSL VPN user login credentials (username and password) on to internal servers. You can enter multiple auto-signon commands. The ASA processes them according to the input order (early commands take precedence). You specify the servers to receive the login credentials using either IP address and IP mask, or URI mask.
Use the auto-signon command in any of three modes: webvpn configuration, webvpn group-policy mode, or webvpn username mode. Username supersedes group, and group supersedes global. The mode you choose depends upon scope of authentication you want:
|
|
|
|---|---|
A subset of clientless SSL VPN users defined by a group policy. |
|
Detailed Steps
The following example commands present various possible combinations of modes and arguments.
Configuring SSO Authentication Using SiteMinder
This section describes configuring the ASA to support SSO with SiteMinder. You would typically choose to implement SSO with SiteMinder if your website security infrastucture already incorporates SiteMinder. With this method, SSO authentication is separate from AAA and happens once the AAA process completes.
Prerequisites
- Specifying the SSO server.
- Specifying the URL of the SSO server to which the ASA makes SSO authentication requests.
- Specifying a secret key to secure the communication between the ASA and the SSO server. This key is similar to a password: you create it, save it, and enter it on both the ASA and the SiteMinder Policy Server using the Cisco Java plug-in authentication scheme.
Optionally, you can do the following configuration tasks in addition to the required tasks:
Restrictions
If you want to configure SSO for a user or group for clientless SSL VPN access, you must first configure a AAA server, such as a RADIUS or LDAP server. You can then set up SSO support for clientless SSL VPN.
Detailed Steps
This section presents specific steps for configuring the ASA to support SSO authentication with CA SiteMinder. To configure SSO with SiteMinder, perform the following steps:
Adding the Cisco Authentication Scheme to SiteMinder
In addition to configuring the ASA for SSO with SiteMinder, you must also configure your CA SiteMinder Policy Server with the Cisco authentication scheme, a Java plug-in you download from the Cisco web site.
Prerequisites
Configuring the SiteMinder Policy Server requires experience with SiteMinder.
Detailed Steps
This section presents general tasks, not a complete procedure. To configure the Cisco authentication scheme on your SiteMinder Policy Server, perform the following steps:
Step 1![]() With the SiteMinder Administration utility, create a custom authentication scheme, being sure to use the following specific arguments:
With the SiteMinder Administration utility, create a custom authentication scheme, being sure to use the following specific arguments:
You configure the secret on the ASA using the policy-server-secret command at the command line interface.
Step 2![]() Using your Cisco.com login, download the file cisco_vpn_auth.jar from http://www.cisco.com/cisco/software/navigator.html and copy it to the default library directory for the SiteMinder server. This.jar file is also available on the Cisco ASA CD.
Using your Cisco.com login, download the file cisco_vpn_auth.jar from http://www.cisco.com/cisco/software/navigator.html and copy it to the default library directory for the SiteMinder server. This.jar file is also available on the Cisco ASA CD.
Configuring SSO Authentication Using SAML Browser Post Profile
This section describes configuring the ASA to support Security Assertion Markup Language (SAML), Version 1.1 POST profile Single Sign-On (SSO) for authorized users.
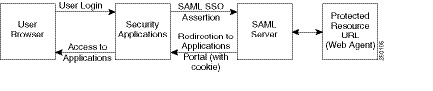
After a session is initiated, the ASA authenticates the user against a configured AAA method. Next, the ASA (the asserting party) generates an assertion to the relying party, the consumer URL service provided by the SAML server. If the SAML exchange succeeds, the user is allowed access to the protected resource. Figure 72-3 shows the communication flow:
Figure 72-3 SAML Communication Flow
Prerequisites
To configure SSO with an SAML Browser Post Profile, you must perform the following tasks:
- Specify the SSO server with the sso-server command.
- Specify the URL of the SSO server for authentication requests (the assertion-consumer-url command)
- Specify the ASA hostname as the component issuing the authentication request (the issuer command)
- Specify the trustpoint certificates use for signing SAML Post Profile assertions (the trustpoint command)
Optionally, in addition to these required tasks, you can do the following configuration tasks:
Restrictions
Detailed Steps
This section presents specific steps for configuring the ASA to support SSO authentication with SAML Post Profile. To configure SSO with SAML-V1.1-POST, perform the following steps:
Configuring the SAML POST SSO Server
Use the SAML server documentation provided by the server software vendor to configure the SAML server in Relying Party mode.The following steps list the specific parameters required to configure the SAML Server for Browser Post Profile:
Detailed Steps
Step 1![]() Configure the SAML server parameters to represent the asserting party (the ASA):
Configure the SAML server parameters to represent the asserting party (the ASA):
Step 2![]() Configure certificates.
Configure certificates.
Step 3![]() Specify that asserting party assertions must be signed.
Specify that asserting party assertions must be signed.
Step 4![]() Select how the SAML server identifies the user:
Select how the SAML server identifies the user:
Configuring SSO with the HTTP Form Protocol
This section describes using the HTTP Form protocol for SSO. HTTP Form protocol is an approach to SSO authentication that can also qualify as a AAA method. It provides a secure method for exchanging authentication information between users of clientless SSL VPN and authenticating web servers. You can use it in conjunction with other AAA servers such as RADIUS or LDAP servers.
Prerequisites
To configure SSO with the HTTP protocol correctly, you must have a thorough working knowledge of authentication and HTTP protocol exchanges.
Restrictions
As a common protocol, it is applicable only when the following conditions are met for the web server application used for authentication:
- The web form must not have dynamic parameters that are relevant for authentication (such as parameters set by JavaScript or unique for each request).
- The authentication cookie must be set for successful request and not set for unauthorized logons. In this case, ASA cannot distinguish successful from failed authentication.
Detailed Steps
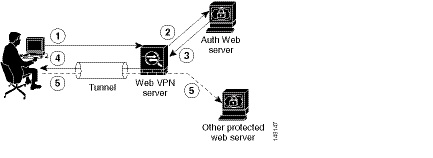
The ASA again serves as a proxy for users of clientless SSL VPN to an authenticating web server but, in this case, it uses HTTP Form protocol and the POST method for requests. You must configure the ASA to send and receive form data. Figure 72-4 illustrates the following SSO authentication steps:
Step 1![]() A user of clientless SSL VPN first enters a username and password to log into the clientless SSL VPN server on the ASA.
A user of clientless SSL VPN first enters a username and password to log into the clientless SSL VPN server on the ASA.
Step 2![]() The clientless SSL VPN server acts as a proxy for the user and forwards the form data (username and password) to an authenticating web server using a POST authentication request.
The clientless SSL VPN server acts as a proxy for the user and forwards the form data (username and password) to an authenticating web server using a POST authentication request.
Step 3![]() If the authenticating web server approves the user data, it returns an authentication cookie to the clientless SSL VPN server where it is stored on behalf of the user.
If the authenticating web server approves the user data, it returns an authentication cookie to the clientless SSL VPN server where it is stored on behalf of the user.
Step 4![]() The clientless SSL VPN server establishes a tunnel to the user.
The clientless SSL VPN server establishes a tunnel to the user.
Step 5![]() The user can now access other websites within the protected SSO environment without reentering a username and password.
The user can now access other websites within the protected SSO environment without reentering a username and password.
Figure 72-4 SSO Authentication Using HTTP Forms
While you would expect to configure form parameters that let the ASA include POST data such as the username and password, you initially might not be aware of additional hidden parameters that the web server requires. Some authentication applications expect hidden data which is neither visible to nor entered by the user. You can, however, discover hidden parameters the authenticating web server expects by making a direct authentication request to the web server from your browser without the ASA in the middle acting as a proxy. Analyzing the web server response using an HTTP header analyzer reveals hidden parameters in a format similar to the following:
Some hidden parameters are mandatory and some are optional. If the web server requires data for a hidden parameter, it rejects any authentication POST request that omits that data. Because a header analyzer does not tell you if a hidden parameter is mandatory or not, we recommend that you include all hidden parameters until you determine which are mandatory.
To configure SSO with the HTTP Form protocol, you must perform the following:
- Configure the uniform resource identifier on the authenticating web server to receive and process the form data ( action-uri).
- Configure the username parameter ( user-parameter).
- Configure the user password parameter ( password-parameter).
You might also need to do the following tasks depending upon the requirements of authenticating web server:
- Configure a starting URL if the authenticating web server requires a pre-login cookie exchange ( start-url).
- Configure any hidden authentication parameters required by the authenticating web server ( hidden-parameter).
- Configure the name of an authentication cookie set by the authenticating web server ( auth-cookie-name).
Gathering HTTP Form Data
This section presents the steps for discovering and gathering necessary HTTP Form data. If you do not know what parameters the authenticating web server requires, you can gather parameter data by analyzing an authentication exchange using the following steps:
Prerequisites
Detailed Steps
Step 1![]() Start your browser and HTTP header analyzer, and connect directly to the web server login page without going through the ASA.
Start your browser and HTTP header analyzer, and connect directly to the web server login page without going through the ASA.
Step 2![]() After the web server login page has loaded in your browser, examine the login sequence to determine if a cookie is being set during the exchange. If the web server has loaded a cookie with the login page, configure this login page URL as the start-URL.
After the web server login page has loaded in your browser, examine the login sequence to determine if a cookie is being set during the exchange. If the web server has loaded a cookie with the login page, configure this login page URL as the start-URL.
Step 3![]() Enter the username and password to log in to the web server, and press Enter. This action generates the authentication POST request that you examine using the HTTP header analyzer.
Enter the username and password to log in to the web server, and press Enter. This action generates the authentication POST request that you examine using the HTTP header analyzer.
An example POST request—with host HTTP header and body—follows:
POST /emco/myemco/authc/forms/MCOlogin.fcc?TYPE=33554433&REALMOID=06-000430e1-7443-125c-ac05-83846dc90034&GUID=&SMAUTHREASON=0&METHOD=GET&SMAGENTNAME=$SM$5FZmjnk3DRNwNjk2KcqVCFbIrNT9%2bJ0H0KPshFtg6rB1UV2PxkHqLw%3d%3d&TARGET=https%3A%2F%2Fwww.example.com%2Femco%2Fmyemco%2FHTTP/1.1
SMENC=ISO-8859-1&SMLOCALE=US-EN&USERID=Anyuser&USER_PASSWORD=XXXXXX&target=https%3A%2F%2Fwww.example.com%2Femco%2Fmyemco%2F&smauthreason=0
Step 4![]() Examine the POST request and copy the protocol, host, and the complete URL to configure the action-uri parameter.
Examine the POST request and copy the protocol, host, and the complete URL to configure the action-uri parameter.
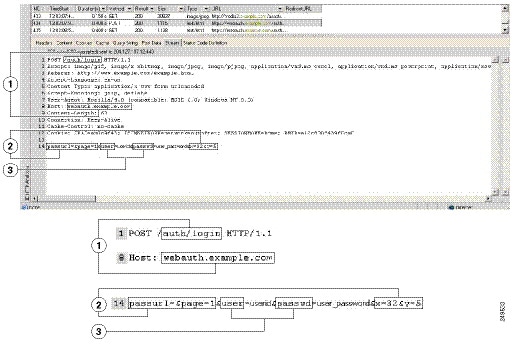
Step 5![]() Examine the POST request body and copy the following:
Examine the POST request body and copy the following:
a.![]() Username parameter. In the preceding example, this parameter is USERID, not the value anyuser.
Username parameter. In the preceding example, this parameter is USERID, not the value anyuser.
b.![]() Password parameter. In the preceding example, this parameter is USER_PASSWORD.
Password parameter. In the preceding example, this parameter is USER_PASSWORD.
c.![]() Hidden parameter. This parameter is everything in the POST body except the username and password parameters. In the preceding example, the hidden parameter is: SMENC=ISO-8859-1&SMLOCALE=US-EN&target=https%3A%2F%2Fwww.example.com%2Femco%2Fmyemco%2F&smauthreason=0
Hidden parameter. This parameter is everything in the POST body except the username and password parameters. In the preceding example, the hidden parameter is: SMENC=ISO-8859-1&SMLOCALE=US-EN&target=https%3A%2F%2Fwww.example.com%2Femco%2Fmyemco%2F&smauthreason=0
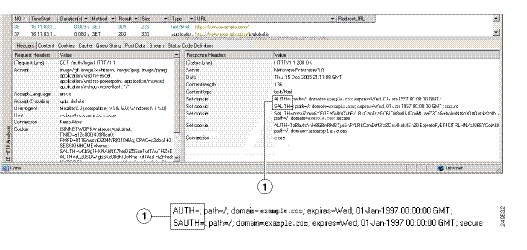
Figure 72-5 highlights the action URI, hidden, username and password parameters within sample output from an HTTP analyzer. This is only an example; output varies widely across different websites.
Figure 72-5 Action-uri, hidden, username and password parameters
|
|
|
|
|
|
|
|
Step 6![]() If you successfully log in to the web server, examine the server response with the HTTP header analyzer to locate the name of the session cookie set by the server in your browser. This is the auth-cookie-name parameter.
If you successfully log in to the web server, examine the server response with the HTTP header analyzer to locate the name of the session cookie set by the server in your browser. This is the auth-cookie-name parameter.
In the following server response header, the name of the session cookie is SMSESSION. You just need the name, not the value.

Figure 72-6 shows an example of authorization cookies in HTTP analyzer output. This is only an example; output varies widely across different websites.
Figure 72-6 Authorization cookies in sample HTTP analyzer output
|
|
Step 7![]() In some cases, the server may set the same cookie regardless of whether the authentication was successful or not, and such a cookie is unacceptable for SSO purposes. To confirm that the cookies are different, repeat Step 1 through Step 6 using invalid login credentials and then compare the “failure” cookie with the “success” cookie.
In some cases, the server may set the same cookie regardless of whether the authentication was successful or not, and such a cookie is unacceptable for SSO purposes. To confirm that the cookies are different, repeat Step 1 through Step 6 using invalid login credentials and then compare the “failure” cookie with the “success” cookie.
You now have the necessary parameter data to configure the ASA for SSO with HTTP Form protocol.
Configuring SSO for Plug-ins
Plug-ins support single sign-on (SSO). They use the same credentials (username and password) entered to authenticate the clientless SSL VPN session. Because the plug-ins do not support macro substitution, you do not have the option to perform SSO on different fields, such as the internal domain password or the attribute on a RADIUS or LDAP server.
To configure SSO support for a plug-in, you install the plug-in and add a bookmark entry to display a link to the server, specifying SSO support using the csco_sso=1 parameter. The following examples show plug-in bookmarks enabled for SSO:
rdp://rdp-server/?Parameter1=value&Parameter2=value&csco_sso=1
Configuring SSO with Macro Substitution
This section describes using macro substitution for SSO. Configuring SSO with macro substitution allows for you to inject certain variables into bookmarks to substitute for dynamic values.
Note![]() Smart tunnel bookmarks support auto-signon but not variable substitution. For example, a SharePoint bookmark configured for smart tunnel uses the same username and password credentials to log into the application as the credentials used to log into clientless SSL VPN. You can use variable substitutions and auto signon simultaneously or separately.
Smart tunnel bookmarks support auto-signon but not variable substitution. For example, a SharePoint bookmark configured for smart tunnel uses the same username and password credentials to log into the application as the credentials used to log into clientless SSL VPN. You can use variable substitutions and auto signon simultaneously or separately.
You can now use bookmarks with macro substitutions for auto sign-on on some web pages. The former POST plug-in approach was created so that administrators could specify a POST bookmark with sign-on macros and receive a kick-off page to load prior to posting the POST request. This POST plug-in approach eliminated those requests that required the presence of cookies or other header items. Now an an administrator determines the pre-load page and URL, which specifies where you want the post login request sent. A pre-load page enables an endpoint browser to fetch certain information that is sent along to the webserver or web application rather than just using a POST request with credentials.
The following variables (or macros) allow for substitutions in bookmarks and forms-based HTTP POST operations:
- CSCO_WEBVPN_USERNAME — user login ID
- CSCO_WEBVPN_PASSWORD — user login password
- CSCO_WEBVPN_INTERNAL_PASSWORD — user internal (or domain) password. This cached credential is not authenticated against a AAA server. When you enter this value, the security appliance uses it as the password for auto signon, instead of the password/primary password value.
Note![]() You cannot use any of these three variables in GET-based http(s) bookmarks. Only POST-based http(s) and cifs bookmarks can use these variables.
You cannot use any of these three variables in GET-based http(s) bookmarks. Only POST-based http(s) and cifs bookmarks can use these variables.
- CSCO_WEBVPN_CONNECTION_PROFILE —user login group drop-down (connection profile alias)
- CSCO_WEBVPN_MACRO1 — set with the RADIUS-LDAP Vendor Specific Attribute (VSA). If you are mapping from LDAP with an ldap-attribute-map command, use the WebVPN-Macro-Substitution-Value1 Cisco attribute for this macro. See the Active Directory ldap-attribute-mapping examples at http://www.cisco.com/en/US/docs/security/asa/asa83/configuration/guide/ref_extserver.html#wp1572118.
The CSCO_WEBVPN_MACRO1 macro substitution with RADIUS is performed by VSA#223 (see Table 72-1 ).
A value such as www.cisco.com/email dynamically populates a bookmark on the Clientless SSL VPN portal, such as https://CSCO_WEBVPN_MACRO1 or https://CSCO_WEBVPN_MACRO2 for the particular DAP or group policy.
- CSCO_WEBVPN_MACRO2 —set with RADIUS-LDAP Vendor Specific Attribute (VSA). If you are mapping from LDAP with an ldap-attribute-map command, use the WebVPN-Macro-Substitution-Value2 Cisco attribute for this macro. See the Active Directory ldap-attribute-mapping examples at http://www.cisco.com/en/US/docs/security/asa/asa83/configuration/guide/ref_extserver.html#wp1572118.
The CSCO_WEBVPN_MACRO2 macro substitution with RADIUS is performed by VSA#224 (see Table 72-1 ).
Each time clientless SSL VPN recognizes one of these six strings in an end-user request (in the form of a bookmark or Post Form), it replaces the string with the user-specified value and then passes the request to a remote server.
If the lookup of the username and password fails on the ASA, an empty string is substituted, and the behavior converts back as if no auto sign-in is available.
Using Auto Signon
The Auto Signon window or tab lets you configure or edit auto signon for users of clientless SSL VPN. Auto signon is a simplified single signon method that you can use if you do not already have an SSO method deployed on your internal network. With auto signon configured for particular internal servers, the ASA passes the login credentials that the user of clientless SSL VPN entered to log in to the ASA (username and password) to those particular internal servers. You configure the ASA to respond to a specific authentication method for a particular range of servers. The authentication methods you can configure the ASA to respond to consists of authentication using Basic (HTTP), NTLM, FTP and CIFS, or all of these methods.
If the lookup of the username and password fails on the ASA, an empty string is substituted, and the behavior converts back as if no auto sign-on is available.
Auto signon is a straight-forward method for configuring SSO for particular internal servers. This section describes the procedure for setting up SSO with auto signon. If you already have SSO deployed using Computer Associates SiteMinder SSO server, or if you have Security Assertion Markup Language (SAML) Browser Post Profile SSO, and if you want to configure the ASA to support this solution, see the “SSO Servers” section.
The following fields are displayed:
- IP Address—In conjunction with the following Mask, displays the IP address range of the servers to be authenticated to as configured with the Add/Edit Auto Signon dialog box. You can specify a server using either the server URI or the server IP address and mask.
- Mask—In conjunction with the preceding IP Address, displays the IP address range of the servers configured to support auto signon with the Add/Edit Auto Signon dialog box.
- URI—Displays a URI mask that identifies the servers configured with the Add/Edit Auto Signon dialog box.
- Authentication Type—Displays the type of authentication—Basic (HTTP), NTLM, FTP and CIFS, or all of these methods—as configured with the Add/Edit Auto Signon dialog box.
Restrictions
- Do not enable auto signon for servers that do not require authentication or that use credentials different from the ASA. When auto signon is enabled, the ASA passes on the login credentials that the user entered to log into the ASA regardless of what credentials are in user storage.
- If you configure one method for a range of servers (for example, HTTP Basic) and one of those servers attempts to authenticate with a different method (for example, NTLM), the ASA does not pass the user login credentials to that server.
Detailed Steps
Step 1![]() Click to add or edit an auto signon instruction. An auto signon instruction defines a range of internal servers using the auto signon feature and the particular authentication method.
Click to add or edit an auto signon instruction. An auto signon instruction defines a range of internal servers using the auto signon feature and the particular authentication method.
Step 2![]() Click to delete an auto signon instruction selected in the Auto Signon table.
Click to delete an auto signon instruction selected in the Auto Signon table.
Step 3![]() Click IP Block to specify a range of internal servers using an IP address and mask.
Click IP Block to specify a range of internal servers using an IP address and mask.
–![]() IP Address—Enter the IP address of the first server in the range for which you are configuring auto sign-on.
IP Address—Enter the IP address of the first server in the range for which you are configuring auto sign-on.
–![]() Mask—From the subnet mask menu, choose the subnet mask that defines the server address range of the servers supporting auto signon.
Mask—From the subnet mask menu, choose the subnet mask that defines the server address range of the servers supporting auto signon.
Step 4![]() Click URI to specify a server supporting auto signon by URI, then enter the URI in the field next to this button.
Click URI to specify a server supporting auto signon by URI, then enter the URI in the field next to this button.
Step 5![]() Determine the authentication method assigned to the servers. For the specified range of servers, the ASA can be configured to respond to Basic HTTP authentication requests, NTLM authentication requests, FTP and CIFS authentication requests, or requests using any of these methods.
Determine the authentication method assigned to the servers. For the specified range of servers, the ASA can be configured to respond to Basic HTTP authentication requests, NTLM authentication requests, FTP and CIFS authentication requests, or requests using any of these methods.
–![]() Basic—Click this button if the servers support basic (HTTP) authentication.
Basic—Click this button if the servers support basic (HTTP) authentication.
–![]() NTLM—Click this button if the servers support NTLMv1 authentication.
NTLM—Click this button if the servers support NTLMv1 authentication.
–![]() FTP/CIFS—Click this button if the servers support FTP and CIFS authentication
FTP/CIFS—Click this button if the servers support FTP and CIFS authentication
–![]() Basic, NTLM, and FTP/CIFS—Click this button if the servers support all of the above.
Basic, NTLM, and FTP/CIFS—Click this button if the servers support all of the above.
Configuring Session Settings
The clientless SSL VPN Add/Edit Internal Group Policy > More Options > Session Settings window lets you specify personalized user information between clientless SSL VPN sessions. By default, each group policy inherits the settings from the default group policy. Use this window to specify personalized clientless SSL VPN user information for the default group policy and any group policies for which you want to differentiate these values.
Detailed Steps
Step 1![]() Click none or choose the file server protocol (smb or ftp) from the User Storage Location drop-down menu. If you choose smb or ftp, use the following syntax to enter the file system destination into the adjacent text field:
Click none or choose the file server protocol (smb or ftp) from the User Storage Location drop-down menu. If you choose smb or ftp, use the following syntax to enter the file system destination into the adjacent text field:
username : password @ host : port-number / path
mike:mysecret@ftpserver3:2323/public
Note![]() Although the configuration shows the username, password, and preshared key, the ASA uses an internal algorithm to store the data in an encrypted form to safeguard it.
Although the configuration shows the username, password, and preshared key, the ASA uses an internal algorithm to store the data in an encrypted form to safeguard it.
Step 2![]() Type the string, if required, for the security appliance to pass to provide user access to the storage location.
Type the string, if required, for the security appliance to pass to provide user access to the storage location.
Step 3![]() Choose one of the following options from the Storage Objects drop-down menu to specify the objects the server uses in association with the user. The ASA store these objects to support clientless SSL VPN connections.
Choose one of the following options from the Storage Objects drop-down menu to specify the objects the server uses in association with the user. The ASA store these objects to support clientless SSL VPN connections.
Step 4![]() Enter the limit in KB transaction size over which to time out the session. This attribute applies only to a single transaction. Only a transaction larger than this value resets the session expiration clock.
Enter the limit in KB transaction size over which to time out the session. This attribute applies only to a single transaction. Only a transaction larger than this value resets the session expiration clock.
Java Code Signer
Code signing appends a digital signature to the executable code itself. This digital signature provides enough information to authenticate the signer as well as to ensure that the code has not been subsequently modified since signed.
Code-signer certificates are special certificates whose associated private keys are used to create digital signatures. The certificates used to sign code are obtained from a CA, with the signed code itself revealing the certificate origin.
Choose the configured certificate that you want to employ in Java object signing from the drop down list.
To configure a Java Code Signer, choose Configuration > Remote Access VPN > Certificate Management > Java Code Signer.
Java objects which have been transformed by clientless SSL VPN can subsequently be signed using a PKCS12 digital certificate associated with a trustpoint. In the Java Trustpoint pane, you can configure the clientless SSL VPN Java object signing facility to use a PKCS12 certificate and keying material from a specified trustpoint location.
To import a trustpoint, choose Configuration > Properties > Certificate > Trustpoint > Import.
Encoding
This pane lets you view or specify the character encoding for clientless SSL VPN portal pages.
Character encoding, also called “character coding” and “a character set,” is the pairing of raw data (such as 0s and 1s) with characters to represent the data. The language determines the character encoding method to use. Some languages use a single method, while others do not. Usually, the geographic region determines the default encoding method used by the browser, but the remote user can change it. The browser can also detect the encoding specified on the page, and render the document accordingly.
The encoding attribute lets you specify the value of the character-encoding method used on the portal page to ensure that the browser renders it properly, regardless of the region in which the user is using the browser, and regardless of any changes made to the browser.
By default, the ASA applies the “Global Encoding Type” to pages from Common Internet File System servers. The mapping of CIFS servers to their appropriate character encoding, globally with the “Global Encoding Type” attribute, and individually with the file-encoding exceptions displayed in the table, provides for the accurate handling and display of CIFS pages when the proper rendering of filenames or directory paths, as well as pages, is an issue.
Detailed Steps
Step 1![]() Global Encoding Type determines the character encoding that all clientless SSL VPN portal pages inherit except for those from the CIFS servers listed in the table. You can type the string or choose one of the options from the drop-down list, which contains the most common values, as follows:
Global Encoding Type determines the character encoding that all clientless SSL VPN portal pages inherit except for those from the CIFS servers listed in the table. You can type the string or choose one of the options from the drop-down list, which contains the most common values, as follows:
Note![]() If you are using Japanese Shift_jis Character encoding, click Do not specify in the Font Family area of the associated Select Page Font pane to remove the font family.
If you are using Japanese Shift_jis Character encoding, click Do not specify in the Font Family area of the associated Select Page Font pane to remove the font family.
Note![]() If you click none or specify a value that the browser on the clientless SSL VPN session does not support, it uses its own default encoding.
If you click none or specify a value that the browser on the clientless SSL VPN session does not support, it uses its own default encoding.
You can type a string consisting of up to 40 characters, and equal to one of the valid character sets identified in http://www.iana.org/assignments/character-sets. You can use either the name or the alias of a character set listed on that page. The string is case-insensitive. The command interpreter converts upper-case to lower-case when you save the ASA configuration.
Step 2![]() Enter the name or IP address of a CIFS server for which the encoding requirement differs from the “Global Encoding Type” attribute setting. The ASA retains the case you specify, although it ignores the case when matching the name to a server.
Enter the name or IP address of a CIFS server for which the encoding requirement differs from the “Global Encoding Type” attribute setting. The ASA retains the case you specify, although it ignores the case when matching the name to a server.
Step 3![]() Choose the character encoding that the CIFS server should provide for clientless SSL VPN portal pages. You can type the string, or choose one from the drop-down list, which contains only the most common values, as follows:
Choose the character encoding that the CIFS server should provide for clientless SSL VPN portal pages. You can type the string, or choose one from the drop-down list, which contains only the most common values, as follows:
Note![]() If you are using Japanese Shift_jis Character encoding, click Do not specify in the Font Family area of the associated Select Page Font pane to remove the font family.
If you are using Japanese Shift_jis Character encoding, click Do not specify in the Font Family area of the associated Select Page Font pane to remove the font family.
If you click none or specify a value that the browser on the clientless SSL VPN session does not support, it uses its own default encoding.
You can type a string consisting of up to 40 characters, and equal to one of the valid character sets identified in http://www.iana.org/assignments/character-sets. You can use either the name or the alias of a character set listed on that page. The string is case-insensitive. The command interpreter converts upper-case to lower-case when you save the ASA configuration.
Content Cache
Caching enhances the performance of clientless SSL VPN. It stores frequently reused objects in the system cache, which reduces the need to perform repeated rewriting and compressing of content. The use of the cache reduces traffic, with the result that many applications run more efficiently.
Detailed Steps
Step 1![]() Click to enable caching. The default value is disable.
Click to enable caching. The default value is disable.
Step 2![]() Define the terms for caching.
Define the terms for caching.
- Enable caching of compressed content—Click to cache compressed content. When you disable this parameter, the ASA stores objects before it compresses them.
- Maximum Object Size—Enter the maximum size in KB of a document that the ASA can cache. The ASA measures the original content length of the object, not rewritten or compressed content. The range is 0 to 10,000 KB; the default is 1000 KB
- Minimum Object Size—Enter the minimum size in KB of a document that the ASA can cache. The ASA measures the original content length of the object, not rewritten or compressed content. The range is 0 to 10,000 KB; the default is 0 KB.
Note![]() The Maximum Object Size must be greater than the Minimum Object Size.
The Maximum Object Size must be greater than the Minimum Object Size.
- Expiration Time—Enter an integer between 0 and 900 to set the number of minutes to cache objects without revalidating them. The default is one minute.
- LM Factor—Enter an integer between 1 and 100; the default is 20.
The LM factor sets the policy for caching objects which have only the last-modified timestamp. This revalidates objects that have no server-set change values. The ASA estimates the length of time since the object has changed, also called the expiration time. The estimated expiration time equals the time elapsed since the last change multiplied by the LM factor. Setting the LM factor to 0 forces immediate revalidation, while setting it to 100 results in the longest allowable time until revalidation.
The expiration time sets the amount of time to for the ASA to cache objects that have neither a last-modified time stamp nor an explicit server-set expiry time.
- Cache static content—Click to cache all content that is not subject to rewrite, for example, PDF files and images.
- Restore Cache Default—Click to restore default values for all cache parameters.
Content Rewrite
The Content Rewrite pane lists all applications for which content rewrite is enabled or disabled.
Clientless SSL VPN processes application traffic through a content transformation/rewriting engine that includes advanced elements such as JavaScript, VBScript, Java, and multi-byte characters to proxy HTTP traffic which may have different semantics and access control rules depending on whether the user is using an application within or independently of an SSL VPN device.
By default, the security appliance rewrites, or transforms, all clientless traffic. You might not want some applications and web resources (for example, public websites) to go through the ASA. The ASA therefore lets you create rewrite rules that let users browse certain sites and applications without going through the ASA. This is similar to split-tunneling in an IPSec VPN connection.
You can create multiple rewrite rules. The rule number is important because the security appliance searches rewrite rules by order number, starting with the lowest, and applies the first rule that matches.
“Configuration Example for Content Rewrite Rules” shows example content rewrite rules.
Note![]() In ASA 8.4.4.1, The clientless SSL VPN rewriter engines were significantly improved to provide better quality and efficacy. As a result, you can expect a better end-user experience for clientless SSL VPN users.
In ASA 8.4.4.1, The clientless SSL VPN rewriter engines were significantly improved to provide better quality and efficacy. As a result, you can expect a better end-user experience for clientless SSL VPN users.
Detailed Steps
The Content Rewrite section displays the following:
- Rule Number—Displays an integer that indicates the position of the rule in the list.
- Rule Name—Provides the name of the application for which the rule applies.
- Rewrite Enabled—Displays content rewrite as enabled or disabled.
- Resource Mask—Displays the resource mask.
Follow these steps to add a rewrite entry or edit a selected rewrite entry.
Step 1![]() Click to enable content rewrite for this rewrite rule.
Click to enable content rewrite for this rewrite rule.
Step 2![]() (Optional) Enter a number for this rule. This number specifies the priority of the rule, relative to the others in the list. Rules without a number are at the end of the list. The range is 1 to 65534.
(Optional) Enter a number for this rule. This number specifies the priority of the rule, relative to the others in the list. Rules without a number are at the end of the list. The range is 1 to 65534.
Step 3![]() (Optional) Provide an alphanumeric string that describes the rule, maximum 128 characters.
(Optional) Provide an alphanumeric string that describes the rule, maximum 128 characters.
Step 4![]() Enter a string to match the application or resource to apply the rule to. The string can be up to 300 characters. You can use one of the following wildcards, but you must specify at least one alphanumeric character.
Enter a string to match the application or resource to apply the rule to. The string can be up to 300 characters. You can use one of the following wildcards, but you must specify at least one alphanumeric character.
* — Matches everything. ASDM does not accept a mask that consists of a * or *.*
? —Matches any single character.
Configuration Example for Content Rewrite Rules
|
|
|
|
|
|
|---|---|---|---|---|
Force all HTTP URLs to be delivered outside of ASA (split-tunneling) |
||||
Authenticating with Digital Certificates
Clientless SSL VPN users that authenticate using digital certificates do not use global authentication and authorization settings. Instead, they use an authorization server to authenticate once the certificate validation occurs. For more information on authentication and authorization using digital certificates, see the “Using Certificates and User Login Credentials” section.
Creating and Applying Clientless SSL VPN Policies for Accessing Resources
Creating and applying policies for clientless SSL VPN that govern access to resources at the central site includes the following task:
Chapter 66, “Configuring Connection Profiles, Group Policies, and Users” includes step-by-step instructions for all of these tasks.
Assigning Users to Group Policies
Assigning users to group policies simplifies the configuration by letting you apply policies to many users. You can use an internal authentication server on the ASA or an external RADIUS or LDAP server to assign users to group policies. See Chapter 66, “Configuring Connection Profiles, Group Policies, and Users”for a thorough explanation of ways to simplify configuration with group policies.
Using the Security Appliance Authentication Server
You can configure users to authenticate to the ASA internal authentication server, and assign these users to a group policy on the ASA.
Using a RADIUS Server
Using a RADIUS server to authenticate users, assign users to group policies by following these steps:
Step 1![]() Authenticate the user with RADIUS and use the Class attribute to assign that user to a particular group policy.
Authenticate the user with RADIUS and use the Class attribute to assign that user to a particular group policy.
Step 2![]() Set the class attribute to the group policy name in the format OU=group_name
Set the class attribute to the group policy name in the format OU=group_name
For example, to assign a clientless SSL VPN user to the SSL_VPN group, set the RADIUS Class Attribute to a value of OU=SSL_VPN; (Do not omit the semicolon.)
Using an LDAP Server
Using an LDAP server to authenticate users, assign users to group policies by following these steps:
Step 1![]() Authenticate the user with LDAP and use the Group Policy attribute to assign that user to a particular group policy.
Authenticate the user with LDAP and use the Group Policy attribute to assign that user to a particular group policy.
Step 2![]() Set the Group Policy attribute to the group policy name in one of these formats:
Set the Group Policy attribute to the group policy name in one of these formats:
For example, to assign a clientless SSL VPN user to the SSL_VPN group, set the LDAP Group Policy Attribute to a value of SSL_VPN, OU=SSL_VPN, or OU=SSL_VPN;.
Configuring Connection Profile Attributes for Clientless SSL VPN
Table 72-3 provides a list of connection profile attributes that are specific to clientless SSL VPN. In addition to these attributes, you configure general connection profile attributes common to all VPN connections. For step-by-step information on configuring connection profiles, see Chapter66, “Configuring Connection Profiles, Group Policies, and Users”
Note![]() In earlier releases, “connection profiles” were known as “tunnel groups.” You configure a connection profile with tunnel-group commands. This chapter often uses these terms interchangeably.
In earlier releases, “connection profiles” were known as “tunnel groups.” You configure a connection profile with tunnel-group commands. This chapter often uses these terms interchangeably.
Configuring Group Policy and User Attributes for Clientless SSL VPN
Table 72-4 provides a list of group policy and user attributes for clientless SSL VPN. For step-by-step instructions on configuring group policy and user attributes, see “Configuring Group Policies” and “Configuring Attributes for Specific Users” or in Chapter66, “Configuring Connection Profiles, Group Policies, and Users”
Configuring Browser Access to Plug-ins
The following sections describe the integration of browser plug-ins for clientless SSL VPN browser access:
- Preparing the Security Appliance for a Plug-in
- Installing Plug-ins Redistributed By Cisco
- Providing Access to Third-Party Plug-ins
- Providing Access to a Citrix Java Presentation Server
A browser plug-in is a separate program that a web browser invokes to perform a dedicated function, such as connect a client to a server within the browser window. The ASA lets you import plug-ins for download to remote browsers in clientless SSL VPN sessions. Of course, Cisco tests the plug-ins it redistributes, and in some cases, tests the connectivity of plug-ins we cannot redistribute. However, we do not recommend importing plug-ins that support streaming media at this time.
Note![]() Per the GNU General Public License (GPL), Cisco redistributes plug-ins without having made any changes to them. Per the GPL, Cisco cannot directly enhance these plug-ins.
Per the GNU General Public License (GPL), Cisco redistributes plug-ins without having made any changes to them. Per the GPL, Cisco cannot directly enhance these plug-ins.
The ASA does the following when you install a plug-in onto the flash device:
- (Cisco-distributed plug-ins only) Unpacks the jar file specified in the URL.
- Writes the file to the
csco-config/97/plugindirectory on the ASA file system. - Populates the drop-down menu next to the URL attributes in ASDM.
- Enables the plug-in for all future clientless SSL VPN sessions, and adds a main menu option and an option to the drop-down menu next to the Address field of the portal page.
Table 72-5 shows the changes to the main menu and address field of the portal page when you add the plug-ins described in the following sections.
|
|
|
|
|---|---|---|
When the user in a clientless SSL VPN session clicks the associated menu option on the portal page, the portal page displays a window to the interface and displays a help pane. The user can select the protocol displayed in the drop-down menu and enter the URL in the Address field to establish a connection.
Some Java plug-ins may report a status of connected or online even when a session to the destination service is not set up. The open-source plug-in reports the status, not the ASA.
The plug-ins support single sign-on (SSO). Refer to the “Configuring SSO with the HTTP Form Protocol” section for implementation details.
The minimum access rights required for remote use belong to the guest privilege mode.
Prerequisites
- Clientless SSL VPN must be enabled on the ASA to provide remote access to the plug-ins.
- To configure SSO support for a plug-in, you install the plug-in, add a bookmark entry to display a link to the server, and specify SSO support when adding the bookmark.
- The minimum access rights required for remote use belong to the guest privilege mode.
- Plug-ins require ActiveX or Sun JRE 5, Update 1.4 or later (JRE 6 or later recommended) to be enabled on the browser. An ActiveX version of the RDP plug-in is unavailable for 64-bit browsers.
Restrictions
- The plug-ins do not work if the security appliance configures the clientless session to use a proxy server.
Note![]() The remote desktop protocol plug-in does not support load balancing with a session broker. Because of the way the protocol handles the redirect from the session broker, the connection fails. If a session broker is not used, the plug-in works.
The remote desktop protocol plug-in does not support load balancing with a session broker. Because of the way the protocol handles the redirect from the session broker, the connection fails. If a session broker is not used, the plug-in works.
- The plug-ins support single sign-on (SSO). They use the same credentials entered to open the clientless SSL VPN session. Because the plug-ins do not support macro substitution, you do not have the options to perform SSO on different fields such as the internal domain password or on an attribute on a RADIUS or LDAP server.
- A stateful failover does not retain sessions established using plug-ins. Users must reconnect following a failover.
- If you use stateless failover instead of stateful failover, clientless features such as bookmarks, customization, and dynamic access-policies are not synchronized between the failover ASA pairs. In the event of a failover, these features do not work.
Adding a New Environment Variable
To set up and use an RDP plug-in, you must add a new environment variable. For the process of adding a new environment variable, use the following steps:
Detailed Steps
Step 1![]() Right click on My Computer to access the System Properties and choose the Advanced tab.
Right click on My Computer to access the System Properties and choose the Advanced tab.
Step 2![]() On the Advanced tab, choose the environment variables button.
On the Advanced tab, choose the environment variables button.
Step 3![]() In the new user variable dialog box, enter the RF_DEBUG variable.
In the new user variable dialog box, enter the RF_DEBUG variable.
Step 4![]() Verify the new Environment Variable in the user variables section.
Verify the new Environment Variable in the user variables section.
Step 5![]() If you used the client computer with versions of WebVPN before version 8.3, you must remove the old Cisco Portforwarder Control. Go to the C:/WINDOWS/Downloaded Program Files directory, right click on the portforwarder control, and choose Remove.
If you used the client computer with versions of WebVPN before version 8.3, you must remove the old Cisco Portforwarder Control. Go to the C:/WINDOWS/Downloaded Program Files directory, right click on the portforwarder control, and choose Remove.
Step 6![]() Clear all of the Internet Explorer browser cache.
Clear all of the Internet Explorer browser cache.
Step 7![]() Launch your WebVPN session and establish an RDP session with the RDP ActiveX Plug-in.
Launch your WebVPN session and establish an RDP session with the RDP ActiveX Plug-in.
You can now observe events in the Windows Application Event viewer.
Preparing the Security Appliance for a Plug-in
Prerequisites
Make sure clientless SSL VPN (“webvpn”) is enabled on an ASA interface.
Restrictions
Do not specify an IP address as the common name (CN) for the SSL certificate. The remote user attempts to use the FQDN to communicate with the ASA. The remote PC must be able to use DNS or an entry in the System32\drivers\etc\hosts file to resolve the FQDN.
Detailed Steps
|
|
|
|
|---|---|---|
Provides a fully-qualified domain name (FQDN) for remote user connection. |
Go to the section that identifies the type of plug-in you want to provide for clientless SSL VPN access.
Installing Plug-ins Redistributed By Cisco
Cisco redistributes the following open-source, Java-based components to be accessed as plug-ins for web browsers in clientless SSL VPN sessions.
Prerequisites
- Make sure clientless SSL VPN (“webvpn”) is enabled on an interface on the ASA. To do so, enter the show running-config command.
- Create a temporary directory named “plugins” on a local TFTP or FTP server (for example, with the hostname “local_tftp_server”), and download the plug-ins from the Cisco web site to the “plugins” directory.
Restrictions
|
|
|
|
|
|---|---|---|---|
Accesses Microsoft Terminal Services hosted by Windows Vista and Windows 2003 R2. Supports Remote Desktop ActiveX Control. We recommend using this plug-in that supports both RDP and RDP2. Only versions up to 5.2 of the RDP and RDP2 protocols are supported. Version 5.2 and later are not supported. |
Cisco redistributes this plug-in without any changes to it per GNU General Public License. The original source of the redistributed plug-in is http://properjavardp.sourceforge.net/ |
||
Accesses Microsoft Terminal Services hosted by Windows Vista and Windows 2003 R2. |
Cisco redistributes this plug-in without any changes to it per the GNU General Public License. The original source of the redistributed plug-in is http://properjavardp.sourceforge.net/ |
||
Accesses Microsoft Terminal Services hosted by Windows 2003 R1. |
Cisco redistributes this plug-in without any changes to it per the GNU General Public License. The source of the redistributed plug-in is http://properjavardp.sourceforge.net/ |
||
The Secure Shell-Telnet plug-in lets the remote user establish a Secure Shell (v1 or v2) or Telnet connection to a remote computer. Note Because keyboard-interactive authentication is not supported by JavaSSH, it cannot be supported with SSH plugin. (Keyboard interactive is a generic authentication method used to implement different authentication mechanisms.) |
Cisco redistributes this plug-in without any changes to it per the GNU General Public License. The web site containing the source of the redistributed plug-in is http://javassh.org/ |
||
The Virtual Network Computing plug-in lets the remote user use a monitor, keyboard, and mouse to view and control a computer with remote desktop sharing (also known as VNC server or service) turned on. This version changes the default color of the text and contains updated French and Japanese help files. |
Cisco redistributes this plug-in without any changes to it per the GNU General Public License. The web site containing the source of the redistributed plug-in is http://www.tightvnc.com/ |
These plug-ins are available on the Cisco Adaptive Security Appliance Software Download site.
Detailed Steps
Follow these steps to provide clientless SSL VPN browser access to a plug-in redistributed by Cisco.
Note![]() The ASA does not retain the import webvpn plug-in protocol command in the configuration. Instead, it loads the contents of the
The ASA does not retain the import webvpn plug-in protocol command in the configuration. Instead, it loads the contents of the csco-config/97/plugin directory automatically. A secondary ASA obtains the plug-ins from the primary ASA.
Step 1![]() Create a temporary directory named plugins on the computer you use to establish ASDM sessions with the ASA.
Create a temporary directory named plugins on the computer you use to establish ASDM sessions with the ASA.
Step 2![]() Download the plug-ins you want from the Cisco website to the plugins directory.
Download the plug-ins you want from the Cisco website to the plugins directory.
Step 3![]() Choose Configuration > Remote Access VPN > Clientless SSL VPN Access > Portal > Client-Server Plug-ins.
Choose Configuration > Remote Access VPN > Clientless SSL VPN Access > Portal > Client-Server Plug-ins.
This pane displays the plug-ins that are available to clientless SSL sessions. The hash and date of these plug-ins are also provided.
The Import Client-Server Plug-in dialog box opens.
Step 5![]() Use the following descriptions to enter the Import Client-Server Plug-in dialog box field values.
Use the following descriptions to enter the Import Client-Server Plug-in dialog box field values.
–![]() ica to provide plug-in access to Citrix MetaFrame or Web Interface services. Then specify the path to the ica-plugin.jar file in the Remote Server field, as described below.
ica to provide plug-in access to Citrix MetaFrame or Web Interface services. Then specify the path to the ica-plugin.jar file in the Remote Server field, as described below.
–![]() rdp to provide plug-in access to Remote Desktop Protocol services. Then specify the path to the rdp-plugin.jar file in the Remote Server field.
rdp to provide plug-in access to Remote Desktop Protocol services. Then specify the path to the rdp-plugin.jar file in the Remote Server field.
–![]() ssh,telnet to provide plug-in access to both Secure Shell and Telnet services. Then specify the path to the ssh-plugin.jar file in the Remote Server field.
ssh,telnet to provide plug-in access to both Secure Shell and Telnet services. Then specify the path to the ssh-plugin.jar file in the Remote Server field.
–![]() vnc to provide plug-in access to Virtual Network Computing services. Then specify the path to the vnc-plugin.jar file in the Remote Server field.
vnc to provide plug-in access to Virtual Network Computing services. Then specify the path to the vnc-plugin.jar file in the Remote Server field.
Note![]() Any undocumented options in this menu are experimental and are not supported.
Any undocumented options in this menu are experimental and are not supported.
–![]() Local computer—Click to retrieve the plug-in from the computer with which you have established the ASDM session. Enter the location and name of the plug-in into the associated Path field, or click Browse Local Files and navigate to the plug-in, choose it, then click Select.
Local computer—Click to retrieve the plug-in from the computer with which you have established the ASDM session. Enter the location and name of the plug-in into the associated Path field, or click Browse Local Files and navigate to the plug-in, choose it, then click Select.
–![]() Flash file system—Click if the plug-in is present on the file system of the ASA. Enter the location and name of the plug-in into the associated Path field, or click Browse Flash and navigate to the plug-in, choose it, then click OK.
Flash file system—Click if the plug-in is present on the file system of the ASA. Enter the location and name of the plug-in into the associated Path field, or click Browse Flash and navigate to the plug-in, choose it, then click OK.
–![]() Remote Server—Click to retrieve the plug-in from a host running an FTP or TFTP server. Choose ftp, tftp, or HTTP from the drop-down menu next to the associated Path attribute, depending on which service is running on the remote server. Enter the host name or address of the server and the path to the plug-in into the adjacent text field.
Remote Server—Click to retrieve the plug-in from a host running an FTP or TFTP server. Choose ftp, tftp, or HTTP from the drop-down menu next to the associated Path attribute, depending on which service is running on the remote server. Enter the host name or address of the server and the path to the plug-in into the adjacent text field.
The plug-in is now available for future clientless SSL VPN sessions.
Providing Access to Third-Party Plug-ins
The open framework of the security appliance lets you add plug-ins to support third-party Java client/server applications. The POST plug-in was developed to solve some key single sign-on (SSO) and homepage requirements for certain applications like Citrix Web Interface. This clientless SSL VPN plug-in as the following key capabilities:
- The option to display the homepage for a Web application (such as Citrix) in the right frame, as part of the default clientless portal, or as the only frame in the page (completely hiding anything that is part of the Cisco portal).
- The option for SSO on the homepage or with an application using WebVPN variables (also known as macros) (and therefore HTTP-POST parameters).
- The option to preload a page before issuing a POST request. This option becomes necessary when a logon page for an application sets some cookies.
Restrictions
- Cisco does not provide direct support for or recommend any particular plug-ins that are not redistributed by Cisco. As a provider of clientless SSL VPN services, you are responsible for reviewing and complying with any license agreements required for the use of plug-ins.
- It is strictly an HTML/JavaScript code and not a JAVA plug-in. It contains no client components.
- No support on Firefox. It is supported only on Internet Explorer and Mac Safari.
- Does not support URLs with queries such as http://example.com/names?Login. The ? character is not supported.
- A POST plug-in adds approximately a 10-second delay to make sure an intermediate page is fully loaded with all objects for an application. This delay is beneficial for an application such as Citrix where an intermediate page performs client detection functions.
Configuring and Applying the POST URL
POST plug-ins are configured with the customization object. For example, to make a Citrix portal as the homepage after Clientless SSL VPN login, follow these steps:
Detailed Steps
Step 1![]() Add the POST URL of the Citrix server to the customization object in the Custom Intranet Web Page URL field (see Figure 72-7).
Add the POST URL of the Citrix server to the customization object in the Custom Intranet Web Page URL field (see Figure 72-7).
For example, if the Citrix server URL is http://mycitrix-server.abcd.com/Citrix/AccessPlatform/auth/login.aspx, adding the POST URL, it becomes post://mycitrix-server.abcd.com/Citrix/AccessPlatform/auth/login.aspx?LoginType=Explicit&user=CSCO_WEBVPN_USERNAME&password=CSCO_WEBVPN_PASSWORD&csco_preload=http://mycitrix-server.abcd.com&csco_ispopup=yes.
Figure 72-7 SSL VPN Customization Editor Window
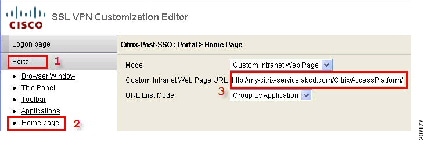
Step 2![]() Apply the customization object to the group or user.
Apply the customization object to the group or user.
For additional information on configuring SSO and the required parameters, refer to the SSL VPN deployment guide (http://www.cisco.com/en/US/docs/security/asa/asa80/asdm60/ssl_vpn_deployment_guide/deploy.html#wp1002989).
Providing Access to a Citrix Java Presentation Server
As an example of how to provide clientless SSL VPN browser access to third-party plug-ins, this section describes how to add clientless SSL VPN support for the Citrix Presentation Server Client.
With a Citrix plug-in installed on the ASA, clientless SSL VPN users can use a connection to the ASA to access Citrix MetaFrame services.
A stateful failover does not retain sessions established using the Citrix plug-in. Citrix users must reauthenticate after failover.
To provide access to the Citrix plug-in, follow the procedures in the following sections.
Preparing the Citrix MetraFrame Server for Clientless SSL VPN Access
The ASA performs the connectivity functions of the Citrix secure gateway when the Citrix client connects to the Citrix MetaFrame Server. Therefore, you must configure the Citrix Web Interface software to operate in a mode that does not use the (Citrix) “secure gateway.” Otherwise, the Citrix client cannot connect to the Citrix MetaFrame Server.
Note![]() If you are not already providing support for a plug-in, you must follow the instructions in the“Preparing the Security Appliance for a Plug-in” section before using this section.
If you are not already providing support for a plug-in, you must follow the instructions in the“Preparing the Security Appliance for a Plug-in” section before using this section.
Creating and Installing the Citrix Plug-in
To create and install the Citrix plug-in, perform the following steps:
Detailed Steps
Step 1![]() Download the ica-plugin.zip file from the Cisco Software Download web site.
Download the ica-plugin.zip file from the Cisco Software Download web site.
This file contains files that Cisco customized for use with the Citrix plug-in.
Step 2![]() Download the Citrix Java client from the Citrix site.
Download the Citrix Java client from the Citrix site.
Step 3![]() Extract the following files from the Citrix Java client, then add them to the ica-plugin.zip file:
Extract the following files from the Citrix Java client, then add them to the ica-plugin.zip file:
You can use WinZip to perform this step.
Step 4![]() Ensure the EULA included with the Citrix Java client grants you the rights and permissions to deploy the client on your web servers.
Ensure the EULA included with the Citrix Java client grants you the rights and permissions to deploy the client on your web servers.
Step 5![]() Open a CLI session with the ASA and install the plug-in by entering the following command in privileged EXEC mode:
Open a CLI session with the ASA and install the plug-in by entering the following command in privileged EXEC mode:
import webvpn plug-in protocol ica URL
URL is the host name or IP address and path to the ica-plugin.zip file.
Note![]() After you import the plug-in, remote users can choose ica and enter host/?DesiredColor=4&DesiredHRes=1024&DesiredVRes=768 into the Address field of the portal page to access Citrix services. We recommend that you add a bookmark to make it easy for users to connect. Adding a bookmark is required if you want to provide SSO support for Citrix sessions.
After you import the plug-in, remote users can choose ica and enter host/?DesiredColor=4&DesiredHRes=1024&DesiredVRes=768 into the Address field of the portal page to access Citrix services. We recommend that you add a bookmark to make it easy for users to connect. Adding a bookmark is required if you want to provide SSO support for Citrix sessions.
Step 6![]() Establish an SSL VPN clientless session and click the bookmark or enter the URL for the Citrix server.
Establish an SSL VPN clientless session and click the bookmark or enter the URL for the Citrix server.
Use the Client for Java Administrator’s Guide as needed.
Viewing the Plug-ins Installed on the Security Appliance
Detailed Steps
Why a Microsoft Kerberos Constrained Delegation Solution
Many organizations want to authenticate their Clientless VPN users and extend their authentication credentials seamlessly to web-based resources using authentication methods beyond what the ASA SSO feature can offer today. With the growing demand to authenticate remote access users with Smart Cards and One-time Passwords (OTP), the SSO feature falls short in meeting that demand, because it only forwards conventional user credentials, such as static username and password, to clientless web-based resources when authentication is required.
For example, neither certificate- or OTP-based authentication methods encompass a conventional username and password necessary for the ASA to seamlessly perform SSO access to web-based resources. When authenticating with a certificate, a username and password is not required for the ASA to extend to web-based resources, making it an unsupported authentication method for SSO. On the other hand, OTP does include a static username; however, the password is dynamic and will subsequently change throughout the VPN session. In general, Web-based resources are configured to accept static usernames and passwords, thus also making OTP an unsupported authentication method for SSO.
Microsoft's Kerberos Constrained Delegation (KCD), a new feature introduced in software release 8.4 of the ASA, provides access to Kerberos-protected Web applications in the private network. With this benefit, you can seamlessly extend certificate- and OTP-based authentication methods to web applications. Thus, with SSO and KCD working together although independently, many organizations can now authenticate their clientless VPN users and extend their authentication credentials seamlessly to web applications using all authentication methods supported by the ASA.
Requirements
In order for the kcd-server command to function, the ASA must establish a trust relationship between the source domain (the domain where the ASA resides) and the target or resource domain (the domain where the web services reside). The ASA, using its unique format, crosses the certification path from the source to the destination domain and acquires the necessary tickets on behalf of the remote access user to access the services.
This crossing of the certificate path is called cross-realm authentication. During each phase of cross-realm authentication, the ASA relies on the credentials at a particular domain and the trust relationship with the subsequent domain.
Understanding How KCD Works
Kerberos relies on a trusted third party to validate the digital identity of entities in a network. These entities (such as users, host machines, and services running on hosts) are called principals and must be present in the same domain. Instead of secret keys, Kerberos uses tickets to authenticate a client to a server. The ticket is derived from the secret key and consists of the client’s identity, an encrypted session key, and flags. Each ticket is issued by the key distribution center and has a set lifetime.
The Kerberos security system is a network authentication protocol used to authenticate entities (users, computers, or applications) and protect network transmissions by scrambling the data so that only the device that the information was intended for can decrypt it. You can configure KCD to provide Clientless SSL VPN (also known as WebVPN) users with SSO access to any web services protected by Kerberos. Examples of such web services or applications include Outlook Web Access (OWA), Sharepoint, and Internet Information Server (IIS).
Two extensions to the Kerberos protocol were implemented: protocol transition and constrained delegation. These extensions allow the Clientless or WebVPN remote access users to access Kerberos authenticated applications in the private network.
The protocol transition provides you with increased flexibility and security by supporting different authentication mechanisms at the user authentication level and by switching to the Kerberos protocol for security features (such as mutual authentication and constrained delegation) in subsequent application layers. Constrained delegation provides a way for domain administrators to specify and enforce application trust boundaries by limiting where application services can act on a user’s behalf. This flexibility improves application security designs by reducing the chance of compromise by an untrusted service.
For more information on constrained delegation, see RFC 1510 via the IETF website ( http://www.ietf.org).
Authentication Flow with KCD
Figure 72-8 depicts the packet and process flow a user will experience directly and indirectly when accessing resources trusted for delegation via the clientless portal. This process assumes that the following tasks have been completed:
- Configured KCD on ASA
- Joined the Windows Active Directory and ensured services are trusted for delegation
- Delegated ASA as a member of the Windows Active Directory domain
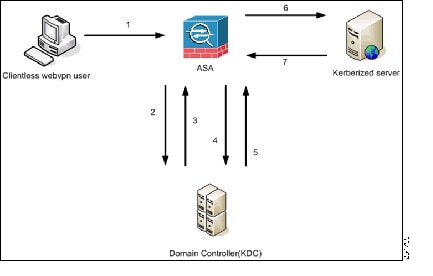
Note![]() A clientless user session is authenticated by the ASA using the authentication mechanism configured for the user. (In the case of Smartcard credentials, ASA performs LDAP authorization with the userPrincipalName from the digital certificate against the Windows Active Directory).
A clientless user session is authenticated by the ASA using the authentication mechanism configured for the user. (In the case of Smartcard credentials, ASA performs LDAP authorization with the userPrincipalName from the digital certificate against the Windows Active Directory).
1.![]() After successful authentication, the user logs in to the ASA clientless portal page. The user accesses a Web service by entering a URL in the portal page or by clicking on the bookmark. If the Web service requires authentication, the server challenges ASA for credentials and sends a list of authentication methods supported by the server.
After successful authentication, the user logs in to the ASA clientless portal page. The user accesses a Web service by entering a URL in the portal page or by clicking on the bookmark. If the Web service requires authentication, the server challenges ASA for credentials and sends a list of authentication methods supported by the server.
Note![]() KCD for Clientless SSL VPN is supported for all authentication methods (RADIUS, RSA/SDI, LDAP, digital certificates, and so on). Refer to the AAA Support table at http://www.cisco.com/en/US/partner/docs/security/asa/asa84/configuration/guide/access_aaa.html#wp1069492.
KCD for Clientless SSL VPN is supported for all authentication methods (RADIUS, RSA/SDI, LDAP, digital certificates, and so on). Refer to the AAA Support table at http://www.cisco.com/en/US/partner/docs/security/asa/asa84/configuration/guide/access_aaa.html#wp1069492.
2.![]() Based on the HTTP headers in the challenge, ASA determines whether the server requires Kerberos authentication. (This is part of the SPNEGO mechanism.) If connecting to a backend server requires Kerberos authentication, the ASA requests a service ticket for itself on behalf of the user from the key distribution center.
Based on the HTTP headers in the challenge, ASA determines whether the server requires Kerberos authentication. (This is part of the SPNEGO mechanism.) If connecting to a backend server requires Kerberos authentication, the ASA requests a service ticket for itself on behalf of the user from the key distribution center.
3.![]() The key distribution center returns the requested tickets to the ASA. Even though these tickets are passed to the ASA, they contain the user’s authorization data.ASA requests a service ticket from the KDC for the specific service that the user wants to access.
The key distribution center returns the requested tickets to the ASA. Even though these tickets are passed to the ASA, they contain the user’s authorization data.ASA requests a service ticket from the KDC for the specific service that the user wants to access.
Note![]() Steps 1 to 3 comprise protocol transition. After these steps, any user who authenticates to ASA using a non-Kerberos authentication protocol is transparently authenticated to the key distribution center using Kerberos.
Steps 1 to 3 comprise protocol transition. After these steps, any user who authenticates to ASA using a non-Kerberos authentication protocol is transparently authenticated to the key distribution center using Kerberos.
4.![]() ASA requests a service ticket from the key distribution center for the specific service that the user wants to access.
ASA requests a service ticket from the key distribution center for the specific service that the user wants to access.
5.![]() The key distribution center returns a service ticket for the specific service to the ASA.
The key distribution center returns a service ticket for the specific service to the ASA.
6.![]() ASA uses the service ticket to request access to the web service.
ASA uses the service ticket to request access to the web service.
7.![]() The Web server authenticates the Kerberos service ticket and grants access to the service. The appropriate error message is displayed and requires acknowledgement if there is an authentication failure. If the Kerberos authentication fails, the expected behavior is to fall back to basic authentication.
The Web server authenticates the Kerberos service ticket and grants access to the service. The appropriate error message is displayed and requires acknowledgement if there is an authentication failure. If the Kerberos authentication fails, the expected behavior is to fall back to basic authentication.
Before Configuring KCD
To configure the ASA for cross-realm authentication, you must use the following commands:
Configuring KCD
To have the ASA join a Windows Active Directory domain and return a success or failure status, follow these commands:
Detailed Steps
Showing KCD Status Information
To display the domain controller information and the domain join status, follow these commands:
|
|
|
|
|---|---|---|
|
|
Displays the domain controller information and the domain join status. |
Showing Cached Kerberos Tickets
To display all Kerberos tickets cached on the ASA, enter the following commands:
Clearing Cached Kerberos Tickets
To clear all Kerberos ticket information on the ASA, follow these commands:
|
|
|
|
|---|---|---|
Adding Windows Service Account in Active Directory
The KCD implementation on the ASA requires a service account, or in other words, an Active Directory user account with privileges necessary to add computers, such as adding the ASA to the domain. For our example, the Active Directory username JohnDoe depicts a service account with the required privileges. For more information on how to implement user privileges in Active Directory, contact Microsoft Support or visit http://microsoft.com.
Configuring DNS for KCD
This section outlines configuration procedures necessary to configure DNS on the ASA. When using KCD as the authentication delegation method on the ASA, DNS is required to enable hostname resolution and communication between the ASA, Domain Controller (DC), and services trusted for delegation.
Step 1![]() From ASDM, navigate to Configuration > Remote Access VPN > DNS and configure the DNS setup as shown in Figure 72-9:
From ASDM, navigate to Configuration > Remote Access VPN > DNS and configure the DNS setup as shown in Figure 72-9:
- DNS Server Group—Enter the DNS server IP address(es), such as 192.168.0.3.
- Domain Name—Enter the domain name in which the DC is a member, such as exampledc.com.
Step 2![]() Enable DNS Lookup on the appropriate interface. Clientless VPN deployments require DNS Lookups via the internal corporate network, typically the inside interface.
Enable DNS Lookup on the appropriate interface. Clientless VPN deployments require DNS Lookups via the internal corporate network, typically the inside interface.
Figure 72-9 ASA DNS Configuration Example
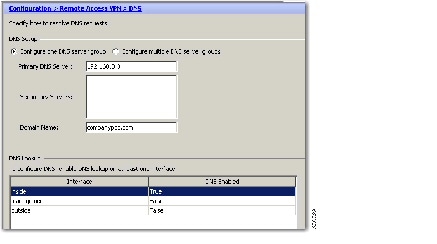
Configuring the ASA to Join the Active Directory Domain
This section outlines configuration procedures necessary to enable the ASA to act as part of the Active Directory domain. KCD requires the ASA to be a member of the Active Directory domain. This configuration enables the functionality necessary for constrained delegation transactions between the ASA and the KCD server.
Step 1![]() From ASDM, navigate to Configuration > Remote Access VPN > Clientless SSL VPN Access > Advanced > Microsoft KCD Server, as shown in Figure 72-10.
From ASDM, navigate to Configuration > Remote Access VPN > Clientless SSL VPN Access > Advanced > Microsoft KCD Server, as shown in Figure 72-10.
Step 2![]() Click New to add a Kerberos Server Group for Constrained Delegation and configure the following
Click New to add a Kerberos Server Group for Constrained Delegation and configure the following
(see Figure 72-10):
–![]() Server Group Name—Define the name of the constrained delegation configuration on the ASA, such as MSKCD, which is the default value. You can configure multiple server groups for redundancy; however, you can only assign one server group to the KCD server configuration used to request service tickets on behalf of VPN users.
Server Group Name—Define the name of the constrained delegation configuration on the ASA, such as MSKCD, which is the default value. You can configure multiple server groups for redundancy; however, you can only assign one server group to the KCD server configuration used to request service tickets on behalf of VPN users.
–![]() Reactivation Mode—Click the radio button for the mode you want to use (Depletion or Timed). In Depletion mode, failed servers are reactivated only after all of the servers in the group are inactive. In Timed mode, failed servers are reactivated after 30 seconds of down time. Depletion is the default configuration.
Reactivation Mode—Click the radio button for the mode you want to use (Depletion or Timed). In Depletion mode, failed servers are reactivated only after all of the servers in the group are inactive. In Timed mode, failed servers are reactivated after 30 seconds of down time. Depletion is the default configuration.
–![]() Dead Time—If you choose the Depletion reactivation mode, you must add a dead time interval. Ten minutes is the default configuration. The interval represents the duration of time, in minutes, that elapses between the disabling of the last server in a group and the subsequent re-enabling of all servers.
Dead Time—If you choose the Depletion reactivation mode, you must add a dead time interval. Ten minutes is the default configuration. The interval represents the duration of time, in minutes, that elapses between the disabling of the last server in a group and the subsequent re-enabling of all servers.
–![]() Max Failed Attempts—Set the number of failed connection attempts allowed before declaring an unresponsive server to be inactive. Three attempts is the default.
Max Failed Attempts—Set the number of failed connection attempts allowed before declaring an unresponsive server to be inactive. Three attempts is the default.
–![]() Interface Name—Choose the interface on which the server resides. In general, authentication server deployments reside on the internal corporate network, typically via the inside interface.
Interface Name—Choose the interface on which the server resides. In general, authentication server deployments reside on the internal corporate network, typically via the inside interface.
–![]() Server Name—Define the hostname of the domain controller, such as ServerHostName.
Server Name—Define the hostname of the domain controller, such as ServerHostName.
–![]() Timeout—Specify the maximum time, in seconds, to wait for a response from the server. Ten seconds is the default.
Timeout—Specify the maximum time, in seconds, to wait for a response from the server. Ten seconds is the default.
–![]() Server Port—88 is the default and the standard port used for KCD.
Server Port—88 is the default and the standard port used for KCD.
–![]() Retry Interval—Choose the desired retry interval. Ten seconds is the default configuration.
Retry Interval—Choose the desired retry interval. Ten seconds is the default configuration.
–![]() Realm—Enter the domain name of the DC in all uppercase (such as EXAMPLEDC.COM). The KCD configuration on the ASA requires the realm value to be in uppercase. A realm is an authentication domain. A service can accept authentication credentials only from entities in the same realm. The realm must match the domain name which the ASA joins.
Realm—Enter the domain name of the DC in all uppercase (such as EXAMPLEDC.COM). The KCD configuration on the ASA requires the realm value to be in uppercase. A realm is an authentication domain. A service can accept authentication credentials only from entities in the same realm. The realm must match the domain name which the ASA joins.
Figure 72-10 KCD Server Group Configuration
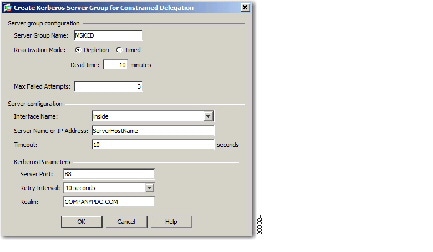
Step 3![]() Click OK to apply your configuration and then configure the Microsoft KCD Server to request service tickets on behalf of the remote access user (see Figure 72-10). The Microsoft KCD Server configuration window appears upon clicking OK.
Click OK to apply your configuration and then configure the Microsoft KCD Server to request service tickets on behalf of the remote access user (see Figure 72-10). The Microsoft KCD Server configuration window appears upon clicking OK.
Configuring Kerberos Server Groups
The Kerberos Server Group for Constrained Delegation, MSKCD, is automatically applied to the KCD Server Configuration. You can also configure Kerberos Server groups and manage them under Configuration > Remote Access VPN > AAA/Local User > AAA Server Groups.
Step 1![]() Under the Server Access Credential section, configure the following:
Under the Server Access Credential section, configure the following:
- Username—Define a Service Account (Active Directory username) such as JohnDoe, which has been granted privileges necessary to add computer accounts to the Active Directory domain. The username does not correspond to a specific administrative user but simply a user with service-level privileges. This service account is used by the ASA to add a computer account for itself to the Active Directory domain at every reboot. You must configure the computer account separately to request Kerberos tickets on behalf of the remote users.
Note![]() Administrative privileges are required for initial join. A user with service-level priviledges on the domain controller will not get access.
Administrative privileges are required for initial join. A user with service-level priviledges on the domain controller will not get access.
- Password—Define the password associated with the username (such as Cisco123). The password does not correspond to a specific password but simply a service-level password privilege to add a device on the Window domain controller.
Step 2![]() Under the Server Group Configuration section, configure the following:
Under the Server Group Configuration section, configure the following:
- Reactivation Mode—Click the mode you want to use (Depletion or Timed). In Depletion mode, failed servers are reactivated only after all of the servers in the group are inactive. In Timed mode, failed servers are reactivated after 30 seconds of down time. Depletion is the default configuration.
- Dead Time—If you choose the Depletion reactivation mode, you must add a dead time interval. The interval represents the duration of time, in minutes, that elapses between the disabling of the last server in a group and the subsequent re-enabling of all servers. Ten minutes is the default.
- Max Failed Attempts—Set the number of failed connection attempts allowed before declaring a nonresponsive server to be inactive. Three attempts is the default.
Note![]() Under the Server Table section, the previously configured DC hostname, ServerHostName, was automatically applied to the KCD Server configuration (see Figure 72-11).
Under the Server Table section, the previously configured DC hostname, ServerHostName, was automatically applied to the KCD Server configuration (see Figure 72-11).
Figure 72-11 KCD Server Configuration
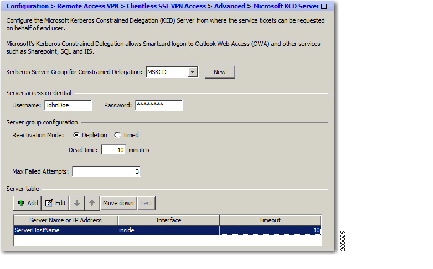
Note![]() After applying your configuration, the ASA automatically starts the process of joining the Active Directory domain. The ASA’s hostname appears in the Computers directory in Active Directory Users and Computers.
After applying your configuration, the ASA automatically starts the process of joining the Active Directory domain. The ASA’s hostname appears in the Computers directory in Active Directory Users and Computers.
To confirm if the ASA has successfully joined the domain, execute the following command from the ASA prompt as shown in Figure 72-12:
Figure 72-12 ASA Domain Membership Confirmation

Configuring Bookmarks to Access the Kerberos Authenticated Services
To access Kerberos Authenticated Services such as Outlook Web Access using the ASA clientless portal, you must configure bookmark lists. Bookmark Lists are assigned and displayed to remote access users based on the VPN security policies they are associated with.
Step 1![]() Navigate to Configuration > Remote Access VPN > Clientless VPN Access > Portal > Bookmarks on the ASDM GUI.
Navigate to Configuration > Remote Access VPN > Clientless VPN Access > Portal > Bookmarks on the ASDM GUI.
Step 2![]() In Bookmark List, enter the URL to reference for the service location.
In Bookmark List, enter the URL to reference for the service location.
Configuring Application Access
The following sections describe how to enable smart tunnel access and port forwarding on clientless SSL VPN sessions, specify the applications to be provided with such access, and provide notes on using it:
Configuring Smart Tunnel Access
A smart tunnel list identifies one or more applications eligible for smart tunnel access and the endpoint operating system associated with the list. Because each group policy or local user policy supports one smart tunnel list, you must group the nonbrowser-based applications to be supported into a smart tunnel list. Without writing a script or uploading anything, an administrator can specify which homepage in the group policy to connect with via smart tunnel (with the homepage use-smart-tunnel CLI command or on the GUI). Following the configuration of a list, you can assign it to one or more group policies or local user policies. If the administrator has it configured as such, you can browse the internet directly while accessing company internal resources via smart tunnel.
The following sections describe smart tunnels and how to configure them:
- About Smart Tunnels
- Why Smart Tunnels?
- Adding Applications to Be Eligible for Smart Tunnel Access
- Configuring a Smart Tunnel (Lotus example)
- Simplifying Configuration of Which Applications to Tunnel
- Adding Applications to Be Eligible for Smart Tunnel Access
- Assigning a Smart Tunnel List
- Configuring and Applying a Smart Tunnel Tunnel Policy
- Specifying Servers for Smart Tunnel Auto Sign-on
- Adding or Editing a Smart Tunnel Auto Sign-on Server Entry
- Enabling and Disabling Smart Tunnel Access
About Smart Tunnels
A smart tunnel is a connection between a TCP-based application and a private site, using a clientless (browser-based) SSL VPN session with the security appliance as the pathway, and the ASA as a proxy server. You can identify applications to which you want to grant smart tunnel access, and specify the local path to each application. For applications running on Microsoft Windows, you can also require a match of the SHA-1 hash of the checksum as a condition for granting smart tunnel access.
Lotus SameTime and Microsoft Outlook are examples of applications to which you might want to grant smart tunnel access.
Configuring smart tunnels requires one of the following procedures, depending on whether the application is a client or is a web-enabled application:
- Create one or more smart tunnel lists of the client applications, then assign the list to the group policies or local user policies for whom you want to provide smart tunnel access.
- Create one or more bookmark list entries that specify the URLs of the web-enabled applications eligible for smart tunnel access, then assign the list to the group policies or local user policies for whom you want to provide smart tunnel access.
You can also list web-enabled applications for which to automate the submission of login credentials in smart tunnel connections over clientless SSL VPN sessions.
Why Smart Tunnels?
Smart tunnel access lets a client TCP-based application use a browser-based VPN connection to access a service. It offers the following advantages to users, compared to plug-ins and the legacy technology, port forwarding:
- Smart tunnel offers better performance than plug-ins.
- Unlike port forwarding, smart tunnel simplifies the user experience by not requiring the user connection of the local application to the local port.
- Unlike port forwarding, smart tunnel does not require users to have administrator privileges.
The advantage of a plug-in is that it does not require the client application to be installed on the remote computer.
Prerequisites
See the Supported VPN Platforms, Cisco ASA 5500 Series for the platforms and browsers supported by ASA Release 8.4 smart tunnels.
The following requirements apply to smart tunnel access on Windows:
- ActiveX or Sun JRE 5, Update 1.5 or later (JRE 6 or later recommended) on Windows must be enabled on the browser.
ActiveX pages require that you enter the activex-relay command on the associated group policy. If you do so or assign a smart tunnel list to the policy, and the browser proxy exception list on the endpoint specifies a proxy, the user must add a “shutdown.webvpn.relay.” entry to this list.
Note![]() Browser-based VPN access does not support Windows Shares (CIFS) Web Folders on Windows 7, Vista, Internet Explorer 8, Mac OS, and Linux. Windows XP SP2 requires a Microsoft hotfix to support Web Folders.
Browser-based VPN access does not support Windows Shares (CIFS) Web Folders on Windows 7, Vista, Internet Explorer 8, Mac OS, and Linux. Windows XP SP2 requires a Microsoft hotfix to support Web Folders.
Restrictions
- For users of Microsoft Windows Vista who use smart tunnel or port forwarding, we recommend that you add the URL of the ASA to the Trusted Site zone. To access the Trusted Site zone, they must start Internet Explorer and choose the Tools > Internet Options > Security tab. Vista users can also disable Protected Mode to facilitate smart tunnel access; however, we recommend against this method because it increases vulnerability to attack.
- Smart tunnel supports only proxies placed between computers running Microsoft Windows and the security appliance. Smart tunnel uses the Internet Explorer configuration (that is, the one intended for system-wide use in Windows). If the remote computer requires a proxy server to reach the ASA, the URL of the terminating end of the connection must be in the list of URLs excluded from proxy services. If the proxy configuration specifies that traffic destined for the ASA goes through a proxy, all smart tunnel traffic goes through the proxy.
- In an HTTP-based remote access scenario, sometimes a subnet does not provide user access to the VPN gateway. In this case, a proxy placed in front of the ASA to route traffic between the web and the end user's location provides web access. However, only VPN users can configure proxies placed in front of the ASA. When doing so, they must make sure these proxies support the CONNECT method. For proxies that require authentication, smart tunnel supports only the basic digest authentication type.
- When smart tunnel starts, the ASA by default passes all browser traffic through the VPN session if the browser process is the same. The ASA also does this if a tunnel-all policy applies. If the user starts another instance of the browser process, it passes all traffic through the VPN session. If the browser process is the same and the security appliance does not provide access to a URL, the user cannot open it. As a workaround, assign a tunnel policy that is not tunnel-all.
- A stateful failover does not retain smart tunnel connections. Users must reconnect following a failover.
- If it takes too long for smart tunnel to load, perform the following:
–![]() Clear the SSL state (with Internet Explorer, go to Tools > Internet Options > Content).
Clear the SSL state (with Internet Explorer, go to Tools > Internet Options > Content).
–![]() Disable the Check for server certificate revocation check box (with Internet Explorer, go to Tools > Internet Options > Advanced > Security).
Disable the Check for server certificate revocation check box (with Internet Explorer, go to Tools > Internet Options > Advanced > Security).
–![]() Delete cookies (with Internet Explorer, go to Tools > Internet Options > General).
Delete cookies (with Internet Explorer, go to Tools > Internet Options > General).
- The Mac version of smart tunnel does not support POST bookmarks, form-based auto sign-on, or POST macro substitution.
- Only applications started from the portal page can establish smart tunnel connections. This requirement includes smart tunnel support for Firefox. Using Firefox to start another instance of Firefox during the first use of a smart tunnel requires the user profile named csco_st. If this user profile is not present, the session prompts the user to create one.
- In a Mac OS, applications using TCP that are dynamically linked to the SSL library can work over a smart tunnel.
- Smart tunnel does not support the following on Mac OS:
–![]() Applications that use two-level name spaces.
Applications that use two-level name spaces.
–![]() Console-based applications, such as Telnet, SSH, and cURL.
Console-based applications, such as Telnet, SSH, and cURL.
–![]() Applications using dlopen or dlsym to locate libsocket calls.
Applications using dlopen or dlsym to locate libsocket calls.
–![]() Statically linked applications to locate libsocket calls.
Statically linked applications to locate libsocket calls.
- For Windows, if you want to add smart tunnel access to an application started from the command prompt, you must specify “cmd.exe” in the Process Name of one entry in the smart tunnel list, and specify the path to the application itself in another entry, because “cmd.exe” is the parent of the application.
- Mac OS requires the full path to the process and is case-sensitive. To avoid specifying a path for each username, insert a tilde (~) before the partial path (e.g., ~/bin/vnc).
- Smart Tunnel and Secure Desktop (Vault) Interoperability
Cisco supports smart tunneling inside a Secure Desktop (Vault) environment on all operating systems that support Vault. We also support smart tunneling of desktop applications and browser-based applications.
ASA 8.3 or later is required to perform smart tunneling from an endpoint using IE8 or a 64-bit Windows operating system.
To implement smart tunneling with IE8, from within a Secure Desktop (Vault), the endpoint must be connected to a secure gateway running ASA 8.3 or later; in addition, the endpoint must have Cisco Secure Desktop 3.5 or later installed.
Smart tunneling is not intended to restrict network access to only internal resources.
Configuring a Smart Tunnel (Lotus example)
To configure a Smart Tunnel, perform the following steps:
Note![]() These example instructions provide the minimum instructions required to add smart tunnel support for an application. See the field descriptions in the sections that follow for more information.
These example instructions provide the minimum instructions required to add smart tunnel support for an application. See the field descriptions in the sections that follow for more information.
Detailed Steps
Step 1![]() Choose Configuration > Remote Access VPN > Clientless SSL VPN Access > Portal > Smart Tunnels.
Choose Configuration > Remote Access VPN > Clientless SSL VPN Access > Portal > Smart Tunnels.
Step 2![]() Double-click the smart tunnel list to which you want to add an application; or click Add to create a list of applications, enter a name for this list in the List Name field, and click Add.
Double-click the smart tunnel list to which you want to add an application; or click Add to create a list of applications, enter a name for this list in the List Name field, and click Add.
For example, click Add in the Smart Tunnels pane, enter Lotus in the List Name field, and click Add.
Step 3![]() Click Add in the Add or Edit Smart Tunnel List dialog box.
Click Add in the Add or Edit Smart Tunnel List dialog box.
Step 4![]() Enter a string in the Application ID field to serve as a unique index to the entry within the smart tunnel list.
Enter a string in the Application ID field to serve as a unique index to the entry within the smart tunnel list.
Step 5![]() Enter the filename and extension of the application into the Process Name dialog box.
Enter the filename and extension of the application into the Process Name dialog box.
Table 72-7 shows example Application ID strings and the associated paths required to support Lotus.
|
|
|
|---|---|
Step 6![]() Select Windows next to OS.
Select Windows next to OS.
Step 8![]() Repeat Steps 3 – 7 for each application to add to the list.
Repeat Steps 3 – 7 for each application to add to the list.
Step 9![]() Click OK in the Add or Edit Smart Tunnel List dialog box.
Click OK in the Add or Edit Smart Tunnel List dialog box.
Step 10![]() Assign the list to the group policies and local user policies to which you want to provide smart tunnel access to the associated applications, as follows:
Assign the list to the group policies and local user policies to which you want to provide smart tunnel access to the associated applications, as follows:
- To assign the list to a group policy, choose Configuration > Remote Access VPN> Clientless SSL VPN Access > Group Policies > Add or Edit > Portal and choose the smart tunnel name from the drop-down list next to the Smart Tunnel List attribute.
- To assign the list to a local user policy, choose Configuration > Remote Access VPN> AAA Setup > Local Users > Add or Edit > VPN Policy > Clientless SSL VPN and choose the smart tunnel name from the drop-down list next to the Smart Tunnel List attribute.
Simplifying Configuration of Which Applications to Tunnel
A smart tunnel application list is essentially a filter of what applications are granted access to the tunnel. The default is to allow access for all processes started by the browser. With Smart Tunnel enabled bookmark, the clientless session grants access only to processes initiated by the web browser. For non-browser applications, an administrator can choose to tunnel all applications and thus remove the need to know which applications an end user may invoke. Table 72-8 shows in which situations processes are granted access.
Restrictions
Detailed Steps
Follow these steps to configure tunnel policy.
Step 1![]() Choose Configuration > Remote Access VPN > AAA/Local Users > Local Users.
Choose Configuration > Remote Access VPN > AAA/Local Users > Local Users.
Step 2![]() In the User Account window, highlight the username that you want to edit.
In the User Account window, highlight the username that you want to edit.
Step 3![]() Click Edit. The Edit User Account window appears.
Click Edit. The Edit User Account window appears.
Step 4![]() In the left sidebar of the Edit User Account window, click VPN Policy > Clientless SSL VPN.
In the left sidebar of the Edit User Account window, click VPN Policy > Clientless SSL VPN.
Step 5![]() Perform one of the following:
Perform one of the following:
–![]() Uncheck the Inherit check box at the Smart Tunnel Policy parameter.
Uncheck the Inherit check box at the Smart Tunnel Policy parameter.
–![]() Choose from the network list and specify one of the tunnel options: use smart tunnel for the specified network, do not use smart tunnel for the specified network, or use tunnel for all network traffic.
Choose from the network list and specify one of the tunnel options: use smart tunnel for the specified network, do not use smart tunnel for the specified network, or use tunnel for all network traffic.
Adding Applications to Be Eligible for Smart Tunnel Access
The clientless SSL VPN configuration of each ASA supports smart tunnel lists, each of which identifies one or more applications eligible for smart tunnel access. Because each group policy or username supports only one smart tunnel list, you must group each set of applications to be supported into a smart tunnel list.
To add an entry to a list of applications that can use a clientless SSL VPN session to connect to private sites, enter the following commands:
The Add or Edit Smart Tunnel entry dialog box lets you specify the attributes of an application in a smart tunnel list.
Step 1![]() Enter a unique name for the list of applications or programs. Do not user spaces.
Enter a unique name for the list of applications or programs. Do not user spaces.
Following the configuration of the smart tunnel list, the list name appears next to the Smart Tunnel List attribute in the Clientless SSL VPN group policies and local user policies. Assign a name that will help you to distinguish its contents or purpose from other lists that you are likely to configure.
Step 2![]() Enter a string to name the entry in the smart tunnel list. This user-specified name is saved and then returned onto the GUI. The string is unique for the operating system. It typically names the application to be granted smart tunnel access. To support multiple versions of an application for which you choose to specify different paths or hash values, you can use this attribute to differentiate entries, specifying the operating system, and name and version of the application supported by each list entry. The string can be up to 64 characters.
Enter a string to name the entry in the smart tunnel list. This user-specified name is saved and then returned onto the GUI. The string is unique for the operating system. It typically names the application to be granted smart tunnel access. To support multiple versions of an application for which you choose to specify different paths or hash values, you can use this attribute to differentiate entries, specifying the operating system, and name and version of the application supported by each list entry. The string can be up to 64 characters.
Step 3![]() Enter the filename or path to the application. The string can be up to 128 characters.
Enter the filename or path to the application. The string can be up to 128 characters.
Windows requires an exact match of this value to the right side of the application path on the remote host to qualify the application for smart tunnel access. If you specify only the filename for Windows, SSL VPN does not enforce a location restriction on the remote host to qualify the application for smart tunnel access.
If you specify a path and the user installed the application in another location, that application does not qualify. The application can reside on any path as long as the right side of the string matches the value you enter.
To authorize an application for smart tunnel access if it is present on one of several paths on the remote host, either specify only the name and extension of the application in this field; or create a unique smart tunnel entry for each path.
Note![]() A sudden problem with smart tunnel access may be an indication that a Process Name value is not up-to-date with an application upgrade. For example, the default path to an application sometimes changes following the acquisition of the company that produces the application and the next application upgrade.
A sudden problem with smart tunnel access may be an indication that a Process Name value is not up-to-date with an application upgrade. For example, the default path to an application sometimes changes following the acquisition of the company that produces the application and the next application upgrade.
For Windows, if you want to add smart tunnel access to an application started from the command prompt, you must specify “cmd.exe” in the Process Name of one entry in the smart tunnel list, and specify the path to the application itself in another entry, because “cmd.exe” is the parent of the application.
Step 4![]() Click Windows or Mac to specify the host operating system of the application.
Click Windows or Mac to specify the host operating system of the application.
Step 5![]() (Optional and applicable only for Windows) To obtain this value, enter the checksum of the application (that is, the checksum of the executable file) into a utility that calculates a hash using the SHA-1 algorithm. One example of such a utility is the Microsoft File Checksum Integrity Verifier (FCIV), which is available at http://support.microsoft.com/kb/841290/. After installing FCIV, place a temporary copy of the application to be hashed on a path that contains no spaces (for example, c:/fciv.exe), then enter fciv.exe -sha1 application at the command line (for example, fciv.exe -sha1 c:\msimn.exe) to display the SHA-1 hash.
(Optional and applicable only for Windows) To obtain this value, enter the checksum of the application (that is, the checksum of the executable file) into a utility that calculates a hash using the SHA-1 algorithm. One example of such a utility is the Microsoft File Checksum Integrity Verifier (FCIV), which is available at http://support.microsoft.com/kb/841290/. After installing FCIV, place a temporary copy of the application to be hashed on a path that contains no spaces (for example, c:/fciv.exe), then enter fciv.exe -sha1 application at the command line (for example, fciv.exe -sha1 c:\msimn.exe) to display the SHA-1 hash.
The SHA-1 hash is always 40 hexadecimal characters.
Before authorizing an application for smart tunnel access, clientless SSL VPN calculates the hash of the application matching the Application ID. It qualifies the application for smart tunnel access if the result matches the value of Hash.
Entering a hash provides a reasonable assurance that SSL VPN does not qualify an illegitimate file that matches the string you specified in the Application ID. Because the checksum varies with each version or patch of an application, the Hash you enter can only match one version or patch on the remote host. To specify a hash for more than one version of an application, create a unique smart tunnel entry for each Hash value.
Note![]() You must update the smart tunnel list in the future if you enter Hash values and you want to support future versions or patches of an application with smart tunnel access. A sudden problem with smart tunnel access may be an indication that the application list containing Hash values is not up-to-date with an application upgrade. You can avoid this problem by not entering a hash.
You must update the smart tunnel list in the future if you enter Hash values and you want to support future versions or patches of an application with smart tunnel access. A sudden problem with smart tunnel access may be an indication that the application list containing Hash values is not up-to-date with an application upgrade. You can avoid this problem by not entering a hash.
Following the configuration of the smart tunnel list, you must assign it to a group policy or a local user policy for it to become active, as follows:
- To assign the list to a group policy, choose Config > Remote Access VPN> Clientless SSL VPN Access > Group Policies > Add or Edit > Portal and choose the smart tunnel name from the drop-down list next to the Smart Tunnel List attribute.
- To assign the list to a local user policy, choose Config > Remote Access VPN> AAA Setup > Local Users > Add or Edit > VPN Policy > Clientless SSL VPN and choose the smart tunnel name from the drop-down list next to the Smart Tunnel List attribute.
Assigning a Smart Tunnel List
For each group policy and username, you can configure clientless SSL VPN to do one of the following:
Restrictions
These options are mutually exclusive for each group policy and username. Use only one.
The following smart tunnel commands are available to each group policy and username. The configuration of each group policy and username supports only one of these commands at a time, so when you enter one, the ASA replaces the one present in the configuration of the group policy or username in question with the new one, or in the case of the last command, simply removes the smart-tunnel command already present in the group policy or username.
Detailed Steps
Configuring and Applying Smart Tunnel Policy
The smart tunnel policy requires a per group policy/username configuration. Each group policy/username references a globally configured list of networks. When the smart tunnel is turned on, you can allow traffic outside of the tunnel with the use of 2 CLIs: one configures the network (a set of hosts), and the other uses the specified smart-tunnel network to enforce a policy on a user. The following commands create a list of hosts to use for configuring smart tunnel policies:
Detailed Steps
Configuring and Applying a Smart Tunnel Tunnel Policy
Like the split tunnel configuration in SSL VPN client, the smart tunnel tunnel policy is a per group-policy/username configuration. Each group policy/username references a globally configured list of networks:
Detailed Steps
Specifying Servers for Smart Tunnel Auto Sign-on
The Add Smart Tunnel Auto Sign-on Server List dialog box lets you add one or more lists of servers for which to automate the submission of login credentials during smart tunnel setup. The Edit Smart Tunnel Auto-signon Server List dialog box lets you modify the contents of these lists. This feature is available for Internet Explorer and Firefox.
To create a list of servers for which to automate the submission of credentials in smart tunnel connections, enter the following commands:
Detailed Steps
Following the configuration of the smart tunnel auto sign-on server list, you must assign it to a group policy or a local user policy for it to become active, as described in the next section.
Step 1![]() Enter a unique name for the list of remote servers. The string can be up to 64 characters. Do not use spaces.
Enter a unique name for the list of remote servers. The string can be up to 64 characters. Do not use spaces.
Following the configuration of the smart tunnel auto sign-on list, the list name appears next to the Auto Sign-on Server List attribute under Smart Tunnel in the clientless SSL VPN group policy and local user policy configurations. Assign a name that will help you to distinguish its contents or purpose from other lists that you are likely to configure.
Adding or Editing a Smart Tunnel Auto Sign-on Server Entry
The Add or Edit Smart Tunnel Entry dialog box lets you identify a server to be added to a smart tunnel auto sign-on list. You can identify it by its hostname, or IP address and subnet mask. You can also elect to have auto-sign on support for form-based authentication or for Internet Explorer or Firefox.
This section describes how to list the servers for which to provide auto sign-on in smart tunnel connections and assign the lists to group policies or usernames.
Prerequisites
You must use the smart-tunnel auto-signon list command to create a list of servers first. You can assign only one list to a group policy or username.
Use the address format used in the source code of the web pages on the intranet. If you are configuring smart tunnel auto sign-on for browser access and some web pages use host names and others use IP addresses, or you do not know, specify both in different smart tunnel auto sign-on entries. Otherwise, if a link on a web page uses a different format than the one you specify, it fails when the user clicks it.
Restrictions
- The smart-tunnel auto sign-on feature supports only applications communicating HTTP and HTTPS using the Microsoft WININET library. For example, Microsoft Internet Explorer uses the WININET dynamic linked library to communicate with web servers.
- Firefox requires the administrator to specify hosts using an exact host name or IP address (instead of a host mask with wild cards, a subnet using IP addresses, or a netmask). For example, within Firefox, you cannot enter *.cisco.com and expect auto sign-on to host email.cisco.com.
Detailed Steps
To enable smart tunnel auto sign-on in clientless (browser-based) SSL VPN sessions, use the following commands:
Step 1![]() Enter a hostname or wildcard mask to auto-authenticate to. You can use the following wildcard characters:
Enter a hostname or wildcard mask to auto-authenticate to. You can use the following wildcard characters:
- * to match any number of characters or zero characters
- ? to match any single character
- [] to match any single character in the range expressed inside the brackets
For example, enter *.example.com. Using this option protects the configuration from dynamic changes to IP addresses.
Note![]() Firefox requires the administrator to specify hosts using an exact host name or IP address (instead of a host mask with wild cards, a subnet using IP addresses, or a netmask). For example, within Firefox, you cannot enter *.cisco.com and expect auto sign-on to host email.cisco.com.
Firefox requires the administrator to specify hosts using an exact host name or IP address (instead of a host mask with wild cards, a subnet using IP addresses, or a netmask). For example, within Firefox, you cannot enter *.cisco.com and expect auto sign-on to host email.cisco.com.
Step 2![]() Enter an IP address to auto-authenticate to.
Enter an IP address to auto-authenticate to.
Step 3![]() (Optional) Specify a realm. Realm is associated with the protected area of the website and passed back to the browser either in the authentication prompt or in the HTTP headers during authentication. Once auto-sign is configured here and a realm string is specified, users can configure the realm string on a web application (such as Outlook Web Access) and access web applications without signing on.
(Optional) Specify a realm. Realm is associated with the protected area of the website and passed back to the browser either in the authentication prompt or in the HTTP headers during authentication. Once auto-sign is configured here and a realm string is specified, users can configure the realm string on a web application (such as Outlook Web Access) and access web applications without signing on.
Note![]() If administrators do not know the corresponding realm, they should perform logon once and get the string from the prompt dialog.
If administrators do not know the corresponding realm, they should perform logon once and get the string from the prompt dialog.
Step 4![]() Enter the sub-network of hosts associated with the IP address.
Enter the sub-network of hosts associated with the IP address.
Step 5![]() (Optional) Click to add the Windows domain to the username if authentication requires it. If you do so, be sure to specify the domain name when assigning the smart tunnel list to one or more group policies or local user policies.
(Optional) Click to add the Windows domain to the username if authentication requires it. If you do so, be sure to specify the domain name when assigning the smart tunnel list to one or more group policies or local user policies.
Step 6![]() (Optional) Specify a port number for the corresponding hosts. For Firefox, if no port number is specified, auto sign is performed on HTTP and HTTPS, accessed by default port numbers 80 and 443 respectively.
(Optional) Specify a port number for the corresponding hosts. For Firefox, if no port number is specified, auto sign is performed on HTTP and HTTPS, accessed by default port numbers 80 and 443 respectively.
Following the configuration of the smart tunnel auto sign-on server list, you must assign it to a group policy or a local user policy for it to become active, as follows:
- To assign the list to a group policy, choose Config > Remote Access VPN > Clientless SSL VPN Access > Group Policies > Add or Edit > Portal, find the Smart Tunnel area, and choose the list name from the drop-down list next to the Auto Sign-on Server List attribute.
- To assign the list to a local user policy, choose Config > Remote Access VPN> AAA Setup > Local Users > Add or Edit > VPN Policy > Clientless SSL VPN, find the Smart Tunnel area, and choose the list name from the drop-down list next to the Auto Sign-on Server List attribute.
Automating Smart Tunnel Access
To start smart tunnel access automatically upon user login, enter the following commands:
Requirements
For Mac OS X, you must click the link for the application in the portal’s Application Access panel, with or without auto-start configured.
Detailed Steps
Enabling and Disabling Smart Tunnel Access
By default, smart tunnels are disabled.
If you enable smart tunnel access, the user will have to start it manually, using the Application Access > Start Smart Tunnels button on the clientless SSL VPN portal page.
Detailed Steps
Logging Off Smart Tunnel
This section describes how to ensure that the smart tunnel is properly logged off. Smart tunnel can be logged off when all browser windows have been closed, or you can right click the notification icon and confirm log out.
Note![]() We strongly recommend the use of the logout button on the portal. This method pertains to clientless SSL VPNs and logs off regardless of whether smart tunnel is used or not. The notification icon should be used only when using standalone applications without the browser.
We strongly recommend the use of the logout button on the portal. This method pertains to clientless SSL VPNs and logs off regardless of whether smart tunnel is used or not. The notification icon should be used only when using standalone applications without the browser.
When Its Parent Process Terminates
This practice requires the closing of all browsers to signify log off. The smart tunnel lifetime is now tied to the starting process lifetime. For example, if you started a smart tunnel from Internet Explorer, the smart tunnel is turned off when no iexplore.exe is running. Smart tunnel can determine that the VPN session has ended even if the user closed all browsers without logging out.
Note![]() In some cases, a lingering browser process is unintentional and is strictly a result of an error. Also, when a Secure Desktop is used, the browser process can run in another desktop even if the user closed all browsers within the secure desktop. Therefore, smart tunnel declares all browser instances gone when no more visible windows exist in the current desktop.
In some cases, a lingering browser process is unintentional and is strictly a result of an error. Also, when a Secure Desktop is used, the browser process can run in another desktop even if the user closed all browsers within the secure desktop. Therefore, smart tunnel declares all browser instances gone when no more visible windows exist in the current desktop.
Detailed Steps
With A Notification Icon
You may also choose to disable logging off when a parent process terminates so that a session survives if you close a browser. For this practice, you use a notification icon in the system tray to log out. The icon remains until the next connection is tried. You may have to wait for the session status to update in the system tray.
Note![]() This icon is an alternative way to log out of SSL VPN. It is not an indicator of VPN session status.
This icon is an alternative way to log out of SSL VPN. It is not an indicator of VPN session status.
Detailed Steps
To enable the icon in the notification area, follow these steps:
Step 1![]() Choose Configuration > Remote Access VPN > Clientless SSL VPN Access > Portal > Smart Tunnels.
Choose Configuration > Remote Access VPN > Clientless SSL VPN Access > Portal > Smart Tunnels.
Step 2![]() Enable the Click on smart-tunnel logoff icon in the system tray radio button.
Enable the Click on smart-tunnel logoff icon in the system tray radio button.
Step 3![]() In the Smart Tunnel Networks portion of the window, check Add and enter both the IP address and hostname of the network which should include the icon.
In the Smart Tunnel Networks portion of the window, check Add and enter both the IP address and hostname of the network which should include the icon.
Note![]() If you right click the icon, a single menu item appears which prompts the user to log out of the SSL VPN.
If you right click the icon, a single menu item appears which prompts the user to log out of the SSL VPN.
Configuring Port Forwarding
The following sections describe port forwarding and how to configure it:
- Information About Port Forwarding
- Configuring DNS for Port Forwarding
- Adding Applications to Be Eligible for Port Forwarding
- Adding/Editing Port Forwarding Entry
- Assigning a Port Forwarding List
- Automating Port Forwarding
Information About Port Forwarding
Port forwarding lets users access TCP-based applications over a clientless SSL VPN connection. Such applications include the following:
- Lotus Notes
- Microsoft Outlook
- Microsoft Outlook Express
- Perforce
- Sametime
- Secure FTP (FTP over SSH)
- SSH
- TELNET
- Windows Terminal Service
- XDDTS
Other TCP-based applications may also work, but we have not tested them. Protocols that use UDP do not work.
Port forwarding is the legacy technology for supporting TCP-based applications over a clientless SSL VPN connection. You may choose to use port forwarding because you have built earlier configurations that support this technology.
Consider the following alternatives to port forwarding:
–![]() Smart tunnel offers better performance than plug-ins.
Smart tunnel offers better performance than plug-ins.
–![]() Unlike port forwarding, smart tunnel simplifies the user experience by not requiring the user connection of the local application to the local port.
Unlike port forwarding, smart tunnel simplifies the user experience by not requiring the user connection of the local application to the local port.
–![]() Unlike port forwarding, smart tunnel does not require users to have administrator privileges.
Unlike port forwarding, smart tunnel does not require users to have administrator privileges.
- Unlike port forwarding and smart tunnel access, a plug-in does not require the client application to be installed on the remote computer.
When configuring port forwarding on the ASA, you specify the port the application uses. When configuring smart tunnel access, you specify the name of the executable file or its path.
Prerequisites
–![]() Microsoft Windows Vista, Windows XP SP2 or SP3; or Windows 2000 SP4.
Microsoft Windows Vista, Windows XP SP2 or SP3; or Windows 2000 SP4.
–![]() Apple Mac OS X 10.4 or 10.5 with Safari 2.0.4(419.3).
Apple Mac OS X 10.4 or 10.5 with Safari 2.0.4(419.3).
- The remote host must also be running Sun JRE 1.5 or later.
- Browser-based users of Safari on Mac OS X 10.5.3 must identify a client certificate for use with the URL of the ASA, once with the trailing slash and once without it, because of the way Safari interprets URLs. For example,
For details, go to the Safari, Mac OS X 10.5.3: Changes in client certificate authentication.
- Users of Microsoft Windows Vista who use port forwarding or smart tunnels must add the URL of the ASA to the Trusted Site zone. To access the Trusted Site zone, they must start Internet Explorer and choose the Tools > Internet Options > Security tab. Vista users can also disable Protected Mode to facilitate smart tunnel access; however, we recommend against this method because it increases the computer’s vulnerability to attack.
- Make sure Sun Microsystems Java Runtime Environment (JRE) 1.5.x or later is installed on the remote computers to support port forwarding (application access) and digital certificates. If JRE 1.4.x is running and the user authenticates with a digital certificate, the application fails to start because JRE cannot access the web browser certificate store.
Restrictions
- Port forwarding supports only TCP applications that use static TCP ports. Applications that use dynamic ports or multiple TCP ports are not supported. For example, SecureFTP, which uses port 22, works over clientless SSL VPN port forwarding, but standard FTP, which uses ports 20 and 21, does not.
- Port forwarding does not support protocols that use UDP.
- Port forwarding does not support Microsoft Outlook Exchange (MAPI) proxy. However, you can configure smart tunnel support for Microsoft Office Outlook in conjunction with Microsoft Outlook Exchange Server.
- A stateful failover does not retain sessions established using Application Access (either port forwarding or smart tunnel access). Users must reconnect following a failover.
- Port forwarding does not support connections to personal digital assistants.
- Because port forwarding requires downloading the Java applet and configuring the local client, and because doing so requires administrator permissions on the local system, it is unlikely that users will be able to use applications when they connect from public remote systems.
The Java applet displays in its own window on the end user HTML interface. It shows the contents of the list of forwarded ports available to the user, as well as which ports are active, and amount of traffic in bytes sent and received.
- The port forwarding applet displays the local port and the remote port as the same when the local IP address 127.0.0.1 is being used and cannot be updated by the clientless SSL VPN connection from the ASA. As a result, the ASA creates new IP addresses 127.0.0.2, 127.0.0.3, and so on for local proxy IDs. Because you can modify the hosts file and use different loopbacks, the remote port is used as the local port in the applet. To connect, you can use Telnet with the host name, without specifying the port. The correct local IP addresses are available in the local hosts file.
Configuring DNS for Port Forwarding
Port Forwarding forwards the domain name of the remote server or its IP address to the ASA for resolution and connection. In other words, the port forwarding applet accepts a request from the application and forwards it to the ASA. The ASA makes the appropriate DNS queries and establishes the connection on behalf of the port forwarding applet. The port forwarding applet only makes DNS queries to the ASA. It updates the host file so that when a port forwarding application attempts a DNS query, the query redirects to a loopback address. Configure the ASA to accept the DNS requests from the port forwarding applet as follows:
Step 1![]() Click Configuration > Remote Access VPN > Clientless SSL VPN Access > Connection Profiles.
Click Configuration > Remote Access VPN > Clientless SSL VPN Access > Connection Profiles.
The DefaultWEBVPNGroup entry is the default connection profile used for clientless connections.
Step 2![]() Highlight the DefaultWEBVPNGroup entry, then click Edit if your configuration uses it for clientless connections. Otherwise, highlight a co nnection profile used in your configuration for clientless connections, then click Edit.
Highlight the DefaultWEBVPNGroup entry, then click Edit if your configuration uses it for clientless connections. Otherwise, highlight a co nnection profile used in your configuration for clientless connections, then click Edit.
Step 3![]() Scan to the DNS area and select the DNS server from the drop-down list. Note the domain name, disregard the remaining steps, and go to the next section if ASDM displays the DNS server you want to use. You need to enter the same domain name when you specify the remote server while configuring an entry in the port forwarding list. Continue with the remaining steps if the DNS server is not present in the configuration.
Scan to the DNS area and select the DNS server from the drop-down list. Note the domain name, disregard the remaining steps, and go to the next section if ASDM displays the DNS server you want to use. You need to enter the same domain name when you specify the remote server while configuring an entry in the port forwarding list. Continue with the remaining steps if the DNS server is not present in the configuration.
Step 4![]() Click Manage in the DNS area.
Click Manage in the DNS area.
The Configure DNS Server Groups window opens.
Step 5![]() Click Configure Multiple DNS Server Groups.
Click Configure Multiple DNS Server Groups.
A window displays a table of DNS server entries.
The Add DNS Server Group window opens.
Step 7![]() Enter a new server group name in the Name field, and enter the IP address and domain name (see Figure 72-13).
Enter a new server group name in the Name field, and enter the IP address and domain name (see Figure 72-13).
Figure 72-13 Example DNS Server Values for Port Forwarding
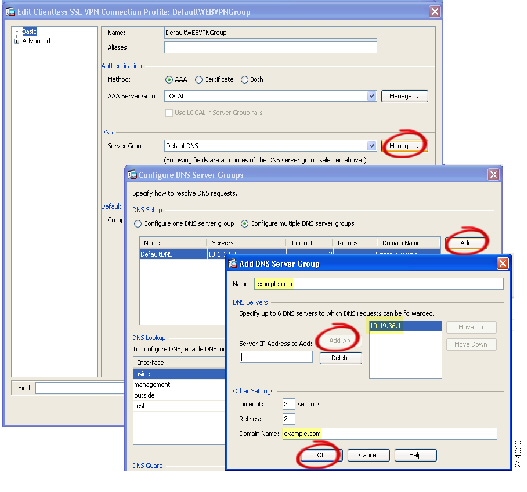
Note the domain name you entered. You need it when you specify the remote server later while configuring a port forwarding entry.
Step 8![]() Click OK until the Connection Profiles window becomes active again.
Click OK until the Connection Profiles window becomes active again.
Step 9![]() Repeat Steps 2 – 8 for each remaining co nnection profile used in your configuration for clientless connections.
Repeat Steps 2 – 8 for each remaining co nnection profile used in your configuration for clientless connections.
Adding Applications to Be Eligible for Port Forwarding
The clientless SSL VPN configuration of each ASA supports port forwarding lists, each of which specifies local and remote ports used by the applications for which you want to provide access. Because each group policy or username supports only one port forwarding list, you must group each set of applications to be supported into a list. To display the port forwarding list entries already present in the ASA configuration, enter the following commands:
Detailed Steps
Following the configuration of a port forwarding list, assign the list to group policies or usernames, as described in the next section.
Adding/Editing Port Forwarding Entry
The Add/Edit Port Forwarding Entry dialog boxes let you specify TCP applications to associate with users or group policies for access over clientless SSL VPN connections. Assign values to the attributes in these windows as follows:
Prerequisites
The DNS name assigned to the Remote Server parameter must match the Domain Name and Server Group parameters to establish the tunnel and resolve to an IP address, per the instructions in the “Assigning a Port Forwarding List” section. The default setting for both the Domain and Server G roup parameters is DefaultDNS.
Detailed Steps
Step 2![]() Type a TCP port number for the application to use. You can use a local port number only once for a listname. To avoid conflicts with local TCP services, use port numbers in the range 1024 to 65535.
Type a TCP port number for the application to use. You can use a local port number only once for a listname. To avoid conflicts with local TCP services, use port numbers in the range 1024 to 65535.
Step 3![]() Enter either the domain name or IP address of the remote server. We recommend using a domain name so that you do not have to configure the client applications for the specific IP address.
Enter either the domain name or IP address of the remote server. We recommend using a domain name so that you do not have to configure the client applications for the specific IP address.
Step 4![]() Type the well-known port number for the application.
Type the well-known port number for the application.
Step 5![]() Type a description of the application. The maximum is 64 characters.
Type a description of the application. The maximum is 64 characters.
Step 6![]() (Optional) Highlight a port forwarding list and click Assign to assign the selected list to one or more group policies, dynamic access policies, or user policies.
(Optional) Highlight a port forwarding list and click Assign to assign the selected list to one or more group policies, dynamic access policies, or user policies.
Assigning a Port Forwarding List
You can add or edit a named list of TCP applications to associate with users or group policies for access over clientless SSL VPN connections. For each group policy and username, you can configure clientless SSL VPN to do one of the following:
- Start port forwarding access automatically upon user login.
- Enable port forwarding access upon user login, but require the user to start it manually, using the Application Access > Start Applications button on the clientless SSL VPN Portal Page.
Note![]() These options are mutually exclusive for each group policy and username. Use only one.
These options are mutually exclusive for each group policy and username. Use only one.
Prerequisites
Before initiating the port-forward enable list_name command, the user is required to start port forwarding manually, using the Application Access > Start Applications button on the clientless SSL VPN portal page.
Detailed Steps
These commands are available to each group policy and username. The configuration of each group policy and username supports only one of these commands at a time, so when you enter one, the ASA replaces the one present in the configuration of the group policy or username in question with the new one, or in the case of the last command, simply removes the port-forward command from the group policy or username configuration.
The Add or Edit Port Forwarding List dialog box lets you add or edit the following:
Step 1![]() Provide an alphanumeric name for the list. The maximum is 64 characters.
Provide an alphanumeric name for the list. The maximum is 64 characters.
Step 2![]() Enter which local port listens for traffic for the application. You can use a local port number only once for a listname. To avoid conflicts with local TCP services, use port numbers in the range 1024 to 65535.
Enter which local port listens for traffic for the application. You can use a local port number only once for a listname. To avoid conflicts with local TCP services, use port numbers in the range 1024 to 65535.
Note![]() Enter the IP address or DNS name of the remote server. We recommend using a domain name so that you do not have to configure the client applications for the specific IP address.
Enter the IP address or DNS name of the remote server. We recommend using a domain name so that you do not have to configure the client applications for the specific IP address.
Step 3![]() Enter the remote port that listens for traffic for the application.
Enter the remote port that listens for traffic for the application.
Step 4![]() Describe the TCP application. The maximum is 64 characters.
Describe the TCP application. The maximum is 64 characters.
For details, go to the section that addresses the option you want to use.
Automating Port Forwarding
To start port forwarding automatically upon user login, enter the following commands:
Detailed Steps
Enabling and Disabling Port Forwarding
By default, port forwarding is disabled.
If you enable port forwarding, the user will have to start it manually, using the Application Access > Start Applications button on the clientless SSL VPN portal page.
Detailed Steps
Configuring the Use of External Proxy Servers
Use the Proxies pane to configure the ASA to use external proxy servers to handle HTTP requests and HTTPS requests. These servers act as an intermediary between users and the Internet. Requiring all Internet access via servers you control provides another opportunity for filtering to assure secure Internet access and administrative control.
Restrictions
HTTP and HTTPS proxy services do not support connections to personal digital assistants.
Detailed Steps
Step 1![]() Click Use an HTTP proxy server.
Click Use an HTTP proxy server.
Step 2![]() Identify the HTTP proxy server by its IP address or hostname.
Identify the HTTP proxy server by its IP address or hostname.
Step 3![]() Enter the hostname or IP address of the external HTTP proxy server.
Enter the hostname or IP address of the external HTTP proxy server.
Step 4![]() Enter the port that listens for HTTP requests. The default port is 80.
Enter the port that listens for HTTP requests. The default port is 80.
Step 5![]() (Optional) Enter a URL or a comma-delimited list of several URLs to exclude from those that can be sent to the HTTP proxy server. The string does not have a character limit, but the entire command cannot exceed 512 characters. You can specify literal URLs or use the following wildcards:
(Optional) Enter a URL or a comma-delimited list of several URLs to exclude from those that can be sent to the HTTP proxy server. The string does not have a character limit, but the entire command cannot exceed 512 characters. You can specify literal URLs or use the following wildcards:
- * to match any string, including slashes (/) and periods (.). You must accompany this wildcard with an alphanumeric string.
- ? to match any single character, including slashes and periods.
- [ x - y ] to match any single character in the range of x and y, where x represents one character and y represents another character in the ANSI character set.
- [ ! x - y ] to match any single character that is not in the range.
Step 6![]() (Optional) Enter this keyword to accompany each HTTP proxy request with a username to provide basic, proxy authentication.
(Optional) Enter this keyword to accompany each HTTP proxy request with a username to provide basic, proxy authentication.
Step 7![]() Enter a password to send to the proxy server with each HTTP request.
Enter a password to send to the proxy server with each HTTP request.
Step 8![]() As an alternative to specifying the IP address of the HTTP proxy server, you can choose Specify PAC file URL to specify a Proxy autoconfiguration file to download to the browser. Once downloaded, the PAC file uses a JavaScript function to identify a proxy for each URL. Enter http:// and type the URL of the proxy autoconfiguration file into the adjacent field. If you omit the http:// portion, the ASA ignores it.
As an alternative to specifying the IP address of the HTTP proxy server, you can choose Specify PAC file URL to specify a Proxy autoconfiguration file to download to the browser. Once downloaded, the PAC file uses a JavaScript function to identify a proxy for each URL. Enter http:// and type the URL of the proxy autoconfiguration file into the adjacent field. If you omit the http:// portion, the ASA ignores it.
Step 9![]() Choose if you want to use an HTTPS proxy server.
Choose if you want to use an HTTPS proxy server.
Step 10![]() Click to identify the HTTPS proxy server by its IP address or hostname.
Click to identify the HTTPS proxy server by its IP address or hostname.
Step 11![]() Enter the hostname or IP address of the external HTTPS proxy server.
Enter the hostname or IP address of the external HTTPS proxy server.
Step 12![]() Enter the port that listens for HTTPS requests. The default port is 443.
Enter the port that listens for HTTPS requests. The default port is 443.
Step 13![]() (Optional) Enter a URL or a comma-delimited list of several URLs to exclude from those that can be sent to the HTTPS proxy server. The string does not have a character limit, but the entire command cannot exceed 512 characters. You can specify literal URLs or use the following wildcards:
(Optional) Enter a URL or a comma-delimited list of several URLs to exclude from those that can be sent to the HTTPS proxy server. The string does not have a character limit, but the entire command cannot exceed 512 characters. You can specify literal URLs or use the following wildcards:
- * to match any string, including slashes (/) and periods (.). You must accompany this wildcard with an alphanumeric string.
- ? to match any single character, including slashes and periods.
- [ x - y ] to match any single character in the range of x and y, where x represents one character and y represents another character in the ANSI character set.
- [ ! x - y ] to match any single character that is not in the range.
Step 14![]() (Optional) Enter this keyword to accompany each HTTPS proxy request with a username to provide basic, proxy authentication.
(Optional) Enter this keyword to accompany each HTTPS proxy request with a username to provide basic, proxy authentication.
Step 15![]() Enter a password to send to the proxy server with each HTTPS request.
Enter a password to send to the proxy server with each HTTPS request.
SSO Servers
The SSO Server pane lets you configure or delete single sign-on (SSO) for users of clientless SSL VPN connecting to a Computer Associates SiteMinder SSO server or to a Security Assertion Markup Language (SAML), Version 1.1, Browser Post Profile SSO server. SSO support, available only for clientless SSL VPN, lets users access different secure services on different servers without entering a username and password more than once.
You can choose from four methods when configuring SSO: Auto Signon using basic HTTP and/or NTLMv1 authentication, HTTP Form protocol, or Computer Associates eTrust SiteMinder (formerly Netegrity SiteMinder), or SAML, Version 1.1 Browser Post Profile.
Restrictions
The SAML Browser Artifact profile method of exchanging assertions is not supported.
The following sections describe the procedures for setting up SSO with both SiteMinder and SAML Browser Post Profile.
- Configuring SiteMinder and SAML Browser Post Profile—configures SSO with basic HTTP or NTLM authentication.
- Configuring Session Settings —configures SSO with the HTTP Form protocol.
The SSO mechanism either starts as part of the AAA process (HTTP Forms) or just after successful user authentication to either a AAA server (SiteMinder) or a SAML Browser Post Profile server. In these cases, the clientless SSL VPN server running on the ASA acts as a proxy for the user to the authenticating server. When a user logs in, the clientless SSL VPN server sends an SSO authentication request, including username and password, to the authenticating server using HTTPS.
If the authenticating server approves the authentication request, it returns an SSO authentication cookie to the clientless SSL VPN server. This cookie is kept on the ASA on behalf of the user and used to authenticate the user to secure websites within the domain protected by the SSO server.
Configuring SiteMinder and SAML Browser Post Profile
SSO authentication with SiteMinder or with SAML Browser Post Profile is separate from AAA and occurs after the AAA process completes. To set up SiteMinder SSO for a user or group, you must first configure a AAA server (RADIUS, LDAP and so forth). After the AAA server authenticates the user, the clientless SSL VPN server uses HTTPS to send an authentication request to the SiteMinder SSO server.
In addition to configuring the ASA, for SiteMinder SSO, you also must configure your CA SiteMinder Policy Server with the Cisco authentication scheme. See Adding the Cisco Authentication Scheme to SiteMinder.
For SAML Browser Post Profile you must configure a Web Agent (Protected Resource URL) for authentication.
Detailed Steps
Use the SAML server documentation provided by the server software vendor to configure the SAML server in Relying Party mode. The following fields are displayed:
- Server Name— Display only. Displays the names of configured SSO Servers. The minimum number of characters is 4, and the maximum is 31.
- Authentication Type— Display only. Displays the type of SSO server. The ASA currently supports the SiteMinder type and the SAML Browser Post Profile type.
- URL— Display only. Displays the SSO server URL to which the ASA makes SSO authentication requests.
- Secret Key— Display only. Displays the secret key used to encrypt authentication communications with the SSO server. The key can be comprised of any regular or shifted alphanumeric character. There is no minimum or maximum number of characters.
- Maximum Retries— Display only. Displays the number of times the ASA retries a failed SSO authentication attempt. The range is 1 to 5 retries, and the default number of retries is 3.
- Request Timeout (seconds)— Display only. Displays the number of seconds before a failed SSO authentication attempt times out. The range is 1 to 30 seconds, and the default number of seconds is 5.
- Add/Edit—Opens the Add/Edit SSO Server dialog box.
- Delete—Deletes the selected SSO server.
- Assign—Highlight an SSO server and click this button to assign the selected server to one or more VPN group policies or user policies.
Step 1![]() Configure the SAML server parameters to represent the asserting party (the ASA):
Configure the SAML server parameters to represent the asserting party (the ASA):
- Recipient consumer (Web Agent) URL (same as the assertion consumer URL configured on the ASA)
- Issuer ID, a string, usually the hostname of appliance
- Profile type -Browser Post Profile
Step 2![]() Configure certificates.
Configure certificates.
Step 3![]() Specify that asserting party assertions must be signed.
Specify that asserting party assertions must be signed.
Step 4![]() Select how the SAML server identifies the user:
Select how the SAML server identifies the user:
Adding the Cisco Authentication Scheme to SiteMinder
Besides configuring the ASA for SSO with SiteMinder, you must also configure your CA SiteMinder Policy Server with the Cisco authentication scheme, provided as a Java plug-in. This section presents general tasks, not a complete procedure. Refer to the CA SiteMinder documentation for the complete procedure for adding a custom authentication scheme. To configure the Cisco authentication scheme on your SiteMinder Policy Server, perform the following steps:
Prerequisites
Configuring the SiteMinder Policy Server requires experience with SiteMinder.
Detailed Steps
Step 1![]() With the Siteminder Administration utility, create a custom authentication scheme being sure to use the following specific arguments:
With the Siteminder Administration utility, create a custom authentication scheme being sure to use the following specific arguments:
Step 2![]() Using your Cisco.com login, download the file cisco_vpn_auth.jar from http://www.cisco.com/cisco/software/navigator.html and copy it to the default library directory for the SiteMinder server. This.jar file is also available on the Cisco ASA CD.
Using your Cisco.com login, download the file cisco_vpn_auth.jar from http://www.cisco.com/cisco/software/navigator.html and copy it to the default library directory for the SiteMinder server. This.jar file is also available on the Cisco ASA CD.
Adding or Editing SSO Servers
This SSO method uses CA SiteMinder and SAML Browser Post Profile. You can also set up SSO using the HTTP Form protocol, or Basic HTML and NTLM authentication. To use the HTTP Form protocol, see Configuring Session Settings. To set use basic HTML or NTLM authentication, use the auto-signon command at the command line interface.
Detailed Steps
Step 1![]() If adding a server, enter the name of the new SSO server. If editing a server, this field is display only; it displays the name of the selected SSO server.
If adding a server, enter the name of the new SSO server. If editing a server, this field is display only; it displays the name of the selected SSO server.
Step 2![]() Display only. Displays the type of SSO server. The types currently supported by the ASA are SiteMinder and SAML Browser Post Profile.
Display only. Displays the type of SSO server. The types currently supported by the ASA are SiteMinder and SAML Browser Post Profile.
Step 3![]() Enter a secret key used to encrypt authentication requests to the SSO server. Key characters can be any regular or shifted alphanumeric characters. There is no minimum or maximum number of characters. The secret key is similar to a password: you create it, save it, and configure it. It is configured on the ASA, the SSO server, and the SiteMinder Policy Server using the Cisco Java plug-in authentication scheme.
Enter a secret key used to encrypt authentication requests to the SSO server. Key characters can be any regular or shifted alphanumeric characters. There is no minimum or maximum number of characters. The secret key is similar to a password: you create it, save it, and configure it. It is configured on the ASA, the SSO server, and the SiteMinder Policy Server using the Cisco Java plug-in authentication scheme.
Step 4![]() Enter the number of times the ASA retries a failed SSO authentication attempt before the authentication times-out. The range is from 1 to 5 retries inclusive, and the default is 3 retries.
Enter the number of times the ASA retries a failed SSO authentication attempt before the authentication times-out. The range is from 1 to 5 retries inclusive, and the default is 3 retries.
Step 5![]() Enter the number of seconds before a failed SSO authentication attempt times out. The range is from1 to 30 seconds inclusive, and the default is 5 seconds.
Enter the number of seconds before a failed SSO authentication attempt times out. The range is from1 to 30 seconds inclusive, and the default is 5 seconds.
Application Access User Notes
The following sections provide information about using application access:
- Closing Application Access to Prevent hosts File Errors
- Recovering from hosts File Errors When Using Application Access
Closing Application Access to Prevent hosts File Errors
To prevent hosts file errors that can interfere with Application Access, close the Application Access window properly when you finish using Application Access. To do so, click the close icon.
Recovering from hosts File Errors When Using Application Access
The following errors can occur if you do not close the Application Access window properly:
- The next time you try to start Application Access, it might be disabled; you receive a
Backup HOSTS File Founderror message. - The applications themselves might be disabled or might malfunction, even when you are running them locally.
These errors can result from terminating the Application Access window in any improper way. For example:
Understanding the hosts File
The hosts file on your local system maps IP addresses to host names. When you start Application Access, clientless SSL VPN modifies the hosts file, adding clientless SSL VPN-specific entries. Stopping Application Access by properly closing the Application Access window returns the file to its original state.
Note![]() Microsoft anti-spyware software blocks changes that the port forwarding Java applet makes to the hosts file. See www.microsoft.com for information on how to allow hosts file changes when using anti-spyware software.
Microsoft anti-spyware software blocks changes that the port forwarding Java applet makes to the hosts file. See www.microsoft.com for information on how to allow hosts file changes when using anti-spyware software.
Stopping Application Access Improperly
When Application Access terminates abnormally, the hosts file remains in a clientless SSL VPN-customized state. Clientless SSL VPN checks the state the next time you start Application Access by searching for a hosts.webvpn file. If it finds one, a Backup HOSTS File Found error message (Figure 72-14) appears, and Application Access is temporarily disabled.
Once you shut down Application Access improperly, you leave your remote access client/server applications in limbo. If you try to start these applications without using clientless SSL VPN, they might malfunction. You might find that hosts that you normally connect to are unavailable. This situation could commonly occur if you run applications remotely from home, fail to quit the Application Access window before shutting down the computer, then try to run the applications later from the office.
Reconfiguring a Host’s File Automatically Using Clientless SSL VPN
If you are able to connect to your remote access server, follow these steps to reconfigure the host’s file and re-enable both Application Access and the applications.
Detailed Steps
Step 1![]() Start clientless SSL VPN and log in. The home page opens.
Start clientless SSL VPN and log in. The home page opens.
Step 2![]() Click the Applications Access link. A
Click the Applications Access link. A Backup HOSTS File Found message appears. (See Figure 72-14.)
Figure 72-14 Backup HOSTS File Found Message

Step 3![]() Choose one of the following options:
Choose one of the following options:
- Restore from backup —Clientless SSL VPN forces a proper shutdown. It copies the hosts.webvpn backup file to the
hostsfile, restoring it to its original state, then deletes hosts.webvpn. You then have to restart Application Access. - Do nothing —Application Access does not start. The remote access home page reappears.
- Delete backup —Clientless SSL VPN deletes the hosts.webvpn file, leaving the hosts file in its clientless SSL VPN-customized state. The original
hostsfile settings are lost. Application Access then starts, using the clientless SSL VPN-customized hosts file as the new original. Choose this option only if you are unconcerned about losing hosts file settings. If you or a program you use might have edited the hosts file after Application Access has shut down improperly, choose one of the other options, or edit the hosts file manually. (See “Reconfiguring hosts File Manually.”)
Reconfiguring hosts File Manually
If you are not able to connect to your remote access server from your current location, or if you have customized the hosts file and do not want to lose your edits, follow these steps to reconfigure the hosts file and reenable both Application Access and the applications.
Detailed Steps
Step 1![]() Locate and edit your hosts file. The most common location is c:\windows\sysem32\drivers\etc\hosts.
Locate and edit your hosts file. The most common location is c:\windows\sysem32\drivers\etc\hosts.
Step 2![]() Check to see if any lines contain the string:
Check to see if any lines contain the string: # added by WebVpnPortForward If any lines contain this string, your hosts file is clientless SSL VPN-customized. If your hosts file is clientless SSL VPN-customized, it looks similar to the following example:
Step 3![]() Delete the lines that contain the string:
Delete the lines that contain the string: # added by WebVpnPortForward
Step 4![]() Save and close the file.
Save and close the file.
Step 5![]() Start clientless SSL VPN and log in.
Start clientless SSL VPN and log in.
Step 6![]() Click the Application Access link.
Click the Application Access link.
The Application Access window appears. Application Access is now enabled.
Configuring File Access
Clientless SSL VPN serves remote users with HTTPS portal pages that interface with proxy CIFS and/or FTP clients running on the ASA. Using either CIFS or FTP, clientless SSL VPN provides users with network access to the files on the network, to the extent that the users meet user authentication requirements and the file properties do not restrict access. The CIFS and FTP clients are transparent; the portal pages delivered by clientless SSL VPN provide the appearance of direct access to the file systems.
When a user requests a list of files, clientless SSL VPN queries the server designated as the master browser for the IP address of the server containing the list. The ASA gets the list and delivers it to the remote user on a portal page.
Clientless SSL VPN lets the user invoke the following CIFS and FTP functions, depending on user authentication requirements and file properties:
- Navigate and list domains and workgroups, servers within a domain or workgroup, shares within a server, and files within a share or directory
- Create directories
- Download, upload, rename, move, and delete files
The ASA uses a master browser, WINS server, or DNS server, typically on the same network as the ASA or reachable from that network, to query the network for a list of servers when the remote user clicks Browse Networks in the menu of the portal page or on the toolbar displayed during the clientless SSL VPN session.
The master browser or DNS server provides the CIFS/FTP client on the ASA with a list of the resources on the network, which clientless SSL VPN serves to the remote user.
Note![]() Before configuring file access, you must configure the shares on the servers for user access.
Before configuring file access, you must configure the shares on the servers for user access.
CIFS File Access Requirement and Limitation
To access \\server\share\subfolder\personal folder, the user must have list permission for all points above personal folder.
Clientless SSL VPN does not support the Copy and Paste buttons displayed on the CIFS browser. Users must click Download to copy files from CIFS directories to the local desktop.
The CIFS browse server feature does not support double-byte character share names (share names exceeding 13 characters in length). This only affects the list of folders displayed, and does not affect user access to the folder. As a workaround, you can pre-configure the bookmark(s) for the CIFS folder(s) that use double-byte share names, or the user can enter the URL or bookmark of the folder in the format cifs://server/<long-folder-name>. For example:
Adding Support for File Access
Configure file access as follows:
Note![]() The first procedure describes how to specify the master browser and WINS servers. As an alternative, you can use ASDM to configure URL lists and entries that provide access to file shares.
The first procedure describes how to specify the master browser and WINS servers. As an alternative, you can use ASDM to configure URL lists and entries that provide access to file shares.
Adding a share in ASDM does not require a master browser or a WINS server. However, it does not provide support for the Browse Networks link. You can use a hostname or an IP address to refer to ServerA when entering this command. If you use a hostname, the ASA requires a DNS server to resolve it to an IP address.
Detailed Steps
|
|
|
|
|---|---|---|
nbns-server {IPaddress | hostname} [master] [timeout timeout] [retry retries] |
Browses a network or domain for each NetBIOS Name Server (NBNS).
|
|
Displays the NBNS servers already present in the connection profile configuration. |
||
|
hostname(config-webvpn-custom)# page style background-color:white |
Specifies the character set to encode in clientless SSL VPN portal pages delivered to remote users. By default, the encoding type set on the remote browser determines the character set for clientless SSL VPN portal pages, so you need to set the character encoding only if it is necessary to ensure proper encoding on the browser. Charset is a string consisting of up to 40 characters, and equal to one of the valid character sets identified in http://www.iana.org/assignments/character-sets. You can use either the name or the alias of a character set listed on that page. Examples include iso-8859-1, shift_jis, and ibm850. Sets the character-encoding attribute to support Japanese Shift_JIS characters, removes the font family, and retains the default background color. |
|
| file-encoding {server-name | server-ip-address} charset |
Specifies the encoding for clientless SSL VPN portal pages from specific CIFS servers. Thus, you can use different file-encoding values for CIFS servers that require different character encodings. Sets the file-encoding attribute of the CIFS server 10.86.5.174 to support IBM860 (alias “CP860”) characters/. |
For a complete description of these commands, see the Cisco Security Appliance Command Reference.
Ensuring Clock Accuracy for SharePoint Access
The clientless SSL VPN server on the ASA uses cookies to interact with applications such as Microsoft Word on the endpoint. The cookie expiration time set by the ASA can cause Word to malfunction when accessing documents on a SharePoint server if the time on the ASA is incorrect. To prevent this malfunction, set the ASA clock properly. We recommend configuring the ASA to dynamically synchronize the time with an NTP server. For instructions, see “Setting the Date and Time.”
Customizing the Clientless SSL VPN User Experience
You can customize the clientless SSL VPN user experience, including the logon, portal, and logout pages. There are two methods you can use. You can customize pre-defined page components in the Add/Edit Customization Object window. This window adds, or makes changes to, an XML file stored on the ASA (a customization object) that is used to customize the pages. Alternatively, you can export the XML file to a local computer or server, make changes to the XML tags, and re-import the file to the ASA. Either method creates a customization object that you apply to a connection profile or group policy.
Rather than customizing the pre-defined components of the logon page, you can create your own page and import it to the ASA for full customization. To do this see the “Replacing the Logon Page with your own Fully Customized Page” section.
You can customize pre-defined components of the logon page, including titles, language options, and messages to users. Alternatively, you can completely replace the page with your own custom page (full customization). The following sections detail both procedures:
- Customizing the Logon Page with the Customization Editor
- Replacing the Logon Page with your own Fully Customized Page
Customizing the Logon Page with the Customization Editor
Figure 72-15 shows the logon page and the pre-defined components you can customize:
Figure 72-15 Components of Clientless Logon Page
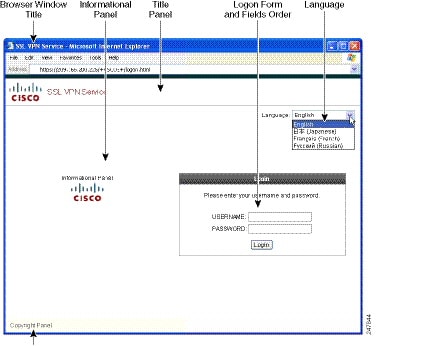
To customize all the components of the logon page, follow this procedure. You can preview your changes for each component by clicking the Preview button:
Step 1![]() Specify pre-defined customization. Go to Logon Page and select Customize pre-defined logon page components. Specify a title for the browser window.
Specify pre-defined customization. Go to Logon Page and select Customize pre-defined logon page components. Specify a title for the browser window.
Step 2![]() Display and customize the title panel. Go to Logon Page > Title Panel and check Display title panel. Enter text to display as the title and specify a logo. Specify any font styles.
Display and customize the title panel. Go to Logon Page > Title Panel and check Display title panel. Enter text to display as the title and specify a logo. Specify any font styles.
Step 3![]() Specify language options to display. Go to Logon Page > Language and check Enable Language Selector. Add or delete any languages to display to remote users. Languages in the list require translation tables that you configure in Configuration > Remote Access VPN > Language Localization.
Specify language options to display. Go to Logon Page > Language and check Enable Language Selector. Add or delete any languages to display to remote users. Languages in the list require translation tables that you configure in Configuration > Remote Access VPN > Language Localization.
Step 4![]() Customize the logon form. Go to Logon Page > Logon Form. Customize the text of the form and the font style in the panel. The secondary password field appears to users only if a secondary authentication server is configured in the connection profile.
Customize the logon form. Go to Logon Page > Logon Form. Customize the text of the form and the font style in the panel. The secondary password field appears to users only if a secondary authentication server is configured in the connection profile.
Step 5![]() Arrange the position of the logon form fields. Go to Logon Page > Form Fields Order. Use the up and down arrow buttons to change the order that the fields are displayed.
Arrange the position of the logon form fields. Go to Logon Page > Form Fields Order. Use the up and down arrow buttons to change the order that the fields are displayed.
Step 6![]() Add messages to users. Go to Logon Page > Informational Panel and check Display informational panel. Add text to display in the panel, change the position of the panel relative to the logon form, and specify a logo to display in this panel.
Add messages to users. Go to Logon Page > Informational Panel and check Display informational panel. Add text to display in the panel, change the position of the panel relative to the logon form, and specify a logo to display in this panel.
Step 7![]() Display a copyright statement. Go to Logon Page > Copyright Panel and check Display copyright panel. Add text to display for copyright purposes.
Display a copyright statement. Go to Logon Page > Copyright Panel and check Display copyright panel. Add text to display for copyright purposes.
Step 8![]() Click OK, then apply the changes to the customization object you edited.
Click OK, then apply the changes to the customization object you edited.
Replacing the Logon Page with your own Fully Customized Page
If you prefer to use your own, custom login screen, rather than changing specific components of the logon page we provide, you can perform this advanced customization using the Full Customization feature.
With Full Customization, you provide the HTML for your own login screen, and you insert Cisco HTML code that calls functions on the ASA that create the Login form and the Language Selector drop-down list.
This document describes the modifications you need to make to your HTML code and the tasks required to configure the ASA to use your code.
Figure 72-16 shows a simple example of a custom login screen enabled by the Full Customization feature.
Figure 72-16 Example of Full Customization of Logon Page
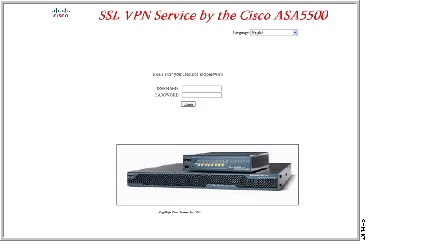
The following sections describe the tasks to customize the login screen:
Creating the Custom Login Screen File
The following HTML code is used as an example and is the code that displays:
</td></tr>
The indented code injects the Login form and the Language Selector on the screen. The function csco_ShowLoginForm('lform') injects the logon form. csco_ShowLanguageSelector('selector') injects the Language Selector.
Follow these steps to modify your HTML file:
Step 1![]() Name your file logon.inc. When you import the file, the ASA recognizes this filename as the logon screen.
Name your file logon.inc. When you import the file, the ASA recognizes this filename as the logon screen.
Step 2![]() Modify the paths of images used by the file to include /+CSCOU+/.
Modify the paths of images used by the file to include /+CSCOU+/.
Files that are displayed to remote users before authentication must reside in a specific area of the ASA cache memory represented by the path /+CSCOU+/. Therefore, the source for each image in the file must include this path. For example:
Step 3![]() Insert the special HTML code below. This code contains the Cisco functions, described earlier, that inject the login form and language selector onto the screen.
Insert the special HTML code below. This code contains the Cisco functions, described earlier, that inject the login form and language selector onto the screen.
Importing the File and Images
Follow these steps to import your HTML file and any images to the ASA:
Step 1![]() Import the file and images as Web Content.
Import the file and images as Web Content.
Step 2![]() Go to Clientless SSL VPN Access > Portal > Web Contents.
Go to Clientless SSL VPN Access > Portal > Web Contents.
Step 3![]() Click Import (1). The Import Web Content window displays. Enter the Source information (2). In the Destination area, select No for Require Authentication to access its content (3). This ensures the files are stored in the area of flash memory accessible to users before authentication.
Click Import (1). The Import Web Content window displays. Enter the Source information (2). In the Destination area, select No for Require Authentication to access its content (3). This ensures the files are stored in the area of flash memory accessible to users before authentication.
Step 4![]() Import any images used by the file as Web Content using the same window.
Import any images used by the file as Web Content using the same window.
Configuring the Security Appliance to use the Custom Login Screen
Follow these steps to enable the ASA to use the new login screen in a customization object:
Step 1![]() Select a customization object. Go to Clientless SSL VPN Access > Portal > Customization. Select a customization object in the table and click Edit. The Edit Customization Object window displays.
Select a customization object. Go to Clientless SSL VPN Access > Portal > Customization. Select a customization object in the table and click Edit. The Edit Customization Object window displays.
Step 2![]() In the navigation pane, select Logon Page.
In the navigation pane, select Logon Page.
Step 3![]() Choose Replace pre-defined logon page with a custom page.
Choose Replace pre-defined logon page with a custom page.
Step 4![]() Click Manage to import your logon page file. The Import Web Content window displays.
Click Manage to import your logon page file. The Import Web Content window displays.
Step 5![]() In the Destination area, select No to ensure your logon page is visible to users before they authenticate.
In the Destination area, select No to ensure your logon page is visible to users before they authenticate.
Step 6![]() Back in the Edit Customization Object window, click General and enable the customization object for the connection profile and/or group policies you desire.
Back in the Edit Customization Object window, click General and enable the customization object for the connection profile and/or group policies you desire.
Using Clientless SSL VPN with PDAs
You can access clientless SSL VPN from your Pocket PC or other certified personal digital assistant device. Neither the ASA administrator nor the clientless SSL VPN user need do anything special to use clientless SSL VPN with a certified PDA.
Cisco has certified the following PDA platform:
HP iPaq H4150
Pocket PC 2003
Windows CE 4.20.0, build 14053
Pocket Internet Explorer (PIE)
ROM version 1.10.03ENG
ROM Date: 7/16/2004
Some differences in the PDA version of clientless SSL VPN exist:
- A banner web page replaces the popup clientless SSL VPN window.
- An icon bar replaces the standard clientless SSL VPN floating toolbar. This bar displays the Go, Home and Logout buttons.
- The Show Toolbar icon is not included on the main clientless SSL VPN portal page.
- Upon clientless SSL VPN logout, a warning message provides instructions for closing the PIE browser properly. If you do not follow these instructions and you close the browser window in the common way, PIE does not disconnect from clientless SSL VPN or any secure website that uses HTTPS.
Restrictions
- Clientless SSL VPN supports OWA 2000 and OWA 2003 Basic Authentication. If Basic Authentication is not configured on an OWA server and a clientless SSL VPN user attempts to access that server, access is denied.
- Unsupported clientless SSL VPN features:
–![]() Application Access and other Java-dependent features.
Application Access and other Java-dependent features.
–![]() The Citrix Metaframe feature (if the PDA does not have the corresponding Citrix ICA client software).
The Citrix Metaframe feature (if the PDA does not have the corresponding Citrix ICA client software).
Using E-Mail over Clientless SSL VPN
Note![]() To configure access to client/server applications, web resources, and files and servers:
To configure access to client/server applications, web resources, and files and servers:
- Enable access in the Configuration | User Management | Base Group/Groups | WebVPN tab.
- Identify specific file servers and urls in the WebVPN Servers and URLS and Port Forwarding screens.
Clientless SSL VPN supports several ways to access e-mail. This section includes the following methods:
Configuring E-mail Proxies
Clientless SSL VPN supports IMAP4S, POP3S, and SMTPS e-mail proxies. The following attributes apply globally to e-mail proxy users.
Restrictions
E-mail clients such as MS Outlook, MS Outlook Express, and Eudora lack the ability to access the certificate store.
Detailed Steps
Configuring Web E-mail: MS Outlook Web App
The ASAsupports Microsoft Outlook Web App to Exchange Server 2010 and Microsoft Outlook Web Access to Exchange Server 2007, 2003, and 2000. OWA requires that users perform the following steps:
Detailed Steps
Step 1![]() Enter the URL of the e-mail service into the address field or click an associated bookmark in the clientless SSL VPN session.
Enter the URL of the e-mail service into the address field or click an associated bookmark in the clientless SSL VPN session.
Step 2![]() When prompted, enter the e-mail server username in the format domain\username.
When prompted, enter the e-mail server username in the format domain\username.
Step 3![]() Enter the e-mail password.
Enter the e-mail password.
Configuring Portal Access Rules
This enhancement allows customers to configure a global clientless SSL VPN access policy to permit or deny clientless SSL VPN sessions based on the data present in the HTTP header. If the ASA denies a clientless SSL VPN session, it returns an error code to the endpoint immediately.
The ASA evaluates this access policy before the endpoint authenticates to the ASA. As a result, in the case of a denial, fewer ASA processing resources are consumed by additional connection attempts from the endpoint.
Prerequisites
Log on to the ASA and enter global configuration mode. In global configuration mode, the ASA displays this prompt:
Detailed Steps
Step 1![]() Start ASDM and select Configuration > Remote Access VPN > Clientless SSL VPN Access > Portal > Portal Access Rule.
Start ASDM and select Configuration > Remote Access VPN > Clientless SSL VPN Access > Portal > Portal Access Rule.
The Portal Access Rule window opens.
Step 2![]() Click Add to create a portal access rule or select an existing rule and click Edit.
Click Add to create a portal access rule or select an existing rule and click Edit.
The Add (or Edit) Portal Access Rule dialog box opens.
Step 3![]() Enter a rule number from 1-65535 in the Rule Priority field.
Enter a rule number from 1-65535 in the Rule Priority field.
Rules are processed in order of priority from 1-65535.
Step 4![]() In the User Agent field, enter the name of the user agent you want to find in the HTTP header.
In the User Agent field, enter the name of the user agent you want to find in the HTTP header.
- Surround the string with wildcards (*) to generalize the string; for example, *Thunderbird*. We recommend using wildcards in your search string. Without wildcards, the rule may not match any strings or it may match many fewer strings than you expect.
- If your string contains a space, ASDM automatically adds quotes to the beginning and end of the string when it saves the rule. For example, if you enter
my agent, ASDM will save the string as“my agent”. ASA will then search for matches ofmy agent.
Do not add quotes to a string with spaces yourself unless you want ASA to match the quotes you added to the string. For example, if you enter “my agent” ASDM will save the string as "\"my agent\"" and try to find a match for “my agent” and it will not find my agent.
Step 5![]() In the Action field, select either Deny or Permit.
In the Action field, select either Deny or Permit.
The ASA will deny or permit a clientless SSL VPN connection based on this setting.
Step 6![]() Enter an HTTP message code in the Returned HTTP Code field.
Enter an HTTP message code in the Returned HTTP Code field.
The HTTP message number 403 is pre-populated in the field and is the default value for portal access rules. The allowed range of message codes is 200-599.
Optimizing Clientless SSL VPN Performance
The ASA provides several ways to optimize clientless SSL VPN performance and functionality. Performance improvements include caching and compressing web objects. Functionality tuning includes setting limits on content transformation and proxy-bypass. APCF provides an additional method of tuning content transformation. The following sections explain these features:
Configuring Caching
Caching enhances clientless SSL VPN performance. It stores frequently reused objects in the system cache, which reduces the need to perform repeated rewriting and compressing of content. It reduces traffic between clientless SSL VPN and the remote servers, with the result that many applications run much more efficiently.
By default, caching is enabled. You can customize the way caching works for your environment by using the caching commands in cache mode.
Detailed Steps
|
|
|
|
|---|---|---|
Caches all cacheable web objects, content not subject to rewriting. Examples include images and PDF files. |
Configuring Content Transformation
By default, the ASA processes all clientless SSL VPN traffic through a content transformation/rewriting engine that includes advanced elements such as JavaScript and Java to proxy HTTP traffic that may have different semantics and access control rules depending on whether the user is accessing an application within or independently of an SSL VPN device.
Some web resources require highly individualized treatment. The following sections describe functionality that provides such treatment:
- Configuring a Certificate for Signing Rewritten Java Content
- Disabling Content Rewrite
- Using Proxy Bypass
- Configuring Application Profile Customization Framework
Subject to the requirements of your organization and the web content involved, you might use one of these features.
Configuring a Certificate for Signing Rewritten Java Content
Java objects which have been transformed by clientless SSL VPN can subsequently be signed using a PKCS12 digital certificate associated with a trustpoint.
Detailed Steps
Disabling Content Rewrite
You might not want some applications and web resources, for example, public websites, to go through the ASA. The ASA therefore lets you create rewrite rules that let users browse certain sites and applications without going through the ASA. This is similar to split-tunneling in an IPsec VPN connection.
Supporting Complex Web Objects
Using Proxy Bypass
You can configure the ASA to use proxy bypass when applications and web resources work better with the special content rewriting this feature provides. Proxy bypass is an alternative method of content rewriting that makes minimal changes to the original content. It is often useful with custom web applications.
You can use this command multiple times. The order in which you configure entries is unimportant. The interface and path mask or interface and port uniquely identify a proxy bypass rule.
You can configure multiple proxy bypass entries. The order in which you configure them is unimportant. The interface and path mask or interface and port uniquely identify a proxy bypass rule.
If you configure proxy bypass using ports rather than path masks, depending on your network configuration, you might need to change your firewall configuration to allow these ports access to the ASA. Use path masks to avoid this restriction. Be aware, however, that path masks can change, so you might need to use multiple pathmask statements to exhaust the possibilities.
A path is everything in a URL after the.com or.org or other types of domain name. For example, in the URL www.example.com/hrbenefits, hrbenefits is the path. Similarly, for the URL www.example.com/hrinsurance, hrinsurance is the path. If you want to use proxy bypass for all hr sites, you can avoid using the command multiple times by using the * wildcard as follows: /hr*.
Detailed Steps
|
|
|
|
|---|---|---|
You can set rules for when the ASA performs little or no content rewriting:
Step 1![]() Select the VLAN for proxy bypass.
Select the VLAN for proxy bypass.
Step 2![]() Specify either a port or a URI for proxy bypass:
Specify either a port or a URI for proxy bypass:
- Port—(radio button) Click to use a port for proxy bypass. The valid port numbers are 20000-21000.
- Port (field)—Enter a high-numbered port for the ASA to reserve for proxy bypass.
- Path Mask—(radio button) Click to use a URL for proxy bypass.
- Path Mask—(Field) Enter a URL for proxy bypass. It can contain a regular expression.
Step 3![]() Define target URLs for proxy bypass:
Define target URLs for proxy bypass:
- URL—(drop-down list) Click either http or https as the protocol.
- URL (text field)—Enter a URL to which you want to apply proxy bypass.
Step 4![]() Specify the content to rewrite. The choices are none or a combination of XML, links, and cookies.
Specify the content to rewrite. The choices are none or a combination of XML, links, and cookies.
Configuring Application Profile Customization Framework
An APCF profile for clientless SSL VPN lets the ASA handle non-standard applications and web resources so that they display correctly over a clientless SSL VPN connection. An APCF profile contains a script that specifies when (pre, post), where (header, body, request, response), and what data to transform for a particular application. The script is in XML and uses sed (stream editor) syntax for string/text transformation. Multiple APCF profiles can run in parallel on an ASA. Within an APCF profile script, multiple APCF rules can apply. In this case, the ASA processes the oldest rule first (based on configuration history), then the next oldest rule, and so forth.
You can store APCF profiles on the ASA flash memory, or on an HTTP, HTTPS, or TFTP server.
Restrictions
We recommend that you configure an APCF profile only with the assistance of Cisco personnel.
Detailed Steps
Step 1![]() Use the following commands to add, edit, and delete APCF packets and put them in priority order:
Use the following commands to add, edit, and delete APCF packets and put them in priority order:
- APCF File Location—Displays information about the location of the APCF package. This can be on the ASA flash memory, or on an HTTP, HTTPS, FTP, or TFTP server.
- Add/Edit—Click to add or edit a new or existing APCF profile.
- Delete—Click to remove an existing APCF profile. There is no confirmation or undo.
- Move Up—Click to rearrange APCF profiles within a list. The list determines the order in which the ASA attempts to use APCF profiles.
Step 2![]() Click Flash file to locate an APCF file stored on the ASA flash memory.
Click Flash file to locate an APCF file stored on the ASA flash memory.
Step 3![]() Enter the path to an APCF file stored on flash memory. If you already added a path, it displays to an APCF file stored on flash memory after you browse to locate it.
Enter the path to an APCF file stored on flash memory. If you already added a path, it displays to an APCF file stored on flash memory after you browse to locate it.
Step 4![]() Click Browse Flash to browse flash memory to locate the APCF file. A Browse Flash Dialog pane displays. Use the Folders and Files columns to locate the APCF file. Highlight the APCF file and click OK. The path to the file then displays in the Path field.
Click Browse Flash to browse flash memory to locate the APCF file. A Browse Flash Dialog pane displays. Use the Folders and Files columns to locate the APCF file. Highlight the APCF file and click OK. The path to the file then displays in the Path field.
Note![]() If you do not see the name of an APCF file that you recently downloaded, click Refresh.
If you do not see the name of an APCF file that you recently downloaded, click Refresh.
- Upload —Click to upload an APCF file from a local computer to the ASA flash file system. The Upload APCF package pane displays.
- URL—Click to use an APCF file stored on an HTTP, HTTPS or TFTP server.
- ftp, http, https, and tftp (unlabeled)—Identify the server type.
- URL (unlabeled)—Enter the path to the FTP, HTTP, HTTPS, or TFTP server.
Uploading APCF Packages
Follow these steps to upload a APCF package:
Step 1![]() The Local File Path field shows the path to the APCF file on your computer. Click Browse Local to automatically insert the path in this field, or enter the path.
The Local File Path field shows the path to the APCF file on your computer. Click Browse Local to automatically insert the path in this field, or enter the path.
Step 2![]() Click Browse Local Files to locate and choose the APCF file on your computer that you want to transfer. The Select File Path dialog box displays the contents of the folder you last accessed on your local computer. Navigate to the APCF file, choose it, and click Open. ASDM inserts the file path into the Local File Path field.
Click Browse Local Files to locate and choose the APCF file on your computer that you want to transfer. The Select File Path dialog box displays the contents of the folder you last accessed on your local computer. Navigate to the APCF file, choose it, and click Open. ASDM inserts the file path into the Local File Path field.
The Flash File System Path shows the path on the ASA to which to upload the APCF file.
Step 3![]() Click Browse Flash to identify the location on the ASA to which you want to upload the APCF file. The Browse Flash dialog box displays the contents of flash memory.
Click Browse Flash to identify the location on the ASA to which you want to upload the APCF file. The Browse Flash dialog box displays the contents of flash memory.
Step 4![]() In the Browse Flash dialog box, the File Name field displays the name of the APCF file you selected on your local computer. We recommend that you use this name to prevent confusion. Confirm that this file displays the correct filename, and click OK.
In the Browse Flash dialog box, the File Name field displays the name of the APCF file you selected on your local computer. We recommend that you use this name to prevent confusion. Confirm that this file displays the correct filename, and click OK.
The Browse Flash dialog box closes. ASDM inserts the destination file path in the Flash File System Path field.
Step 5![]() Click Upload File when you have identified the location of the APCF file on your computer, and the location where you want to download it to the ASA.
Click Upload File when you have identified the location of the APCF file on your computer, and the location where you want to download it to the ASA.
A Status window appears and remains open for the duration of the file transfer.
Step 6![]() Following the transfer, an Information window displays the message, “File is uploaded to flash successfully.” Click OK. The Upload Image dialog window removes the contents of the Local File Path and Flash File System Path fields, indicating you can upload another file. To do so, repeat these instructions. Otherwise, click Close.
Following the transfer, an Information window displays the message, “File is uploaded to flash successfully.” Click OK. The Upload Image dialog window removes the contents of the Local File Path and Flash File System Path fields, indicating you can upload another file. To do so, repeat these instructions. Otherwise, click Close.
The Upload image dialog box closes.
Step 7![]() Click Close after you upload the APCF file to flash memory or if you decide not to upload it. If you do upload it, the filename appears in the APCF File Location field of the APCF window. If you do not upload it, a Close Message dialog box prompts, “Are you sure you want to close the dialog without uploading the file?” Click OK if you do not want to upload the file. The Close Message and Upload Image dialog boxes close, revealing the APCF Add/Edit pane. Otherwise, click Cancel in the Close Message dialog box. The dialog box closes, revealing the Upload Image dialog box again, with the values in the fields intact. Click Upload File.
Click Close after you upload the APCF file to flash memory or if you decide not to upload it. If you do upload it, the filename appears in the APCF File Location field of the APCF window. If you do not upload it, a Close Message dialog box prompts, “Are you sure you want to close the dialog without uploading the file?” Click OK if you do not want to upload the file. The Close Message and Upload Image dialog boxes close, revealing the APCF Add/Edit pane. Otherwise, click Cancel in the Close Message dialog box. The dialog box closes, revealing the Upload Image dialog box again, with the values in the fields intact. Click Upload File.
APCF Syntax
APCF profiles use XML format, and sed script syntax, with the XML tags in Table 72-10 .
Guidelines
Misuse of an APCF profile can result in reduced performance and undesired rendering of content. In most cases, Cisco Engineering supplies APCF profiles to solve specific application rendering issues.
Configuration Examples for APCF
<APCF>
<version>1.0</version>
<application>
<id>Do not compress content from example.com</id>
<apcf-entities>
<process-request-header>
<conditions>
<server-fnmatch>*.example.com</server-fnmatch>
</conditions>
<action>
<do><no-gzip/></do>
</action>
</process-request-header>
</apcf-entities>
</application>
</APCF>
Squelching Application Keep-Alives
Using GZIP Compression
Configuring File Access
Configure access to files and servers in the Configuration | Tunneling and Security | WebVPN | Servers and URLs screen. Remember to select CIFS as Server Type.
Configuring Access to Applications
Configure access to TCP/IP applications in the Configuration | Tunneling and Security | WebVPN | Port Forwarding screen.
Configuring Web Access
Configure access to URLs in the Configuration | Tunneling and Security | WebVPN | Servers and URLs screen. Remember to select CIFS as Server Type.
Using the WebVPN Capture Tool
The WebVPN CLI includes a capture tool that lets you log information about websites that do not display properly over a WebVPN connection. The data this tool records can help your Cisco customer support representative troubleshoot problems.
WebVPN Capture Tool Output
The output of the WebVPN capture tool consists of two files:
- mangled.1, 2,3, 4... and so on, depending on the web page activity. The mangle files record the html actions of the VPN Concentrator transferring these pages on a WebVPN connection.
- original.1,2,3,4... and so on, depending on the web page activity. The original files are the files the URL sent to the VPN Concentrator.
Viewing and Using WebVPN Capture Tool Output
To open and view these files, go to Administration | File Management. Zip the output files and send them to your Cisco support representative.
Note![]() Using the WebVPN capture tool does impact VPN Concentrator performance. Be sure to disable the capture tool after you have generated the output files. See Step 5 in the next section for the location of the Enable/Disable parameter.
Using the WebVPN capture tool does impact VPN Concentrator performance. Be sure to disable the capture tool after you have generated the output files. See Step 5 in the next section for the location of the Enable/Disable parameter.
Clientless SSL VPN End User Setup
This section is for the system administrator who sets up clientless SSL VPN for end users. It describes how to customize the end-user interface.
This section summarizes configuration requirements and tasks for a remote system. It specifies information to communicate to users to get them started using clientless SSL VPN. It includes the following topics:
- Defining the End User Interface
- Customizing Clientless SSL VPN Pages
- Customizing Help
- Requiring Usernames and Passwords
- Communicating Security Tips
- Configuring Remote Systems to Use Clientless SSL VPN Features
- Translating the Language of User Messages
Defining the End User Interface
The clientless SSL VPN end user interface consists of a series of HTML panels. A user logs on to clientless SSL VPN by entering the IP address of an ASA interface in the format https:// address. The first panel that displays is the login screen (Figure 72-17).
Figure 72-17 Clientless SSL VPN Login Screen

Viewing the Clientless SSL VPN Home Page
After the user logs in, the portal page opens (Figure 72-18).
Figure 72-18 Clientless SSL VPN Home Page
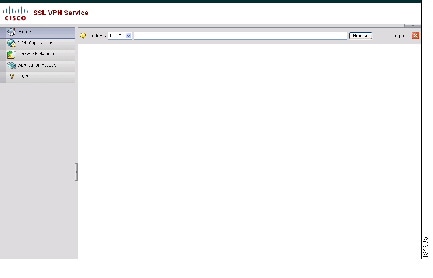
The home page displays all of the clientless SSL VPN features you have configured, and its appearance reflects the logo, text, and colors you have selected. This sample home page includes all available clientless SSL VPN features with the exception of identifying specific file shares. It lets users browse the network, enter URLs, access specific websites, and use Application Access (port forwarding and smart tunnels) to access TCP applications.
Viewing the Clientless SSL VPN Application Access Panel
To start port forwarding or smart tunnels, a user clicks the Go button in the Application Access box. The Application Access window opens (Figure 72-19).
Figure 72-19 Clientless SSL VPN Application Access Window
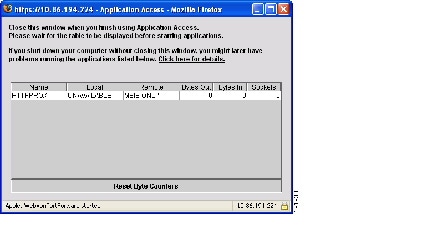
This window displays the TCP applications configured for this clientless SSL VPN connection. To use an application with this panel open, the user starts the application in the normal way.
Note![]() A stateful failover does not retain sessions established using Application Access. Users must reconnect following a failover.
A stateful failover does not retain sessions established using Application Access. Users must reconnect following a failover.
Viewing the Floating Toolbar
The floating toolbar shown in Figure 72-20 represents the current clientless SSL VPN session.
Figure 72-20 Clientless SSL VPN Floating Toolbar
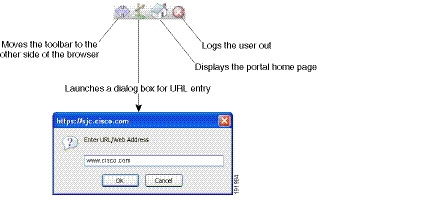
Be aware of the following characteristics of the floating toolbar:
- The toolbar lets you enter URLs, browse file locations, and choose preconfigured web connections without interfering with the main browser window.
- If you configure your browser to block popups, the floating toolbar cannot display.
- If you close the toolbar, the ASA prompts you to confirm that you want to end the clientless SSL VPN session.
See Table 72-17 for detailed information about using clientless SSL VPN.
Customizing Clientless SSL VPN Pages
You can change the appearance of the portal pages displayed to clientless SSL VPN users. This includes the Login page displayed to users when they connect to the security appliance, the Home page displayed to users after the security appliance authenticates them, the Application Access window displayed when users launch an application, and the Logout page displayed when users log out of clientless SSL VPN sessions.
After you customize the portal pages, you can save your customization and apply it to a specific connection profile, group policy, or user. The changes do not take effect until you reload the ASA, or you disable and then enable clientless SSL.
You can create and save many customization objects, enabling the security appliance to change the appearance of portal pages for individual users or groups of users.
This section includes the following topics:
- Information About Customization
- Exporting a Customization Template
- Editing the Customization Template
- Importing a Customization Object
- Applying Customizations to Connection Profiles, Group Policies and Users
- Login Screen Advanced Customization
Information About Customization
The ASA uses customization objects to define the appearance of user screens. A customization object is compiled from an XML file which contains XML tags for all the customizable screen items displayed to remote users. The ASA software contains a customization template that you can export to a remote PC. You can edit this template and import the template back into the ASA as a new customization object.
When you export a customization object, an XML file containing XML tags is created at the URL you specify. The XML file created by the customization object named Template contains empty XML tags, and provides the basis for creating new customization objects. This object cannot be changed or deleted from cache memory but can be exported, edited, and imported back into the ASA as a new customization object.
Customization Objects, Connection Profiles, and Group Policies
Initially, when a user first connects, the default customization object (named DfltCustomization) identified in the connection profile (tunnel group) determines how the logon screen appears. If the connection profile list is enabled, and the user selects a different group which has its own customization, the screen changes to reflect the customization object for that new group.
After the remote user is authenticated, the screen appearance is determined by whether a customization object that has been assigned to the group policy.
Exporting a Customization Template
When you export a customization object, an XML file is created at the URL you specify. The customization template (named Template) contains empty XML tags and provides the basis for creating new customization objects. This object cannot be changed or deleted from cache memory but can be exported, edited, and imported back into the ASA as a new customization object.
Detailed Steps
Editing the Customization Template
This section shows the contents of the customization template and has convenient figures to help you quickly choose the correct XML tag and make changes that affect the screens.
You can use a text editor or an XML editor to edit the XML file. The following example shows the XML tags of the customization template. Some redundant tags have been removed for easier viewing:
Figure 72-21 shows the Logon page and its customizing XML tags. All these tags are nested within the higher-level tag <auth-page>.
Figure 72-21 Logon Page and Associated XML Tags
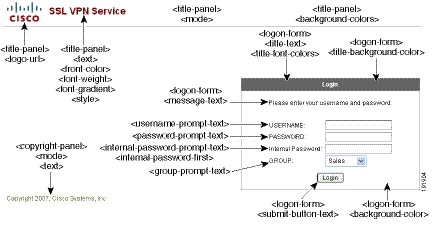
Figure 72-22 shows the Language Selector drop-down list that is available on the Logon page, and the XML tags for customizing this feature. All these tags are nested within the higher-level <auth-page> tag.
Figure 72-22 Language Selector on Logon Screen and Associated XML Tags
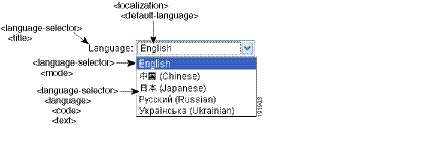
Figure 72-23 shows the Information Panel that is available on the Logon page, and the XML tags for customizing this feature. This information can appear to the left or right of the login box. These tags are nested within the higher-level <auth-page> tag.
Figure 72-23 Information Panel on Logon Screen and Associated XML Tags
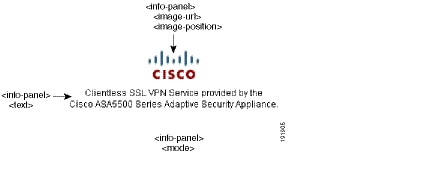
Figure 72-24 shows the Portal page and the XML tags for customizing this feature. These tags are nested within the higher-level <auth-page> tag.
Figure 72-24 Portal Page and Associated XML Tags
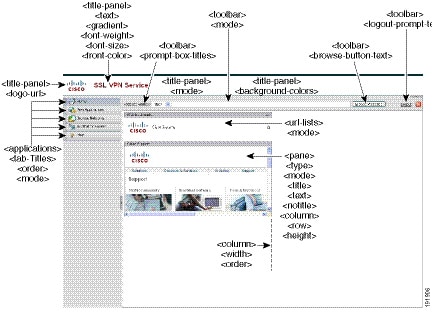
Importing a Customization Object
After you edit and save the XML file, import it into cache memory of the ASA using the following commands:
Detailed Steps
Applying Customizations to Connection Profiles, Group Policies and Users
After you create a customization, you can apply the customization to a connection profile (tunnel group), a group, or a user, with the customization command. The options displayed with this command are different depending on the mode you are in.
Note![]() After you customize the portal pages, the changes do not take effect until you reload the ASA, or you disable and then enable clientless SSL.
After you customize the portal pages, the changes do not take effect until you reload the ASA, or you disable and then enable clientless SSL.
For more information about configuring connection profiles, group policies, and users, see Chapter66, “Configuring Connection Profiles, Group Policies, and Users”.
Detailed Steps
Login Screen Advanced Customization
If you prefer to use your own, custom login screen, rather than changing specific screen elements of the login screen we provide, you can perform this advanced customization using the Full Customization feature.
With Full Customization, you provide the HTML for your own login screen, and you insert Cisco HTML code that calls functions on the ASA that create the Login form and the Language Selector drop-down list.
This section describes the modifications you need to make to your HTML code and the tasks required to configure the ASA to use your code.
Figure 72-25 shows the standard Cisco login screen that displays to clientless SSL VPN users. The Login form is displayed by a function called by the HTML code.
Figure 72-25 Standard Cisco Login Page
Figure 72-26 shows the Language Selector drop-down list. This feature is an option for clientless SSL VPN users and is also called by a function in the HTML code of the login screen.
Figure 72-26 Language Selector Drop-down List
Figure 72-27 shows a simple example of a custom login screen enabled by the Full Customization feature.
Figure 72-27 Example of Full Customization of Login Screens
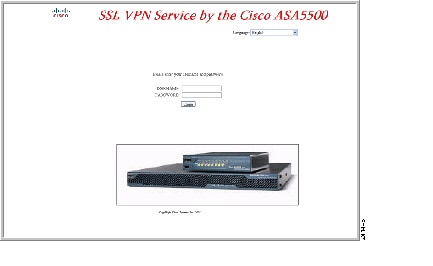
The following HTML code is used as an example and is the code that displays:
The indented code injects the Login form and the Language Selector on the screen. The function csco_ShowLoginForm('lform') injects the logon form. csco_ShowLanguageSelector('selector') injects the Language Selector.
Modifying Your HTML File
Detailed Steps
Step 1![]() Name your file logon.inc. When you import the file, the ASA recognizes this filename as the logon screen.
Name your file logon.inc. When you import the file, the ASA recognizes this filename as the logon screen.
Step 2![]() Modify the paths of images used by the file to include /+CSCOU+/.
Modify the paths of images used by the file to include /+CSCOU+/.
Files that are displayed to remote users before authentication must reside in a specific area of the ASA cache memory represented by the path /+CSCOU+/. Therefore, the source for each image in the file must include this path. For example:
Step 3![]() Insert the special HTML code below. This code contains the Cisco functions, described earlier, that inject the login form and language selector onto the screen.
Insert the special HTML code below. This code contains the Cisco functions, described earlier, that inject the login form and language selector onto the screen.
Customizing the Portal Page
Figure 72-28 Customizable Components of the Portal Page
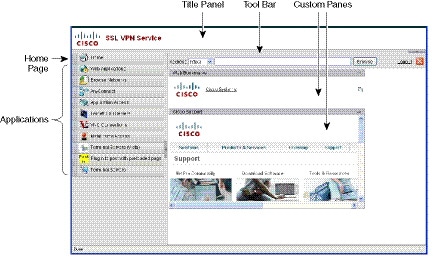
In addition to customizing the components of the page, you can divide the portal page into custom panes that display text, an image, an RSS feed, or HTML. In Figure 72-28, the portal page is divided into one column with two rows.
To customize the portal page, follow this procedure. You can preview your changes for each component by clicking the Preview button:
Step 1![]() Go to Portal Page and specify a title for the browser window.
Go to Portal Page and specify a title for the browser window.
Step 2![]() Display and customize the title panel. Go to Portal Page > Title Panel and check Display title panel. Enter text to display as the title and specify a logo. Specify any font styles.
Display and customize the title panel. Go to Portal Page > Title Panel and check Display title panel. Enter text to display as the title and specify a logo. Specify any font styles.
Step 3![]() Enable and customize the toolbar. Go to Portal Page > Toolbar and check Display toolbar. Customize the Prompt Box, Browse button, and Logout prompt as desired.
Enable and customize the toolbar. Go to Portal Page > Toolbar and check Display toolbar. Customize the Prompt Box, Browse button, and Logout prompt as desired.
Step 4![]() Customize the Applications list. Go to Portal Page > Applications and check Show navigation panel. The applications populated in the table are those applications you enabled in the ASA configuration, including client-server plugins and port forwarding applications.
Customize the Applications list. Go to Portal Page > Applications and check Show navigation panel. The applications populated in the table are those applications you enabled in the ASA configuration, including client-server plugins and port forwarding applications.
Step 5![]() Create custom panes in the portal page space. Go to Portal Page > Custom Panes and divide the window into rows and columns for text, images, RSS feeds, or HTML pages, as desired.
Create custom panes in the portal page space. Go to Portal Page > Custom Panes and divide the window into rows and columns for text, images, RSS feeds, or HTML pages, as desired.
Step 6![]() Specify a home page URL. Go to Portal Page > Home Page and check Enable custom intranet web page. Choose a bookmark mode that defines how bookmarks are organized.
Specify a home page URL. Go to Portal Page > Home Page and check Enable custom intranet web page. Choose a bookmark mode that defines how bookmarks are organized.
Configure a timeout alert message and a tooltip. Go to Portal Page > Timeout Alerts. See Configuring Custom Portal Timeout Alerts for full instructions.
Configuring Custom Portal Timeout Alerts
So that users of the clientless SSL VPN feature can manage their time in the VPN session, the clientless SSL VPN portal page displays a countdown timer showing the total time left before the clientless VPN session expires. Sessions can timeout due to inactivity or because they have reached the end of a maximum allowed connection time that you have configured.
You can create custom messages to alert users that their session is about to end because of an idle timeout or a session timeout. Your custom message replaces the default idle timeout message. The default message is, “ Your session will expire in %s . ” The %s place holder in your message is replaced by a ticking countdown timer.
Step 1![]() Start ASDM and select Configuration > Remote Access VPN > Clientless SSL VPN Access > Portal > Customization.
Start ASDM and select Configuration > Remote Access VPN > Clientless SSL VPN Access > Portal > Customization.
Step 2![]() Click Add to add a new customization object or select an existing customization object and click Edit to add a custom idle timeout message to an existing customization object.
Click Add to add a new customization object or select an existing customization object and click Edit to add a custom idle timeout message to an existing customization object.
Step 3![]() In the Add / Edit Customization Object pane, expand the Portal Page node on the navigation tree and click Timeout Alerts.
In the Add / Edit Customization Object pane, expand the Portal Page node on the navigation tree and click Timeout Alerts.
Step 4![]() Check Enable alert visual tooltip (red background for timer countdown). This displays the countdown timer as a tool tip on a red background. When users click the Time left area, the time area expands to display your custom timeout alert message. If you leave this box unchecked, users see the custom timeout alerts in a pop-up window.
Check Enable alert visual tooltip (red background for timer countdown). This displays the countdown timer as a tool tip on a red background. When users click the Time left area, the time area expands to display your custom timeout alert message. If you leave this box unchecked, users see the custom timeout alerts in a pop-up window.
Step 5![]() Enter a message in the Idle Timeout Message box and in the Session Timeout Message box. An example of a message could be,
Enter a message in the Idle Timeout Message box and in the Session Timeout Message box. An example of a message could be, Warning: Your session will end in %s. Please complete your work and prepare to close your applications.
Specifying a Custom Timeout Alert in a Customization Object File
If you desire, you can edit an existing customization object file outside of the ASA and import it to the ASA. For more information about Importing and Exporting Customization objects see Importing/Exporting Customization Object. See also, Creating XML-Based Portal Customization Objects and URL Lists.
The timeout messages are configured in the <timeout-alerts> XML element of your XML customization object file. The <timeout-alerts> element is a child of the <portal> element. The <portal> element is a child of the <custom> element.
The <timeout-alerts> element is placed after the <home-page> element and before any <application> elements in the order of the <portal> child elements.
You need to specify these child-elements of <timeout-alerts>:
- <alert-tooltip> – If set to “yes”, users see the countdown timer on a red background as a tool tip. Clicking the count down timer expands the tooltip to display your custom message. If set to “no” or if is undefined, users receive your custom messages in pop-up windows.
- <session-timeout-message> – Enter your custom session timeout message in this element. If set and not empty, users receive your custom message instead of the default message. The %s place holder in the message will be replaced with a ticking countdown timer.
- <idle-timeout-message> – Enter your custom idle timeout message in this element. If set and not empty, users receive your custom message instead of the default message. The %s place holder will be replaced with a ticking countdown timer.
Configuration Example for Timeout-alert Element and Child Elements
This example shows only the <timeout-alerts> elements of the <portal> element.
Note![]() Do not cut and paste this example into an existing customization object.
Do not cut and paste this example into an existing customization object.
Customizing the Logout Page
Figure 72-29 shows the logout page you can customize:
Figure 72-29 Components of the Logout Page
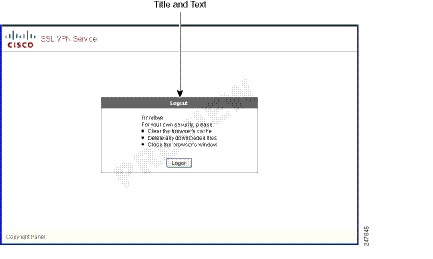
To customize the logout page, follow this procedure. You can preview your changes for each component by clicking the Preview button:
Step 1![]() Go to Logout Page. Customize the title or text as you desire.
Go to Logout Page. Customize the title or text as you desire.
Step 2![]() For the convenience of the user, you can display the Login button on the Logout page. To do this, check Show logon button. Customize the button text, if desired.
For the convenience of the user, you can display the Login button on the Logout page. To do this, check Show logon button. Customize the button text, if desired.
Step 3![]() Customize the title font or background, as desired.
Customize the title font or background, as desired.
Step 4![]() Click OK, then apply the changes to the customization object you edited.
Click OK, then apply the changes to the customization object you edited.
Adding Customization Object
To add a customization object, create a copy of and provide a unique name for the DfltCustomization object. Then you can modify or edit it to meet your requirements.
Detailed Steps
Step 1![]() Click Add and enter a name for the new customization object. Maximum 64 characters, no spaces.
Click Add and enter a name for the new customization object. Maximum 64 characters, no spaces.
Step 2![]() (Optional) Click Find to search for a customization object. Start typing in the field, and the tool searches the beginning characters of every field for a match. You can use wild cards to expand your search. For example, typing sal in the Find field matches a customization object named sales but not a customization object named wholesalers. If you type *sal in the Find field, the search finds the first instance of either sales or wholesalers in the table.
(Optional) Click Find to search for a customization object. Start typing in the field, and the tool searches the beginning characters of every field for a match. You can use wild cards to expand your search. For example, typing sal in the Find field matches a customization object named sales but not a customization object named wholesalers. If you type *sal in the Find field, the search finds the first instance of either sales or wholesalers in the table.
Use the up and down arrows to skip up or down to the next string match. Check the Match Case checkbox to make your search case sensitive.
Step 3![]() Specify when the onscreen keyboard shows on portal pages. The choices are as follows:
Specify when the onscreen keyboard shows on portal pages. The choices are as follows:
- Do not show OnScreen Keyboard
- Show only for the login page
- Show for all portal pages requiring authentication
Step 4![]() (Optional) Highlight a customization object and click Assign to assign the selected object to one or more group policies, connection profiles, or LOCAL users.
(Optional) Highlight a customization object and click Assign to assign the selected object to one or more group policies, connection profiles, or LOCAL users.
Importing/Exporting Customization Object
You can import or export already-existing customization objects. Import an object that you want to apply to end users. Export a customization object already resident on the ASA for editing purposes, after which you can reimport it.
Detailed Steps
Step 1![]() Identify the customization object by name. Maximum 64 characters, no spaces.
Identify the customization object by name. Maximum 64 characters, no spaces.
Step 2![]() Choose the method by which you want to import or export the customization file:
Choose the method by which you want to import or export the customization file:
- Local computer—Choose this method to import a file that resides on the local PC.
- Path—Provide the path to the file.
- Browse Local Files—Browse to the path for the file.
- Flash file system—Choose this method to export a file that resides on the ASA.
- Path—Provide the path to the file.
- Browse Flash—Browse to the path for the file.
- Remote server—Choose this option to import a customization file that resides on a remote server accessible from the ASA.
- Path—Identify the method to access the file (ftp, http, or https), and provide the path to the file.
Step 3![]() Click to import or export the file.
Click to import or export the file.
Creating XML-Based Portal Customization Objects and URL Lists
This section includes the following topics:
- Understanding the XML Customization File Structure
- Configuration Example for Customization
- Using the Customization Template
- Help Customization
- Import/Export Application Help Content
Understanding the XML Customization File Structure
Table 72-11 presents the file structure for an XML customization object.
Note![]() Absence of a parameter/tag results in a default/inherited value, while presence results in setting the parameter/tag value even it is an empty string.
Absence of a parameter/tag results in a default/inherited value, while presence results in setting the parameter/tag value even it is an empty string.
Configuration Example for Customization
The following example illustrates the following customization options:
- Hides tab for the File access application
- Changes title and order of Web Access application
- Defines two columns on the home page
- Adds an RSS pane
- Adds three panes (text, image, and html) at the top of second pane
Using the Customization Template
A customization template, named Template, contains all currently employed tags with corresponding comments that describe how to use them. Use the export command to download the customization template from the ASA, as follows:
You cannot change or delete the file Template. When you export it as in this example, you are saving it to a new name, default.xml. After you make your changes to this file, using it to create a customization object that meets the needs of your organization, you import it to the ASA, either as default.xml or another name of your choosing. For example:
hostname# import webvpn customization General tftp://webserver/custom.xml
hostname#
The Customization Template
The customization template, named Template, follows:
first
Help Customization
The ASA displays help content on the application panes during clientless sessions. Each clientless application pane displays its own help file content using a predetermined filename. For example, the help content displayed on the Application Access panel is from the file named app-access-hlp.inc. Table 72-12 shows the clientless application panels and predetermined filenames for the help content.
|
|
|
|
|---|---|---|
Telnet/SSH Servers4 |
||
|
|
You can customize the help files provided by Cisco or create help files in other languages. Then use the Import button to copy them to the flash memory of the ASA for display during subsequent clientless sessions. You can also export previously imported help content files, customize them, and reimport them to flash memory.
The following sections describe how to customize or create help content visible on clientless sessions:
Detailed Steps
Step 1![]() Click Import to launch the Import Application Help Content dialog, where you can import new help content to flash memory for display during clientless sessions.
Click Import to launch the Import Application Help Content dialog, where you can import new help content to flash memory for display during clientless sessions.
Step 2![]() (Optional) Click Export to retrieve previously imported help content selected from the table.
(Optional) Click Export to retrieve previously imported help content selected from the table.
Step 3![]() (Optional) Click Delete to delete previously imported help content selected from the table.
(Optional) Click Delete to delete previously imported help content selected from the table.
Step 4![]() The abbreviation of the language rendered by the browser is displayed. This field is not used for file translation; it indicates the language used in the file. To identify the name of a language associated with an abbreviation in the table, display the list of languages rendered by your browser. For example, a dialog window displays the languages and associated language codes when you use one of the following procedures:
The abbreviation of the language rendered by the browser is displayed. This field is not used for file translation; it indicates the language used in the file. To identify the name of a language associated with an abbreviation in the table, display the list of languages rendered by your browser. For example, a dialog window displays the languages and associated language codes when you use one of the following procedures:
- Open Internet Explorer and choose Tools > Internet Options > Languages > Add.
- Open Mozilla Firefox and choose Tools > Options > Advanced > General, click Choose next to Languages, and click Select a language to add.
The filename that the help content file was imported as is provided.
Customizing a Help File Provided by Cisco
To customize a help file provided by Cisco, you need to get a copy of the file from the flash memory card first. Get the copy and customize it by performing the following steps:
Step 1![]() Use your browser to establish a clientless session with the ASA.
Use your browser to establish a clientless session with the ASA.
Step 2![]() Display the help file by appending the string in “URL of Help File in Flash Memory of the Security Appliance” in Table 72-13 , to the address of the ASA, substituting language as described below, then press Enter.
Display the help file by appending the string in “URL of Help File in Flash Memory of the Security Appliance” in Table 72-13 , to the address of the ASA, substituting language as described below, then press Enter.
|
|
|
|
|---|---|---|
language is the abbreviation for the language rendered by the browser. It is not used for file translation; it indicates the language used in the file. For help files provided by Cisco in English, enter the abbreviation en.
The following example address displays the English version of the Terminal Servers help:
https:// address_of_security_appliance /+CSCOE+/help/en/rdp-hlp.inc
Step 3![]() Choose File > Save (Page) As.
Choose File > Save (Page) As.
Note![]() Do not change the contents of the File name box.
Do not change the contents of the File name box.
Step 4![]() Change the Save as type option to Web Page, HTML only and click Save.
Change the Save as type option to Web Page, HTML only and click Save.
Step 5![]() Use your preferred HTML editor to customize the file.
Use your preferred HTML editor to customize the file.
Note![]() You can use most HTML tags, but do not use tags that define the document and its structure (for example, do not use <html>, <title>, <body>, <head>, <h1>, <h2>, etc. You can use character tags, such as the <b> tag, and the <p>, <ol>, <ul>, and <li> tags to structure content.
You can use most HTML tags, but do not use tags that define the document and its structure (for example, do not use <html>, <title>, <body>, <head>, <h1>, <h2>, etc. You can use character tags, such as the <b> tag, and the <p>, <ol>, <ul>, and <li> tags to structure content.
Step 6![]() Save the file as HTML only, using the original filename and extension.
Save the file as HTML only, using the original filename and extension.
Step 7![]() Make sure the filename matches the one in Table 72-14 , and that it does not have an extra filename extension.
Make sure the filename matches the one in Table 72-14 , and that it does not have an extra filename extension.
Return to ASDM and choose Configuration > Remote Access VPN > Clientless SSL VPN Access > Portal > Help Customization > Import to import the modified help file into flash memory.
Creating Help Files for Languages Not Provided by Cisco
Use standard HTML to create help files in other languages. We recommend creating a separate folder for each language you want to support.
Note![]() You can use most HTML tags, but do not use tags that define the document and its structure (for example, do not use <html>, <title>, <body>, <head>, <h1>, <h2>, etc. You can use character tags, such as the <b> tag, and the <p>, <ol>, <ul>, and <li> tags to structure content.
You can use most HTML tags, but do not use tags that define the document and its structure (for example, do not use <html>, <title>, <body>, <head>, <h1>, <h2>, etc. You can use character tags, such as the <b> tag, and the <p>, <ol>, <ul>, and <li> tags to structure content.
Save the file as HTML only. Use the filename in the Filename column.
Return to ASDM and choose Configuration > Remote Access VPN > Clientless SSL VPN Access > Portal > Help Customization > Import to import the new help file into flash memory.
Import/Export Application Help Content
Use the Import Application Help Content dialog box to import help files to flash memory for display on the portal pages during clientless sessions. Use the Export Application Help Content dialog box to retrieve previously imported help files for subsequent editing.
Detailed Steps
Step 1![]() The Language field specifies the language rendered by the brower but is not used for file translation. (This field is inactive in the Export Application Help Content dialog box.) Click the dots next to the Language field and double-click the row containing the language shown in the Browse Language Code dialog box. Confirm the abbreviation in the Language Code field matches the abbreviation in the row and click OK.
The Language field specifies the language rendered by the brower but is not used for file translation. (This field is inactive in the Export Application Help Content dialog box.) Click the dots next to the Language field and double-click the row containing the language shown in the Browse Language Code dialog box. Confirm the abbreviation in the Language Code field matches the abbreviation in the row and click OK.
Step 2![]() If the language for which you want to provide help content is not present in the Browse Language Code dialog box, perform the following
If the language for which you want to provide help content is not present in the Browse Language Code dialog box, perform the following
1.![]() Display the list of languages and abbreviations rendered by your browser.
Display the list of languages and abbreviations rendered by your browser.
2.![]() Enter the abbreviation for the language in the Language Code field and click OK.
Enter the abbreviation for the language in the Language Code field and click OK.
OR
You can also enter it into the Language text box to the left of the dots.
A dialog box displays the languages and associated language codes when you use one of the following procedures:
- Open Internet Explorer and choose Tools > Internet Options > Languages > Add.
- Open Mozilla Firefox and choose Tools > Options > Advanced > General, click Choose next to Languages, and click Select a language to add.
Step 3![]() If you are importing, choose the new help content file from the File Name drop-down list. If you are exporting, this field is unavailable.
If you are importing, choose the new help content file from the File Name drop-down list. If you are exporting, this field is unavailable.
Step 4![]() Configure the parameters for the source file (if importing) or destination file (if exporting):
Configure the parameters for the source file (if importing) or destination file (if exporting):
–![]() Path—Identify the path of the source or destination file.
Path—Identify the path of the source or destination file.
–![]() Browse Local Files—Click to browse the local computer for the source or destination file.
Browse Local Files—Click to browse the local computer for the source or destination file.
–![]() Path—Identify the path of the source or destination file in flash memory.
Path—Identify the path of the source or destination file in flash memory.
–![]() Browse Flash—Click to browse the flash memory for the source or destination file.
Browse Flash—Click to browse the flash memory for the source or destination file.
–![]() Path—Choose the file transfer (copy) method, either ftp, tftp, or http (for importing only), and specify the path.
Path—Choose the file transfer (copy) method, either ftp, tftp, or http (for importing only), and specify the path.
Customizing a Help File Provided by Cisco
To customize a help file provided by Cisco, you need to get a copy of the file from the flash memory card first. Get the copy and customize it by performing the following steps:
Step 1![]() Use your browser to establish a clientless session with the ASA.
Use your browser to establish a clientless session with the ASA.
Step 2![]() Display the help file by appending the string in “URL of Help File in Flash Memory of the Security Appliance” in Table 72-14 , to the address of the ASA, substituting language as described below, then press Enter.
Display the help file by appending the string in “URL of Help File in Flash Memory of the Security Appliance” in Table 72-14 , to the address of the ASA, substituting language as described below, then press Enter.
|
|
|
|
|---|---|---|
language is the abbreviation for the language rendered by the browser. It is not used for file translation; it indicates the language used in the file. For help files provided by Cisco in English, enter the abbreviation en.
The following example address displays the English version of the Terminal Servers help:
https:// address_of_security_appliance /+CSCOE+/help/en/rdp-hlp.inc
Step 3![]() Choose File > Save (Page) As.
Choose File > Save (Page) As.
Note![]() Do not change the contents of the File name box.
Do not change the contents of the File name box.
Step 4![]() Change the Save as type option to “Web Page, HTML only” and click Save.
Change the Save as type option to “Web Page, HTML only” and click Save.
Step 5![]() Use your preferred HTML editor to customize the file.
Use your preferred HTML editor to customize the file.
Note![]() You can use most HTML tags, but do not use tags that define the document and its structure (for example, do not use <html>, <title>, <body>, <head>, <h1>, <h2>, etc. You can use character tags, such as the <b> tag, and the <p>, <ol>, <ul>, and <li> tags to structure content.
You can use most HTML tags, but do not use tags that define the document and its structure (for example, do not use <html>, <title>, <body>, <head>, <h1>, <h2>, etc. You can use character tags, such as the <b> tag, and the <p>, <ol>, <ul>, and <li> tags to structure content.
Step 6![]() Save the file as HTML only, using the original filename and extension.
Save the file as HTML only, using the original filename and extension.
Step 7![]() Make sure the filename matches the one in Table 72-14 , and that it does not have an extra filename extension.
Make sure the filename matches the one in Table 72-14 , and that it does not have an extra filename extension.
Return to ASDM and choose Configuration > Remote Access VPN > Clientless SSL VPN Access > Portal > Help Customization > Import to import the modified help file into flash memory.
Creating Help Files for Languages Not Provided by Cisco
Use standard HTML to create help files in other languages. We recommend creating a separate folder for each language you want to support.
Note![]() You can use most HTML tags, but do not use tags that define the document and its structure (for example, do not use <html>, <title>, <body>, <head>, <h1>, <h2>, etc. You can use character tags, such as the <b> tag, and the <p>, <ol>, <ul>, and <li> tags to structure content.
You can use most HTML tags, but do not use tags that define the document and its structure (for example, do not use <html>, <title>, <body>, <head>, <h1>, <h2>, etc. You can use character tags, such as the <b> tag, and the <p>, <ol>, <ul>, and <li> tags to structure content.
Save the file as HTML only. Use the filename in the Filename column of Table 72-16 .
Return to ASDM and choose Configuration > Remote Access VPN > Clientless SSL VPN Access > Portal > Help Customization > Import to import the new help file into flash memory.
Configuring Browser Access to Client-Server Plug-ins
The Client-Server Plug-in table displays the plug-ins the ASA makes available to browsers in clientless SSL VPN sessions.
To add, change, or remove a plug-in, do one of the following:
- To add a plug-in, click Import. The Import Plug-ins dialog box opens.
- To remove a plug-in, choose it and click Delete.
The following sections describe the integration of browser plug-ins for Clientless SSL VPN browser access:
- About Installing Browser Plug-ins
- Preparing the Security Appliance for a Plug-in
- Installing Plug-ins Redistributed By Cisco
About Installing Browser Plug-ins
A browser plug-in is a separate program that a web browser invokes to perform a dedicated function, such as connect a client to a server within the browser window. The ASA lets you import plug-ins for download to remote browsers in clientless SSL VPN sessions. Of course, Cisco tests the plug-ins it redistributes, and in some cases, tests the connectivity of plug-ins we cannot redistribute. However, we do not recommend importing plug-ins that support streaming media at this time.
The ASA does the following when you install a plug-in onto the flash device:
- (Cisco-distributed plug-ins only) Unpacks the jar file specified in the URL.
- Writes the file to the csco-config/97/plugin directory on the ASA file system.
- Populates the drop-down menu next to the URL attributes in ASDM.
- Enables the plug-in for all future clientless SSL VPN sessions, and adds a main menu option and an option to the drop-down menu next to the Address field of the portal page.
Table 72-15 shows the changes to the main menu and address field of the portal page when you add the plug-ins described in the following sections.
|
|
|
|
|---|---|---|
Note![]() A secondary ASA obtains the plug-ins from the primary ASA.
A secondary ASA obtains the plug-ins from the primary ASA.
When the user in a clientless SSL VPN session clicks the associated menu option on the portal page, the portal page displays a window to the interface and displays a help pane. The user can select the protocol displayed in the drop-down menu and enter the URL in the Address field to establish a connection.
Note![]() Some Java plug-ins may report a status of connected or online even when a session to the destination service is not set up. The open-source plug-in reports the status, not the ASA.
Some Java plug-ins may report a status of connected or online even when a session to the destination service is not set up. The open-source plug-in reports the status, not the ASA.
Before installing the first plug-in, you must follow the instructions in the next section.
Prerequisites
- The plug-ins do not work if the security appliance configures the clientless session to use a proxy server.
Note![]() The remote desktop protocol plug-in does not support load balancing with a session broker. Because of the way the protocol handles the redirect from the session broker, the connection fails. If a session broker is not used, the plug-in works.
The remote desktop protocol plug-in does not support load balancing with a session broker. Because of the way the protocol handles the redirect from the session broker, the connection fails. If a session broker is not used, the plug-in works.
- The plug-ins support single sign-on (SSO). They use the same credentials entered to open the clientless SSL VPN session. Because the plug-ins do not support macro substitution, you do not have the options to perform SSO on different fields such as the internal domain password or on an attribute on a RADIUS or LDAP server.
- To configure SSO support for a plug-in, you install the plug-in, add a bookmark entry to display a link to the server, and specify SSO support when adding the bookmark.
- The minimum access rights required for remote use belong to the guest privilege mode.
Requirements
- Per the GNU General Public License (GPL), Cisco redistributes plug-ins without having made any changes to them. Per the GPL, Cisco cannot directly enhance these plug-ins.
- Clientless SSL VPN must be enabled on the ASA to provide remote access to the plug-ins.
- A stateful failover does not retain sessions established using plug-ins. Users must reconnect following a failover.
- Plug-ins require ActiveX or Sun JRE 5, Update 1.4 or later (JRE 6 or later recommended) to be enabled on the browser. An ActiveX version of the RDP plug-in is unavailable for 64-bit browsers.
RDP Plug-in ActiveX Debug Quick Reference
To set up and use an RDP plug-in, you must add a new environment variable. For the process of adding a new environment variable, use the following steps:
Step 1![]() Right-click My Computer to access the System Properties and choose the Advanced tab.
Right-click My Computer to access the System Properties and choose the Advanced tab.
Step 2![]() On the Advanced tab, choose the environment variables button.
On the Advanced tab, choose the environment variables button.
Step 3![]() In the new user variable dialog box, enter the RF_DEBUG variable.
In the new user variable dialog box, enter the RF_DEBUG variable.
Step 4![]() Verify the new Environment Variable in the user variables section.
Verify the new Environment Variable in the user variables section.
Step 5![]() If you used the client computer with versions of WebVPN before version 8.3, you must remove the old Cisco Portforwarder Control. Go to the C:/WINDOWS/Downloaded Program Files directory, right-click portforwarder control, and choose Remove.
If you used the client computer with versions of WebVPN before version 8.3, you must remove the old Cisco Portforwarder Control. Go to the C:/WINDOWS/Downloaded Program Files directory, right-click portforwarder control, and choose Remove.
Step 6![]() Clear all of the Internet Explorer browser cache.
Clear all of the Internet Explorer browser cache.
Step 7![]() Launch your WebVPN session and establish an RDP session with the RDP ActiveX Plug-in.
Launch your WebVPN session and establish an RDP session with the RDP ActiveX Plug-in.
You can now observe events in the Windows Application Event viewer.
Preparing the Security Appliance for a Plug-in
Before installing a plug-in, prepare the ASA by performing the following steps:
Step 1![]() Make sure clientless SSL VPN (“webvpn”) is enabled on an ASA interface.
Make sure clientless SSL VPN (“webvpn”) is enabled on an ASA interface.
Step 2![]() Install an SSL certificate onto the ASA interface to which remote users use a fully-qualified domain name (FQDN) to connect.
Install an SSL certificate onto the ASA interface to which remote users use a fully-qualified domain name (FQDN) to connect.
Note![]() Do not specify an IP address as the common name (CN) for the SSL certificate. The remote user attempts to use the FQDN to communicate with the ASA. The remote PC must be able to use DNS or an entry in the System32\drivers\etc\hosts file to resolve the FQDN.
Do not specify an IP address as the common name (CN) for the SSL certificate. The remote user attempts to use the FQDN to communicate with the ASA. The remote PC must be able to use DNS or an entry in the System32\drivers\etc\hosts file to resolve the FQDN.
Configuring the ASA to Use the New HTML File
Follow these steps to configure the ASA to use the new HTML file you just customized in the previous steps.
Detailed Steps
Customizing Help
The ASA displays help content on the application panels during clientless SSL VPN sessions. You can customize the help files provided by Cisco or create help files in other languages. You then import them to flash memory for display during subsequent clientless sessions. You can also retrieve previously imported help content files, modify them, and reimport them to flash memory.
Each clientless application panel displays its own help file content using a predetermined filename. The prospective location of each is in the /+CSCOE+/help/ language / URL within flash memory of the ASA. Table 72-16 shows the details about each of the help files you can maintain for clientless SSL VPN sessions.
|
|
|
|
|
|---|---|---|---|
language is the abbreviation of the language rendered by the browser. This field is not used for file translation; it indicates the language used in the file. To specify a particular language code, copy the language abbreviation from the list of languages rendered by your browser. For example, a dialog window displays the languages and associated language codes when you use one of the following procedures:
- Open Internet Explorer and choose Tools > Internet Options > Languages > Add.
- Open Mozilla Firefox and choose Tools > Options > Advanced > General, click Choose next to Languages, and click Select a language to add.
The following sections describe how to customize the help content visible on clientless sessions:
Customizing a Help File Provided By Cisco
To customize a help file provided by Cisco, you need to get a copy of the file from the flash memory card first. Get the copy and customize it as follows:
Detailed Steps
Step 1![]() Use your browser to establish a clientless SSL VPN session with the ASA.
Use your browser to establish a clientless SSL VPN session with the ASA.
Step 2![]() Display the help file by appending the string in “URL of Help File in Flash Memory of the Security Appliance” in Table 72-16 , to the address of the ASA, then press Enter.
Display the help file by appending the string in “URL of Help File in Flash Memory of the Security Appliance” in Table 72-16 , to the address of the ASA, then press Enter.
Note![]() Enter en in place of language to get the help file in English.
Enter en in place of language to get the help file in English.
The following example address displays the English version of the Terminal Servers help:
https:// address_of_security_appliance /+CSCOE+/help/en/rdp-hlp.inc
Step 3![]() Choose File > Save (Page) As.
Choose File > Save (Page) As.
Note![]() Do not change the contents of the File name box.
Do not change the contents of the File name box.
Step 4![]() Change the Save as type option to Web Page, HTML only and click Save.
Change the Save as type option to Web Page, HTML only and click Save.
Step 5![]() Use your preferred HTML editor to modify the file.
Use your preferred HTML editor to modify the file.
Note![]() You can use most HTML tags, but do not use tags that define the document and its structure (e.g., do not use <html>, <title>, <body>, <head>, <h1>, <h2>, etc. You can use character tags, such as the <b> tag, and the <p>, <ol>, <ul>, and <li> tags to structure content.
You can use most HTML tags, but do not use tags that define the document and its structure (e.g., do not use <html>, <title>, <body>, <head>, <h1>, <h2>, etc. You can use character tags, such as the <b> tag, and the <p>, <ol>, <ul>, and <li> tags to structure content.
Step 6![]() Save the file as HTML only, using the original filename and extension.
Save the file as HTML only, using the original filename and extension.
Step 7![]() Make sure the filename matches the one in Table 72-16 , and that it does not have an extra filename extension.
Make sure the filename matches the one in Table 72-16 , and that it does not have an extra filename extension.
See “Importing a Help File to Flash Memory” to import the modified file for display in clientless SSL VPN sessions.
Creating Help Files for Languages Not Provided by Cisco
Use HTML to create help files in other languages.
We recommend creating a separate folder for each language you want to support.
Save the file as HTML only. Use the filename following the last slash in “URL of Help File in Flash Memory of the Security Appliance” in Table 72-16 .
See the next section to import the files for display in clientless SSL VPN sessions.
Restrictions
You can use most HTML tags, but do not use tags that define the document and its structure (e.g., do not use <html>, <title>, <body>, <head>, <h1>, <h2>, etc. You can use character tags, such as the <b> tag, and the <p>, <ol>, <ul>, and <li> tags to structure content.
Importing a Help File to Flash Memory
To import a help content file to flash memory for display in clientless SSL VPN sessions, follow these steps:
Detailed Steps
|
|
|
|
|---|---|---|
import webvpn webcontent destination_url source_url hostname# import webvpn webcontent /+CSCOE+/help/en/app-access-hlp.inc tftp://209.165.200.225/app-access-hlp.inc |
Imports a help content file to flash memory for display in clientless SSL VPN sessions.
Copies the help file app-access-hlp.inc to flash memory from the TFTP server at 209.165.200.225. The URL includes the abbreviation en for the English language. |
Exporting a Previously Imported Help File from Flash Memory
To retrieve a previously imported help content file for subsequent edits, follow these steps:
Detailed Steps
|
|
|
|
|---|---|---|
export webvpn webcontent source_url destination_url hostname# export webvpn webcontent /+CSCOE+/help/en/file-access-hlp.inc tftp://209.165.200.225/file-access-hlp.inc |
Retrieves a previously imported help content file for subsequent edits.
Copies the English language help file file-access-hlp.inc displayed on the Browser Networks panel to TFTP Server 209.165.200.225. |
Requiring Usernames and Passwords
Depending on your network, during a remote session users might have to log in to any or all of the following: the computer itself, an Internet service provider, clientless SSL VPN, mail or file servers, or corporate applications. Users might have to authenticate in many different contexts, requiring different information, such as a unique username, password, or PIN.
Table 72-17 lists the type of usernames and passwords that clientless SSL VPN users might need to know.
Communicating Security Tips
Advise users to always click the logout icon on the toolbar to close the clientless SSL VPN session. (Closing the browser window does not close the session.)
Clientless SSL VPN ensures the security of data transmission between the remote PC or workstation and the ASA on the corporate network. Advise users that using clientless SSL VPN does not ensure that communication with every site is secure. If a user then accesses a non-HTTPS web resource (located on the Internet or on the internal network), the communication from the corporate ASA to the destination web server is not private because it is not encrypted.
Observing Clientless SSL VPN Security Precautions addresses an additional tip to communicate with users, depending on the steps you follow within that section.
Configuring Remote Systems to Use Clientless SSL VPN Features
This section describes how to set up remote systems to use clientless SSL VPN and includes the following topics:
- Starting Clientless SSL VPN
- Using the Clientless SSL VPN Floating Toolbar
- Browsing the Web
- Browsing the Network (File Management)
- Using Port Forwarding
- Using E-mail Via Port Forwarding
- Using E-mail Via Web Access
- Using E-mail Via E-mail Proxy
- Using Smart Tunnel
You may configure user accounts differently and different clientless SSL VPN features can be available to each user.
Starting Clientless SSL VPN
You can connect to the internet using any supported connection including:
Note![]() See the Cisco ASA 5500 Series VPN Compatibility Reference for the list of web browsers supported by clientless SSL VPN.
See the Cisco ASA 5500 Series VPN Compatibility Reference for the list of web browsers supported by clientless SSL VPN.
Prerequisites
- Cookies must be enabled on the browser in order to access applications via port forwarding.
- You must have a URL for clientless SSL VPN. The URL must be an https address in the following form: https: //address, where address is the IP address or DNS hostname of an interface of the ASA (or load balancing cluster) on which SSL VPN is enabled. For example, https://cisco.example.com.
- You must have a clientless SSL VPN username and password.
Restrictions
Using the Clientless SSL VPN Floating Toolbar
A floating toolbar is available to simplify the use of clientless SSL VPN. The toolbar lets you enter URLs, browse file locations, and choose preconfigured web connections without interfering with the main browser window.
The floating toolbar represents the current clientless SSL VPN session. If you click the Close button, the ASA prompts you to confirm that you want to close the clientless SSL VPN session.

Tip To paste text into a text field, use Ctrl-V. (Right-clicking is disabled on the toolbar displayed during the clientless SSL VPN session.)
Restrictions
If you configure your browser to block popups, the floating toolbar cannot display.
Browsing the Web
Using clientless SSL VPN does not ensure that communication with every site is secure. See Communicating Security Tips.
The look and feel of web browsing with clientless SSL VPN might be different from what users are accustomed to. For example:
–![]() Entering the URL in the Enter Web Address field on the clientless SSL VPN Home page
Entering the URL in the Enter Web Address field on the clientless SSL VPN Home page
–![]() Clicking on a preconfigured website link on the clientless SSL VPN Home page
Clicking on a preconfigured website link on the clientless SSL VPN Home page
–![]() Clicking a link on a webpage accessed via one of the previous two methods
Clicking a link on a webpage accessed via one of the previous two methods
Also, depending on how you configured a particular account, it might be that:
Prerequisites
Restrictions
Also, depending on how you configured a particular account, it might be that:
Browsing the Network (File Management)
Users might not be familiar with how to locate their files through your organization network.
Note![]() Do not interrupt the Copy File to Server command or navigate to a different screen while the copying is in progress. Interrupting the operation can cause an incomplete file to be saved on the server.
Do not interrupt the Copy File to Server command or navigate to a different screen while the copying is in progress. Interrupting the operation can cause an incomplete file to be saved on the server.
Prerequisites
Restrictions
Only shared folders and files are accessible via clientless SSL VPN.
Using Port Forwarding
Note![]() Users should always close the Application Access window when they finish using applications by clicking the Close icon. Failure to quit the window properly can cause Application Access or the applications themselves to be disabled. See Recovering from hosts File Errors When Using Application Access for details.
Users should always close the Application Access window when they finish using applications by clicking the Close icon. Failure to quit the window properly can cause Application Access or the applications themselves to be disabled. See Recovering from hosts File Errors When Using Application Access for details.
Prerequisites
- On Macintosh OS X, only the Safari browser supports this feature.
- You must have client applications installed.
- You must have Cookies enabled on the browser.
- You must have administrator access on the PC if you use DNS names to specify servers, because modifying the hosts file requires it.
- You must have Sun Microsystems Java Runtime Environment (JRE) version 1.4.x and 1.5.x installed.
If JRE is not installed, a pop-up window displays, directing users to a site where it is available. On rare occasions, the port forwarding applet fails with JAVA exception errors. If this happens, do the following:
a.![]() Clear the browser cache and close the browser.
Clear the browser cache and close the browser.
b.![]() Verify that no JAVA icons are in the computer task bar.
Verify that no JAVA icons are in the computer task bar.
c.![]() Close all instances of JAVA.
Close all instances of JAVA.
d.![]() Establish a clientless SSL VPN session and launch the port forwarding JAVA applet.
Establish a clientless SSL VPN session and launch the port forwarding JAVA applet.
- You must have Javascript enabled on the browser. By default, it is enabled.
- If necessary, you must configure client applications.
Note![]() The Microsoft Outlook client does not require this configuration step. All non-Windows client applications require configuration. To determine if configuration is necessary for a Windows application, check the value of the Remote Server field. If the Remote Server field contains the server hostname, you do not need to configure the client application. If the Remote Server field contains an IP address, you must configure the client application.
The Microsoft Outlook client does not require this configuration step. All non-Windows client applications require configuration. To determine if configuration is necessary for a Windows application, check the value of the Remote Server field. If the Remote Server field contains the server hostname, you do not need to configure the client application. If the Remote Server field contains an IP address, you must configure the client application.
Restrictions
Because this feature requires installing Sun Microsystems Java™ Runtime Environment and configuring the local clients, and because doing so requires administrator permissions on the local system or full control of C:\windows\System32\drivers\etc, it is unlikely that users will be able to use applications when they connect from public remote systems.
Detailed Steps
.To configure the client application, use the server’s locally mapped IP address and port number. To find this information:
1.![]() Start a clientless SSL VPN session and click the Application Access link on the Home page. The Application Access window appears.
Start a clientless SSL VPN session and click the Application Access link on the Home page. The Application Access window appears.
2.![]() In the Name column, find the name of the server you want to use, then identify its corresponding client IP address and port number (in the Local column).
In the Name column, find the name of the server you want to use, then identify its corresponding client IP address and port number (in the Local column).
3.![]() Use this IP address and port number to configure the client application. Configuration steps vary for each client application.
Use this IP address and port number to configure the client application. Configuration steps vary for each client application.
Note![]() Clicking a URL (such as one in an -e-mail message) in an application running over a clientless SSL VPN session does not open the site over that session. To open a site over the session, paste the URL into the Enter Clientless SSL VPN (URL) Address field.
Clicking a URL (such as one in an -e-mail message) in an application running over a clientless SSL VPN session does not open the site over that session. To open a site over the session, paste the URL into the Enter Clientless SSL VPN (URL) Address field.
Using E-mail Via Port Forwarding
To use e-mail, start Application Access from the clientless SSL VPN home page. The mail client is then available for use.
Note![]() If you are using an IMAP client and you lose your mail server connection or are unable to make a new connection, close the IMAP application and restart clientless SSL VPN.
If you are using an IMAP client and you lose your mail server connection or are unable to make a new connection, close the IMAP application and restart clientless SSL VPN.
Prerequisites
You must fulfill requirements for application access and other mail clients.
Restrictions
We have tested Microsoft Outlook Express versions 5.5 and 6.0.
Clientless SSL VPN should support other SMTPS, POP3S, or IMAP4S e-mail programs via port forwarding, such as Lotus Notes and Eudora, but we have not verified them.
Using E-mail Via Web Access
The following e-mail applications are supported:
OWA requires Internet Explorer 7 or later, or Firefox 3.01 or later.
For best results, use OWA on Internet Explorer 6.x or later, or Firefox 3.x.
Prerequisites
Restrictions
Other web-based e-mail applications should also work, but we have not verified them.
Using E-mail Via E-mail Proxy
The following legacy e-mail applications are supported:
See the instructions and examples for your mail application in Using E-Mail over Clientless SSL VPN.
Prerequisites
Restrictions
Using Smart Tunnel
JAVA is not automatically downloaded for you as in port forwarder.
Prerequisites
- Smart tunnel requires either ActiveX or JRE on Windows and Java Web Start on Mac OS.
- You must enable cookies on the browser. (By default, they are enabled.)
- You must install Sun Microsystems Java Runtime Environment (JRE) version 1.4.x and 1.5.x.
- You must enable Javascript on the browser. (By default, it is enabled.)
Restrictions
- Mac OS does not support a front-side proxy.
- Supports only the operating systems and browsers specified in “Configuring Smart Tunnel Access” section.
- Only TCP socket-based applications are supported.
Translating the Language of User Messages
The ASA provides language translation for the portal and screens displayed to users that initiate browser-based, clientless SSL VPN connections, as well as the interface displayed to Cisco AnyConnect VPN Client users.
This section describes how to configure the ASA to translate these user messages and includes the following sections:
- Understanding Language Translation
- Creating Translation Tables
- Referencing the Language in a Customization Object
- Changing a Group Policy or User Attributes to Use the Customization Object
Understanding Language Translation
Functional areas and their messages that are visible to remote users are organized into translation domains. Table 72-18 shows the translation domains and the functional areas translated.
The software image package for the ASA includes a translation table template for each domain that is part of the standard functionality. The templates for plug-ins are included with the plug-ins and define their own translation domains.
You can export the template for a translation domain, which creates an XML file of the template at the URL you provide. The message fields in this file are empty. You can edit the messages and import the template to create a new translation table object that resides in flash memory.
You can also export an existing translation table. The XML file created displays the messages you edited previously. Reimporting this XML file with the same language name creates a new version of the translation table object, overwriting previous messages.
Some templates are static, but some change based on the configuration of the ASA. Because you can customize the logon and logout pages, portal page, and URL bookmarks for clientless users, the ASA generates the customization and url-list translation domain templates dynamically, and the template automatically reflects your changes to these functional areas.
After creating translation tables, they are available to customization objects that you create and apply to group policies or user attributes. With the exception of the AnyConnect translation domain, a translation table has no affect, and messages are not translated on user screens until you create a customization object, identify a translation table to use in that object, and specify that customization for the group policy or user. Changes to the translation table for the AnyConnect domain are immediately visible to AnyConnect client users.
Creating Translation Tables
The following procedure describes how to create translation tables:
Detailed Steps
If you import a translation table for the AnyConnect domain, your changes are effective immediately. If you import a translation table for any other domain, you must create a customization object, identify the translation table to use in that object, and specify that customization object for the group policy or user.
Step 1![]() Choose Remove Access VPN > Clientless SSL VPN Access > Portal > Advanced > Language Localization. The Language Localization pane displays. Click Add. The Add Language Localization window displays.
Choose Remove Access VPN > Clientless SSL VPN Access > Portal > Advanced > Language Localization. The Language Localization pane displays. Click Add. The Add Language Localization window displays.
Step 2![]() Choose a Language Localization Template from the drop-down box. The entries in the box correspond to functional areas that are translated.
Choose a Language Localization Template from the drop-down box. The entries in the box correspond to functional areas that are translated.
Step 3![]() Specify a language for the template. The template becomes a translation table in cache memory with the name you specify. Use an abbreviation that is compatible with the language options for your browser. For example, if you are creating a table for the Chinese language, and you are using IE, use the abbreviation zh, that is recognized by IE.
Specify a language for the template. The template becomes a translation table in cache memory with the name you specify. Use an abbreviation that is compatible with the language options for your browser. For example, if you are creating a table for the Chinese language, and you are using IE, use the abbreviation zh, that is recognized by IE.
Step 4![]() Edit the translation table. For each message represented by the msgid field that you want to translate, enter the translated text between the quotes of the associated msgstr field. The example below shows the message Connected, with the Spanish text in the msgstr field:
Edit the translation table. For each message represented by the msgid field that you want to translate, enter the translated text between the quotes of the associated msgstr field. The example below shows the message Connected, with the Spanish text in the msgstr field:
Step 5![]() Click OK. The new table appears in the list of translation tables.
Click OK. The new table appears in the list of translation tables.
Referencing the Language in a Customization Object
This section describes how to export the customization template, edit it, and import it as a customization object so that you can refer to it.
Prerequisites
For the customization object to call these translation tables correctly, the tables must have been previously imported using the same names. These names must be compatible with language options of the browser.
Detailed Steps
|
|
|
|
|---|---|---|
export webvpn customization template hostname# export webvpn customization template tftp://209.165.200.225/sales |
Exports a customization template to a URL where you can edit it. Exports the template and creates the copy sales at the URL specified. |
|
Edit the customization template and reference the previously-imported translation table |
Two areas of XML code in the customization template pertain to translation tables. Specifies the translation table to use.
Note Figure 72-30 shows the Language Selector that displays on the logon page. The Language Selector gives the remote user establishing an SSL VPN connection the ability to choose a language. Affects the display of the Language Selector and includes the <language selector> tag and the associated <language> tags that enable and customize the Language Selector:
|
|
|
|
||
show import webvpn customization |
Figure 72-30 Language Selector

Adding/Editing Localization Entry
You can add a new translation table, based on a template, or you can modify an already-imported translation table in this pane.
Step 1![]() Select a template to modify and use as a basis for a new translation table. The templates are organized into translation domains and affect certain areas of functionality. The following table shows the translation domains and the functional areas affected:
Select a template to modify and use as a basis for a new translation table. The templates are organized into translation domains and affect certain areas of functionality. The following table shows the translation domains and the functional areas affected:
Step 2![]() Specify a language. Use an abbreviation that is compatible with the language options of your browser. The ASA creates the new translation table with this name.
Specify a language. Use an abbreviation that is compatible with the language options of your browser. The ASA creates the new translation table with this name.
Step 3![]() Use the editor to change the message translations. The message ID field (msgid) contains the default translation. The message string field (msgstr) that follows msgid provides the translation. To create a translation, enter the translated text between the quotes of the msgstr string. For example, to translate the message “Connected” with a Spanish translation, insert the Spanish text between the msgstr quotes:
Use the editor to change the message translations. The message ID field (msgid) contains the default translation. The message string field (msgstr) that follows msgid provides the translation. To create a translation, enter the translated text between the quotes of the msgstr string. For example, to translate the message “Connected” with a Spanish translation, insert the Spanish text between the msgstr quotes:
After making changes, click Apply to import the translation table.
Changing a Group Policy or User Attributes to Use the Customization Object
This section describes how to activate your changes for specific groups or users.
Detailed Steps
Customizing the AnyConnect Client
You can customize the AnyConnect VPN client to display your own corporate image to remote users, including clients running on Windows, Linux, and Mac OS X computers.
You can use one of three methods to customize the client:
–![]() Rebrand the client by importing individual client GUI components, such as the corporate logo and icons, to the ASA which deploys them to remote computers with the installer.
Rebrand the client by importing individual client GUI components, such as the corporate logo and icons, to the ASA which deploys them to remote computers with the installer.
–![]() Import your own program (Windows and Linux only) that provides its own GUI or CLI and uses the AnyConnect API.
Import your own program (Windows and Linux only) that provides its own GUI or CLI and uses the AnyConnect API.
–![]() Import a transform (Windows only) that you create for more extensive rebranding. The ASA deploys it with installer.
Import a transform (Windows only) that you create for more extensive rebranding. The ASA deploys it with installer.
–![]() Create Scripts that deploy with the client and run when the client establishes or terminates a VPN connection.
Create Scripts that deploy with the client and run when the client establishes or terminates a VPN connection.
The following sections explain how to customize the AnyConnect client:
- Customizing AnyConnect by Importing Resource Files
- Customizing Your Own AnyConnect GUI Text and Scripts
- Customizing AnyConnect GUI Text and Messages
- Customizing the Installer Program Using Installer Transforms
- Localizing the Install Program using Installer Transforms
Restrictions
Customizing AnyConnect by Importing Resource Files
You can customize the AnyConnect client by importing your own custom files to the security appliance, which deploys the new files with the client. For detailed information about the original GUI icons and information about their sizes, see the AnyConnect VPN Client Administrators Guide. You can use this information to create your custom files.
Detailed Steps
To import and deploy your custom files with the client, follow this procedure:
Step 1![]() Go to Configuration > Remote Access VPN > Network (Client) Access > AnyConnect Customization/Localization > Resources.
Go to Configuration > Remote Access VPN > Network (Client) Access > AnyConnect Customization/Localization > Resources.
Click Import. The Import AnyConnect Customization Object window displays.
Step 2![]() Enter the Name of the file to import. See the AnyConnect VPN Client Administrators Guide for the filenames of all the GUI components that you can replace.
Enter the Name of the file to import. See the AnyConnect VPN Client Administrators Guide for the filenames of all the GUI components that you can replace.
Note![]() The filenames of your custom components must match the filenames used by the AnyConnect client GUI. The filenames of the GUI components are different for each OS and are case sensitive for Mac and Linux. For example, if you want to replace the corporate logo for Windows clients, you must import your corporate logo as company_logo.bmp. If you import it as a different filename, the AnyConnect installer does not change the component. However, if you deploy your own executable to customize the GUI, the executable can call resource files using any filename.
The filenames of your custom components must match the filenames used by the AnyConnect client GUI. The filenames of the GUI components are different for each OS and are case sensitive for Mac and Linux. For example, if you want to replace the corporate logo for Windows clients, you must import your corporate logo as company_logo.bmp. If you import it as a different filename, the AnyConnect installer does not change the component. However, if you deploy your own executable to customize the GUI, the executable can call resource files using any filename.
Step 3![]() Select a platform and specify the file to import. Click Import Now. The file now appears in the table.
Select a platform and specify the file to import. Click Import Now. The file now appears in the table.
Note![]() If you import an image as a resource file (such as company_logo.bmp), the image you import customizes the AnyConnect client until you reimport another image using the same filename. For example, if you replace company_logo.bmp with a custom image, and then delete the image, the client continues to display your image until you import a new image (or the original Cisco logo image) using the same filename.
If you import an image as a resource file (such as company_logo.bmp), the image you import customizes the AnyConnect client until you reimport another image using the same filename. For example, if you replace company_logo.bmp with a custom image, and then delete the image, the client continues to display your image until you import a new image (or the original Cisco logo image) using the same filename.
Step 4![]() Clicking Import launches the Import AnyConnect Customization Objects dialog, where you can specify a file to import as an object.
Clicking Import launches the Import AnyConnect Customization Objects dialog, where you can specify a file to import as an object.
Step 5![]() Clicking Export launches the Export AnyConnect Customization Objects dialog, where you can specify a file to export as an object.
Clicking Export launches the Export AnyConnect Customization Objects dialog, where you can specify a file to export as an object.
Step 6![]() Clicking Delete removes the selected object.
Clicking Delete removes the selected object.
The type of remote PC platform supported by the object and the object name is displayed.
Customizing Your Own AnyConnect GUI Text and Scripts
For Windows, Linux, or Mac (PPP or Intel-based) computers, you can deploy your own client that uses the AnyConnect client API. You replace the AnyConnect GUI or the AnyConnect CLI by replacing the client binary files.
You can also download and run scripts that run when the client establishes a connection (an OnConnect script), or when the client terminates a session (an OnDisconnect script). Some examples that show how you might want to use this feature include:
- Refreshing the group policy upon VPN connection.
- Mapping a network drive upon VPN connection, and un-mapping it after disconnection.
- Logging on to a service upon VPN connection, and logging off after disconnection.
For complete information about customizing the AnyConnect GUI and creating and deploying scripts, see the AnyConnect VPN Client Administrators Guide.
The following sections describe how to import binary executables and scripts to the ASA:
Importing your own GUI as a Binary Executable
For Windows, Linux, or Mac (PPP or Intel-based) computers, you can deploy your own client that uses the AnyConnect client API. You replace the AnyConnect GUI or the AnyConnect CLI by replacing the client binary files. Table 72-19 lists the filenames of the client executable files for the different operating systems.
|
|
|
|
|---|---|---|
Not supported5 |
|
5.Not supported by ASA deployment. However, you can deploy an executable for the Mac that replaces the client GUI using other means, such as Altiris Agent. |
Your executable can call any resource files, such as logo images, that you import to the ASA (See Table 72-19 ). Unlike replacing the pre-defined GUI components, when you deploy your own executable, can use any filenames for your resource files.
We recommend that you sign your custom Windows client binaries (either GUI or CLI version) that you import to the ASA. A signed binary has a wider range of functionality available to it. If the binaries are not signed the following functionality is affected:
- Web-Launch—The clientless portal is available and the user can authenticate. However, the behavior surrounding tunnel establishment does not work as expected. Having an unsigned GUI on the client results in the client not starting as part of the clientless connection attempt. And once it detects this condition, it aborts the connection attempt.
- SBL—The Start Before Logon feature requires that the client GUI used to prompt for user credentials be signed. If it is not, the GUI does not start. Because SBL is not supported for the CLI program, this affects only the GUI binary file.
- Auto Upgrade—During the upgrade to a newer version of the client, the old GUI exits, and after the new GUI installs, the new GUI starts. The new GUI does not start unless it is signed. As with Web-launch, the VPN connection terminates if the GUI is not signed. However, the upgraded client remains installed.
Restrictions
The ASA does not support this feature for the AnyConnect VPN client, Versions 2.0 and 2.1. For more information on manually customizing the client, see the AnyConnect VPN Client Administrator Guide and the Release Notes for Cisco AnyConnect VPN Client.
Importing Scripts
AnyConnect lets you download and run scripts when the following events occur:
- Upon the establishment of a new AnyConnect client VPN session with the security appliance. We refer to a script triggered by this event as an OnConnect script because it requires this filename prefix.
- Upon the tear-down of an AnyConnect client VPN session with the security appliance. We refer to a script triggered by this event as an OnDisconnect script because it requires this filename prefix.
Thus, the establishment of a new AnyConnect VPN session initiated by Trusted Network Detection triggers the OnConnect script (assuming the requirements are satisfied to run the script). The reconnection of a persistent AnyConnect VPN session after a network disruption does not trigger the OnConnect script.
Prerequisites
These instructions assume you know how to write scripts and run them from the command line of the targeted endpoint to test them.
Restrictions
- The AnyConnect software download site provides some example scripts; if you examine them, please remember that they are only examples; they may not satisfy the local computer requirements for running them, and are unlikely to be usable without customizing them for your network and user needs. Cisco does not support example scripts or customer-written scripts.
For complete information about deploying scripts, and their limitations and restrictions, see the AnyConnect VPN Client Administrators Guide.
Writing, Testing, and Deploying Scripts
Restrictions
- Scripts written on Microsoft Windows computers have different line endings than scripts written on Mac OS and Linux. Therefore, you should write and test the script on the targeted OS. If a script cannot run properly from the command line on the native OS, AnyConnect cannot run it properly either.
- Microsoft Windows Mobile does not support this option. You must deploy scripts using the manual method for this OS.
Step 1![]() Write and test the script using the OS type on which it will run when AnyConnect launches it.
Write and test the script using the OS type on which it will run when AnyConnect launches it.
Step 2![]() To import a script, go to Network (Client) Access > AnyConnect Customization/Localization > Script. The Customization Scripts pane displays.
To import a script, go to Network (Client) Access > AnyConnect Customization/Localization > Script. The Customization Scripts pane displays.
Step 3![]() Enter a name for the script. Be sure to specify the correct extension with the name. For example, myscript.bat.
Enter a name for the script. Be sure to specify the correct extension with the name. For example, myscript.bat.
Step 4![]() Choose a script action: Script runs when client connects or Script runs when client disconnects.
Choose a script action: Script runs when client connects or Script runs when client disconnects.
AnyConnect adds the prefix scripts_ and the prefix OnConnect or OnDisconnect to your filename to identify the file as a script on the ASA. When the client connects, the ASA downloads the script to the proper target directory on the remote computer, removing the scripts_ prefix and leaving the remaining OnConnect or OnDisconnect prefix. For example, if you import the script myscript.bat, the script appears on the ASA as scripts_OnConnect_myscript.bat. On the remote computer, the script appears as OnConnect_myscript.bat.
To ensure the scripts run reliably, configure all ASAs to deploy the same scripts. If you want to modify or replace a script, use the same name as the previous version and assign the replacement script to all of the ASAs that the users might connect to. When the user connects, the new script overwrites the one with the same name.
Step 5![]() Select a file as the source of the script. The name does not need to be the same as the name you provided for the script. ASDM imports the file from any source file, creating the new name you specify for Name in Step 3.
Select a file as the source of the script. The name does not need to be the same as the name you provided for the script. ASDM imports the file from any source file, creating the new name you specify for Name in Step 3.
Table 72-20 shows the locations of scripts on the remote computer:
|
|
|
|---|---|
%ALLUSERPROFILE%\Application Data\Cisco\Cisco AnyConnect VPN Client\ |
|
| Note Assign execute permissions to the file for User, Group and Other. |
|
Step 6![]() Click Import to launch the Import AnyConnect Customization Objects dialog, where you can specify a file to import as an object.
Click Import to launch the Import AnyConnect Customization Objects dialog, where you can specify a file to import as an object.
Step 7![]() Click Export to launch the Export AnyConnect Customization Objects dialog, where you can specify a file to export as an object.
Click Export to launch the Export AnyConnect Customization Objects dialog, where you can specify a file to export as an object.
Step 8![]() Click Delete to remove a selected object.
Click Delete to remove a selected object.
The type of remote PC platform supported by the object and the object name is displayed.
Customizing AnyConnect GUI Text and Messages
Change text and messages displayed on the AnyConnect client GUI displayed to remote users in this pane. This pane also shares functionality with the Language Localization pane. For more extensive language translation, go to Configuration > Remote Access VPN > Language Localization.
To change messages that appear on the AnyConnect GUI, perform the following steps:
Step 1![]() Click Template to expand the template area. Click Export to export the English language template to your local PC or a remote device.
Click Template to expand the template area. Click Export to export the English language template to your local PC or a remote device.
Step 2![]() Edit the template and make changes to any messages. The text contained between the quotes of the msgid field represents the default text. Do not change this text. To display a different message, insert your custom text between the quotes of mgstr. The example below shows a message containing connection termination information:
Edit the template and make changes to any messages. The text contained between the quotes of the msgid field represents the default text. Do not change this text. To display a different message, insert your custom text between the quotes of mgstr. The example below shows a message containing connection termination information:
Step 3![]() Click Import to import the file you edited as a new translation template.
Click Import to import the file you edited as a new translation template.
Step 4![]() Specify a language for the template. The template becomes a translation table in cache memory with the name you specify. Use an abbreviation that is compatible with the language options for your browser. For example, if you are creating a table for the Chinese language, and you are using IE, use the abbreviation zh, that is recognized by IE.
Specify a language for the template. The template becomes a translation table in cache memory with the name you specify. Use an abbreviation that is compatible with the language options for your browser. For example, if you are creating a table for the Chinese language, and you are using IE, use the abbreviation zh, that is recognized by IE.
Step 5![]() Click Apply to make your changes to the ASA.
Click Apply to make your changes to the ASA.
Step 6![]() (Optional) Click Add to launch the Add Localization Entry dialog where you can select a localization template to add and you can edit the contents of the template.
(Optional) Click Add to launch the Add Localization Entry dialog where you can select a localization template to add and you can edit the contents of the template.
Step 7![]() (Optional) Click Edit to launch the Edit Localization Entry dialog for the selected language in the table, and allows you to edit the previously-imported language localization table.
(Optional) Click Edit to launch the Edit Localization Entry dialog for the selected language in the table, and allows you to edit the previously-imported language localization table.
Step 8![]() (Optional) Click Delete to delete a selected language localization table.
(Optional) Click Delete to delete a selected language localization table.
Step 9![]() (Optional) Click Import to launch the Import Language Localization dialog where you can import a language localization template or table.
(Optional) Click Import to launch the Import Language Localization dialog where you can import a language localization template or table.
Step 10![]() (Optional) Click Export to launch the Export Language Localization dialog where you can export a language localization template or table to a URL where you can make changes to the table or template.
(Optional) Click Export to launch the Export Language Localization dialog where you can export a language localization template or table to a URL where you can make changes to the table or template.
Step 11![]() (Optional) Specify the language of the localization table.
(Optional) Specify the language of the localization table.
Customizing the Installer Program Using Installer Transforms
You can perform more extensive customizing of the AnyConnect client GUI (Windows only) by creating your own transform that deploys with the client installer program. You import the transform to the ASA, which deploys it with the installer program.
To create an MSI transform, you can download and install the free database editor from Microsoft, named Orca. With this tool, you can modify existing installations and even add new files. The Orca tool is part of the Microsoft Windows Installer Software Development Kit (SDK) which is included in the Microsoft Windows SDK. The following link leads to the bundle containing the Orca program:
http://msdn.microsoft.com/library/default.asp?url=/library/en-us/msi/setup/orca_exe.asp.
After you install the SDK, the Orca MSI is located here:
C:\Program Files\Microsoft SDK SP1\Microsoft Platform SDK\Bin\Orca.msi.
Install the Orca software, then access the Orca program from your Start > All Programs menu.
To import your transform, follow these steps:
Step 1![]() Go to Configuration > Remote Access VPN > Network (Client) Access > AnyConnect Customization/Localization > Customized Installer Transforms. Click Import. The Import AnyConnect Customization Objects windows displays.
Go to Configuration > Remote Access VPN > Network (Client) Access > AnyConnect Customization/Localization > Customized Installer Transforms. Click Import. The Import AnyConnect Customization Objects windows displays.
Step 2![]() Enter the Name of the file to import. Unlike the names of other customizing objects, the name is not significant to the ASA and is for your own convenience.
Enter the Name of the file to import. Unlike the names of other customizing objects, the name is not significant to the ASA and is for your own convenience.
Step 3![]() Select a platform and specify the file to import. Click Import Now. The file now appears in the table.
Select a platform and specify the file to import. Click Import Now. The file now appears in the table.
Note![]() Windows is the only valid choice for applying a transform.
Windows is the only valid choice for applying a transform.
Step 4![]() (Optional) Click Import to launch the Import AnyConnect Customization Objects dialog, where you can specify a transform file to import.
(Optional) Click Import to launch the Import AnyConnect Customization Objects dialog, where you can specify a transform file to import.
Step 5![]() (Optional) Click Export to launch the Export AnyConnect Customization Objects dialog, where you can specify a transform file to export.
(Optional) Click Export to launch the Export AnyConnect Customization Objects dialog, where you can specify a transform file to export.
Step 6![]() (Optional) Click Delete to remove the selected file.
(Optional) Click Delete to remove the selected file.
The type of remote PC platform supported by the transform and the name of the transform is displayed.
Configuration Example for Transform
While offering a tutorial on creating transforms is beyond the scope of this document, we provide the text below as representative of some entries in a transform. These entries replace company_logo.bmp with a local copy and install the custom profile MyProfile.xml.
+ MyProfile.xml MyProfile.xml MyProf~1.xml|MyProfile.xml 601 8192 35
Specify transform files for customizing the AnyConnect client installation in this pane.
Localizing the Install Program using Installer Transforms
As with the AnyConnect client GUI, you can translate messages displayed by the client installer program. The ASA uses transforms to translate the messages displayed by the installer. The transform alters the installation, but leaves the original security-signed MSI intact. These transforms only translate the installer screens and do not translate the client GUI screens.
Each language has its own transform. You can edit a transform with a transform editor such as Orca, and make changes to the message strings. Then you import the transform to the ASA. When the user downloads the client, the client detects the preferred language of the computer (the locale specified during installation of the operating system) and applies the appropriate transform.
We currently offer transforms for 30 languages. These transforms are available in the following.zip file on the AnyConnect client software download page at cisco.com:
anyconnect-win-<VERSION>-web-deploy-k9-lang.zip
In this file, <VERSION> is the version of AnyConnect release (e.g. 2.2.103).
The package contains the transforms (.mst files) for the available translations. If you need to provide a language to remote users that is not one of the 30 languages we provide, you can create your own transform and import it to the ASA as a new language. With Orca, the database editor from Microsoft, you can modify existing installations and new files. Orca is part of the Microsoft Windows Installer Software Development Kit (SDK) which is included in the Microsoft Windows SDK. The following link leads to the bundle containing the Orca program:
http://msdn.microsoft.com/library/default.asp?url=/library/en-us/msi/setup/orca_exe.asp.
After you install the SDK, the Orca MSI is located here:
C:\Program Files\Microsoft SDK SP1\Microsoft Platform SDK\Bin\Orca.msi.
The following procedure shows how to import a transform to the ASA using ASDM:
Step 1![]() Import a Transform. Go to: Configuration > Remote Access VPN > Network (Client) Access > AnyConnect Customization/Localization > Localized Installer Transforms. Click Import. The Import MST Language Localization window opens.
Import a Transform. Go to: Configuration > Remote Access VPN > Network (Client) Access > AnyConnect Customization/Localization > Localized Installer Transforms. Click Import. The Import MST Language Localization window opens.
Step 2![]() Choose a language for this transform. Click the Language drop-list to display languages and their industry-recognized abbreviations. If you enter the abbreviation manually, be sure to use an abbreviation recognized by browsers and operating systems.
Choose a language for this transform. Click the Language drop-list to display languages and their industry-recognized abbreviations. If you enter the abbreviation manually, be sure to use an abbreviation recognized by browsers and operating systems.
Step 3![]() Click Import Now. A message displays saying you successfully imported the table.
Click Import Now. A message displays saying you successfully imported the table.
Be sure to click Apply to save your changes.
Step 4![]() (Optional) Click Import to launch the Import AnyConnect Customization Objects dialog, where you can specify a file to import as a transform.
(Optional) Click Import to launch the Import AnyConnect Customization Objects dialog, where you can specify a file to import as a transform.
Step 5![]() (Optional) Click Export to launch the Export AnyConnect Customization Objects dialog, where you can specify a file to export as a transform.
(Optional) Click Export to launch the Export AnyConnect Customization Objects dialog, where you can specify a file to export as a transform.
Step 6![]() (Optional) Click Delete to remove the selected transform.
(Optional) Click Delete to remove the selected transform.
The type of remote PC platform supported by the transform and the name are displayed.
Importing/Exporting Language Localization
In the Import Translation Table and Export Translation Table dialog boxes, you can import or export a translation table to the ASA to provide translation of user messages.
Translation templates are XML files that contain message fields that can be edited with translated messages. You can export a template, edit the message fields, and import the template as a new translation table, or you can export an existing translation table, edit the message fields, and re-import the table to overwrite the previous version.
Detailed Steps
Step 1![]() Enter a name for the language.
Enter a name for the language.
- When exporting, it is automatically filled-in with the name from the entry you selected in the table.
- When importing, you enter the language name in the manner that you want it to be identified. The imported translation table then appears in the list with the abbreviation you designated. To ensure that your browser recognizes the language, use language abbreviations that are compatible with the language options of the browser. For example, if you are using IE, use zh as the abbreviation for the Chinese language.
Step 2![]() The name of the XML file containing the message fields includes the following:
The name of the XML file containing the message fields includes the following:
- AnyConnect—Messages displayed on the user interface of the Cisco AnyConnect VPN Client.
- CSD—Messages for the Cisco Secure Desktop (CSD).
- customization—Messages on the logon and logout pages, portal page, and all the messages customizable by the user.
- keepout—Message displayed to remote users when VPN access is denied.
- PortForwarder—Messages displayed to Port Forwarding users.
- url-list—Text that user specifies for URL bookmarks on the portal page.
- webvpn—All the layer 7, AAA and portal messages that are not customizable.
- plugin-ica—Messages for the Citrix plug-in.
- plugin-rdp—Messages for the Remote Desktop Protocol plug-in.
- plugin-telnet,ssh—Messages for the TELNET and SSH plug-in. This plug-in is capable of doing both sshv1 and sshv2.
- plugin-vnc—Messages for the VNC plug-in.
Step 3![]() Choose the method by which you want to import or export the file:
Choose the method by which you want to import or export the file:
- Remote server—Select this option to import a customization file that resides on a remote server accessible from the ASA.
- Path—Identify the method to access the file (ftp, http, or https), and provide the path to the file.
- Flash file system—Choose this method to export a file that resides on the ASA.
- Path—Provide the path to the file.
- Browse Flash—Browse to the path for the file.
- Local computer—Choose this method to import a file that resides on the local PC.
- Path—Provide the path to the file.
- Browse Local Files—Browse to the path for the file.
Step 4![]() Click Import/Export Now to import or export the file.
Click Import/Export Now to import or export the file.
Configuring Bookmarks
The Bookmarks panel lets you add, edit, delete, import, and export bookmark lists.
Use the Bookmarks panel to configure lists of servers and URLs for access over clientless SSL VPN. Following the configuration of a bookmark list, you can assign the list to one or more policies – group policies, dynamic access policies, or both. Each policy can have only one bookmark list. The list names populate a drop-down list on the URL Lists tab of each DAP.
You can now use bookmarks with macro substitutions for auto sign-on on some web pages. The former POST plug-in approach was created so that administrators could specify a POST bookmark with sign-on macros and receive a kick-off page to load prior to posting the POST request. This POST plug-in approach eliminated those requests that required the presence of cookies or other header items. Now an an administrator determines the pre-load page and URL, which specifies where you want the post login request sent. A pre-load page enables an endpoint browser to fetch certain information that is sent along to the webserver or web application rather than just using a POST request with credentials.
The existing bookmark lists are displayed. You can add, edit, delete, import, or export the bookmark list. You can configure lists of servers and URLs for access and order the items in the designated URL list.
Guidelines
Configuring bookmarks does not prevent the user from visiting fraudulent sites or sites that violate your company's acceptable use policy. In addition to assigning a bookmark list to the group policy, dynamic access policy, or both, apply a web ACL to these policies to control access to traffic flows. Disable URL Entry on these policies to prevent user confusion over what is accessible. See the “Observing Clientless SSL VPN Security Precautions” section for instructions.
Detailed Steps
Step 1![]() Specify the name of the list to be added or select the name of the list to be modified or deleted.
Specify the name of the list to be added or select the name of the list to be modified or deleted.
The bookmark title and actual associated URL are displayed.
Step 2![]() (Optional) Click Add to configure a new server or URL.
(Optional) Click Add to configure a new server or URL.
Step 3![]() (Optional) Click Edit to make changes to the server, URL, or display name.
(Optional) Click Edit to make changes to the server, URL, or display name.
Step 4![]() (Optional) Click Delete to remove the selected item from the URL list. No confirmation or undo exists.
(Optional) Click Delete to remove the selected item from the URL list. No confirmation or undo exists.
Step 5![]() (Optional) Choose the location from which you want to import or export the file:
(Optional) Choose the location from which you want to import or export the file:
- Local computer—Click to import or export a file that resides on the local PC.
- Flash file system—Click to import or export a file that resides on the ASA.
- Remote server—Click to import a file that resides on a remote server accessible from the ASA.
- Path—Identify the method to access the file (ftp, http, or https), and provide the path to the file.
- Browse Local Files.../Browse Flash...—Browse to the path for the file.
Step 6![]() (Optional) Highlight a bookmark and click Assign to assign the selected bookmark to one or more group policies, dynamic access policies, or LOCAL users.
(Optional) Highlight a bookmark and click Assign to assign the selected bookmark to one or more group policies, dynamic access policies, or LOCAL users.
Step 7![]() (Optional) Change the position of the selected item in the URL list using the Move Up or Move Down options.
(Optional) Change the position of the selected item in the URL list using the Move Up or Move Down options.
Adding a Bookmark Entry
The Add Bookmark Entry dialog box lets you create a link or bookmark for a URL list.
Prerequisites
To access \\server\share\subfolder\<personal folder>, the user must have list permission for all points above <personal folder>.
Detailed Steps
Step 1![]() Enter a name for the bookmark to display for the user.
Enter a name for the bookmark to display for the user.
Step 2![]() Use the URL drop-down menu to select the URL type: http, https, cifs, or ftp. The URL types of all imported plug-ins also populate this menu. Select the URL type of a plug-in if you want to display the plug-in as a link on the portal page.
Use the URL drop-down menu to select the URL type: http, https, cifs, or ftp. The URL types of all imported plug-ins also populate this menu. Select the URL type of a plug-in if you want to display the plug-in as a link on the portal page.
Step 3![]() Enter the DNS name or IP address for the bookmark. For a plug-in, enter the name of the server. Enter a forward slash and a question mark (/?) after the server name to specify optional parameters, then use an ampersand to separate parameter-value pairs, as shown in the following syntax:
Enter the DNS name or IP address for the bookmark. For a plug-in, enter the name of the server. Enter a forward slash and a question mark (/?) after the server name to specify optional parameters, then use an ampersand to separate parameter-value pairs, as shown in the following syntax:
server /? Parameter = Value & Parameter = Value
host /?DesiredColor=4&DesiredHRes=1024&DesiredVRes=768
The particular plug-in determines the optional parameter-value pairs that you can enter.
To provide single sign-on support for a plug-in, use the parameter-value pair csco_sso=1. For example:
host /?csco_sso=1&DesiredColor=4&DesiredHRes=1024&DesiredVRes=768
Step 4![]() (Optional) Enter a preload URL. When you enter a preload URL, you can also enter the wait time, which is the time you allow for loading of the page until you are forwarded to the actual POST URL.
(Optional) Enter a preload URL. When you enter a preload URL, you can also enter the wait time, which is the time you allow for loading of the page until you are forwarded to the actual POST URL.
Step 5![]() As a subtitle, provide additional user-visible text that describes the bookmark entry.
As a subtitle, provide additional user-visible text that describes the bookmark entry.
Step 6![]() Use the Thumbnail drop-down menu to select an icon to associate with the bookmark on the end-user portal.
Use the Thumbnail drop-down menu to select an icon to associate with the bookmark on the end-user portal.
Step 7![]() Click Manage to import or export images to use as thumbnails.
Click Manage to import or export images to use as thumbnails.
Step 8![]() Click to open the bookmark in a new window that uses the smart tunnel feature to pass data through the ASA to or from the destination server. All browser traffic passes securely over the SSL VPN tunnel. This option lets you provide smart tunnel support for a browser-based application, whereas the Smart Tunnels option, also in the Clientless SSL VPN > Portal menu, lets you add nonbrowser-based applications to a smart tunnel list for assignment to group policies and usernames.
Click to open the bookmark in a new window that uses the smart tunnel feature to pass data through the ASA to or from the destination server. All browser traffic passes securely over the SSL VPN tunnel. This option lets you provide smart tunnel support for a browser-based application, whereas the Smart Tunnels option, also in the Clientless SSL VPN > Portal menu, lets you add nonbrowser-based applications to a smart tunnel list for assignment to group policies and usernames.
Step 9![]() Check Allow the users to bookmark the link to let clientless SSL VPN users use the Bookmarks or Favorites options on their browsers. Uncheck to prevent access to these options. If you uncheck this option, the bookmark does not appear in the Home section of the WebVPN portal.
Check Allow the users to bookmark the link to let clientless SSL VPN users use the Bookmarks or Favorites options on their browsers. Uncheck to prevent access to these options. If you uncheck this option, the bookmark does not appear in the Home section of the WebVPN portal.
Step 10![]() (Optional) Choose Advanced Options to configure further bookmark characteristics.
(Optional) Choose Advanced Options to configure further bookmark characteristics.
- URL Method—Choose Get for simple data retrieval. Choose Post when processing the data might involve changes to it, for example, storing or updating data, ordering a product, or sending e-mail.
- Post Parameters—Configure the particulars of the Post URL method.
- Add/Edit—Click to add a post parameter.
- Edit—Click to edit the highlighted post parameter.
- Delete—Click to delete the highlighted post parameter.
Importing/Exporting Bookmark List
You can import or export already configured bookmark lists. Import lists that are ready to use. Export lists to modify or edit them, and then reimport.
Detailed Steps
Step 1![]() Identify the bookmark list by name. Maximum is 64 characters, no spaces.
Identify the bookmark list by name. Maximum is 64 characters, no spaces.
Step 2![]() Choose the method by which you want to import or export the list file:
Choose the method by which you want to import or export the list file:
- Local computer—Click to import a file that resides on the local PC.
- Flash file system—Click to export a file that resides on the ASA.
- Remote server—Click to import a url list file that resides on a remote server accessible from the ASA.
- Path—Identify the method to access the file (ftp, http, or https), and provide the path to the file.
- Browse Local Files/Browse Flash—Browse to the path for the file.
- Import/Export Now—Click to import or export the list file.
Importing/Exporting GUI Customization Objects (Web Contents)
This dialogue box lets you import and export web content objects. The names of the web content objects and their file types are displayed.
Web contents can range from a wholly configured home page to icons or images you want to use when you customize the end user portal. You can import or export already configured web contents. Import web contents that are ready for use. Export web contents to modify or edit them, and then reimport.
Step 1![]() Choose the location from which you want to import or export the file:
Choose the location from which you want to import or export the file:
- Local computer—Click to import or export a file that resides on the local PC.
- Flash file system—Click to import or export a file that resides on the ASA.
- Remote server—Click to import a file that resides on a remote server accessible from the ASA.
- Path—Identify the method to access the file (ftp, http, or https), and provide the path to the file.
- Browse Local Files.../Browse Flash...—Browse to the path for the file.
Step 2![]() Determine whether authentication is required to access the content.
Determine whether authentication is required to access the content.
The prefix to the path changes depending on whether you require authentication. The ASA uses /+CSCOE+/ for objects that require authentication, and /+CSCOU+/ for objects that do not. The ASA displays /+CSCOE+/ objects on the portal page only, while /+CSCOU+/ objects are visible and usable in either the logon or the portal pages.
Step 3![]() Click to import or export the file.
Click to import or export the file.
Adding/Editing Post Parameter
Use this pane to configure post parameters for bookmark entries and URL lists.
Clientless SSL VPN variables allow for substitutions in URLs and forms-based HTTP post operations. These variables, also known as macros, let you configure users for access to personalized resources that contain the user ID and password or other input parameters. Examples of such resources include bookmark entries, URL lists, and file shares.
Detailed Steps
Step 1![]() Provide the name and value of the parameters exactly as in the corresponding HTML form, for example: <input name=“ param_name ” value=“ param_value ”>.
Provide the name and value of the parameters exactly as in the corresponding HTML form, for example: <input name=“ param_name ” value=“ param_value ”>.
You can choose one of the supplied variables from the drop-down list, or you can construct a variable. The variables you can choose from the drop-down list include the following:
When the ASA recognizes one of these six variable strings in an end-user request—in a bookmark or a post form—it replaces it with the user-specific value before passing the request to a remote server.
Note![]() You can obtain the http-post parameters for any application by performing an HTTP Sniffer trace in the clear (without the security appliance involved). Here is a link to a free browser capture tool, also called an HTTP Analyzer: http://www.ieinspector.com/httpanalyzer/downloadV2/IEHttpAnalyzerV2.exe.
You can obtain the http-post parameters for any application by performing an HTTP Sniffer trace in the clear (without the security appliance involved). Here is a link to a free browser capture tool, also called an HTTP Analyzer: http://www.ieinspector.com/httpanalyzer/downloadV2/IEHttpAnalyzerV2.exe.
Using Variables 1 - 4
The ASA obtains values for the first four substitutions from the SSL VPN Login page, which includes fields for username, password, internal password (optional), and group. It recognizes these strings in user requests and replaces them with the value specific to the user before it passes the request on to a remote server.
For example, if a URL list contains the link, http://someserver/homepage/CSCO_WEBVPN_USERNAME.html, the ASA translates it to the following unique links:
- For USER1 the link becomes http://someserver/homepage/USER1.html
- For USER2 the link is http://someserver/homepage/USER2.html
In the following case, cifs://server/users/CSCO_WEBVPN_USERNAME, lets the ASA map a file drive to specific users:
Using Variables 5 and 6
Values for macros 5 and 6 are RADIUS or LDAP vendor-specific attributes (VSAs). These substitutions let you set substitutions configured on either a RADIUS or an LDAP server.
Using Variables 7 - 10
Each time the ASA recognizes one of these four strings in an end-user request (a bookmark or a post form), it replaces it with the user-specific value before passing the request to a remote server.
Example 1: Setting a Homepage
The following example sets a URL for the homepage:
- WebVPN-Macro-Value1 (ID=223), type string, is returned as wwwin-portal.example.com
- WebVPN-Macro-Value2 (ID=224), type string, is returned as 401k.com
To set a home page value, you would configure the variable substitution as
https://CSCO_WEBVPN_MACRO1, which would translate to https://wwwin-portal.example.com.
The best way to do this is to configure the Homepage URL parameter in ASDM.
Go to the Add/Edit Group Policy pane, from either the Network Client SSL VPN or Clientless SSL VPN Access section of ASDM. The paths are as follows:
- Configuration > Remote Access VPN > Network (Client) Access > Group Policies > Add/Edit Group Policy > Advanced > SSL VPN Client > Customization > Homepage URL attribute.
- Configuration > Remote Access VPN > Clientless SSL VPN Access > Group Policies > Add/Edit Group Policy > More Options > Customization > Homepage URL attribute.
Configuration Example for Setting a Bookmark or URL Entry
You can use an HTTP Post to log in to an OWA resource using an RSA one-time password (OTP) for SSL VPN authentication, and then the static, internal password for OWA e-mail access. The best way to do this is to add or edit a bookmark entry in ASDM.
There are several paths to the Add Bookmark Entry pane, including the following:
- Configuration > Remote Access VPN > Clientless SSL VPN Access > Portal > Bookmarks > Add/Edit Bookmark Lists > Add/Edit Bookmark Entry > Advanced Options area > Add/Edit Post Parameters (available after you click Post in the URL Method attribute).
(Available after you click Post in the URL Method attribute):
Configuration Example for Configuring File Share (CIFS) URL Substitutions
You can allow a more flexible bookmark configuration by using variable substitution for CIFS URLs.
If you configure the URL cifs://server/CSCO_WEBVPN_USERNAME, the ASA automatically maps it to the user’s file share home directory. This method also allows for password and internal password substitution. The following are example URL substitutions:
cifs://CSCO_WEBVPN_USERNAME:CSCO_WEBVPN_PASSWORD@server
cifs://CSCO_WEBVPN_USERNAME:CSCO_WEBVPN_INTERNAL_PASSWORD@server
cifs://domain;CSCO_WEBVPN_USERNAME:CSCO_WEBVPN_PASSWORD@server
cifs://domain;CSCO_WEBVPN_USERNAME:CSCO_WEBVPN_INTERNAL_PASSWORD@server
cifs://domain;CSCO_WEBVPN_USERNAME:CSCO_WEBVPN_PASSWORD@server/CSCO_WEBVPN_USERNAME
cifs://domain;CSCO_WEBVPN_USERNAME:CSCO_WEBVPN_INTERNAL_PASSWORD@server/CSCO_WEBVPN_USERNAME
Configuration Example for Customizing External Ports
You can use the external portal feature to create your own portal instead of using the pre-configured one. If you set up your own portal, you can bypass the clientless portal and send a POST request to retrieve your portal.
Detailed Steps
Step 1![]() Choose Configuration > Remote Access VPN > Clientless SSL VPN Access > Portal > Customization. Highlight the desired customization and choose Edit.
Choose Configuration > Remote Access VPN > Clientless SSL VPN Access > Portal > Customization. Highlight the desired customization and choose Edit.
Step 2![]() Check the Enable External Portal check box.
Check the Enable External Portal check box.
Step 3![]() In the URL field, enter the desired external portal so that POST requests are allowed.
In the URL field, enter the desired external portal so that POST requests are allowed.
Capturing Data
The CLI capture command lets you log information about websites that do not display properly over a clientless SSL VPN session. This data can help your Cisco customer support engineer troubleshoot problems. The following sections describe how to capture and view clientless SSL VPN session data:
Prerequisites
Creating a Capture File
Perform the following steps to capture data about a clientless SSL VPN session to a file.
Detailed Steps
Using a Browser to Display Capture Data
Perform the following steps to capture data about a clientless SSL VPN session and view it in a browser.
 Feedback