- About this Guide
-
- Clientless SSL VPN Overview
- Basic Clientless SSL VPN Configuration
- Advanced Clientless SSL VPN Configuration
- Configuring Policy Groups
- Clientless SSL VPN Remote Users
- Configuring Clientless SSL VPN Users
- Using Clientless SSL VPN with Mobile Devices
- Customizing Clientless SSL VPN
- Clientless SSL VPN Troubleshooting
- Clientless SSL VPN Licensing
- Index
ASDM Book 3: Cisco ASA Series VPN ASDM Configuration Guide, 7.1
Bias-Free Language
The documentation set for this product strives to use bias-free language. For the purposes of this documentation set, bias-free is defined as language that does not imply discrimination based on age, disability, gender, racial identity, ethnic identity, sexual orientation, socioeconomic status, and intersectionality. Exceptions may be present in the documentation due to language that is hardcoded in the user interfaces of the product software, language used based on RFP documentation, or language that is used by a referenced third-party product. Learn more about how Cisco is using Inclusive Language.
- Updated:
- August 21, 2014
Chapter: Customizing Clientless SSL VPN
- Defining the End User Interface
- Customizing Clientless SSL VPN Pages
- Information About Customization
- Exporting a Customization Template
- Editing the Customization Template
- Customizing the Portal Page
- Customizing the Logout Page
- Customizing the External Portal Page
- Adding Customization Object
- Importing/Exporting Customization Object
Customizing Clientless SSL VPN
Customizing the Clientless SSL VPN User Experience
You can customize the Clientless SSL VPN user experience, including the logon, portal, and logout pages. There are two methods you can use. You can customize pre-defined page components in the Add/Edit Customization Object window. This window adds, or makes changes to, an XML file stored on the ASA (a customization object) that is used to customize the pages. Alternatively, you can export the XML file to a local computer or server, make changes to the XML tags, and re-import the file to the ASA. Either method creates a customization object that you apply to a connection profile or group policy.
Rather than customizing the pre-defined components of the logon page, you can create your own page and import it to the ASA for full customization. To do this see the “Replacing the Logon Page with your own Fully Customized Page” section.
You can customize pre-defined components of the logon page, including titles, language options, and messages to users. Alternatively, you can completely replace the page with your own custom page (full customization). The following sections detail both procedures:
- Customizing the Logon Page with the Customization Editor
- Replacing the Logon Page with your own Fully Customized Page
Customizing the Logon Page with the Customization Editor
Figure 18-1 shows the logon page and the pre-defined components you can customize:
Figure 18-1 Components of Clientless Logon Page

To customize all the components of the logon page, follow this procedure. You can preview your changes for each component by clicking the Preview button:
Step 2![]() Display and customize the title panel. Go to Logon Page > Title Panel and check Display title panel. Enter text to display as the title and specify a logo. Specify any font styles.
Display and customize the title panel. Go to Logon Page > Title Panel and check Display title panel. Enter text to display as the title and specify a logo. Specify any font styles.
Step 3![]() Specify language options to display. Go to Logon Page > Language and check Enable Language Selector. Add or delete any languages to display to remote users. Languages in the list require translation tables that you configure in Configuration > Remote Access VPN > Language Localization.
Specify language options to display. Go to Logon Page > Language and check Enable Language Selector. Add or delete any languages to display to remote users. Languages in the list require translation tables that you configure in Configuration > Remote Access VPN > Language Localization.
Step 4![]() Customize the logon form. Go to Logon Page > Logon Form. Customize the text of the form and the font style in the panel. The secondary password field appears to users only if a secondary authentication server is configured in the connection profile.
Customize the logon form. Go to Logon Page > Logon Form. Customize the text of the form and the font style in the panel. The secondary password field appears to users only if a secondary authentication server is configured in the connection profile.
Step 5![]() Arrange the position of the logon form fields. Go to Logon Page > Form Fields Order. Use the up and down arrow buttons to change the order that the fields are displayed.
Arrange the position of the logon form fields. Go to Logon Page > Form Fields Order. Use the up and down arrow buttons to change the order that the fields are displayed.
Step 6![]() Add messages to users. Go to Logon Page > Informational Panel and check Display informational panel. Add text to display in the panel, change the position of the panel relative to the logon form, and specify a logo to display in this panel.
Add messages to users. Go to Logon Page > Informational Panel and check Display informational panel. Add text to display in the panel, change the position of the panel relative to the logon form, and specify a logo to display in this panel.
Step 7![]() Display a copyright statement. Go to Logon Page > Copyright Panel and check Display copyright panel. Add text to display for copyright purposes.
Display a copyright statement. Go to Logon Page > Copyright Panel and check Display copyright panel. Add text to display for copyright purposes.
Step 8![]() Click OK , then apply the changes to the customization object you edited.
Click OK , then apply the changes to the customization object you edited.
Replacing the Logon Page with your own Fully Customized Page
If you prefer to use your own, custom login screen, rather than changing specific components of the logon page we provide, you can perform this advanced customization using the Full Customization feature.
With Full Customization, you provide the HTML for your own login screen, and you insert Cisco HTML code that calls functions on the ASA that create the Login form and the Language Selector drop-down list.
This document describes the modifications you need to make to your HTML code and the tasks required to configure the ASA to use your code.
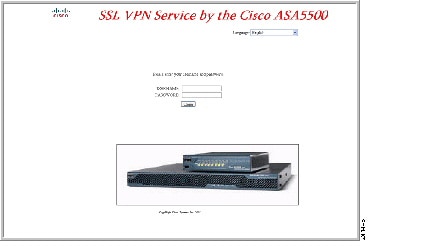
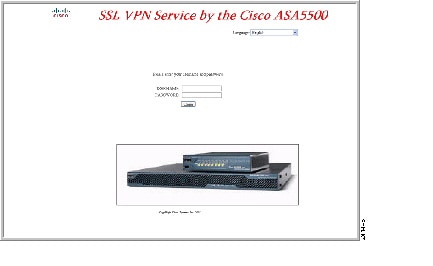
Figure 18-2 shows a simple example of a custom login screen enabled by the Full Customization feature.
Figure 18-2 Example of Full Customization of Logon Page
The following sections describe the tasks to customize the login screen:
Creating the Custom Login Screen File
The following HTML code is used as an example and is the code that displays:
</td></tr>
The indented code injects the Login form and the Language Selector on the screen. The function csco_ShowLoginForm('lform') injects the logon form. csco_ShowLanguageSelector('selector') injects the Language Selector.
DETAILED STEPS
Step 2![]() Modify the paths of images used by the file to include /+CSCOU+/.
Modify the paths of images used by the file to include /+CSCOU+/.
Files that are displayed to remote users before authentication must reside in a specific area of the ASA cache memory represented by the path /+CSCOU+/. Therefore, the source for each image in the file must include this path. For example:
Step 3![]() Insert the special HTML code below. This code contains the Cisco functions, described earlier, that inject the login form and language selector onto the screen.
Insert the special HTML code below. This code contains the Cisco functions, described earlier, that inject the login form and language selector onto the screen.
Importing the File and Images
DETAILED STEPS
Step 1![]() Go to Clientless SSL VPN Access > Portal > Web Contents.
Go to Clientless SSL VPN Access > Portal > Web Contents.
Step 2![]() Click Import. The Import Web Content window displays.
Click Import. The Import Web Content window displays.
a.![]() Select the Source option, and enter the path the Web content files.
Select the Source option, and enter the path the Web content files.
b.![]() In the Destination area, select No for Require Authentication to access its content . This ensures the files are stored in the area of flash memory accessible to users before authentication.
In the Destination area, select No for Require Authentication to access its content . This ensures the files are stored in the area of flash memory accessible to users before authentication.
Step 3![]() Click Import Now, and kee used by the file as Web Content using the same window.
Click Import Now, and kee used by the file as Web Content using the same window.
Configuring the Security Appliance to use the Custom Login Screen
DETAILED STEPS
Step 2![]() In the navigation pane, select Logon Page.
In the navigation pane, select Logon Page.
Step 3![]() Choose Replace pre-defined logon page with a custom page.
Choose Replace pre-defined logon page with a custom page.
Step 4![]() Click Manage to import your logon page file. The Import Web Content window displays.
Click Manage to import your logon page file. The Import Web Content window displays.
Step 5![]() In the Destination area, select No to ensure your logon page is visible to users before they authenticate.
In the Destination area, select No to ensure your logon page is visible to users before they authenticate.
Step 6![]() Back in the Edit Customization Object window, click General and enable the customization object for the connection profile and/or group policies you desire.
Back in the Edit Customization Object window, click General and enable the customization object for the connection profile and/or group policies you desire.
Clientless SSL VPN End User Setup
This section is for the system administrator who sets up Clientless SSL VPN for end users. It describes how to customize the end-user interface.
This section summarizes configuration requirements and tasks for a remote system. It specifies information to communicate to users to get them started using Clientless SSL VPN. It includes the following topics:
- Defining the End User Interface
- Customizing Clientless SSL VPN Pages
- Information About Customization
- Exporting a Customization Template
- Editing the Customization Template
Defining the End User Interface
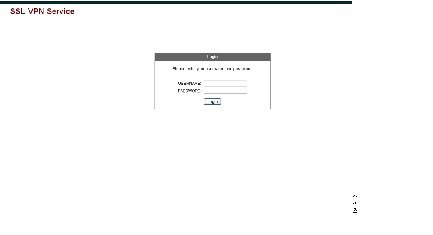
The Clientless SSL VPN end user interface consists of a series of HTML panels. A user logs on to Clientless SSL VPN by entering the IP address of an ASA interface in the format https:// address . The first panel that displays is the login screen (Figure 18-3).
Figure 18-3 Clientless SSL VPN Login Screen
Viewing the Clientless SSL VPN Home Page
After the user logs in, the portal page opens.
The home page displays all of the Clientless SSL VPN features you have configured, and its appearance reflects the logo, text, and colors you have selected. This sample home page includes all available Clientless SSL VPN features with the exception of identifying specific file shares. It lets users browse the network, enter URLs, access specific websites, and use Application Access (port forwarding and smart tunnels) to access TCP applications.
Viewing the Clientless SSL VPN Application Access Panel
To start port forwarding or smart tunnels, a user clicks the Go button in the Application Access box. The Application Access window opens (Figure 18-4).
Figure 18-4 Clientless SSL VPN Application Access Window
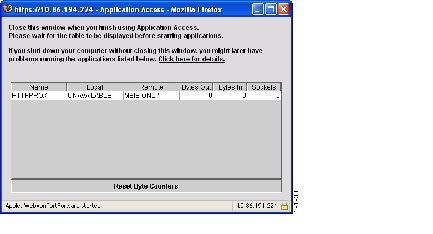
This window displays the TCP applications configured for this Clientless SSL VPN connection. To use an application with this panel open, the user starts the application in the normal way.

Note![]() A stateful failover does not retain sessions established using Application Access. Users must reconnect following a failover.
A stateful failover does not retain sessions established using Application Access. Users must reconnect following a failover.
Viewing the Floating Toolbar
The floating toolbar shown in Figure 18-5 represents the current Clientless SSL VPN session.
Figure 18-5 Clientless SSL VPN Floating Toolbar
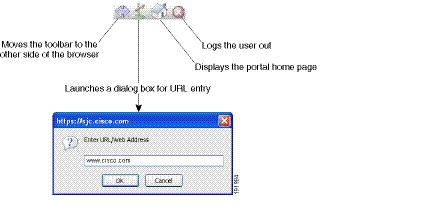
Be aware of the following characteristics of the floating toolbar:
- The toolbar lets you enter URLs, browse file locations, and choose preconfigured Web connections without interfering with the main browser window.
- If you configure your browser to block popups, the floating toolbar cannot display.
- If you close the toolbar, the ASA prompts you to end the Clientless SSL VPN session.
Customizing Clientless SSL VPN Pages
You can change the appearance of the portal pages displayed to Clientless SSL VPN users. This includes the Login page displayed to users when they connect to the security appliance, the Home page displayed to users after the security appliance authenticates them, the Application Access window displayed when users launch an application, and the Logout page displayed when users log out of Clientless SSL VPN sessions.
After you customize the portal pages, you can save your customization and apply it to a specific connection profile, group policy, or user. The changes do not take effect until you reload the ASA, or you switch off and then enable clientless SSL.
You can create and save many customization objects, enabling the security appliance to change the appearance of portal pages for individual users or groups of users.
Information About Customization
The ASA uses customization objects to define the appearance of user screens. A customization object is compiled from an XML file which contains XML tags for all the customizable screen items displayed to remote users. The ASA software contains a customization template that you can export to a remote PC. You can edit this template and import the template back into the ASA as a new customization object.
When you export a customization object, an XML file containing XML tags is created at the URL you specify. The XML file created by the customization object named Template contains empty XML tags, and provides the basis for creating new customization objects. This object cannot be changed or deleted from cache memory but can be exported, edited, and imported back into the ASA as a new customization object.
Customization Objects, Connection Profiles, and Group Policies
Initially, when a user first connects, the default customization object (named DfltCustomization ) identified in the connection profile (tunnel group) determines how the logon screen appears. If the connection profile list is enabled, and the user selects a different group which has its own customization, the screen changes to reflect the customization object for that new group.
After the remote user is authenticated, the screen appearance is determined by whether a customization object that has been assigned to the group policy.
Exporting a Customization Template
When you export a customization object, an XML file is created at the URL you specify. The customization template (named Template ) contains empty XML tags and provides the basis for creating new customization objects. This object cannot be changed or deleted from cache memory but can be exported, edited, and imported back into the ASA as a new customization object.
Editing the Customization Template
This section shows the contents of the customization template and has convenient figures to help you quickly choose the correct XML tag and make changes that affect the screens.
You can use a text editor or an XML editor to edit the XML file. The following example shows the XML tags of the customization template. Some redundant tags have been removed for easier viewing:
Figure 18-6 shows the Logon page and its customizing XML tags. All these tags are nested within the higher-level tag <auth-page>.
Figure 18-6 Logon Page and Associated XML Tags
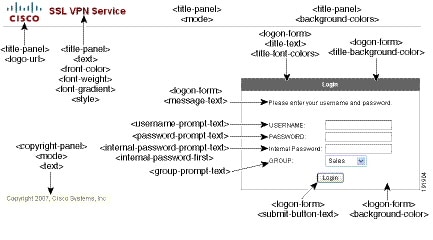
Figure 18-7 shows the Language Selector drop-down list that is available on the Logon page, and the XML tags for customizing this feature. All these tags are nested within the higher-level <auth-page> tag.
Figure 18-7 Language Selector on Logon Screen and Associated XML Tags
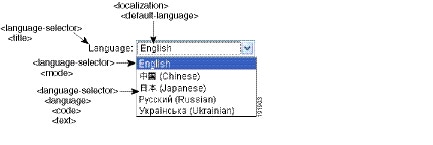
Figure 18-8 shows the Information Panel that is available on the Logon page, and the XML tags for customizing this feature. This information can appear to the left or right of the login box. These tags are nested within the higher-level <auth-page> tag.
Figure 18-8 Information Panel on Logon Screen and Associated XML Tags
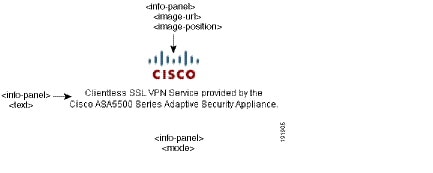
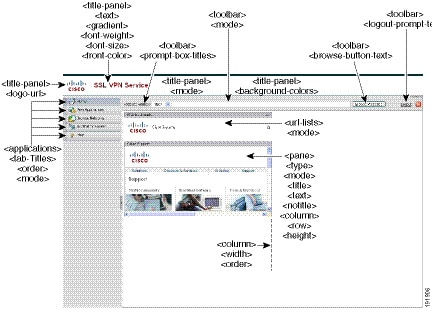
Figure 18-9 shows the Portal page and the XML tags for customizing this feature. These tags are nested within the higher-level <auth-page> tag.
Figure 18-9 Portal Page and Associated XML Tags
Login Screen Advanced Customization
If you prefer to use your own, custom login screen, rather than changing specific screen elements of the login screen we provide, you can perform this advanced customization using the Full Customization feature.
With Full Customization, you provide the HTML for your own login screen, and you insert Cisco HTML code that calls functions on the ASA that create the Login form and the Language Selector drop-down list.
This section describes the modifications you need to make to your HTML code and the tasks required to configure the ASA to use your code.
Figure 18-10 shows the standard Cisco login screen that displays to Clientless SSL VPN users. The Login form is displayed by a function called by the HTML code.
Figure 18-10 Standard Cisco Login Page
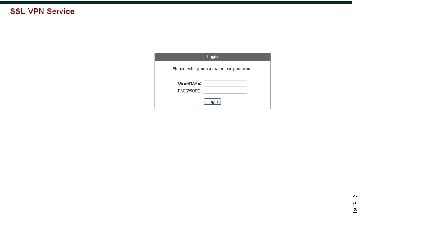
Figure 18-11 shows the Language Selector drop-down list. This feature is an option for Clientless SSL VPN users and is also called by a function in the HTML code of the login screen.
Figure 18-11 Language Selector Drop-down List
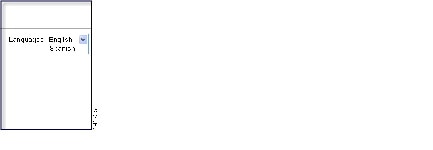
Figure 18-12 shows a simple example of a custom login screen enabled by the Full Customization feature.
Figure 18-12 Example of Full Customization of Login Screens
The following HTML code is used as an example and is the code that displays:
The indented code injects the Login form and the Language Selector on the screen. The function csco_ShowLoginForm('lform') injects the logon form. csco_ShowLanguageSelector('selector') injects the Language Selector.
Modifying Your HTML File
DETAILED STEPS
Step 2![]() Modify the paths of images used by the file to include /+CSCOU+/.
Modify the paths of images used by the file to include /+CSCOU+/.
Files that are displayed to remote users before authentication must reside in a specific area of the ASA cache memory represented by the path /+CSCOU+/. Therefore, the source for each image in the file must include this path. For example:
Step 3![]() Insert the special HTML code below. This code contains the Cisco functions, described earlier, that inject the login form and language selector onto the screen.
Insert the special HTML code below. This code contains the Cisco functions, described earlier, that inject the login form and language selector onto the screen.
Customizing the Portal Page
Figure 18-13 Customizable Components of the Portal Page
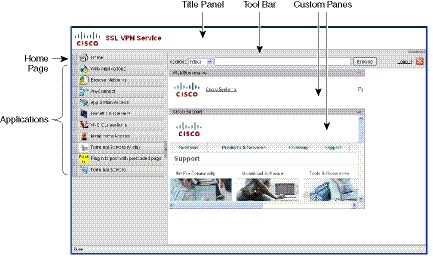
In addition to customizing the components of the page, you can divide the portal page into custom panes that display text, an image, an RSS feed, or HTML. In Figure 18-13, the portal page is divided into one column with two rows.
To customize the portal page, follow this procedure. You can preview your changes for each component by clicking the Preview button:
Step 2![]() Display and customize the title panel. Go to Portal Page > Title Panel and check Display title panel. Enter text to display as the title and specify a logo. Specify any font styles.
Display and customize the title panel. Go to Portal Page > Title Panel and check Display title panel. Enter text to display as the title and specify a logo. Specify any font styles.
Step 3![]() Enable and customize the toolbar. Go to Portal Page > Toolbar and check Display toolbar. Customize the Prompt Box, Browse button, and Logout prompt as desired.
Enable and customize the toolbar. Go to Portal Page > Toolbar and check Display toolbar. Customize the Prompt Box, Browse button, and Logout prompt as desired.
Step 4![]() Customize the Applications list. Go to Portal Page > Applications and check Show navigation panel. The applications populated in the table are those applications you enabled in the ASA configuration, including client-server plugins and port forwarding applications.
Customize the Applications list. Go to Portal Page > Applications and check Show navigation panel. The applications populated in the table are those applications you enabled in the ASA configuration, including client-server plugins and port forwarding applications.
Step 5![]() Create custom panes in the portal page space. Go to Portal Page > Custom Panes and divide the window into rows and columns for text, images, RSS feeds, or HTML pages, as desired.
Create custom panes in the portal page space. Go to Portal Page > Custom Panes and divide the window into rows and columns for text, images, RSS feeds, or HTML pages, as desired.
Step 6![]() Specify a home page URL. Go to Portal Page > Home Page and check Enable custom intranet Web page. Choose a bookmark mode that defines how bookmarks are organized.
Specify a home page URL. Go to Portal Page > Home Page and check Enable custom intranet Web page. Choose a bookmark mode that defines how bookmarks are organized.
Configure a timeout alert message and a tooltip. Go to Portal Page > Timeout Alerts. See Configuring Custom Portal Timeout Alerts for full instructions.
Configuring Custom Portal Timeout Alerts
So that users of the Clientless SSL VPN feature can manage their time in the VPN session, the Clientless SSL VPN portal page displays a countdown timer showing the total time left before the clientless VPN session expires. Sessions can timeout due to inactivity or because they have reached the end of a maximum allowed connection time that you have configured.
You can create custom messages to alert users that their session is about to end because of an idle timeout or a session timeout. Your custom message replaces the default idle timeout message. The default message is, “ Your session will expire in %s . ” The %s place holder in your message is replaced by a ticking countdown timer.
Step 1![]() Start ASDM and select Configuration > Remote Access VPN > Clientless SSL VPN Access > Portal > Customization .
Start ASDM and select Configuration > Remote Access VPN > Clientless SSL VPN Access > Portal > Customization .
Step 2![]() Click Add to add a new customization object or select an existing customization object and click Edit to add a custom idle timeout message to an existing customization object.
Click Add to add a new customization object or select an existing customization object and click Edit to add a custom idle timeout message to an existing customization object.
Step 3![]() In the Add / Edit Customization Object pane, expand the Portal Page node on the navigation tree and click Timeout Alerts .
In the Add / Edit Customization Object pane, expand the Portal Page node on the navigation tree and click Timeout Alerts .
Step 4![]() Check Enable alert visual tooltip (red background for timer countdown) . This displays the countdown timer as a tool tip on a red background. When users click the Time left area, the time area expands to display your custom timeout alert message. If you leave this box unchecked, users see the custom timeout alerts in a pop-up window.
Check Enable alert visual tooltip (red background for timer countdown) . This displays the countdown timer as a tool tip on a red background. When users click the Time left area, the time area expands to display your custom timeout alert message. If you leave this box unchecked, users see the custom timeout alerts in a pop-up window.
Step 5![]() Enter a message in the Idle Timeout Message box and in the Session Timeout Message box. An example of a message could be,
Enter a message in the Idle Timeout Message box and in the Session Timeout Message box. An example of a message could be, Warning: Your session will end in %s. Please complete your work and prepare to close your applications.
Specifying a Custom Timeout Alert in a Customization Object File
If you desire, you can edit an existing customization object file outside of the ASA and import it to the ASA. For more information about Importing and Exporting Customization objects see Importing/Exporting Customization Object. See also, Creating XML-Based Portal Customization Objects and URL Lists.
The timeout messages are configured in the <timeout-alerts> XML element of your XML customization object file. The <timeout-alerts> element is a child of the <portal> element. The <portal> element is a child of the <custom> element.
The <timeout-alerts> element is placed after the <home-page> element and before any <application> elements in the order of the <portal> child elements.
You need to specify these child-elements of <timeout-alerts>:
- <alert-tooltip> – If set to “yes”, users see the countdown timer on a red background as a tool tip. Clicking the count down timer expands the tooltip to display your custom message. If set to “no” or if is undefined, users receive your custom messages in pop-up windows.
- <session-timeout-message> – Enter your custom session timeout message in this element. If set and not empty, users receive your custom message instead of the default message. The %s place holder in the message will be replaced with a ticking countdown timer.
- <idle-timeout-message> – Enter your custom idle timeout message in this element. If set and not empty, users receive your custom message instead of the default message. The %s place holder will be replaced with a ticking countdown timer.
Configuration Example for Timeout-alert Element and Child Elements
This example shows only the <timeout-alerts> elements of the <portal> element.
Note![]() Do not cut and paste this example into an existing customization object.
Do not cut and paste this example into an existing customization object.
Customizing the Logout Page
Figure 18-14 shows the logout page you can customize:
Figure 18-14 Components of the Logout Page
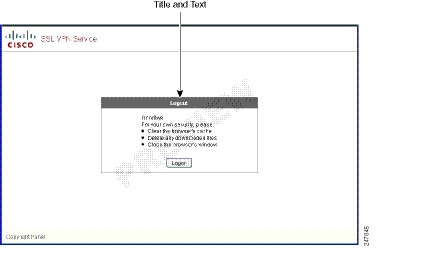
To customize the logout page, follow this procedure. You can preview your changes for each component by clicking the Preview button:
Step 2![]() For the convenience of the user, you can display the Login button on the Logout page. To do this, check Show logon button. Customize the button text, if desired.
For the convenience of the user, you can display the Login button on the Logout page. To do this, check Show logon button. Customize the button text, if desired.
Step 3![]() Customize the title font or background, as desired.
Customize the title font or background, as desired.
Step 4![]() Click OK , then apply the changes to the customization object you edited.
Click OK , then apply the changes to the customization object you edited.
Customizing the External Portal Page
Adding Customization Object
To add a customization object, create a copy of and provide a unique name for the DfltCustomization object. Then you can modify or edit it to meet your requirements.
DETAILED STEPS
Step 1![]() Click Add and enter a name for the new customization object. Maximum 64 characters, no spaces.
Click Add and enter a name for the new customization object. Maximum 64 characters, no spaces.
Step 2![]() (Optional) Click Find to search for a customization object. Start typing in the field, and the tool searches the beginning characters of every field for a match. You can use wild cards to expand your search. For example, typing sal in the Find field matches a customization object named sales but not a customization object named wholesalers. If you type *sal in the Find field, the search finds the first instance of either sales or wholesalers in the table.
(Optional) Click Find to search for a customization object. Start typing in the field, and the tool searches the beginning characters of every field for a match. You can use wild cards to expand your search. For example, typing sal in the Find field matches a customization object named sales but not a customization object named wholesalers. If you type *sal in the Find field, the search finds the first instance of either sales or wholesalers in the table.
Use the up and down arrows to skip up or down to the next string match. Check the Match Case check box to make your search case sensitive.
Step 3![]() Specify when the onscreen keyboard shows on portal pages. The choices are as follows:
Specify when the onscreen keyboard shows on portal pages. The choices are as follows:
- Do not show OnScreen Keyboard
- Show only for the login page
- Show for all portal pages requiring authentication
Step 4![]() (Optional) Highlight a customization object and click Assign to assign the selected object to one or more group policies, connection profiles, or LOCAL users.
(Optional) Highlight a customization object and click Assign to assign the selected object to one or more group policies, connection profiles, or LOCAL users.
Importing/Exporting Customization Object
You can import or export already-existing customization objects. Import an object to apply to end users. Export a customization object already resident on the ASA for editing purposes, after which you can reimport it.
DETAILED STEPS
Step 1![]() Identify the customization object by name. Maximum 64 characters, no spaces.
Identify the customization object by name. Maximum 64 characters, no spaces.
Step 2![]() Choose the method to import or export the customization file:
Choose the method to import or export the customization file:
- Local computer—Choose this method to import a file that resides on the local PC.
- Path—Provide the path to the file.
- Browse Local Files—Browse to the path for the file.
- Flash file system—Choose this method to export a file that resides on the ASA.
- Path—Provide the path to the file.
- Browse Flash—Browse to the path for the file.
- Remote server—Choose this option to import a customization file that resides on a remote server accessible from the ASA.
- Path—Identify the method to access the file (ftp, http, or https), and provide the path to the file.
Step 3![]() Click to import or export the file.
Click to import or export the file.
Creating XML-Based Portal Customization Objects and URL Lists
This section includes the following topics:
- Understanding the XML Customization File Structure
- Configuration Example for Customization
- Using the Customization Template
- Help Customization
- Import/Export Application Help Content
Understanding the XML Customization File Structure
Table 18-1 presents the file structure for an XML customization object.
Note![]() Absence of a parameter/tag results in a default/inherited value, while presence results in setting the parameter/tag value even it is an empty string.
Absence of a parameter/tag results in a default/inherited value, while presence results in setting the parameter/tag value even it is an empty string.
Configuration Example for Customization
The following example illustrates the following customization options:
- Hides tab for the File access application
- Changes title and order of Web Access application
- Defines two columns on the home page
- Adds an RSS pane
- Adds three panes (text, image, and html) at the top of second pane
Using the Customization Template
A customization template, named Template , contains all currently employed tags with corresponding comments that describe how to use them. Use the export command to download the customization template from the ASA, as follows:
You cannot change or delete the file Template . When you export it, as in this example, you are saving it to a new name, default.xml . After you make your changes to this file to create a customization object that meets the needs of your organization, import it to the ASA, either as default.xml or another name of your choosing. For example:
hostname# import webvpn customization General tftp://webserver/custom.xml
hostname#
where you import an XML object called custom.xml , and name it General on the ASA.
The Customization Template
The customization template, named Template , follows:
first
Help Customization
The ASA displays help content on the application panes during clientless sessions. Each clientless application pane displays its own help file content using a predetermined filename. For example, the help content displayed on the Application Access panel is from the file named app-access-hlp.inc. Table 18-2 shows the clientless application panels and predetermined filenames for the help content.
|
|
|
|
|---|---|---|
Telnet/SSH Servers1 |
||
|
|
You can customize the help files provided by Cisco or create help files in other languages. Then use the Import button to copy them to the flash memory of the ASA for display during subsequent clientless sessions. You can also export previously imported help content files, customize them, and reimport them to flash memory.
The following sections describe how to customize or create help content visible on clientless sessions:
DETAILED STEPS
Step 1![]() Click Import to launch the Import Application Help Content dialog, where you can import new help content to flash memory for display during clientless sessions.
Click Import to launch the Import Application Help Content dialog, where you can import new help content to flash memory for display during clientless sessions.
Step 2![]() (Optional) Click Export to retrieve previously imported help content selected from the table.
(Optional) Click Export to retrieve previously imported help content selected from the table.
Step 3![]() (Optional) Click Delete to delete previously imported help content selected from the table.
(Optional) Click Delete to delete previously imported help content selected from the table.
Step 4![]() The abbreviation of the language rendered by the browser is displayed. This field is not used for file translation; it indicates the language used in the file. To identify the name of a language associated with an abbreviation in the table, display the list of languages rendered by your browser. For example, a dialog window displays the languages and associated language codes when you use one of the following procedures:
The abbreviation of the language rendered by the browser is displayed. This field is not used for file translation; it indicates the language used in the file. To identify the name of a language associated with an abbreviation in the table, display the list of languages rendered by your browser. For example, a dialog window displays the languages and associated language codes when you use one of the following procedures:
- Open Internet Explorer and choose Tools > Internet Options > Languages > Add .
- Open Mozilla Firefox and choose Tools > Options > Advanced > General , click Choose next to Languages, and click Select a language to add .
The filename that the help content file was imported as is provided.
Customizing a Help File Provided by Cisco
To customize a help file provided by Cisco, you first require a copy of the file from the flash memory card.
DETAILED STEPS
Step 1![]() Use your browser to establish a clientless session with the ASA.
Use your browser to establish a clientless session with the ASA.
Step 2![]() Display the help file by appending the string in “URL of Help File in Flash Memory of the Security Appliance” in Table 18-3 , to the address of the ASA, substituting language as described below, then press Enter .
Display the help file by appending the string in “URL of Help File in Flash Memory of the Security Appliance” in Table 18-3 , to the address of the ASA, substituting language as described below, then press Enter .
|
|
|
|
|---|---|---|
language is the abbreviation for the language rendered by the browser. It is not used for file translation; it indicates the language used in the file. For help files provided by Cisco in English, enter the abbreviation en .
The following example address displays the English version of the Terminal Servers help:
https:// address_of_security_appliance /+CSCOE+/help/en/rdp-hlp.inc
Step 3![]() Choose File > Save (Page) As .
Choose File > Save (Page) As .
Note Do not change the contents of the File name box.
Step 4![]() Change the Save as type option to Web Page, HTML only and click Save .
Change the Save as type option to Web Page, HTML only and click Save .
Step 5![]() Use your preferred HTML editor to customize the file.
Use your preferred HTML editor to customize the file.
Note You can use most HTML tags, but do not use tags that define the document and its structure (for example, do not use <html>, <title>, <body>, <head>, <h1>, <h2>, etc. You can use character tags, such as the <b> tag, and the <p>, <ol>, <ul>, and <li> tags to structure content.
Step 6![]() Save the file as HTML only, using the original filename and extension.
Save the file as HTML only, using the original filename and extension.
Step 7![]() Ensure the filename matches the one in Table 18-4 , and that it does not have an extra filename extension.
Ensure the filename matches the one in Table 18-4 , and that it does not have an extra filename extension.
Return to ASDM and choose Configuration > Remote Access VPN > Clientless SSL VPN Access > Portal > Help Customization > Import to import the modified help file into flash memory.
Creating Help Files for Languages Not Provided by Cisco
Use standard HTML to create help files in other languages. We recommend creating a separate folder for each language to support.
Note![]() You can use most HTML tags, but donot use tags that define the document and its structure (for example, do not use <html>, <title>, <body>, <head>, <h1>, <h2>, etc. You can use character tags, such as the <b> tag, and the <p>, <ol>, <ul>, and <li> tags to structure content.
You can use most HTML tags, but donot use tags that define the document and its structure (for example, do not use <html>, <title>, <body>, <head>, <h1>, <h2>, etc. You can use character tags, such as the <b> tag, and the <p>, <ol>, <ul>, and <li> tags to structure content.
Save the file as HTML only. Use the filename in the Filename column.
Return to ASDM and choose Configuration > Remote Access VPN > Clientless SSL VPN Access > Portal > Help Customization > Import to import the new help file into flash memory.
Import/Export Application Help Content
Use the Import Application Help Content dialog box to import help files to flash memory for display on the portal pages during clientless sessions. Use the Export Application Help Content dialog box to retrieve previously imported help files for subsequent editing.
DETAILED STEPS
Step 1![]() The Language field specifies the language rendered by the browser but is not used for file translation. (This field is inactive in the Export Application Help Content dialog box.) Click the dots next to the Language field and double-click the row containing the language shown in the Browse Language Code dialog box. Confirm the abbreviation in the Language Code field matches the abbreviation in the row and click OK .
The Language field specifies the language rendered by the browser but is not used for file translation. (This field is inactive in the Export Application Help Content dialog box.) Click the dots next to the Language field and double-click the row containing the language shown in the Browse Language Code dialog box. Confirm the abbreviation in the Language Code field matches the abbreviation in the row and click OK .
Step 2![]() If the language required to provide help content is not present in the Browse Language Code dialog box, perform the following
If the language required to provide help content is not present in the Browse Language Code dialog box, perform the following
1.![]() Display the list of languages and abbreviations rendered by your browser.
Display the list of languages and abbreviations rendered by your browser.
2.![]() Enter the abbreviation for the language in the Language Code field and click OK.
Enter the abbreviation for the language in the Language Code field and click OK.
OR
You can also enter it into the Language text box to the left of the dots.
A dialog box displays the languages and associated language codes when you use one of the following procedures:
- Open Internet Explorer and choose Tools > Internet Options > Languages > Add .
- Open Mozilla Firefox and choose Tools > Options > Advanced > General , click Choose next to Languages, and click Select a language to add .
Step 3![]() If you are importing, choose the new help content file from the File Name drop-down list. If you are exporting, this field is unavailable.
If you are importing, choose the new help content file from the File Name drop-down list. If you are exporting, this field is unavailable.
Step 4![]() Configure the parameters for the source file (if importing) or destination file (if exporting):
Configure the parameters for the source file (if importing) or destination file (if exporting):
–![]() Path—Identify the path of the source or destination file.
Path—Identify the path of the source or destination file.
–![]() Browse Local Files—Click to browse the local computer for the source or destination file.
Browse Local Files—Click to browse the local computer for the source or destination file.
–![]() Path—Identify the path of the source or destination file in flash memory.
Path—Identify the path of the source or destination file in flash memory.
–![]() Browse Flash—Click to browse the flash memory for the source or destination file.
Browse Flash—Click to browse the flash memory for the source or destination file.
–![]() Path—Choose the file transfer (copy) method, either ftp, tftp, or http (for importing only), and specify the path.
Path—Choose the file transfer (copy) method, either ftp, tftp, or http (for importing only), and specify the path.
Customizing a Help File Provided by Cisco
To customize a help file provided by Cisco, you first require a copy of the file from the flash memory card.
DETAILED STEPS
Step 1![]() Use your browser to establish a clientless session with the ASA.
Use your browser to establish a clientless session with the ASA.
Step 2![]() Display the help file by appending the string in “URL of Help File in Flash Memory of the Security Appliance” in Table 18-4 , to the address of the ASA, substituting language as described below, then press Enter .
Display the help file by appending the string in “URL of Help File in Flash Memory of the Security Appliance” in Table 18-4 , to the address of the ASA, substituting language as described below, then press Enter .
|
|
|
|
|---|---|---|
language is the abbreviation for the language rendered by the browser. It is not used for file translation; it indicates the language used in the file. For help files provided by Cisco in English, enter the abbreviation en .
The following example address displays the English version of the Terminal Servers help:
https:// address_of_security_appliance /+CSCOE+/help/en/rdp-hlp.inc
Step 3![]() Choose File > Save (Page) As .
Choose File > Save (Page) As .
Note Do not change the contents of the File name box.
Step 4![]() Change the Save as type option to “Web Page, HTML only” and click Save .
Change the Save as type option to “Web Page, HTML only” and click Save .
Step 5![]() Use your preferred HTML editor to customize the file.
Use your preferred HTML editor to customize the file.
Note You can use most HTML tags, but do not use tags that define the document and its structure (for example, do not use <html>, <title>, <body>, <head>, <h1>, <h2>, etc. You can use character tags, such as the <b> tag, and the <p>, <ol>, <ul>, and <li> tags to structure content.
Step 6![]() Save the file as HTML only, using the original filename and extension.
Save the file as HTML only, using the original filename and extension.
Step 7![]() Ensure the filename matches the one in Table 18-4 , and that it does not have an extra filename extension.
Ensure the filename matches the one in Table 18-4 , and that it does not have an extra filename extension.
Return to ASDM and choose Configuration > Remote Access VPN > Clientless SSL VPN Access > Portal > Help Customization > Import to import the modified help file into flash memory.
Creating Help Files for Languages Not Provided by Cisco
Use standard HTML to create help files in other languages. We recommend creating a separate folder for each language to support.
Note![]() You can use most HTML tags, but donot use tags that define the document and its structure (for example, do not use <html>, <title>, <body>, <head>, <h1>, <h2>, etc. You can use character tags, such as the <b> tag, and the <p>, <ol>, <ul>, and <li> tags to structure content.
You can use most HTML tags, but donot use tags that define the document and its structure (for example, do not use <html>, <title>, <body>, <head>, <h1>, <h2>, etc. You can use character tags, such as the <b> tag, and the <p>, <ol>, <ul>, and <li> tags to structure content.
Save the file as HTML only. Use the filename in the Filename column of Table 18-5 .
Return to ASDM and choose Configuration > Remote Access VPN > Clientless SSL VPN Access > Portal > Help Customization > Import to import the new help file into flash memory.
Customizing Bookmark Help
The ASA displays help content on the application panels for each selected bookmark. You can customize those help files or create help files in other languages. You then import them to flash memory for display during subsequent sessions. You can also retrieve previously imported help content files, modify them, and reimport them to flash memory.
Each application panel displays its own help file content using a predetermined filename. The prospective location of each is in the /+CSCOE+/help/ language / URL within flash memory of the ASA. Table 18-5 shows the details about each of the help files you can maintain for VPN sessions.
|
|
|
|
|
|---|---|---|---|
language is the abbreviation of the language rendered by the browser. This field is not used for file translation; it indicates the language used in the file. To specify a particular language code, copy the language abbreviation from the list of languages rendered by your browser. For example, a dialog window displays the languages and associated language codes when you use one of the following procedures:
- Open Internet Explorer and choose Tools > Internet Options > Languages > Add .
- Open Mozilla Firefox and choose Tools > Options > Advanced > General , click Choose next to Languages, and click Select a language to add .
The following sections describe how to customize the help contents:
Customizing a Help File Provided By Cisco
To customize a help file provided by Cisco, you need to get a copy of the file from the flash memory card first. Get the copy and customize it as follows:
DETAILED STEPS
Step 1![]() Use your browser to establish a Clientless SSL VPN session with the ASA.
Use your browser to establish a Clientless SSL VPN session with the ASA.
Step 2![]() Display the help file by appending the string in “URL of Help File in Flash Memory of the Security Appliance” in Table 18-5 , to the address of the ASA, then press Enter.
Display the help file by appending the string in “URL of Help File in Flash Memory of the Security Appliance” in Table 18-5 , to the address of the ASA, then press Enter.
Note Enter en in place of language to get the help file in English.
The following example address displays the English version of the Terminal Servers help:
https:// address_of_security_appliance /+CSCOE+/help/en/rdp-hlp.inc
Step 3![]() Choose File > Save (Page) As .
Choose File > Save (Page) As .
Note Do not change the contents of the File name box.
Step 4![]() Change the Save as type option to Web Page, HTML only and click Save .
Change the Save as type option to Web Page, HTML only and click Save .
Step 5![]() Use your preferred HTML editor to modify the file.
Use your preferred HTML editor to modify the file.
Note You can use most HTML tags, but do not use tags that define the document and its structure (e.g., do not use <html>, <title>, <body>, <head>, <h1>, <h2>, etc. You can use character tags, such as the <b> tag, and the <p>, <ol>, <ul>, and <li> tags to structure content.
Step 6![]() Save the file as HTML only, using the original filename and extension.
Save the file as HTML only, using the original filename and extension.
Step 7![]() Ensure the filename matches the one in Table 18-5 , and that it does not have an extra filename extension.
Ensure the filename matches the one in Table 18-5 , and that it does not have an extra filename extension.
Return to ASDM and choose Configuration > Remote Access VPN > Clientless SSL VPN Access > Portal > Help Customization > Import to import the new help file into flash memory.
Creating Help Files for Languages Not Provided by Cisco
Use HTML to create help files in other languages.
We recommend creating a separate folder for each language to support.
Save the file as HTML only. Use the filename following the last slash in “URL of Help File in Flash Memory of the Security Appliance” in Table 18-5 .
See the next section to import the files for display during VPN sessions.
Restrictions
You can use most HTML tags, but do not use tags that define the document and its structure (e.g., do not use <html>, <title>, <body>, <head>, <h1>, <h2>, etc. You can use character tags, such as the <b> tag, and the <p>, <ol>, <ul>, and <li> tags to structure content.
Translating the Language of User Messages
The ASA provides language translation for the entire Clientless SSL VPN session. This includes login, logout banners, and portal pages displayed after authentication such as plugins and AnyConnect.
This section describes how to configure the ASA to translate these user messages and includes the following sections:
Understanding Language Translation
Functional areas and their messages that are visible to remote users are organized into translation domains. Table 18-6 shows the translation domains and the functional areas translated.
Table 18-6 Language Translation Domain Options
The ASA includes a translation table template for each domain that is part of standard functionality. The templates for plug-ins are included with the plug-ins and define their own translation domains.
You can export the template for a translation domain, which creates an XML file of the template at the URL you provide. The message fields in this file are empty. You can edit the messages and import the template to create a new translation table object that resides in flash memory.
You can also export an existing translation table. The XML file created displays the messages you edited previously. Reimporting this XML file with the same language name creates a new version of the translation table object, overwriting previous messages.
Some templates are static, but some change based on the configuration of the ASA. Because you can customize the logon and logout pages, portal page, and URL bookmarks for clientless users, the ASA generates the customization and url-list translation domain templates dynamically, and the template automatically reflects your changes to these functional areas.
After creating translation tables, they are available to customization objects that you create and apply to group policies or user attributes. With the exception of the AnyConnect translation domain, a translation table has no affect, and messages are not translated on user screens until you create a customization object, identify a translation table to use in that object, and specify that customization for the group policy or user. Changes to the translation table for the AnyConnect domain are immediately visible to AnyConnect client users.
Editing a Translation Table
Step 2![]() Choose a Language Localization Template from the drop-down box. The entries in the box correspond to functional areas that are translated.
Choose a Language Localization Template from the drop-down box. The entries in the box correspond to functional areas that are translated.
Step 3![]() Specify a language for the template. The template becomes a translation table in cache memory with the name you specify. Use an abbreviation that is compatible with the language options for your browser. For example, if you are creating a table for the Chinese language, and you are using IE, use the abbreviation zh, that is recognized by IE.
Specify a language for the template. The template becomes a translation table in cache memory with the name you specify. Use an abbreviation that is compatible with the language options for your browser. For example, if you are creating a table for the Chinese language, and you are using IE, use the abbreviation zh, that is recognized by IE.
Step 4![]() Edit the translation table. For each message represented by the msgid field to translate, enter the translated text between the quotes of the associated msgstr field. The example below shows the message Connected, with the Spanish text in the msgstr field:
Edit the translation table. For each message represented by the msgid field to translate, enter the translated text between the quotes of the associated msgstr field. The example below shows the message Connected, with the Spanish text in the msgstr field:
Step 5![]() Click OK . The new table appears in the list of translation tables.
Click OK . The new table appears in the list of translation tables.
Adding a Translation Table
You can add a new translation table, based on a template, or you can modify an already-imported translation table in this pane.
Step 1![]() Select a template to modify and use as a basis for a new translation table. The templates are organized into translation domains and affect certain areas of functionality. Table 18-6 shows the translation domains and the functional areas affected.
Select a template to modify and use as a basis for a new translation table. The templates are organized into translation domains and affect certain areas of functionality. Table 18-6 shows the translation domains and the functional areas affected.
Step 2![]() Select the translation domain from the drop-down. (This field is greyed out on the GUI Text and Messages pane).
Select the translation domain from the drop-down. (This field is greyed out on the GUI Text and Messages pane).
Step 3![]() Select a language from the drop-down.
Select a language from the drop-down.
Step 4![]() Use the editor to change the message translations. The message ID field (msgid) contains the default translation. The message string field (msgstr) that follows msgid provides the translation. To create a translation, enter the translated text between the quotes of the msgstr string. For example, to translate the message “Connected” with a Spanish translation, insert the Spanish text between the msgstr quotes:
Use the editor to change the message translations. The message ID field (msgid) contains the default translation. The message string field (msgstr) that follows msgid provides the translation. To create a translation, enter the translated text between the quotes of the msgstr string. For example, to translate the message “Connected” with a Spanish translation, insert the Spanish text between the msgstr quotes:
After making changes, click Apply to import the translation table.
Importing/Exporting Language Localization
This is help for the import button on Configuration > Remote Access VPN > Language Localization.
In the Import Translation Table and Export Translation Table dialog boxes, you can import or export a translation table to the ASA to provide translation of user messages.
Translation templates are XML files that contain message fields that can be edited with translated messages. You can export a template, edit the message fields, and import the template as a new translation table, or you can export an existing translation table, edit the message fields, and re-import the table to overwrite the previous version.
Step 1![]() Enter a name for the language.
Enter a name for the language.
- When exporting , it is automatically filled-in with the name from the entry you selected in the table.
- When importing , you enter the language name in the manner that you want it to be identified. The imported translation table then appears in the list with the abbreviation you designated. To ensure that your browser recognizes the language, use language abbreviations that are compatible with the language options of the browser. For example, if you are using IE, use zh as the abbreviation for the Chinese language.
Step 2![]() The name of the XML file containing the message fields includes the following:
The name of the XML file containing the message fields includes the following:
- AnyConnect—Messages displayed on the user interface of the Cisco AnyConnect VPN Client.
- banners—Message displayed to Clientless users that VPN access is denied.
- CSD—Messages for the Cisco Secure Desktop (CSD).
- customization—Messages on the logon and logout pages, portal page, and all the messages customizable by the user.
- PortForwarder—Messages displayed to Port Forwarding users.
- url-list—Text that user specifies for URL bookmarks on the portal page.
- webvpn—All the layer 7, AAA and portal messages that are not customizable.
Step 3![]() Choose the method by which you want to import or export the file:
Choose the method by which you want to import or export the file:
- Remote server—Select this option to import a customization file that resides on a remote server accessible from the ASA.
- Path—Identify the method to access the file (ftp, http, or https), and provide the file location.
- Flash file system—Choose this method to export a file that resides on the ASA.
- Path—File location.
- Browse Flash—Browse to the path for the file.
- Local computer—Choose this method to import a file that resides on the local PC.
- Path—Provide the path to the file.
- Browse Local Files—Browse to the path for the file.
Step 4![]() Click Import/Export Now to import or export the file.
Click Import/Export Now to import or export the file.
 Feedback