- Preface
- Introducing the CLI Configuration Guide
- Logging In to the Sensor
- Initializing the Sensor
- Setting Up the Sensor
- Configuring Interfaces
- Configuring Virtual Sensors
- Configuring Event Action Rules
- Defining Signatures
- Configuring Anomaly Detection
- Configuring Global Correlation
- Configuring External Product Interfaces
- Configuring IP Logging
- Displaying and Capturing Live Traffic on an Interface
- Configuring Attack Response Controller for Blocking and Rate Limiting
- Configuring SNMP
- Working With Configuration Files
- Administrative Tasks for the Sensor
- Configuring AIM IPS
- Configuring AIP SSM
- Configuring IDSM2
- Configuring NME IPS
- Obtaining Software
- Upgrading, Downgrading, and Installing System Images
- System Architecture
- Signature Engines
- Troubleshooting
- CLI Error Messages
- Open Source License Files
- Glossary
- Index
Cisco Intrusion Prevention System Sensor CLI Configuration Guide for IPS 7.0
Bias-Free Language
The documentation set for this product strives to use bias-free language. For the purposes of this documentation set, bias-free is defined as language that does not imply discrimination based on age, disability, gender, racial identity, ethnic identity, sexual orientation, socioeconomic status, and intersectionality. Exceptions may be present in the documentation due to language that is hardcoded in the user interfaces of the product software, language used based on RFP documentation, or language that is used by a referenced third-party product. Learn more about how Cisco is using Inclusive Language.
- Updated:
- April 21, 2009
Chapter: Configuring AIM IPS
- AIM IPS Configuration Sequence
- Verifying Installation and Finding the Serial Number
- Hardware Interfaces
- Setting Up Interfaces on the AIM IPS and the Router
- Establishing Sessions
- Opening and Closing a Session
- Displaying the Status of the AIM IPS
- Enabling and Disabling Heartbeat Reset
- Rebooting, Resetting, and Shutting Down the AIM IPS
- New and Modified Commands
Configuring the AIM IPS

Note ![]() All IPS platforms allow ten concurrent CLI sessions.
All IPS platforms allow ten concurrent CLI sessions.
This chapter describes how to configure the AIM IPS and get it ready to receive IPS traffic. After that you are ready to configure intrusion prevention. This chapter contains the following sections:
•![]() AIM IPS Configuration Sequence
AIM IPS Configuration Sequence
•![]() Verifying Installation and Finding the Serial Number
Verifying Installation and Finding the Serial Number
•![]() Setting Up Interfaces on the AIM IPS and the Router
Setting Up Interfaces on the AIM IPS and the Router
•![]() Opening and Closing a Session
Opening and Closing a Session
•![]() Displaying the Status of the AIM IPS
Displaying the Status of the AIM IPS
•![]() Enabling and Disabling Heartbeat Reset
Enabling and Disabling Heartbeat Reset
•![]() Rebooting, Resetting, and Shutting Down the AIM IPS
Rebooting, Resetting, and Shutting Down the AIM IPS
AIM IPS Configuration Sequence
Perform the following tasks to configure the AIM IPS:
1. ![]() Set up the interfaces.
Set up the interfaces.
2. ![]() Log in to the AIM IPS.
Log in to the AIM IPS.
3. ![]() Initialize the AIM IPS. Run the setup command to initialize the AIM IPS.
Initialize the AIM IPS. Run the setup command to initialize the AIM IPS.
4. ![]() Create the service account.
Create the service account.

5. ![]() Perform the other initial tasks, such as adding users, trusted hosts, and so forth.
Perform the other initial tasks, such as adding users, trusted hosts, and so forth.
6. ![]() Configure intrusion prevention.
Configure intrusion prevention.
7. ![]() Configure global correlation.
Configure global correlation.
8. ![]() Perform administrative tasks to keep your AIM IPS running smoothly.
Perform administrative tasks to keep your AIM IPS running smoothly.
9. ![]() Upgrade the IPS software with new signature updates and service packs.
Upgrade the IPS software with new signature updates and service packs.
10. ![]() Reimage the boot helper and bootloader when needed.
Reimage the boot helper and bootloader when needed.
For More Information
•![]() For the procedure for setting up interfaces, see Setting Up Interfaces on the AIM IPS and the Router.
For the procedure for setting up interfaces, see Setting Up Interfaces on the AIM IPS and the Router.
•![]() For the procedure for logging in to the AIM IPS, see Establishing Sessions.
For the procedure for logging in to the AIM IPS, see Establishing Sessions.
•![]() For the procedure for running the setup command on the AIM IPS, see Advanced Setup for the AIM IPS.
For the procedure for running the setup command on the AIM IPS, see Advanced Setup for the AIM IPS.
•![]() For the procedure for creating the service account, see Creating the Service Account.
For the procedure for creating the service account, see Creating the Service Account.
•![]() For the procedures for setting up the sensor, see Chapter 4 "Setting Up the Sensor."
For the procedures for setting up the sensor, see Chapter 4 "Setting Up the Sensor."
•![]() For the procedures for configuring global correlation, see Chapter 10 "Configuring Global Correlation."
For the procedures for configuring global correlation, see Chapter 10 "Configuring Global Correlation."
•![]() For the procedures for configuring intrusion prevention, see Chapter 9 "Configuring Anomaly Detection," Chapter 7 "Configuring Event Action Rules," Chapter 8 "Defining Signatures," and Chapter 14 "Configuring Attack Response Controller for Blocking and Rate Limiting."
For the procedures for configuring intrusion prevention, see Chapter 9 "Configuring Anomaly Detection," Chapter 7 "Configuring Event Action Rules," Chapter 8 "Defining Signatures," and Chapter 14 "Configuring Attack Response Controller for Blocking and Rate Limiting."
•![]() For the procedures for configuring global correlation, see Chapter 10 "Configuring Global Correlation."
For the procedures for configuring global correlation, see Chapter 10 "Configuring Global Correlation."
•![]() For the procedures to keep your sensor running smoothly, see Chapter 17 "Administrative Tasks for the Sensor."
For the procedures to keep your sensor running smoothly, see Chapter 17 "Administrative Tasks for the Sensor."
•![]() For more information on obtaining Cisco IPS software, see Obtaining Cisco IPS Software.
For more information on obtaining Cisco IPS software, see Obtaining Cisco IPS Software.
•![]() For the procedure for reimaging the AIM IPS, see Installing the AIM IPS System Image.
For the procedure for reimaging the AIM IPS, see Installing the AIM IPS System Image.
Verifying Installation and Finding the Serial Number
Use the show inventory command in privileged EXEC mode to verify the installation of the AIM IPS.
Note ![]() You can also use this command to find the serial number of your AIM IPS for use in troubleshooting with TAC. The serial number appears in the PID line, for example, SN: FOC11372M9X.
You can also use this command to find the serial number of your AIM IPS for use in troubleshooting with TAC. The serial number appears in the PID line, for example, SN: FOC11372M9X.
To verify the installation of the AIM IPS, follow these steps:
Step 1 ![]() Log in to the router.
Log in to the router.
Step 2 ![]() Enter privileged EXEC mode on the router.
Enter privileged EXEC mode on the router.
router> enable
Step 3 ![]() Verify that the AIM IPS is part of the router inventory.
Verify that the AIM IPS is part of the router inventory.
router# show inventory
NAME: "3825 chassis", DESCR: "3825 chassis"
PID: CISCO3825 , VID: V01 , SN: FTX1009C3KT
NAME: "Cisco Intrusion Prevention System AIM in AIM slot: 1", DESCR: "Cisco Intrusion
Prevention"
PID: AIM IPS-K9 , VID: V01 , SN: FOC11372M9X
router#
Hardware Interfaces
Figure 19-1 shows the router and the AIM IPS interfaces used for internal communication. You can configure the router interfaces through the Cisco IOS CLI and the AIM IPS interfaces through the IPS CLI, IDM, IME, or CSM.
Figure 19-1 AIM IPS and Router Interfaces
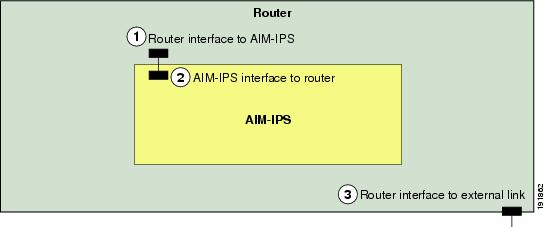
Note ![]() You need two IP addresses to configure the AIM IPS. The AIM IPS has a command and control IP address that you configure through the Cisco IPS CLI. You also assign an IP address to the router for its internal interface (IDS-Sensor 0/x) to the AIM IPS. This IP address belongs to the router itself and is used for routing traffic to the command and control interface of the AIM IPS. It is used as the default router IP address when you set up the AIM IPS command and control interface.
You need two IP addresses to configure the AIM IPS. The AIM IPS has a command and control IP address that you configure through the Cisco IPS CLI. You also assign an IP address to the router for its internal interface (IDS-Sensor 0/x) to the AIM IPS. This IP address belongs to the router itself and is used for routing traffic to the command and control interface of the AIM IPS. It is used as the default router IP address when you set up the AIM IPS command and control interface.
Setting Up Interfaces on the AIM IPS and the Router
This section describes how to set up interfaces on the AIM IPS and the router, and contains the following topics:
•![]() AIM IPS Interface Configuration Sequence
AIM IPS Interface Configuration Sequence
•![]() Using an Unnumbered IP Address Interface
Using an Unnumbered IP Address Interface
•![]() Using a Routable IP Address Interface
Using a Routable IP Address Interface
•![]() Using a Default IP Address and NAT
Using a Default IP Address and NAT
•![]() Using a User-Configured IP Address and NAT
Using a User-Configured IP Address and NAT
•![]() Configuring Monitoring on the Router Interface
Configuring Monitoring on the Router Interface
AIM IPS Interface Configuration Sequence
Follow this sequence to set up interfaces on the AIM IPS and the router:
1. ![]() Configure the IPS command and control interface on the router, and the AIM IPS IP address, mask, and gateway using one of the following methods:
Configure the IPS command and control interface on the router, and the AIM IPS IP address, mask, and gateway using one of the following methods:
•![]() An unnumbered IP address on the IDS-Sensor interface
An unnumbered IP address on the IDS-Sensor interface
Note ![]() Using an unnumbered IP address on the IDS-Sensor interface is the preferred method for configuring interfaces on the module and router.
Using an unnumbered IP address on the IDS-Sensor interface is the preferred method for configuring interfaces on the module and router.
•![]() A routable IP address
A routable IP address
•![]() Default module IP address with NAT
Default module IP address with NAT
•![]() User-configured IP address with NAT
User-configured IP address with NAT
2. ![]() Enable the monitoring interface and specify whether it is promiscuous or inline, assign the ACL to the interface, specify how you want the router to handle traffic if the module fails, and create a monitoring ACL (optional).
Enable the monitoring interface and specify whether it is promiscuous or inline, assign the ACL to the interface, specify how you want the router to handle traffic if the module fails, and create a monitoring ACL (optional).
3. ![]() Save the configuration.
Save the configuration.
For More Information
•![]() For the procedure for configuring an unnumbered IP address on the IDS-Sensor interface, see Using an Unnumbered IP Address Interface.
For the procedure for configuring an unnumbered IP address on the IDS-Sensor interface, see Using an Unnumbered IP Address Interface.
•![]() For the procedure for configuring a routable IP address, see Using a Routable IP Address Interface.
For the procedure for configuring a routable IP address, see Using a Routable IP Address Interface.
•![]() For the procedure for configuring the default module IP address using NAT, see Using a Default IP Address and NAT.
For the procedure for configuring the default module IP address using NAT, see Using a Default IP Address and NAT.
•![]() For the procedure for configuring the IP address with NAT, see Using a User-Configured IP Address and NAT. F
For the procedure for configuring the IP address with NAT, see Using a User-Configured IP Address and NAT. F
•![]() For the procedure for enabling the monitoring interface, see Configuring Monitoring on the Router Interface.
For the procedure for enabling the monitoring interface, see Configuring Monitoring on the Router Interface.
Advantages of NAT
NAT has the following advantages:
•![]() You can use private IP addresses on your inside networks. Private IP addresses are not routable on the Internet.
You can use private IP addresses on your inside networks. Private IP addresses are not routable on the Internet.
•![]() NAT hides the local IP addresses from other networks, so attackers cannot learn the real IP address of a host.
NAT hides the local IP addresses from other networks, so attackers cannot learn the real IP address of a host.
•![]() NAT can resolve IP routing problems by supporting overlapping IP addresses.
NAT can resolve IP routing problems by supporting overlapping IP addresses.
For More Information
•![]() For information on how ARC and NAT operate together, see ARC and NAT.
For information on how ARC and NAT operate together, see ARC and NAT.
•![]() For the procedure to configure AIM to use NAT, see Using a Default IP Address and NAT.
For the procedure to configure AIM to use NAT, see Using a Default IP Address and NAT.
ARC and NAT
If you use NAT to establish management access to the AIM IPS, ARC on the AIM IPS does not know the external IP address of the AIM IPS. To make sure that management access to the AIM IPS is not interrupted by devices that the AIM IPS is managing, you must state the NAT address of the AIM IPS every time you add a blocking device.
For More Information
•![]() For more information on ARC, see Chapter 14 "Configuring Attack Response Controller for Blocking and Rate Limiting."
For more information on ARC, see Chapter 14 "Configuring Attack Response Controller for Blocking and Rate Limiting."
•![]() For the procedures for configuring the AIM IPS NAT address every time you add a blocking device, see the following procedures:
For the procedures for configuring the AIM IPS NAT address every time you add a blocking device, see the following procedures:
–![]() Configuring the Sensor to Manage Cisco Routers
Configuring the Sensor to Manage Cisco Routers
–![]() Configuring the Sensor to Manage Catalyst 6500 Series Switches and Cisco 7600 Series Routers
Configuring the Sensor to Manage Catalyst 6500 Series Switches and Cisco 7600 Series Routers
–![]() Configuring the Sensor to Manage Cisco Firewalls
Configuring the Sensor to Manage Cisco Firewalls
Using an Unnumbered IP Address Interface
Note ![]() Using an unnumbered IP address on the IDS-Sensor interface is the preferred method for configuring interfaces on the AIM IPS and the router.
Using an unnumbered IP address on the IDS-Sensor interface is the preferred method for configuring interfaces on the AIM IPS and the router.
To configure the interface using an unnumbered IP address interface, follow these steps:
Step 1 ![]() Log in to the router.
Log in to the router.
Step 2 ![]() Enter privileged EXEC mode on the router.
Enter privileged EXEC mode on the router.
router> enable
Step 3 ![]() Confirm the module slot number in your router.
Confirm the module slot number in your router.
router# show run | include ids-sensor
interface IDS-Sensor0/1
router#
Step 4 ![]() Configure the IPS command and control interface on the router using the ip unnumbered command on the IDS-Sensor interface to specify the router interface that provides external connectivity:
Configure the IPS command and control interface on the router using the ip unnumbered command on the IDS-Sensor interface to specify the router interface that provides external connectivity:
a. ![]() Make sure the IDS-Sensor interface is not shut down.
Make sure the IDS-Sensor interface is not shut down.
router# configure terminal
router(config)# interface ids-sensor 0/1
router(config-if)# no shutdown
b. ![]() Specify the external router interface.
Specify the external router interface.
router(config-if)# ip unnumbered other_router_interface
router(config-if)# exit
router(config)#
Note ![]() The IDS-Sensor interface shares the IP address between the two router interfaces (the IDS-Sensor interface and the other specified interface).
The IDS-Sensor interface shares the IP address between the two router interfaces (the IDS-Sensor interface and the other specified interface).
Note ![]() The IP address of the sensor and the other_router_interface IP address must be on the same subnet.
The IP address of the sensor and the other_router_interface IP address must be on the same subnet.
c. ![]() Enter a route to send traffic to the IP address of the AIM IPS to the IDS-Sensor interface.
Enter a route to send traffic to the IP address of the AIM IPS to the IDS-Sensor interface.
router(config)# ip route sensor_ip_address 255.255.255.255 ids-sensor 0/1
router(config)#
d. ![]() Exit configuration mode.
Exit configuration mode.
router(config)# exit
router#
Step 5 ![]() Configure the IP address, mask, and gateway:
Configure the IP address, mask, and gateway:
Note ![]() You can also configure these parameters by initializing the AIM IPS with the setup command.
You can also configure these parameters by initializing the AIM IPS with the setup command.
Note ![]() The AIM IPS IP address defaults to 192.168.1.2/24,192.168.1.1.
The AIM IPS IP address defaults to 192.168.1.2/24,192.168.1.1.
a. ![]() Session to the AIM IPS.
Session to the AIM IPS.
router# service-module ids-sensor 0/1 session
Trying 192.168.1.2, 2322 ... Open
sensor login:
b. ![]() Log in to the CLI.
Log in to the CLI.
c. ![]() Enter global configuration mode.
Enter global configuration mode.
sensor# configure terminal
sensor(config)#
d. ![]() Enter service host mode.
Enter service host mode.
sensor(config)# service host
sensor(config-hos)#
e. ![]() Assign the command and control interface and the gateway.
Assign the command and control interface and the gateway.
sensor(config-hos)# network-settings
sensor(config-hos-net)# host-ip ip_address/mask,gateway
sensor(config-hos-net)#
Note ![]() The gateway should be the IP address of the other_router_interface that you set up in Step 4b.
The gateway should be the IP address of the other_router_interface that you set up in Step 4b.
f. ![]() Exit network settings mode.
Exit network settings mode.
sensor(config-hos-net)# exit
sensor(config-hos)# exit
Apply Changes:?[yes]:
g. ![]() Press Enter to apply the changes or enter no to discard them.
Press Enter to apply the changes or enter no to discard them.
h. ![]() Exit the session to the AIM IPS.
Exit the session to the AIM IPS.
Step 6 ![]() Write the configuration to NVRAM.
Write the configuration to NVRAM.
router# write memory
Building configuration
[OK]
For More Information
•![]() For the procedure for using the setup command to initialize the AIM IPS, see Advanced Setup for the AIM IPS.
For the procedure for using the setup command to initialize the AIM IPS, see Advanced Setup for the AIM IPS.
•![]() For more information on sessioning from the router to the AIM IPS and exiting sessions, see Opening and Closing a Session.
For more information on sessioning from the router to the AIM IPS and exiting sessions, see Opening and Closing a Session.
Using a Routable IP Address Interface
To configure the interface using a routable IP address interface, follow these steps:
Step 1 ![]() Log in to the router.
Log in to the router.
Step 2 ![]() Enter privileged EXEC mode on the router.
Enter privileged EXEC mode on the router.
router> enable
Step 3 ![]() Confirm the module slot number in your router.
Confirm the module slot number in your router.
router# show run | include ids-sensor
interface IDS-Sensor0/1
router#
Step 4 ![]() Configure the IPS command and control interface on the router using the ip unnumbered command on the IDS-Sensor interface to specify the router interface that provides external connectivity:
Configure the IPS command and control interface on the router using the ip unnumbered command on the IDS-Sensor interface to specify the router interface that provides external connectivity:
a. ![]() Make sure the IDS-Sensor interface is not shut down.
Make sure the IDS-Sensor interface is not shut down.
router# configure terminal
router(config)# interface ids-sensor 0/1
router(config-if)# no shutdown
b. ![]() Configure an IP address for the IDS-Sensor interface.
Configure an IP address for the IDS-Sensor interface.
router(config-if)# ip address 192.168.1.2 255.255.255.0
router(config0if)#
Use 192.168.1.2 (default IP address for the default gateway on the AIM IPS). You cannot session to the AIM IPS if its interface does not have an IP address.
c. ![]() Enter a route to send traffic to the IP address of the AIM IPS to the IDS-Sensor interface.
Enter a route to send traffic to the IP address of the AIM IPS to the IDS-Sensor interface.
router(config)# ip route sensor_ip_address 255.255.255.255 ids-sensor 0/1
router(config)#
d. ![]() Exit configuration mode.
Exit configuration mode.
router(config)# exit
router#
Step 5 ![]() Configure the AIM IPS IP address, mask, and gateway:
Configure the AIM IPS IP address, mask, and gateway:
Note ![]() The AIM IPS IP address defaults to 192.168.1.2/24,192.168.1.1.
The AIM IPS IP address defaults to 192.168.1.2/24,192.168.1.1.
a. ![]() Session to the AIM IPS.
Session to the AIM IPS.
router# service-module ids-sensor 0/1 session
Trying 192.168.1.2, 2322 ... Open
sensor login:
b. ![]() Log in to the CLI.
Log in to the CLI.
c. ![]() Enter global configuration mode.
Enter global configuration mode.
sensor# configure terminal
sensor(config)#
d. ![]() Enter service host mode.
Enter service host mode.
sensor(config)# service host
sensor(config-hos)#
e. ![]() Assign the command and control interface and the gateway.
Assign the command and control interface and the gateway.
sensor(config-hos)# network-settings
sensor(config-hos-net)# host-ip ip_address/mask,gateway
sensor(config-hos-net)#
f. ![]() Exit network settings mode.
Exit network settings mode.
sensor(config-hos-net)# exit
sensor(config-hos)# exit
Apply Changes:?[yes]:
g. ![]() Press Enter to apply the changes or enter no to discard them.
Press Enter to apply the changes or enter no to discard them.
h. ![]() Exit the session to the AIM IPS.
Exit the session to the AIM IPS.
Step 6 ![]() Write the configuration to NVRAM.
Write the configuration to NVRAM.
router# write memory
Building configuration
[OK]
For More Information
•![]() For the procedure for using the setup command to initialize the AIM IPS, see Advanced Setup for the AIM IPS.
For the procedure for using the setup command to initialize the AIM IPS, see Advanced Setup for the AIM IPS.
•![]() For more information on sessioning from the router to the AIM IPS and exiting sessions, see Opening and Closing a Session.
For more information on sessioning from the router to the AIM IPS and exiting sessions, see Opening and Closing a Session.
Using a Default IP Address and NAT
To configure the interfaces using the default IP address and NAT, follow these steps:
Step 1 ![]() Log in to the router.
Log in to the router.
Step 2 ![]() Enter privileged EXEC mode on the router.
Enter privileged EXEC mode on the router.
router> enable
Step 3 ![]() Confirm the module slot number in your router.
Confirm the module slot number in your router.
router# show run | include ids-sensor
interface IDS-Sensor0/1
router#
Step 4 ![]() Configure the IPS command and control interface on the router using the default sensor IP address and have the router perform NAT:
Configure the IPS command and control interface on the router using the default sensor IP address and have the router perform NAT:
a. ![]() Make sure the IDS-Sensor interface is not shut down.
Make sure the IDS-Sensor interface is not shut down.
router# configure terminal
router(config)# interface ids-sensor 0/1
router(config-if)# no shutdown
b. ![]() Configure an IP address for the IDS-Sensor interface (should match the default gateway that is configured on the AIM IPS).
Configure an IP address for the IDS-Sensor interface (should match the default gateway that is configured on the AIM IPS).
router(config-if)# ip address 192.168.1.2 255.255.255.0
router(config0if)#
Use 192.168.1.2 (default IP address for the default gateway on the AIM IPS). You cannot session to the AIM IPS if its interface does not have an IP address.
c. ![]() Set up a NAT address for the AIM IPS (the AIM IPS default IP address is 192.168.1.2).
Set up a NAT address for the AIM IPS (the AIM IPS default IP address is 192.168.1.2).
router(config-if)# ip nat inside
router(config-if)# exit
router(config)# interface router_nat_outside_interface
router(config-if)# ip nat outside
router(config-if)# exit
router(config)# ip nat inside source static 192.168.1.2 aim_external_ip_address
router(config-if)# exit
Note ![]() The aim_external_ip_address and the router_nat_outside_interface IP addresses must be on the same subnet. The IP address of the AIM IPS must be on a separate subnet.
The aim_external_ip_address and the router_nat_outside_interface IP addresses must be on the same subnet. The IP address of the AIM IPS must be on a separate subnet.
d. ![]() Exit configuration mode.
Exit configuration mode.
router(config-if)# exit
router(config)# exit
router#
Step 5 ![]() Configure the AIM IPS IP address, mask, and gateway:
Configure the AIM IPS IP address, mask, and gateway:
Note ![]() The AIM IPS IP address defaults to 192.168.1.2/24,192.168.1.1.
The AIM IPS IP address defaults to 192.168.1.2/24,192.168.1.1.
a. ![]() Session to the AIM IPS.
Session to the AIM IPS.
router# service-module ids-sensor 0/1 session
Trying 192.168.1.2, 2322 ... Open
sensor login:
b. ![]() Log in to the CLI.
Log in to the CLI.
c. ![]() Enter global configuration mode.
Enter global configuration mode.
sensor# configure terminal
sensor(config)#
d. ![]() Enter service host mode.
Enter service host mode.
sensor(config)# service host
sensor(config-hos)#
e. ![]() Assign the command and control interface and the gateway.
Assign the command and control interface and the gateway.
sensor(config-hos)# network-settings
sensor(config-hos-net)# host-ip ip_address/mask,gateway
sensor(config-hos-net)#
f. ![]() Exit network settings mode.
Exit network settings mode.
sensor(config-hos-net)# exit
sensor(config-hos)# exit
Apply Changes:?[yes]:
g. ![]() Press Enter to apply the changes or enter no to discard them.
Press Enter to apply the changes or enter no to discard them.
h. ![]() Exit the session to the AIM IPS.
Exit the session to the AIM IPS.
Step 6 ![]() Write the configuration to NVRAM.
Write the configuration to NVRAM.
router# write memory
Building configuration
[OK]
For More Information
•![]() For more information on how ARC and NAT operate on the AIM IPS, see ARC and NAT.
For more information on how ARC and NAT operate on the AIM IPS, see ARC and NAT.
•![]() For the procedure for using the setup command to initialize the AIM IPS, see Advanced Setup for the AIM IPS.
For the procedure for using the setup command to initialize the AIM IPS, see Advanced Setup for the AIM IPS.
•![]() For more information on sessioning from the router to the AIM IPS and exiting sessions, see Opening and Closing a Session.
For more information on sessioning from the router to the AIM IPS and exiting sessions, see Opening and Closing a Session.
Using a User-Configured IP Address and NAT
To configure the interfaces using a user-configured IP address and NAT, follow these steps:
Step 1 ![]() Log in to the router.
Log in to the router.
Step 2 ![]() Enter privileged EXEC mode on the router.
Enter privileged EXEC mode on the router.
router> enable
Step 3 ![]() Confirm the module slot number in your router.
Confirm the module slot number in your router.
router# show run | include ids-sensor
interface IDS-Sensor0/1
router#
Step 4 ![]() Configure the IPS command and control interface on the router using the default sensor IP address and have the router perform NAT:
Configure the IPS command and control interface on the router using the default sensor IP address and have the router perform NAT:
a. ![]() Make sure the IDS-Sensor interface is not shut down.
Make sure the IDS-Sensor interface is not shut down.
router# configure terminal
router(config)# interface ids-sensor 0/1
router(config-if)# no shutdown
b. ![]() Configure an IP address for the IDS-Sensor interface.
Configure an IP address for the IDS-Sensor interface.
router(config-if)# ip address user_configured_ip_address gateway
router(config0if)#
You cannot session to the AIM IPS if its interface does not have an IP address.
c. ![]() Set up a NAT address for the AIM IPS.
Set up a NAT address for the AIM IPS.
router(config-if)# ip nat inside
router(config-if)# exit
router(config)# interface router_nat_outside_interface
router(config-if)# ip nat outside
router(config-if)# exit
router(config)# ip nat inside source static AIM_ip_address AIM_external_ip_address
router(config-if)# exit
d. ![]() Exit configuration mode.
Exit configuration mode.
router(config-if)# exit
router(config)# exit
router#
Step 5 ![]() Configure the AIM IPS IP address, mask, and gateway:
Configure the AIM IPS IP address, mask, and gateway:
Note ![]() The AIM IPS IP address defaults to 192.168.1.2/24,192.168.1.1.
The AIM IPS IP address defaults to 192.168.1.2/24,192.168.1.1.
a. ![]() Session to the AIM IPS.
Session to the AIM IPS.
router# service-module ids-sensor 0/1 session
Trying 192.168.1.2, 2322 ... Open
sensor login:
b. ![]() Log in to the CLI.
Log in to the CLI.
c. ![]() Enter global configuration mode.
Enter global configuration mode.
sensor# configure terminal
sensor(config)#
d. ![]() Enter service host mode.
Enter service host mode.
sensor(config)# service host
sensor(config-hos)#
e. ![]() Assign the command and control interface and the gateway.
Assign the command and control interface and the gateway.
sensor(config-hos)# network-settings
sensor(config-hos-net)# host-ip ip_address/mask,gateway
sensor(config-hos-net)#
f. ![]() Exit network settings mode.
Exit network settings mode.
sensor(config-hos-net)# exit
sensor(config-hos)# exit
Apply Changes:?[yes]:
g. ![]() Press Enter to apply the changes or enter no to discard them.
Press Enter to apply the changes or enter no to discard them.
h. ![]() Exit the session to the router.
Exit the session to the router.
Step 6 ![]() Write the configuration to NVRAM.
Write the configuration to NVRAM.
router# write memory
Building configuration
[OK]
For More Information
•![]() For more information on how ARC and NAT operate on the AIM IPS, see ARC and NAT.
For more information on how ARC and NAT operate on the AIM IPS, see ARC and NAT.
•![]() For the procedure for using the setup command to initialize the AIM IPS, see Advanced Setup for the AIM IPS.
For the procedure for using the setup command to initialize the AIM IPS, see Advanced Setup for the AIM IPS.
•![]() For more information on sessioning from the router to the AIM IPS and exiting sessions, see Opening and Closing a Session.
For more information on sessioning from the router to the AIM IPS and exiting sessions, see Opening and Closing a Session.
Configuring Monitoring on the Router Interface
Note ![]() You must add the AIM IPS internal interface to the virtual sensor (vs0) so that traffic can be monitored.
You must add the AIM IPS internal interface to the virtual sensor (vs0) so that traffic can be monitored.
To configure the router interface to be monitored, follow these steps:
Step 1 ![]() Log in to the router.
Log in to the router.
Step 2 ![]() Enter privileged EXEC mode on the router.
Enter privileged EXEC mode on the router.
router> enable
Step 3 ![]() (Optional) Configure a monitoring access list on the router.
(Optional) Configure a monitoring access list on the router.
router(config)# access-list 101 permit tcp any eq www any
You can set up a standard access list and apply it to filter what type of traffic you want to inspect. A matched ACL causes traffic not to be inspected for that ACL. This example bypasses inspection of HTTP traffic only. Refer to your Cisco IOS Command Reference for more information on the options for the access-list command.
Step 4 ![]() Enable monitoring on the interface in either inline or promiscuous mode and associate the access list.
Enable monitoring on the interface in either inline or promiscuous mode and associate the access list.
router(config)# interface monitored_interface
router(config-if)# ids-service-module monitoring {inline | promiscuous} access-list 101
router(config-if)# exit
router(config)#
Note ![]() Associating the access list with the interface further controls what traffic is sent to the AIM IPS.
Associating the access list with the interface further controls what traffic is sent to the AIM IPS.
Step 5 ![]() (For inline mode) Confirm the module slot number in your router.
(For inline mode) Confirm the module slot number in your router.
router# show run | include ids-sensor
interface IDS-Sensor0/1
router#
Step 6 ![]() (For inline mode) Specify how the router handles traffic inspection during a module failure.
(For inline mode) Specify how the router handles traffic inspection during a module failure.
router(config)# interface ids-sensor 0/1
router(config-if)# service-module {fail-close | fail-open}
router(config-if)#
The default is fail-open.
Note ![]() The fail-close option means that if the AIM IPS fails, then the router does not let traffic pass. The fail-open option means if the AIM IPS fails, the router lets traffic pass, but it is not inspected by the IPS.
The fail-close option means that if the AIM IPS fails, then the router does not let traffic pass. The fail-open option means if the AIM IPS fails, the router lets traffic pass, but it is not inspected by the IPS.
Step 7 ![]() Exit configuration mode.
Exit configuration mode.
router(config-if)# exit
router(config)# exit
router#
Step 8 ![]() Write the configuration to NVRAM.
Write the configuration to NVRAM.
router# write memory
Building configuration
[OK]
For More Information
•![]() For the procedure for adding the AIM IPS internal interface to the virtual sensor (vs0), see Advanced Setup for the AIM IPS.
For the procedure for adding the AIM IPS internal interface to the virtual sensor (vs0), see Advanced Setup for the AIM IPS.
•![]() For more information on promiscuous mode, see Configuring Promiscuous Mode.
For more information on promiscuous mode, see Configuring Promiscuous Mode.
•![]() For more information on inline interface mode, see Configuring Inline Interface Mode.
For more information on inline interface mode, see Configuring Inline Interface Mode.
Establishing Sessions
Because the AIM IPS does not have an external console port, console access to the AIM IPS is enabled when you issue the service-module ids-sensor slot/port session command on the router, or when you initiate a Telnet connection into the router with the slot number corresponding to the AIM IPS port number. The lack of an external console port means that the initial bootup configuration is possible only through the router.
When you issue the service-module ids-sensor slot/port session command, you create a console session with the AIM IPS, in which you can issue any IPS configuration commands. After completing work in the session and exiting the IPS CLI, you are returned to the Cisco IOS CLI.
The session command starts a reverse Telnet connection using the IP address of the IDS-Sensor interface. The IDS-Sensor interface is an interface between the AIM IPS and the router. You must assign an IP address to the IDS-Sensor interface before invoking the session command. Assigning a routable IP address can make the IDS-Sensor interface itself vulnerable to attacks, because the AIM IPS is visible on the network through that routable IP address, meaning you can communicate with the AIM IPS outside the router. To counter this vulnerability, assign an unnumbered IP address to the IDS-Sensor interface. Then the AIM IPS IP address is only used locally between the router and the AIM IPS, and is isolated for the purposes of sessioning in to the AIM IPS.
Note ![]() Before you install your application software or reimage the module, opening a session brings up the bootloader. After you install the software, opening a session brings up the application.
Before you install your application software or reimage the module, opening a session brings up the bootloader. After you install the software, opening a session brings up the application.
For More Information
For the procedure for setting up an unnumbered IP address, see Using an Unnumbered IP Address Interface.
Opening and Closing a Session
Note ![]() You must initialize the AIM IPS (run the setup command) from the router. After networking is configured, SSH and Telnet are available.
You must initialize the AIM IPS (run the setup command) from the router. After networking is configured, SSH and Telnet are available.
Use the service-module ids-sensor slot/port session command to establish a session from the AIM IPS to the module. Press Ctrl-Shift-6, then x, to return a session prompt to a router prompt, that is, to go from the AIM IPS prompt back to the router prompt. Press Enter on a blank line to go back to the session prompt, which is also the router prompt. You should only suspend a session to the router if you will be returning to the session after executing router commands. If you do not plan on returning to the AIM IPS session, you should close the session rather than suspend it.
When you close a session, you are logged completely out of the AIM IPS CLI and a new session connection requires a username and password to log in. A suspended session leaves you logged in to the CLI. When you connect with the session command, you can go back to the same CLI without having to provide your username and password.
Note ![]() Telnet clients vary. In some cases, you may have to press Ctrl-6 + x. The control character is specified as ^^, Ctrl-^, or ASCII value 30 (hex 1E).
Telnet clients vary. In some cases, you may have to press Ctrl-6 + x. The control character is specified as ^^, Ctrl-^, or ASCII value 30 (hex 1E).
To open and close sessions to the AIM IPS, follow these steps:
Step 1 ![]() Log in to the router.
Log in to the router.
Step 2 ![]() Check the status of the AIM IPS to make sure it is running.
Check the status of the AIM IPS to make sure it is running.
router# service-module ids-sensor 0/1 status
Service Module is Cisco IDS-Sensor0/1
Service Module supports session via TTY line 322
Service Module is in Steady state
Getting status from the Service Module, please wait..
Cisco Systems Intrusion Prevention System Network Module
Software version: 6.2(1)E3
Model: AIM IPS
Memory: 443508 KB
Mgmt IP addr: 10.89.148.196
Mgmt web ports: 443
Mgmt TLS enabled: true
router#
Step 3 ![]() Open a session from the router to the AIM IPS.
Open a session from the router to the AIM IPS.
router# service-module ids-sensor 0/1 session
Trying 10.89.148.196, 2322 ... Open
Step 4 ![]() Exit, or suspend and close the module session:
Exit, or suspend and close the module session:
•![]()
sensor# exit
Note ![]() If you are in submodes of the IPS CLI, you must exit all submodes. Enter exit until the sensor login prompt appears.
If you are in submodes of the IPS CLI, you must exit all submodes. Enter exit until the sensor login prompt appears.
router# prompt to close the Cisco IOS session completely.
•![]() To suspend and close the session to the AIM IPS, press Ctrl-Shift and press 6. Release all keys, and then press x.
To suspend and close the session to the AIM IPS, press Ctrl-Shift and press 6. Release all keys, and then press x.
Note ![]() When you are finished with a session, you need to return to the router to establish the association between a session (the IPS application) and the router interfaces you want to monitor.
When you are finished with a session, you need to return to the router to establish the association between a session (the IPS application) and the router interfaces you want to monitor.
Step 5 ![]() Disconnect from the router.
Disconnect from the router.
router# disconnect
Step 6 ![]() Press Enter to confirm the disconnection.
Press Enter to confirm the disconnection.
router# Closing connection to 10.89.148.196 [confirm] <Enter>
For More Information
For the procedure for initializing the AIM IPS, see Advanced Setup for the AIM IPS.
Displaying the Status of the AIM IPS
Use the service-module ids-sensor slot/port status command in privileged EXEC mode to display the status and statistics of the AIM IPS.
To display the status of the AIM IPS, follow these steps:
Step 1 ![]() Log in to the router.
Log in to the router.
Step 2 ![]() Enter privileged EXEC mode on the router.
Enter privileged EXEC mode on the router.
router> enable
Step 3 ![]() Display the status of the AIM IPS.
Display the status of the AIM IPS.
router# service-module ids-sensor 0/1 status
Service Module is Cisco IDS-Sensor0/1
Service Module supports session via TTY line 322
Service Module is in Steady state
Service Module is in fail close
Cisco Systems Intrusion Prevention System Network Module
Software version: 7.0(4)E4
Model: AIM IPS
Memory: 443508 KB
Mgmt IP addr: 10.89.148.196
Mgmt web ports: 443
Mgmt TLS enabled: true
router#
Enabling and Disabling Heartbeat Reset
Use the service-module ids-sensor slot/port heartbeat reset {enable | disable} command in privileged EXEC mode to reset the heartbeat of AIM IPS.
When AIM IPS is booted in failsafe mode or is undergoing an upgrade, you can use the service-module ids heartbeat-reset command to prevent a reboot during the process. If you leave the heartbeat reset enabled during an upgrade, you may lose the AIM IPS heartbeat.
When the AIM IPS heartbeat is lost, the router applies a fail-open or fail-close configuration option to AIM IPS and stops sending traffic to AIM IPS, and sets AIM IPS to error state. The router performs a hardware reset on AIM IPS and monitors AIM IPS until the heartbeat is reestablished.
Note ![]() Disabling the heartbeat reset prevents the router from resetting the module during system image installation if the process takes too long.
Disabling the heartbeat reset prevents the router from resetting the module during system image installation if the process takes too long.
To reset the heartbeat of AIM IPS, follow these steps:
Step 1 ![]() Log in to the router.
Log in to the router.
Step 2 ![]() Enter privileged EXEC mode on the router.
Enter privileged EXEC mode on the router.
router> enable
Step 3 ![]() Verify the status of heartbeat reset.
Verify the status of heartbeat reset.
router# service-module ids-sensor 0/1 status
Service Module is Cisco IDS-Sensor 0/1
Service Module supports session via TTY line 194
Service Module heartbeat-reset is enabled
Step 4 ![]() To disable the heartbeat on AIM IPS:
To disable the heartbeat on AIM IPS:
router# service-module ids-sensor 0/1 heartbeat-reset disable
Step 5 ![]() To reenable the heartbeat on AIM IPS:
To reenable the heartbeat on AIM IPS:
router# service-module ids-sensor 0/1 heartbeat-reset enable
For More Information
•![]() For the procedure for upgrading the AIM IPS, see Upgrading the Sensor.
For the procedure for upgrading the AIM IPS, see Upgrading the Sensor.
•![]() For the procedure for installing the AIM IPS system image, see Installing the AIM IPS System Image.
For the procedure for installing the AIM IPS system image, see Installing the AIM IPS System Image.
Rebooting, Resetting, and Shutting Down the AIM IPS
This section describes when and how the AIM IPS shuts down. It contains the following topics:
•![]() Rebooting, Resetting, and Shutting Down the AIM IPS
Rebooting, Resetting, and Shutting Down the AIM IPS
AIM IPS Status Monitoring
The AIM IPS uses RBCP to monitor its status. RBCP is monitored by the main application on the AIM IPS, not by SensorApp. If the main application on the AIM IPS fails, the RBCP heartbeat responses do not return from the AIM IPS. When the router determines that the AIM IPS has failed, a reload command is issued through RBCP to reboot the Linux kernel on the AIM IPS. In the period during the attempt to bring the AIM IPS back up, the router works in the mode determined by the failover operation configured.
In some cases, SensorApp may stop processing, but the main application on the AIM IPS continues to process RBCP packets. In this case, packets are processed according to the bypass settings set for the AIM IPS by the IPS CLI, IDM, or IME.
There are two situations in which the AIM IPS shuts down:
•![]() A hardware or software error forces it to fail. The router can detect this through the loss of the RBCP heartbeat.
A hardware or software error forces it to fail. The router can detect this through the loss of the RBCP heartbeat.
•![]() Reload or shutdown command.
Reload or shutdown command.
For More Information
•![]() For more information on SensorApp, see SensorApp.
For more information on SensorApp, see SensorApp.
•![]() For more information on software bypass, see Configuring Inline Bypass Mode.
For more information on software bypass, see Configuring Inline Bypass Mode.
Rebooting, Resetting, and Shutting Down the AIM IPS
Use the service-module ids-sensor slot/port [reload | reset | shutdown] command in privileged EXEC mode to reboot, reset, and shut down the AIM IPS.
To reboot, reset, and shut down the AIM IPS, follow these steps:
Step 1 ![]() Log in to the router.
Log in to the router.
Step 2 ![]() Enter privileged EXEC mode on the router.
Enter privileged EXEC mode on the router.
router> enable
Step 3 ![]() To gracefully halt and reboot the operating system on the AIM IPS:
To gracefully halt and reboot the operating system on the AIM IPS:
router# service-module ids-sensor 0/1 reload
Do you want to proceed with the reload? [confirm]
Step 4 ![]() To reset the hardware on the AIM IPS:
To reset the hardware on the AIM IPS:
router# service-module ids-sensor 0/1 reset
Use reset only to recover from shutdown or failed state
Warning: May lose data on the hard disc!
Do you want to reset?[confirm]
Note ![]() The AIM IPS has a compact flash device that functions as a permanent storage device rather than a hard-disk drive.
The AIM IPS has a compact flash device that functions as a permanent storage device rather than a hard-disk drive.
Step 5 ![]() To shut down applications running on the AIM IPS:
To shut down applications running on the AIM IPS:
router# service-module ids-sensor 0/1 shutdown
Trying 10.10.10.1, 2129 . . . Open
%SERVICEMODULE-5-SHUTDOWN2:Service module IDS-Sensor1/0 shutdown complete
New and Modified Commands
Note ![]() All other Cisco IOS software commands are documented in the Cisco IOS Release 12.4(20)T command reference at Cisco.com, http://www.cisco.com/en/US/products/ps6441/index.html.
All other Cisco IOS software commands are documented in the Cisco IOS Release 12.4(20)T command reference at Cisco.com, http://www.cisco.com/en/US/products/ps6441/index.html.
This section describes the following new and modified Cisco IOS commands, and specific commands that are used to configure the AIM IPS. It contains the following topics:
interface ids-sensor
To configure the IPS sensor interface and enter config-if mode, use the interface ids-sensor command in config mode. To specify how the router handles traffic inspection during a module failure, use the service-module command in config-if mode. The default is fail open.
interface ids-sensor slot/port
ip {address | unnumbered}
service-module {fail-close | fail-open}
Syntax Description
Defaults
The default setting is fail-open.
Command Modes
Config
Config-if
Command History
|
|
|
|---|---|
12.4(20)T |
This command was introduced. |
Usage Guidelines
The interface ids-sensor slot/port command lets you enter config-if mode and configure the IPS sensor slot and port. On the AIM IPS, the slot value is 0 and the port number value is specified by identifying the physical location where the module is installed on the router.
Examples
The following example demonstrates how to use the interface ids-sensor command to enter config-if mode on an AIM IPS in slot 0, port1:
router(config)# interface ids-sensor 0/1
router(config-if)#
The following example demonstrates how to use the interface ids-sensor command with the ip unnumbered subcommand to specify the router command and control interface:
router(config)# interface ids-sensor 0/1
router(config-if)# ip unnumbered router_command_and_control_interface
router(config-if)#
The following example demonstrates how to use the service-module fail-open command to configure the AIM IPS to pass all traffic through the module when the hardware fails, but not to perform traffic inspection:
router(config)# interface ids-sensor 0/1
router(config-if)# service-module fail-open
router(config-if)#
Related Commands
|
|
|
|---|---|
interface interface_name |
Lets you specify which interface should be monitored. |
interface interface_name
To enter config-if mode, configure the interface for monitoring in promiscuous or inline mode, and apply a standard or extended ACL to inline monitoring, use the interface interface_name command in config mode.
interface interface_name
ids-service-module monitoring {promiscuous | inline} access-list number
Syntax Description
Defaults
None
Command Modes
Config
Config-if
Command History
|
|
|
|---|---|
12.4(20)T |
This command was introduced. |
Usage Guidelines
The interface interface_name command lets you enter config-if mode and configure the router to operate in inline or promiscuous mode for that interface.
Examples
The following example demonstrates how to use the interface command to enter config-if mode and configure monitoring for GigabitEthernet0/0 using ACL 101:
router(config)# interface GigabitEthernet0/0
router(config-if)# ids-service-module monitoring inline access-list 101
router(config-if)#
Related Commands
|
|
|
|---|---|
interface ids-sensor |
Configures the IPS interface. |
service-module ids-sensor
To prevent the Cisco IOS software from rebooting the AIM IPS when the heartbeat is lost, to reboot, reset, enable console access to, shut down, see the statistics, and monitor the status of a module, use the service-module ids-sensor command in privileged EXEC mode.
service-module ids-sensor slot/port {heartbeat-reset [enable | disable] reload | reset | session | shutdown | status}
Syntax Description
Defaults
The default is heartbeat-reset enabled.
Command Modes
Privileged EXEC
Command History
|
|
|
|---|---|
12.4(15)XY |
This command was introduced. |
12.4(20)T |
This command was introduced. |
Usage Guidelines
When the AIM IPS is booted in failsafe mode or is undergoing an upgrade, you can use the service-module ids heartbeat-reset command to prevent a reboot during the process. If you leave the heartbeat reset enabled during an upgrade, you may lose the AIM IPS heartbeat.
When the AIM IPS heartbeat is lost, the router applies a fail-open or fail-close configuration option to the AIM IPS and stops sending traffic to the AIM IPS, and sets the AIM IPS to error state. The router performs a hardware reset on the AIM IPS and monitors the AIM IPS until the heartbeat is reestablished.
If a confirmation prompt is displayed, press Enter to confirm the action or n to cancel.
Examples
The following example demonstrates how to disable or enable the reset action when the heartbeat is lost on an AIM IPS in slot 0, port1:
router# service-module ids-sensor 0/1 heartbeat-reset {disable | enable}
The following example demonstrates how to enable the heartbeat on the AIM IPS:
router# service-module ids-sensor 0/1 heartbeat-reset enable
The following example demonstrates how to display the status of the heartbeat reset by using the service-module ids slot/port status command:
router# service-module ids-sensor 0/1 status
Service Module is Cisco IDS-Sensor 0/1
Service Module supports session via TTY line 194
Service Module heartbeat-reset is enabled
The following example demonstrates how to gracefully halt and reboot the operating system on the AIM IPS:
router# service-module ids-sensor 0/1 reload
Do you want to proceed with reload?[confirm]
The following example demonstrates how to reset the hardware on an AIM IPS. A warning is displayed:
router# service-module ids-sensor 0/1 reset
Use reset only to recover from shutdown or failed state
Warning: May lose data on the NVRAM, nonvolatile file system or unsaved configuration!
Do you want to reset?[confirm]
The following example demonstrates how to enable console access to the AIM IPS operating system:
router# service-module ids-sensor 0/1 session
The following example demonstrates how to shut down IPS applications running on the AIM IPS:
router# service-module ids-sensor 0/1 shutdown
Trying 10.10.10.1, 2129 ... Open
%SERVICEMODULE-5-SHUTDOWN2:Service module IDS-Sensor 0/1 shutdown complete
The following example demonstrates how to display IPS software statistics:
router# service-module ids-sensor 0/1 statistics
Module Reset Statistics:
CLI reset count = 1
CLI reload count = 0
Registration request timeout reset count = 1
Error recovery timeout reset count = 1
Module registration count = 7
The last IOS initiated event was a cli reset at 20:18:36.038 UTC Tue Jan 16 2007
The following example demonstrates how to show the status of the IPS software on the AIM IPS:
router# service-module ids-sensor 0/1 status
Service Module is Cisco IDS-Sensor0/1
Service Module supports session via TTY line 33
Service Module is in Steady state
Getting status from the Service Module, please wait...
Service Module Version information received, Major ver = 1, Minor ver= 1
Cisco Systems Intrusion Prevention System Network Module
Software version: 7.0(4)E4
Model: AIM IPS
Memory: 890996 KB
Mgmt IP addr: 10.1.9.201
Mgmt web ports: 443
Mgmt TLS enabled: true
Related Commands
|
|
|
|---|---|
ids-service-module monitoring |
Enables IPS monitoring on a specified interface. |
service-module ids-bootmode
To enter failsafe or normal boot mode for the AIM IPS, use the service-module ids-sensor bootmode command in privileged EXEC mode.
service-module ids-sensor slot/port bootmode {failsafe | normal}
Syntax Description
Defaults
None
Command Modes
Privileged EXEC (#)
Command History
|
|
|
|---|---|
12.4(15)XY |
This command was introduced. |
12.4(20)T |
This command was integrated into Cisco IOS Release 12.4(20)T. |
Usage Guidelines
If a confirmation prompt is displayed, press Enter to confirm the action, or press n to cancel.
Examples
The following example demonstrates how to enter failsafe boot mode on an AIM IPS in slot 0, port 1:
router# service-module ids-sensor 0/1 bootmode failsafe
The following example demonstrates how to enter normal boot mode on the AIM IPS:
router# service-module ids-sensor 0/1 bootmode normal
Related Commands
|
|
|
|---|---|
ids-service-module monitoring |
Enables IDS monitoring on a specified interface. |
 Feedback