Cisco IP Camera Setup Software Reference Guide
Bias-Free Language
The documentation set for this product strives to use bias-free language. For the purposes of this documentation set, bias-free is defined as language that does not imply discrimination based on age, disability, gender, racial identity, ethnic identity, sexual orientation, socioeconomic status, and intersectionality. Exceptions may be present in the documentation due to language that is hardcoded in the user interfaces of the product software, language used based on RFP documentation, or language that is used by a referenced third-party product. Learn more about how Cisco is using Inclusive Language.
- Updated:
- December 8, 2017
Chapter: Getting Started
Getting Started
This chapter provides information that you need to get started with the Cisco IP Camera Setup Software. It includes these topics:
About the Cisco IP Camera Setup Software
The Cisco IP Camera Setup Software provides a simple user interface that you can use to set up, configure, and manage Cisco IP Cameras in a network. This tool lets you perform many of the configuration, management, and operational tasks that you can perform from the dedicated web-based interface of a camera.
The options that are available in the Cisco IP Camera Setup Software vary by camera model. Not all options apply to all models.
Installing the Cisco IP Camera Setup Software
You can install the Cisco IP Camera Setup Software on a PC that meets these requirements:
- Operating system—Microsoft Windows 7, 10, or higher
- CPU—Intel Core i7, 3.07 GHz or faster
- Memory—8 GB DDR3 or greater
- Network connectivity—Gigabit Ethernet (GigE) network connection
To obtain and install the Cisco IP Camera Setup Software, follow these steps:
Step 1 Take these actions to obtain the Cisco IP Camera Setup Software software:
https://software.cisco.com/download/navigator.html
b. In the Downloads Home area, choose
Product
>
Connected Safety and Security
>
Video Surveillance IP Cameras > Video Surveillance 6000 Series IP Cameras >
Cisco Surveillance 6000P IP Camera
.
c. In the Select a Software Type area, click IP Camera Applications and Utilities .
d. In the list of versions, navigate to the desired versions of the Cisco IP Camera Setup Software.
e. Click the Download button next to CiscoIPCameraSetupSoftwareV x . xx . xx .
f. Follow the on screen prompts to download the software to your local computer.
Step 2 Take these actions to install the Cisco IP Camera Setup Software:
a. Locate and double-click the CiscoIPCameraSetupSoftware file that you downloaded.
b. Follow the on-screen prompts to complete the installation.
Starting the Cisco IP Camera Setup Software
To start the Cisco IP Camera Setup Software, take either of these actions:
- Click the Cisco IP Camera Setup Software icon on your PC desktop.
- Navigate to the C:\Program Files (x86)\Cisco\Cisco IP Camera Setup folder and click CiscoIPCameraSetupSoftware.exe .
Exiting the Cisco IP Camera Setup Software
To exit the Cisco IP Camera Setup Software, choose File > Exit , and then click Yes in the confirmation dialog box.
Obtaining Information about Cisco IP Camera Setup Software
To see version, copyright, and trademark information for the Cisco IP Camera Setup Software, choose Help > About .
Cisco IP Camera Setup Software Main Window
The Main window appears when you start the Cisco IP Camera Setup Software. This window provides access to the Cisco IP Camera Setup Software features.
Figure 1-1 illustrates the Cisco IP Camera Setup Software Main window with the Add Cameras tab selected.
Figure 1-1 Cisco IP Camera Setup Software Main Window
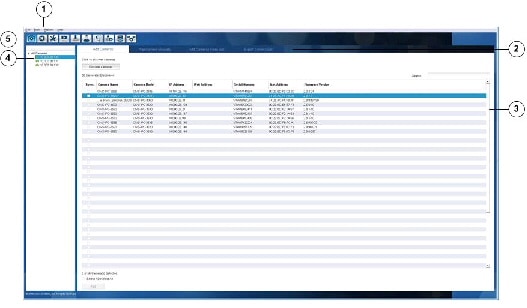
Menu bar. Provides access to the following menus:
|
|
Tabs. Include various options and controls. The tab or tabs that appear vary depending on the menu item or quick access button that you choose. |
|
Tab options and controls. The items in this area vary depending on the current tab. |
|
Added Cameras list. Displays the Cisco IP Cameras that have been added to the Cisco IP Camera Setup Software.
To see all cameras in the list, click the Expand icon |
|
Quick access buttons. Use these buttons to quickly access tabs. See the Quick Access Buttons. You can hover your mouse pointer over a button to see the button name. |
 next to “All Cameras.” The icon changes to the Collapse icon
  . Click the Collapse icon to hide the cameras.
Quick Access Buttons
Quick access buttons appear under the menu bar on the Cisco IP Camera Setup Software Main window. These buttons provide one-click access to various tabs.
Hover your mouse pointer over a button to see the button name.
Table 1-1 describes these buttons and the tab that each button displays.
|
See the “Adding Cameras” section . |
||
Removes a camera from being managed by the Cisco IP Camera Setup Software. See the “Removing a Camera” section. |
||
|
See the“Viewing and Configuring Basic Setup Options” section. |
Actions > Settings & Maintenance > any option , then choose the Basic Setup tab |
|
|
See the “Viewing Live Video and Configuring Viewing Options” section . |
||
|
See the “Managing Users” section. |
||
Displays the Initialization tab. See the “Initialization” section. |


 Feedback