Serial Interface Cards
Available Languages
Table of Contents
2-Port Asynchronous/Synchronous Serial WIC
Serial WAN Interface Card LEDs
Prerequisites for Connecting 1- and 2-Port Serial WICs to a Network
Installing a Cisco Serial WAN Interface Card
Connecting 1- and 2-Port Serial WICs to a Network
4-Port Multiprotocol High Speed HWIC
4-Port Multiprotocol Low Speed Asynchronous/Synchronous HWIC
8-Port RS-232 Asynchronous/Synchronous HWIC
Prerequisites for Connecting Serial HWICs to the Network
Installing a Cisco Serial High Speed WAN Interface Card
Cables for 4-Port Serial HWICs
Cables for 8-Port and 16-Port Serial HWICs
Connecting Serial HWICs to the Network
Obtaining Documentation, Obtaining Support, and Security Guidelines
Serial Interface Cards
Revised: 11/14/2008, OL-12843-01
This guide describes how to connect Cisco serial interface cards to your network. It contains the following sections:
Serial WAN Interface Cards
This section describes serial WAN interface cards (WICs) and how to connect 1- and 2-port Cisco serial WICs to a network. It contains the following subsections:
- 1- and 2-Port Serial WICs
- 2-Port Asynchronous/Synchronous Serial WIC
- Serial WAN Interface Card LEDs
- Supported Platforms
- Prerequisites for Connecting 1- and 2-Port Serial WICs to a Network
- Connecting 1- and 2-Port Serial WICs to a Network
1- and 2-Port Serial WICs
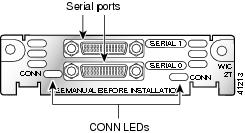
The 1-port serial WIC (WIC-1T), shown in Figure 1, and the 2-port serial WIC (WIC-2T), shown in Figure 2, provide an EIA/TIA-232, EIA/TIA-449, V.35, X.21, data terminal equipment/data communications equipment (DTE/DCE), EIA-530 DTE, or nonreturn to zero/nonreturn to zero inverted (NRZ/NRZI) serial interface to a Cisco modular router.

Note
A WIC-2T port that is not connected to a cable is automatically configured as DCE and assigned the default clock rate of 2 Mbps.
Figure 1 1-Port Serial WIC Front Panel (WIC-1T)

Figure 2 2-Port Serial WIC Front Panel (WIC-2T)
2-Port Asynchronous/Synchronous Serial WIC
The 2-port asynchronous/synchronous (A/S) WIC (WIC-2A/S), shown in Figure 3, provides an EIA/TIA-232, EIA/TIA-449, V.35, X.21, DTE/DCE, EIA-530, or EIA-530A serial interface to a Cisco modular router.

Caution To comply with the Telcordia GR-1089 NEBS standard for electromagnetic compatibility and safety, connect the 2-port A/S WAN interface card (WIC-2A/S) only to intra-building or non-exposed wiring or cabling. The intrabuilding cable must be shielded and the shield must be grounded at both ends.
Figure 3 2-Port A/S Serial WIC Front Panel (WIC-2A/S)

Serial WAN Interface Card LEDs
Each serial WIC has one LED, labeled CONN for each port, which lights when the serial port is connected. When the port is in DTE mode, the CONN LED indicates that Data Send Ready (DSR), Data Carrier Detect (DCD), and Clear To Send (CTS) have been detected. When the port is in DCE mode, it indicates that Data Terminal Ready (DTR) and Ready To Send (RTS) have been detected.
Supported Platforms
For a list of the platforms that support a Cisco interface card see Cisco Interface Cards for Cisco Access Routers .

Note
In Cisco 3600 series and Cisco 2600 series routers, the 2-port serial WIC supports both asynchronous (up to 115.2 kbps) and synchronous (up to 2.048 Mbps) data rates. The 1-port serial WIC supports only synchronous data rates up to 2.048 Mbps.

Note
In the Cisco 1720 series router, the 1-port and 2-port serial WICs support both asynchronous (up to 115.2 kbps) and synchronous (up to 2.048 Mbps) data rates.

Note
In Cisco 1600 series routers, the 1-port serial WIC supports asynchronous data rates up to 115.2 kbps, and synchronous data rates up to 2.048 Mbps. The 2-port serial WIC is not supported on this router.

Note
In Cisco 3700 series, Cisco 3600 series, Cisco 2600 series, Cisco 1720, and Cisco MWR 1941-DC routers, the 2-port A/S WIC supports both asynchronous (up to 115.2 kbps) and synchronous (up to 128 kbps) data rates.

Note
The 2-port A/S WIC is not supported in Cisco 1600 series routers.
Finding Support Information for Platforms and Cisco IOS Software Images
Use Cisco Feature Navigator to find information about platform support and Cisco IOS software image support. Access Cisco Feature Navigator at http://www.cisco.com/go/fn . You must have an account on Cisco.com. If you do not have an account or have forgotten your username or password, click Cancel at the login dialog box and follow the instructions that appear.
Prerequisites for Connecting 1- and 2-Port Serial WICs to a Network
Before connecting a WIC to the network, ensure that the WIC is installed in the router, the equipment is properly grounded, and you have the proper cables for connecting the WIC to the network. This section describes the preparation necessary before connecting a 1- and 2-Port WIC to the network.
Installing a Cisco Serial WAN Interface Card
Install the Cisco serial wan interface card according to the instructions in Installing Cisco Interface Cards in Cisco Access Routers .
Grounding
Ensure that the equipment you are working with is properly grounded according to the instructions in Installing Cisco Interface Cards in Cisco Access Routers .
Cables
After you install the serial WIC, use the appropriate serial cable to connect the WIC’s serial port to one of the following types of equipment. (See Figure 5.):
- An asynchronous modem, if connecting to an analog telephone line
- A synchronous modem, DSU or CSU, or other DCE, if connecting to a digital WAN line
The 1-port serial WIC has a DB-60 serial port, whereas the 2-port serial WIC and the 2-port A/S WIC have Cisco smart serial ports. Use the correct cable for your serial WIC.
The serial cable attached to a smart serial port determines the port’s electrical interface type and mode (DTE or DCE).

Caution Do not over-torque the screws on the serial cable when attaching to the serial WAN interface card. Recommended torque is 2.0 kgf.cm (1.7 lbf.in). Over-torquing may cause damage to the interface card.

Tip A cable providing surge protection (CAB-SS-SURGE) is also available from Cisco Systems. See the “For connection limitations, see the “1- and 2-Port Serial WICs” section on page 1, and the “2-Port Asynchronous/Synchronous Serial WIC” section on page 2.” section for instructions on connecting the surge protector cable.
Types of Cables for 1- and 2-Port Serial WICs
Six types of serial cables (also called serial adapter cables or serial transition cables ) are available from Cisco Systems for 1- and 2-port serial WICs:
- EIA/TIA-232 serial cable assembly
- EIA/TIA-449 serial cable assembly
- V.35 serial cable assembly
- X.21 serial cable assembly
- EIA/TIA-530 serial cable assembly
- EIA/TIA-530A serial cable assembly
All serial cables provide a universal plug at the interface card end. The network end of each cable provides the physical connectors most commonly used for the interface. For example, the network end of the EIA/TIA-232 serial cable is a DB-25 connector, the most widely used EIA/TIA-232 connector.
All serial interface types except EIA-530 are available in DTE or DCE format: DTE with a plug connector at the network end and DCE with a receptacle at the network end. V.35 is available in either mode with either gender at the network end. EIA-530 is available in DTE only.

Connecting 1- and 2-Port Serial WICs to a Network

Note
For connection limitations, see the “1- and 2-Port Serial WICs” section, and the “2-Port Asynchronous/Synchronous Serial WIC” section.
To connect the serial card to the WAN, follow these steps:
Step 1
Confirm that the router is turned off.
On the Cisco MWR 1941-DC router, turn off power by turning OFF the DC power source at the circuit breaker and taping the circuit breaker into the OFF position.

Caution To comply with the Telcordia GR-1089 NEBS standard for electromagnetic compatibility and safety, connect the 2-port A/S WAN interface card (WIC-2A/S) only to intra-building or non-exposed wiring or cabling. The intrabuilding cable must be shielded and the shield must be grounded at both ends.
Step 2
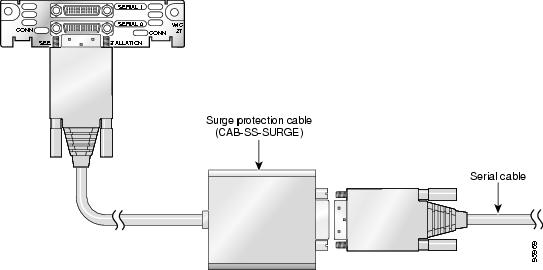
(Optional) Connect the surge protection cable to the connector on the card faceplate. (See Figure 4.)
Step 3
(Optional) Connect one end of the appropriate serial cable to the other connector on the surge protector cable. (See Figure 4.)
Figure 4 Connecting the Cisco Surge Protector Cable (CAB-SS-SURGE) to a Serial WAN Interface
Step 4
Connect one end of the appropriate serial cable to the connector on the card faceplate.
Step 5
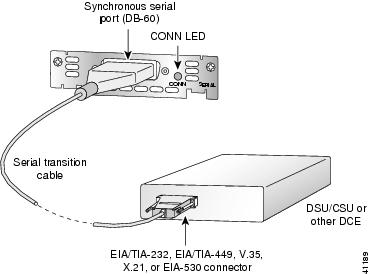
Connect the other end of the cable to the appropriate type of equipment, as shown in Figure 5.
Figure 5 Connecting the Serial WAN Port to a Modem or DSU/CSU
Step 6
Turn on power to the router by pressing the power switch to the ON ( | ) position.
On the Cisco MWR 1941-DC router, turn on power to the router by turning ON the DC power source at the circuit breaker.
Step 7
Check that the CONN LED goes on, which indicates that the card’s serial port detects the WAN serial connection.
Serial High Speed WICs
There are five Cisco serial high speed WICs (HWICs). This section describes the HWICs and tells how to connect them to a network. It contains the following subsections:
- 4-Port Multiprotocol High Speed HWIC
- 4-Port Multiprotocol Low Speed Asynchronous/Synchronous HWIC
- 8-Port RS-232 Asynchronous/Synchronous HWIC
- 8-Port Asynchronous HWIC
- 16-Port Asynchronous HWIC
- LED Status
- Supported Platforms
- Prerequisites for Connecting Serial HWICs to the Network
- Connecting Serial HWICs to the Network
4-Port Multiprotocol High Speed HWIC
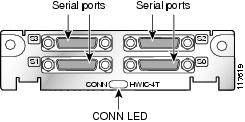
The 4-port multiprotocol high speed HWIC (HWIC-4T) is illustrated in Figure 6. Protocols supported are Async (SLIP), Async (PPP), HDLC, Bisync, and transparent.
Interfaces supported are as follows:
The maximum data rate supported is 8 Mbps per port.

Caution To comply with the Telcordia GR-1089 NEBS standard for electromagnetic compatibility and safety, connect the 4-port multiprotocol high speed HWIC (HWIC-4T) only to intra-building or non-exposed wiring or cabling. The intrabuilding cable must be shielded and the shield must be grounded at both ends.
Figure 6 4-Port Multiprotocol HWIC Front Panel (HWIC-4T)
4-Port Multiprotocol Low Speed Asynchronous/Synchronous HWIC
The 4-port multiprotocol low speed asynchronous/synchronous HWIC (HWIC-4A/S) is illustrated in Figure 7. Protocols supported are Async (SLIP), Async (PPP), HDLC, Bisync, and transparent.
Interfaces supported are as follows:
The maximum data rate supported is 256 kbps per port (synchronous).

Caution To comply with the Telcordia GR-1089 NEBS standard for electromagnetic compatibility and safety, connect the 4-port multiprotocol low speed asynchronous/synchronous HWIC (HWIC-4A/S) only to intra-building or non-exposed wiring or cabling. The intrabuilding cable must be shielded and the shield must be grounded at both ends.
Figure 7 4-Port Multiprotocol A/S HWIC Front Panel (HWIC-4A/S)

8-Port RS-232 Asynchronous/Synchronous HWIC
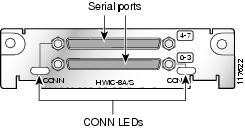
The 8-port RS-232 asynchronous/synchronous HWIC (HWIC-8A-RS232), illustrated in Figure 8, provides 8 asynchronous/synchronous RS-232 interfaces in both DCE and DTE formats. Data rates of up to 230.4 kbps are supported in asynchronous mode, and up to 256 kbps in synchronous mode.
Figure 8 8-Port RS-232 Asynchronous/Synchronous HWIC Front Panel (HWIC-8A/S-RS232)
8-Port Asynchronous HWIC
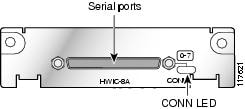
The 8-port asynchronous HWIC (HWIC-8A), illustrated in Figure 9, provides 8 asynchronous RS-232 interfaces in DTE format, at data rates of up to 230.4 kbps.

Caution To comply with the Telcordia GR-1089 NEBS standard for electromagnetic compatibility and safety, connect the 8-port asynchronous HWIC (HWIC-8A) only to intra-building or non-exposed wiring or cabling. The intrabuilding cable must be shielded and the shield must be grounded at both ends.
Figure 9 8-Port Asynchronous HWIC Front Panel (HWIC-8A)
16-Port Asynchronous HWIC
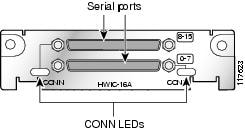
The 16-port asynchronous HWIC (HWIC-16A), illustrated in Figure 10, provides 16 asynchronous RS-232 interfaces in DTE format, at data rates of up to 230.4 kbps.

Caution To comply with the Telcordia GR-1089 NEBS standard for electromagnetic compatibility and safety, connect the 16-port asynchronous HWIC (HWIC-16A) only to intra-building or non-exposed wiring or cabling. The intrabuilding cable must be shielded and the shield must be grounded at both ends.
Figure 10 16-Port Asynchronous HWIC Front Panel (HWIC-16A)
LED Status
Due to the high port density on the HWIC front panels, the amount of LED status per port is limited. There is no room for individual LEDs to indicate transmit or receive activity, or clock status.
HWIC-4T and HWIC-4A/S have a single bi-color LED to monitor status over four ports. HWIC-8A has a single LED to monitor status over 8 ports. There are two LEDs on the HWIC-8A/S-RS232 that monitor 4 ports each. On the HWIC-16A, two LEDs monitor 8 ports each.
See Table 1 for the definition of HWIC LED Status.
Supported Platforms
For a list of the platforms that support a Cisco interface card see Cisco Interface Cards for Cisco Access Routers .
Finding Support Information for Platforms and Cisco IOS Software Images
Use Cisco Feature Navigator to find information about platform support and Cisco IOS software image support. Access Cisco Feature Navigator at http://www.cisco.com/go/fn . You must have an account on Cisco.com. If you do not have an account or have forgotten your username or password, click Cancel at the login dialog box and follow the instructions that appear.
Prerequisites for Connecting Serial HWICs to the Network
Before connecting a serial high speed WIC (HWIC) to the network, ensure that the HWIC is installed in the router, the equipment is properly grounded, and you have the proper cables for connecting the HWIC to the network. This section describes the preparation necessary before connecting a Cisco serial HWIC to the network.
Installing a Cisco Serial High Speed WAN Interface Card
Install the Cisco serial HWIC according to the instructions in Installing Cisco Interface Cards in Cisco Access Routers .
Grounding
Ensure that the equipment you are working with is properly grounded.
For instructions on grounding your HWIC, see Installing Cisco Interface Cards in Cisco Access Routers .
Cables
After you install the serial HWIC, use the appropriate serial cable to connect the HWIC ports to the following types of equipment:
- Asynchronous modems, if connecting to analog telephone lines
- Synchronous modems, data service units/channel service units (DSUs/CSUs), or other DCEs, if connecting to digital WAN lines
The 4-port serial HWICs have 26-pin 12-in-1 Cisco smart serial ports, whereas the 8- and 16-port serial HWICs have 68-pin serial ports. Use the correct cable for your serial HWIC.

Cables for 4-Port Serial HWICs
The 4-port serial HWICs use Cisco smart serial cables. Six types of smart serial cables are available:
- EIA/TIA-232 serial cable assembly
- EIA/TIA-449 serial cable assembly
- V.35 serial cable assembly
- X.21 serial cable assembly
- EIA-530 serial cable assembly
- EIA-530A serial cable assembly
All of these serial cables provide a 26-pin plug at the interface card end. The network end of each cable provides the physical connectors most commonly used for the interface. For example, the network end of the EIA/TIA-232 serial cable is a DB-25 connector, the most widely used EIA/TIA-232 connector.
See Cisco Modular Access Router Cable Specifications for network end connectors and pinouts of these cables.
The EIA-530 and EIA-530A serial cables are available in DTE format only. All other cables are available in either DTE or DCE format.
Cables for 8-Port and 16-Port Serial HWICs
The following cables are available from Cisco Systems for the 8-port and 16-port serial HWICs.
Cable for the 8-Port RS-232 Asynchronous/Synchronous HWIC
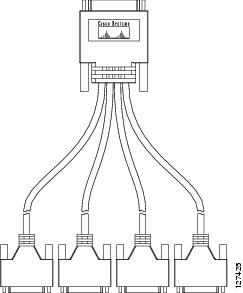
The 8-port RS-232 asynchronous/synchronous HWIC uses a quad cable, consisting of a 68-pin connector on the interface card end and four DB25 connectors on the system end. (See Figure 11.) This cable is available in either DCE or DTE format.
Cable for the 8-Port and 16-Port Asynchronous HWICs
The 8-port and 16-port asynchronous HWICs use an octal cable, consisting of a 68-pin connector on the interface card end and eight RJ45 connectors on the system end. See Figure 12. This cable is available in DTE format only.
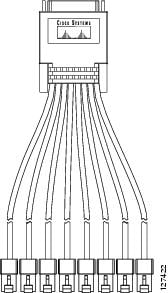
Connecting Serial HWICs to the Network
To connect the serial HWIC to the network, follow these steps:
Step 1
Confirm that the router is turned off.
Step 2
Connect one end of the appropriate serial cable to the connector on the card faceplate.
Step 3
Connect the other end (or ends) of the cable to the appropriate type of equipment.
Step 4
Turn on power to the router.
Step 5
Check that the CONN LED goes on, which indicates that the card’s serial port detects a WAN serial connection.
Related Documentation
Related documentation is available on Cisco.com or on the Product Documentation DVD. For more information, see the “$paratext>” section.
- 2-Port Async/Sync WAN Interface Card (WIC-2A/S) , tech note
- Understanding the 1-Port Serial WAN Interface Card (WIC-1T) , tech note
- Understanding 2-Port Serial WAN Interface Card (WIC-2T) , tech note
- Cisco Network Modules and Interface Cards Regulatory Compliance and Safety Information
- “ Configuring Asynchronous Connections ” chapter of the Cisco 1700 Series Router Software Configuration Guide
- “Configuring Serial Interfaces” chapter of the Cisco IOS Interface Configuration Guide for your Cisco IOS software release
- Cisco Signaling Link Terminal G.732 Support , Cisco IOS Release 12.2(2)T feature module
- Cisco Signaling Link Terminal , Cisco IOS Release 12.1(1)T feature module
- Multilink PPP Across Two Serial Physical-layer Async Interfaces , sample configuration
- Configuring PPP Dialin with External Modems , sample configuration
- Configuring Basic MPLS Using IS-IS , sample configuration
- Inverse MUX Application using Multilink PPP , sample configuration
- Configuring a Basic MPLS VPN , sample configuration
- Multilink Via Virtual-Template on Two Serial Interfaces , sample configuration
Obtaining Documentation, Obtaining Support, and Security Guidelines
For information on obtaining documentation, obtaining support, providing documentation feedback, security guidelines, and also recommended aliases and general Cisco documents, see the monthly What’s New in Cisco Product Documentation , which also lists all new and revised Cisco technical documentation, at:
http://www.cisco.com/en/US/docs/general/whatsnew/whatsnew.html
Cisco and the Cisco logo are trademarks or registered trademarks of Cisco and/or its affiliates in the U.S. and other countries. To view a list of Cisco trademarks, go to this URL: www.cisco.com/go/trademarks . Third-party trademarks mentioned are the property of their respective owners. The use of the word partner does not imply a partnership relationship between Cisco and any other company. (1110R)
Any Internet Protocol (IP) addresses used in this document are not intended to be actual addresses. Any examples, command display output, and figures included in the document are shown for illustrative purposes only. Any use of actual IP addresses in illustrative content is unintentional and coincidental.
© 2008 Cisco Systems, Inc. All rights reserved.
Contact Cisco
- Open a Support Case

- (Requires a Cisco Service Contract)
 Feedback