Azure Arc-enabled Kubernetes with Cisco IKS (Intersight Kubernetes Service) White Paper
Available Languages
Bias-Free Language
The documentation set for this product strives to use bias-free language. For the purposes of this documentation set, bias-free is defined as language that does not imply discrimination based on age, disability, gender, racial identity, ethnic identity, sexual orientation, socioeconomic status, and intersectionality. Exceptions may be present in the documentation due to language that is hardcoded in the user interfaces of the product software, language used based on RFP documentation, or language that is used by a referenced third-party product. Learn more about how Cisco is using Inclusive Language.
This document provides step-by-step procedures to connect Cisco Intersight™ Kubernetes Service (IKS) to Microsoft Azure using Azure Arc-enabled Kubernetes.
Cisco Intersight (https://intersight.com) is an API-driven, cloud-based, software-as-a-service (SaaS) hybrid cloud operations platform. It delivers intelligent automation, observability, and optimization for traditional and cloud-native applications and infrastructure. It is a new generation of global management tool for the Cisco Unified Computing System™ (Cisco UCS®), Cisco HyperFlex™ systems, other Cisco Intersight–connected devices, and third-party Intersight-connected devices. It provides a holistic and unified approach to managing distributed infrastructure, cloud services, virtualized workloads, and container orchestration platforms. As a result, customers can achieve significant TCO savings and deliver applications faster in support of new business initiatives.
Cisco Intersight simplifies provisioning of servers, associated storage, and fabric automatically with model-based configurations. Along with predefined profiles, IT can align policy for consistent compliance and productivity and can lower the risk of failures. To enhance the customer experience, Cisco Intersight also has a guided wizard to aid in the definition of profiles, set rules, and operating characteristics.
Cisco Intersight Kubernetes Service (IKS) introduces lifecycle management capabilities into the Intersight orchestration platform to offer Kubernetes as a service. It enables customers to quickly provision, deploy, and easily manage the lifecycle of Kubernetes clusters across the globe using a single cloud portal – Cisco Intersight. IKS also has a full stack of observability, monitoring, and logging for Kubernetes management. With IKS, Cisco Intersight delivers a turn-key SaaS solution for deploying and operating consistent, production-grade Kubernetes clusters anywhere.
IKS allows you to create Kubernetes cluster profiles to configure and deploy clusters anywhere. A cluster profile contains information such as the infrastructure provider, the target environment, and the node configuration. You can set these configurations by choosing existing Kubernetes policies or by creating new policies. IKS policies define the configurations that can be used across multiple cluster profiles. Using policies helps you to quickly and easily update multiple cluster profile configurations. Whenever you update a policy, the changes apply to all cluster profiles that use the policy. The Kubernetes clusters can be created by applying the Kubernetes cluster profiles from the Cisco Intersight GUI, or the deployment can be automated using the Terraform provider for Cisco Intersight.
Azure Arc is an offering of Azure service that simplifies the governance and management of complex and distributed environments across on-premises, edge, and multicloud. It provides you with a single pane of glass by projecting your non-Azure, on-premises, or other cloud resources (like AWS, GCP, etc.) into Azure Resource Manager. With Azure Arc you can:
● easily organize, govern, and secure servers (Windows and Linux), SQL Servers, and Kubernetes clusters across data centers, the edge, and multicloud environments and use Azure tools like Azure Policy and Azure Resource Graph with both traditional and cloud workloads.
● ensure consistent deployments and configuration – deploy and manage Kubernetes applications with GitHub and Azure Policy. Ensure that applications and clusters are consistently deployed and configured at scale from source control.
● automate and enforce policies to meet data governance and security requirements, and manage costs efficiently. Get the latest cloud innovation and automation, elastic scale, and unified management for data workloads that are running across hybrid infrastructure.
With Azure Arc enabled Kubernetes, you can attach and configure Kubernetes clusters running anywhere. When the Kubernetes cluster is connected to Azure Arc it will appear in the Azure portal as a resource with an ARM ID and a managed identity placed under Azure subscription and resource group and can receive tags like any other Azure resource. The Kubernetes cluster admin needs to deploy agents to connect the cluster to Azure and these agents run in the ‘azure-arc’ Kubernetes namespace as standard Kubernetes deployments, handle connectivity to Azure, collect Azure Arc logs and metrics and watch for configuration requests.
Azure Arc-enabled Kubernetes supports the following scenarios:
● Connect Kubernetes running outside of Azure for inventory, grouping, and tagging.
● Deploy applications and apply configuration using GitOps-based configuration management.
● View and monitor your clusters using Azure Monitor for containers.
● Enforce threat protection using Azure Defender for Kubernetes.
● Apply policy definitions using Azure Policy for Kubernetes.
● Create custom locations as target locations for deploying Azure Arc-enabled Data Services, App Services on Azure Arc and Event Grid on Kubernetes.
Azure Arc enabled Kubernetes Validation Program
Azure Arc-enabled Kubernetes works with any Cloud Native Computing Foundation (CNCF) certified Kubernetes clusters. The Azure Arc team has worked with key industry partners to validate conformance of their Kubernetes distributions with Azure Arc-enabled Kubernetes.
Cisco IKS participated in the validation program and has successfully passed the conformance tests for Azure Arc-enabled Kubernetes for IKS. For more information on Azure Arc service and technology partners and the validated distributions, refer the following links: https://techcommunity.microsoft.com/t5/azure-arc-blog/azure-arc-service-and-technology-partners/ba-p/2478102
https://docs.microsoft.com/en-us/azure/azure-arc/kubernetes/validation-program
The conformance tests run as part of the Azure Arc-enabled Kubernetes validation cover the following scenarios:
1. Connect Kubernetes clusters to Azure Arc:
● Deploy Azure Arc-enabled Kubernetes agent Helm chart on cluster.
● Set up Managed System Identity (MSI) certificate on cluster.
● Agents send cluster metadata to Azure.
2. Configuration:
● Create configuration on top of Azure Arc-enabled Kubernetes resource.
● Flux, needed for setting up GitOps workflow, is deployed on the cluster.
● Flux pulls manifests and Helm charts from demo Git repo and deploys to cluster.
Connect IKS cluster to Azure with Azure Arc Enabled for Kubernetes
This section covers the steps to connect a Cisco IKS cluster to Azure.
To connect/onboard an existing Kubernetes cluster to Azure Arc, make sure the below prerequisites are installed.
1. A Cisco IKS cluster up and running or refer this link to install a new Kubernetes cluster.
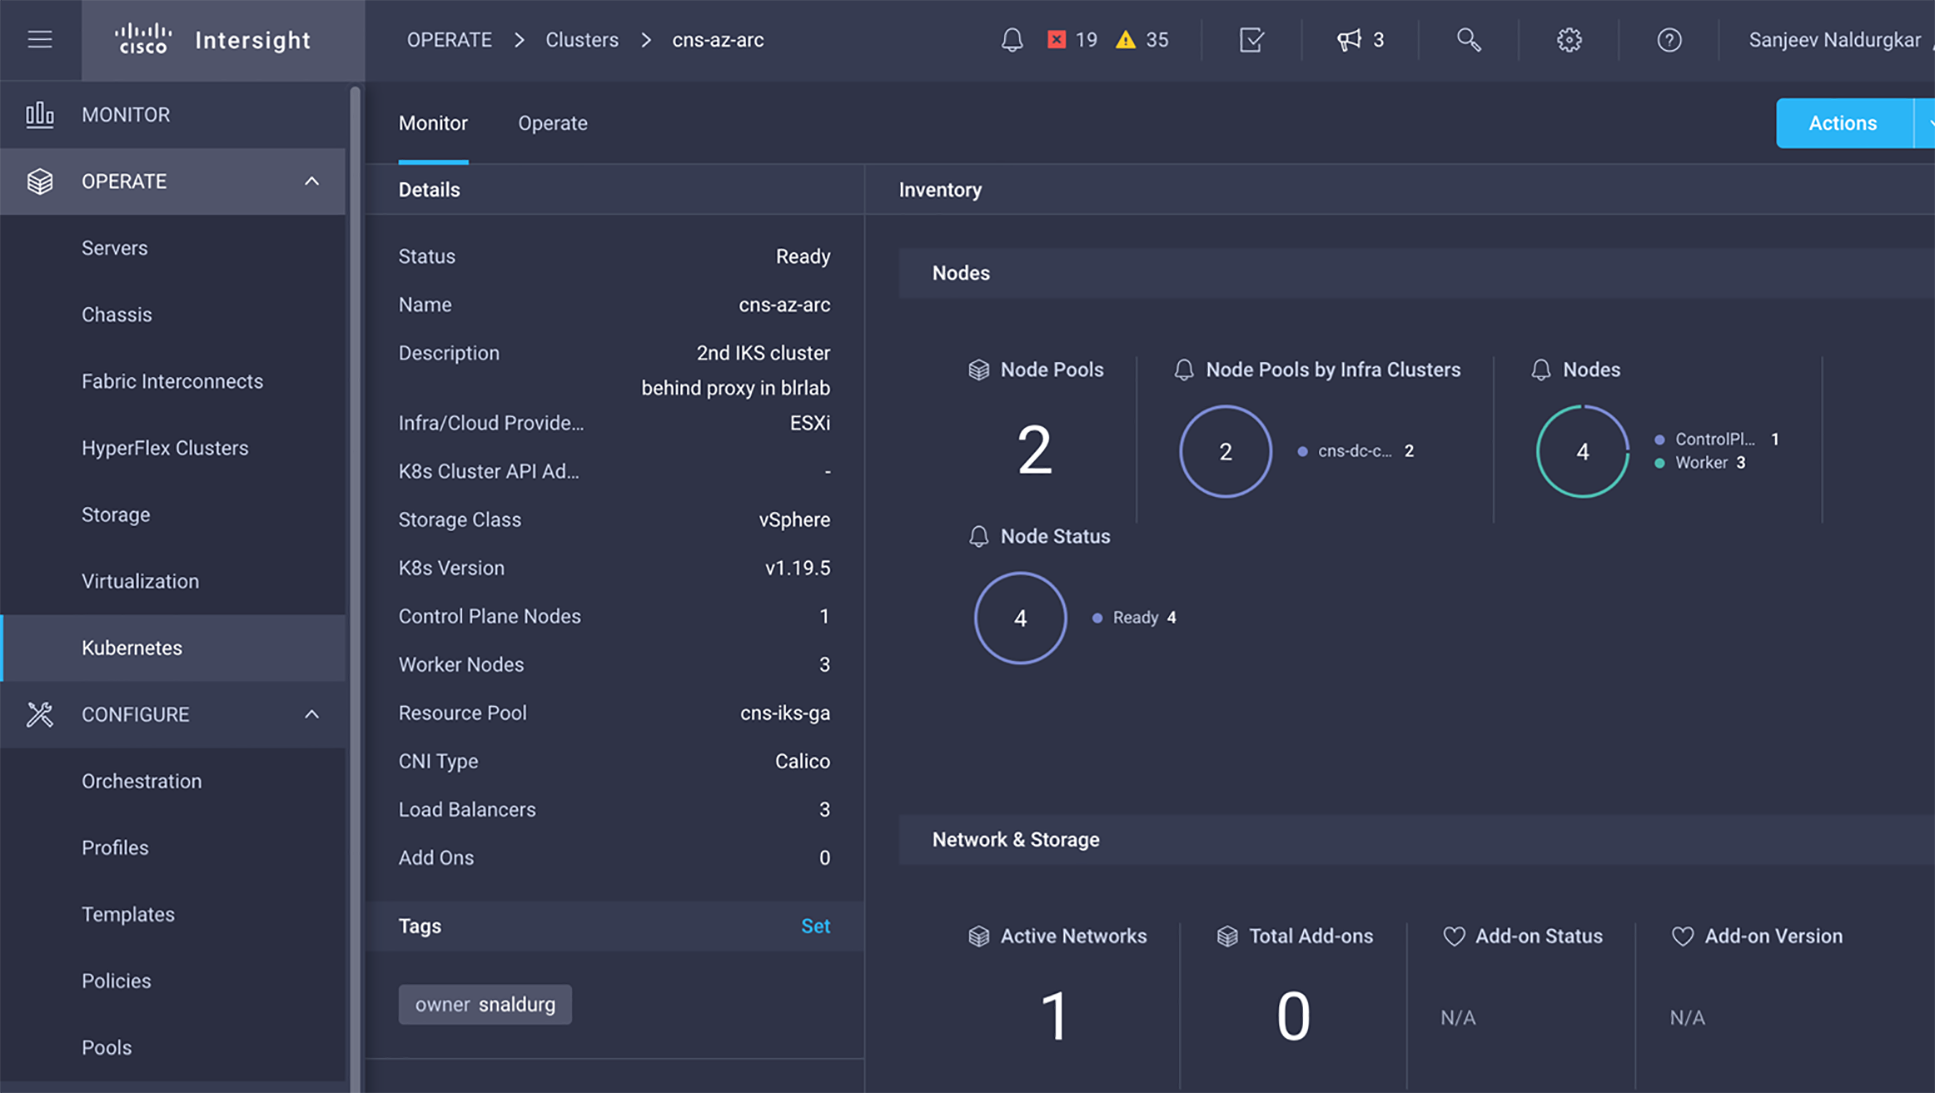
2. An Azure subscription with “read' and 'write' permissions on the Azure Arc-enabled Kubernetes resource type (Microsoft.Kubernetes/connectedClusters).
3. Setup your local machine/workstation with the below tools and extensions:
● Install Azure CLI with version >=2.16.0.
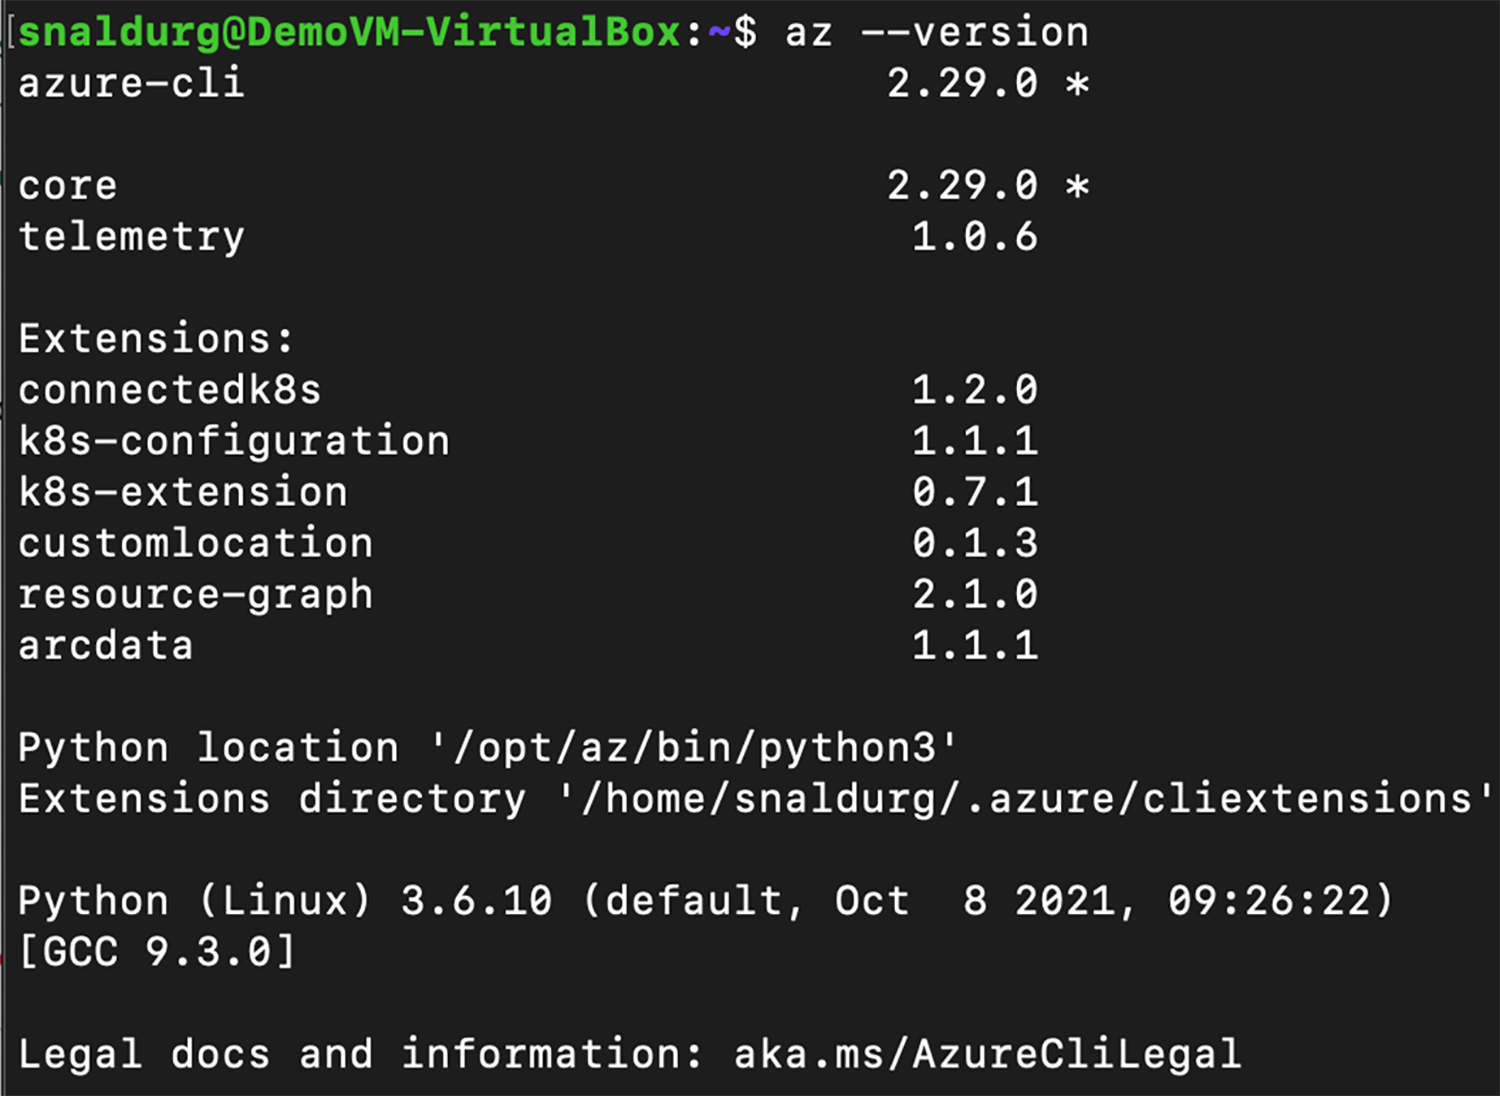
● Install the latest Azure CLI extensions – connectedk8s, k8s-configuration, k8s-extension and custom location.
> az extension add --name connectedk8s
> az extension add --name k8s-configuration
> az extension add --name k8s-extension
> az extension add --name customlocation
> az extension list -o table

● A kubeconfig file with cluster admin permissions.
> kubectl cluster-info

● Install Helm 3.
> helm version
![]()
● The Kubernetes clusters has access to ports 443 and 9418 and the required outbound URLs.
Connect the IKS cluster to Azure
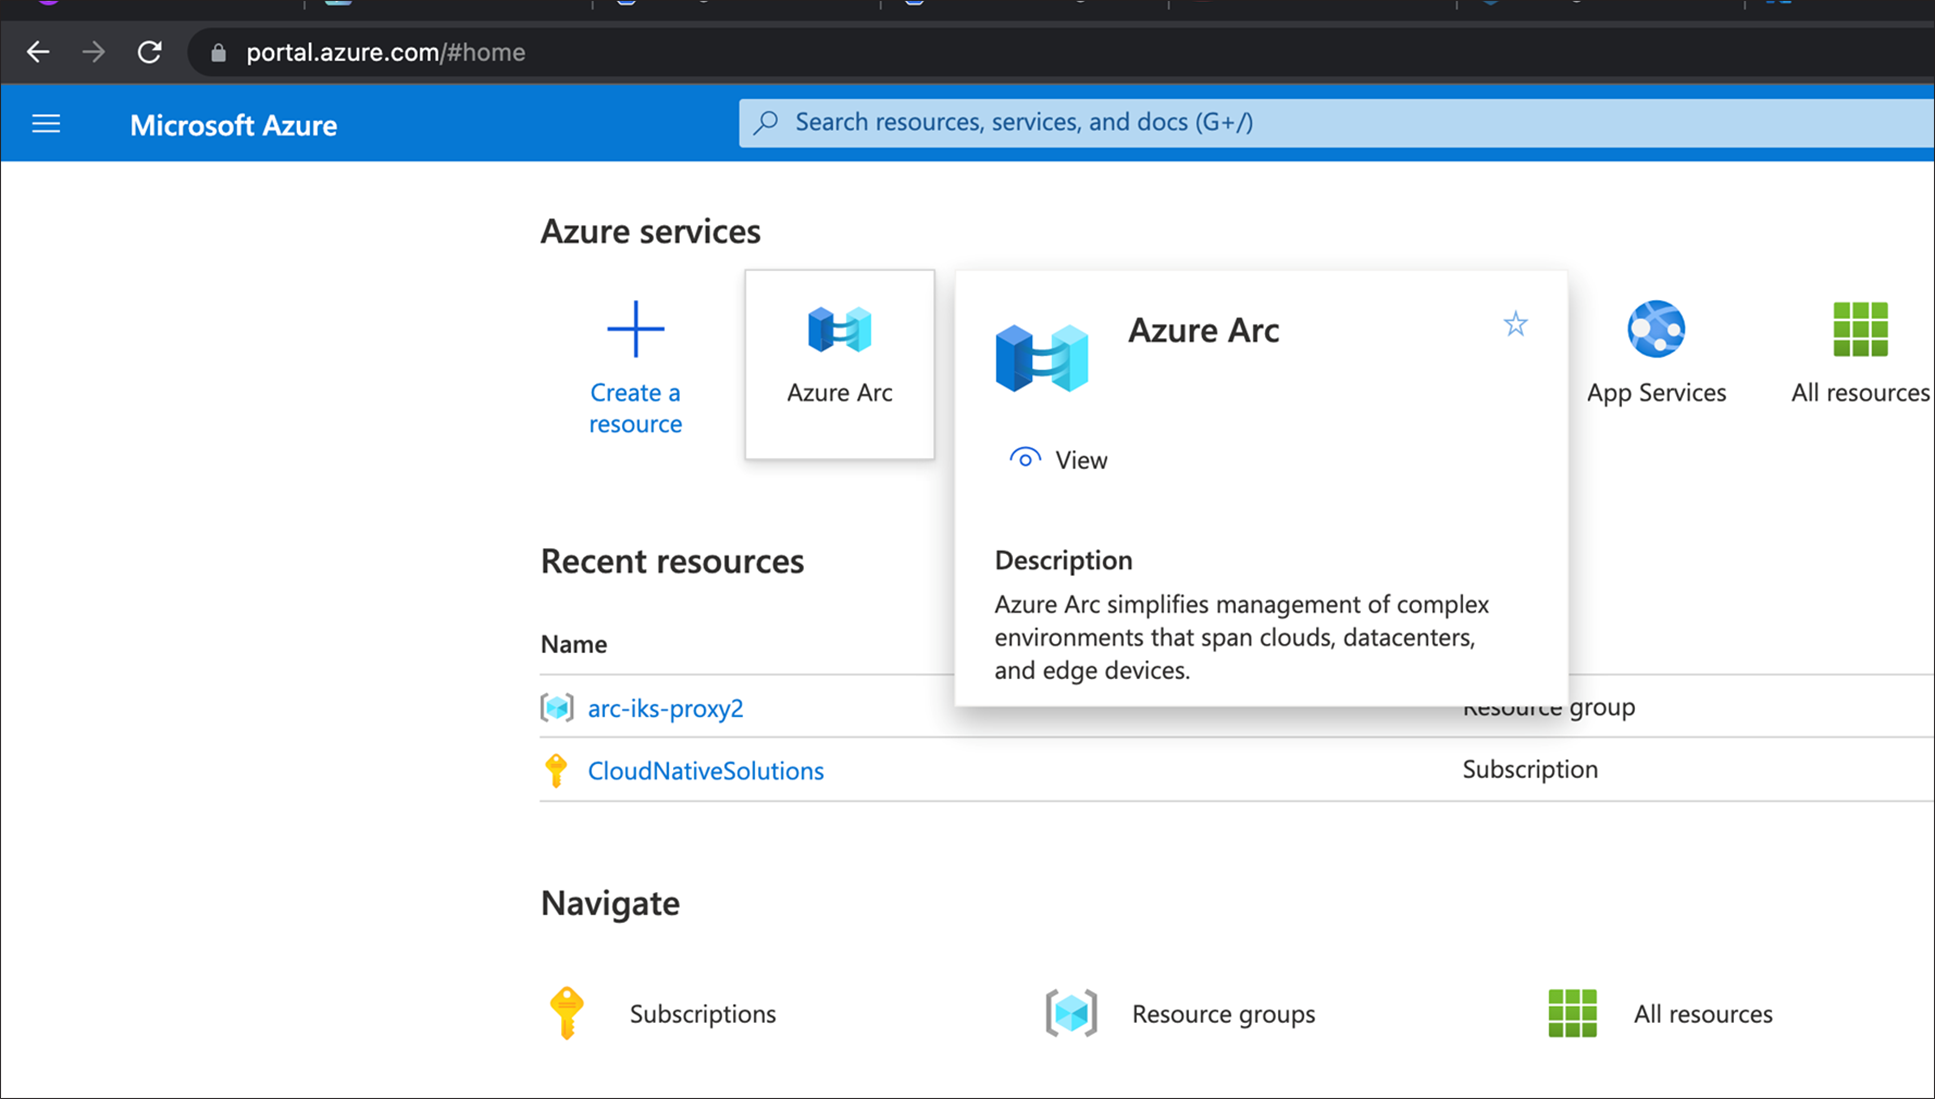
1. Log in to the Azure portal, search for Azure Arc, and click on it to open.
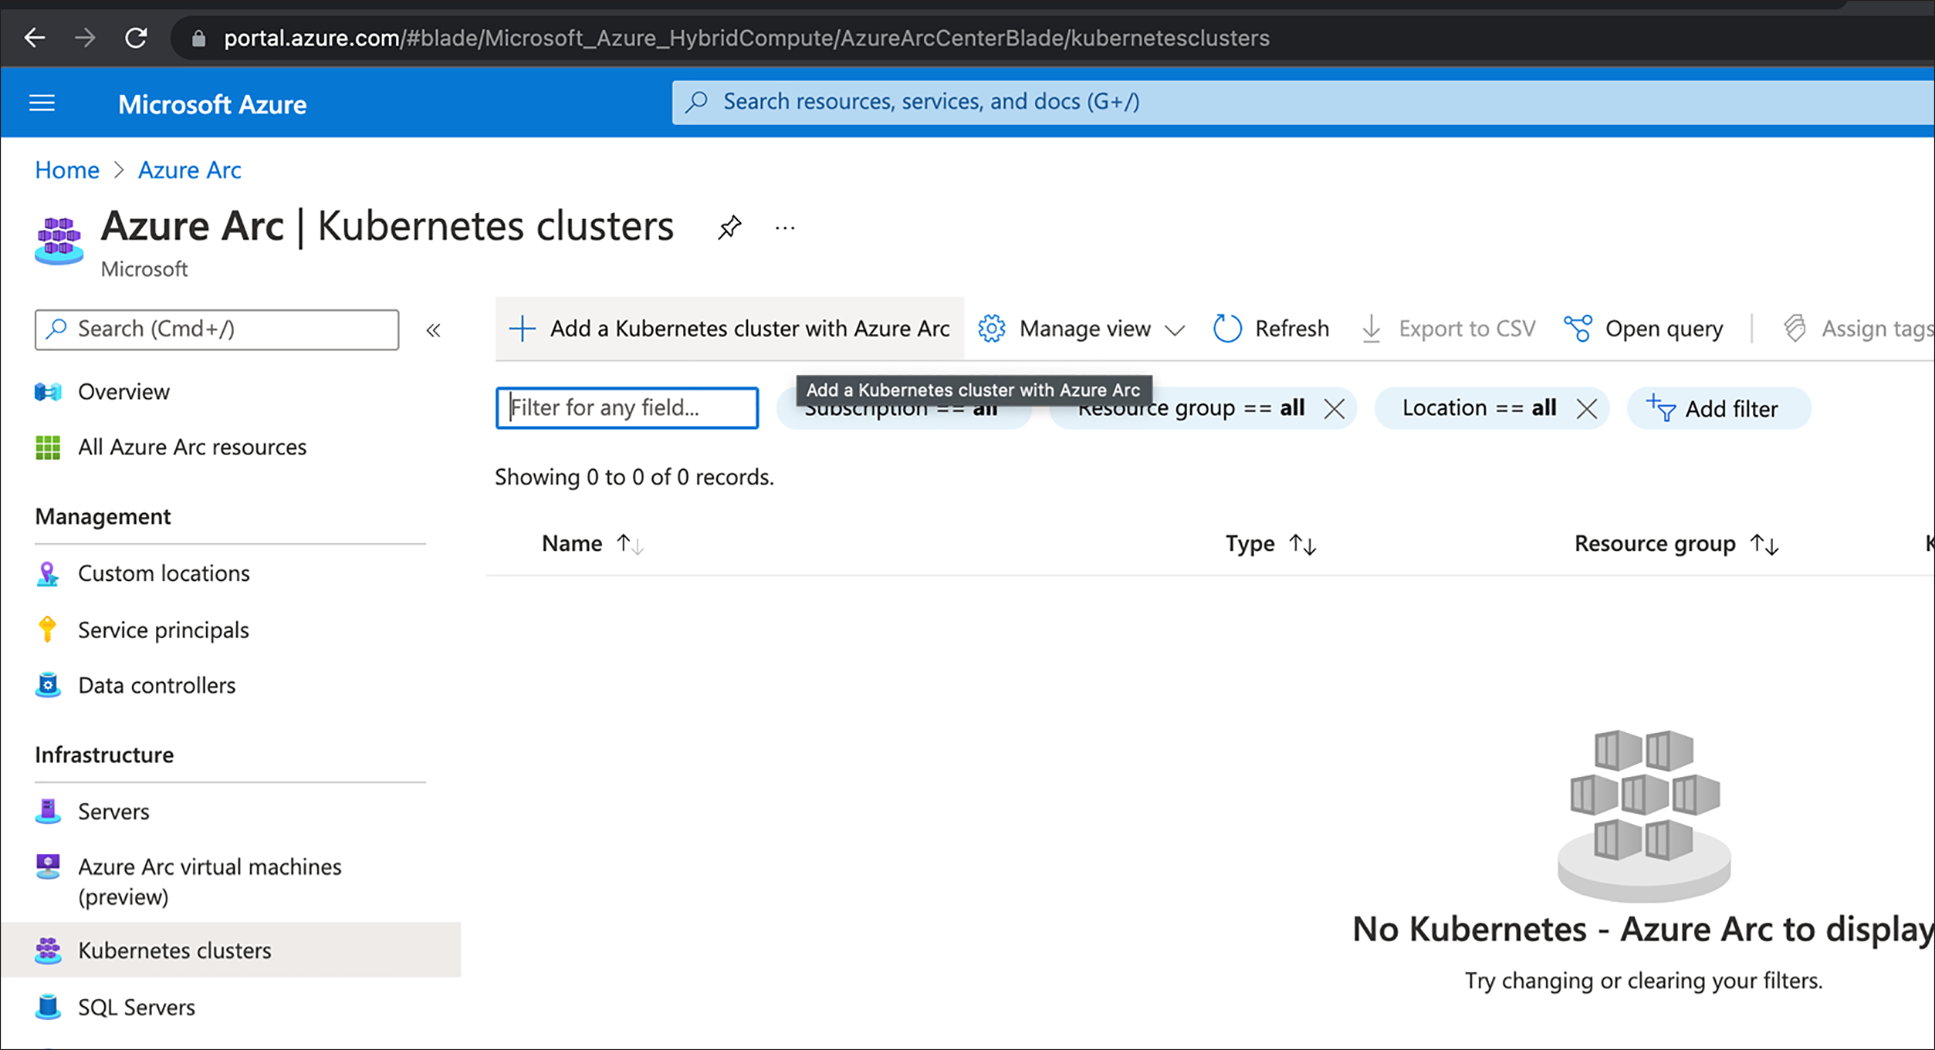
2. In the Azure Arc page, select “Kubernetes clusters” from under the Infrastructure section and click on “Add a Kubernetes cluster with Azure Arc”.
3. In the prerequisites page, make sure they are fulfilled before adding the cluster to Azure Arc and click Next.
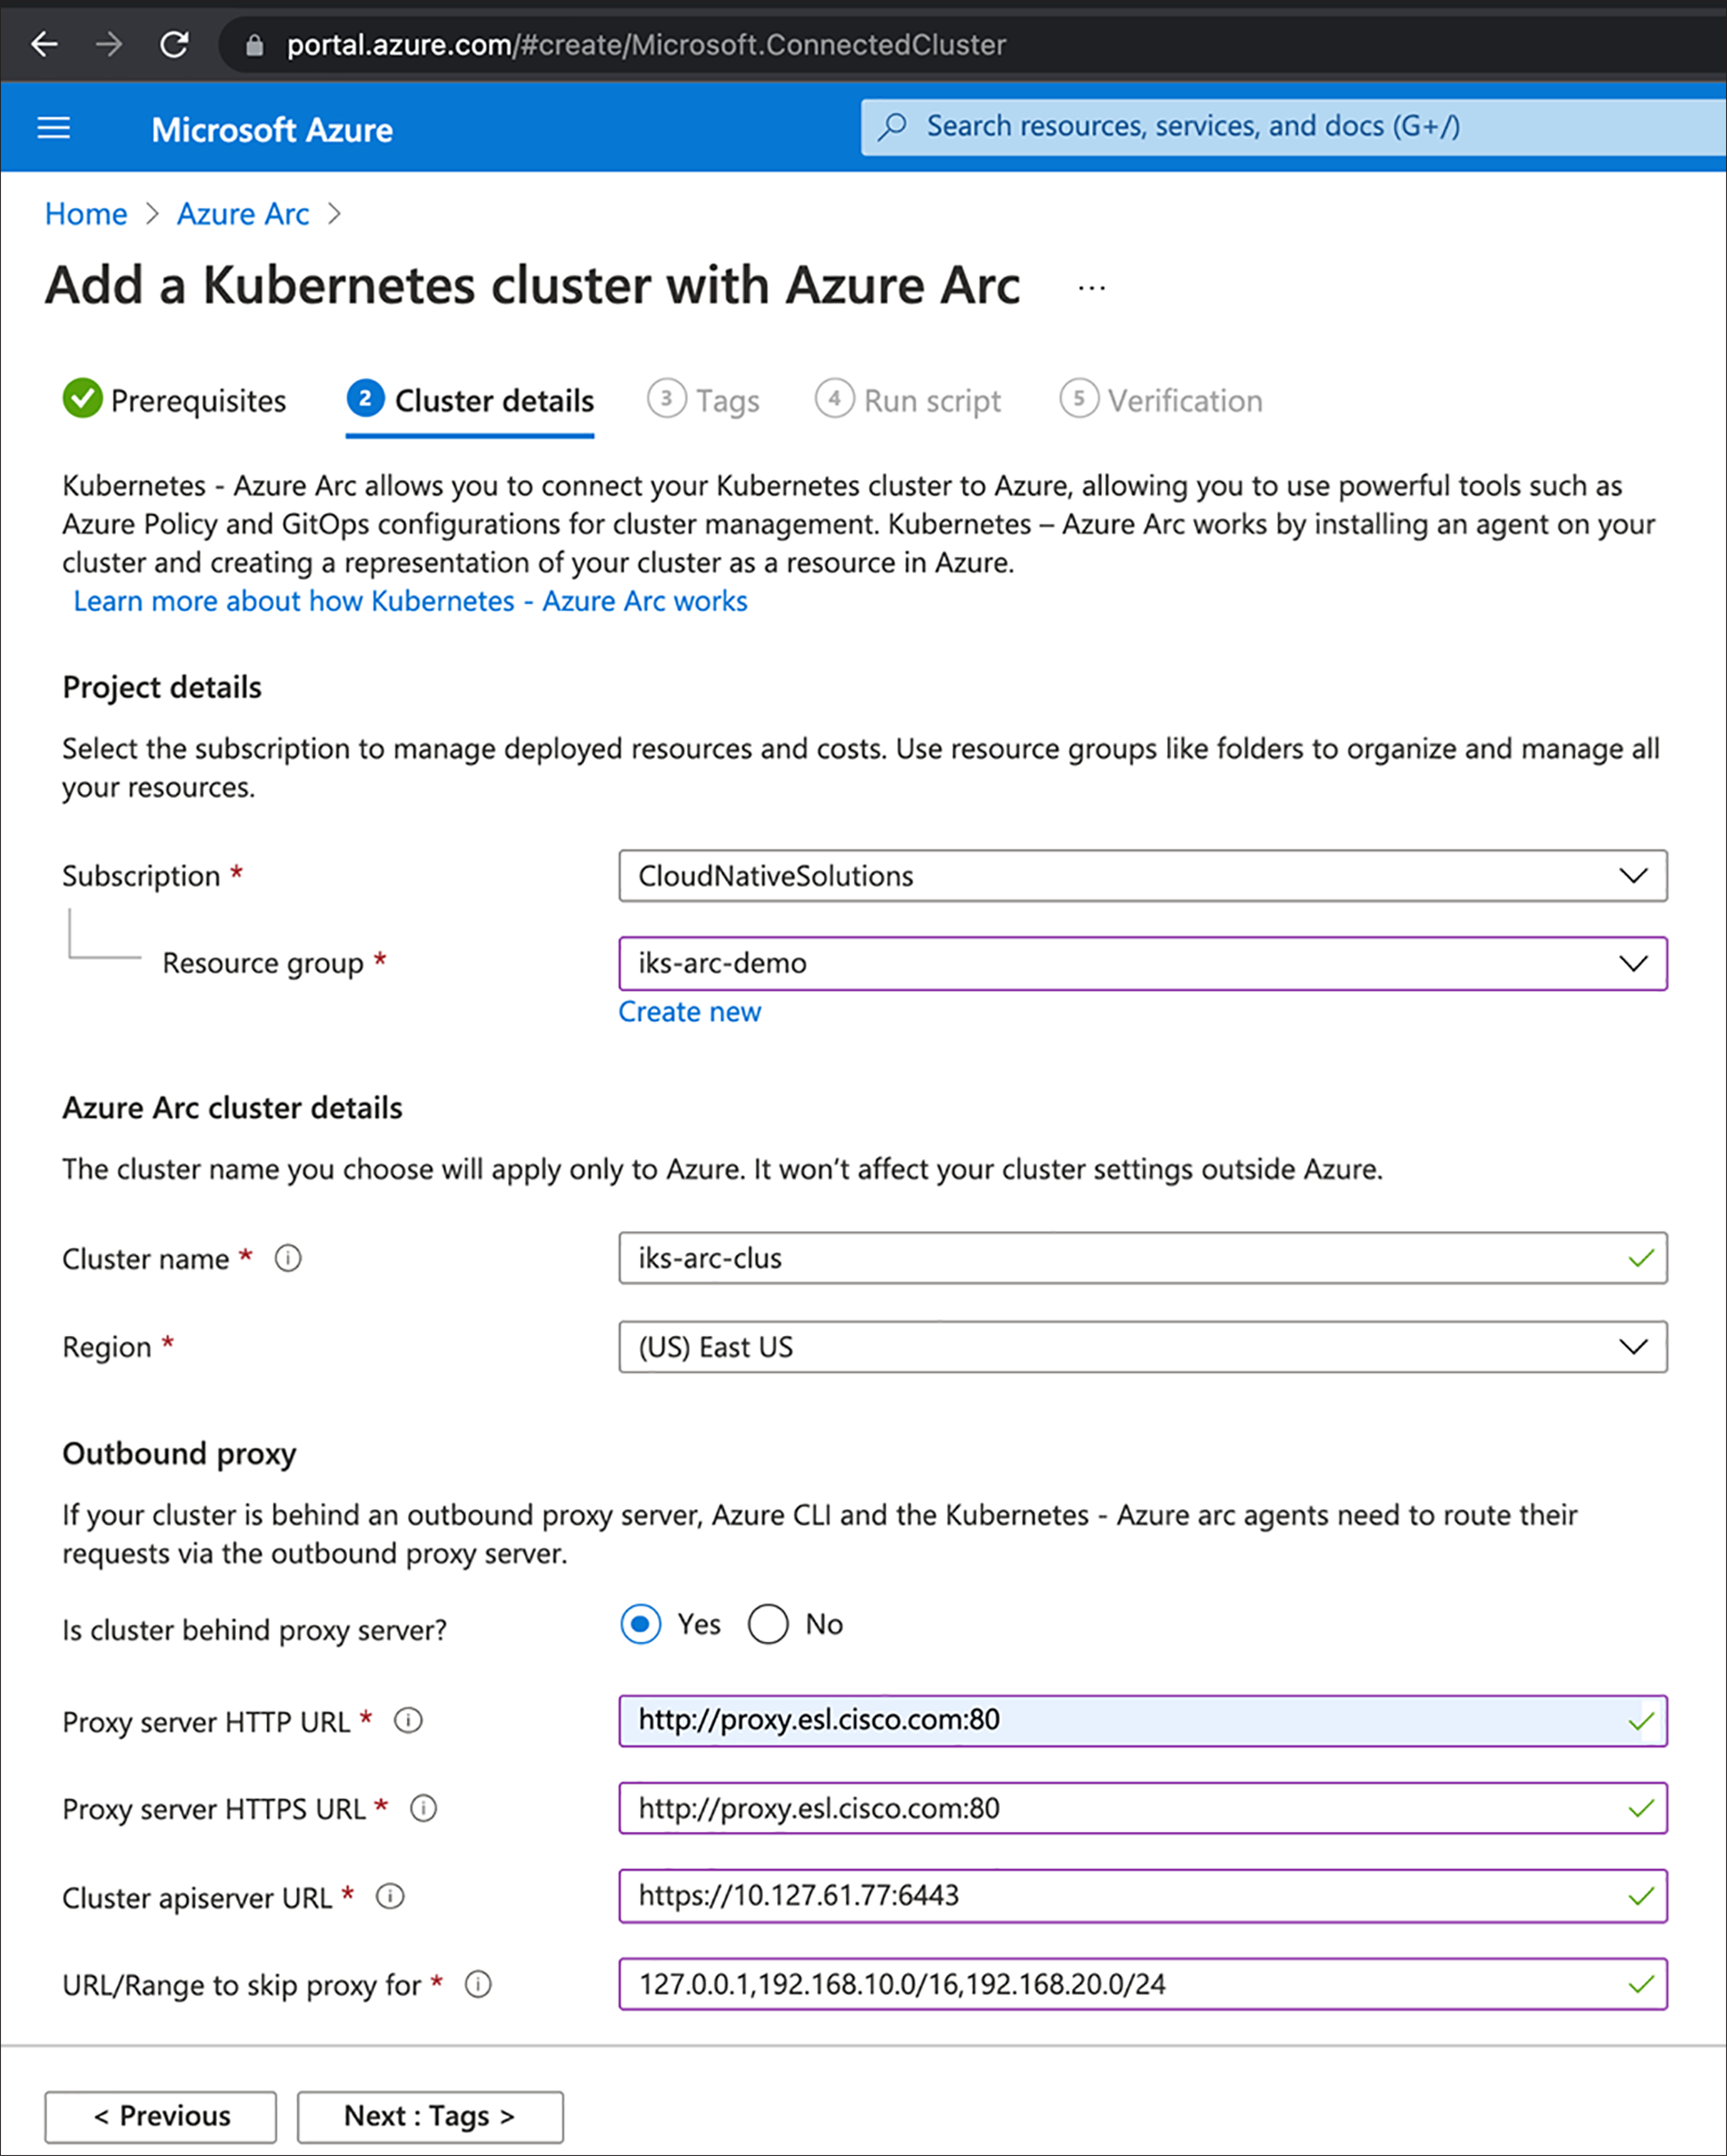
4. In the Cluster details page, select and fill the details as shown in the below figure and click Next.
5. This step is optional. However, you can create/assign tags and click Next.
6. Click on the “Download.sh” tab to download the script to your local machine with prerequisites installed.
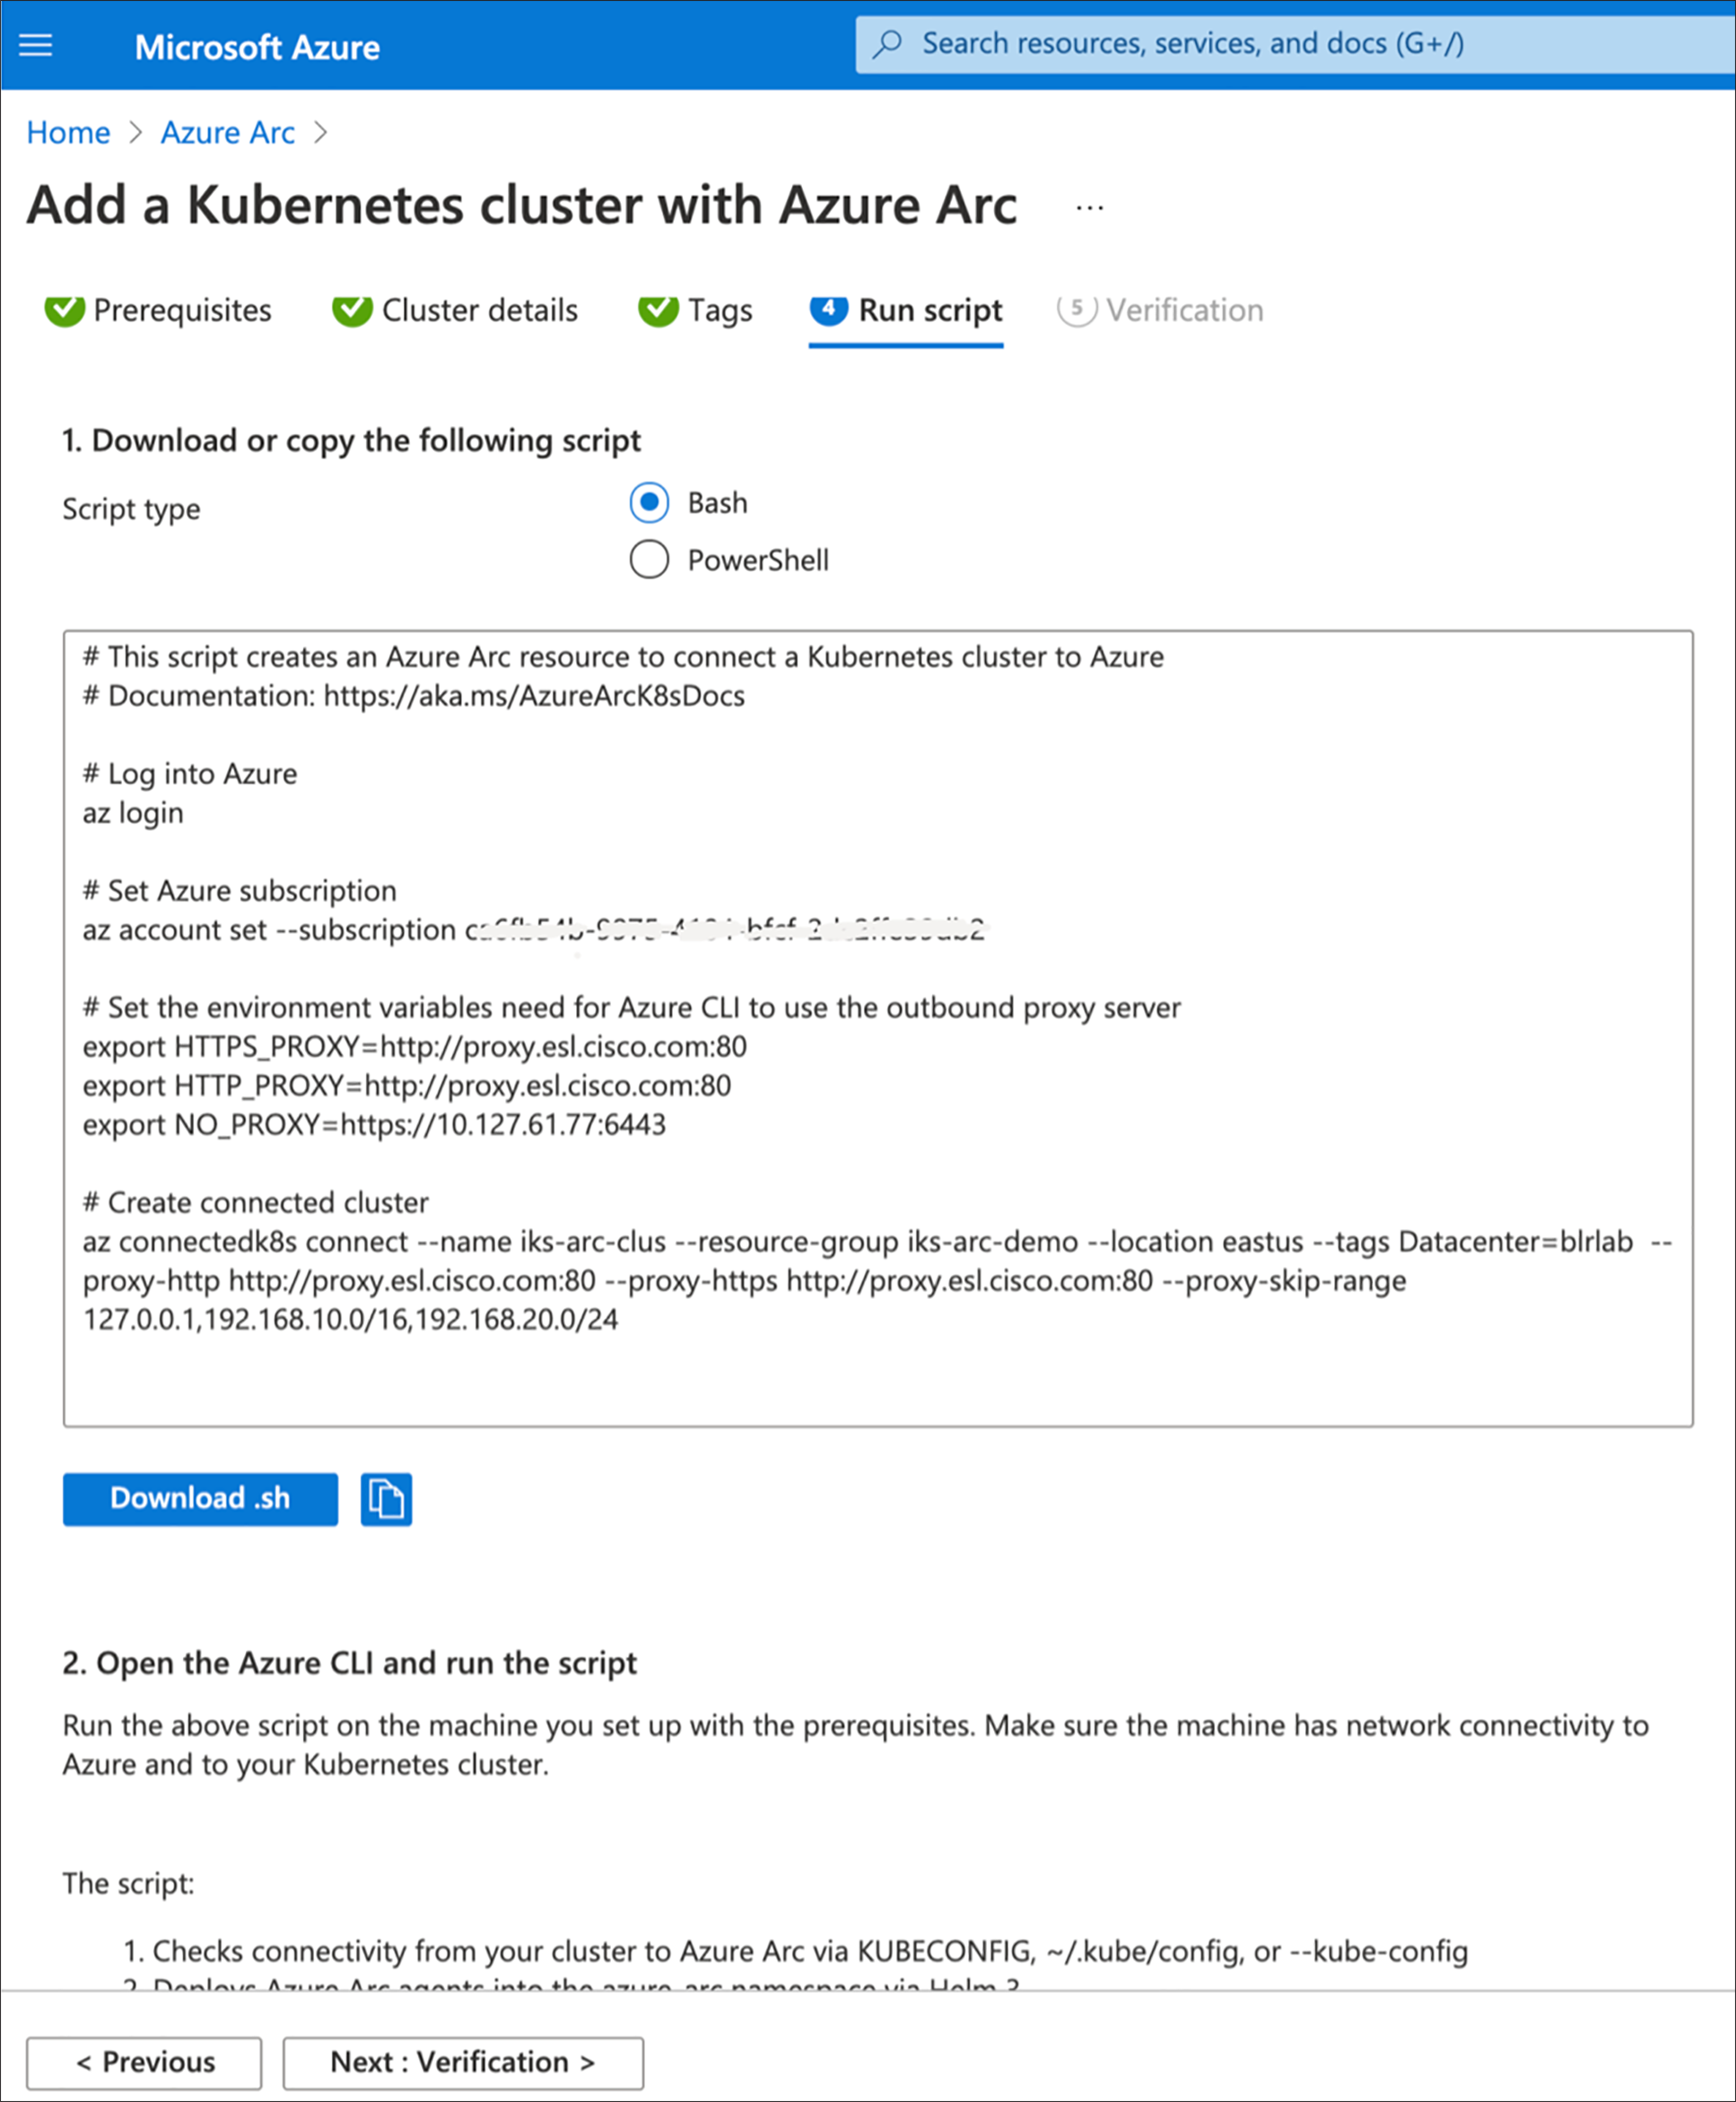
7. To make the downloaded file executable, enter the below command on your local machine installed with the prerequisites
> chmod +x Download.sh
![]()
8. Run the script and as mentioned open the page in a web browser and sign in with the code to authenticate.
> ./Download.sh

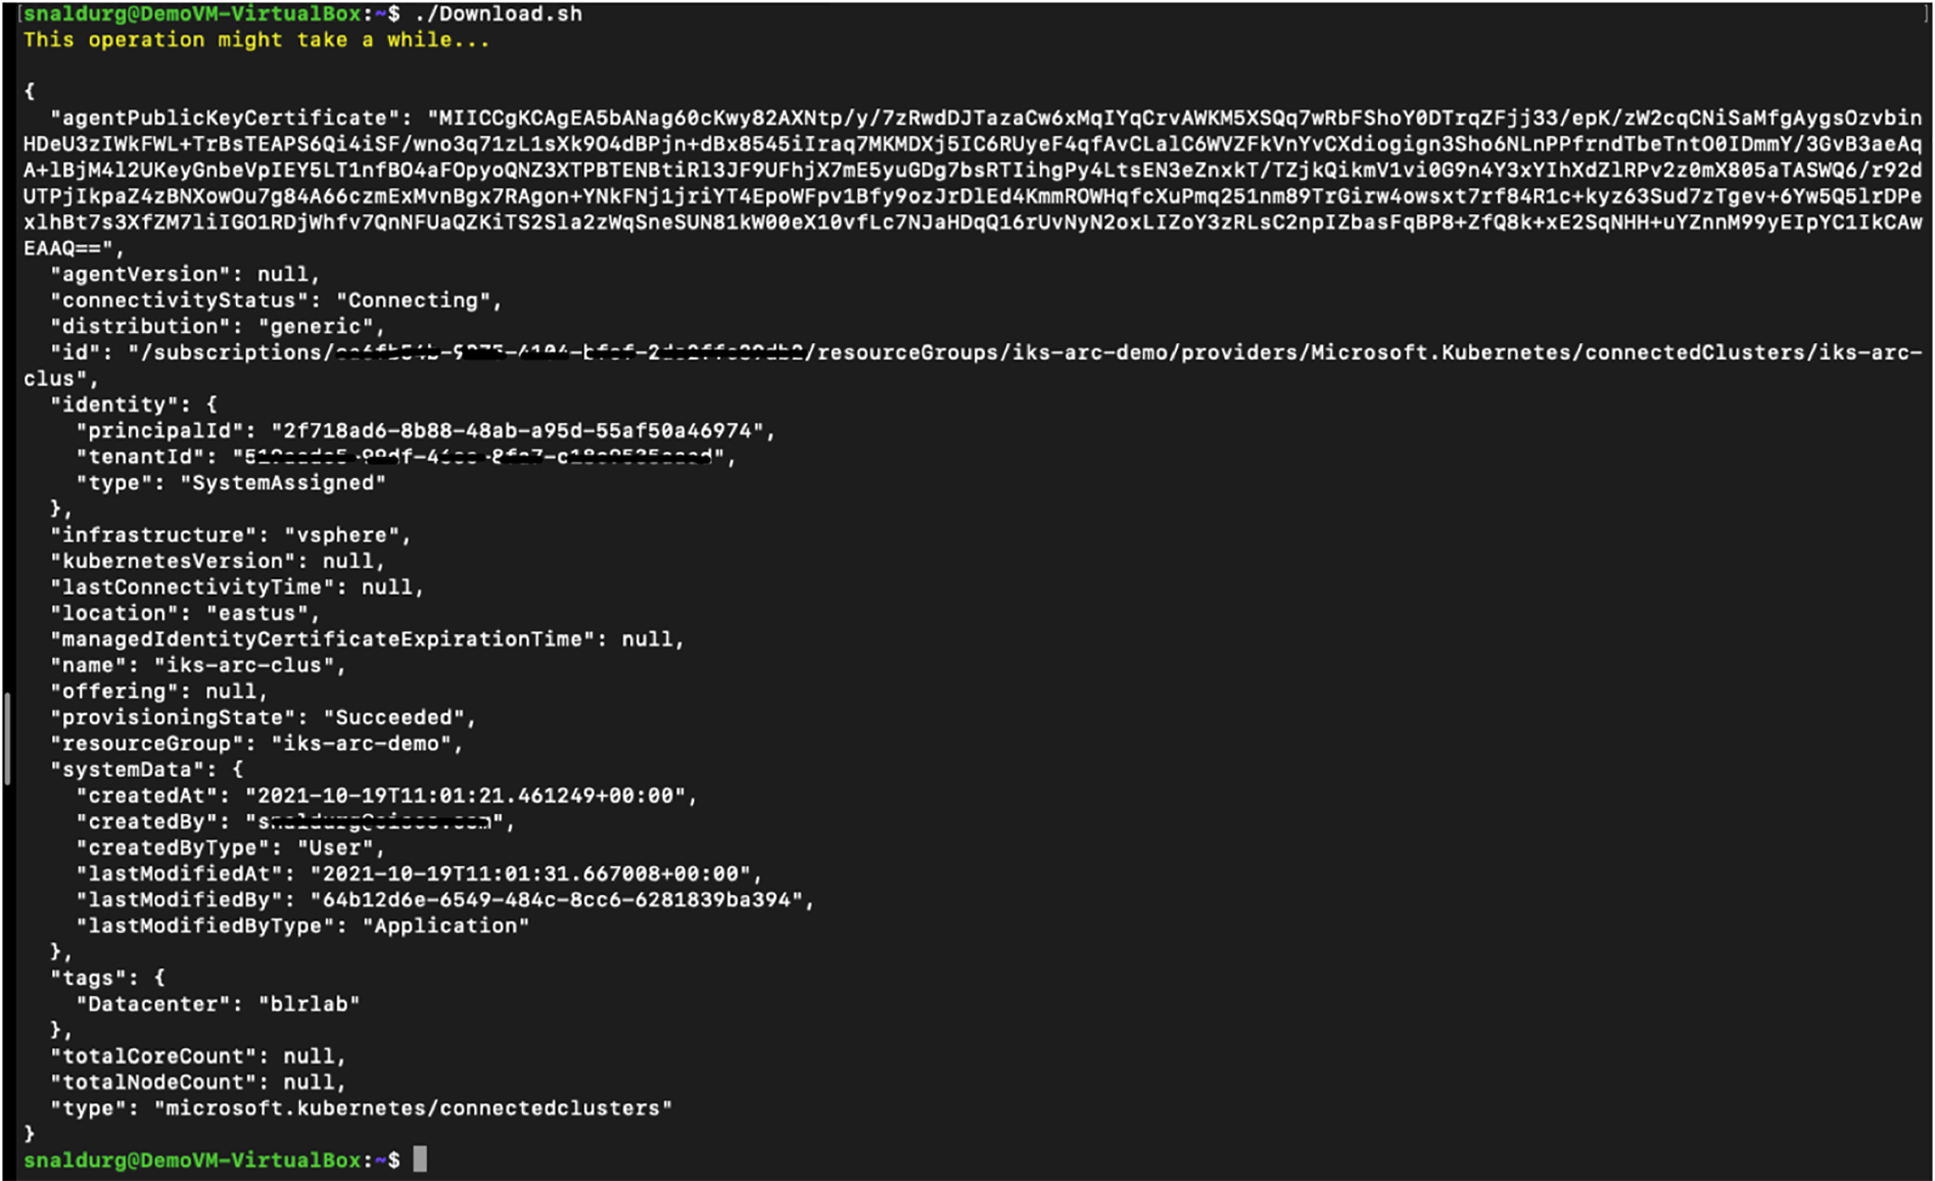
9. Select an Azure account to complete the sign in for the script execution to complete. The below figure shows the output of a successful script execution.
10. Verify the cluster connection using the command below:
> az connectedk8s list --resource-group <Resource Group Name> --output table

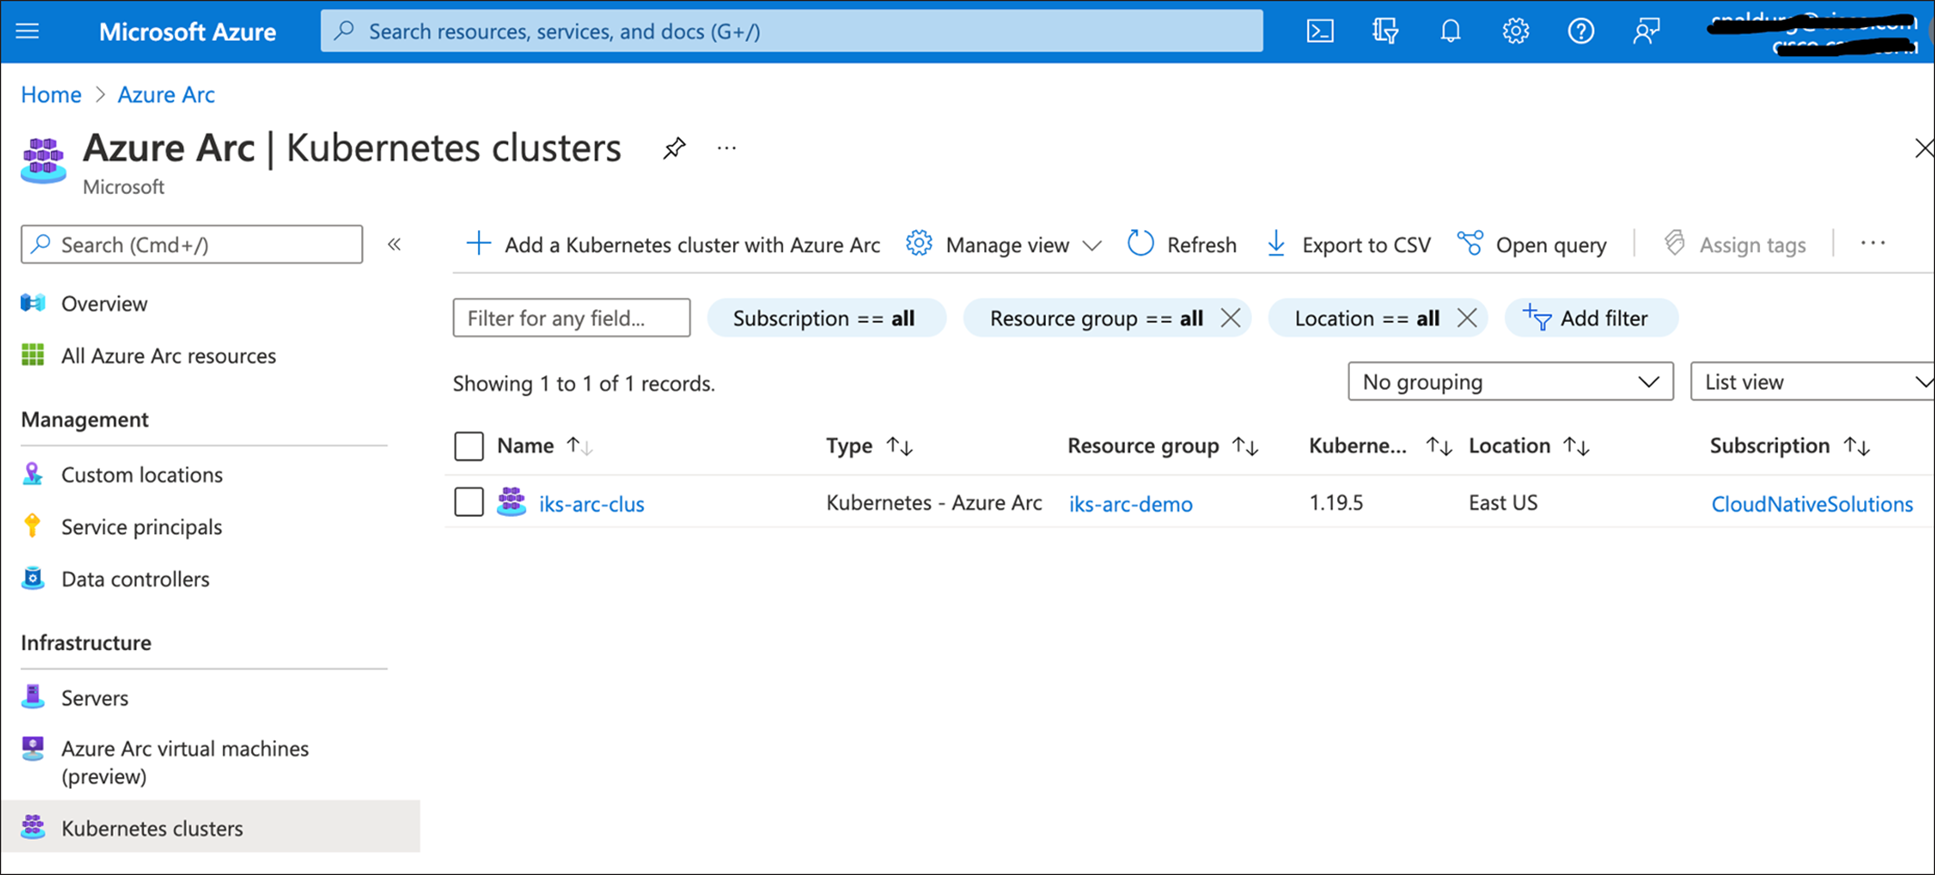
11. You can also view the cluster connection listed in the Azure portal by searching for Azure Arc services.
12. View the Azure Arc agents deployed on the Kubernetes cluster using the command below:
> kubectl get deployments,pods -n azure-arc
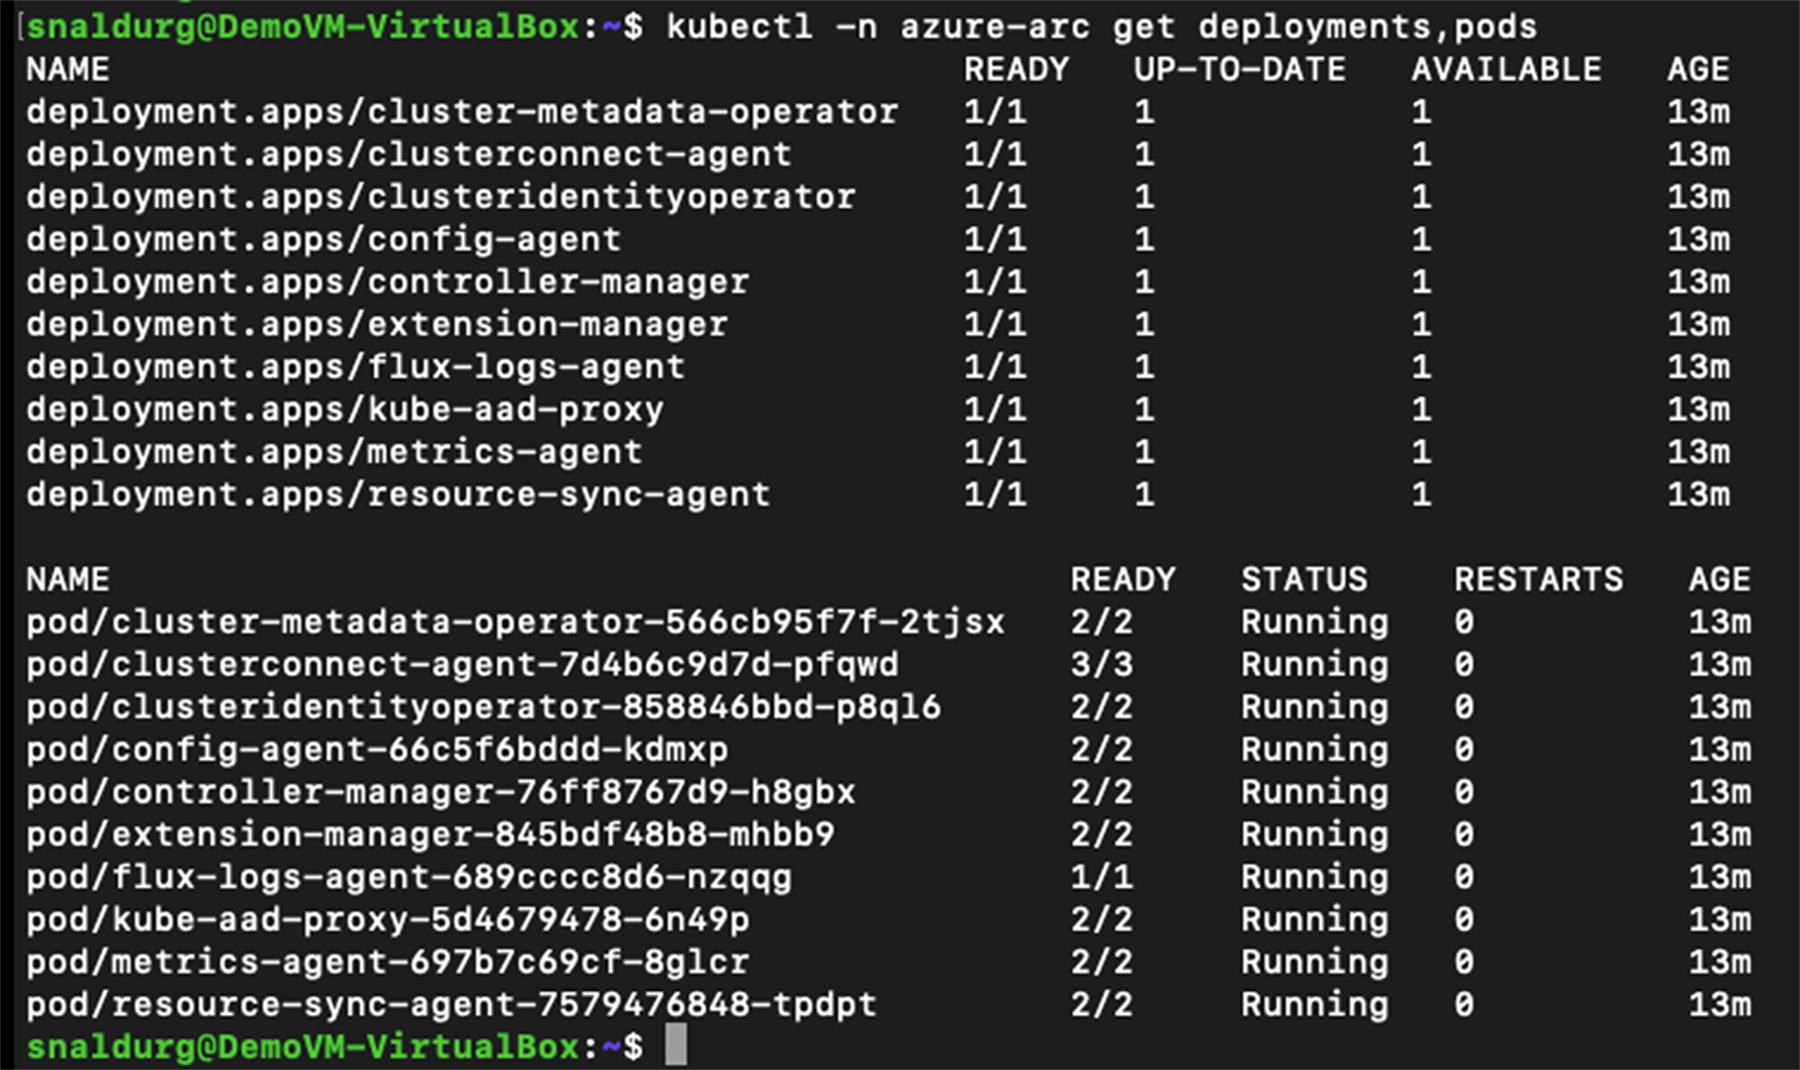
13. Verify the Azure Arc helm status using the command below:
> helm --namespace default status azure-arc

Monitor using Azure Monitor for Containers
Azure Monitor Container Insights for Azure Arc-enabled Kubernetes clusters provides rich monitoring experience for Azure Arc–enabled Kubernetes clusters. The container insights feature enables you to understand the performance and health of your Kubernetes cluster and the container workloads.
Follow the below steps to configure Azure Monitor for containers from the Azure Arc-enabled Kubernetes resource blade:
1. In the Azure portal, select the Azure Arc-enabled Kubernetes cluster that you wish to monitor.
2. Select the “Insights” item under the “Monitoring” section of the resource blade.
3. On the onboarding page, select the “Configure Azure Monitor” button.
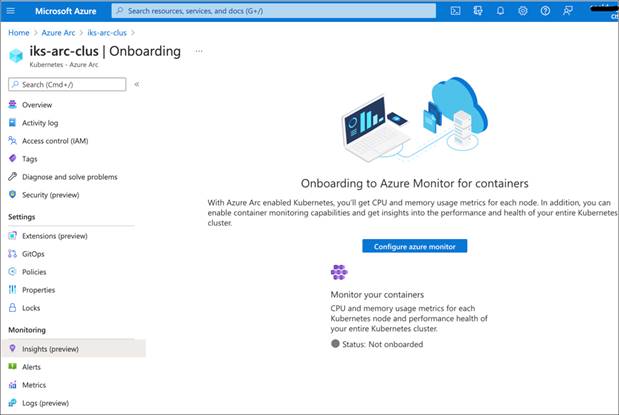
4. You can now choose the Log Analytics workspace to send your metrics and logs data to.
5. Select the “Configure” button to deploy the Azure Monitor Container Insights cluster extension.
6. Insights under the Monitoring section provides insights on cluster, reports, nodes, controllers and containers. For example, the below figures shows insights of the cluster, nodes and deployment reports.
You can access container insights in two ways from the Azure portal: from Azure Monitor or directly from the Azure Arc–enabled Kubernetes cluster.
For example, the figure below shows some key performance metrics of your cluster. To access this page, navigate to Home > Azure Arc > Kubernetes Cluster > Monitoring > Insights, and click on the Cluster tab.
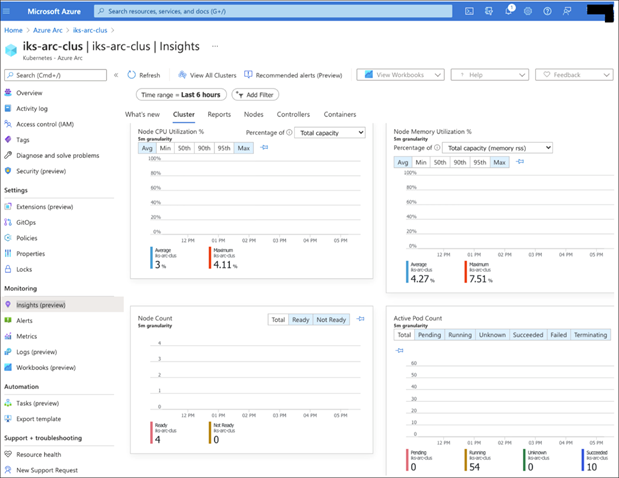
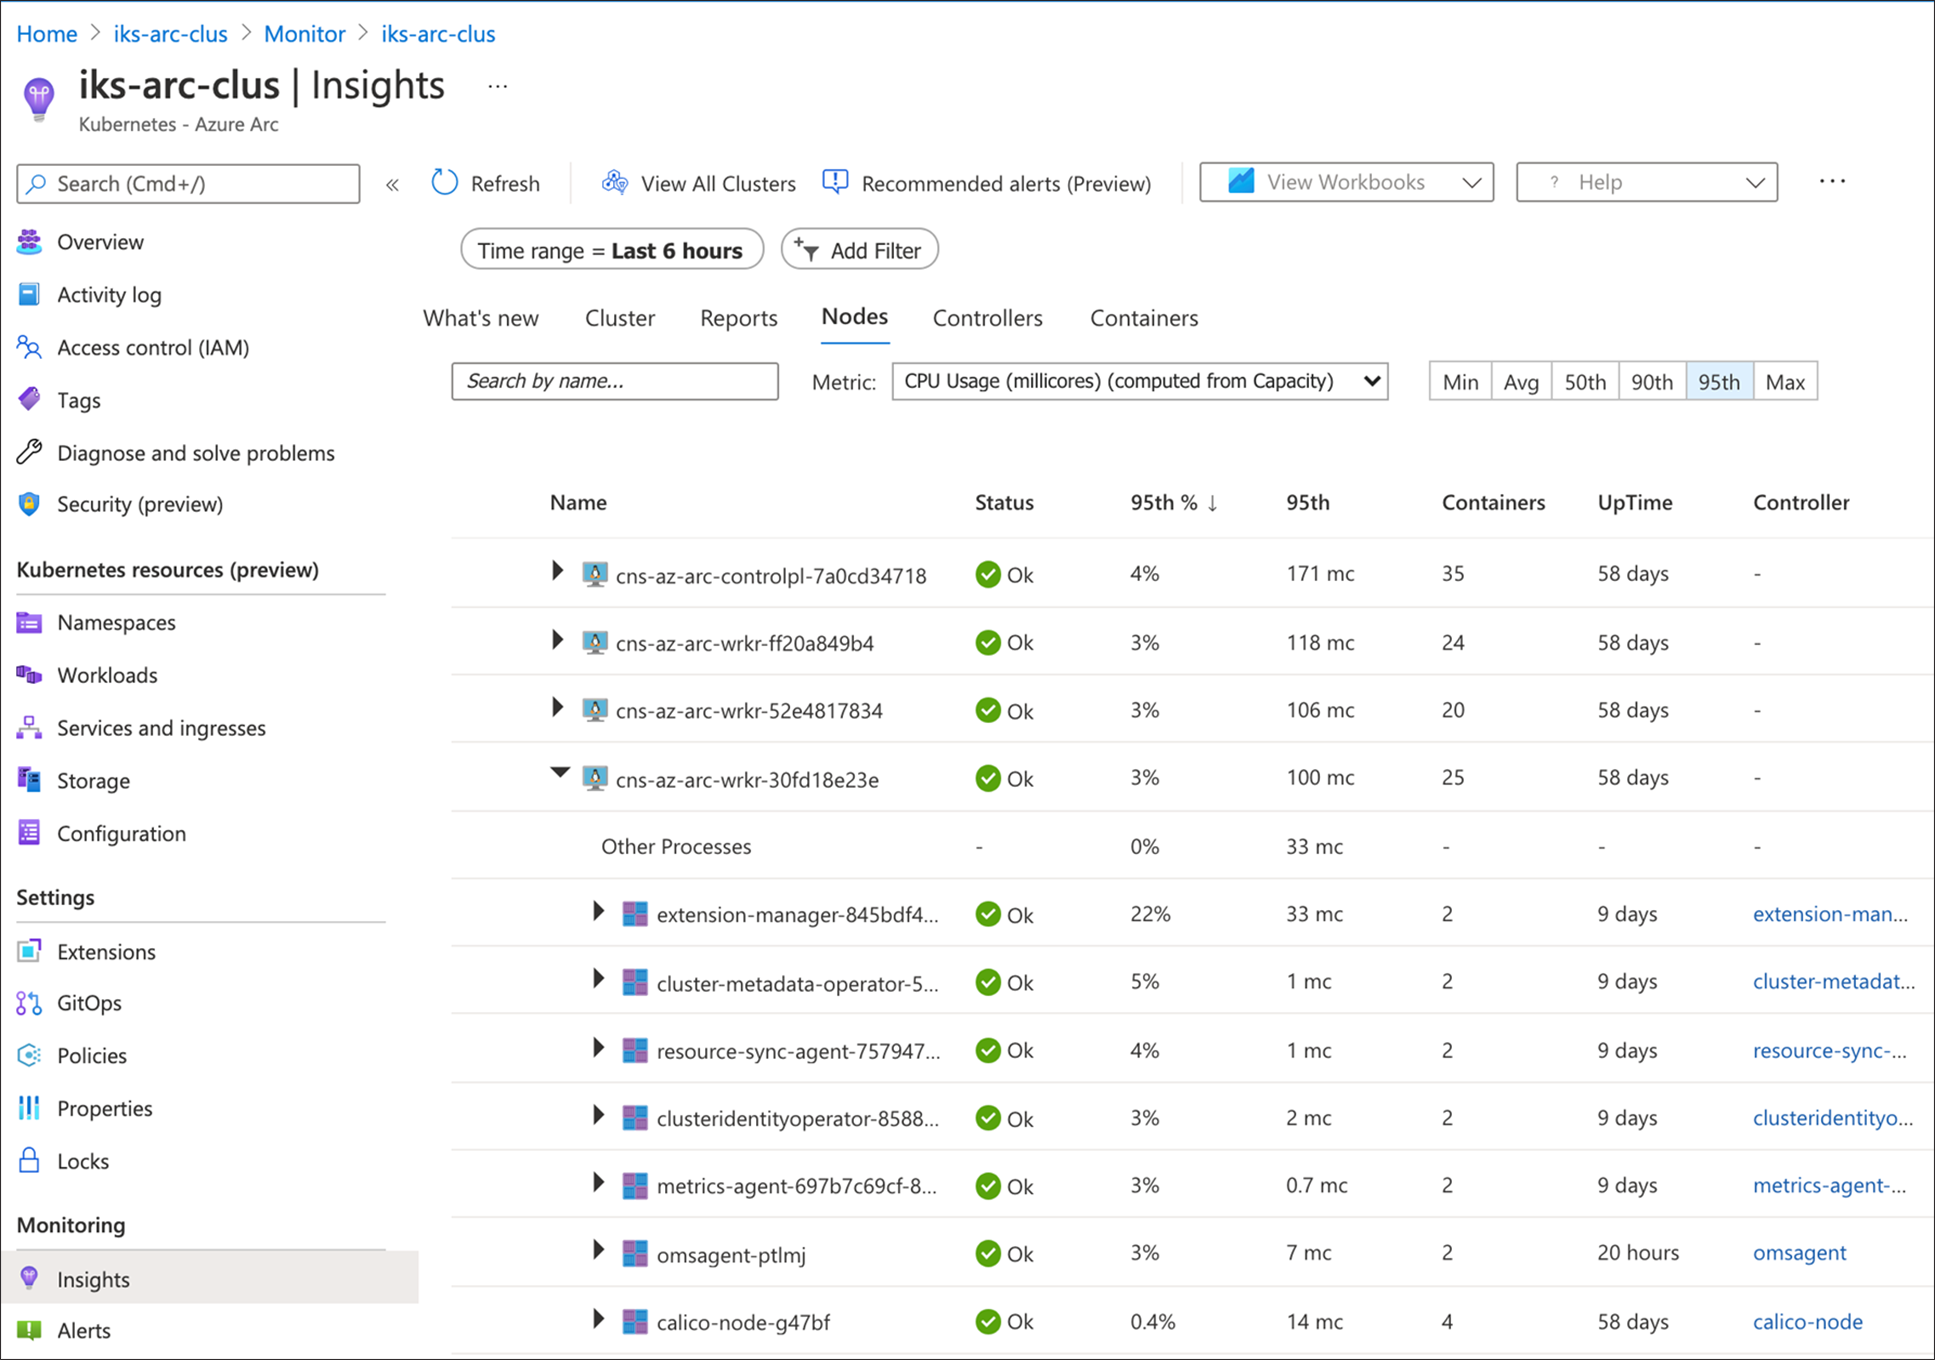
You can switch to other tabs to display and analyse the health of nodes, controllers, and containers. The figure below shows the status and performance metrics of cluster nodes. You can expand the objects by clicking on the arrow button; selecting an object shows its properties on the right-side of the pane.
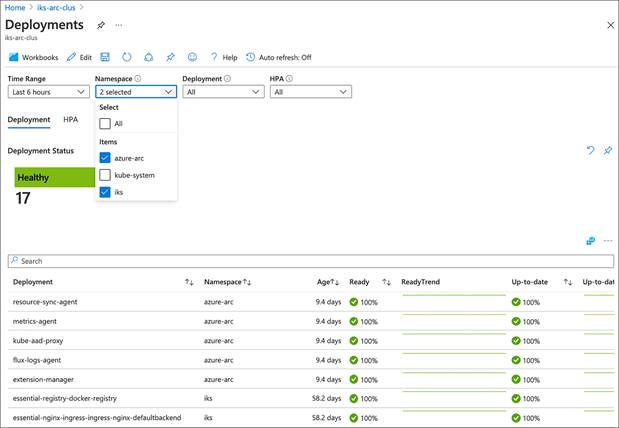
Reports in container insights have some recommended out-of-the-box Azure workbooks. For example, the figure below shows the status and health of the deployments by navigating to Reports > Resource Monitoring workbooks and clicking on Deployments. You can also create a custom workbook.
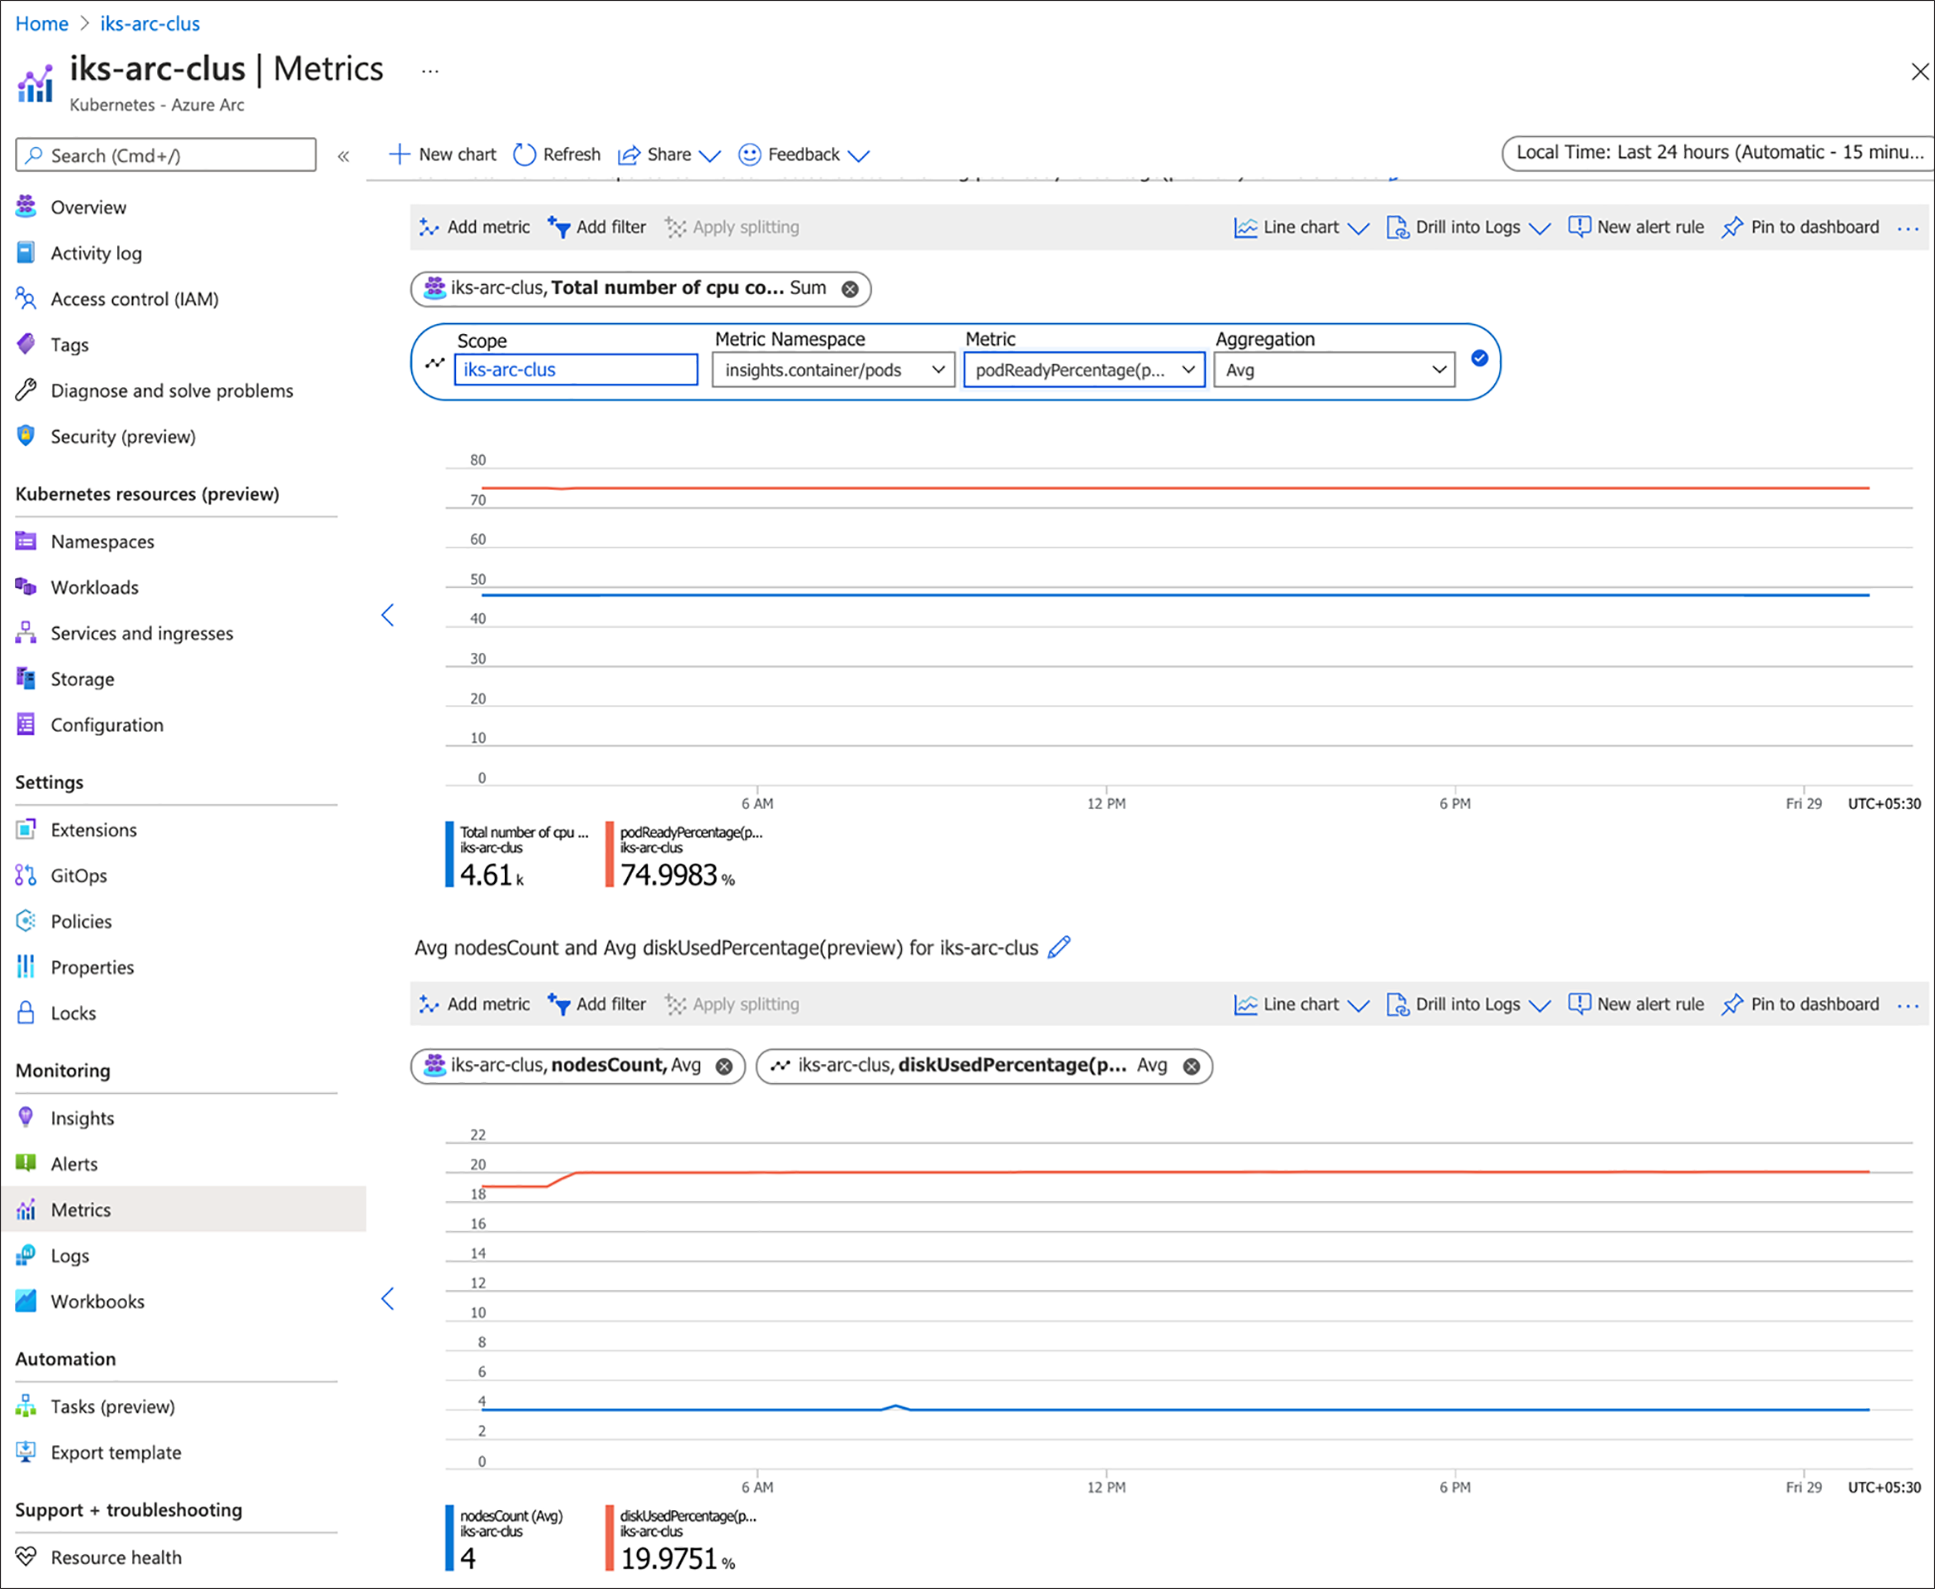
7. Azure Monitor Metrics, a feature of Azure Monitor, collects numeric data at regular intervals from resources into a time series database. You can use this feature to analyse, alert, visualize, automate, retrieve, export, and archive based on the data collected. The figure below shows some of the metrics for the connected Kubernetes cluster:
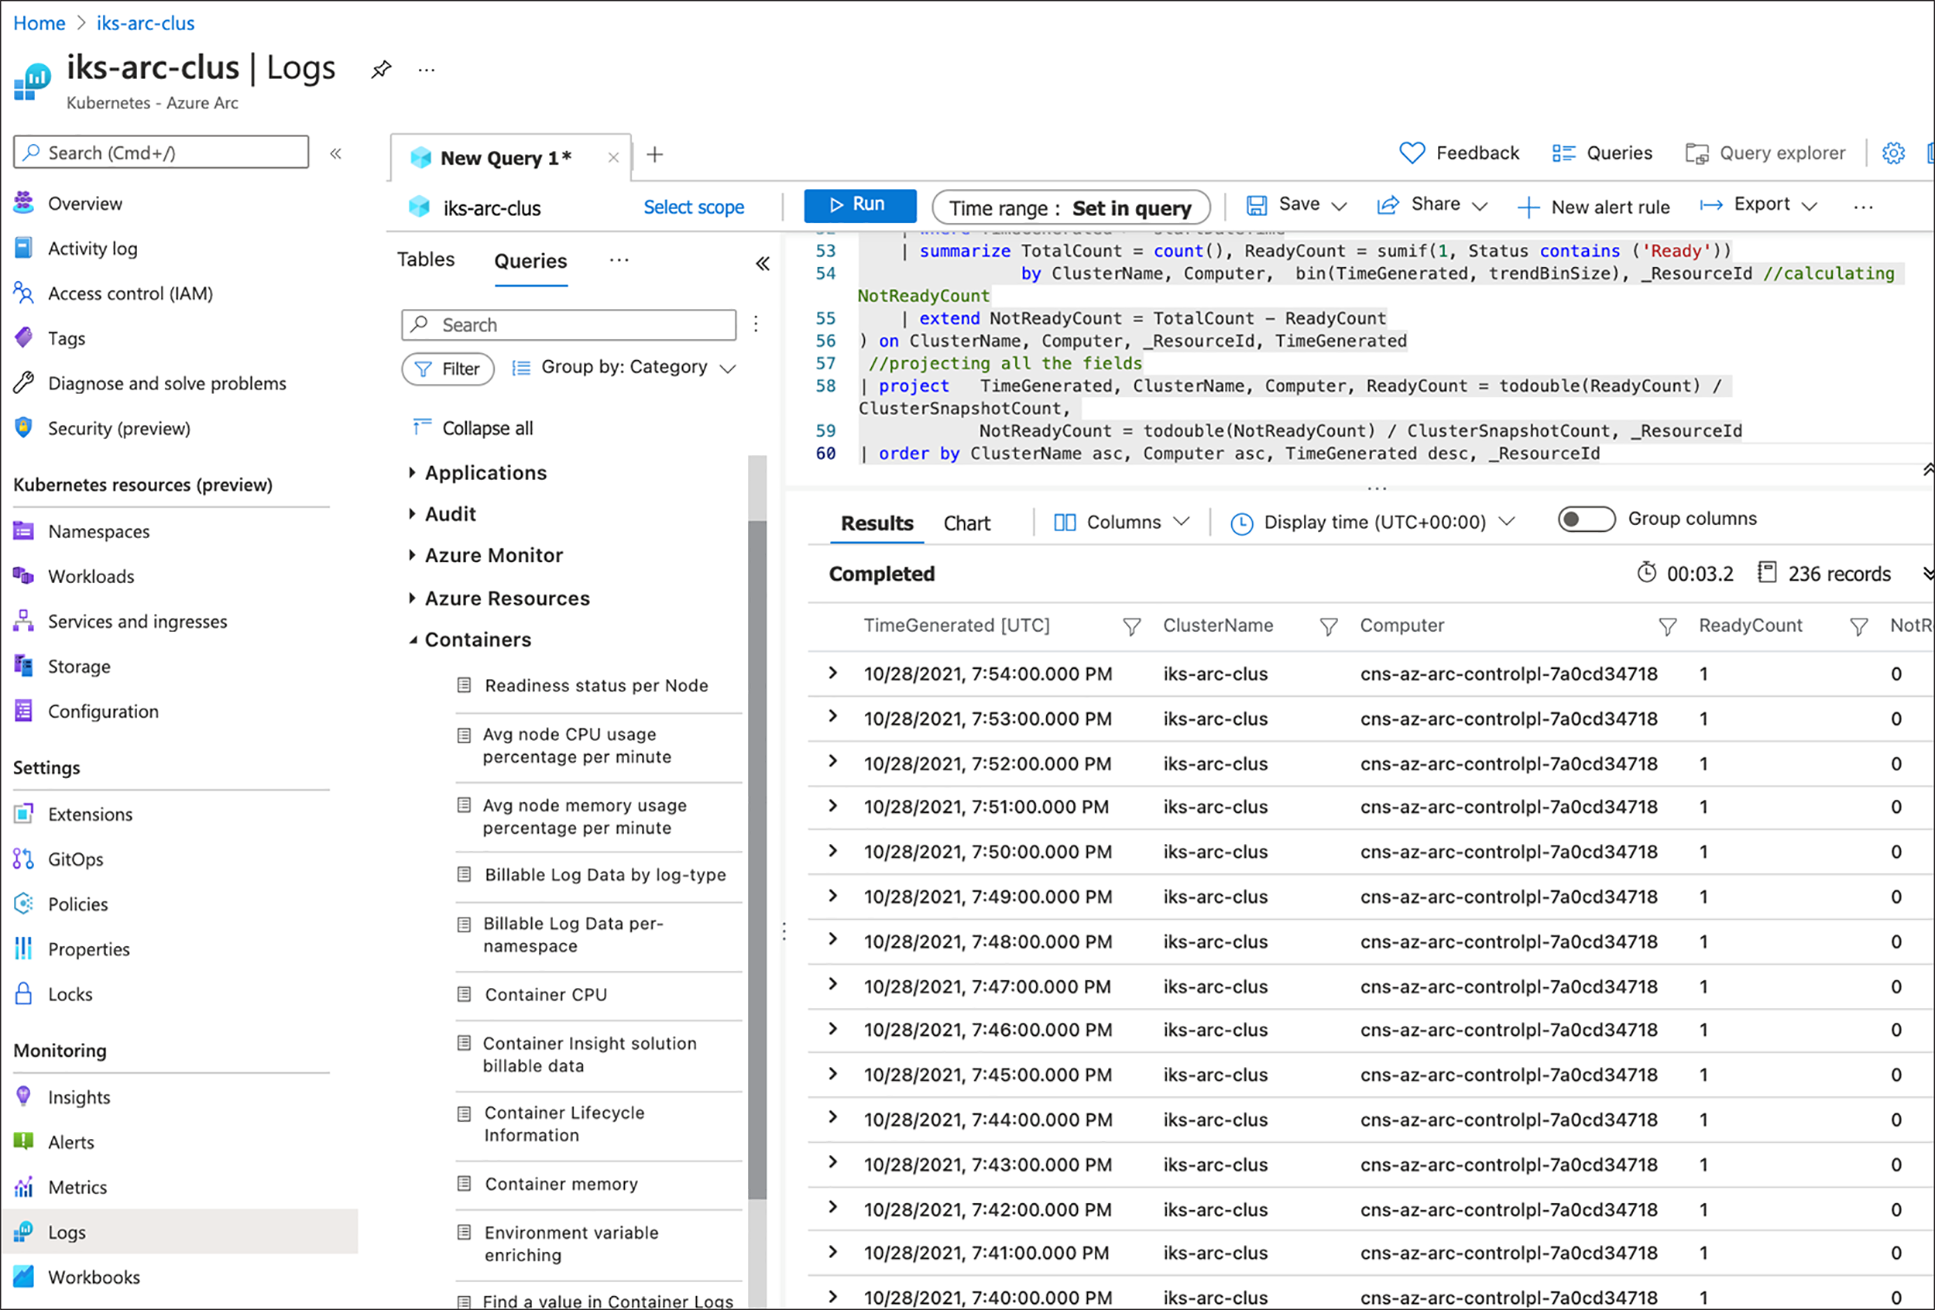
8. Azure Monitor Logs is another feature of Azure Monitor that collects and organises log and performance data; it allows data to be analysed using a query language. The figure below shows the logs for a container’s readiness status per node.
Deploy configurations using GitOps on an Azure Arc-enabled Kubernetes cluster
This section covers the steps to apply configurations using GitOps on Cisco IKS Azure Arc-enabled Kubernetes cluster. For this document purpose, we are using an example public repository which holds the Kubernetes resources and Helm charts that needs to be applied to the cluster. To associate a private repository with the configuration, refer this URL. The manifests in this repository provision a few namespaces, deploy workloads, and provide some team-specific configuration. Using this repository with GitOps creates the following resources on your cluster:
● Namespaces: cluster-config, team-a, team-b
● Deployment: arc-k8s-demo
● ConfigMap: team-a/endpoints
The config-agent polls Azure for new or updated configurations.
Prerequisites
● An Azure account with an active subscription.
● An existing Azure Arc-enabled Kubernetes connected cluster.
● An understanding of the benefits and architecture of this feature. Read more in Configurations and GitOps - Azure Arc-enabled Kubernetes article.
● Install the k8s-configuration Azure CLI extension of version >= 1.0.0:
> az extension add --name k8s-configuration
Deploy configurations using GitOps
1. In Azure portal, navigate to Azure Arc > Kubernetes and open a connected IKS cluster on which you want to deploy GitOps configuration.
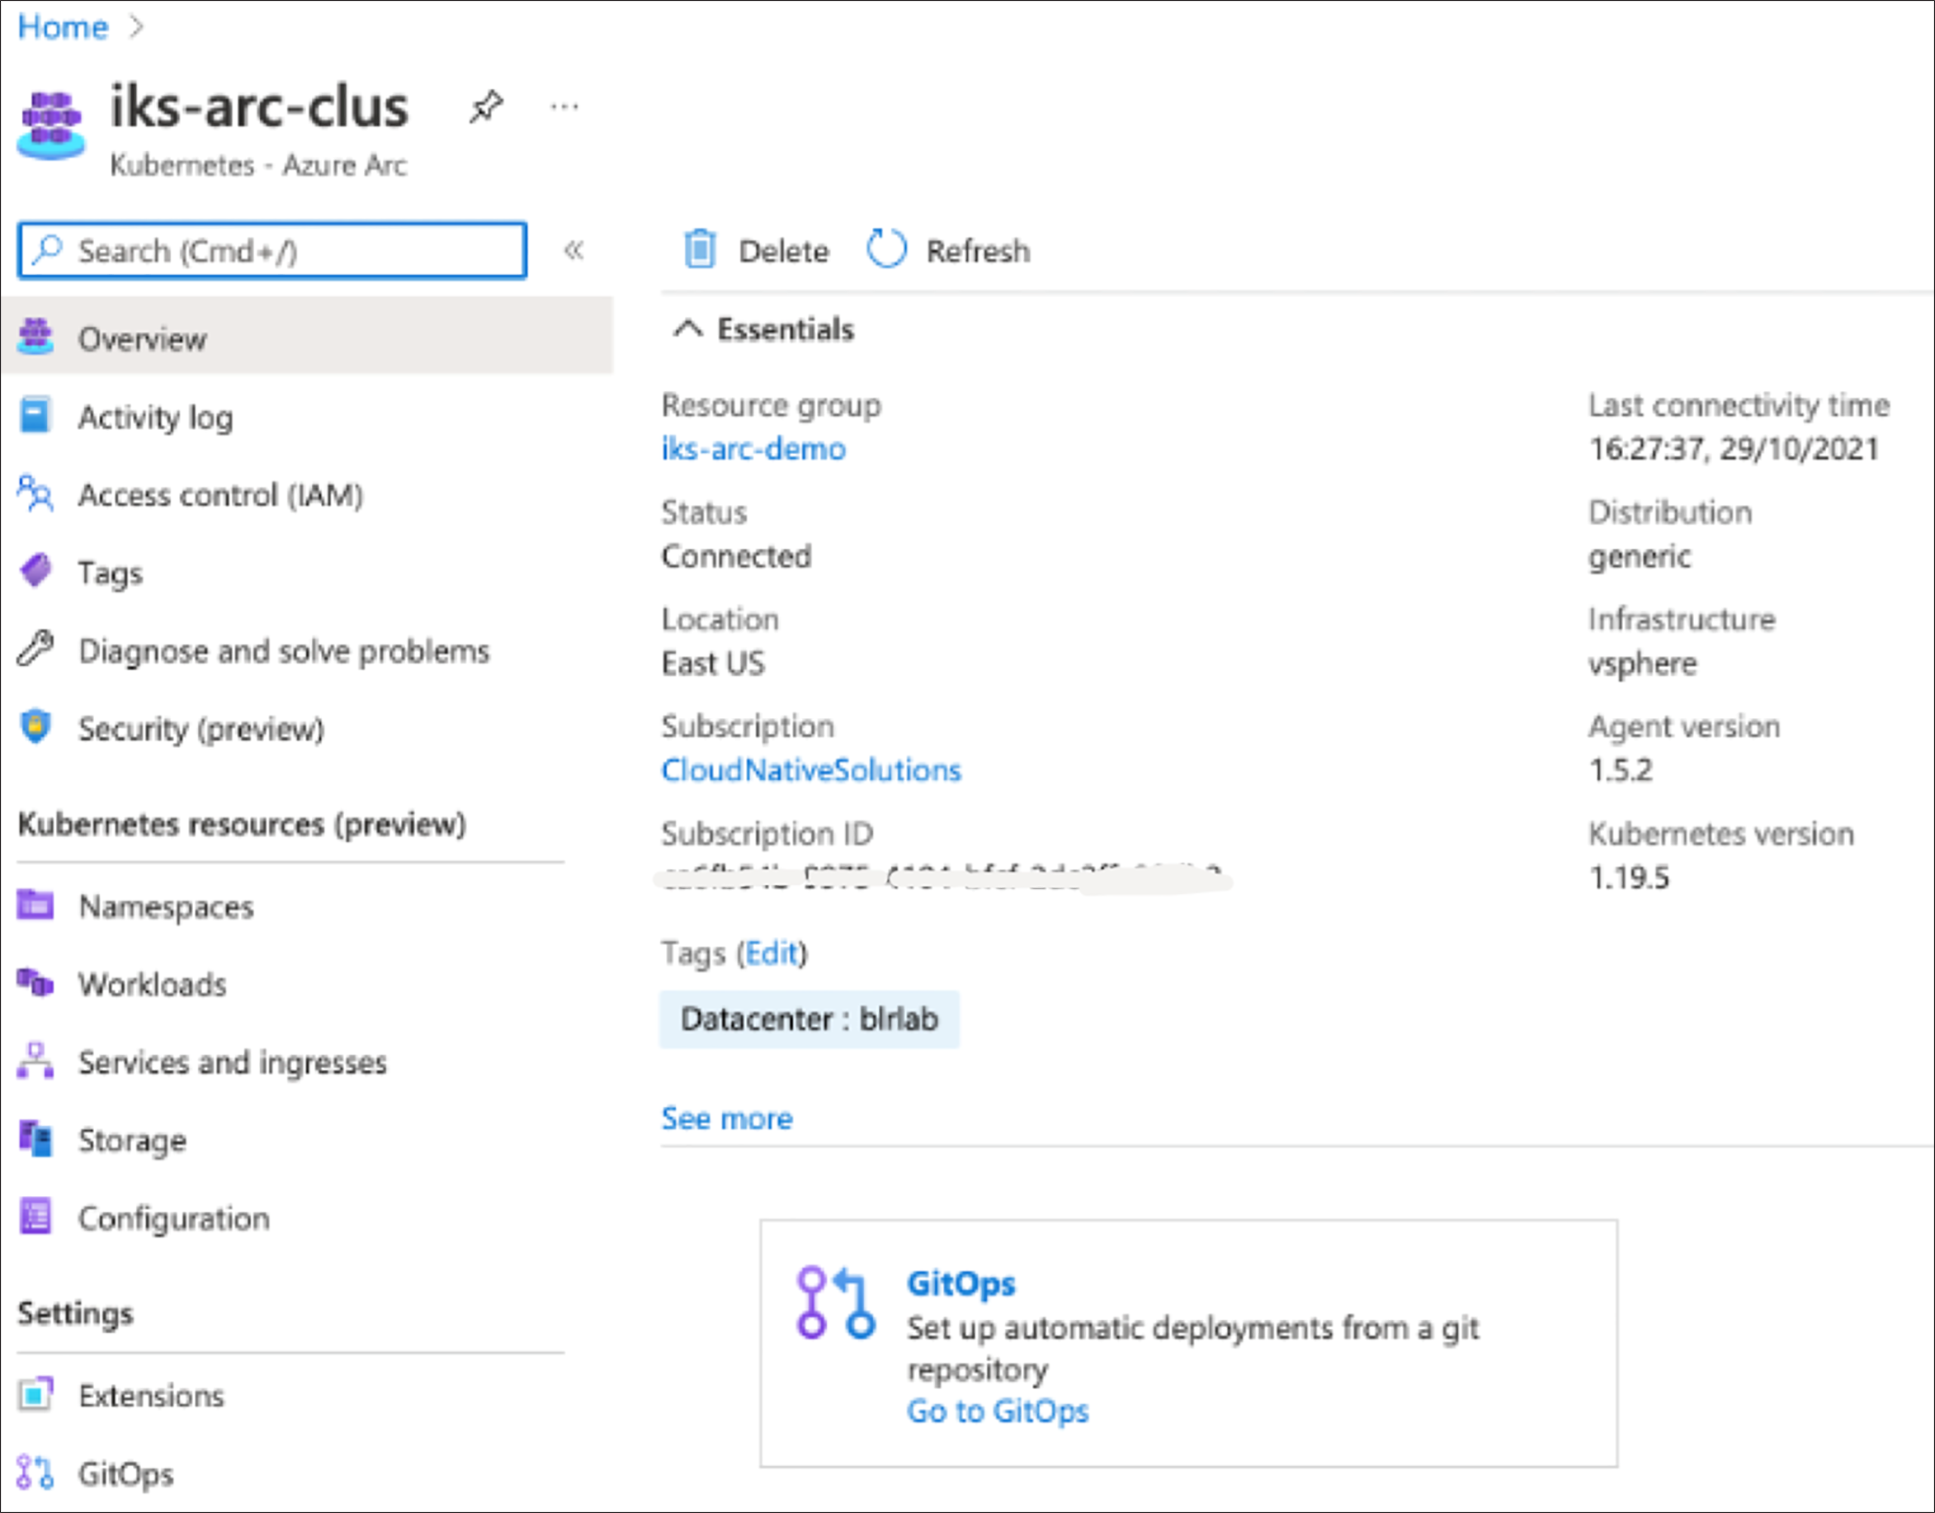
2. Click on GitOps box seen in the overview section of the cluster or you can also find it under the Settings section on the left pane.
3. Click on this github link and fork the repository. This requires the Git client to be installed on the administrator’s workstation. This is a public repository containing official cluster configuration for Azure Arc–enabled Kubernetes for demos.

4. Click on “Add Configuration,” enter the details, and provide a link to the forked repository containing the manifest files, then Click Add. The scope of the configuration can be applied either to the cluster or to a particular namespace.
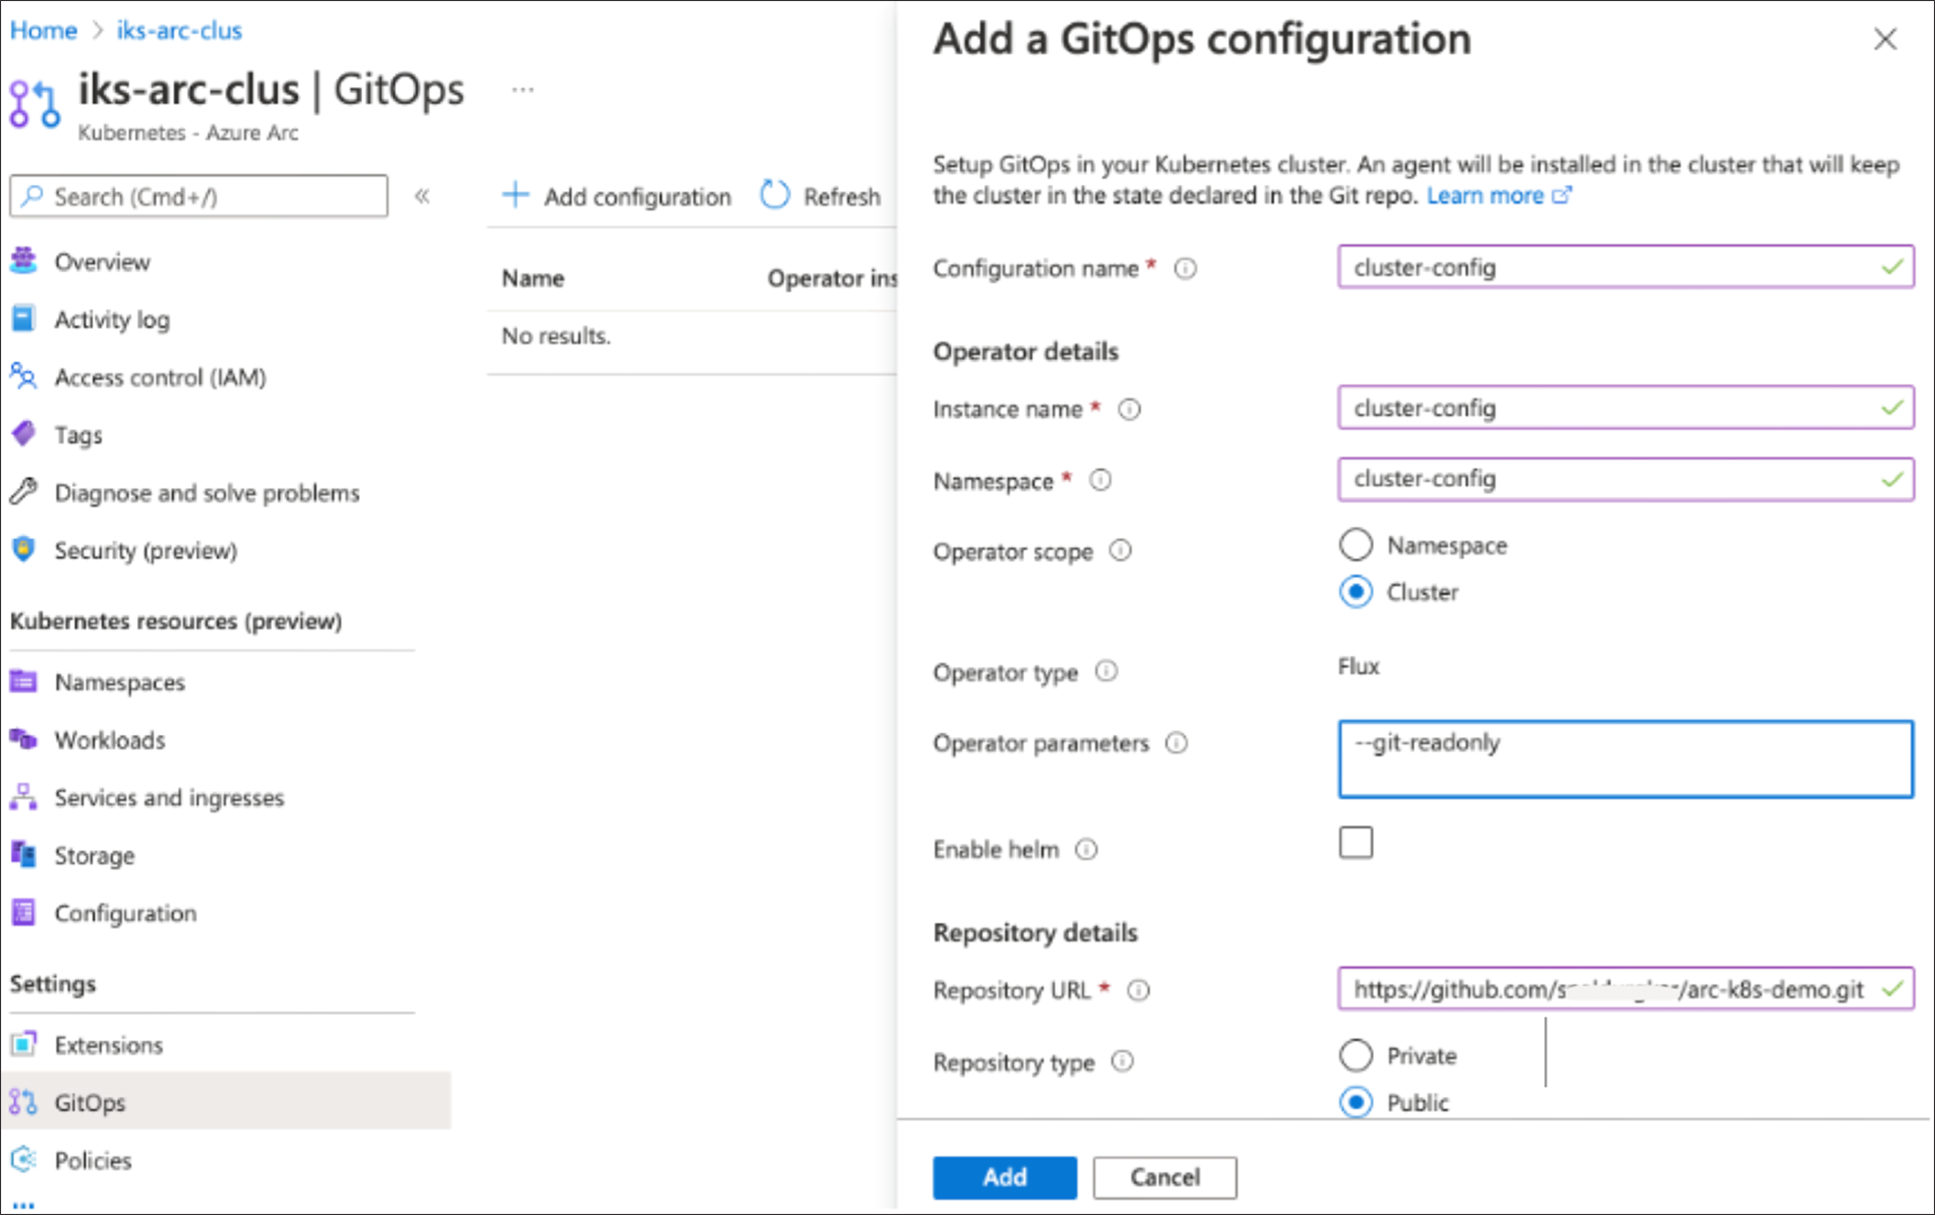
5. The Azure Arc configuration agent will notice the new configuration applied, connects the cluster to the repository and installs the Flux operator. Click on refresh to see the configuration’s operator state change from pending to installed.

6. Verify the namespaces created on the cluster after the configuration is applied
> kubectl get ns –show-labels

7. Verify the deployment created on the cluster after the configuration is applied.
> kubectl -n cluster-config get deploy -o wide
![]()
8. Verify the pods created in the default namespace after the configuration is applied. Note a single pod is deployed as per the configuration.
> kubectl get pods
![]()
9. Next open the yaml file and change the replica set number from one to three in the repository and commit the changes.
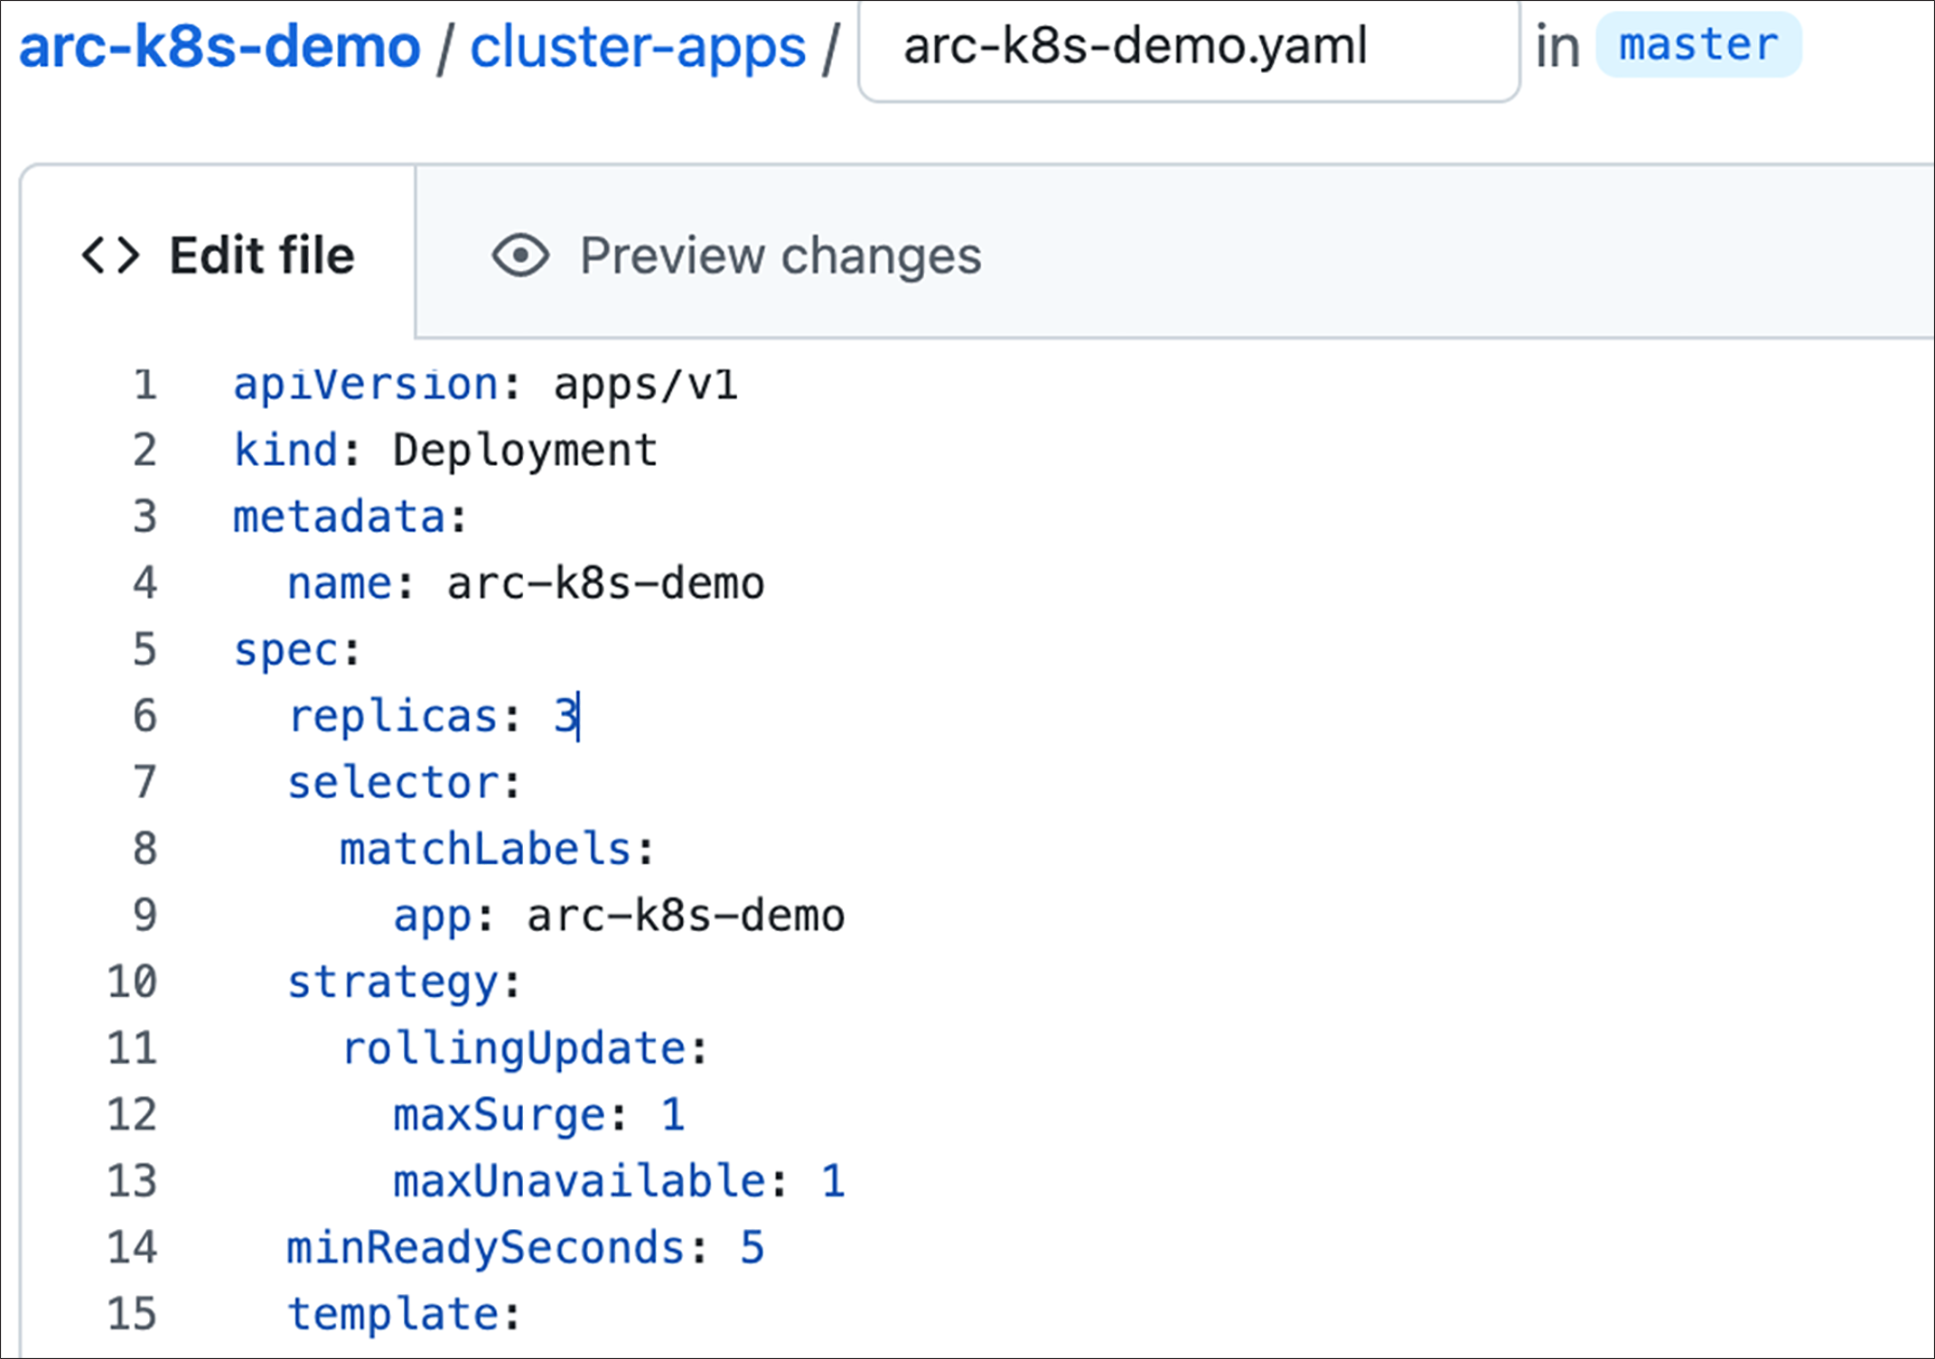
10. After committing the changes, the updates are applied automatically and can be verified using the command below:
> kubectl get pods –w

11. After the update is rolled out successfully, we can see the three replicas of the pod running now.
> kubectl get pods

Connect Cisco IKS cluster to Azure using Azure CLI
This section shows how to connect a Kubernetes cluster to Azure with Azure Arc-enabled Kubernetes using the Azure CLI.
1. Refer to the above prerequisites section to prepare the environment.
2. Login to the Azure and set the Azure subscription by running the below commands
> az login
> az account set –subscription xxxxxxxxxxx
3. Run the following command to create a resource group in the Azure:
> az group create --name glx-arc-demo --location EastUS --output table

4. To connect the Kubernetes cluster to Azure.
● Run the following command if the cluster is not behind an outbound proxy server:
> az connectedk8s connect --name glx-iks-arc --resource-group glx-arc-demo --location eastus --tags Datacenter=rtp-glxy owner=snaldurg

● Run the following command with proxy parameters if the cluster is behind an outbound proxy server:
> export HTTP_PROXY=<proxy-server-ip-address>:<port>
> export HTTPS_PROXY=<proxy-server-ip-address>:<port>
> export NO_PROXY=<cluster-apiserver-ip-address>:<port>
> az connectedk8s connect --name <cluster-name> --resource-group <resource-group> --proxy-https https://<proxy-server-ip-address>:<port> --proxy-http http://<proxy-server-ip-address>:<port> --proxy-skip-range <excludedIP>,<excludedCIDR> --proxy-cert <path-to-cert-file>
5. To verify the cluster connection run the below command:
> az connectedk8s list --resource-group glx-arc-demo --output table

6. To view the Azure Arc agents deployed to the Kubernetes cluster, run the below command:
> kubectl get deployments,pods -n azure-arc
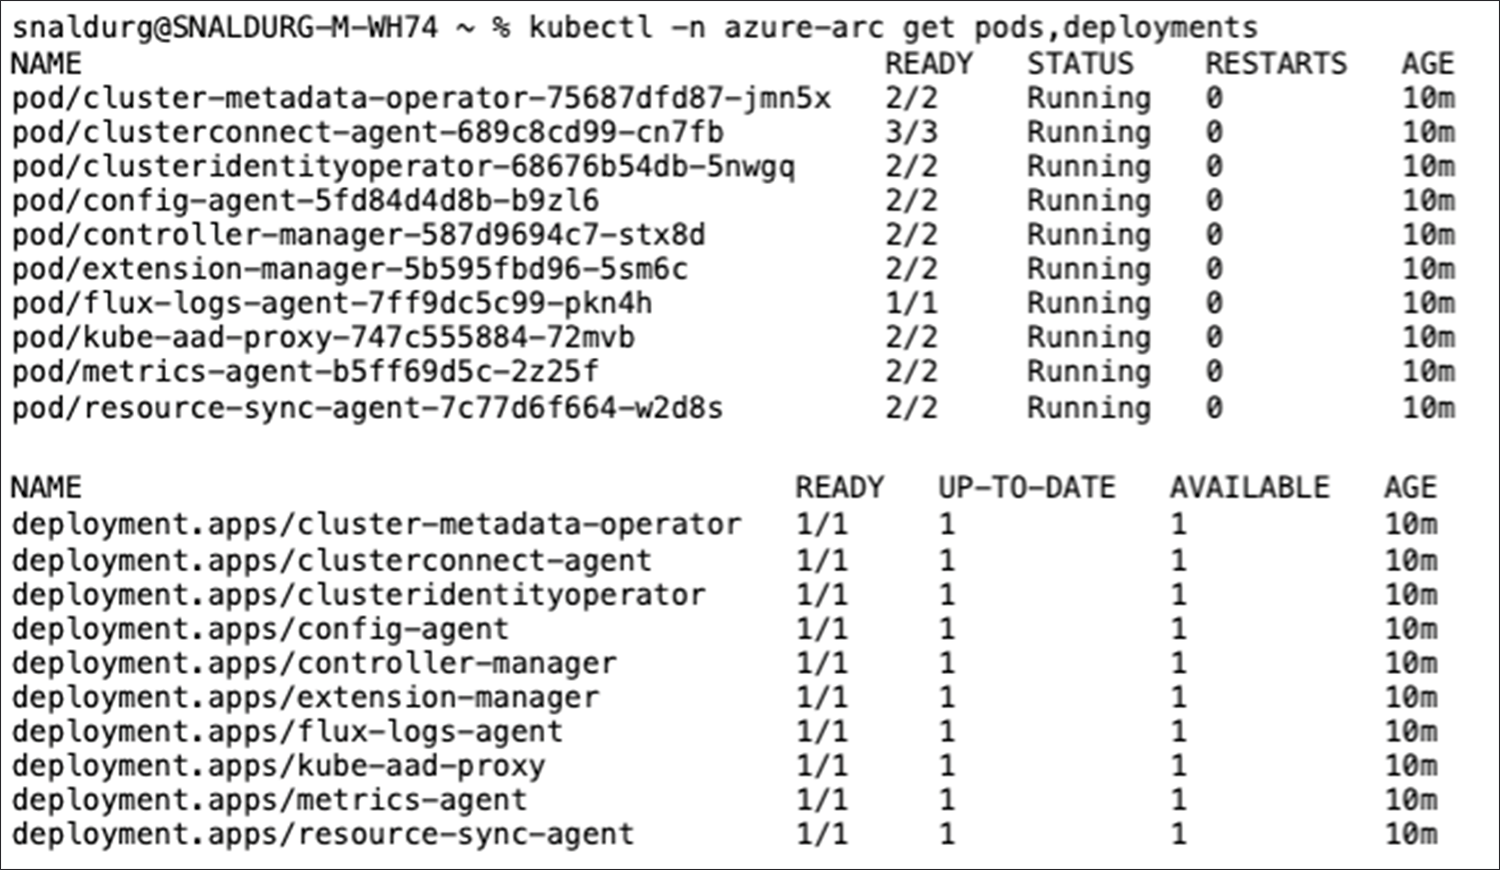
7. Log in to the Azure portal and verify that the cluster is listed and in a connected state.
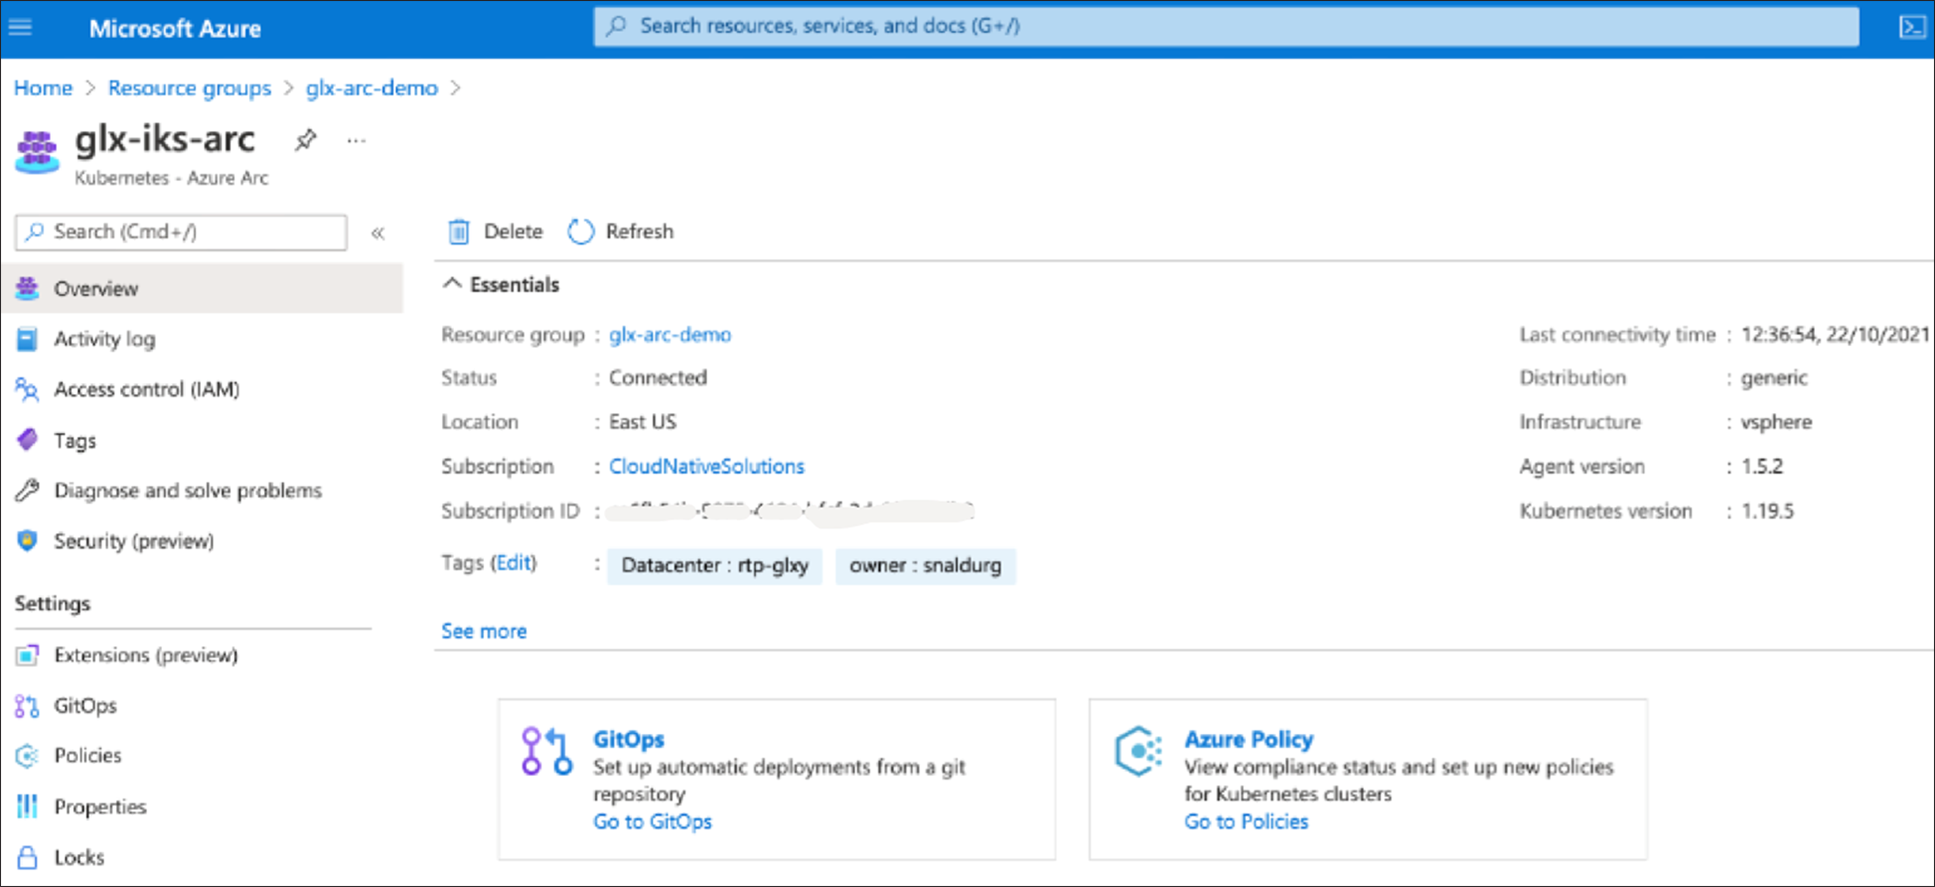
For additional information, see the following resources:
● https://intersight.com/help/saas/resources/intersight_kubernetes_service_user_guide#overview
● https://docs.microsoft.com/en-us/azure/azure-arc/kubernetes/overview
● https://docs.microsoft.com/en-us/azure/azure-arc/kubernetes/conceptual-agent-overview
● https://docs.microsoft.com/en-us/azure/azure-arc/kubernetes/conceptual-gitops-flux2