CX Cloud Agent Overview v2.4
Available Languages
Download Options
Bias-Free Language
The documentation set for this product strives to use bias-free language. For the purposes of this documentation set, bias-free is defined as language that does not imply discrimination based on age, disability, gender, racial identity, ethnic identity, sexual orientation, socioeconomic status, and intersectionality. Exceptions may be present in the documentation due to language that is hardcoded in the user interfaces of the product software, language used based on RFP documentation, or language that is used by a referenced third-party product. Learn more about how Cisco is using Inclusive Language.
Contents
Introduction
This document describes Cisco's Customer Experience (CX) Cloud Agent. Cisco's CX Cloud Agent is a highly scalable platform that collects telemetry data from customer network devices to deliver actionable insights for customers. CX Cloud Agent enables the Artificial Intelligence (AI)/Machine Learning (ML) transformation of active running configuration data into proactive and predictive insights displayed in CX Cloud.
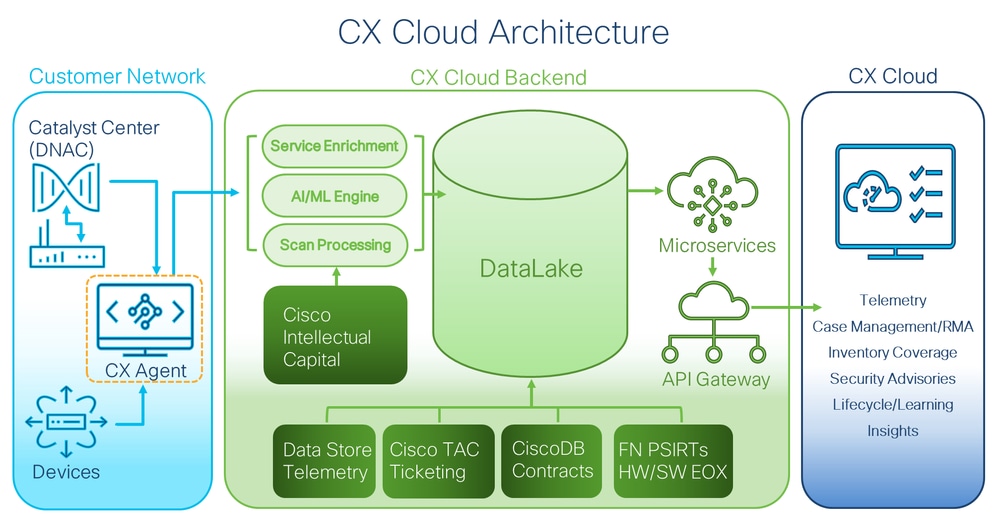 CX Cloud Architecture
This guide is specific to CX Cloud Agent v2.4. Refer to the Cisco CX Cloud Agent page to access prior versions.

Note: Images in this guide are for reference purposes only. Actual content can vary.
Prerequisites
CX Cloud Agent runs as a Virtual Machine (VM) and is available for download as an Open Virtual Appliance (OVA) or a Virtual Hard Disk (VHD).
Deployment Requirements
- One of the following hypervisors is required for a new install:
- VMware ESXi v5.5 or later
- Oracle Virtual Box v5.2.30 or later
- Windows Hypervisor version 2012 to 2022
- The configurations in the following table are required for deploying VM:
|
CX Cloud Agent Deployment Type |
Number of CPU Cores |
RAM |
Hard Disk |
*Maximum number of Assets directly |
Supported Hypervisors |
|
Small OVA |
8C |
16GB |
200GB |
10,000 |
VMware ESXi, Oracle VirtualBox, and Windows Hyper-V |
|
Medium OVA |
16C |
32GB |
600GB |
20,000 |
VMware ESXi |
|
Large OVA |
32C |
64GB |
1200GB |
50,000 : |
VMware ESXi |
*In addition to connecting 20 Cisco Catalyst Center (Catalyst Center) non-clusters or 10 Catalyst Center clusters for each CX Cloud Agent instance.
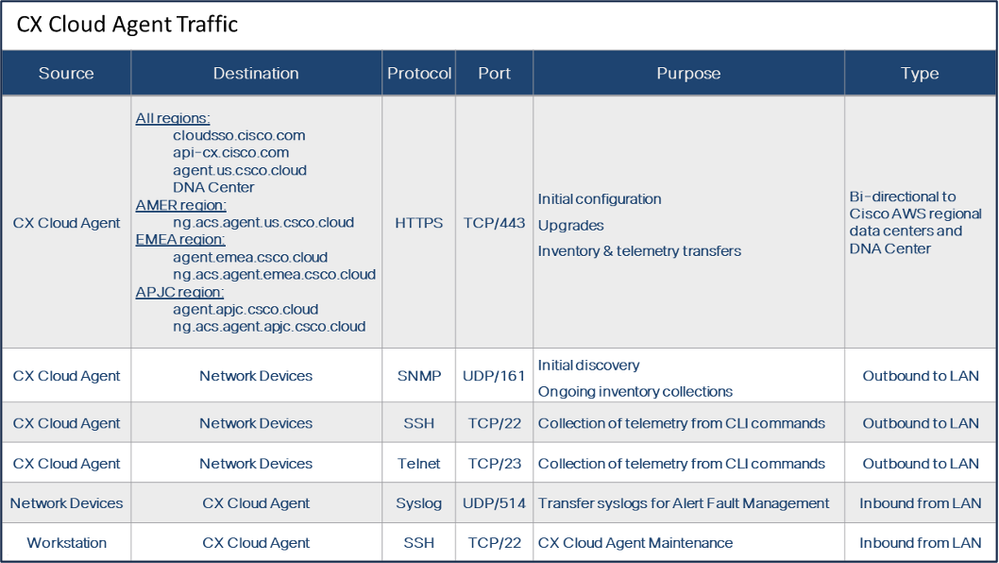
- For customers using designated US data centers as the primary data region to store CX Cloud data, the CX Cloud Agent must be able to connect to the servers shown here, using the Fully Qualified Domain Name (FQDN), and using HTTPS on TCP port 443:
- FQDN: agent.us.csco.cloud
- FQDN: ng.acs.agent.us.csco.cloud
- FQDN: cloudsso.cisco.com
- FQDN: api-cx.cisco.com
- For customers using designated Europe data centers as the primary data region to store CX Cloud data: the CX Cloud Agent must be able to connect to both of the servers shown here, using the FQDN, and using HTTPS on TCP port 443:
- FQDN: agent.us.csco.cloud
- FQDN: agent.emea.csco.cloud
- FQDN: ng.acs.agent.emea.csco.cloud
- FQDN: cloudsso.cisco.com
- FQDN: api-cx.cisco.com
- For customers using designated Asia Pacific data centers as the primary data region to store CX Cloud data: the CX Cloud Agent must be able to connect to both of the servers shown here, using the FQDN, and using HTTPS on TCP port 443:
- FQDN: agent.us.csco.cloud
- FQDN: agent.apjc.csco.cloud
- FQDN: ng.acs.agent.apjc.csco.cloud
- FQDN: cloudsso.cisco.com
- FQDN: api-cx.cisco.com
- For customers using designated Europe and Asia Pacific data centers as their primary data region, connectivity to FQDN: agent.us.csco.cloud is required only for registering the CX Cloud Agent with CX Cloud during initial setup. After the CX Cloud Agent is successfully registered with CX Cloud, this connection is no longer required.
- For local management of the CX Cloud Agent, port 22 must be accessible.
- The following table provides a summary of the ports and protocols that must be opened and enabled for CX Cloud Agent to function correctly:
- An IP is automatically detected if the Dynamic Host Configuration Protocol (DHCP) is enabled in the VM environment; Otherwise, a free IPv4 address, Subnet mask, Default Gateway IP address, and Domain Name Service (DNS) server IP address must be available.
- Only IPv4 is supported.
- The certified single node and High Availability (HA) Cluster Catalyst Center versions are 2.1.2.x to 2.2.3.x, 2.3.3.x, 2.3.5.x, 2.3.7.x and Catalyst Center Virtual Appliance and Catalyst Center Virtual Appliance.
- If the network has SSL interception, permit-list CX Cloud Agent’s IP address.
- For all directly connected assets, SSH privilege level 15 is required.
- Use only the provided hostnames; static IP addresses cannot be used.
Accessing Critical Domains
To start the CX Cloud journey, users require access to the following domains. Use only the hostnames provided; do not use static IP addresses.
Domains Specific to the CX Cloud Agent Portal
|
Major Domains |
Other Domains |
|
csco.cloud |
cloudfront.net |
|
split.io |
eum-appdynamics.com |
|
appdynamics.com |
|
|
tiqcdn.com |
|
|
jquery.com |
Domains Specific to CX Cloud Agent OVA
|
AMERICAS |
EMEA |
APJC |
|
cloudsso.cisco.com |
cloudsso.cisco.com |
cloudsso.cisco.com |
|
api-cx.cisco.com |
api-cx.cisco.com |
api-cx.cisco.com |
|
agent.us.csco.cloud |
agent.us.csco.cloud |
agent.us.csco.cloud |
|
ng.acs.agent.us.csco.cloud |
agent.emea.csco.cloud |
agent.apjc.csco.cloud |
|
ng.acs.agent.emea.csco.cloud |
ng.acs.agent.apjc.csco.cloud |
Note: The outbound access must be allowed with redirection enabled on port 443 for the specified FQDN's.
Catalyst Center Supported Version
Supported single node and HA Cluster Catalyst Center versions are 2.1.2.x to 2.2.3.x, 2.3.3.x, 2.3.5.x, 2.3.7.x and Catalyst Center Virtual Appliance and Catalyst Center Virtual Appliance.
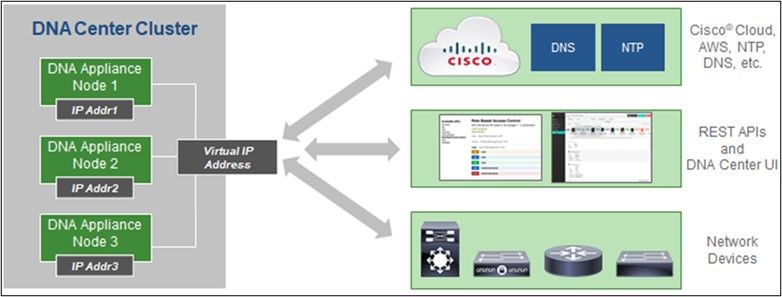 Multi-Node HA Cluster Cisco DNA Center
Supported Browsers
For the best experience on Cisco.com, the latest official release of these browsers is recommended:
- Google Chrome
- Microsoft Edge
- Mozilla Firefox
Supported Product List
To view the list of products supported by CX Cloud Agent, refer to the Supported Product List.
Upgrading/Installing CX Cloud Agent v2.4
- Existing customers upgrading to the new version should refer to Upgrade CX Cloud Agent v2.4.
- New customers implementing a fresh flexible OVA v2.4 install should refer to Adding CX Cloud Agent as Data Source.
Upgrading Existing VMs to Large and Medium Configuration
Customers can upgrade their existing VM configuration to medium or large using Flexible OVA options based on their network size and complexity.
To upgrade the existing VM configuration from small to medium or large, refer to section Upgrading CX Cloud Agent VMs to medium and large configuration.
Upgrade CX Cloud Agent v2.4
Customers running CX Cloud Agent v2.3.x and above can follow the steps in this section to directly upgrade to v2.4.

Note: Customers on CX Cloud Agent v2.2.x should upgrade to v2.3.x before upgrading to v2.4 or install the v2.4 as fresh OVA install.
To install the CX Cloud Agent upgrade v2.4 from CX Cloud:
- Log in CX Cloud. The Home page displays.
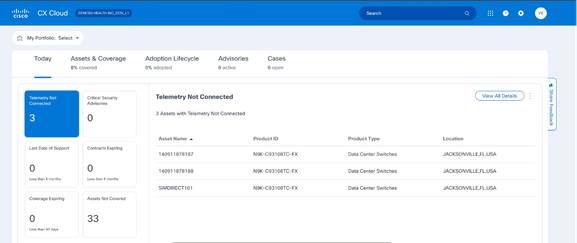 CX Cloud Home Page
 - Click the Admin Center icon. The Data Sources window opens displaying CX Cloud Agent as an existing data source.
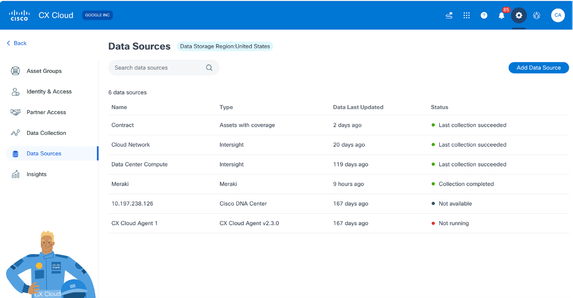 Data Sources
 - Click the CX Cloud Agent data source. The CX Cloud Agent details window opens.
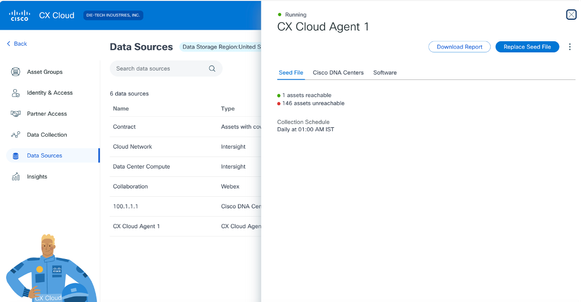 Data Sources Detail View
 - Click the Software tab.
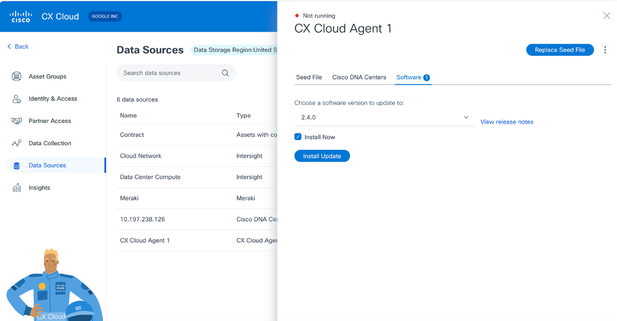 CX Cloud Agent Detail View
- Select the software version 2.4.0 from Choose a software version to update to drop-down.
- Click Install Update to install CX Cloud Agent v2.4.0.

Note: Customers can schedule the update for later by clearing the Install Now check box which displays scheduling options.
Adding CX Cloud Agent
Customers can add up to twenty (20) CX Cloud Agent instances in CX Cloud.
To add a CX Cloud Agent:

Note: Repeat the following steps to add additional CX Cloud Agent instances as a data source.
- Log in to CX Cloud. The Home page displays.
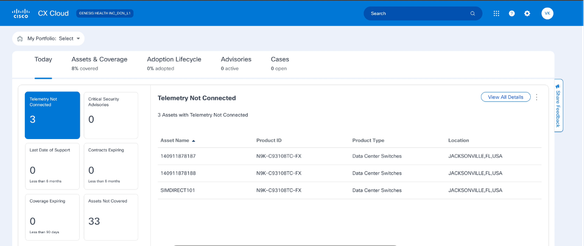 CX Cloud Home Page
 - Select the Admin Center icon. The Data Sources window opens.
 Data Sources
- Click Add Data Source. The Add Data Source window opens. The options displayed vary based on customer subscriptions.
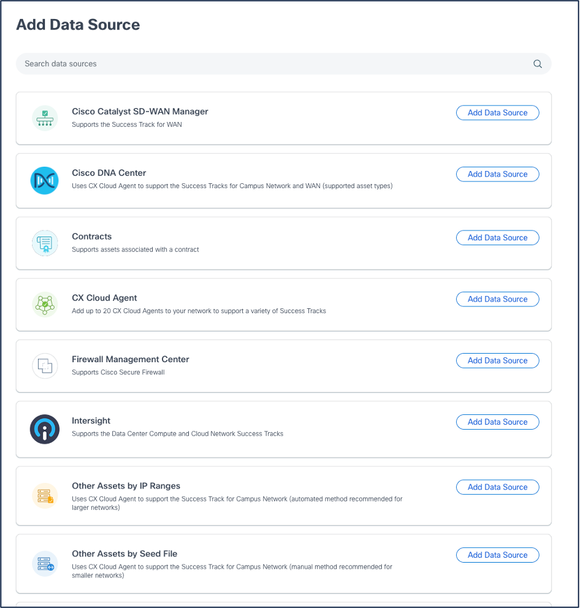 Add Data Source
 - Click Add Data Source from the CX Cloud Agent option. The Set Up CX Cloud Agent window opens.
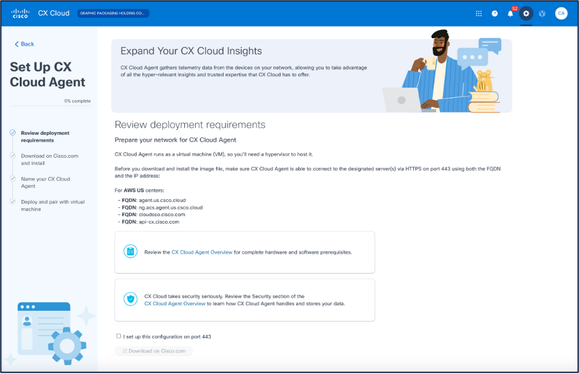 Set Up CX Cloud Agent
 - Review the Review deployment requirements section and select the I set up this configuration on port 443 check box.
- Click Download on Cisco.com. The Software Download page opens.
- Download the CX Cloud Agent v2.4 OVA file.

Note: A Pairing Code, required to complete the setup of the CX Cloud Agent, is generated after deploying the OVA file.
- Enter the CX Cloud Agent name in the Name Your CX Cloud Agent field.
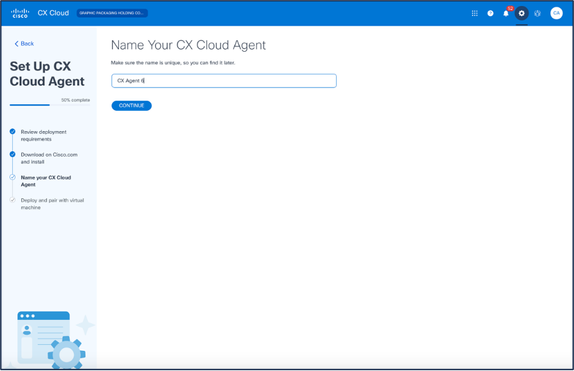 Name Your CX Cloud Agent
 - Click Continue. The Deploy and pair with your virtual machine window opens.
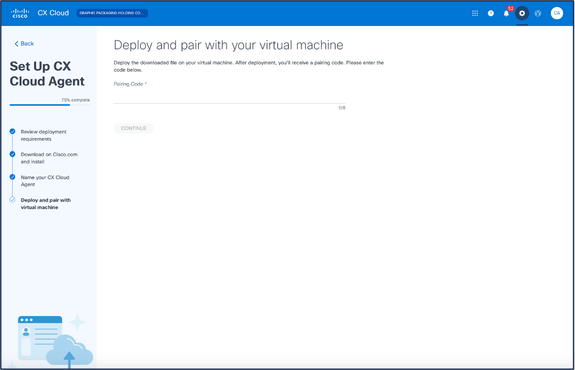 Deploy and Pair with Your Virtual Machine
 - Enter the Pairing Code received after deployment of the downloaded OVA file.
- Click Continue. The registration progress displays, followed by a confirmation.
Adding Catalyst Center as Data Source
To add Catalyst Center as data source:
- Click Add Data Source in the Admin Center > Data Sources window.
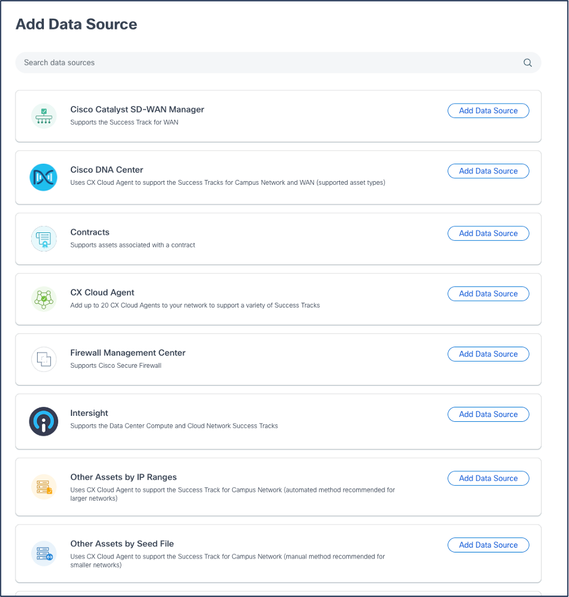 Add Data Source
 - Click Add Data Source from the Catalyst Center option.
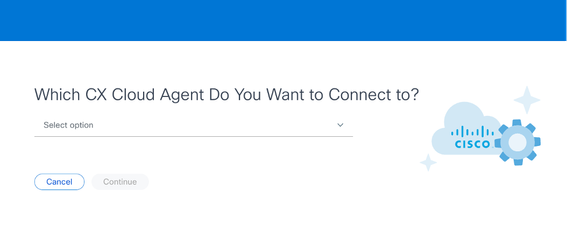 Select CX Cloud Agent
 - Select the CX Cloud Agent from the Which CX Cloud Agent Do You Want to Connect to drop-down list.
- Click Continue. The Connect to CX Cloud window opens.
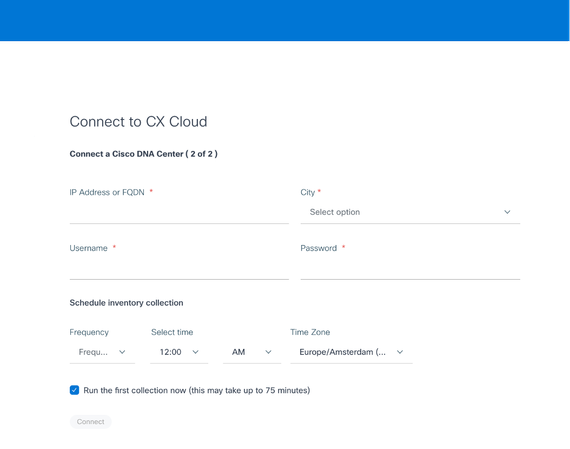 Connect to CX Cloud
 - Enter the following details:
- Virtual IP Address or FQDN (i.e.,Catalyst Center IP Address),
- City (i.e., Catalyst Center’s location),
- Username
- Password
- Frequency, Time, and Time Zone to indicate how often the CX Cloud Agent should perform network scans in Schedule Inventory Collection sections

Note:Select Run the first collection now checkbox to run the collection now.
-
Click Connect. A confirmation displays with the Catalyst Center IP Address.
Adding Other Assets as Data Sources
Telemetry collection has been extended to devices not managed by the Catalyst Center, enabling customers to view and interact with telemetry-derived insights and analytics for a broader range of devices. After the initial CX Cloud Agent setup, users have the option to configure CX Cloud Agent to connect to 20 additional Catalyst Centers within the infrastructure monitored by CX Cloud.
Users can identify devices to incorporate into CX Cloud by uniquely identifying such devices using a seed file or by specifying an IP range, which can be scanned by CX Cloud Agent. Both approaches rely on Simple Network Management Protocol (SNMP) for the purpose of discovery (SNMP) and on Secure Shell (SSH) for connectivity. These must be properly configured to enable successful telemetry collection.
To add other assets as data sources:
- Upload a seed file using a seed file template.
- Provide an IP address range.
Discovery Protocols
Both seed file-based direct device discovery and IP range-based discovery rely on SNMP as the discovery protocol. Different versions of SNMP exist, but CX Cloud Agent supports SNMPV2c and SNMP V3 and either or both versions can be configured. The same information, described next in complete detail, must be provided by the user to complete configuration and to enable connectivity between the SNMP-managed device and SNMP service manager.
SNMPV2c and SNMPV3 differ in terms of security and remote configuration model. SNMPV3 uses an enhanced cryptographic security system supporting SHA encryption to authenticate messages and ensure their privacy. It is recommended that SNMPv3 be used on all public and internet-facing networks to protect against security risks and threats. On CX Cloud, it is preferred that SNMPv3 be configured and not SNMPv2c, except for older legacy devices that lack built-in support for SNMPv3. If both versions of SNMP are configured by the user, CX Cloud Agent can, by default, attempt to communicate with each respective device using SNMPv3 and revert to SNMPv2c if the communication cannot be successfully negotiated.
Connectivity Protocols
As part of the direct device connectivity setup, users must specify details of the device connectivity protocol: SSH (or, alternatively, telnet). SSHv2 can be used, except in the cases of individual legacy assets which lack the appropriate built-in support. Be aware that SSHv1 protocol contains fundamental vulnerabilities. Absent additional security, telemetry data and the underlying assets can be compromised due to these vulnerabilities when relying on SSHv1. Telnet is also insecure. Credential information (usernames and passwords) submitted through telnet are not encrypted and therefore vulnerable to compromise, absent additional security.
Telemtery Processing Limitation for Devices
The following are limitations when processing telemetry data for devices:
- Some devices may show as reachable in the Collection Summary but are not visible in the CX Cloud Assets page. Device instrumentation limitations prevent the processing of such devices telemetry.
- If a device from the seed file or IP range collections is also part of the Cisco Catalyst Center inventory, the device is reported only once for the Cisco Catalyst Center entry. The respective devices within the seed file/IP range entry are skipped to avoid duplication.
Adding Other Assets Using a Seed File
A seed file is a .csv file where each line represents a system data record. In a seed file, every seed file record corresponds to a unique device from which telemetry can be collected by CX Cloud Agent. All error or information messages for each device entry from the seed file being imported are captured as part of job log details. All devices in a seed file are considered managed devices, even if the devices are unreachable at the time of initial configuration. In the event a new seed file is being uploaded to replace a previous one, the date of last upload is displayed in CX Cloud.
CX Cloud Agent can attempt to connect to the devices but cannot be able to process each one to show in the Assets pages in cases where it is not able to determine the PIDs or Serial Numbers.Any row in the seed file that starts with a semicolon is ignored. The header row in the seed file starts with a semicolon and can be kept as is (recommended option) or deleted while creating the customer seed file.
It is important that the format of the sample seed file, including column headers, not be altered in any way. Click the link provided to view a seed file in PDF format. This PDF is for reference only and can be used to create a seed file that needs to be saved in .csv format.
Click this link to view a seed file that can be used to create a seed file in .csv format.
Note: This PDF is for reference only and can be used to create a seed file that needs to be saved in .csv format.
This table identifies all necessary seed file columns and the data that must be included in each column.
|
Seed File Column |
Column Header / Identifier |
Purpose of the Column |
|
A |
IP Address or hostname |
Provide a valid, unique IP Address or hostname of the device. |
|
B |
SNMP protocol version |
The SNMP protocol is required by CX Cloud Agent and is used for device discovery within the customer network. Values can be snmpv2c or snmpv3, but snmpv3 is recommended due to security considerations. |
|
C |
snmpRo : Mandatory if col#=3 selected as 'snmpv2c' |
If the legacy variant of SNMPv2 is selected for a specific device, then snmpRO (read only) credentials for the device SNMP collection must be specified. Otherwise, entry can be blank. |
|
D |
snmpv3UserName : Mandatory if col#=3 selected as 'snmpv3' |
If SNMPv3 is selected to communicate with a specific device, then the respective login username must be provided. |
|
E |
snmpv3AuthAlgorithm : values can be MD5 or SHA |
SNMPv3 protocol permits Authentication via either the MD5 or SHA Algorithm. If the device is configured with secure Authentication, then the respective Auth Algorithm must be provided. 
Note: MD5 is considered insecure, and SHA can be used on all devices that support it. |
|
F |
snmpv3AuthPassword : password |
If either a MD5 or a SHA cryptographic algorithm is configured on the device, then the relevant Authentication password needs to be provided for device access. |
|
G |
snmpv3PrivAlgorithm : values can be DES , 3DES |
If the device is configured with the SNMPv3 privacy algorithm (this algorithm is used to encrypt the response), then the respective Algorithm needs to be provided. 
Note: 56-bit keys used by DES are considered too short to provide cryptographic security, and that 3DES can be used on all devices that support it. |
|
H |
snmpv3PrivPassword : password |
If the SNMPv3 privacy algorithm is configured on the device, then its respective privacy password needs to be provided for device connection. |
|
I |
snmpv3EngineId : engineID, unique ID representing device, specify engine ID if manually configured on device |
The SNMPv3 EngineID is a unique ID representing each device. This engine ID is sent as a reference while collecting the SNMP datasets by CX Cloud Agent. If the customer configures the EngineID manually, then the respective EngineID needs to be provided. |
|
J |
cliProtocol: values can be 'telnet', 'sshv1', 'sshv2'. If empty can set to 'sshv2' by default |
The CLI is intended to interact with the device directly. CX Cloud Agent uses this protocol for CLI collection for a specific device. This CLI collection data is used for Assets and other Insights Reporting within CX Cloud. SSHv2 is recommended; absent other network security measures, in themselves SSHv1 and Telnet protocols do not provide adequate transport security. |
|
K |
cliPort : CLI protocol port number |
If any CLI Protocol is selected, its respective port number needs to be provided. For example, 22 for SSH and 23 for telnet. |
|
L |
cliUser : CLI User name (either CLI username/password or BOTH can be provided, BUT both columns (col#=12 and col#=13) cannot be empty.) |
The respective CLI username of the device needs to be provided. This is used by CX Cloud Agent at the time of connecting to the device during CLI collection. |
|
M |
cliPassword : CLI user password (either CLI username/password or BOTH can be provided, BUT both columns (col#=12 and col#=13) cannot be empty.) |
The respective CLI password of the device needs to be provided. This is used by CX Cloud Agent at the time of connecting to the device during CLI collection. |
|
N |
cliEnableUser |
If enable is configured on the device, then the device’s enableUsername value needs to be provided. |
|
O |
cliEnablePassword |
If enable is configured on the device, then the device’s enablePassword value needs to be provided. |
|
P |
Future Support (No Inputs required) |
Reserved for Future Use |
|
Q |
Future Support (No Inputs required) |
Reserved for Future Use |
|
R |
Future Support (No Inputs required) |
Reserved for Future Use |
|
S |
Future Support (No Inputs required) |
Reserved for Future Use |
Add Other Assets Using a New Seed File
To add other assets using a new seed file:
- Click Add Data Source in the Admin Center > Data Sources window.
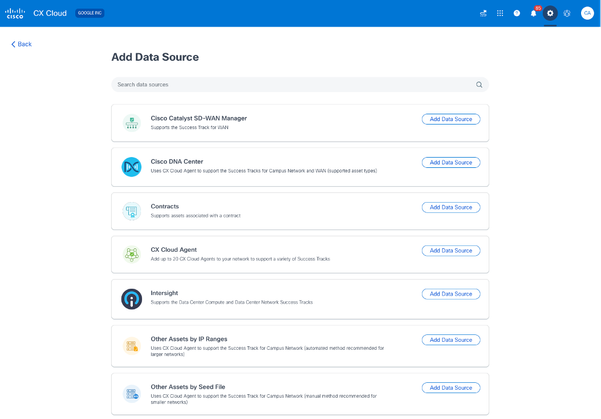 Add Data Source
 - Click Add Data Source from the Other Assets by Seed File option.
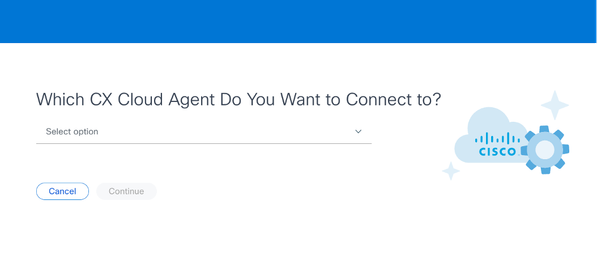 Select CX Cloud Agent
 - Select the CX Cloud Agent from the Which CX Cloud Agent Do You Want to Connect to drop-down list.
 Continue
- Click Continue. The Upload Your Seed File page displays.
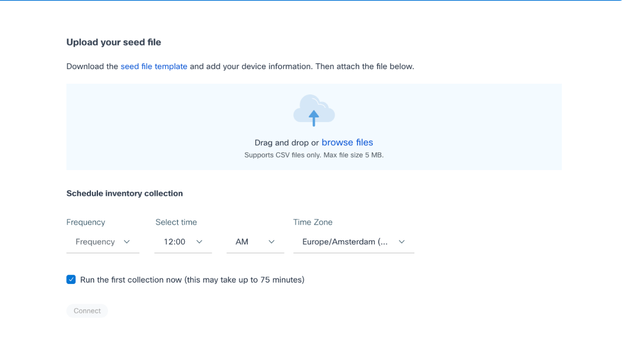 Upload Your Seed File
 - Click the hyperlinked seed file template to download the template.
- Manually enter or import data into the file. Once complete, save the template as a .csv file to import the file into CX Cloud Agent.
- Drag-and-drop or click browse files to upload the .csv file.
- Complete the Schedule inventory collection section.

Note: Before initial configuration of CX Cloud is completed, CX Cloud Agent must perform the first telemetry collection by processing the seed file and establishing connection with all identified devices. Collection can be initiated on-demand or run according to a schedule defined here. Users can perform the first telemetry connection by selecting the Run the first collection now check box. Depending on the number of entries specified in the seed file and other factors, this process can take a considerable amount of time.
- Click Connect. The Data Sources window opens, displaying a confirmation message.
Add Other Assets Using a Modified Seed File
To add, modify, or delete devices using the current seed file:
- Open the previously created seed file, make required changes, and save the file.
Note: To add assets to the seed file, append those assets to the previously created seed file and reload the file. This is necessary since uploading a new seed file replaces the current seed file. Only the latest uploaded seed file is used for discovery and collection.
- From the Data Sources page, click the CX Cloud Agent data source that requires an updated seed file. The CX Cloud Agent details window opens.
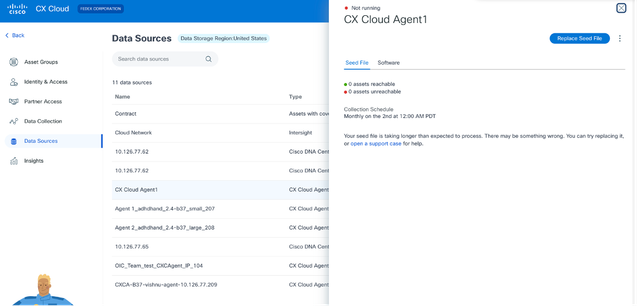 CX Cloud Agent Details window
 - Click Replace Seed File.
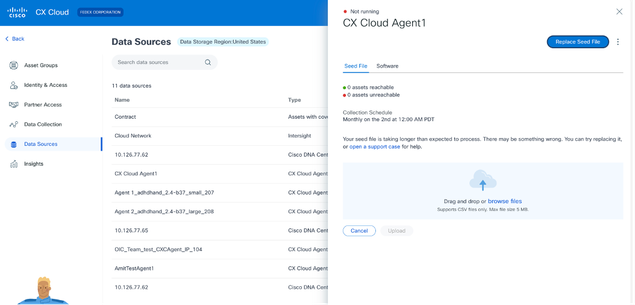 CX Cloud Agent window
 - Drag-and-drop or click browse files to upload the modified seed file.
- Click Upload.
Add Other Assets Using IP Ranges
IP ranges allow users to identify hardware assets and, subsequently, collect telemetry from those devices based on IP addresses. The devices for telemetry collection can be uniquely identified by specifying a single network-level IP range, which can be scanned by CX Cloud Agent using the SNMP protocol. If the IP range is chosen to identify a directly connected device, the IP addresses that are referenced can be as restrictive as possible, while allowing coverage for all required assets.
- Specific IPs can be provided, or wildcards can be used to replace octets of an IP to create a range.
- If a specific IP address is not included in the IP range identified during setup, CX Cloud Agent does not attempt to communicate with a device that has such an IP address, nor does it collect telemetry from such a device.
- Entering *.*.*.* allows CX Cloud Agent to use the user-supplied credential with any IP. For example: 172.16.*.* allows the credentials to be used for all devices in the 172.16.0.0/16 subnet.
- If there are any changes to the network or Installed Base (IB), the IP range can be modified. Refer to section Editing IP Ranges
CX Cloud Agent will attempt to connect to the devices but may not be able to process each one to show in the Assets view in cases where it is not able to determine the PIDs or Serial Numbers.
Notes:
Clicking Edit IP Address Range initiates on-demand device discovery. When any new device is added or deleted (within or outside) to a specified IP-range, customer must always click Edit IP Address Range (refer to section Editing IP Ranges) and complete the steps required for initiating the on-demand device discovery to include any newly added device to the CX Cloud Agent collection inventory.
Adding devices using an IP range requires users to specify all applicable credentials through the configuration UI. The fields visible vary depending on the protocols selected on the previous windows. If multiple selections are made for the same protocol, for example, selecting both SNMPv2c and SNMPv3 or selecting both SSHv2 and SSHv1, CX Cloud Agent automatically auto-negotiates the protocol selection based on the individual device capabilities.
When connecting devices using IP addresses, customer should ensure all relevant protocols in the IP range along with SSH versions and Telnet credentials are valid or the connections will fail.
Adding Other Assets by IP Ranges
To add devices using the IP range:
- Click Add Data Source in the Admin Center > Data Sources window.
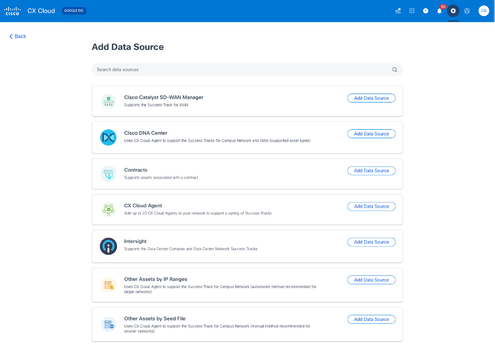 Add Data Sources
 - Click Add Data Source in the Other Assets by IP Ranges option.
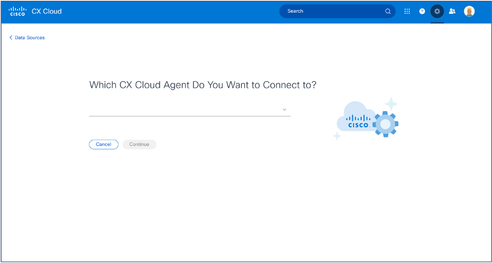 Select CX Cloud Agent
 - Select the CX Cloud Agent from the Which CX Cloud Agent Do You Want to Connect to drop-down list.
- Click Continue. The Select Your Protocol window opens.
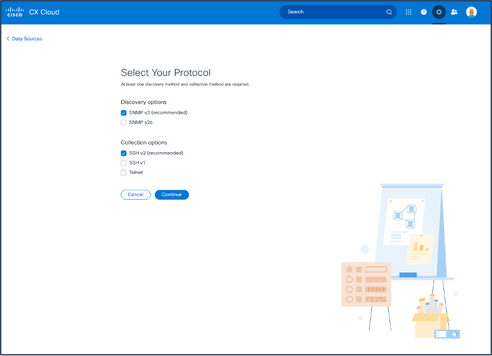 Select Your Protocol
 - Select the applicable check boxes for Discovery options and Collection options.
- Click Continue.
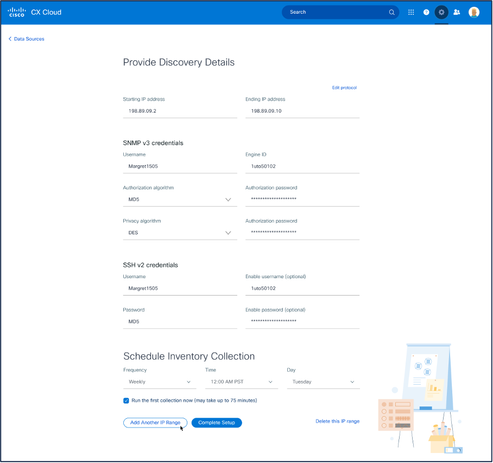 Provide Discovery Details and Schedule Inventory Collection Sections
 - Enter the required details in the Provide Discovery Details and Schedule Inventory Collection sections.

Note: To add another IP range for the selected CX Cloud Agent, click Add Another IP Range to navigate back to the Set Your Protocol window and repeat the steps in this section.
- Click Complete Setup. A confirmation displays upon successful deployment.
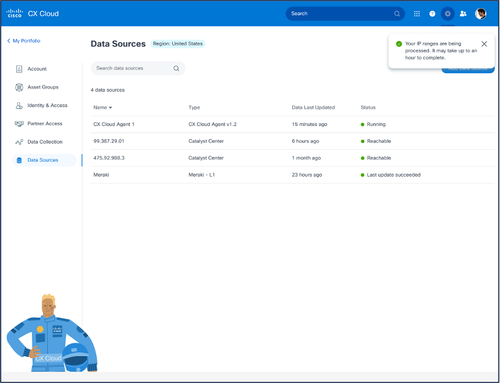 Confirmation Message
Editing IP Ranges
To edit an IP range:
- Navigate to the Data Sources window.
- Click the CX Cloud Agent that requires IP range edit in Data Sources. The details window opens.
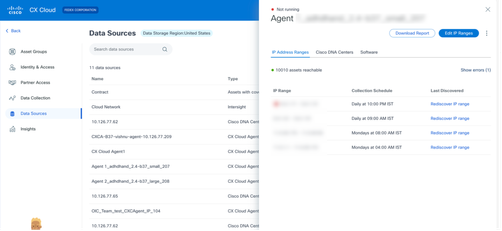 Data Sources
 - Click Edit IP Address Range. The Connect to CX Cloud window opens.
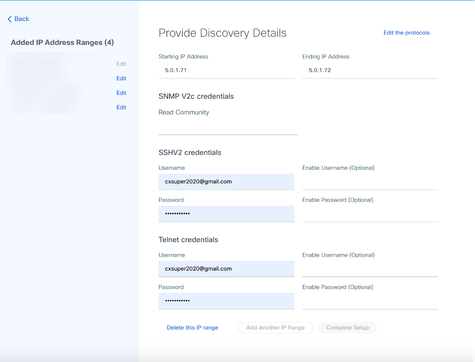 Provide Discovery Details
 - Click Edit the protocols. The Select Your Protocol window opens.
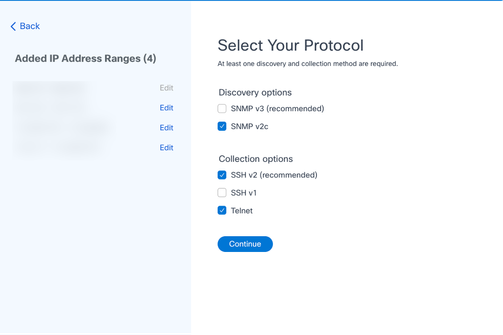 Select Your Protocol
 - Select the appropriate check boxes to choose applicable protocols and click Continue to navigate back to the Provide Discovery Details window.
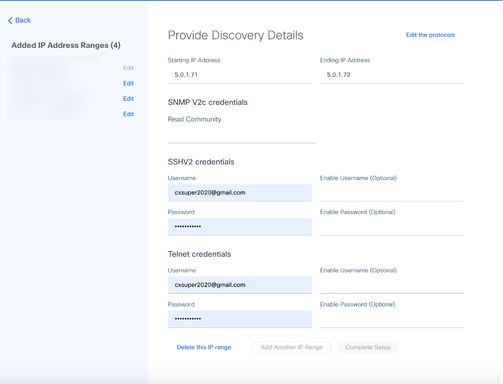 Provide Discovery Details
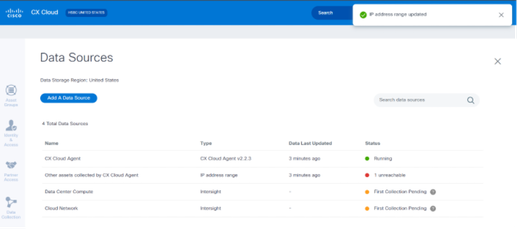
6. Edit the details as required and click Complete Setup. The Data Sources window opens, displaying a message confirming the addition of newly added IP Address range(s).

Note: This confirmation message does not verify whether devices within the modified range are reachable or if their credentials are accepted. This confirmation occurs when the customer initiates the discovery process..
.
Deleting IP Range
To delete an IP range:
- Navigate to the Data Sources window.
- Select the respective CX Cloud Agent with the IP range that needs to be deleted. The details window opens.
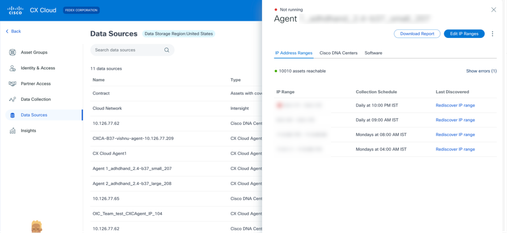 Data Sources
 - Click Edit IP Ranges. The Provide Discovery Details window opens.
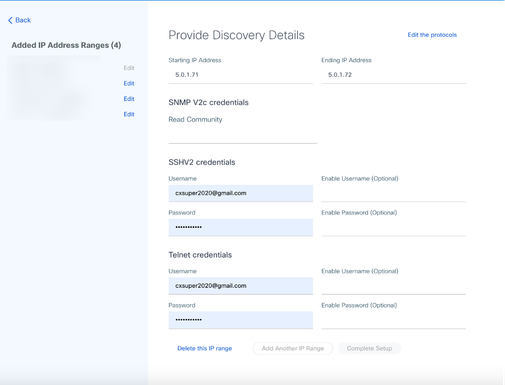 Provide Discovery Details
 - Click the Delete this IP range link. The confirmation message displays.
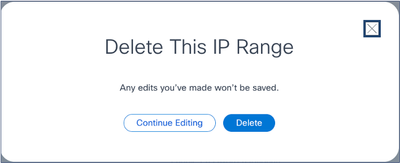 Confirmation Delete Message
 - Click Delete.
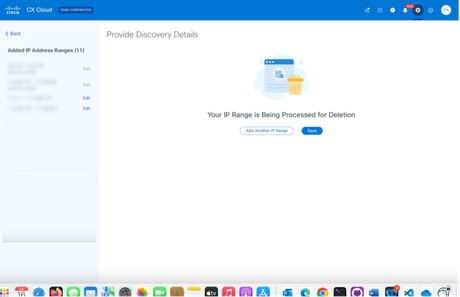 IP Range Delete
 - Click Save. The processing message displays.
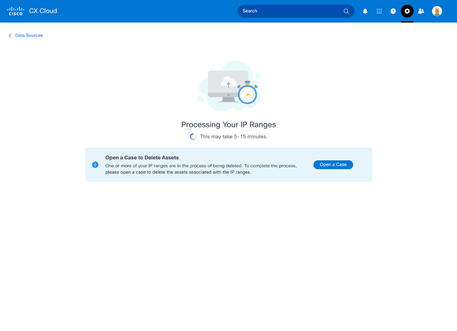 Deleting IP Ranges
 - Click Open a Case to create a case to delete the assets associated with the IP range. The Data Sources window opens, displaying a confirmation message.
About Devices Discovered from Multiple Controllers
It is possible that some devices could be discovered by both the Cisco Catalyst Center and direct device connection to CX Cloud Agent causing duplicate data to be collected from those devices. To avoid collecting duplicate data and having only one controller manage the devices, a precedence for which CX Cloud Agent manages the devices needs to be determined.
- If a device is first discovered by Cisco Catalyst Center and then rediscovered by direct device connection (using a seed file or an IP range), Cisco Catalyst Center takes precedence in controlling the device.
- If a device is first discovered by direct device connection to CX Cloud Agent and then rediscovered by Cisco Catalyst Center, Cisco Catalyst Center takes precedence in controlling the device.
Scheduling Diagnostics Scans
Customers can schedule on demand diagnostic scans in CX Cloud.

Note: Cisco recommends scheduling diagnostic scans or initiating on-demand scans at least 6-7 hours apart from inventory collection schedules so they do not overlap. Executing multiple diagnostic scans simultaneously can slow the scanning process and potentially result in scan failures.
To schedule diagnostic scans:
- On the Home page, click the Settings (gear) icon.
- On the Data Sources page, select Data Collection in the left pane.
- Click Schedule Scan.
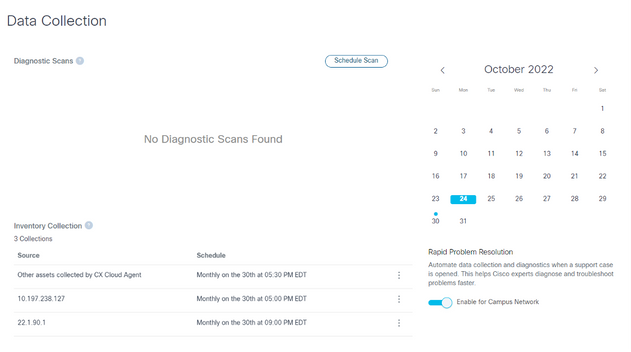 Data Collection
 - Configure a schedule for this scan.
 Configure Scan Schedule
 - In the devices list, select all devices for the scan and click Add.
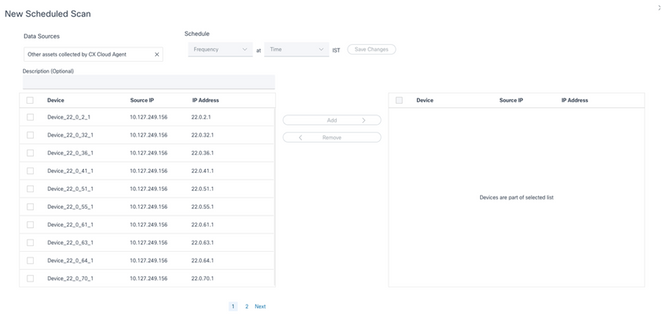 Schedule a Scan
 - Click Save Changes when the scheduling is complete.
The Diagnostic Scans and the Inventory Collection schedules can be edited and deleted from the Data Collection page.
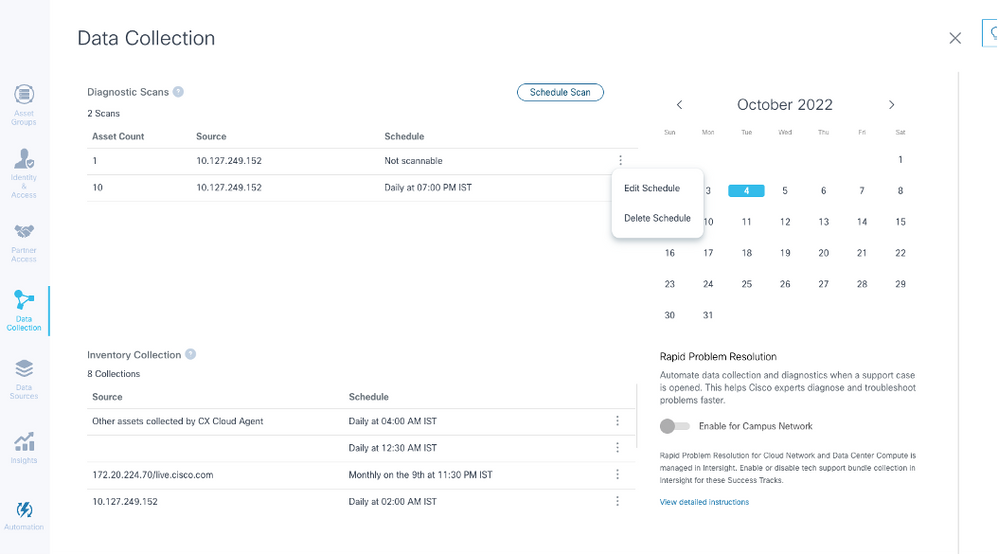 Data Collection with Edit and Delete Schedule Options
Upgrading CX Cloud Agent VMs to Medium and Large Configurations
Once VMs are upgraded, it is not possible to:
- Downscale from a large or medium to a small configuration
- Downscale from a large to medium configuration
- Upgrade from a medium to large configuration
Prior to upgrading the VM, Cisco recommends taking a snapshot for the purpose of recovery in case of failure. Refer to Backing Up and Restoring the CX Cloud VM for more details.
Reconfiguring Using VMware vSphere Thick Client
To upgrade the VM configuration using existing VMware vSphere Thick Client:
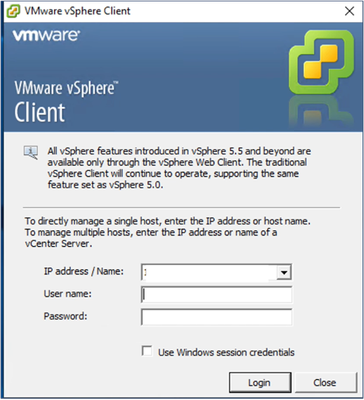 vSphere Client
- Log in to the VMware vSphere Client. The Home page displays a list of VMs.
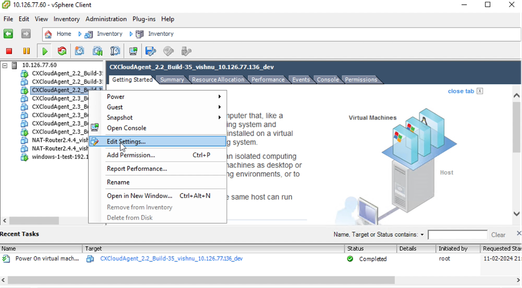 Edit Settings
 - Right-click the target VM and select Edit Settings from the menu. The VM Properties window opens.
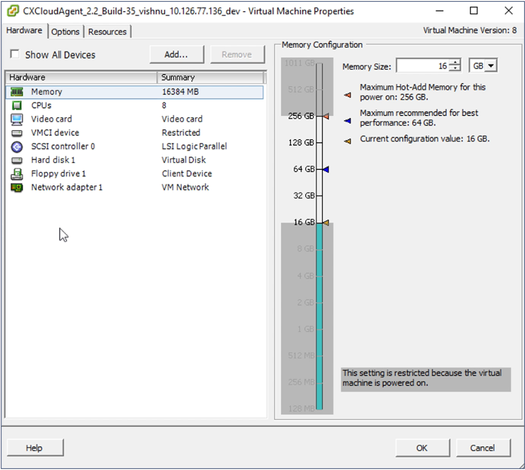 VM Properties
 - Update the Memory Size values as specified:
Medium: 32 GB (32768 MB)
Large: 64 GB (65536 MB) - Select CPUs and update the values as specified:
Medium: 16 core (8 sockets *2 core/socket)
Large: 32 core (16 sockets *2 core/socket) - Click Add. The Add Hardware window opens.
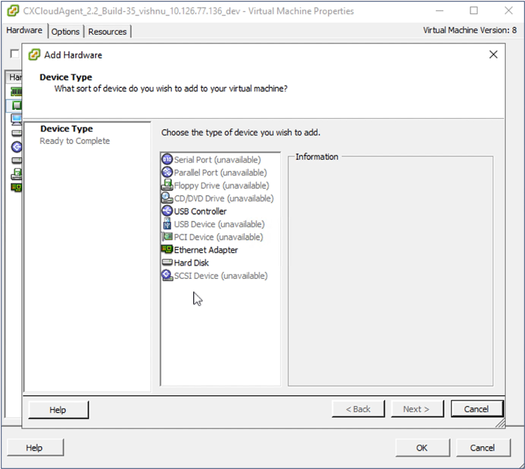 Device Type
 - Select Hard Disk as the Device Type.
- Click Next.
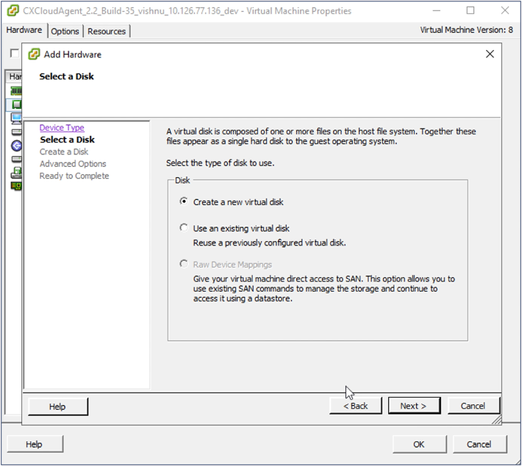 Select Disk
 - Select the Create a new virtual disk radio button and click Next.
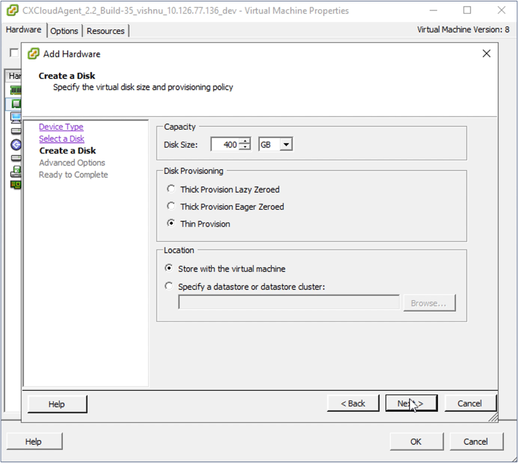 Create Disk
 - Update the Capacity > Disk Size as specified:
Small to Medium: 400 GB, (Initial size 200 GB, increasing total space to 600 GB)
Small to Large: 1000 GB, (Initial size 200 GB, increasing total space to 1200 GB) - Select the Thin Provision radio button for Disk Provisioning.
- Click Next. The Advanced Options window displays.
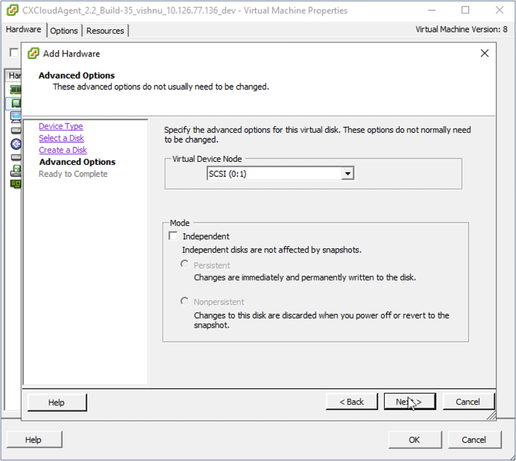 Advanced Options
 - Do not make changes. Click Next to continue.
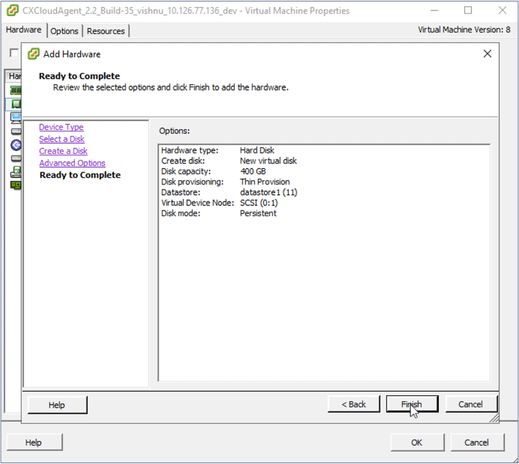 Ready to Complete
 - Click Finish.
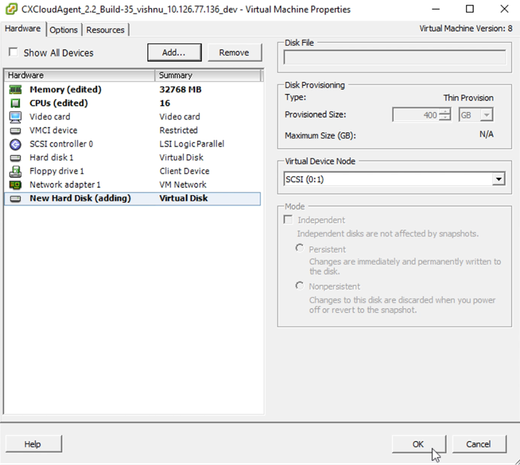 Hardware
 - Click OK to complete the reconfiguration. The completed reconfiguration displays in the Recent Tasks panel.
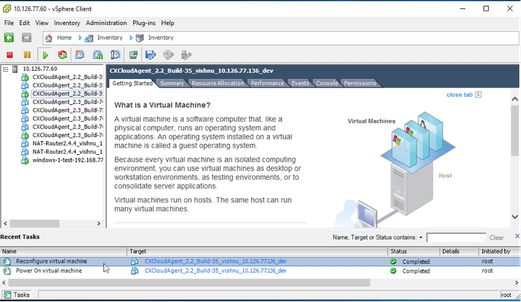 Recent Tasks

Note: Configuration changes take approximately five minutes to complete.
Reconfiguring Using Web Client ESXi v6.0
To update VM configurations using Web Client ESXi v6.0:
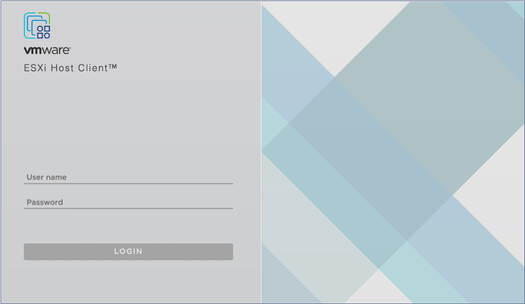 ESXi Client
- Log in to the VMware ESXi Client. The Home page displays.
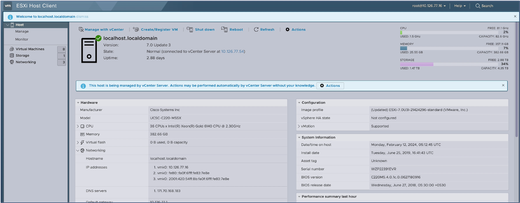 ESXi Home Page
 - Click Virtual Machine to display a list of VMs.
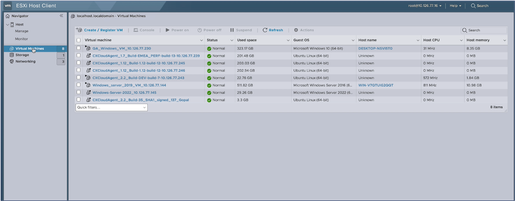 List of VMs
 - Select the target VM.
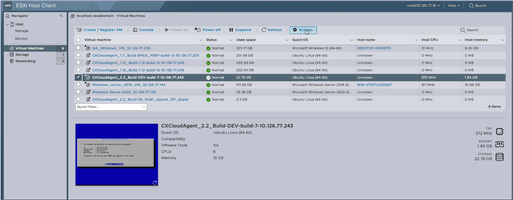 Target VM
 - Click Actions and select Edit Settings. The Edit Settings window opens.
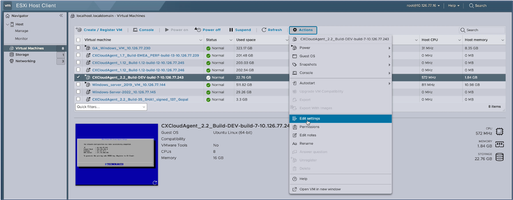 Actions
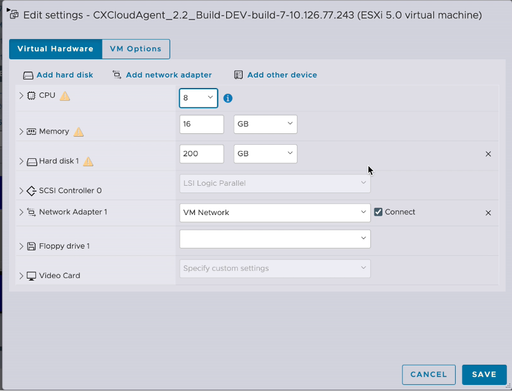 Edit Settings
 - Update the CPU value as specified:
Medium: 16 core (8 sockets *2 core/socket)
Large: 32 core (16 sockets *2 core/socket) - Update the Memory value as specified:
Medium: 32 GB
Large: 64 GB - Click Add hard disk > New standard hard disk. The new hard disk entry displays in the Edit settings window.
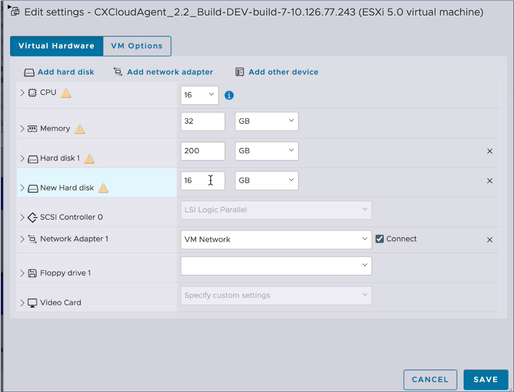 Edit Settings
 - Update New Hard disk values as specified:
Small to Medium: 400 GB, (Initial size 200 GB, increasing total space to 600 GB)
Small to Large: 1000 GB, (Initial size 200 GB, increasing total space to 1200 GB) - Click the arrow to expand New Hard disk. The properties display.
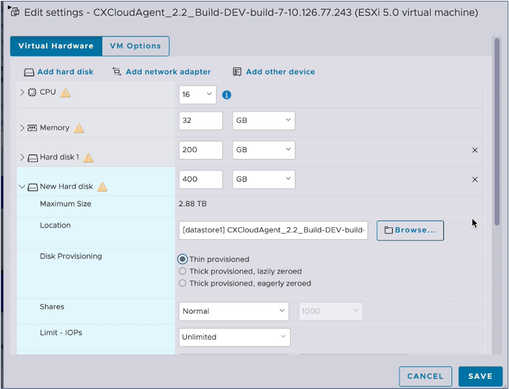 Edit Settings
 - Select the Thin provisioned radio button.
- Click Save to complete the configuration. The configuration update displays in the Recent tasks.
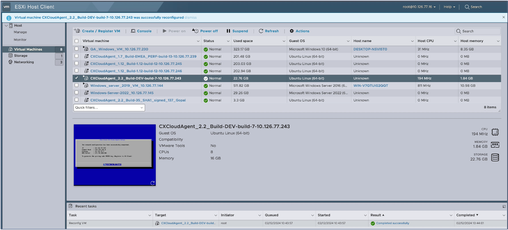 Recent Tasks
Reconfiguring Using Web Client vCenter
To update the VM configurations using the Web Client vCenter:
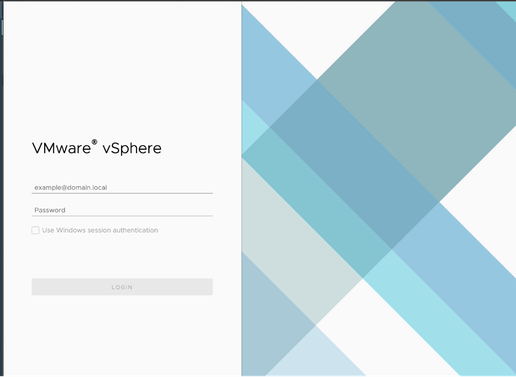 vCenter
- Log in to vCenter. The Home page displays.
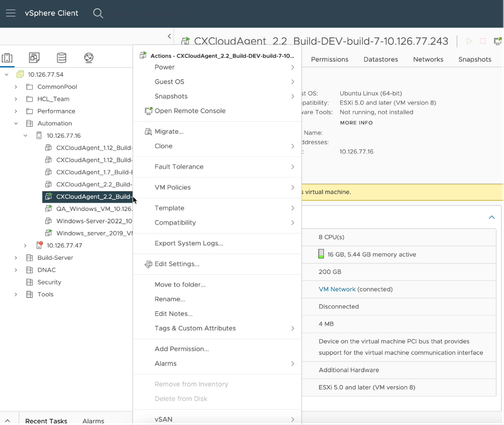 List of VMs
 - Right-click the target VM and select Edit Settings from the menu. The Edit Settings window opens.
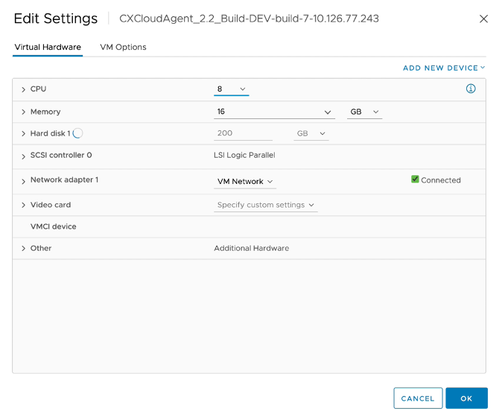 Edit Settings
 - Update the CPU values as specified:
Medium: 16 core (8 sockets *2 core/socket)
Large: 32 core (16 sockets *2 core/socket) - Update the Memory values as specified:
Medium: 32 GB
Large: 64 GB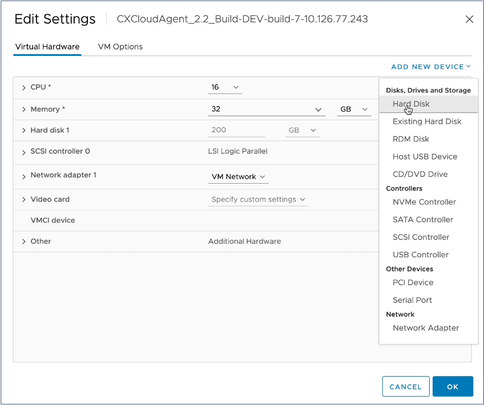 Edit Settings
 - Click Add New Device and select Hard Disk. The New Hard disk entry is added.
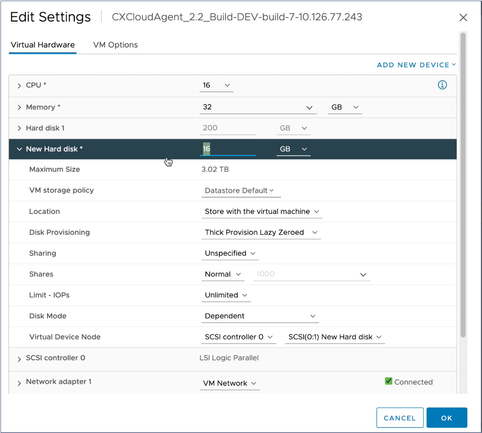 Edit Settings
 - Update New Hard disk memory as specified:
Small to Medium: 400 GB, (Initial size 200 GB, increasing total space to 600 GB)
Small to Large: 1000 GB, (Initial size 200 GB, increasing total space to 1200 GB)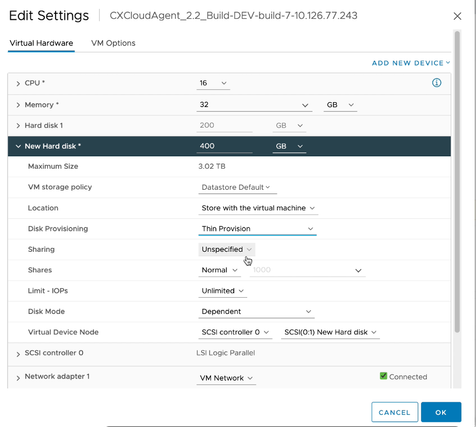 Edit Settings
 - Select Thin Provision from the Disk Provisioning drop-down list.
- Click OK to complete the upgrade.
Deployment and Network Configuration
Select any of these options to deploy the CX Cloud Agent:
- VMware vSphere/vCenter Thick Client ESXi 5.5/6.0
- VMware vSphere/vCenter Web Client ESXi 6.0 or Web Client vCenter Installation
- Oracle Virtual Box 7.0.12
- Microsoft Hyper-V Installation
OVA Deployment
Thick Client ESXi 5.5/6.0 Installation
This client allows deployment of CX Cloud Agent OVA by use of the vSphere thick client.
- After downloading the image, launch the VMware vSphere Client and log in.
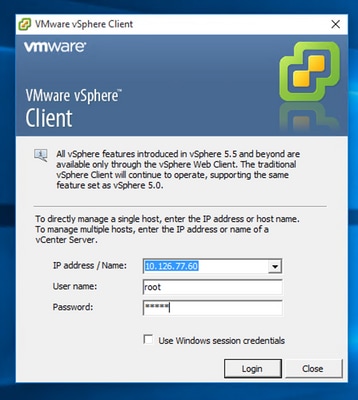 Login
Login - From the menu, select File > Deploy OVF Template.
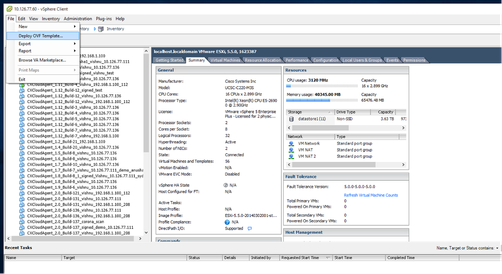 vSphere Client
 - Browse to select the OVA file and click Next.
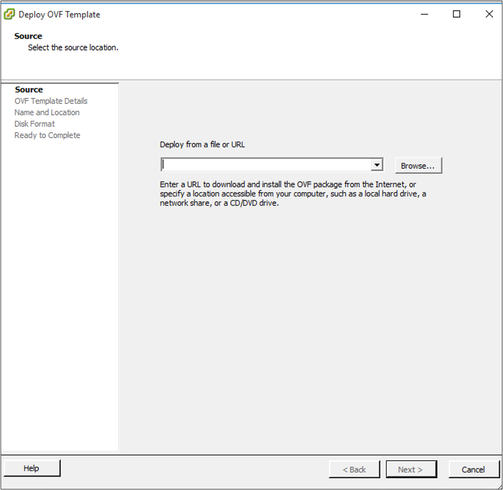 OVA Path
 - Verify the OVF Details and click Next.
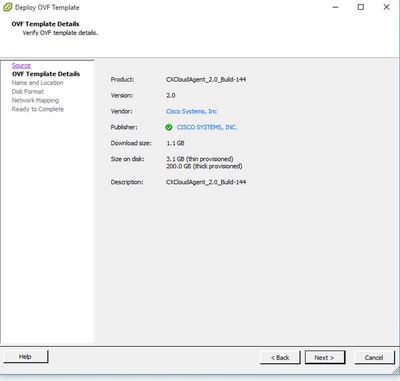 Template Details
 - Enter a Unique Name and click Next.
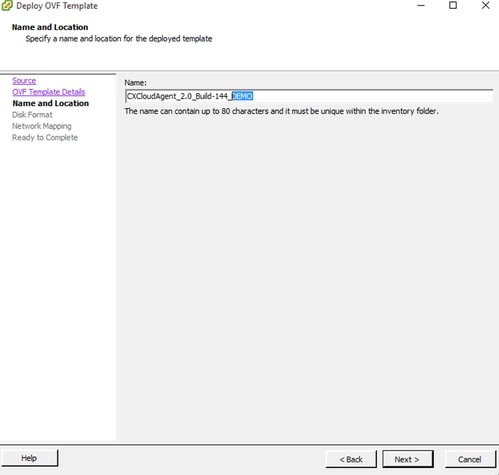 Name and Location
 - Select a Disk Format and click Next (Thin Provision is recommended).
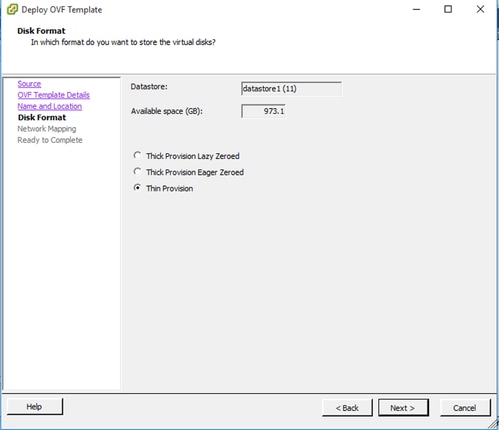 Disk Format
 - Select the Power on after deployment check box and click Close.
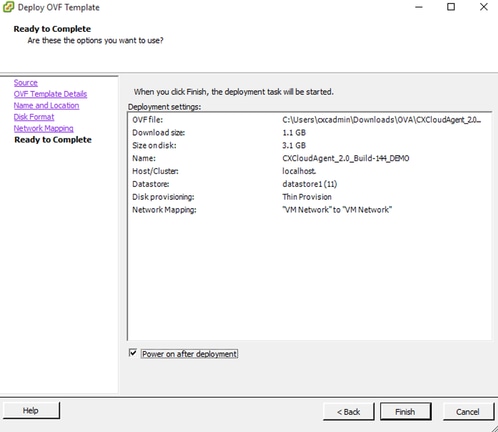 Ready to Complete
Deployment can take several minutes. Confirmation displays upon successful deployment.
 Deployment Complete
 - Select the deployed VM, open the console, and go to Network Configuration to proceed with the next steps.
Web Client ESXi 6.0 Installation
This client deploys CX Cloud Agent OVA by use of the vSphere web.
- Log in to the VMWare UI with the ESXi/hypervisor credentials used for deploying VM.
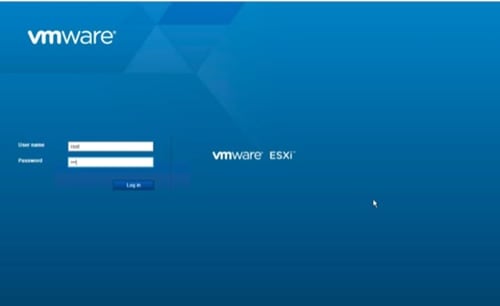 VMWare ESXi Login
 - Select Virtual Machine > Create / Register VM.
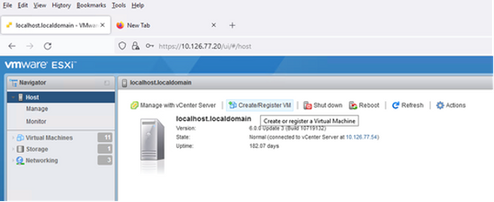 Create VM
 - Select Deploy a virtual machine from an OVF or OVA file and click Next.
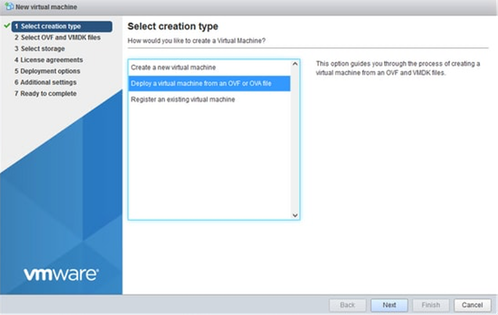 Select Creation Type
 - Enter the name of the VM, browse to select the file, or drag-and-drop the downloaded OVA file.
- Click Next.
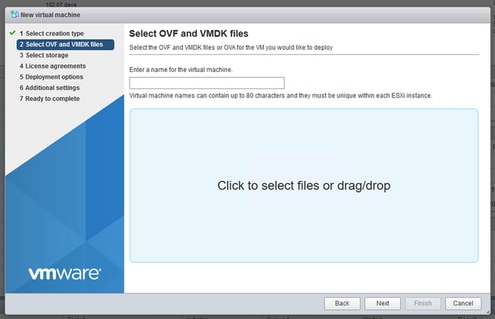 OVA Selection
 - Select Standard storage and click Next.
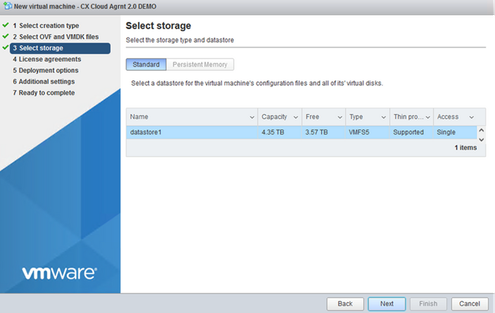 Select Storage
 - Select the appropriate Deployment options and click Next.
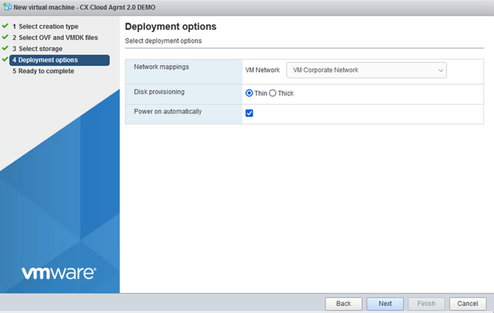 Deployment Options
 - Review the settings and click Finish.
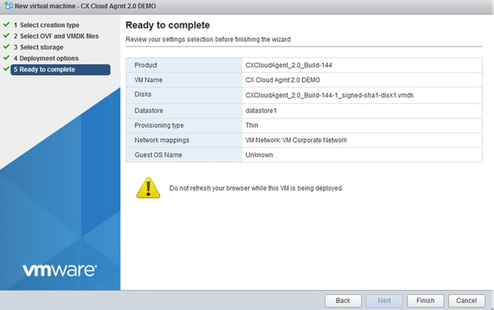 Ready to Complete
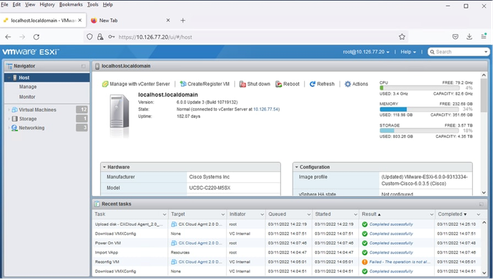 Successful Completion
 - Select the VM just deployed and select Console > Open browser console.
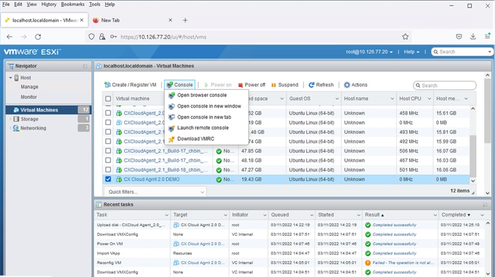 Console
 - Navigate to Network Configuration to proceed with the next steps.
Web Client vCenter Installation
Perform these steps:
- Log into vCenter Client using ESXi/hypervisor credentials.
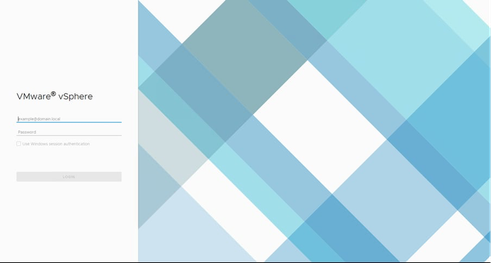 Log In
 - From the Home page, click Hosts and Clusters.
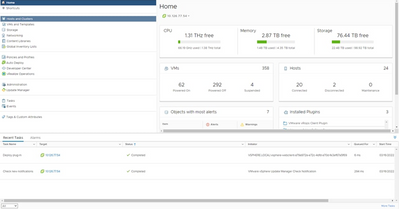 Home Page
 - Select the VM and click Action > Deploy OVF Template.
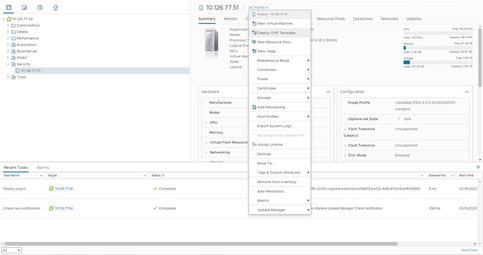 Actions
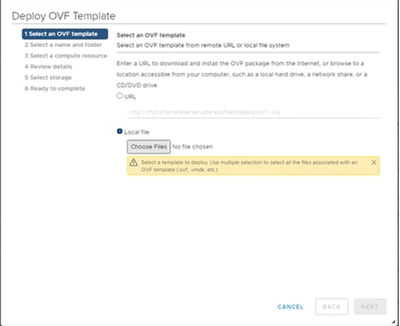 Select Template
 - Add the URL directly or browse to select the OVA file and click Next.
- Enter a unique name and browse to the location if required.
- Click Next.
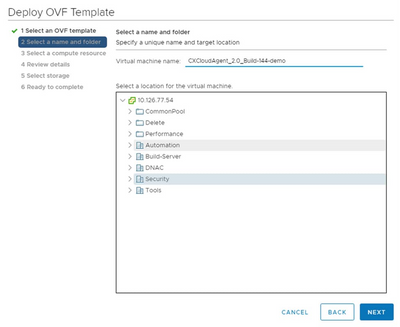 Name and Folder
 - Select a compute resource and click Next.
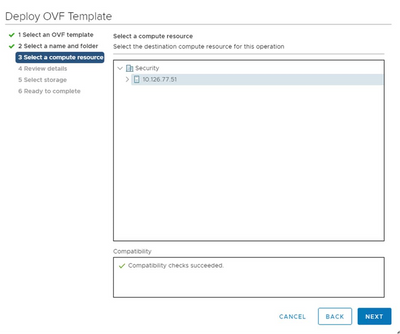 Select Computer Resource
 - Review the details and click Next.
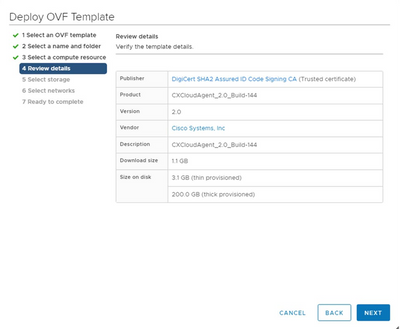 Review Details
 - Select the virtual disk format and click Next.
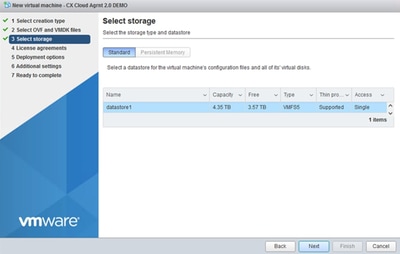 Select Storage
 - Click Next.
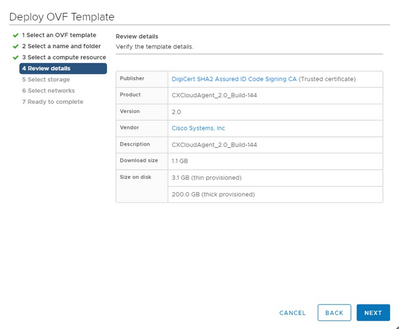 Select Network
 - Click Finish.
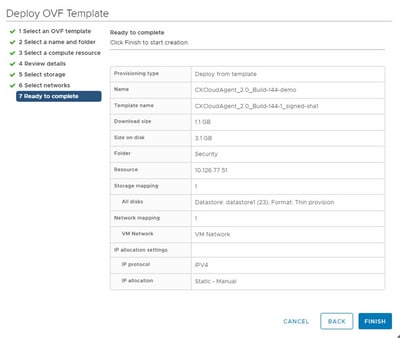 Ready to Complete
 - Click the name of the newly added VM to view the status.
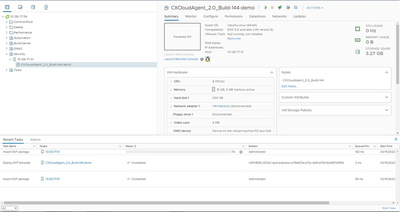 VM Added
 - Once installed, power on the VM and open the console.
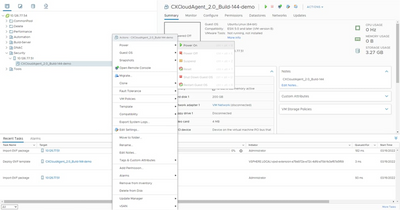 Open Console
 - Navigate to Network Configuration to proceed with the next steps.
Oracle Virtual Box 7.0.12 Installation
This client deploys CX Cloud Agent OVA though the Oracle Virtual Box.
- Download the CXCloudAgent_2.4 OVA into the windows box to any folder.
- Browse to the folder using the command line interface.
- Unzip the OVA file using the command tar -xvf D:\CXCloudAgent_2.4_Build-xx.ova.
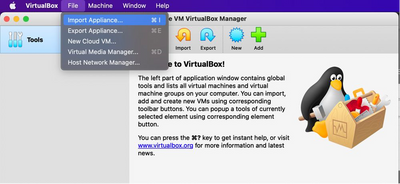 Unzip OVA File
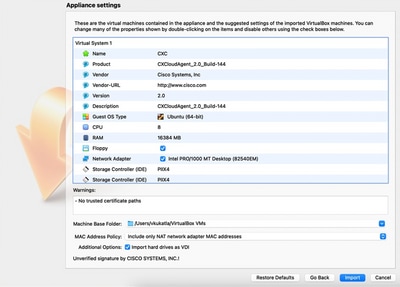
 - Open the Oracle VM UI.
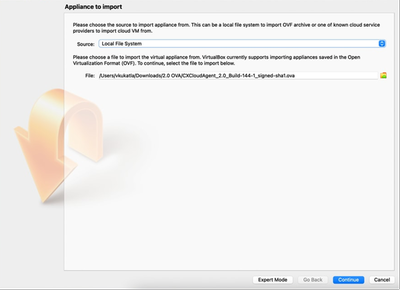 Oracle VM
 - From the menu, select Machine>New. The Create Virtual Machine window opens.
 Create Virtual Machine
 - Enter the following details in the Virtual machine Name and Operating System window.
Name: VM name
Folder: Location where VM data to be stored
ISO image: none
Type: Linux
Version: Gentoo (64bit) - Click Next. The Hardware window opens.
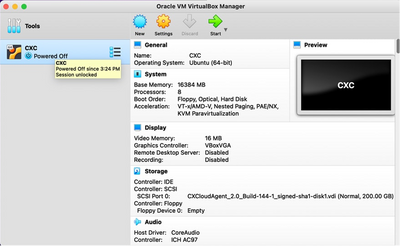 Hardware
 - Enter Base Memory (16384 MB) and Processors (8 CPU) and click Next. The Virtual Hard Disk window opens.
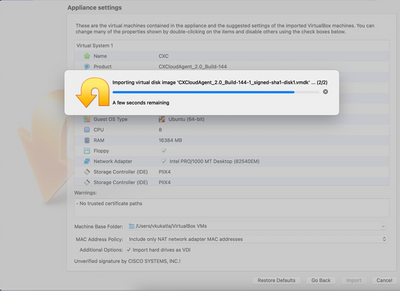 Virtual Hard Disk
 - Select the Use an Existing Virtual Hard Disk File radio button and select the Browse icon. The Hard Disk Selector window opens.
 Hard Disk Selector
 - Browse to the OVA folder and select the VMDK file.
 OVA Folder
 - Click Open. The file displays in the Hardware Disk Selector window.
 Hard Disk Selector
 - Click Choose. The Virtual Hard Disk window opens. Confirm the displayed option is selected.
 Select file
 - Click Next. The Summary window opens.
 Summary
 - Click Finish.
 VM Console Startup
 - Select the deployed VM and click Start. The VM powers in and the console screen displays for setup.
 Open the console
 - Navigate to Network Configuration to proceed with the next steps.
Microsoft Hyper-V Installation
This client deploys CX Cloud Agent OVA though the Microsoft Hyper-V installation.
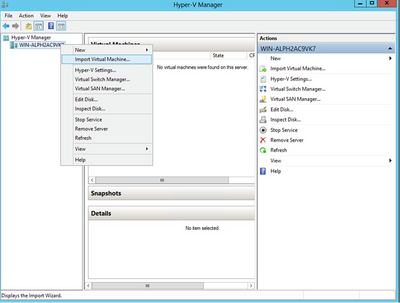
- Login into the Hyper-V Manager.
 Hyper V Manager
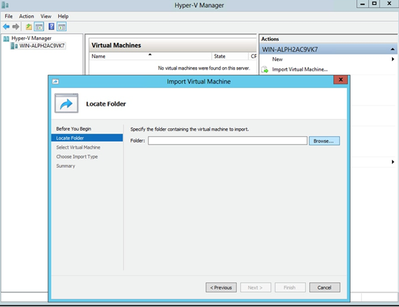
 - Select target VM, right-click to open menu, and select Import Virtual Machine.
 Folder to Import
 - Browse and select the download folder and click Next.
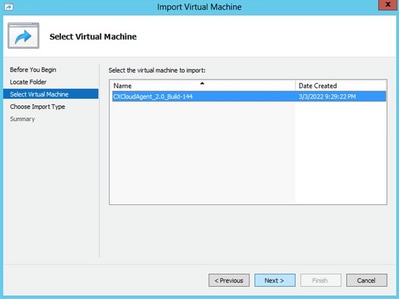
 Select VM
 - Select the VM and click Next.
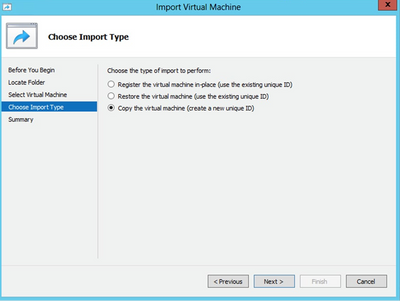
 Import Type
 - Select the Copy the virtual machine (create a new unique ID) radio button and click Next.
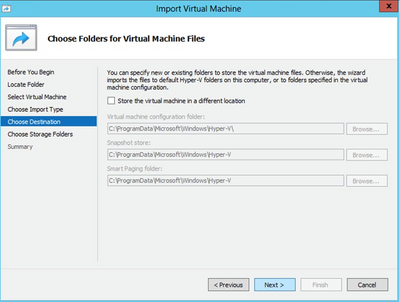
 Choose Folders for Virtual Machine Files
 - Browse to select the folder for VM files. Cisco recommends using the default paths.
- Click Next.
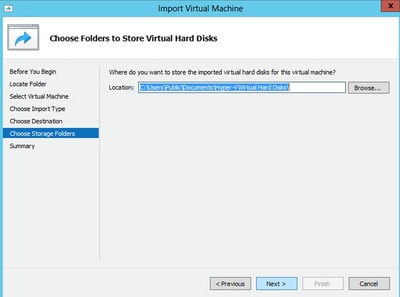
 Folder to Store the Virtual Hard Disks
 - Browse and select the folder to store the VM hard disks. Cisco recommends using the default paths.
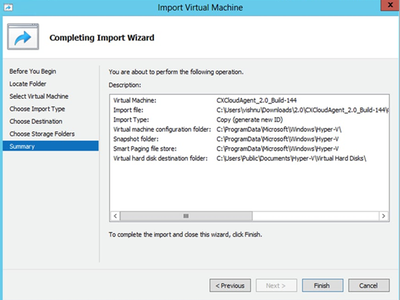
- Click Next. The VM summary displays.
 Summary
 - Verify all inputs and click Finish.
- Once the import is successfully complete, a new VM is created on Hyper-V. Open the VM settings.
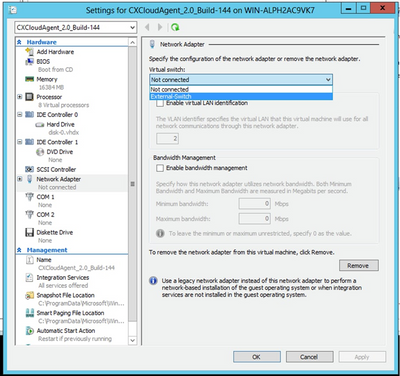
 Virtual Switch
 - Select the Network Adaptor from the left panel and select the available Virtual Switch from the drop-down list.
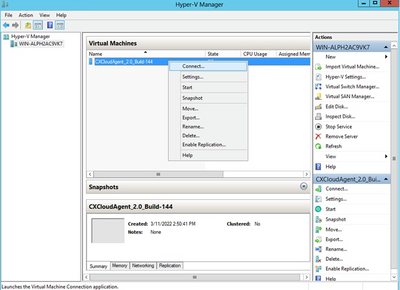
 Starting VM
 - Select Connect to start the VM.
- Navigate to Network Configuration to proceed with the next steps.
Network Configuration
To set the CX Cloud Agent password for the cxcadmin username:
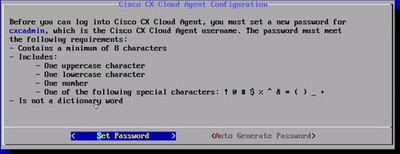
 Set Password
- Click Set Password to add a new password for cxcadmin OR click Auto Generate Password to get a new password.
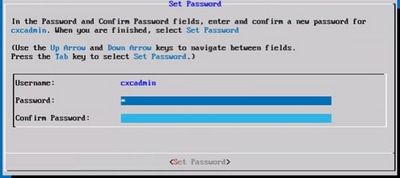
 New Password
 - If Set Password is selected, enter the password for cxcadmin and confirm it. Click Set Password and go to Step 3.
OR
If Auto Generate Password is selected, copy the password generated and store it for future use. Click Save Password and go to Step 4.
 Auto Generated Password
 Save Password
 - Click Save Password to use it for authentication.
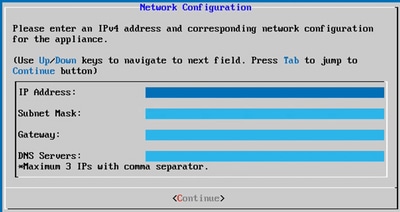
 Network Configuration
 - Enter the IP Address, Subnet Mask, Gateway, and DNS Server and click Continue.
 Confirmation
 - Confirm the entries and click Yes, Continue.
 Custom Subnet
 - Enter the Custom Subnet IP for the K3S cluster configuration (if a customer’s default subnet conflicts with their devices network, select another custom subnet).
- Click Continue.
 Proxy Set Up
 - Click Yes, Set Up Proxy to set the proxy details or click No, Continue to Configuration to directly proceed to Step 11.
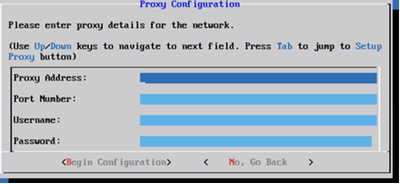
 Proxy Configuration
 - Enter the Proxy Address, Port Number, Username, and Password.
- Click Begin Configuration.
 CX Cloud Agent Set Up
 CX Cloud Agent Configuration
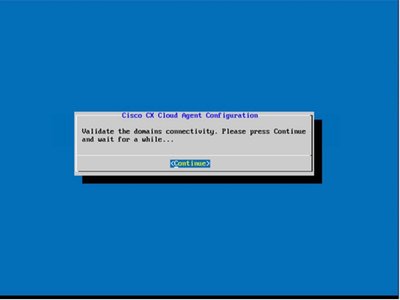
 - Click Continue.
 Configuration Continues
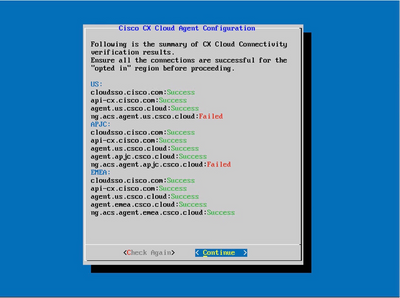
 - Click Continue to proceed with the configuration for successful domain reach. The configuration can take several minutes to complete.
Note: If the domains cannot be reached successfully, the customer must fix domain reachability by making changes in their firewall to ensure that domains are reachable. Click Check Again once the domains reachability issue is resolved.
 Register to CX Cloud
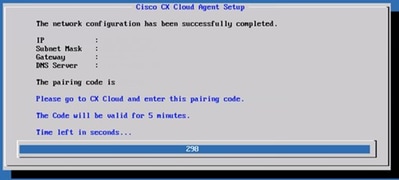
 - Click Register to CX Cloud to obtain pairing code.
 Pairing Code
 - Copy the Pairing Code and return to CX Cloud to continue the setup.
 Registration Successful
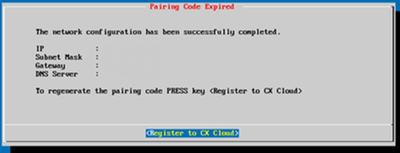
Note: If the pairing code expires, click Register to CX Cloud to generate new pairing code (Step 13).
15. Click OK.
Alternative Approach to Generate Pairing Code Using CLI
Users can also generate a pairing code by using CLI options.
To generate a pairing code using CLI:
- Log in to the Cloud Agent via SSH using the cxcadmin user credential.
- Generate the pairing code using the command cxcli agent generatePairingCode.
 Generate Pairing Code CLI
 - Copy the Pairing Code and return to CX Cloud to continue the setup.
Configure Cisco Catalyst Center To Forward Syslog to CX Cloud Agent
Prerequisites
Supported Cisco Catalyst Center versions are 2.1.2.0 to 2.2.3.5, 2.3.3.4 to 2.3.3.6, 2.3.5.0, and Cisco Catalyst Center Virtual Appliance
Configure Syslog Forward Setting
To configure Syslog Forwarding to CX Cloud Agent in the Cisco Catalyst Center, perform these steps:
- Launch Cisco Catalyst Center.
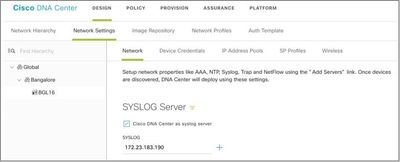
- Go to Design > Network Settings >Network.
- For each site, add the CX Cloud Agent IP as the Syslog Server.
 Syslog Server
Note: Once configured, all devices associated with that site are configured to send syslog with level critical to CX Cloud Agent. Devices must be associated to a site for enabling the syslog forwarding from the device to CX Cloud Agent. When a syslog server setting is updated, all devices associated with that site are automatically set to default critical level.
Configure Other Assets to Forward Syslog to CX Cloud Agent
Devices must be configured to send Syslog messages to the CX Cloud Agent to use the Fault Management feature of CX Cloud.
Note: Only Campus Success Track Level 2 devices are eligible to configure other assets to forward syslog.
Existing Syslog Servers with Forward Capability
Perform the configuration instructions for the syslog server software and add the CX Cloud Agent IP Address as a new destination.
Note: When forwarding syslogs, ensure that the source IP address of the original syslog message is preserved.
Existing Syslog Servers without Forward Capability OR without Syslog Server
Configure each device to send syslogs directly to the CX Cloud Agent IP Address. Refer to this documentation for specific configuration steps.
Cisco IOS® XE Configuration Guide
AireOS Wireless Controller Configuration Guide
Enable Information Level Syslog Settings
To make Syslog Information level visible, perform these steps:
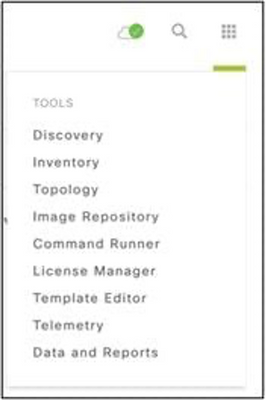
- Navigate to Tools>Telemetry.
 Tools Menu
 - Select and expand the Site View and select a site from site hierarchy.
 Site View
 -
Select the required site and select all devices using the Device name check box.
- Select Optimal Visibility from the Actions drop-down.
 Actions
Back Up and Restore the CX Cloud VM
It is recommended to preserve the state and data of a CX Cloud Agent VM at a specific point in time using the snapshot feature. This feature facilitates CX Cloud VM restoration to the specific time that the snapshot is taken.
Back Up
To back up the CX Cloud VM:
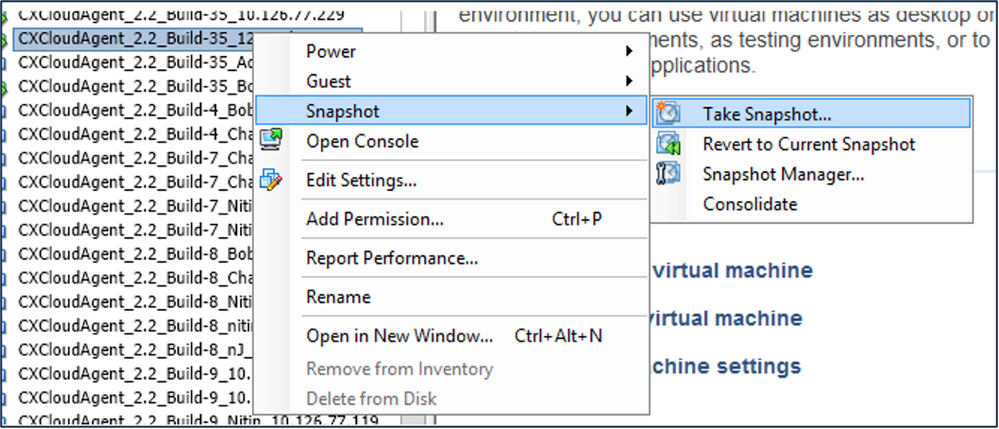
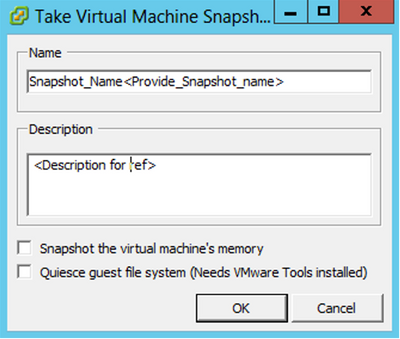
- Right-click the VM and select Snapshot > Take Snapshot. The Take Virtual Machine Snapshot window opens.
 Select VM
 Take Virtual Machine Snapshot
 - Enter Name and Description.
Note: Verify that the Snapshot the virtual machine’s memory check box is cleared.
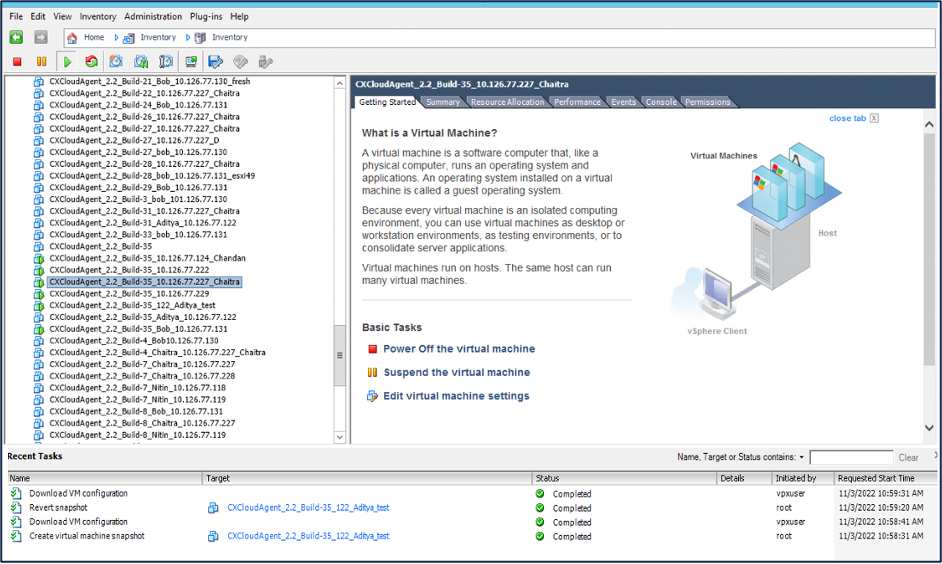
3. Click OK. The Create virtual machine snapshot status displays as Completed in the Recent Tasks list.
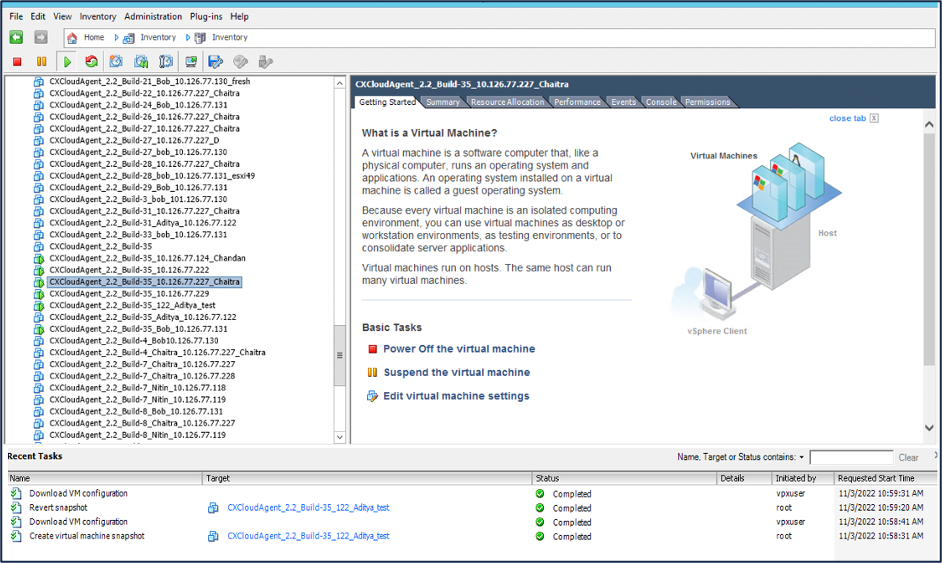 Recent Tasks
Restore
To restore the CX Cloud VM:
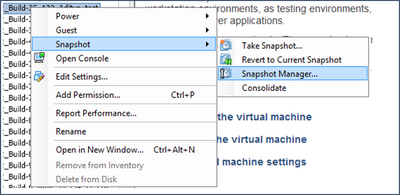
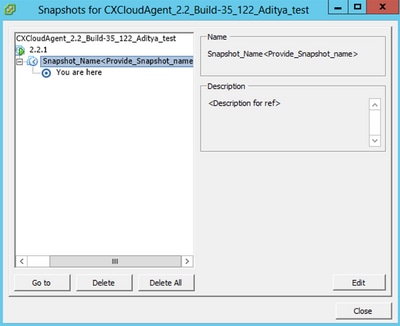
- Right-click the VM and select Snapshot > Snapshot Manager. The Snapshots of the VM window opens.
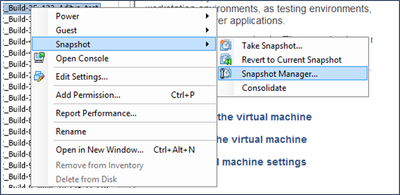 Select VM window
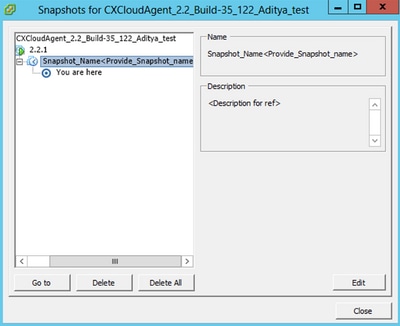 Snapshots Window
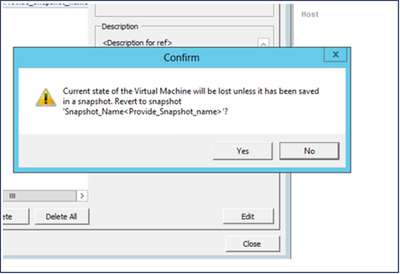
- Click Go to. The Confirm window opens.
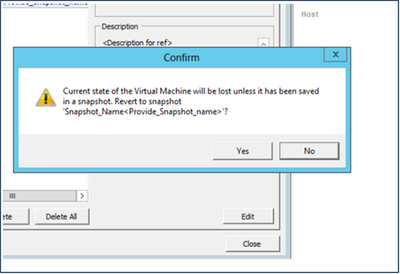 Confirm Window
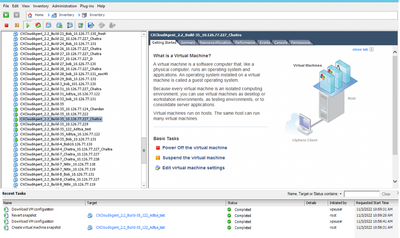
 - Click Yes. The Revert snapshot status displays as Completed in the Recent Tasks list.
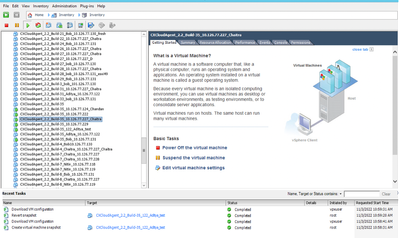 Recent Tasks
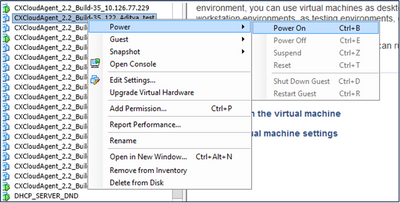
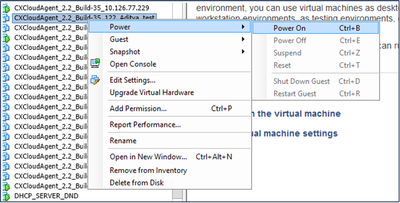
 - Right-click the VM and select Power > Power On to power on the VM.
Security
CX Cloud Agent assures the customer of end-to-end security. The connection between CX Cloud and CX Cloud Agent is TLS secured. Cloud Agent’s default SSH user is limited to perform only basic operations.
Physical Security
Deploy CX Cloud Agent OVA image in a secured VMware server firm. The OVA is shared securely through Cisco software download center. Bootloader (single user mode) password is set with a randomly unique password. Users must refer to this FAQ to set this bootloader (single-user mode) password.
Account Security
During deployment, the cxcadmin user account is created. Users are forced to set a password during the initial configuration. cxcadmin user/credentials are used to access both the CX Cloud Agent APIs and to connect to the appliance over SSH.
cxcadmin users have restricted access with the least privileges. The cxcadmin password follows the security policy and is one-way hashed with an expiry period of 90 days. cxcadmin users can create a cxcroot user using the utility called remoteaccount. cxcroot users can gain root privileges.
Network Security
The CX Cloud Agent VM can be accessed using SSH with cxcadmin user credentials. Incoming ports are restricted to 22 (SSH), 514(Syslog).
Authentication
Password based authentication: Appliance maintains a single user (cxcadmin) which enables the user to authenticate and communicate with the CX Cloud Agent.
- Root privileged actions on the appliance using SSH.
cxcadmin users can create cxcroot user using a utility called remoteaccount. This utility displays an RSA/ECB/PKCS1v1_5 encrypted password which can be decrypted only from the SWIM portal (DECRYPT Request Form). Only authorized personnel have access to this portal. cxcroot users can gain root privileges using this decrypted password. Passphrase is valid only for two days. cxcadmin users must recreate the account and obtain the password from the SWIM portal post password expiry.
Hardening
CX Cloud Agent appliance follows Center of Internet Security hardening standards.
Data Security
CX Cloud Agent appliance does not store any customer personal information. Device credential application (running as one of the pods) stores encrypted server credentials inside secured database. The collected data is not stored in any form inside the appliance except temporarily when it is being processed. Telemetry data is uploaded to CX Cloud as soon as possible after the collection is complete and is promptly deleted from local storage after it is confirmed that the upload was successful.
Data Transmission
The registration package contains the required unique X.509 device certificate and keys to establish secure connection with Iot Core. Using that agent establishes a secure connection using Message Queuing Telemetry Transport (MQTT) over Transport Layer Security (TLS) v1.2
Logs and Monitoring
Logs do not contain any form of Personal Identifiable Information (PII) data. Audit logs capture all security-sensitive actions performed on the CX Cloud Agent appliance.
Cisco Telemetry Commands
CX Cloud retrieves asset telemetry using the APIs and commands listed in the Cisco Telemetry Commands. This document categorizes commands based on their applicability to the Cisco Catalyst Center inventory, Diagnostic Bridge, Intersight, Compliance Insights, Faults, and all other sources of telemetry collected by the CX Cloud Agent.
Sensitive information within asset telemetry is masked before being transmitted to the cloud. The CX Cloud Agent masks sensitive data for all the collected assets that send telemetry directly to the CX Cloud Agent. This includes passwords, keys, community strings, usernames, and so on. Controllers provide data masking for all controller-managed assets before transferring this information to the CX Cloud Agent. In some instances, controller-managed assets telemetry can be anonymized further. Refer to the corresponding product support documentation to learn more about anonymizing the telemetry (for example, the Anonymize Data section of the Cisco Catalyst Center Administrator Guide).
While the list of telemetry commands cannot be customized and the data masking rules cannot be modified, customers can control which assets’ telemetry CX Cloud accesses by specifying data sources as discussed in the product support documentation for controller-managed devices or the Connecting Data Sources section of this document (for Other assets collected by CX Cloud Agent).
Security Summary
|
Security Features |
Description |
|
Bootloader Password |
Bootloader (Single user mode) password is set with a randomly unique password. Users must refer to FAQ to set his bootloader (single user mode) password. |
|
User Access |
SSH: · Access to appliance using cxcadmin user requires credentials created during installation. · Access to appliance using cxcroot user requires credentials to be decrypted using SWIM portal by authorized personnel. |
|
User Accounts |
· cxcadmin: default user account created; User can execute CX Cloud Agent application commands using cxcli and has least privileges on the appliance; cxcroot user and its encrypted password is generated using cxcadmin user. · cxcroot: cxcadmin can create this user using the utility remoteaccount; User can gain root privileges with this account. |
|
cxcadmin password policy |
· Password is one-way hashed using SHA-256 and stored securely. · Minimum eight (8) characters, containing three of these categories: uppercase, lowercase, numbers, and special characters. |
|
cxcroot password policy |
· cxcroot password is RSA/ECB/PKCS1v1_5 encrypted · The passphrase generated needs to be decrypted in SWIM portal. · The cxcroot user and password is valid for two days and can be regenerated using cxcadmin user. |
|
ssh login password policy |
· Minimum of eight characters that contains three of these categories: uppercase, lowercase, numbers, and special characters. · Five failed log in attempts lock the box for 30 minutes; Password expires in 90 days. |
|
Ports |
Open Incoming Ports – 514(Syslog) and 22 (SSH) |
|
Data Security |
· No Customer information stored. · No Device data stored. · Cisco Catalyst Center server credentials encrypted and stored in the database. |
Revision History
| Revision | Publish Date | Comments |
|---|---|---|
3.0 |
14-Nov-2024 |
Section "Oracle Virtual Box 7.0.12 Installation" has been updated. |
2.0 |
26-Sep-2024 |
Updated the document to reflect Cisco DNA Center name change to Cisco Catalyst Center. |
1.0 |
25-Jul-2024 |
Initial Release |
Contact Cisco
- Open a Support Case

- (Requires a Cisco Service Contract)
 Feedback