Introduction
This document describes the steps required to set up EAP-TLS authentication with OCSP for real-time client certificate revocation checks.
Prerequisites
Requirements
Cisco recommends that you have knowledge of these topics:
- Configuration of Cisco Identity Services Engine
- Configuration of Cisco Catalyst
- Online Certificate Status Protocol
Components Used
The information in this document is based on these software and hardware versions:
- Identity Services Engine Virtual 3.2 Patch 6
- C1000-48FP-4G-L 15.2(7)E9
- Windows Server 2016
- Windows 10
The information in this document was created from the devices in a specific lab environment. All of the devices used in this document started with a cleared (default) configuration. If your network is live, ensure that you understand the potential impact of any command.
Network Diagram
This image shows the topology that is used for the example of this document.
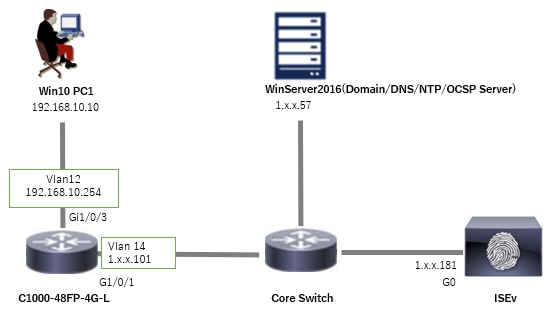 Network Diagram
Background Information
In EAP-TLS, a client presents its digital certificate to the server as part of the authentication process. This document describes how the ISE validates the client certificate by checking the certificate common name (CN) against the AD server and confirming whether the certificate has been revoked by using OCSP (Online Certificate Status Protocol), which provides real-time protocol status.
The domain name configured on Windows Server 2016 is ad.rem-xxx.com, which is used as an example in this document.
The OCSP (Online Certificate Status Protocol) and AD (Active Directory) server referenced in this document are used for certificate validation.
This is the certificate chain with the common name of each certificate used in the document.
- CA: ocsp-ca-common-name
- Client Certificate: clientcertCN
- Server Certificate: ise32-01.ad.rem-xxx.com
- OCSP Signing Certificate: ocspSignCommonName
Configurations
Configuration in C1000
This is the minimal configuration in C1000 CLI.
aaa new-model

radius server ISE32
address ipv4 1.x.x.181
key cisco123

aaa group server radius AAASERVER
server name ISE32

aaa authentication dot1x default group AAASERVER
aaa authorization network default group AAASERVER
aaa accounting dot1x default start-stop group AAASERVER
dot1x system-auth-control

interface Vlan12
ip address 192.168.10.254 255.255.255.0

interface Vlan14
ip address 1.x.x.101 255.0.0.0

interface GigabitEthernet1/0/1
Switch port access vlan 14
Switch port mode access

interface GigabitEthernet1/0/3
switchport access vlan 12
switchport mode access
authentication host-mode multi-auth
authentication port-control auto
dot1x pae authenticator
spanning-tree portfast edge
Configuration in Windows PC
Step 1. Configure User Authentication
Navigate toAuthentication, checkEnable IEEE 802.1X authentication and select Microsoft: Smart Card or other certificate.
ClickSettingsbutton, checkUse a certificate on this computer, and select the trusted CA of Windows PC.
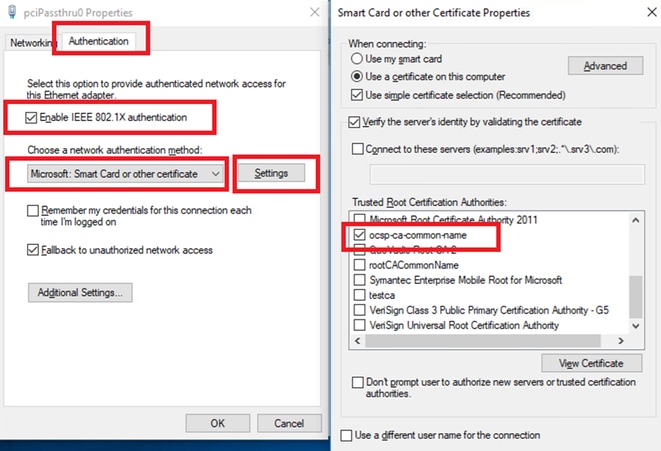 Enable Certificate Authentication
Navigate toAuthentication, checkAdditional Settings. SelectUser or computer authenticationfrom drop-down list.
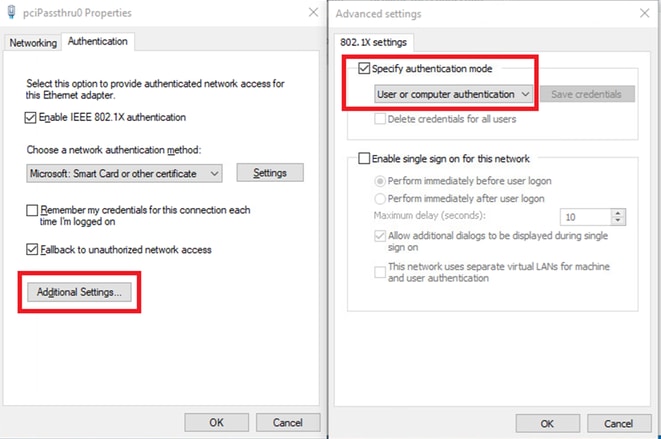 Specify Authentication Mode
Step 2. Confirm Client Certificate
Navigate to Certificates - Current User > Personal > Certificates, and check the client certificate used for authentication.
 Confirm Client Certificate
Double click the client certificate, navigate to Details, check the detail of Subject, CRL Distribution Points, Authority Information Access.
 Detail of Client Certificate
Configuration in Windows Server
Step 1. Add Users
Navigate toActive Directory Users and Computers, clickUsers. Add clientcertCN as user logon name.
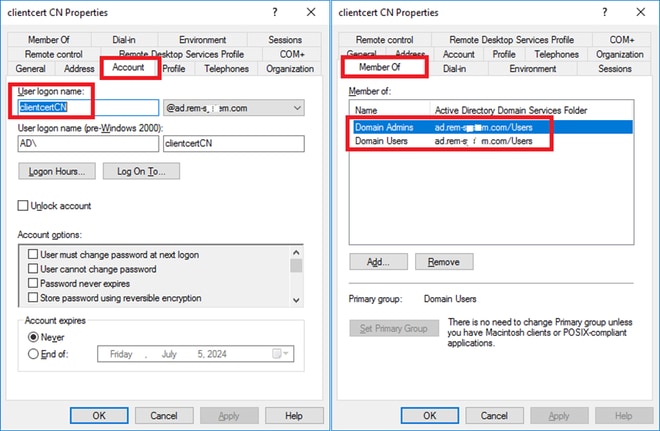 User Logon Name
Step 2. Confirm OCSP Service
Navigate to Windows, click Online Responder Management. Confirm the status of OCSP server.
 Status of OCSP Server
Click winserver.ad.rem-xxx.com, check the status of OCSP signing certificate.
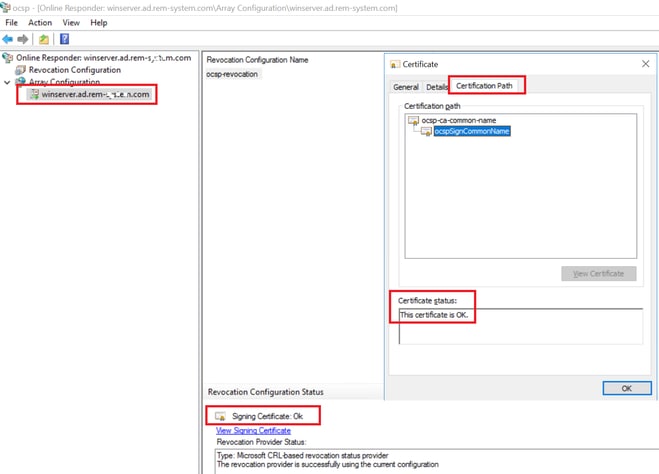 Status of OCSP Signing Certificate
Configuration in ISE
Step 1. Add Device
Navigate toAdministration > Network Devices, clickAddbutton to add C1000 device.
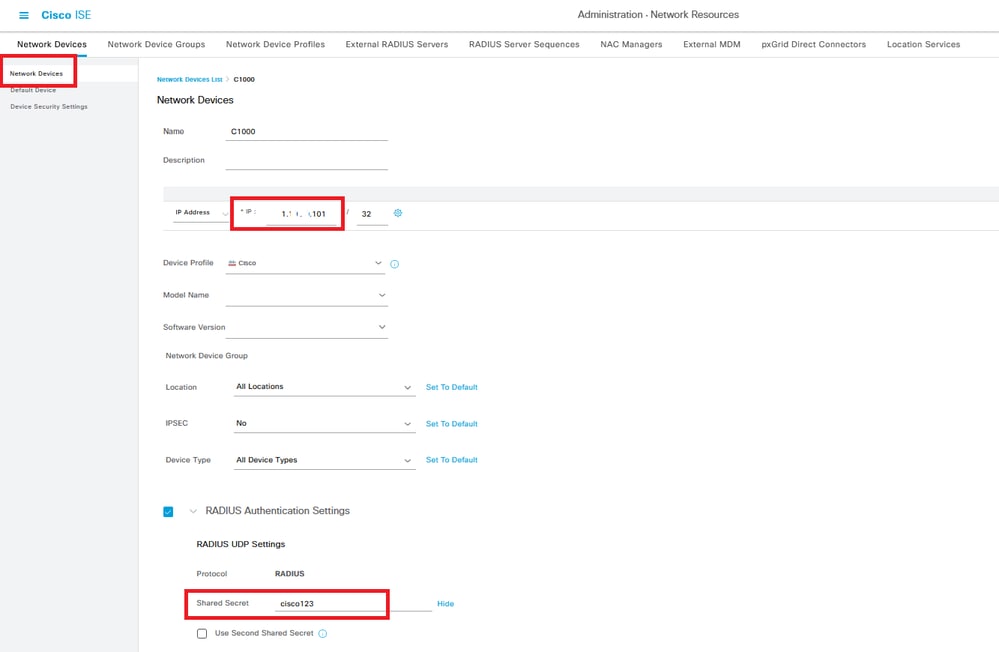 Add Device
Step 2. Add Active Directory
Navigate toAdministration > External Identity Sources > Active Directory, clickConnectiontab, add Active Directory to ISE.
- Join Point Name: AD_Join_Point
- Active Directory Domain: ad.rem-xxx.com
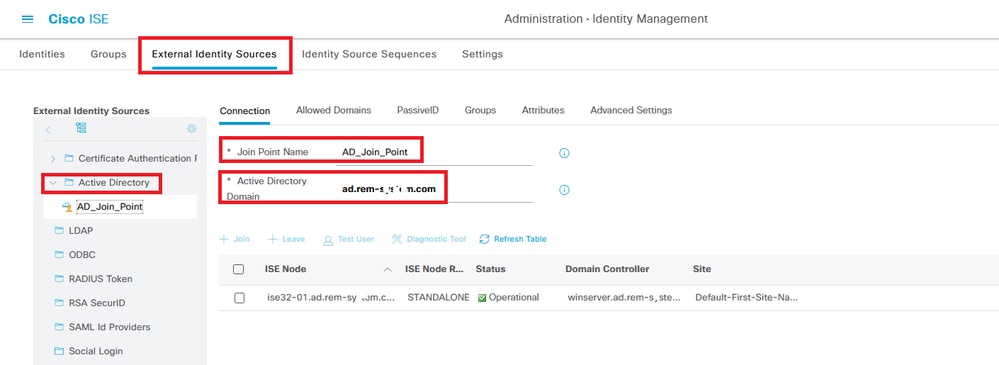 Add Active Directory
Navigate to Groups tab, selectSelect Groups From Directoryfrom drop-down list.
 Select Groups from Directory
ClickRetrieve Groupsfrom drop-down list. Checkad.rem-xxx.com/Users/Cert Publishers and clickOK.
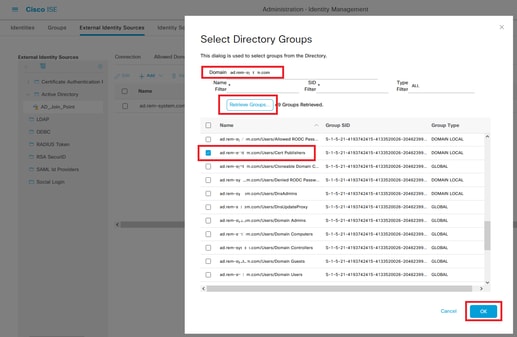 Check Cert Publishers
Step 3. Add Certificate Authentication Profile
Navigate to Administration > External Identity Sources > Certificate Authentication Profile, click Add button to add a new certificate authentication profile.
- Name: cert_authen_profile_test
- Identity Store: AD_Join_Point
- Use Identity From Certificate Attribute: Subject - Common Name.
- Match Client Certificate Against Certificate In Identity Store: Only to resolve identity ambiguity.
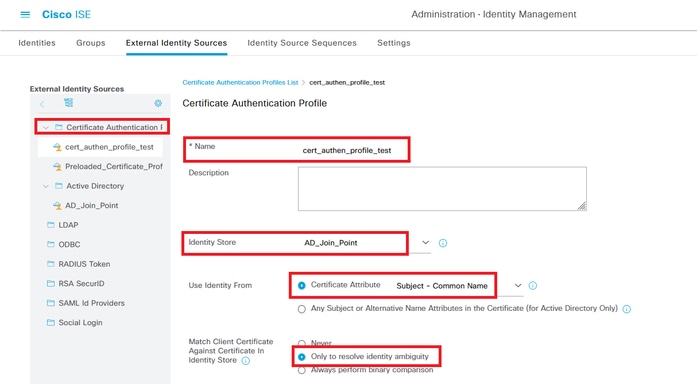 Add Certificate Authentication Profile
Step 4. Add Identity Source Sequesce
Navigate toAdministration > Identity Source Sequences, add an Identity Source Sequence.
- Name: Identity_AD
- Select Certificate Authentication Profile: cert_authen_profile_test
- Authentication Search List: AD_Join_Point
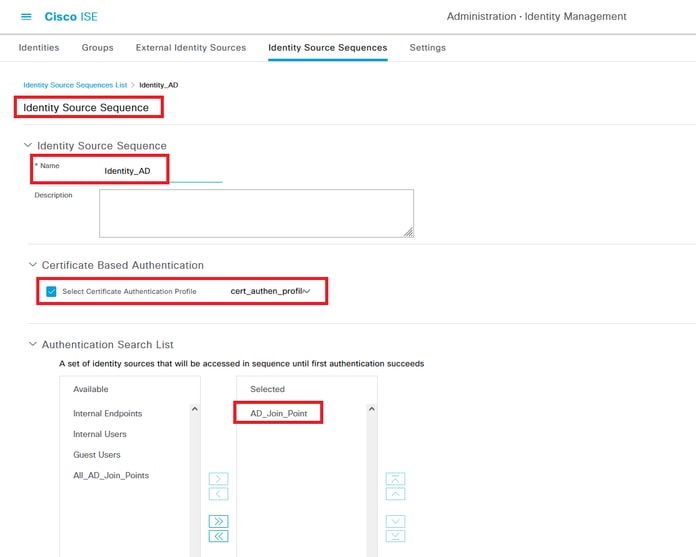 Add Identity Source Sequences
Step 5. Confrim Certificate in ISE
Navigate to Administration > Certificates > System Certificates, confirm the server certificate is signed by the trusted CA.
 Server Certificate
Navigate to Administration > Certificates > OCSP Client Profile, click Add button to add a new OCSP client profile.
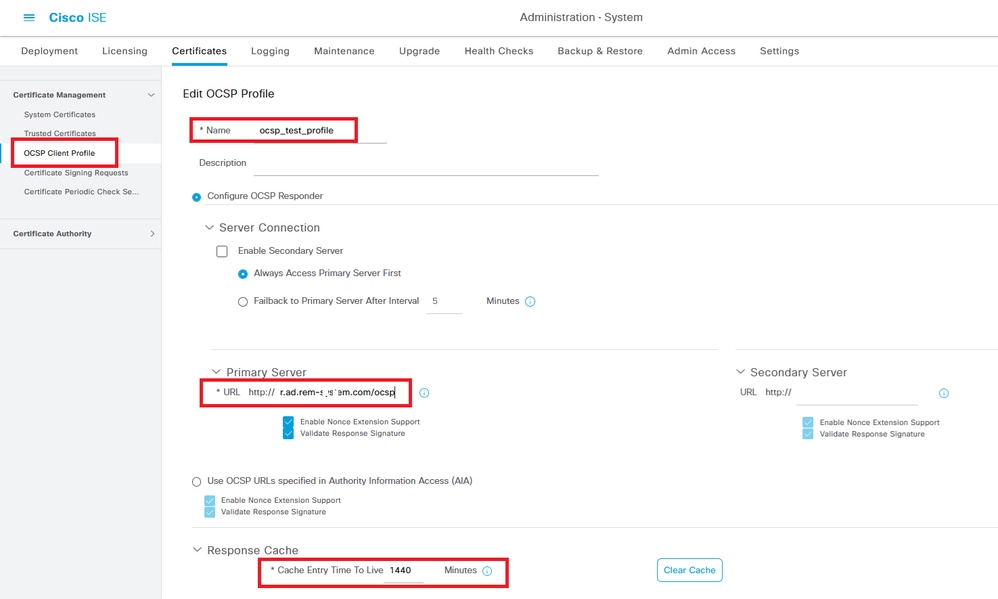 OCSP Client Profile
Navigate to Administration > Certificates > Trusted Certificates, confirm the trusted CA is imported to ISE.
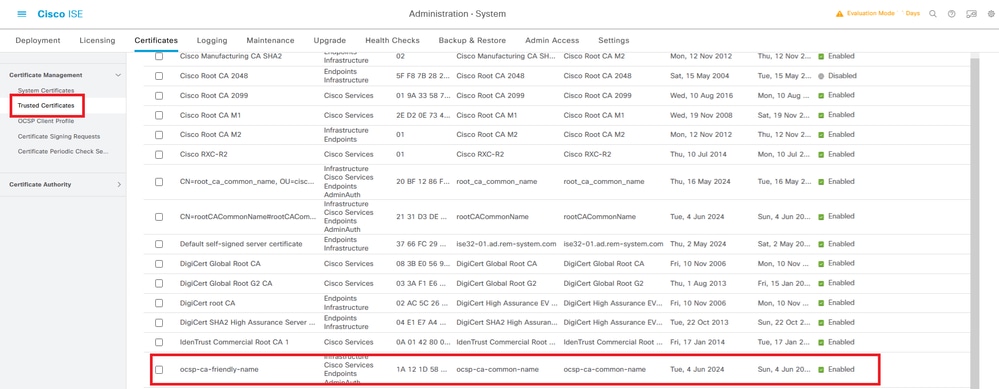 Trusted CA
Check the CA and click Edit button, input the detail of OCSP configuration for Certificate Status Validation.
- Validate against OCSP Service: ocsp_test_profile
- Reject the request if OCSP returns UNKNOWN status: check
- Reject the request if OCSP Responder is unreachable: check
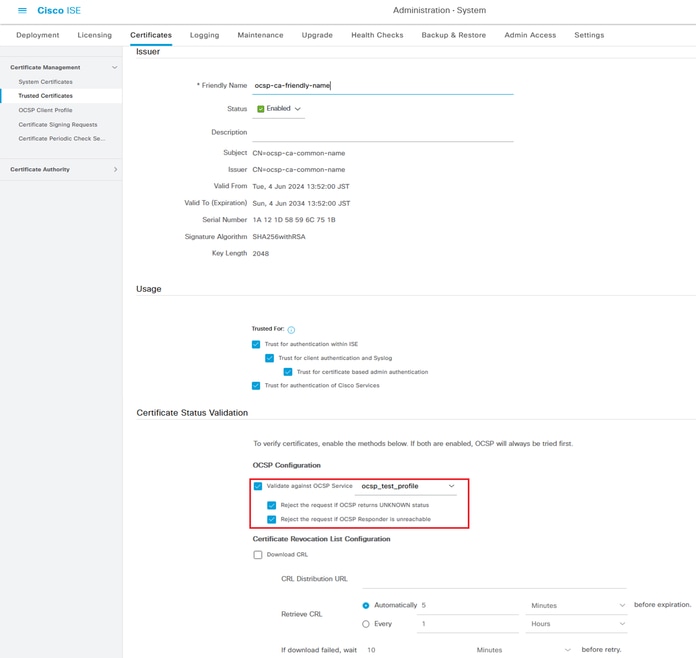 Certificate Status Validation
Step 6. Add Allowed Protocols
Navigate to Policy > Results > Authentication > Allowed Protocols, edit the Default Network Access service list and then check Allow EAP-TLS.
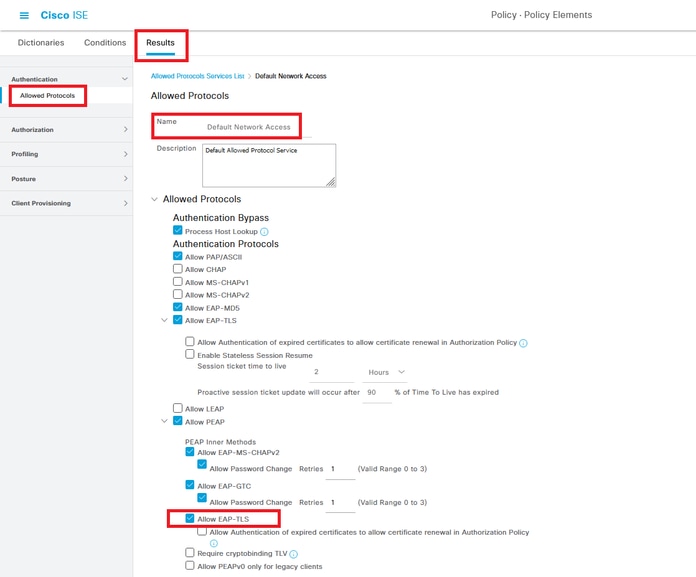 Allow EAP-TLS
Step 7. Add Policy Set
Navigate to Policy > Policy Sets, click + to add a policy set.
- Policy Set Name: EAP-TLS-Test
- Conditions: Network Access Protocol EQUALS RADIUS
- Allowed Protocols / Server Sequence: Default Network Access
 Add Policy Set
Step 8. Add Authentication Policy
Navigate to Policy Sets, click EAP-TLS-Testto add an authentication policy.
- Rule Name: EAP-TLS-Authentication
- Conditions: Network Access EapAuthentication EQUALS EAP-TLS AND Wired_802.1 X
- Use: Identity_AD
 Add Authentication Policy
Step 9. Add Authorization Policy
Navigate to Policy Sets, click EAP-TLS-Test to add an authorization policy.
- Rule Name: EAP-TLS-Authorization
- Conditions: CERTIFICATE Subject - Common Name EQUALS clientcertCN
- Results: PermitAccess
 Add Authorization Policy
Verify
Step 1. Confirm Authentication Session
Runshow authentication sessions interface GigabitEthernet1/0/3 details command to confirm authentication session in C1000.
Switch#show authentication sessions interface GigabitEthernet1/0/3 details
Interface: GigabitEthernet1/0/3
MAC Address: b496.9114.398c
IPv6 Address: Unknown
IPv4 Address: 192.168.10.10
User-Name: clientcertCN
Status: Authorized
Domain: DATA
Oper host mode: multi-auth
Oper control dir: both
Session timeout: N/A
Restart timeout: N/A
Periodic Acct timeout: N/A
Session Uptime: 111s
Common Session ID: 01C20065000000933E4E87D9
Acct Session ID: 0x00000078
Handle: 0xB6000043
Current Policy: POLICY_Gi1/0/3

Local Policies:
Service Template: DEFAULT_LINKSEC_POLICY_SHOULD_SECURE (priority 150)

Server Policies:


Method status list:
Method State

dot1x Authc Success
Step 2. Confirm Radius Live Log
Navigate to Operations > RADIUS > Live Logsin ISE GUI, confirm the live log for authentication.
 Radius Live Log
Confirm the detailed live log of authentication.
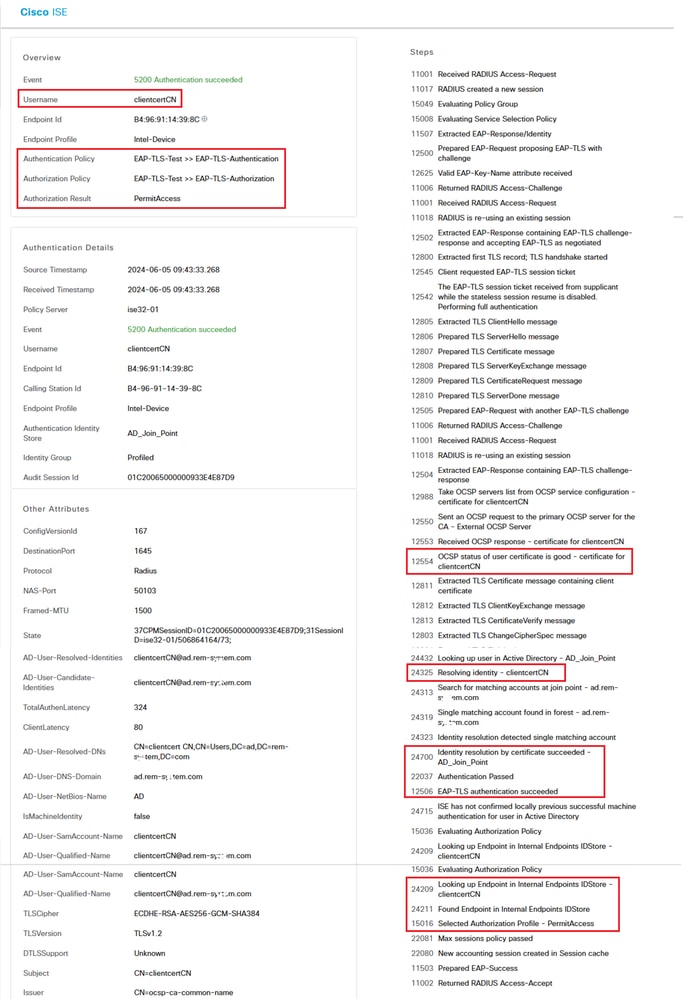 Detail of Authentication
Troubleshoot
1. Debug log
This debug log (prrt-server.log) help you to confirm the detailed behavior of authentication in ISE.
// OCSP request and response
Crypto,2024-06-05 09:43:33,064,DEBUG,0x7f9822961700,NIL-CONTEXT,Crypto::Result=0, CryptoLib.CSSL.OCSP Callback - starting OCSP request to primary,SSL.cpp:1444
Crypto,2024-06-05 09:43:33,064,DEBUG,0x7f9822961700,NIL-CONTEXT,Crypto::Result=0, Crypto.OcspClient::performRequest - Start processing OCSP request, URL=http://winserver.ad.rem-xxx.com/ocsp, use nonce=1,OcspClient.cpp:144

Crypto,2024-06-05 09:43:33,104,DEBUG,0x7f9822961700,NIL-CONTEXT,Crypto::Result=0, Crypto.OcspClient::performRequest - Received OCSP server response,OcspClient.cpp:411
Crypto,2024-06-05 09:43:33,104,DEBUG,0x7f9822961700,NIL-CONTEXT,Crypto::Result=0, Crypto.OcspClient::performRequest - Nonce verification passed,OcspClient.cpp:426

Crypto,2024-06-05 09:43:33,104,DEBUG,0x7f9822961700,NIL-CONTEXT,Crypto::Result=0, Crypto.OcspClient::performRequest - OCSP responser name 8CD12ECAB78607FA07194126EDA82BA7789CE00C,OcspClient.cpp:462
Crypto,2024-06-05 09:43:33,104,DEBUG,0x7f9822961700,NIL-CONTEXT,Crypto::Result=0, Crypto.OcspClient::performRequest - Verify response signature and KU/EKU attributes of response signer certificate,OcspClient.cpp:472

Crypto,2024-06-05 09:43:33,104,DEBUG,0x7f9822961700,NIL-CONTEXT,Crypto::Result=0, Crypto.OcspClient::performRequest - Response signature verification passed,OcspClient.cpp:482
Crypto,2024-06-05 09:43:33,104,DEBUG,0x7f9822961700,NIL-CONTEXT,Crypto::Result=0, Crypto.OcspClient::performRequest - Response contains 1 single responses for certificates,OcspClient.cpp:490

Crypto,2024-06-05 09:43:33,104,DEBUG,0x7f9822961700,NIL-CONTEXT,Crypto::Result=0, Crypto.OcspClient::performRequest - User certificate status: Good,OcspClient.cpp:598
Crypto,2024-06-05 09:43:33,104,DEBUG,0x7f9822961700,NIL-CONTEXT,Crypto::Result=0, CryptoLib.CSSL.OCSP Callback - perform OCSP request succeeded, status: Good,SSL.cpp:1684

// Radius session
Radius,2024-06-05 09:43:33,120,DEBUG,0x7f982d7b9700,cntx=0000017387,sesn=ise32-01/506864164/73,CPMSessionID=01C20065000000933E4E87D9,CallingStationID=B4-96-91-14-39-8C,RADIUS PACKET:: Code=1(AccessRequest) Identifier=238 Length=324
[1] User-Name - value: [clientcertCN]
[4] NAS-IP-Address - value: [1.x.x.101]
[5] NAS-Port - value: [50103]
[24] State - value: [37CPMSessionID=01C20065000000933E4E87D9;31SessionID=ise32-01/506864164/73;]
[87] NAS-Port-Id - value: [GigabitEthernet1/0/3]

Radius,2024-06-05 09:43:33,270,DEBUG,0x7f982d9ba700,cntx=0000017387,sesn=ise32-01/506864164/73,CPMSessionID=01C20065000000933E4E87D9,user=clientcertCN,CallingStationID=B4-96-91-14-39-8C,RADIUS PACKET:: Code=2(AccessAccept) Identifier=238 Length=294
[1] User-Name - value: [clientcertCN]

Radius,2024-06-05 09:43:33,342,DEBUG,0x7f982d1b6700,cntx=0000017401,sesn=ise32-01/506864164/74,CPMSessionID=01C20065000000933E4E87D9,CallingStationID=B4-96-91-14-39-8C,RADIUS PACKET:: Code=4(AccountingRequest) Identifier=10 Length=286
[1] User-Name - value: [clientcertCN]
[4] NAS-IP-Address - value: [1.x.x.101]
[5] NAS-Port - value: [50103]
[40] Acct-Status-Type - value: [Interim-Update]
[87] NAS-Port-Id - value: [GigabitEthernet1/0/3]
[26] cisco-av-pair - value: [audit-session-id=01C20065000000933E4E87D9]
[26] cisco-av-pair - value: [method=dot1x] ,RADIUSHandler.cpp:2455

Radius,2024-06-05 09:43:33,350,DEBUG,0x7f982e1be700,cntx=0000017401,sesn=ise32-01/506864164/74,CPMSessionID=01C20065000000933E4E87D9,user=clientcertCN,CallingStationID=B4-96-91-14-39-8C,RADIUS PACKET:: Code=5(AccountingResponse) Identifier=10 Length=20,RADIUSHandler.cpp:2455
2. TCP Dump
In the TCP dump in ISE, you expect to find information about the OCSP response and Radius session.
OCSP request and response :
 Packet Capture of OCSP Request and Response
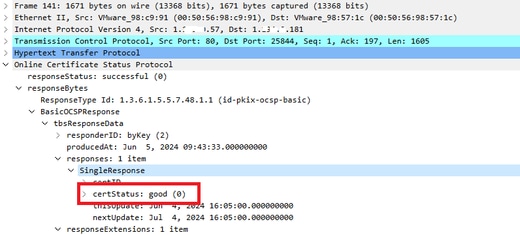 Capture Detail of OCSP Response
Radius session :
 Packet Capture of Radius Session
Related Information
Configure EAP-TLS Authentication with ISE
Configure TLS/SSL Certificates in ISE


 Feedback