Introduction
This document describes the procedure for utilizing openAPI to manage Cisco Identity Services Engine (ISE) deployment.
Background
In modern enterprise networks, security and management have become increasingly complex and critical. To address these challenges, From Cisco ISE 3.1 onwards, newer APIs are available in the OpenAPI format, which offers robust network access control and policy management capabilities. The admin is now able to check ISE deployment more efficiently through OpenAPI, and take action proactively rather than waiting for problem reports from endusers.
Prerequisites
Requirements
Cisco recommends that you have knowledge of these topics:
- Cisco Identity Services Engine (ISE)
- REST API
- Python
Components Used
The information in this document was created from the devices in a specific lab environment. All of the devices used in this document started with a cleared (default) configuration. If your network is live, ensure that you understand the potential impact of any command.
Configure
Network Diagram
 Topology
Configuration on ISE
Step 1: Add an Open API admin account
TTo add an API admin, navigate toAdministration > System > Admin Access > Administrators > Admin Users > Add.
 API Admin
Step 2: Enable Open API on ISE
Open API is disabled by default on ISE. To enable it, navigate to Administration > System > Settings > API Settings > API Service Settings. Toggle the Open API options. Click Save.
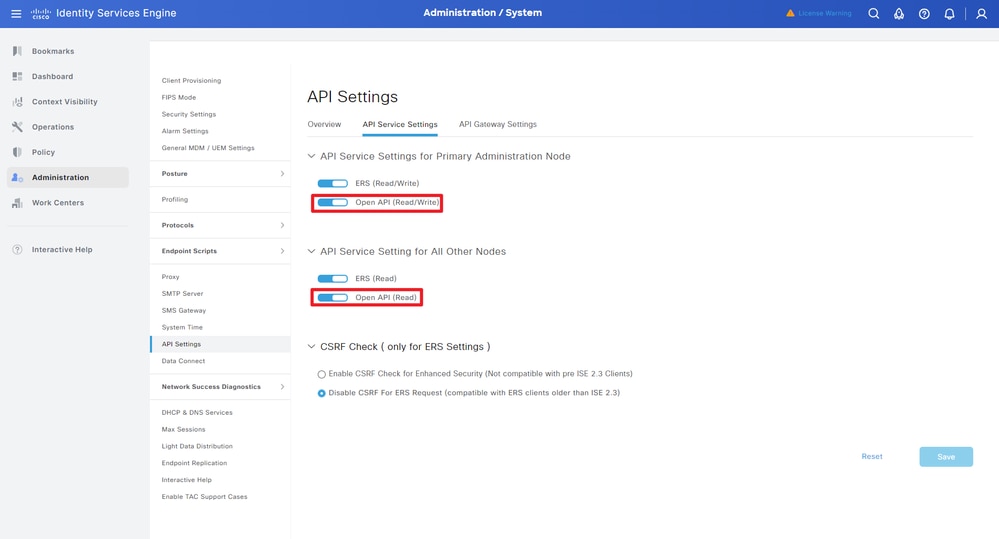 Enable OpenAPI
Step 3: Explore ISE open API
Navigate to Administration > System > Settings > API Settings > Overview. Click open API visit link.
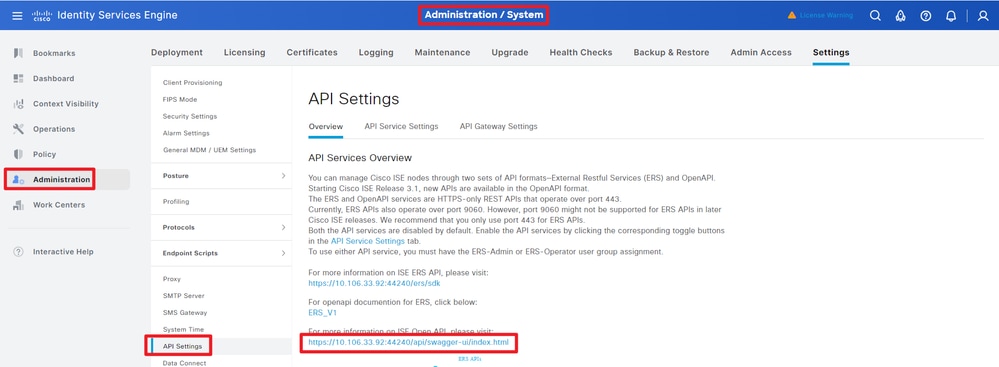 Visit OpenAPI
Python Examples
Retrieve The List Of All The Nodes That Are Deployed In The Cluster
The API lists all the nodes that are deployed in the cluster.
Step 1: Required information for an API call.
Step 2: Locate the URL that is utilized to retrieve deployment information.
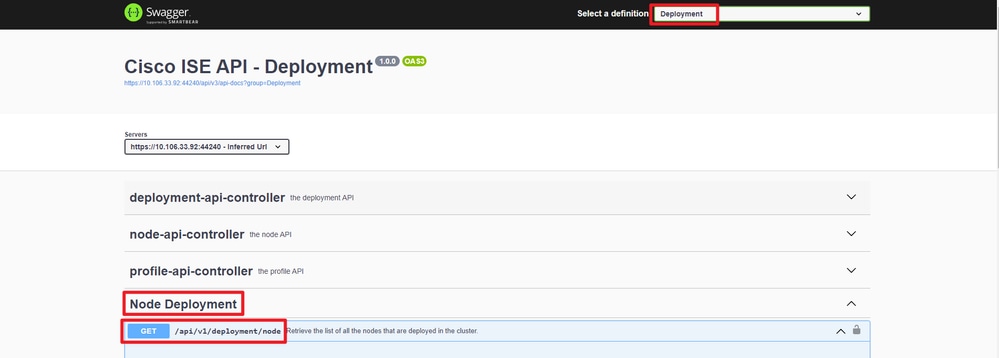 API URI
Step 3: Here is the example of Python Code. Copy and paste the content. Replace the ISE IP, username, password. Save as a python file to execute.
Ensure the good connectivity between ISE and the device running the python code example.
from requests.auth import HTTPBasicAuth
import requests

requests.packages.urllib3.disable_warnings()

if __name__ == "__main__":

    url = "https://10.106.33.92/api/v1/deployment/node"
    headers = {"Accept": "application/json", "Content-Type": "application/json"}
    basicAuth = HTTPBasicAuth("ApiAdmin", "Admin123")

    response = requests.get(url=url, auth=basicAuth, headers=headers, verify=False)
    print("Return Code:")
    print(response.status_code)
    print("Expected Outputs:")
    print(response.json())
Here is the example of expected outputs.
Return Code:
200
Expected Outputs:
{'response': [{'hostname': 'ISE-BGL-CFME01-PAN', 'fqdn': 'ISE-BGL-CFME01-PAN.cisco.com', 'ipAddress': '192.168.20.240', 'roles': ['PrimaryAdmin'], 'services': ['Session', 'Profiler', 'DeviceAdmin'], 'nodeStatus': 'Connected'}, {'hostname': 'ISE-BGL-CFME02-MNT', 'fqdn': 'ISE-BGL-CFME02-MNT.cisco.com', 'ipAddress': '192.168.21.240', 'roles': ['PrimaryMonitoring'], 'services': ['Session', 'Profiler', 'DeviceAdmin'], 'nodeStatus': 'Connected'}, {'hostname': 'ISE-DLC-CFME01-PSN', 'fqdn': 'ISE-DLC-CFME01-PSN.cisco.com', 'ipAddress': '192.168.40.240', 'roles': [], 'services': ['Session', 'Profiler', 'DeviceAdmin'], 'nodeStatus': 'Connected'}, {'hostname': 'ISE-DLC-CFME02-PSN', 'fqdn': 'ISE-DLC-CFME02-PSN.cisco.com', 'ipAddress': '192.168.41.240', 'roles': [], 'services': ['Session', 'Profiler', 'DeviceAdmin'], 'nodeStatus': 'Connected'}, {'hostname': 'ISE-RTP-CFME01-PAN', 'fqdn': 'ISE-RTP-CFME01-PAN.cisco.com', 'ipAddress': '192.168.10.240', 'roles': ['SecondaryAdmin'], 'services': ['Session', 'Profiler', 'DeviceAdmin'], 'nodeStatus': 'Connected'}, {'hostname': 'ISE-RTP-CFME02-MNT', 'fqdn': 'ISE-RTP-CFME02-MNT.cisco.com', 'ipAddress': '192.168.11.240', 'roles': ['SecondaryMonitoring'], 'services': ['Session', 'Profiler', 'DeviceAdmin'], 'nodeStatus': 'Connected'}], 'version': '1.0.0'}
Retrieve Details Of A Deployed Node
This API retrieves detailed information of the specific ISE node.
Step 1: Required information for an API call.
| Method |
GET |
| URL |
https://<ISE-PAN-IP>/api/v1/deployment/node/<ISE-Node-Hostname> |
| Credentials |
Use Open API account credentials |
| Headers |
Accept: application/json
Content-Type: application/json
|
Step 2: Locate the URL that is utilized to retrieve the specific ISE node information.
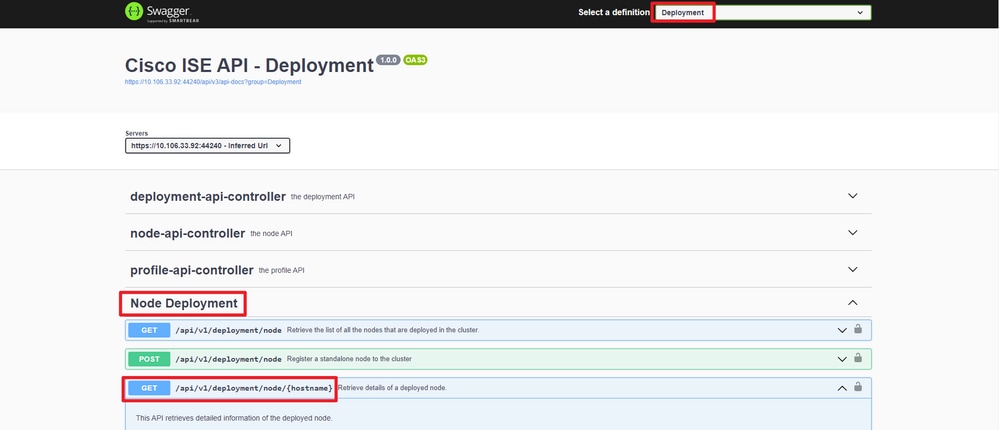 API URI
Step 3. Here is the example of Python Code. Copy and paste the content. Replace the ISE IP, username, password. Save as a python file to execute.
Ensure the good connectivity between ISE and the device running the python code example.
from requests.auth import HTTPBasicAuth
import requests

requests.packages.urllib3.disable_warnings()

if __name__ == "__main__":

    url = "https://10.106.33.92/api/v1/deployment/node/ISE-DLC-CFME02-PSN"
    headers = {"Accept": "application/json", "Content-Type": "application/json"}
    basicAuth = HTTPBasicAuth("ApiAdmin", "Admin123")

    response = requests.get(url=url, auth=basicAuth, headers=headers, verify=False)
    print("Return Code:")
    print(response.status_code)
    print("Expected Outputs:")
    print(response.json())
Here is the example of expected outputs.
Return Code:
200
Expected Outputs:
{'response': {'hostname': 'ISE-DLC-CFME02-PSN', 'fqdn': 'ISE-DLC-CFME02-PSN.cisco.com', 'ipAddress': '192.168.41.240', 'roles': [], 'services': ['Session', 'Profiler', 'DeviceAdmin'], 'nodeStatus': 'Connected'}, 'version': '1.0.0'}
Troubleshoot
To troubleshoot issues that are related to the Open APIs, set theLog Levelfor theapiservicecomponent toDEBUGin theDebug Log Configurationwindow.
To enable debug, Navigate to Operations > Troubleshoot > Debug Wizard > Debug Log Configuration > ISE Node > apiservice.
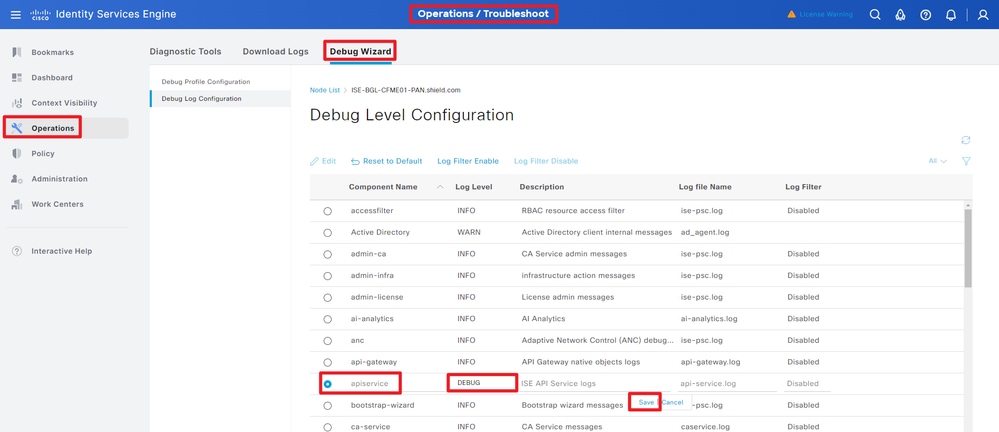 API Service Debug
To download debug logs, Navigate to Operations > Troubleshoot > Downlaod Logs > ISE PAN Node > Debug Logs.
 Download Debug Logs


 Feedback