- Cisco StadiumVision Director Remote Software Installation and Upgrade Guide
- Preface
- Getting Started Installing or Upgrading a Cisco StadiumVision Director Remote Server
- Installing Cisco StadiumVision Director Remote Software on a Server for the First Time
- Upgrading Cisco StadiumVision Director Remote Software from Release 3.1 to Release 3.2 Using the TUI
- Using the Software Manager to Upgrade Cisco StadiumVision Director Remote Release 3.2 Software
- Appendix A: Cisco UCS C22 Hardware Installation Guidelines
Installing Cisco StadiumVision Director Remote Software on a Server for the First Time
First Published: April 21, 2014
This module describes how to install the Cisco StadiumVision Director Remote Release 3.2 software from an Open Virtual Appliance (OVF) template that is downloaded from Cisco.com. The process applies to a brand new server that has never been installed with any version of Cisco StadiumVision Director Remote software.
Prerequisites
Be sure that the following requirements are met before you install the Cisco StadiumVision Director Remote software:
- Be sure that your system meets the requirements documented in the Getting Started Installing or Upgrading a Cisco StadiumVision Director Remote Server.
- If you are installing on the Cisco UCS C22 server, you have a copy of or access to the Cisco UCS C-Series Servers VMware Installation Guide on Cisco.com.
- You have purchased the appropriate licensing and have contacted Cisco Technical Support for access to download the Cisco StadiumVision Director Remote OVF file.
Installation Tasks
To install the Cisco StadiumVision Director Remote software, complete the following tasks:
- Downloading the Software (required)
- Installing the VMware vSphere Software (required)
- Configuring the vSphere Host (required)
- Deploying the Cisco StadiumVision Director Remote OVF Template on the VMware vSphere Host (required)
- Performing the Full ISO Installation (required)
Downloading the Software
Be sure to download the files to a location, such as a laptop computer, where you can access them for installation onto the Cisco StadiumVision Director Remote server:
- Downloading the Cisco StadiumVision Director Remote OVF File (required)
- Downloading the VMware vSphere Software (required)
- Downloading the VMware vSphere Client (required)
Downloading the Cisco StadiumVision Director Remote OVF File
You are eligible to obtain information about how to access the Cisco StadiumVision Director Remote OVF file after you have purchased the proper licensing. Contact Cisco Technical Support for information about how to download the OVF file ( Table 1 ).
|
|
|---|
SV-REMOTE_FULL_TEMPLATE_3.2.0-XXX-Y.x86_64.zip1 |
|
1.“XXX” represents the build number and “Y” is the version of the OVF for that build. |
Downloading the VMware vSphere Software

Note![]() Cisco StadiumVision Director Remote supports VMware vSphere version 5.1 and 5.5. If your server already has this VMware vSphere software version installed, you can skip this task. Cisco StadiumVision Director Remote supports VMware vSphere version 5.1 and 5.5. If your server already has this VMware vSphere software version installed, you can skip this task.
Cisco StadiumVision Director Remote supports VMware vSphere version 5.1 and 5.5. If your server already has this VMware vSphere software version installed, you can skip this task. Cisco StadiumVision Director Remote supports VMware vSphere version 5.1 and 5.5. If your server already has this VMware vSphere software version installed, you can skip this task.
To download the VMware vSphere software, complete the following steps:
Step 1![]() Go to the VMware software download site at:
Go to the VMware software download site at:
http://www.vmware.com/download/
Step 2![]() Locate the VMware vSphere software link and follow the instructions on the VMware site.
Locate the VMware vSphere software link and follow the instructions on the VMware site.
Downloading the VMware vSphere Client
Note![]() The VMware vSphere Client software requires the Microsoft Windows operating system. If the computer that you will use to deploy the Cisco StadiumVison Director Remote OVF already has VMware vSphere Client software installed, skip this task. The VMware vSphere Client software requires the Microsoft Windows operating system. If the computer that you will use to deploy the Cisco StadiumVison Director Remote OVF already has VMware vSphere Client software installed, skip this task.
The VMware vSphere Client software requires the Microsoft Windows operating system. If the computer that you will use to deploy the Cisco StadiumVison Director Remote OVF already has VMware vSphere Client software installed, skip this task. The VMware vSphere Client software requires the Microsoft Windows operating system. If the computer that you will use to deploy the Cisco StadiumVison Director Remote OVF already has VMware vSphere Client software installed, skip this task.
The VMware vSphere Client software is required to install the Cisco StadiumVision Director OVF file.
To download the VMware vSphere client, complete the following steps:
Step 1![]() Go to the VMware software download site at:
Go to the VMware software download site at:
http://www.vmware.com/download/
Step 2![]() Locate the VMware vSphere client software link and follow the instructions on the VMware site to download and install the software on the computer that you will use to access the VMware vSphere host.
Locate the VMware vSphere client software link and follow the instructions on the VMware site to download and install the software on the computer that you will use to access the VMware vSphere host.

Tip Alternatively, you can download the VMware vSphere Client software when you access the VMware vSphere host. For more information, see the “Deploying the Cisco StadiumVision Director Remote OVF Template on the VMware vSphere Host” section.
Installing the VMware vSphere Software
Note![]() If VMware vSphere version 5.1 or 5.5 is already installed and configured on your server, skip this task. If VMware vSphere version 5.1 or 5.5 is already installed and configured on your server, skip this task.
If VMware vSphere version 5.1 or 5.5 is already installed and configured on your server, skip this task. If VMware vSphere version 5.1 or 5.5 is already installed and configured on your server, skip this task.
To install and configure the VMware vSphere software, complete one of the following steps:
- If installing on your own equipment, follow the VMware vSphere installation instructions for your hardware.
- If installing on the Cisco UCS C22 server, follow the instructions to install the VMware ESX software using the “VMware vSphere ESX Installation” module in the Cisco UCS C-Series Servers VMware Installation Guide.
Configuring the vSphere Host
After you have installed the VMware vSphere software, you need to configure the settings for your network environment. For more information about customizing the VMware vSphere configuration, see the VMware vSphere Installation and Setup Guide for your release under the Datacenter Product Documentation area of the VMware Documentation site at:
http://www.vmware.com/support/pubs/
Tip If you are configuring the vSphere host on a Cisco UCS C22 server, you also can access the vSphere host from the KVM console if a connection has been mapped to the vSphere management interface.
To configure the vSphere host, complete the following steps:
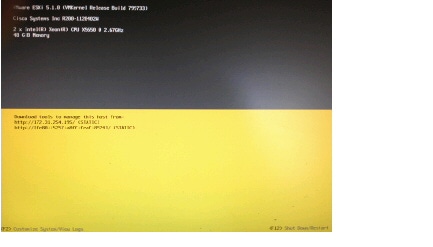
Step 1![]() To customize the VMware vSphere configuration, press F2 at the ESX initialization screen.
To customize the VMware vSphere configuration, press F2 at the ESX initialization screen.
Figure 1 shows an example of an ESX initialization screen.
Figure 1 Sample VMware ESX Initialization Screen
Step 2![]() At the System Customization screen, select the Configure Password option to specify a password for the administrator account.
At the System Customization screen, select the Configure Password option to specify a password for the administrator account.
The administrative user name for the ESX host is root . By default, the administrative password is not set.
Step 3![]() Specify the new password and repeat the entry for confirmation and then press Enter .
Specify the new password and repeat the entry for confirmation and then press Enter .
Tip You will use the root account and password to log into the VMware ESX host to install the Cisco StadiumVision Director Remote OVF template.
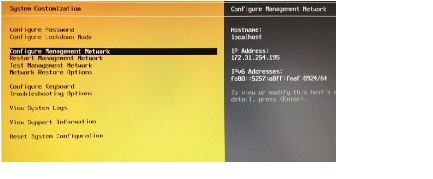
Step 4![]() From the System Customization screen, select the Configure Management Network option as shown in the example in Figure 2 and press Enter .
From the System Customization screen, select the Configure Management Network option as shown in the example in Figure 2 and press Enter .
Figure 2 Sample VMware System Customization Screen
a.![]() Select the IP Configuration option and press Enter .
Select the IP Configuration option and press Enter .
Figure 3 shows an example of the IP Configuration screen.
Figure 3 Sample IP Configuration Screen
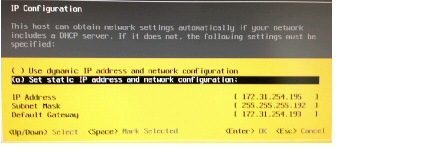
b.![]() Modify the IP address configuration according to your network environment and press Enter .
Modify the IP address configuration according to your network environment and press Enter .
Note The Cisco StadiumVision Director Remote server should be configured with a static IP address or a non-expiring DHCP lease.
Tip You will use this IP address to access the VMware ESX host from your computer’s web browser.
c.![]() (Optional) To change the ESX hostname and domain, choose the DNS configuration option and press Enter . The default hostname is localhost. When your updates are complete, press Enter .
(Optional) To change the ESX hostname and domain, choose the DNS configuration option and press Enter . The default hostname is localhost. When your updates are complete, press Enter .
Step 5![]() Restart the management network.
Restart the management network.
Verify that the IP address information on this screen correctly shows the changes that you made.
Deploying the Cisco StadiumVision Director Remote OVF Template on the VMware vSphere Host
Prerequisites
Before you install the Cisco StadiumVision Director Remote OVF template, be sure that the following requirements are met:
- The VMware vSphere Client is required to install the Cisco StadiumVision Director Remote OVF template.
If you have not already downloaded and installed the VMware vSphere Client on the computer that you will use to access the VMware vSphere host, then a link to download and install the software is provided when you log into the VMware vSphere host.
- Download and unzip SV-REMOTE_FULL_TEMPLATE_3.2.0-XXX-Y.x86_64.zip to extract the OVF file. SV-REMOTE_FULL_TEMPLATE_3.2.0-XXX-Y.x86_64.zip contains:
–![]() SV-REMOTE_FULL_TEMPLATE_3.2.0-XXX-Y.ovf (XML VM descriptor file - text)
SV-REMOTE_FULL_TEMPLATE_3.2.0-XXX-Y.ovf (XML VM descriptor file - text)
–![]() SV-REMOTE_FULL_TEMPLATE_3.2.0-XXX-Y.vdmk (VM disk file - binary)
SV-REMOTE_FULL_TEMPLATE_3.2.0-XXX-Y.vdmk (VM disk file - binary)
–![]() SV-REMOTE_FULL_TEMPLATE_3.2.0-XXX-Y.mf (Checksum file - text)
SV-REMOTE_FULL_TEMPLATE_3.2.0-XXX-Y.mf (Checksum file - text)
–![]() SV-REMOTE_FULL_TEMPLATE_3.2.0-XXX-Y.iso (SVD full installation ISO file - binary)
SV-REMOTE_FULL_TEMPLATE_3.2.0-XXX-Y.iso (SVD full installation ISO file - binary)
You can access a link to download the VMware vSphere Client after you have installed the ESX host by completing the following steps:
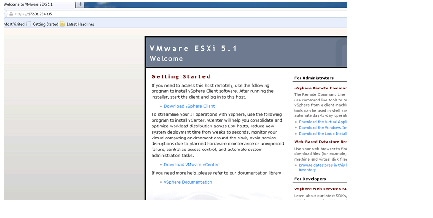
Step 1![]() From a web browser, type the IP address of the VMware vSphere host.
From a web browser, type the IP address of the VMware vSphere host.
The VMWare ESX Welcome Screen is displayed as shown in the example in Figure 4.
Figure 4 Sample VMware Welcome Screen
Step 2![]() Click the Download vSphere Client link as shown on the Welcome screen (Figure 4).
Click the Download vSphere Client link as shown on the Welcome screen (Figure 4).
Follow the VMware instructions to download and install the software.
Procedure
To install the Cisco StadiumVision Director Remote OVF template on the VMware vSphere host, complete the following steps:
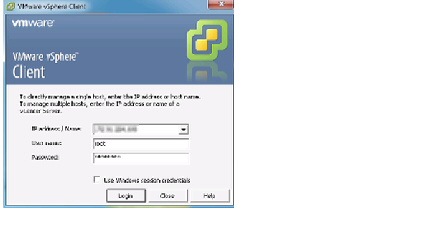
Step 1![]() Start the VMware vSphere Client.
Start the VMware vSphere Client.
Step 2![]() In the VMware vSphere Client window, type the following information:
In the VMware vSphere Client window, type the following information:
- IP address / Name: IP address of the vSphere host (or name of host if using DNS)
- User name for the administrator account: root
- Password for the administrator account.
Tip This information is configured in the vSphere host. For more information, see the “Installing the VMware vSphere Software” section.
Figure 5 Sample VMware vSphere Client
Step 3![]() From the File menu, click Deploy OVF Template .
From the File menu, click Deploy OVF Template .
Step 4![]() To select the source location for the template, click Browse and locate the OVF template for the Cisco StadiumVision Director Remote software that you downloaded and unzipped to your computer.
To select the source location for the template, click Browse and locate the OVF template for the Cisco StadiumVision Director Remote software that you downloaded and unzipped to your computer.
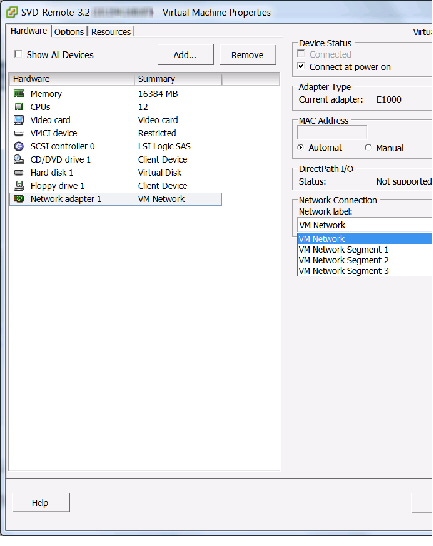
Step 5![]() Once the import completes, right click on the VM and edit the network settings pertinent to your configuration.
Once the import completes, right click on the VM and edit the network settings pertinent to your configuration.
Figure 6 Sample VMware vSphere Virtual Machine Properties
Step 6![]() Click Next to step
Click Next to step ![]() through the installation wizard screens to read and accept the license and set the installation options:
through the installation wizard screens to read and accept the license and set the installation options:
Step 7![]() Review your configuration and click Finish .
Review your configuration and click Finish .
Performing the Full ISO Installation
To install the full ISO, power on the Cisco StadiumVision Director Remote server from VMware by completing the following steps:
Step 1![]() Start the VMware vSphere Client and log in as root user.
Start the VMware vSphere Client and log in as root user.
Step 2![]() From the inventory list, right-click on the name of the Cisco StadiumVision Director Remote server machine.
From the inventory list, right-click on the name of the Cisco StadiumVision Director Remote server machine.
Step 3![]() Select Power > Power On .
Select Power > Power On .
Step 4![]() From the management console for Cisco StadiumVision Director Remote, click the Console tab as shown in Figure 7.
From the management console for Cisco StadiumVision Director Remote, click the Console tab as shown in Figure 7.
The Cisco StadiumVision Director Remote installation begins. You will be asked to configure your deployment with the IP address, hostname and other settings. If you do not configure these during installation, you will need to configure them later after the Cisco StadiumVision Director Remote install has been completed.
Figure 7 Sample Console Output During Cisco StadiumVision Director Remote Power On
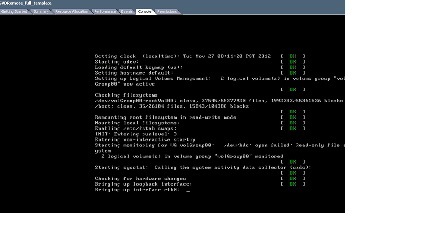
Step 5![]() Observe the output on the console to confirm that the filesystems, drives, and interfaces successfully come up (indicated by “OK” beside the system area).
Observe the output on the console to confirm that the filesystems, drives, and interfaces successfully come up (indicated by “OK” beside the system area).
What To Do Next
After you have installed the Cisco StadiumVision Director Remote software, go to the “ Configuring Cisco StadiumVision Director Remote Servers ” module of the Cisco StadiumVision Director Server Administration Guide, Release 3.2 to set up the remote server for network communication and connectivity to the Cisco StadiumVision Director server.
Be sure to note the IP address that you configured for the VMware vSphere host because it will be needed to complete the Cisco StadiumVision Director Remote configuration.
 Feedback