Manage the Crosswork Cluster

This section contains the following topics:

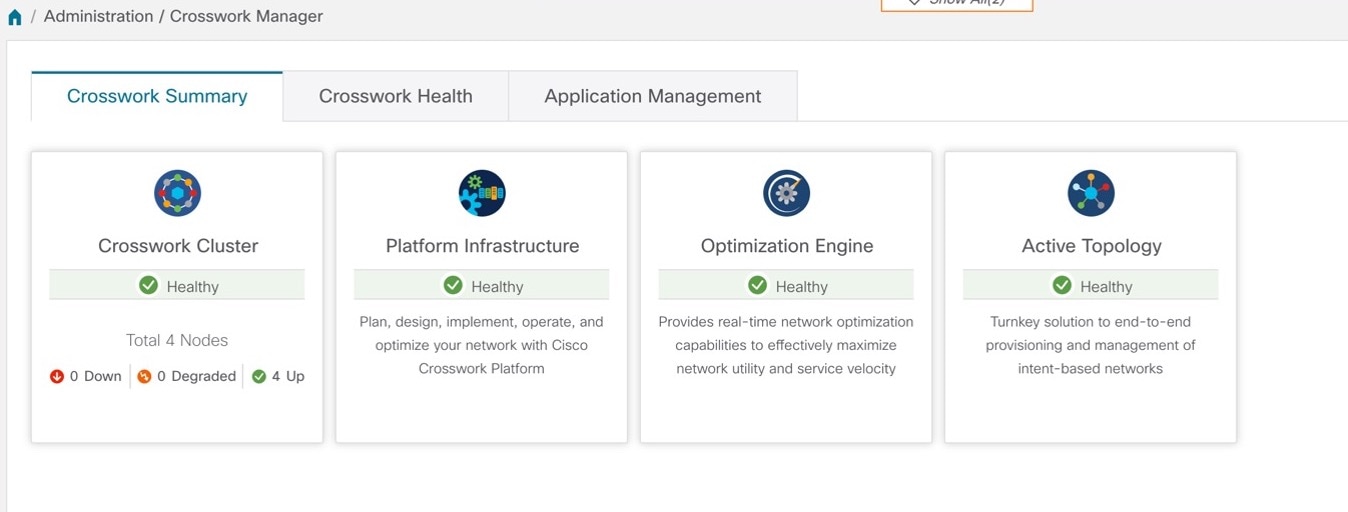
Cluster Management Overview

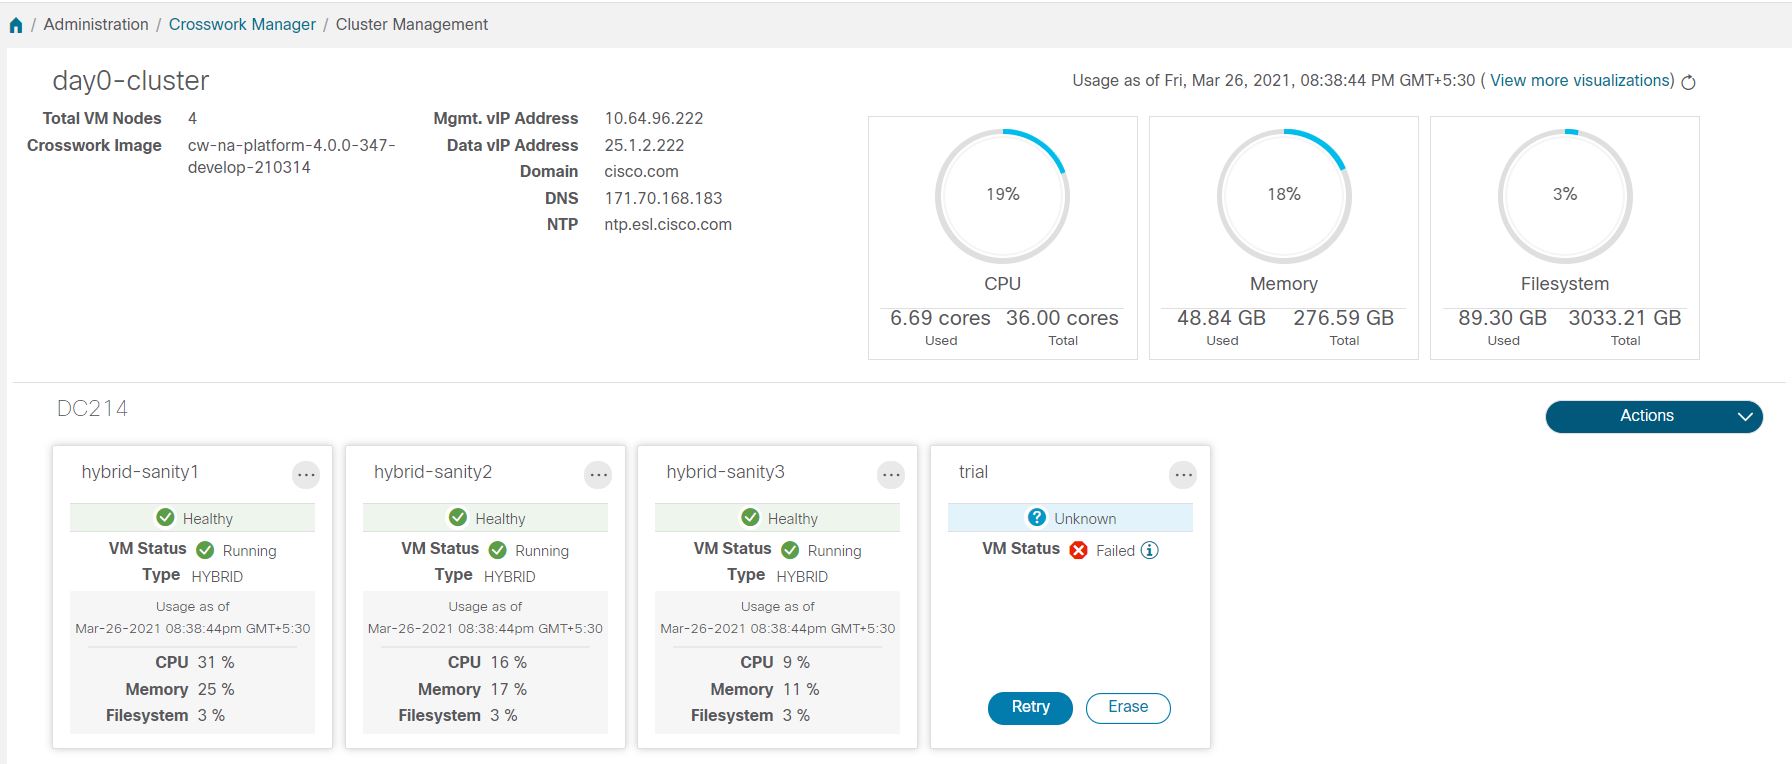
The Cisco Crosswork platform uses a cluster architecture. The cluster distributes platform services across a unified group of virtual machine (VM) hosts, called nodes. The underlying software architecture distributes processing and traffic loads across the nodes automatically and dynamically. This architecture helps Cisco Crosswork respond to how you actually use the system, allowing it to perform in a scalable, available, and extensible manner.

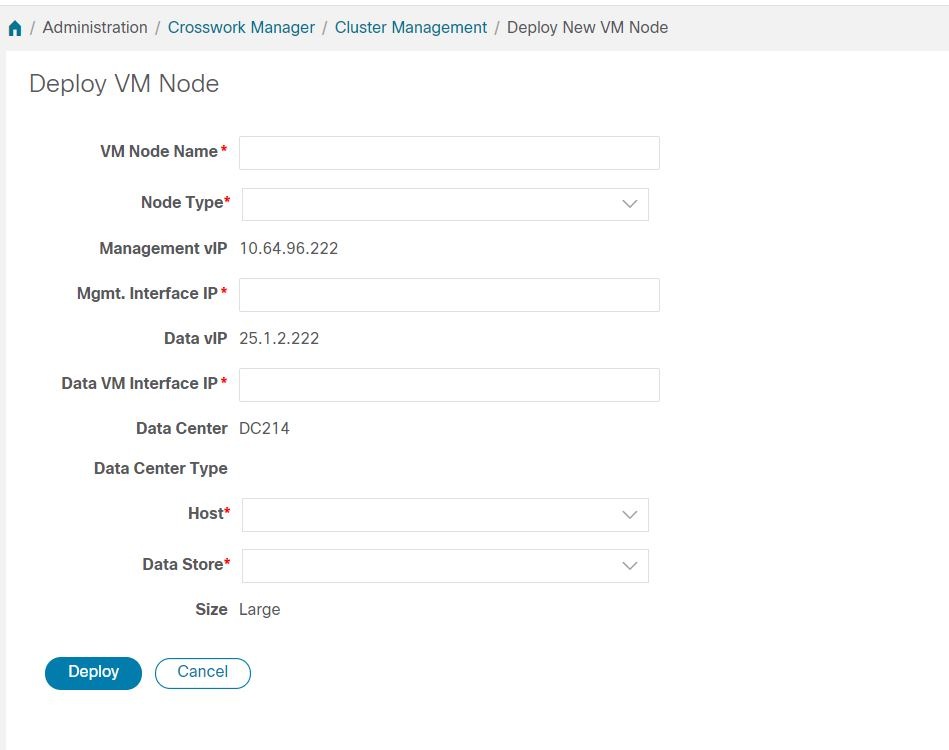
For the 4.0 release, a single cluster consists of a minimum of three nodes, all operating in a hybrid configuration. These three hybrid nodes are mandatory for all Cisco Crosswork deployments. If you have more demanding scale requirements, you can add up to three more nodes, all operating in a worker configuration.

As a Cisco Crosswork administrator, you have full access to all cluster configuration and monitoring functions.

Check Cluster Health

Use the Crosswork Manager window to check the health of the cluster. To display this window, from the main menu, choose Administration > Crosswork Manager.

Figure 1. Crosswork Manager Window
Crosswork Manager Window

The Crosswork Manager window gives you summary information about the status of the cluster nodes, the Platform Infrastructure, and the applications you have installed.

For details on the nodes in the cluster: On the Crosswork Summary tab, click the Crosswork Cluster tile. Cisco Crosswork displays a Cluster Management window like the one shown in the following figure.

Figure 2. Cluster Management Window
Cluster Management window

The top section of the window shows the total resources that the cluster is using. The bottom section breaks down the resource utilization by node, with a separate detail tile for each node. The window shows other details, including the IP addresses in use, whether each node is a hybrid or worker, and so on.


Note

Click the View more visualizations link to Visually Monitor System Functions in Real Time.


To see details for a single node: On the tile for the node, click and choose View Details. The VM Node window displays the node details and the list of microservices running on the node.

Figure 3. VM Node Details Window
VM Node Details window

To restart a microservice, click under the Action column, and choose Restart.

For information on how to use the Crosswork Health tab, see Monitor Platform Infrastructure and Application Health.

Deploy New Cluster Nodes

After the cluster installer forms the Cisco Crosswork cluster, you may find you need more nodes to meet your requirements. The following steps show how to deploy a new node.

Before you begin

Before you begin, you must know:

  • Details about the Cisco Crosswork network configuration, such as the management IP address.

  • Details about the VMware host where you are deploying the new node, such as the data store and data VM interface IP address.

  • The type of node you want to add. Your cluster can have a minimum of three hybrid nodes and up to three worker nodes.

Procedure


Step 1

From the main menu, choose Administration > Crosswork Manager.

Step 2

On the Crosswork Summary tab, click the Crosswork Cluster tile to display the Cluster Management window.

Step 3

Choose Actions > Deploy VM to display the Deploy New VM Node window.

Figure 4. Deploy VM Node Window
Deploy New VM Node
Step 4

Fill the relevant values in the fields provided.

Step 5

Click Deploy. The system starts to provision the new node in VMware. Cisco Crosswork adds a tile for the new node in the Crosswork Manager window. The tile displays the progress of the deployment.

You can monitor the node deployment status by choosing Cluster Management > Actions > View Job History, or from the VMware user interface.

If you added the VM node using Cisco Crosswork APIs: On the newly added VM node tile, click and choose Deploy to complete the operation.


View and Edit Data Center Credentials

You can deploy the Cisco Crosswork platform in a data center under either VMware vCenter or Cisco CSP management. The following steps show how to view and edit the credentials for the data center.

Procedure


Step 1

From the main menu, choose Administration > Crosswork Manager.

Step 2

On the Crosswork Summary tab, click the Crosswork Cluster tile to display the Cluster Management window.

Step 3

Choose Actions > View/Edit Data Center to display the Edit Data Center window.

The Edit Data Center window displays details of the data center.

Step 4

Use the Edit Data Center window to enter values for the Access fields: Address, Username, and Password).

Step 5

Click Save to save the data center credential changes.


View Cluster Job History

Use the Job History window to track the status of cluster jobs, such as deploying a VM or importing cluster inventory.

Procedure


Step 1

From the main menu, choose Administration > Crosswork Manager.

Step 2

On the Crosswork Summary tab, click the Crosswork Cluster tile to display the Cluster Management window.

Step 3

Choose Actions > View Job History.

The Job History window displays a list of cluster jobs. You can filter or sort the Jobs list using the fields provided: Status, Job ID, VM ID, Action, and Users.

Step 4

Click any job to view it in the Job Details panel at the right.


Retry Failed Nodes

Node deployments with incorrect information can fail. After providing the correct details, you can retry the deployment.

Procedure


Step 1

From the main menu, choose Administration > Crosswork Manager

Step 2

On the Crosswork Summary tab, click the Crosswork Cluster tile to display the Cluster Management window.

Figure 5. Cluster Management Window: Failed VM Deployment
Retry Failed Nodes
Step 3

Click Retry on the failed node tile to display the Deploy New VM Node window.

Step 4

Provide corrected information in the fields provided.

Step 5

Click Deploy.


Erase Nodes

As an Administrator, you can erase (that is, remove or delete) any failed or healthy node from your Cisco Crosswork cluster. Erasing a node removes the node reference from the Cisco Crosswork cluster and deletes it from the host VM.

The steps to erase a node are the same for both hybrid and worker nodes. However, the number and timing of erasure is different in each case:

  • The system must maintain three operational hybrid nodes at all times. If one of the three hybrid nodes is faulty, erase it immediately. Then replace it by deploying a new hybrid node.

  • You can have from one to three worker nodes. While you can erase all of them without consequences, we recommend that you erase and replace them one at a time.

  • If one hybrid node is faulty, along with one or more worker nodes and applications, try the "Clean System Reboot" procedure described in Cluster System Recovery.

    If more than one hybrid node is faulty, follow the "Redeploy and Recover" procedure described in Cluster System Recovery.

  • If you are still having trouble after taking these steps, contact the Cisco Customer Experience team for assistance.

Erasing a node is a disruptive action and can block some processes until the action is completed. To minimize disruption, try to conduct this activity during a maintenance window only.


Note

While removing a Hybrid or Worker node, the Cisco Crosswork UI may become unreachable for 1-2 minutes, due to the location of the cw-ui pod in the removed node.


Procedure


Step 1

From the main menu, choose Administration > Crosswork Manager.

Step 2

On the Crosswork Summary tab, click the Crosswork Cluster tile to display the Cluster Management window.

Step 3

On the tile for the node you want to remove, click and select Erase to display the Erase VM Node dialog box .

Step 4

Click Erase again to confirm the action.


Import Cluster Inventory

Cisco Crosswork uses a cluster inventory file to deploy or replace nodes in your cluster. If your cluster was a manual install, you must import the cluster inventory file to Cisco Crosswork manually.


Note

Importing the cluster inventory file is a required operation for manually-installed clusters. "Manually installed" means clusters that are created without the help of the cluster installer. You cannot deploy or remove VM nodes until you complete this operation. Cisco Crosswork disables the options to deploy or remove a VM until you import the missing cluster inventory file.


Procedure


Step 1

From the main menu, choose Administration > Crosswork Manager.

Step 2

On the Crosswork Summary tab, click the Crosswork Cluster tile to display the Cluster Management window.

Step 3

Choose Actions > Import Cluster Inventory to display the Import Cluster Inventory dialog box.

Step 4

(Optional) Click Download sample template file to download and edit the template.

Step 5

Click Browse and select the cluster inventory file.

Step 6

Click Import to complete the operation.


Export Cluster Inventory

Use the cluster inventory file to monitor and manage your Cisco Crosswork cluster.

Procedure


Step 1

From the main menu, choose Administration > Crosswork Manager.

Step 2

On the Crosswork Summary tab, click the Crosswork Cluster tile to display the Cluster Management window.

Step 3

Choose Actions > Export Cluster Inventory.

Cisco Crosswork downloads the cluster inventory gzip file to your local directory.


Collect Cluster Logs and Metrics

As an administrator, you can monitor or audit the components of your Cisco Crosswork cluster by collecting periodic logs and metrics for each cluster component. These components include the cluster as a whole, individual nodes in the cluster, and the microservices running on each of the nodes.

Cisco Crosswork provides logs and metrics using the following showtech options:

  • Request All to collect both logs and metrics.

  • Request Metrics to collect only metrics.

  • Collect Logs to collect only logs.

  • View Showtech Jobs to view all showtech jobs.

Procedure


Step 1

From the main menu, choose Administration > Crosswork Manager.

Step 2

On the Crosswork Summary tab, click the Crosswork Cluster tile to display the Cluster Management window.

Step 3

To collect logs and metrics for the cluster, click Actions and select the showtech option that you want to perform.

Step 4

To collect logs and metrics for any node in the cluster:

  1. Click the node tile.

  2. Click Showtech Options and select the operation that you want to perform.

Step 5

To collect logs and metrics for the individual microservices running on the VM node, click the under the Actions column. Then select the showtech option that you want to perform.

Step 6

(Optional) To view the status of your showtech jobs, click View Showtech Jobs. The Showtech Requests window displays the details of the showtech jobs.


Cluster System Recovery

When System Recovery Is Needed

At some time during normal operations of your Cisco Crosswork cluster, you may find that you need to recover the entire system. This can be the result of one or more malfunctioning nodes, one or more malfunctioning services or applications, or a disaster that destroys the hosts for the entire cluster.

A functional cluster requires a minimum of three hybrid nodes. These hybrid nodes share the processing and traffic loads imposed by the core Cisco Crosswork management, orchestration and infrastructure services. The hybrid nodes are highly available and able to re-distribute processing loads among themselves, and to worker nodes, automatically.

The cluster can tolerate one hybrid node reboot (whether graceful or ungraceful). During the hybrid node reboot, the system is still functional, but degraded from an availability point of view. The system can tolerate any number of failed worker nodes, but again, system availability is degraded until the worker nodes are restored.

Cisco Crosswork generates alarms when nodes, applications, or services are malfunctioning. If you are experiencing system faults, first examine the alarm. Then check on the health of the individual node, application, or service identified in the alarm. You can use the features described in Check Cluster Health to drill down on the source of the problem and, if it turns out to be a service fault, restart the problem service.

If you see alarms indicating that one hybrid node has failed, or that one hybrid node and one or more worker nodes have failed, start by attempting to reboot or replace (erase and then re-add) the failed nodes. If you are still having trouble after that, consider performing a clean system reboot.

The loss of two or more hybrid nodes is a double fault. Even if you replace or reboot the failed hybrid nodes, there is no guarantee that the system will recover correctly. There may also be cases where the entire system has degraded to a bad state. For such states, you can deploy a new cluster, and then recover the entire system using a recent backup taken from the old cluster.

The following two sections describe the steps to follow in each case.

If you instantiated your Cisco Crosswork nodes using Cisco CSP 5000, the process in both cases is similar to the process for VMware. See the CSP 5000 documentation at https://www.cisco.com/c/en/us/support/switches/cloud-services-platform-5000/series.html#~tab-documents.

Clean System Reboot (VMware)

Follow these steps to perform a clean system reboot:

  1. Power down the VM hosting each node:

    1. Log in to the VMware vSphere Web Client.

    2. In the Navigator pane, right-click the VM that you want to shut down.

    3. Choose Power > Power Off.

    4. Wait for the VM status to change to Off.

  2. Repeat Step 1 for each of the remaining VMs, until you are sure they are all shut down.

  3. Power up the VM hosting the first of your hybrid nodes:

    1. Log in to the VMware vSphere Web Client.

    2. In the Navigator pane, right-click the VM that you want to power up.

    3. Choose Power > Power Up.

    4. Wait for the VM status to change to On, then wait another 30 seconds before continuing.

  4. Repeat Step 3 for each of the remaining hybrid nodes, staggering the reboot by 30 seconds before continuing. Then continue with each of your worker nodes, again staggering the reboot by 30 seconds.

Redeploy and Restore (VMware)

Follow these steps to redeploy and recover your system from a backup. Note that this method assumes you have taken periodic backups of your system before it needed recovery. For information on how to take backups, see Manage Cisco Crosswork Backup and Restore.

  1. Power down the VM hosting each node:

    1. Log in to the VMware vSphere Web Client.

    2. In the Navigator pane, right-click the VM that you want to shut down.

    3. Choose Power > Power Off.

    4. Wait for the VM status to change to Off.

    5. Repeat these steps as needed for the remaining nodes in the cluster.

  2. Once all the VMs are powered down, delete them:

    1. In the VMware vSphere Web Client Navigator pane, right-click the VM that you want to delete.

    2. Choose Delete from Disk.

    3. Wait for the VM status to change to Deleted.

    4. Repeat these steps as needed for the remaining VM nodes in the cluster.

  3. Deploy a new Cisco Crosswork cluster, as explained in the Cisco Crosswork Platform 4.0 and Applications Installation Guide.

  4. Recover the system state to the newly deployed cluster, as explained in Restore After a Disaster.