Install Cisco Crosswork Network Controller on AWS EC2

This chapter contains the following topics:

Installation Overview

This section provides an overview of how Cisco Crosswork is installed on Amazon EC2.

Cisco Crosswork uses the CloudFormation (CF) templates to deploy the cluster stacks. The CF process is faster and less error-prone than the manual procedure to build the cluster, however you must have the necessary skills to prepare a CF template with details of the cluster deployment.


Note


The terms 'stack' and 'instance' refers to cluster and VM respectively.


Important


The CF templates (.yaml file) provided are samples that must be customized according to your production preferences and executed as per the steps mentioned in this chapter.


Extract CF Template Image

This section explains the procedure to extract and validate the Cisco Crosswork CF template image.


Attention


The file names mentioned in this topic are sample names and may differ from the actual file names in release version.


Procedure


Step 1

Download the Crosswork CF template package (signed-CFT-6.0.0_release_12.tar.gz) from cisco.com.

Step 2

Use the following command to unzip the package:

tar -xzvf signed-CFT-6.0.0_release_12.tar.gz

The contents of the package is unzipped to a new directory. This new directory contains the CF template image and files necessary to validate the image.

For example:

tar -xzvf signed-CFT-6.0.0_release_12.tar.gz
x CFT-6.0.0_release_12.tar.gz
x CFT-6.0.0_release_12.tar.gz.signature
x README
x CW-CCO_RELEASE.cer
x cisco_x509_verify_release.py3
x cisco_x509_verify_release.py

Step 3

Review the contents of the README file in order to understand everything that is in the package and how it will be validated in the following steps.

Step 4

Navigate to the directory created in the previous step and use the following command to verify the signature of the installer image:

Note


Use python --version to find out the version of Python on your machine.

If you are using Python 2.x, use the following command to validate the file:

python cisco_x509_verify_release.py -e <.cer file> -i <.tar.gz file> -s <.tar.gz.signature file>
-v dgst -sha512

If you are using Python 3.x, use the following command to validate the file:

python cisco_x509_verify_release.py3 -e <.cer file> -i <.tar.gz file> -s <.tar.gz.signature file>
-v dgst -sha512

For example:

python cisco_x509_verify_release.py3 -e CW-CCO_RELEASE.cer -i CFT-6.0.0_release_12.tar.gz -s CFT-6.0.0_release_12.tar.gz.signature -v dgst -sha512
Retrieving CA certificate from http://www.cisco.com/security/pki/certs/crcam2.cer ...
Successfully retrieved and verified crcam2.cer.
Retrieving SubCA certificate from http://www.cisco.com/security/pki/certs/innerspace.cer ...
Successfully retrieved and verified innerspace.cer.
Successfully verified root, subca and end-entity certificate chain.
Successfully fetched a public key from CW-CCO_RELEASE.cer.
Successfully verified the signature of CFT-6.0.0_release_12.tar.gz using CW-CCO_RELEASE.cer

The contents of the package is extracted and validated successfully.

Step 5

In the directory, locate the install-cnc-templates file and follow the instructions provided within its Description section.

Customize the CF templates in the directory to install Cisco Crosswork on Amazon EC2.


What to do next

Return to the installation workflow: Install Cisco Crosswork Network Controller on AWS EC2

Roles and Policy Permissions

This section describes the roles and the policy permissions that you must have when deploying the CF template on Amazon. For information on how to create and manage the roles, refer to the Amazon documentation.

Table 1. Amazon EC2 Roles and Actions Assigned to the Roles

Role

Actions

EC2

DescribeInternetGateways, DescribeNetworkInterfaces, DescribeImages, DeleteLaunchTemplate, DescribeSubnets, DescribeAccountAttributes, DescribeSecurityGroups, RunInstances, DescribeVpcs, DescribeInstances, CreateNetworkInterface, CreateTags, DescribeKeyPairs, CreateLaunchTemplate, DeleteNetworkInterface, TerminateInstances

ELB

DescribeLoadBalancers, CreateLoadBalancer, ModifyLoadBalancerAttributes, AddTags, DeleteLoadBalancer

ELB v2

DescribeLoadBalancers, CreateLoadBalancer, AddTags, DeleteLoadBalancer, CreateTargetGroup, CreateListener, DeleteListener, DescribeTargetGroups, ModifyLoadBalancerAttributes, DescribeListeners, RegisterTargets, DeleteTargetGroup, ModifyTargetGroupAttributes, DescribeTargetHealth

IAM

CreateNodegroup, DescribeNodegroup, DeleteNodegroup

Configure the CloudFormation (CF) Template Parameters

This section explains the important parameters that must be specified for module deployments.


Important


  • The parameters that are mandatory for creating the templates are indicated explicitly. Parameters without this indication are optional and are populated with the default values, which you can alter based on your deployment requirement.

  • All IP addresses you enter as parameters should be available.


CF Template Parameters for Installing Cisco Crosswork Cluster VMs

This section describes the parameters that are required for deploying Cisco Crosswork Cluster VMs with 3 hybrid VMs on Amazon EC2. It also describes the Management and Data NLB parameters.

Once you have determined the subnet for your cluster nodes and any other virtual machines you are going to deploy, confirm that there are enough available IP addresses to support the number of VMs (and virtual IP addresses) needed.

Table 2. Cisco Crosswork Cluster VMs Deployment Parameters

Parameter

Description

VpcId

The virtual private cloud (VPC) ID of your existing VPC. For example, vpc-0f83aac74690101a3.

SecGroup

Precreated security group that must be applied to the stack. For example, sg-096ff4bc355af16a0. The group must allow ingress access to ports 22, 30160:31560.

CwSSHPassword

The SSH password of the Crosswork Network Controller.

Important


We recommend using an external secret store for the password.

CwAmiId

The Crosswork AMI ID.

This is a mandatory parameter.

CwMgmtSubnet1Id

Management subnet for Crosswork VM 1.

This is a mandatory parameter.

CwMgmtSubnet2Id

Management subnet for Crosswork VM 2.

This is a mandatory parameter.

CwMgmtSubnet3Id

Management subnet for Crosswork VM 3.

This is a mandatory parameter.

CwMgmtSubnet1Netmask

The first management subnet netmask in the dotted-decimal form. For example, 255.255.255.0. This parameter is ignored when deploying on a single interface.

This is a mandatory parameter.

CwMgmtSubnet2Netmask

The second management subnet netmask in the dotted-decimal form. For example, 255.255.255.0. This parameter is ignored when deploying on a single interface.

This is a mandatory parameter.

CwMgmtSubnet3Netmask

The third management subnet netmask in the dotted-decimal form. For example, 255.255.255.0. This parameter is ignored when deploying on a single interface.

This is a mandatory parameter.

CwMgmtSubnet1Gateway

The management default gateway on the selected data subnet. Typically, the first address on the subnet. This parameter is ignored when deployed on single interface mode.

This is a mandatory parameter.

CwMgmtSubnet2Gateway

The management default gateway on the selected data subnet. Typically, the first address on the subnet. This parameter is ignored when deployed on single interface mode.

This is a mandatory parameter.

CwMgmtSubnet3Gateway

The management default gateway on the selected data subnet. Typically, the first address on the subnet. This parameter is ignored when deployed on single interface mode.

This is a mandatory parameter.

ManagementVIPName

Crosswork Management VIP name. For example, dev1-cwmgnt.

This will be the host name to access the Crosswork cluster.

DataVIPName

Crosswork Data VIP name. For example, dev1-cwdata.

Route53DomainName

Domain name used for all Route53 objects.

This is the DNS domain name for the Crosswork cluster.

This is a mandatory parameter.

HostedZoneId

The Hosted Zone ID provided with the domain name (Route53DomainName). The Network Load Balancer (NLB) deployments require a predefined Route53 hosted zone.

This is a mandatory parameter.

UseExternalNLB

Determines whether to use an external NLB for the Crosswork cluster (multi-AZ or subnet) or a Crosswork VIP (only single AZ or subnet). Options are True or False.

This is a mandatory parameter.

CwClusterPlacementStrategy

The EC2 instance placement strategy that is valid for single availability zone. Default 'cluster' ensures maximum throughput. Options are:

  • cluster

  • partition

  • spread

CwNodeType

The Crosswork Node Type for deployment. Options are Hybrid or Worker.

A replacement Hybrid node must reuse the same IP addresses as the Hybrid node it is replacing.

Default value is Worker.

This is a mandatory parameter.

InterfaceDeploymentMode

The deployment mode.

Options are 1 to deploy the Management interface or 2 to deploy the Management and Data interface.

CwDataSubnet1Id

Data subnet of Crosswork VM 1.

In a single interface, the deployments happen on the subnet where the Management interface is deployed.

This is a mandatory parameter.

CwDataSubnet2Id

Data subnet of Crosswork VM 2.

In a single interface, the deployments happen on the subnet where the Management interface is deployed.

This is a mandatory parameter.

CwDataSubnet3Id

Data subnet of Crosswork VM 3.

In a single interface, the deployments happen on the subnet where the Management interface is deployed.

This is a mandatory parameter.

CwDataSubnet1Netmask

The first data subnet netmask in the dotted-decimal form. For example, 255.255.255.0. This parameter is ignored when deploying in a single interface mode.

This is a mandatory parameter.

CwDataSubnet1Gateway

The first default data gateway on the selected data subnet. Typically, the value is the first address on the subnet. This parameter is ignored when deploying in a single interface mode.

This is a mandatory parameter.

CwDataSubnet2Netmask

The second data subnet netmask in the dotted-decimal form. For example, 255.255.255.0. This parameter is ignored when deploying in a single interface mode.

This is a mandatory parameter.

CwDataSubnet2Gateway

The second data subnet netmask in the dotted-decimal form. This parameter is ignored when deploying in a single interface mode.

This is a mandatory parameter.

CwDataSubnet3Netmask

The third data subnet netmask in the dotted-decimal form. For example, 255.255.255.0. This parameter is ignored when deploying in a single interface mode.

This is a mandatory parameter.

CwDataSubnet3Gateway

The third data subnet netmask in the dotted-decimal form. This parameter is ignored when deploying in a single interface mode.

This is a mandatory parameter.

CwMgmtVIP

The current Crosswork Management VIP address.

CwDataVIP

The current Crosswork Data VIP address. When using an external NLB, you can leave this parameter empty.

Cw1MgmtIP

A free address on the management subnet. If not specified, an address is automatically assigned.

Cw1DataIP

A free address on the data subnet. If not specified, an address is automatically assigned.

Cw2MgmtIP

A free address on the management subnet. If not specified, an address is automatically assigned .

Cw2DataIP

A free address on the data subnet. If not specified, an address is automatically assigned.

Cw3MgmtIP

A free address on the management subnet. If not specified, an address is automatically assigned.

Cw3DataIP

A free address on the data subnet. If not specified, an address is automatically assigned .

OtherCwMgmtIP1

The Management IP address \#1 of the existing Crosswork node. This is used when the deployment happens with an external load balancer.

OtherCwMgmtIP2

The Management IP address \#2 of the existing Crosswork node. This parameter is used when the deployment happens with an external load balancer.

OtherCwDataIP1

The Data IP address \#1 of the existing Crosswork node. This parameter is used when the deployment happens with an external load balancer.

OtherCwDataIP2

The Data IP address \#2 of the existing Crosswork node. This parameter is used when the deployment happens with an external load balancer.

Table 3. Crosswork VM Customization

Parameter

Description

InstanceType

The EC2 instance type for the node instances.

This is a mandatory parameter.

RunAsSpotInstance

A spot instance.

Options are:

  • True: to enable the feature

  • False: to disable the feature

Default value is False.

This is a mandatory parameter.

DataDiskSize

Crosswork data disk size. The default is 450 GB and should be fine for most deployments. Enter the default unless otherwise directed by Cisco Customer Experience team.

This is a mandatory parameter.

K8sServiceNetwork

The network address for the Kubernetes service network. The CIDR range is fixed to '/16'. If not provided, the default will be taken, that is, 10.96.0.0.

This is a mandatory parameter.

K8sPodNetwork

The network address for the Kubernetes pod network. The CIDR range is fixed to '/16'."

This is a mandatory parameter.

SkipAutoInstall

Configures the Skip Auto Install feature. Options are:

  • True: to enable the feature

  • False: to disable the feature

Default value is False.

This is a mandatory parameter.

Table 4. Cisco Crosswork Cluster Management NLB Deployment Parameters

Parameter

Description

VpcId

The virtual private cloud (VPC) ID of your existing VPC. For example, vpc-0f83aac74690101a3.

CwTargetSubnetIdList

This is a list of the Crosswork management subnets.

This is a mandatory parameter.

CwTargetIP1

This is a Crosswork VM management IP. In this template, this is a mandatory parameter.

CwTargetIP2

This is a Crosswork VM management IP. In this template, this is a mandatory parameter.

CwTargetIP3

This is a Crosswork VM management IP. In this template, this is a mandatory parameter.

Route53DomainName

Domain name used for all Route53 objects.

This is a mandatory parameter.

HostName

The domain name used for all Route53 objects.

This is a mandatory parameter.

HostedZoneId

The hosted zone ID.

This is a mandatory parameter.

Table 5. Data NLB Deployment Parameters

Parameter

Description

VpcId

The virtual private cloud (VPC) ID of your existing VPC. For example, vpc-0f83aac74690101a3.

CwTargetSubnetIdList

The first management subnet for the Crosswork VMs.

This is a mandatory parameter.

CwTargetIP1

A free address on the management subnet. If not specified, an address is automatically assigned.

CwTargetIP2

A free address on the management subnet. If not specified, an address is automatically assigned.

CwTargetIP3

A free address on the management subnet. If not specified, an address is automatically assigned.

Route53DomainName

Domain name used for all Route53 objects.

This is a mandatory parameter.

HostName

The domain name used for all Route53 objects.

This is a mandatory parameter.

HostedZoneId

The hosted zone ID.

This is a mandatory parameter.

CF Template Parameters for Installing Crosswork Data Gateway

This section describes the parameters that are required when creating the Crosswork Data Gateway control plane, node, pool, and other important containers. It also has parameters that are required for creating EC2 Crosswork Data Gateway NLB stack.

Table 6. Crosswork Data Gateway Deployment Parameters

Parameter

Description

AwsIamRole

The Amazon Web Services IAM role name for the EC2 VIP update.

VpcId

The virtual private cloud (VPC) ID of your existing VPC. For example, vpc-0f83aac74690101a3.

SecGroup

Precreated security group that must be applied to the stack. For example, sg-096ff4bc355af16a0. The group must allow ingress access to all ports that Crosswork, NSO, Crosswork Data Gateway, and IOS-XR uses.

CDGSSHPassword

The SSH password to be configured on the Crosswork Data Gateway node.

CDGOperPassword

The password to be configured on the Crosswork Data Gateway for Dg-Oper user.

CDGAmiId

The Crosswork Data Gateway AMI ID.

InstanceType

The EC2 instance type for the node instances.

This is a mandatory parameter.

CNCControllerIP

Host address or name of the Crosswork Data Gateway controller. In a multi-AZ deployment, this value must be the name.

This is a mandatory parameter.

CNCControllerPassword

The cw-admin user password used to access Crosswork or CNC Controller.

InterfaceDeploymentMode

Crosswork Data Gateway deployment mode.

The options are:

  • 1: to deploy all the interfaces.

  • 2: to deploy the Management and Data interfaces.

  • 3: to deploy the Management, Data, and Control interfaces.

CDGInterface0IPAddress

A free IP address on the subnet. If set to 0.0.0.0, the IP address is automatically allocated.

This is a mandatory parameter.

CDGInterface0SubnetId

The first interface subnet for the Crosswork Data Gateway VM.

CDGInterface0Gateway

The default gateway on the selected subnet. Typically, the first address on the subnet.

CDGInterface0SubnetNetmask

The first interface subnet netmask in the dotted-decimal form. For example, 255.255.255.0.

This is a mandatory parameter.

CDGInterface1IPAddress

A free IP address on the first subnet. If set to 0.0.0.0, the IP address is automatically allocated.

This is a mandatory parameter.

CDGInterface1SubnetId

The second interface subnet for the Crosswork Data Gateway. The subnet must be in the same availability zone as the CDGInterface0SubnetId.

CDGInterface1Gateway

The second interface default gateway on the selected subnet. Typically, the first address on the subnet.

This is a mandatory parameter.

CDGInterface1SubnetNetmask

The second interface subnet netmask in the dotted-decimal form. For example, 255.255.255.0. This parameter is ignored when dual interface mode is not used.

This is a mandatory parameter.

CDGInterface2IPAddress

A free IP address on the second subnet. If set to 0.0.0.0, the IP address is automatically allocated.

This is a mandatory parameter.

CDGInterface2SubnetId

The third interface subnet for the Crosswork Data Gateway VM. The subnet must be in the same availability zone as the CDGInterface0SubnetId.

CDGInterface2Gateway

The third interface default gateway on the selected subnet. Typically, the first address on the subnet.

This is a mandatory parameter.

CDGInterface2SubnetNetmask

The third interface subnet netmask in the dotted-decimal form. For example, 255.255.255.0. This parameter is ignored when triple interface mode is not used.

This is a mandatory parameter.

CNCControllerIP

Host address of the Crosswork Data Gateway controller.

HANetworkMode

The Crosswork Data Gateway HA mode.

The pool mode options are:

  • L2: Use this option when you specify IP addresses for creating the HA pool.

  • L3: Use this option when you specify FQDN for creating the HA pool and for multisubnet deployment.

For information on the pool types, refer to the Create a Cisco Crosswork Data Gateway Pool section in Cisco Crosswork Network Controller 6.0 Administration Guide.

This is a mandatory parameter.

DataDiskSize

Size of the Crosswork data disk. The minimum size is 20. Default size is 50.

This is a mandatory parameter.

CDGProfile

The deployment profile of Crosswork Data Gateway.

  • Standard

  • Extended

This is a mandatory parameter.

CdgInstanceHostname

The Crosswork Data Gateway instance name, for example CDG-01.

az_id

The physical location of Availability Zone 1 and 2.

region_id

The physical location of the Crosswork Data Gateway VM.

site_location

The location of the primary and second Crosswork sites.

During enrollment, Crosswork sends this value to cdg-manager to preset the cluster affiliation of the instance.

Table 7. Crosswork Data Gateway and Network Load Balancer (NLB) Stack Parameters

Parameter

Description

VpcId

The VPC ID of the worker instances.

This is a mandatory parameter.

SubnetId1

The management ID of subnet 1.

This is a mandatory parameter.

SubnetId2

The management ID of subnet 2.

This is a mandatory parameter.

DomainName

The domain name.

This is a mandatory parameter.

HostedZoneId

The hosted zone ID.

This is a mandatory parameter.

CdgPoolHostname

Name of the Route53 record.

This is a mandatory parameter.

CdgTargetIP1

The IP address 1 of the Management node.

In the event of a single Crosswork Data Gateway, one target IP must be configured.

CdgTargetIP2

The IP address 2 of the Management node.

LBIPaddress1

The first LB IP address on subnet.

This is a mandatory parameter.

LBIPaddress2

The second LB IP address on subnet.

This is a mandatory parameter.

CF Template Parameters for Installing NSO

This section describes the parameters that are required for deploying NSO on Amazon EC2.

Table 8. NSO Deployment Parameters

Parameter

Description

VpcId

The virtual private cloud (VPC) ID of your existing VPC. For example, vpc-0f83aac74690101a3.

SecGroup

Precreated security group that must be applied to the stack. For example, sg-096ff4bc355af16a0. The group must allow ingress access to ports 22, 30160:31560.

NSOSubnetId

The subnet for the NSO VM.

KeyName

Name of an existing EC2 KeyPair to enable SSH access to the instance.

NSOAmiId

The NSO AMI ID.

This is a mandatory parameter.

NSOInterface0IPAddress

A free IP address on the second subnet. If set to 0.0.0.0, the IP address is automatically allocated.

This is a mandatory parameter.

InstanceType

The EC2 instance type for the node instances.

This is a mandatory parameter.

CF Template Parameters for Installing Single Hybrid Cluster or Worker Node

This section describes the parameters that are required for deploying a single cluster node (Hybrid or Worker).


Attention


  • A replacement hybrid node must reuse the same IP addresses as the hybrid VM it is replacing.

  • As you will be adding another node (worker or hybrid) to the existing cluster determine the subnet that is being used and find an additional available IP on that subnet.


Table 9. Single Hybrid Cluster or Worker Cisco Crosswork Nodes Deployment Parameters

Parameter

Description

VpcId

The virtual private cloud (VPC) ID of your existing VPC. For example, vpc-0f83aac74690101a3.

SecGroup

Precreated security group that must be applied to the stack. For example, sg-096ff4bc355af16a0. The group must allow ingress access to ports 22, 30160:31560.

EC2ENIRole

Existing role name for the Crosswork cluster. The role must permit EC2 access.

CwAmiId

The Crosswork AMI ID.

This is a mandatory parameter.

CwSSHPassword

The SSH password of the Crosswork Network Controller.

Important


We recommend using an external secret store for the password.

InstanceType

The EC2 instance type for the node instances.

This is a mandatory parameter.

ManagementVIPName

Crosswork Management VIP name. For example, dev1-cwmgnt.

DataVIPName

Crosswork Data VIP name. For example, dev1-cwdata.

Route53DomainName

Domain name used for all Route53 objects.

This is a mandatory parameter.

UseExternalNLB

Determines whether to use an external NLB for the Crosswork cluster (multi-AZ or subnet) or a Crosswork VIP (only single AZ or subnet). Options are True or False.

This is a mandatory parameter.

CwMgmtSubnetId

The management subnet for the Crosswork VMs.

CwMgmtSubnetNetmask

The management subnet netmask in dotted decimal form. For example, 255.255.255.0. This parameter is ignored when deploying in a single interface mode.

This is a mandatory parameter.

CwDataSubnetGateway

The management default gateway on the selected data subnet. Typically, the first address on the subnet. This parameter is ignored when deployed on single interface mode.

This is a mandatory parameter.

CwDataSubnetId

The data subnet for the Crosswork VMs.

CwDataSubnetNetmask

The data subnet netmask in dotted decimal form. For example, 255.255.255.0. This parameter is ignored when deploying in a single interface mode.

This is a mandatory parameter.

CwDataSubnetGateway

The data default gateway on the selected data subnet. Typically, the first address on the subnet. This parameter is ignored when deployed on single interface mode.

This is a mandatory parameter.

CwNodeType

The Crosswork Node Type for deployment. Options are Hybrid or Worker.

A replacement Hybrid node must reuse the same IP addresses as the Hybrid node it is replacing.

This is a mandatory parameter.

DataDiskSize

Crosswork data disk size. The default is 450 (in GB) and should be fine for most deployments. Enter the default unless otherwise directed by Cisco Customer Experience team.

This is a mandatory parameter.

K8sServiceNetwork

The network address for the Kubernetes service network. The CIDR range is fixed to '/16'. If not provided, the default (10.96.0.0) is taken.

K8sPodNetwork

The network address for the Kubernetes pod network. The CIDR range is fixed to '/16'. If not provided, the default (10.244.0.0) is taken.

Table 10. Optional VM parameters

Parameters

Description

CwMgmtVIP

The current Crosswork Management VIP address.

CwDataVIP

The current Crosswork Data VIP address. When using an external NLB, you can leave this parameter empty.

Cw1MgmtIP

A free address on the management subnet. If not specified, an address is automatically assigned.

Cw1DataIP

A free address on the data subnet. If not specified, an address is automatically assigned.

OtherCwMgmtIP1

The first Management IP address of the existing Crosswork node. This is used when the deployment happens with an external load balancer.

OtherCwMgmtIP2

The second Management IP address of the existing Crosswork node. This parameter is used when the deployment happens with an external load balancer.

OtherCwDataIP1

The first Data IP address of the existing Crosswork node. This parameter is used when the deployment happens with an external load balancer.

OtherCwDataIP2

The second Data IP address of the existing Crosswork node. This parameter is used when the deployment happens with an external load balancer.

Install Using Module Deployment Method

The module-based deployment procedures involve deploying each resource separately. Each resource has its own template file, which can be used to deploy them individually. For more information, see the following topics:

Install Cisco Crosswork Cluster on Amazon EC2

This section provides an overview of how Cisco Crosswork cluster is installed on Amazon EC2.

Cisco Crosswork uses a set of CF templates to deploy Crosswork cluster.

Crosswork Cluster Deployment Workflow

The Crosswork cluster deployment procedure involves deploying various Crosswork resources using the corresponding YAML files.

Table 11. Resources Deployed During Crosswork Cluster Deployment

Resource

Description

EC2 Cluster

The main stack (cw-cluster.yaml) which will deploy other nested stacks for creating EC2 CW NLBs.

Management NLB

The cw-mgmt-nlb.yaml file creates Network Load Balancer, Target Groups, Listeners and Route53Record for EC2 CW Management Nodes.

Data NLB

The cw-data-nlb.yaml file creates Network Load Balancer, Target Groups, Listeners and Route53Record for EC2 CW Data Nodes

Installation Parameters

For list of important parameters that you must specify in the CF templates that are used to deploy Crosswork cluster, see CF Template Parameters for Installing Cisco Crosswork Cluster VMs. Crosswork cluster is deployed on Amazon EC2 based on the parameters specified in the templates.


Note


Once you have determined the subnet for your cluster nodes and any other virtual machines you are going to deploy, confirm that there are enough available IP addresses to support the number of VMs (and virtual IP addresses) needed.


Deploy the CF Templates

You can install the Crosswork cluster on Amazon EC2 by customizing the CF templates. For the list of CF templates that are used for Crosswork cluster deployment, see Crosswork Cluster Deployment Workflow.

For instructions on how to deploy the CF templates on Amazon EC2, see Deploy a CF Template.

Verify the Installation

Verify that the Crosswork cluster installation is successful by following the steps in Monitor the Installation.

Deploy an Additional Crosswork Cluster Node

For instructions on how to deploy an additional worker/hybrid node on the Crosswork cluster, see Deploy an Additional Crosswork Cluster Node.

What to do next

Return to the installation workflow: Install Cisco Crosswork Network Controller on AWS EC2

Install Crosswork Data Gateway on Amazon EC2

This section provides an overview of how Crosswork Data Gateway is installed on Amazon EC2.

Crosswork Data Gateway Deployment Workflow

The Crosswork Data Gateway deployment procedure involves deploying various Crosswork resources using the corresponding YAML files.

The main file cdg-stack-ec2.yaml deploys the stacks for one CDG NLB (cdg-nlb.yaml) and two CDG (cdg.yaml).

  • An additional Crosswork Data Gateway VM to the Crosswork Data Gateway high availability pool is deployed using the cdg.yaml file. For each additional VM deployment, you must repeat the deployment procedure.

  • An additional NLB and Crosswork Data Gateway high availability pool is deployed using the cdg-nlb.yaml file.

The following table provides information about the components are installed:

Table 12. Resources Deployed During Crosswork Data Gateway Deployment

Resource

Description

EC2 Crosswork Data Gateway

The resources related to EC2 node are created by deploying the cdg.yaml file.

Crosswork Data Gateway Network Load Balancer

The EC2 NLB components (target groups, network load balancer, data listeners, and NLB route 53 record) are created by deploying the cdg-nlb.yaml file.

Installation Parameters

For list of important parameters in the Crosswork Data Gateway CF templates, see CF Template Parameters for Installing Crosswork Data Gateway.

Crosswork Data Gateway is deployed on Amazon EC2 based on the parameters specified in the CF templates. For list of CF templates that are used for Crosswork Data Gateway deployment, see Crosswork Data Gateway Deployment Workflow.

Deploy the CF Templates

For instructions on how to deploy the CF templates on Amazon EC2, see Deploy a CF Template.


Note


Amazon EC2 mandates entering an IP address for the vNIC2 interface when Crosswork Data Gateway is deployed using 3 NICs. This is an AWS EC2 requirement and not imposed by Crosswork.


Verify the Installation

Verify that the Crosswork Data Gateway installation is successful by following the steps in Monitor the Installation.

What to do next

Return to the installation workflow: Install Cisco Crosswork Network Controller on AWS EC2

Auto-Configuration for Deploying Crosswork Data Gateway

The auto-configuration procedure discovers the configuration parameters that are missing, and it automatically defines the mandatory parameters to install Base VM. The configuration parameters are passed using the Dynamic Host Configuration Protocol (DHCP) framework. In the Day 0 configuration, the auto-configuration mechanism defines only the essential parameters with the default values.

A default password is provided during the auto-configuration to comply with the security policies. On the initial log in, the dg-admin and dg-oper users must change the default password. The Crosswork Data Gateway services are inactive until the default password is changed.

The auto-configuration process supports the default 3 NIC deployment. In particular, only eth0 is configured for the Management network.

The DHCP interaction takes place over the eth0 interface. The auto-configuration procedure uses the default values stored on the DHCP server. After Base VM is deployed, you can configure or modify the default values using the Interactive Console. For more information about the console, see Cisco Crosswork Network Controller 6.0 Administration Guide.


Important


The auto-configuration mechanism is not supported for deploying Crosswork Data Gateway on the VMware platform.


Parameters used during Auto-Configuration

The auto-configuration utility configures the following parameters with the default values. For more information about these parameters, see Cisco Crosswork Data Gateway Parameters and Deployment Scenarios.

Table 13. Cisco Crosswork Data Gateway Mandatory Deployment Parameters

Name

Parameter

Default Value

AllowRFC8190

AllowRFC8190

The default value is Yes.

Auditd Server Port

AuditdPort

The default port is 60.

Crosswork Controller Port

ControllerPort

The default port is 30607.

Description

Description

The default value is CDG auto configure.

dg-admin Passphrase

dg-adminPassword

The default password is changeme.

Reset the default value with the password that you have chosen for the dg-admin user.

Password must be 8-64 characters.

dg-oper Passphrase

dg-operPassword

The default password is changeme.

Reset the default value with the password you have chosen for the dg-oper user.

Password must be 8-64 characters.

Data Disk Size

DGAppdataDisk

The default value of this parameter is 5.

DNS Address

DNS

The default values of this parameter are

208.67.222.222

208.67.220.220

DNS Security Extensions

DNSSEC

The default value of this parameter is False.

DNS over TLS

DNSTLS

The default value of this parameter is False.

DNS Search Domain

Domain

The default value of this parameter is localdomain.

Crosswork Data Gateway HA mode

HANetworkMode

The default value of this parameter is L2.

Hostname

Hostname

The default value of this parameter is dg-<eth0 address>.

Where <eth0-address> is the address of vNIC0.

Link-Local Multicast Name Resolution

LLMNR

The default value of this parameter is False.

Multicast DNS

mDNS

The default value of this parameter is False.

NicAdministration

NicAdministration

The default value of this parameter is eth0.

NicControl

NicControl

The default value of this parameter is eth1.

NicDefaultGateway

NicDefaultGateway

The default value of this parameter is eth0.

NicExternalLogging

NicExternalLogging

The default value of this parameter is eth0.

NicManagement

NicManagement

The default value of this parameter is eth0.

NicNBExternalData

NicNBExternalData

The default value of this parameter is eth1.

NicNBSystemData

NicNBSystemData

The default value of this parameter is eth1.

NicSBData

NicSBData

The default value of this parameter is the last active interface such as eth0 for 1-NIC deployment, eth1 for 2-NIC.

NTPv4 Servers

NTP

The default values of this parameter are

162.159.200.1

65.100.46.164

40.76.132.147

104.131.139.195

Use NTPv4 Authentication

NTPAuth

The default value of this parameter is False.

Profile

Profile

The default value of this parameter is Standard.

Syslog Multiserver Mode

SyslogMultiserverMode

The default value of this parameter is Simultaneous.

Syslog Server Port

SyslogPort

The default value of this parameter is 514.

Syslog Server Protocol

SyslogProtocol

The default value of this parameter is UDP.

Use Syslog over TLS

SyslogTLS

The default value of this parameter is False.

Use Remote Auditd Server

UseRemoteAuditd

The default value of this parameter is False.

Use Remote Syslog Server

UseRemoteSyslog

The default value of this parameter is False.

vNIC IPv4 Method

Vnic0IPv4Method

The default value of this parameter is DHCP.

vNIC IPv4 Skip Gateway

Vnic0IPv4SkipGateway

The default value of this parameter is False.

vNIC IPv6 Method

Vnic0IPv6Method

The default value is None.

vNIC IPv6 Skip Gateway

Vnic0IPv6SkipGateway

The default value is False.

vNIC IPv4 Method

Vnic1IPv4Method

The default value is DHCP.

vNIC IPv4 Skip Gateway

Vnic1IPv4SkipGateway

The default value is False.

vNIC IPv6 Method

Vnic1IPv6Method

The default value is None.

vNIC IPv6 Skip Gateway

Vnic1IPv6SkipGateway

The default value is False.

vNIC IPv4 Method

Vnic2IPv4Method

The default value is DHCP.

vNIC IPv4 Skip Gateway

Vnic2IPv4SkipGateway

The default value is False.

vNIC IPv6 Method

Vnic2IPv6Method

The default value is None.

vNIC IPv6 Skip Gateway

Vnic2IPv6SkipGateway

The default vale is False.

Install Cisco NSO on Amazon EC2

This section provides an overview of how Cisco NSO is installed on Amazon EC2.

Cisco Crosswork uses a set of CF templates to deploy NSO.

NSO Deployment Workflow

The NSO deployment procedure involves deploying various Crosswork resources using the corresponding YAML files.

The nso-stack-ec2.yaml file deploys stacks for one NSO NLB (nso-nlb-ec2.yaml) and two NSOs (nso.yaml). See below table for more information.

Table 14. Resources Deployed During NSO Deployment

Resource

Description

EC2 NSO

The nso.yaml file is deployed to create the EC2 node resources (network interface and an instance) in the stack.

NSO NLB

The nso-nlb-ec2.yaml file is deployed to create the EC2 NLB resources (target groups, network load balancer, data listeners, and NLB route 53 record) in the stack.

Installation Parameters

For list of important parameters that you must specify in the CF templates that are used to deploy NSO, see CF Template Parameters for Installing NSO. NSO is deployed on Amazon EC2 based on the parameters specified in the templates.


Note


While deleting the NSO setup, delete the NSO Route53 Record (NsoRoute53RecordName) manually.


Deploy the CF Templates

You can install NSO on Amazon EC2 by customizing the CF templates. For list of CF templates that are used for NSO deployment, see NSO Deployment Workflow.

For instructions on how to deploy the CF templates on Amazon EC2, see Deploy a CF Template.

Verify the Installation

Verify that the NSO installation is successful by following the steps in Monitor the Installation.

What to do next

Return to the installation workflow: Install Cisco Crosswork Network Controller on AWS EC2

Deploy an Additional Crosswork Cluster Node

This section explains how to deploy an additional worker/hybrid node on the Crosswork cluster.

Deploying an additional node on the Crosswork cluster involves deploying the Crosswork network configuration and VM customization resources using the cw-add-vm.yaml file.


Important


Before deploying an additional worker node, ensure that the Crosswork cluster and Crosswork application have been created.


Note


A new hybrid node MUST reuse the same IP addresses as the hybrid VM it is replacing, and a maximum of 3 hybrid nodes are allowed.


Installation Parameters

For list of important parameters that you must specify in the CF template that is used to deploy an additional node on the Crosswork cluster, see CF Template Parameters for Installing Single Hybrid Cluster or Worker Node. Additional nodes are deployed on the Crosswork cluster based on the parameters specified in the templates.

Deploy the CF Templates

You can install an additional worker/hybrid node on the Crosswork cluster by customizing the CF template.

For instructions on how to deploy the CF templates on Amazon EC2, see Deploy a CF Template.

Verify the Installation

Verify that the nodes are attached to the Crosswork cluster. On the EC2 console, select the Crosswork cluster and make sure that the nodes that you added appear under the Compute section. For more information, see Monitor the Installation.

What to do next

Return to the installation workflow: Install Cisco Crosswork Network Controller on AWS EC2

Manage CF Template Deployment

The following sections explain how to deploy a CF template on Amazon EC2 and verify its installation:

Deploy a CF Template

You can install Crosswork on Amazon EC2 with custom resources. Depending on the configured parameters, the needed components with the capabilities are also installed.

Before you begin

  • Make sure that you have met the Resource Requirements and Prerequisites prescribed for installing Crosswork on Amazon EC2.

  • Ensure that you have access to the CloudFormation templates that are stored in the S3 bucket or on your local machine. If the template is in Amazon S3, keep the URL of the template file copied.

Procedure


Step 1

Log in to the AWS account and navigate to the S3 bucket. If the CF template is on your local computer, you can upload the template.

Step 2

In the AWS CloudFormation console, navigate to the Stacks page and choose Create stack > With new resources (standard). The Create stack page opens.

Step 3

Enter the following details:

  1. Under Prerequisite - Prepare template, select Template is ready.

  2. Under Specify template > Template source, select one of the following options:

    • If you have the YAML or JSON file URL directing to the S3 bucket where the CF template is located, select Amazon S3 URL. In the Amazon S3 URL field, enter the URL and click Next.

    • If the CF template is saved on your local computer, select Upload a template file and click Choose File to select the file that you want to upload. After you have selected the template, Amazon uploads the file and displays the S3 URL. Click Next.

Note


(Optional) Click View in Designer to view a visual representation of the execution flow in your CF template.

Step 4

In the Specify stack details page, enter the relevant values for the stack name and parameter values. Click Next.

Note


The parameter field names visible in this window are defined by the parameters in the CF template.

Step 5

Review the parameter values that you have configured.

Step 6

Under the Capabilities, select the check boxes next to:

  • I acknowledge that AWS CloudFormation might create IAM resources with custom names.

  • I acknowledge that AWS CloudFormation might require the following capability: CAPABILITY_AUTO_EXPAND.

Step 7

Click Submit.


What to do next

The time taken to create the cluster can vary based on the size of your deployment profile and the performance characteristics of your hardware. See Monitor the Installation to know how you can check the status of the installation.

Monitor the Installation

This section describes how to verify if the deployment is complete without errors.

Procedure


Step 1

In the CloudFormation console, from the left-hand side Stacks pane, select the stack that you have deployed.

Step 2

The stack details are displayed on the right. Click on each tab in this window to view details of the stack. If the stack creation is in progress, the status of the stack in the Events tab is CREATE_IN_PROGRESS.

Step 3

After the stack is created:

  • The status of the stack changes to CREATE_COMPLETE and the Logical ID displays the stack name.

  • The Resources tab displays details of the all the resources that the CF template has created, including the physical IDs.

  • The Outputs tab has details of the VM's interface IP addresses.


What to do next

After the stack creation is complete, you can access the Crosswork UI and monitor the health of your cluster. For more information on how to log in to the Crosswork UI, see Accessing the Crosswork UI.

Accessing the Crosswork UI

After the stacks are created, you can check if all the nodes are up and running in the cluster from the Cisco Crosswork UI.

Before you begin

  • Ensure that you have a spare Network Load Balancer (NLB). To access Crosswork UI, use an external NLB that routes requests to its targets using the protocol DNS and port number that you specify.

  • Verify that the Crosswork cluster and pods are in the running state. For information on how to view the status of the cluster, see Monitor the Installation.

  • Make sure to keep the IP address of the Management node copied. This IP address is used to access the Crosswork UI. You can copy the IP address from the Outputs tab of the CloudFormation console. For information on accessing the Outputs tab, see Monitor the Installation.

Procedure


Step 1

Log in to the AWS console and navigate to Target Groups to register the targets.

Step 2

Under Targets, click Register targets. The Register targets page opens.

Step 3

In the IPv4 address, specify the Management IP address that you copied from the CloudFormation console.

Step 4

Specify the port as 30603. Click Include as pending below

Step 5

Click Register pending targets.

To deregister the targets that are no longer in use, select the target and click Deregister.

Step 6

After the target is in the healthy state, click on the load balancer name under Details. The Load balancer page opens.

Step 7

Copy the DNS name from the DNS name column.

Step 8

Launch a supported browser and enter the following in the address bar: https://<DNS_name>:30603/

Note


When you access Cisco Crosswork for the first time, some browsers display a warning that the site is untrusted. When this happens, follow the prompts to add a security exception and download the self-signed certificate from Cisco Crosswork server. After you add a security exception, the browser accepts the server as a trusted site in all future login attempts. If you want to use a CA signed certificate, see the Manage Certificates section in Crosswork Network Controller 6.0 Administration Guide.

Step 9

Log in to Cisco Crosswork as follows:

  1. Enter the Cisco Crosswork administrator username admin and the default password admin.

  2. Click Log In.

  3. When prompted to change the administrator's default password, enter the new password in the fields provided, and then click OK.

    Note


    Use a strong VM Password (minimum 8 characters long, including upper & lower case letters, numbers, and one special character). Avoid using passwords similar to dictionary words (for example, "Pa55w0rd!") or relatable words (for example, C!sco123 or Cwork321!).

Step 10

(Optional) Click on the Crosswork Health tab, and click on the Crosswork Infrastructure tile to view the health status of the microservices running on Cisco Crosswork.


What to do next

Return to the installation workflow: Install Cisco Crosswork Network Controller on AWS EC2

Crosswork Data Gateway Post-installation Tasks

This section lists the steps that you can complete after you have deployed Crosswork Data Gateway.

Configure Timezone of the Crosswork Data Gateway VM

In general, the Crosswork Data Gateway VM launches with the default timezone as UTC. Cisco recommends that you configure the timezone to match your geographical area. With this configuration, all the Crosswork Data Gateway processes including the Showtech logs use the same configured timezone.

Procedure


Step 1

In Crosswork Data Gateway VM interactive menu, select Change Current System Settings.

Step 2

Select 9 Timezone.

Step 3

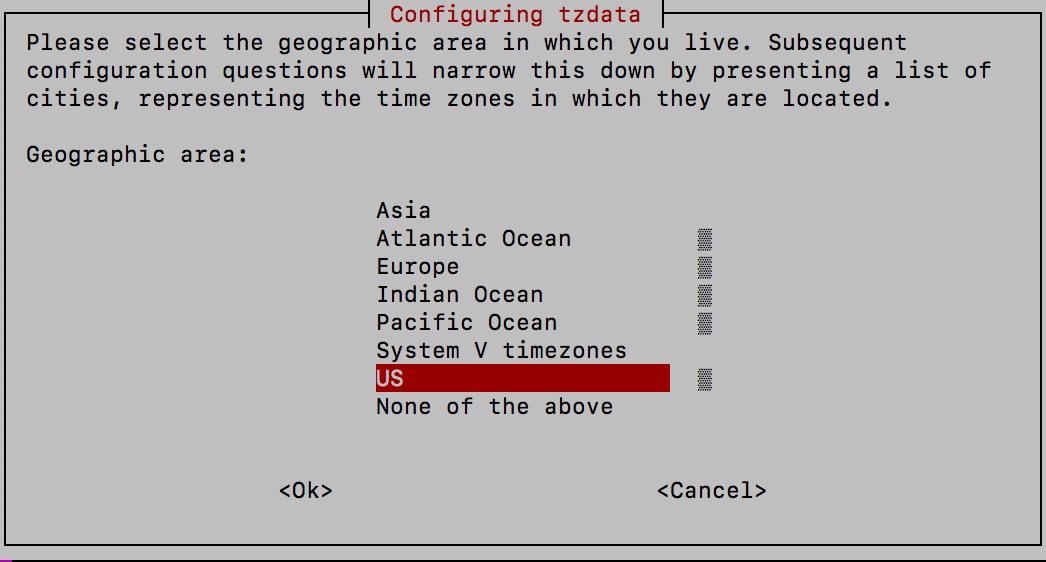
Select the geographic area in which you live.

Figure 1. Timezone Settings - Geographic Area Selection
Timezone Settings - Geographic Area Selection

Step 4

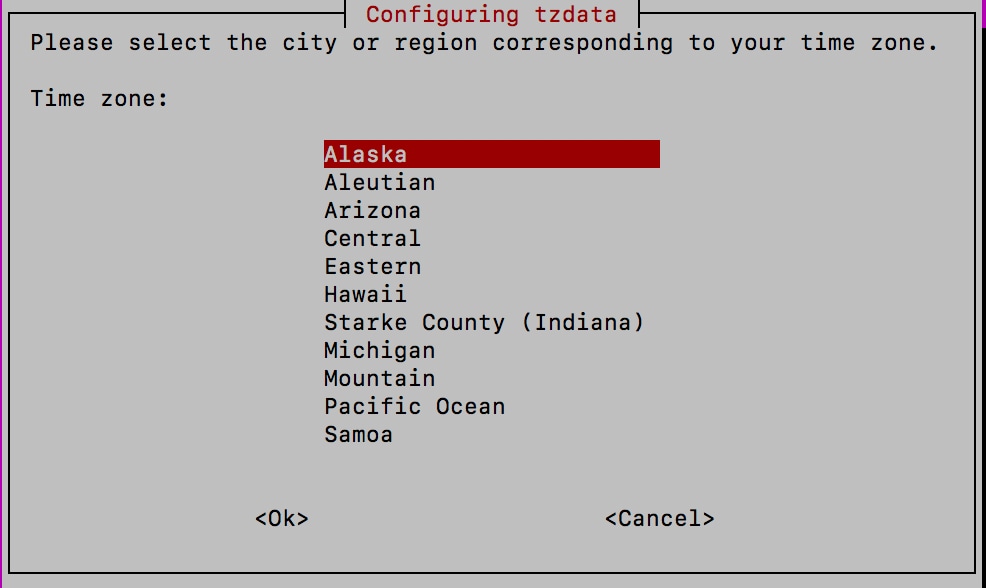
Select the city or region corresponding to your timezone.

Figure 2. Timezone Settings - Region Selection
Timezone Settings - Region Selection

Step 5

Select OK to save the settings.

Step 6

Reboot the Crosswork Data Gateway VM so that all processes pick up the new timezone.

Step 7

Log out of the Crosswork Data Gateway VM.


Log in and Log out of Crosswork Data Gateway VM

This section describes how to log in and out to the Crosswork Data Gateway VM.

Follow these steps to access and log out of the Crosswork Data Gateway VM:

Access Crosswork Data Gateway VM from SSH

Secure Shell (SSH) offers a protection from brute force attacks by blocking the client IP after several login failures. Failures such as incorrect username or password, connection disconnect, or algorithm mismatch are counted against the IP. Up to 4 failures within a 20 minute window causes the client IP to be blocked for at least 7 minutes. Continuing to accumulate failures cause the blocked time to be increased. Each client IP is tracked separately.

Follow these steps to log in to the Cisco Crosswork Data Gateway VM from SSH.

Procedure

Step 1

From your work station with network access to the Cisco Crosswork Data Gateway management IP, run the following command:

ssh <username>@<ManagementNetworkIP>

where ManagementNetworkIP is the management network IP address.

For example,

To login as administrator user: ssh dg-admin@<ManagementNetworkIP>

To log in as operator user: ssh dg-oper@<ManagementNetworkIP>

The Crosswork Data Gateway flash screen opens prompting for password.

Step 2

Input the corresponding password (the one that you created during installation process) and press Enter.


If you are unable to access the Cisco Crosswork Data Gateway VM, there is an issue with your network configuration settings. From the console, check the network settings. If they are incorrect, it is best to delete the Cisco Crosswork Data Gateway VM and reinstall with the correct network settings.

Log out of Crosswork Data Gateway VM

To log out of the VM, from the Main Menu, select l Logout and press Enter or click OK.

Troubleshoot Crosswork Data Gateway Installation and Enrollment

If Crosswork Data Gateway fails to auto-enroll with Cisco Crosswork, you can collect Crosswork Data Gateway show-tech (Main menu > 5 Troubleshooting > 2 Run show-tech) and check for the reason in controller-gateway logs. For more information on how to collect show-tech logs, see the Collect show-tech logs from the Interactive Console section in Cisco Crosswork Network Controller 6.0 Administration Guide. If there are session establishment or certificate-related issues, ensure that the controller.pem certificate is uploaded using the Interactive Console.


Important


When using an IPv6 address, it must be surrounded by square brackets ([1::1]).


The following table lists common problems that might be experienced while installing or enrolling Crosswork Data Gateway, and provides approaches to identifying the source of the problem and solving it.

Table 15. Troubleshooting the Installation/Enrollment

Issue

Action

Crosswork Data Gateway cannot be enrolled with Cisco Crosswork due to an NTP issue, i.e., there is a clock-drift between the two.

The clock-drift might be with either Crosswork Data Gateway or Cisco Crosswork.

Also, on the NTP servers for Cisco Crosswork and Crosswork Data Gateway, the initial time is set to the ESXi server. For this reason, the ESXi server must also have NTP configured.

Sync the clock time on the host and retry.

1. Log in to the Crosswork Data Gateway VM.

2. From the main menu, select 5 Troubleshooting > 2 Run show-tech.

Enter the destination to save the tarball containing logs and vitals and click OK.

The show-tech is now encrypted with a file extension ending with .tar.xz.

3. Run the following command to decrypt the show-tech file.

openssl enc -d -AES-256-CBC -pbkdf2 -md sha512 -iter 100000 -in <showtech file> -out <decrypted filename> -pass pass:<encrypt string>

In the show-tech logs (in file session.log at location /opt/dg/log/controller-gateway/session.log), if you see the error UNAUTHENTICATED:invalid certificate. reason: x509: certificate has expired or is not yet valid, then there is a clock-drift between Crosswork Data Gateway and Cisco Crosswork.

3. From the main menu, go to 3 Change Current System Settings > 1 Configure NTP.

Configure NTP to sync with the clock time on the Cisco Crosswork server and try reenrolling Crosswork Data Gateway.

Crosswork Data Gateway remains in degraded state for more than 10 minutes with reason stated as "Could not collect vitals" due to certificate errors.

1. Log in to the Crosswork Data Gateway VM.

2. From the main menu, select 5 Troubleshooting > 2 Run show-tech.

Enter the destination to save the tarball containing logs and vitals and click OK.

The show-tech is now encrypted with a file extension ending with .tar.xz.

3. Run the following command to decrypt the show-tech file.

openssl enc -d -AES-256-CBC -pbkdf2 -md sha512 -iter 100000 -in <showtech file> -out <decrypted filename> -pass pass:<encrypt string>

In the show-tech logs (in file gateway.log at location /opt/dg/log/controller-gateway/gateway.log), if you see certificate errors, then reupload the Controller Signing Certificate, as explained in the steps below:

1. From the main menu, select 3 Change Current System Settings > 7 Import Certificate.

2. From the Import Certificates menu, select 1 Controller Signing Certificate File and click OK.

3. Enter the SCP URI for the certificate file and click OK.

Crosswork Data Gateway remains in degraded state for more than 10 minutes with reason stated as "gRPC connection cannot be established" due to certificate errors.

1. Reupload the certificate file using the following steps:

a. From the main menu, select 3 Change Current System Settings > 7 Import Certificate.

b. From the Import Certificates menu, select 1 Controller Signing Certificate File and click OK.

c. Enter the SCP URI for the certificate file and click OK.

2. Reboot the Crosswork Data Gateway VM following the steps below:

a. From the main menu, select 5 Troubleshooting and click OK.

b. From the Troubleshooting menu, select 4 Reboot VM and click OK.

c. Once the reboot is complete, check if the Crosswork Data Gateway's operational status is Up.

During a Crosswork upgrade, some of the Crosswork Data Gateways may not get upgraded or reenrolled leading to logging multiple error messages in the dg-manager logs.

Reenroll or redeploy the Crosswork Data Gateways. For more information, see the Redeploy a Crosswork Data Gateway Instance and Reenroll Crosswork Data Gateway sections in Cisco Crosswork Network Controller 6.0 Administration Guide.

If a Crosswork Data Gateway instance that was previously attached to Crosswork is now reattached to a different Crosswork version 4.x or 5.0, the operational state of the instance may be Degraded with the robot-astack-influxdb error.

1. Log in to the Crosswork UI from the SSH.

2. Run the Docker executive commands to access the robot-astack-influxdb pod.

3. In the pod, navigate to the following directory and delete it:

/mnt/datafs/influxdb

4. Restart the service using the following command:

supervisorctl restart all

If Data Gateway is redeployed without moving the gateway to the Maintenance mode, Crosswork enrollment will be unsuccessful and errors will be logged in the dg-manager and controller-gateway logs.

Move the Data Gateway to the Maintenance mode or manually reenroll the gateway. For more information, see the Reenroll Crosswork Data Gateway section in Cisco Crosswork Network Controller 6.0 Administration Guide.

Import Controller Signing Certificate File

The Controller Certificate file is automatically imported after the VM boots. If there is an import failure, the Crosswork Data Gateway VM makes several attempts to import the certificate while giving you the option to manually import it.

  • You have not specified the Controller Signing Certificate File URI under the Controller Settings during installation.

  • Cisco Crosswork was upgraded or reinstalled and you need to authenticate and enroll Crosswork Data Gateway with Cisco Crosswork.

  • Cisco Crosswork configuration is in-progress when Crosswork Data Gateway tries to import the Controller Certificate file.

  • The Cisco Crosswork Controller IP address in unreachable or incorrect.

  • The Cisco Crosswork username or password is incorrect.

Follow these steps to import the controller signing certificate file:

Procedure

Step 1

From the Cisco Crosswork Data Gateway VM's Interactive Menu, select 3 Change Current System Settings.

The Change System Settings menu opens.

Step 2

Select 7 Import Certificate.

Step 3

From the Import Certificates menu, select 1 Controller Signing Certificate File.

Step 4

Enter the SCP URI for the certificate file.

An example URI is given below:

cw-admin@{server ip}:/home/cw-admin/controller.pem

Step 5

Enter the SCP passphrase (the SCP user password).

The certificate file is imported.

Step 6

Verify that the certificate was installed successfully. See View the Controller Signing Certificate File.


View the Controller Signing Certificate File

Follow these steps to view the signing certificate:

Procedure

Step 1

From the Crosswork Data Gateway VM's interactive menu, select 2 Show System Settings.

Step 2

From the Show Current System Settings menu, select 7 Certificates.

Step 3

Select 2 Controller Signing Certificate File.

Crosswork Data Gateway displays the default certificate if no new certificate has been imported. Otherwise, it displays the new certificate if it was successfully imported.