Cisco Network Insights Advisor Setup and Settings

This chapter contains the following sections:

About Cisco Network Insights Advisor

The Cisco Network Insights Advisor (Cisco NIA) application monitors a data center network and pinpoints issues that can be addressed to maintain availability and reduce surprise outages. Cisco NIA's understanding of your network allows it to provide proactive advice with a focus on maintaining availability and alerting you about potential issues that can impact up-time.

The Cisco NIA app collects the CPU, device name, device pid, serial number, version, memory, device type, and disk usage information for the nodes in the fabric. The Cisco NIA app provides TAC Assist functionalities for Cisco Customers to collect tech support across multiple devices and upload those tech supports to Cisco Cloud. These tech support are accessible to our TAC teams when helping customers through a resolution of a Service Request. Additionally, it enables capability for our TAC teams to collect tech support on demand for a particular device.

The Cisco NIA app consists of the following components:

  • Advisories

    • Software Upgrades

    • Cisco Recommendations

    • Reports

  • Notices

    • EoL/EoS Dates

    • Field Notices

  • Issues

    • Anomalies

    • Bug/PSIRT Reports

  • Devices

  • TAC Assist

    • Log Collection

    • Technical Support to Cloud

    • Enhanced TAC Assist

  • Jobs

    • Fabric

Cisco NIA Initial Setup

This section contains the steps required to set up the Cisco NIA app in the Cisco APIC. This set up is required for the Cisco NIA app to show important information and gather relevant data.

Procedure


Step 1

Once Cisco NIA app is installed and after your first log in, a welcome dialog appears. Click Begin Setup.

An App Setup dialog appears.

The Cisco NIA app is enabled with Cisco APIC.

Step 2

Uncheck Help Cisco improve its products to stop sending the CX telemetry data to the cloud.


Cisco NIA Settings

Settings

Displayed across the top of the work pane is a group of icons and a list menu comprising the Cisco NIA app settings. The following table describes each:

Property Description

Device Connector Status: Identifies the current connection status of the Cisco NIA application to the Cisco Intersight cloud and the device connector claim condition. Possible connection statuses are:

  • Not Connected: The Cisco NIA application is not connected to the Cisco Intersight cloud.

  • Connected / Not Claimed: The Cisco NIA application is connected to the Cisco Intersight cloud but the device connector has not been claimed by the customer.

  • Connected / Claimed: The Cisco NIA application is connected to the Cisco Intersight cloud and the device connector has been claimed by the customer.

For more information, see Setting Up the Intersight Device Connector below.

Inbox: View messages from Cisco regarding software upgrades or other relevant information about devices on your network.

Clicking on this icon invokes a list menu allowing you to make changes to the following:

  • About Network Insights—Displays an information dialog identifying the version number of the Cisco NIA application. Click Update to Latest to fetch the latest metadata published version. This requires that the using of the Cisco Intersight Device Connecter is connected and claimed.

  • Rerun Setup—Allows you to edit the Data Collection Setup by adding or removing the fabric.

Displays the online help for Cisco NIA application.

Setting Up the Device Connector

This secion describes setting up the device connector for Cisco NIA on Cisco APIC.

About Device Connector

Devices are connected to the Intersight portal through a Device Connector that is embedded in the management controller of each system. Device Connector provides a secure way for the connected devices to send information and receive control instructions from the Cisco Intersight portal, using a secure Internet connection.

When an Intersight-enabled device or application starts, the Device Connector starts at boot by default, and attempts to connect to the cloud service. If the Auto Update option is enabled, the Device Connector is automatically updated to the latest version through a refresh by the Intersight service when you connect to Intersight. For more information on the Auto Update option, see Configuring the Intersight Device Connector.


Note

The Cisco NIA app supports only one active Device Connector at a time, either on Cisco APIC or on Cisco Application Services Engine. If you want to switch to use Device Connector on Cisco Application Services Engine, you must first turn off the Device Connector on Cisco APIC.


Configuring the Intersight Device Connector

Procedure


Step 1

In the Cisco APIC GUI, click System > System Settings > Intersight.

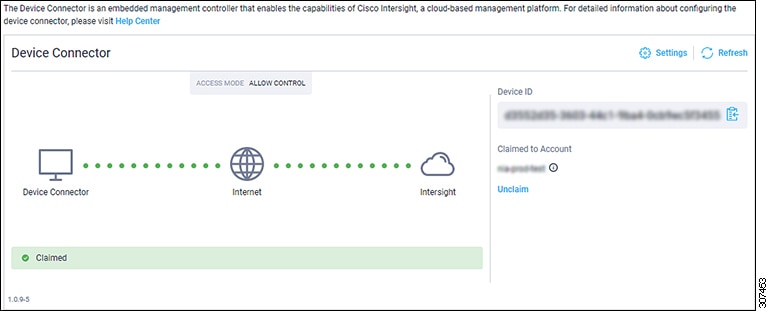
The Device Connector work pane appears:

  • If you see green dotted lines connecting Internet to Intersight in the Device Connector graphic, and the text Claimed underneath the graphic, then your Intersight Device Connector is already configured and connected to the Intersight service, and the device is claimed.

  • If you see yellow dotted lines and a caution icon connecting Internet to Intersight in the Device Connector graphic, and the text Not Claimed underneath the graphic, then your Intersight Device Connector is not yet configured and connected to the Intersight service, and the device is not yet claimed. Follow these procedures to configure the Intersight Device Connector and connect to the Intersight service, and claim the device.

Note 

If you see red dotted lines connecting Internet to Intersight in the Device Connector graphic, that means that you configured the proxy incorrectly in Step 6.

Step 2

Determine if you would like to update the software at this time, if there is a new Device Connector software version available.

If there is a new Device Connector software version available and you do not have the Auto Update option enabled, you will see a message towards the top of the screen, telling you that Device Connector has important updates available.

  • If you do not want to update the software at this time, go to Step 3 to begin configuring the Intersight Device Connector.

  • If you would like to update the software at this time, click one of the two links in the yellow bar towards the top of the page, depending on how you would like to update the software:

    • Update Now: Click this link to update the Device Connector software immediately.

    • Enable Auto Update: Click this link to go to the General page, where you can toggle the Auto Update field to ON, which allows the system to automatically update the Device Connector software. See Step 4c for more information.

Step 3

Locate the Settings link to the right of the Device Connector heading and click the Settings link.

The Settings page appears, with the General tab selected by default.

Step 4

In the General page, configure the following settings.

  1. In the Device Connector field, determine if you want to allow communication between the device and Cisco Intersight.

    The Device Connector option (enabled by default) enables you to claim the device and leverage the capabilities of Intersight. If it is turned OFF, no communication will be allowed to Intersight.

  2. In the Access Mode field, determine if you want to allow Intersight the capability to make changes to this device.

    Access Mode enables you to allow full read/write operations from the cloud or restrict changes made to this device from Intersight.

    • The Allow Control option (selected by default) enables you to perform full read/write operations from the cloud, based on the features available in Cisco Intersight. This function is not used for changes from Cisco Cloud to the customer network.

    • The Read-only option ensures that no changes are made to this device from Intersight. For example, actions such as upgrading firmware or a profile deployment will not be allowed in the Read-Only mode. However, the actions depend on the features available for a particular system.

  3. In the Auto Update field, determine if you want to allow the system to automatically update the software.

    • Toggle ON to allow the system to automatically update the software.

    • Toggle OFF so that you manually update the software when necessary. You will be asked to manually update the software when new releases become available in this case.

    Note 

    If the Auto Update option is turned OFF, that may periodically cause the Device Connector to be out-of-date, which could affect the ability of the Device Connector to connect to Intersight.

Step 5

When you have completed the configurations in the General page, click Save.

The Intersight - Device Connector overview pages appears again. At this point, you can make or verify several configure settings for the Intersight Device Connnector:

  • If you want to configure the proxy that the Device Connector will use to communicate with the Intersight cloud, go to Step 6.

  • If you want to manage certificates with the Device Connector, go to Step 9.

Step 6

If you want to configure the proxy that the Device Connector will use to communicate with the Intersight cloud, click Settings, then click Proxy Configuration.

The Proxy Configuration page appears.

Step 7

In the Proxy Configuration page, configure the following settings.

In this page, you can configure the proxy that the Device Connector will use to communicate with the Intersight cloud.

Note 

The Device Connector does not mandate the format of the login credentials; they are passed as-is to the configured HTTP proxy server. Whether or not the username must be qualified with a domain name depends on the configuration of the HTTP proxy server.

  1. In the Enable Proxy field, toggle the option to ON to configure the proxy settings.

  2. In the Proxy Hostname/IP field, enter a Proxy Hostname and IP Address.

  3. In the Proxy Port field, enter a Proxy Port.

  4. In the Authentication field, toggle the Authentication option to ON to configure the proxy authentication settings, then enter a Proxy Username and Password for authentication.

Step 8

When you have completed the configurations in the Proxy Configuration page, click Save.

The Intersight - Device Connector overview pages appears again.

If you want to make manage certificates with the Device Connector, go to the next step.

Step 9

If you want to manage certificates with the Device Connector, click Settings, then click Certificate Manager.

The Certificate Manager page appears.

Step 10

In the Certificate Manager page, configure the following settings.

By default, the device connector trusts only the built-in svc.ucs-connect.com certificate. If the device connector establishes a TLS connection and a server sends a certificate that does not match the built-in svc.ucs-connect.com certificate, the device connector terminates TLS connections because it cannot determine if the server is a trusted device or not.

Click Import to import a CA signed certificate. The imported certificates must be in the *.pem (base64 encoded) format. After a certificate is successfully imported, it is listed in the list of Trusted Certificates and if the certificate is correct, it is shown in the In-Use column.

View these details for a list of certificates that are used to connect to svc.ucs-connect.com (intersight.com):

  • Name—Common name of the CA certificate.

  • In Use—Whether the certificate in the trust store was used to successfully verify the remote server.

  • Issued By—The issuing authority for the certificate.

  • Expires—The expiry date of the certificate.

Delete a certificate from the list of Trusted certificates. However, you cannot delete bundled certificates (root+intermediate certificates) from the list. The lock icon represents the Bundled certificates.

Step 11

When you have completed the configurations in the Certificate Manager page, click Close.

You can claim the device using the instructions provided in Claiming a Device.


Claiming a Device

Before you begin

Configure the Intersight Device Connector information from the Cisco APIC site using the instructions provided in Configuring the Intersight Device Connector.

Procedure


Step 1

Log into the Cisco Intersight cloud site:

https://www.intersight.com

Step 2

In the Cisco Intersight cloud site, under the Devices tab, click Claim a New Device.

The Claim a New Device page appears.

Step 3

Go back to the Cisco APIC site and navigate back to the Intersight - Device Connector page.

  1. On the menu bar, choose System > System Settings.

  2. In the Navigation pane, click Intersight.

Step 4

Copy the Device ID and Claim Code from the Cisco APIC site and paste them into the proper fields in the Claim a New Device page in the Intersight cloud site.

Click on the clipboard next to the fields in the Cisco APIC site to copy the field information into the clipboard.

Step 5

In the Claim a New Device page in the Intersight cloud site, click Claim.

You should see the message "Your device has been successfully claimed" in the Claim a New Device page. Also, in the main page, you should see your Cisco APIC system, with Connected shown in the Status column.

Step 6

Go back to the Intersight - Device Connector page in the Cisco APIC GUI and verify that the system was claimed successfully.

You should see green dotted lines connecting Internet to Intersight in the Device Connector graphic, and the text Claimed underneath the graphic.

Note 

You may have to click Refresh in the Intersight - Device Connector page to update the information in the page to the current state.

If you decide to unclaim this device for some reason, locate the Unclaim link in the Intersight - Device Connector page and click that link.


Navigating Cisco NIA

The Cisco NIA application window is divided into two parts: the Navigation pane and the Work pane.

Navigation Pane

The Cisco NIA app navigation pane divides the collected data into seven categories:

1 Dashboard: The main dashboard for the Cisco NIA application, providing immediate access to total advisories, issues, notices, devices, and TAC assist logs.

2 Advisories: Displays hardware, software, and hardening check advisories applicable to your network.

3 Notices: Displays notices applicable to the hardware and software in your network.

4 Issues: Displays anomalies, hardware and software bugs and Product Security Incident Response Team (PSIRT) alerts applicable to your network.

5 Devices: Sorts devices by device name, serial number, IP address, version, and platform.

6 TAC Assist: Collects logs for specified devices that can be attached to service requests using the Cisco Intersight Cloud.

7 Jobs: Provides access to configure and schedule bug scan and compliance check jobs that run for a specific fabric.

1 Dashboard View icon: Provides immediate access to top usage or issues for the selected alert type.

2 Browse View icon: Provides a detailed view of the alert(s) and access to more granular detail.

3 Configure icon: Displays the list of currently scheduled jobs and allows for the configuration of bug scanner and compliance check.

Work Pane

The work pane is the main viewing location in the Cisco NIA application. All information tiles, graphs, charts, and lists appear in the work pane.

Dashboard Work Pane

In an information tile, you can usually click on a numeric value to switch to the Browse work pane:

1 Launches the Browse work pane with all of the items displayed from the graph in the information tile.

2 Launches the Browse work pane with only the selected items displayed from the number in the information tile.

Browse Work Pane

The Browse work pane isolates the data for the parameter chosen on the Dashboard. The Browse work pane displays a top node lists, graphs over time, and lists all the nodes in an order defined by the anomaly score:

Clicking on one of the nodes in the list opens the Details work pane for that selection.

Details Work Pane

The Details work pane provides resource details about the item selected in the event list on the Browse work pane. The Details work pane consists of:

  • General Information: Includes information about the selected object. This varies based on from which browse window the details work pane was initiated.

  • Notices: Includes notices affecting devices in your network.

  • Devices Affected: Includes affected devices in your network.

Devices

The Devices page displays the devices by device name, serial number, IP address, version, and platform.

TAC Assist

The TAC Assist work pane lets you collect logs for specified devices that can be attached to service requests using the Cisco Intersight Cloud. It lets you check the device(s) for which you can collect logs to assist TAC.

The Log Collection section displays the new job triggered for TAC Assist. The Job Details page lists the TAC Assist logs.

All information about TAC Assist job including, status, devices, fabric, start time, job id, device name, log location, and cloud upload appear in the work pane.

Jobs

The configuration icon from the Jobs > Fabric lets you to configure a scheduled bug scan and compliance check for the selected fabric.

The browse icon from the Jobs > Fabric lets you view the scheduled jobs for the selected fabric and time range from the Fabric Job List page.