Configuring Policy-Based Redirect

About Policy-Based Redirect

Cisco Application Centric Infrastructure (ACI) policy-based redirect (PBR) enables provisioning service appliances, such as firewalls or load balancers. Typical use cases include provisioning service appliances that can be pooled, tailored to application profiles, scaled easily, and have reduced exposure to service outages. PBR simplifies the deployment of service appliances by enabling the provisioning consumer and provider endpoint groups to be all in the same virtual routing and forwarding (VRF) instance. PBR deployment consists of configuring a route redirect policy and a cluster redirect policy, and creating a service graph template that uses the route and cluster redirect policies. After the service graph template is deployed, use the service appliance by enabling endpoint groups to consume the service graph provider endpoint group. This can be further simplified and automated by using vzAny. While performance requirements may dictate provisioning dedicated service appliances, virtual service appliances can also be deployed easily using PBR.

The following figure illustrates the use case of redirecting specific traffic to the firewall:

Figure 1. Use Case: Redirecting Specific Traffic to the Firewall


In this use case, you must create two subjects. The first subject permits HTTP traffic, which then gets redirected to the firewall. After the traffic passes through the firewall, it goes to the Web endpoint. The second subject permits all traffic, which captures traffic that is not redirected by the first subject. This traffic goes directly to the Web endpoint.

The following figure illustrates a sample ACI PBR physical topology:

Figure 2. Sample ACI PBR Physical Topology


The following figure illustrates a sample ACI PBR logical topology:

Figure 3. Sample ACI PBR Logical Topology


While these examples illustrate simple deployments, ACI PBR enables scaling up mixtures of both physical and virtual service appliances for multiple services, such as firewalls and server load balancers.

Guidelines and Limitations for Configuring Policy-Based Redirect

Observe the following guidelines and limitations when planning policy-based redirect (PBR) service nodes:

  • A firewall (or a device that does not perform IP address translation) is inserted by using PBR for both directions.

  • A load balancer (or a device that perorms IP address translation) is inserted by using unidirectional PBR. The destination IP address (VIP address or NAT'd IP address) for the other direction is owned by the device. The exception is Layer 2 direct server return, where the return traffic does not come back to the load balancer.

  • The source MAC address of the packet can be rewritten because of the need to route the packet with PBR inside the fabric. The time-to-live (TTL) field in the IP address header will be decremented by as many times as the packet is routed within the fabric.

  • Select the same action for both service legs. In other words, if you select the deny action for the internal service leg, you should also select the deny action for the external service leg.

  • L3Out EPGs and regular EPGs can be consumer or provider EPGs.

  • L2Out EPGs cannot be either consumer or provider EPGs.

  • For a Cold Standby active/standby deployment, configure the service nodes with the MAC address of the active deployment. In a Cold Standby active/standby deployment, when the active node goes down, the standby node takes over the MAC address of active node.

  • You must provide the next-hop service node IP address.

  • Prior to the 5.2(1) release, you must provide the virtual MAC address. Beginning with the 5.2(1) release, you can optionally choose not to provide the virtual MAC address and instead let the Cisco Application Policy Infrastructure Controller (Cisco APIC) detect the address dynamically.

  • If you provision service appliances in the same bridge domain, you must use Cisco Nexus 9300-EX and 9300-FX platform leaf switches.

  • When downgrading from the Cisco APIC release 3.1, an internal code checks whether the policy-based redirect bridge domain uses the same bridge domain as a consumer or a provider. If it does, then the fault is disabled during the downgrade as such a configuration is not supported in earlier Cisco APIC versions.

  • If you downgrade from the 5.2(1) or later release to a release earlier than 5.2(1), you must remove all PBR-related configurations that include PBR-related features from the 5.2 releases and you must remove the associated service graphs. For example:

    • Remove a device selection policy that uses a PBR destination in an L3Out.

    • Remove a Layer 4 to Layer 7 services device that uses the enhanced lag policy.

    • Remove an IP SLA monitoring policy that uses the HTTP SLA type.

    • Remove a PBR destination that does not have the destination MAC address configured.

  • The service appliance, source, and bridge domain can be in the same VRF instance.

  • For Cisco N9K-93128TX, N9K-9396PX, N9K-9396TX, N9K-9372PX, and N9K-9372TX switches, the service appliance must not be in the same leaf switch as either the source or destination endpoint group. For Cisco N9K-C93180YC-EX and N9K-93108TC-EX switches, the service appliance can be in the same leaf switch as either the source or destination endpoint group.

  • PBR node interfaces are not supported on FEX host interfaces. A PBR node interface must be connected under leaf down link interface, not under FEX host interface. Consumer and provider endpoints can be connected under FEX host interfaces.

  • The service appliance can only be in a bridge domain.

  • The contract offered by the service appliance provider endpoint group can be configured to allow-all, but traffic should be routed by the Cisco Application Centric Infrastructure (Cisco ACI) fabric.

  • If you use the Cisco Nexus 9300-EX and 9300-FX platform leaf switches, it is not necessary for you to have the endpoint dataplane learning disabled on policy-based redirect bridge domains. During service graph deployment, the endpoint dataplane learning will be automatically disabled only for policy-based redirect node EPG. If you use non-EX and non-FX platform leaf switches, you must have the endpoint dataplane learning disabled on policy-based redirect bridge domains. The policy-based redirect bridge domain must have the endpoint dataplane learning disabled.

  • You can attach a service graph with PBR to a contract subject. The intra-EPG contract with the service graph cannot be used as an inter-EPG contract at the same time. You must use a separate contract for inter-EPG and intra-EPG communication when used with a service graph that has redirect enabled.

  • You can use the filters-from-contract option in the service graph template to use the specific filter of the contract subject where the service graph is attached, instead of the default filter for zoning-rules that do not include consumer EPG class ID as source or destination. For zoning-rules that have consumer EPG class ID as source or destination, it uses the specific filter regardless the option.

  • Multi-node policy-based redirect (multi-node PBR):

    • Supports up to five function nodes in a service graph that can be configured for policy-based redirect.

    • When using a multi-node PBR service chain, all the service devices have to be either in local leaf switch or they have to be connected to a remote leaf switch, but should not spread across both.

      • Supported topology:

        In this topology, RL means remote leaf switch and LL means local leaf switch that is under main location, and not under remote leaf switch.

        • N1(LL)--N2(LL)--N3(LL): All the devices are connected to local leaf switches not distributed across main location and remote leaf switch.

        • N1(RL)-N2(RL)--N3(RL): All the devices are connected to remote leaf switches.

      • Topology not supported:

        • N1(LL)--N2(RL)--N3(LL): Service devices are distributed across local leaf switches and remote leaf switches.

    • Multi-node PBR Layer 3 destination guidelines for load balancers:

      • Layer 3 destination upgrade: The Layer 3 destination (VIP) parameter is enabled by default after the upgrade. No issues will occur from this because if the PBR policy was not configured on a specific service node (prior to the 3.2(1) release), the node connector was treated as an Layer 3 destination and will continue to be in the new Cisco APIC release.

      • Traffic does not always need to be destined to only consumer/provider.

      • In the forward direction, the traffic is destined to load balancer VIP address.

      • In the reverse direction, if SNAT is enabled, the traffic is destined to the load balancer’s internal leg.

      • In both directions, enable (check) Layer 3 destination (VIP) on the Logical Interface Context.

      • Enable (check) Layer 3 destination (VIP) in both directions to allow you to switch from SNAT to No-SNAT on the load balancer internal by configuring the PBR policy on the internal side.

      • If SNAT is disabled:

        • Reverse direction traffic is destined to consumer but not to load balancer internal leg (enable PBR policy on the internal leg).

        • Layer 3 destination (VIP) is not applicable in this case because a PBR policy is applied.

  • Multicast and broadcast traffic redirection is not supported.

  • If you change a redirect policy's destination to a different group, the Cisco APIC raises a fault due to the change and the policy's operational status becomes disabled. You must clear the fault to re-enable the policy.

  • An intra-EPG or intra-external EPG contract with PBR must not be used for the inter-EPG contract.

  • When Migrating endpoints from a non-PBR EPG to a PBR EPG, the remote endpoints on the destination leaf switches do not clear their remote endpoints, which have the sclass details of the old non-PBR EPG. This issue occurs when the destination leaf switch with the remote endpoint is a switch with the -EX, -FX, or -GX suffix in the product ID. This issue does not occur with switches that have -FX2, -GX2, or a later suffix in the product ID.

    If you encounter this issue, you can manually clear the remote endpoint by using the following CLI command:

    vsh -c "clear system internal epm endpoint key vrf vrf_name ip ip_name"

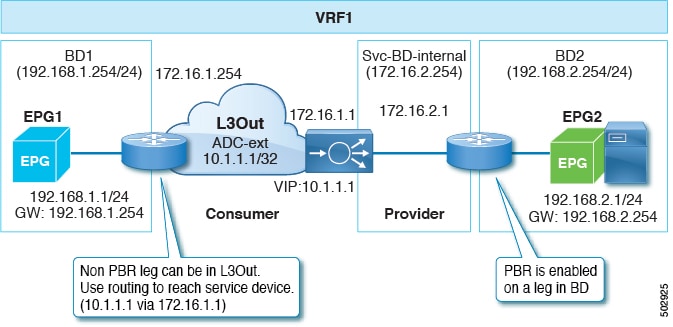
  • Supported policy-based redirect configurations include the following:

    Figure 4. Policy-based Redirect in the Same VRF Instance
    Figure 5. Policy-based Redirect With Different VRF Instances
    Figure 6. Policy-based Redirect With an L3Out Destination
  • Unsupported policy-based redirect configurations include the following:

    Figure 7. Unsupported Policy-based Redirect Configurations

Configuring Policy-Based Redirect Using the GUI

The following procedure configures policy-based redirect (PBR) using the GUI.

Procedure


Step 1

On the menu bar, choose Tenants > All Tenants.

Step 2

In the Work pane, double click the tenant's name.

Step 3

In the Navigation pane, choose Tenant tenant_name > Services > L4-L7 > Devices.

Step 4

In the Work pane, choose Actions > Create L4-L7 Devices.

Step 5

In the Create L4-L7 Devices dialog box, complete the fields as required.

In the General section, the Service Type can be Firewall, ADC, or Other.

Note


For a Layer 1/Layer 2 PBR configuration, create the Layer 4 to Layer 7 service device, and perform the following steps:

  1. Select the Service Type as Other.

  2. Select the Device Type Physical (cloud/virtual is not supported).

  3. Select a physical domain.

  4. Select the Function Type L1 or L2 as required.

  5. Create external and internal concrete interfaces and port connectivity on the corresponding leafs.

  6. Create Cluster interfaces by selecting the previously created concrete interfaces. You must specify a VLAN encapsulation when creating this interface. The encapsulation is pushed to the service device.

    Note


    For static VLAN configuration, ensure external and internal legs have a different VLAN for Layer 2, otherwise it is the same VLAN for Layer 1.

Step 6

In the Navigation pane, choose Tenant tenant_name > Services > L4-L7 > Service Graph Templates.

Step 7

In the Work pane, choose Action > Create L4-L7 Service Graph Template.

Step 8

In the Create L4-L7 Service Graph Template dialog box, perform the following actions:

  1. In the Graph Name field, enter a name for the service graph template.

  2. For the Graph Type radio buttons, click Create A New Graph.

  3. Drag and drop the device that you created from the Device Clusters pane to between the consumer endpoint group and provider endpoint group. This creates the service node.

    As of Cisco Application Policy Infrastructure Controller (APIC) release 4.2(1), you can optionally repeat step c to include up to five (5) service nodes.

  4. Select the following based on the service type of the device:

    For Firewall, select Routed and continue with the steps below. For ADC, select One-Arm or Two-Arm and continue with the steps below.
  5. Select the Route Redirect checkbox.

  6. Click Submit.

The new service graph template appears in the Service Graph Templates table.

Step 9

In the Navigation pane, choose Tenant tenant_name > Policies > Protocol > L4-L7 Policy Based Redirect.

Step 10

In the Work pane, choose Action > Create L4-L7 Policy Based Redirect.

Step 11

In the Create L4-L7 Policy Based Redirect dialog box, complete the fields as required. This policy-based redirect policy is for the consumer connector.

Step 12

Create another policy-based redirect policy for the provider connector.

Step 13

In the Navigation pane, choose Tenant tenant_name > Services > L4-L7 > Service Graph Templates > service_graph_template_name.

Choose the service graph template that you just created.

Step 14

Right click the service graph template and choose Apply L4-L7 Service Graph Template.

Step 15

In the Apply L4-L7 Service Graph Template to EPGs dialog box, perform the following actions:

  1. In the Consumer EPG/External Network drop-down list, choose the consumer endpoint group.

  2. In the Provider EPG/External Network drop-down list, choose the provider endpoint group.

  3. For the Contract radio buttons, click Create A New Contract.

  4. In the Contract Name field, enter a name for the contract.

  5. Do not put a check in the No Filter (Allow All Traffic) check box.

  6. On the Filter Entries table, click + to add an entry.

  7. For the new filter entry, enter "IP" for the name, choose IP for the Ether Type, and click Update.

  8. Click Next.

  9. For the Consumer Connector Redirect Policy drop-down list, choose the redirect policy that you created for the consumer connector.

  10. For the Consumer Connector Cluster Interface drop-down list, choose the consumer cluster interface.

  11. For the Provider Connector Redirect Policy drop-down list, choose the redirect policy that you created for the provider connector.

  12. For the Provider Connector Cluster Interface drop-down list, choose the provider cluster interface.

  13. Cick Finish.


Configuring Policy-Based Redirect Using the NX-OS-Style CLI

The example commands in this procedure include the route redirect, the cluster redirect, and the graph deployment. The device is created under tenant T1.

Procedure


Step 1

Create the device cluster.

Example:

  l4l7 cluster name ifav-asa-vm-ha type virtual vlan-domain ACIVswitch service FW function go-to
      cluster-device Device2 vcenter ifav108-vcenter vm "ASAv_HA1"
      cluster-device Device1 vcenter ifav108-vcenter vm "ASAv_HA"
      cluster-interface provider
        member device Device1 device-interface GigabitEthernet0/1
          interface ethernet 1/45 leaf 102
          vnic "Network adapter 3"
          exit
        member device Device2 device-interface GigabitEthernet0/1
          interface ethernet 1/45 leaf 102
          vnic "Network adapter 3"
          exit
        exit
      cluster-interface failover_link
        member device Device1 device-interface GigabitEthernet0/8
          interface ethernet 1/45 leaf 102
          vnic "Network adapter 10"
          exit
        member device Device2 device-interface GigabitEthernet0/8
          interface ethernet 1/45 leaf 102
          vnic "Network adapter 10"
          exit
        exit
      cluster-interface consumer
        member device Device1 device-interface GigabitEthernet0/0
          interface ethernet 1/45 leaf 102
          vnic "Network adapter 2"
          exit
        member device Device2 device-interface GigabitEthernet0/0
          interface ethernet 1/45 leaf 102
          vnic "Network adapter 2"
          exit
        exit
      exit
  exit

Step 2

Under tenant PBRv6_ASA_HA_Mode, deploy the PBR service graph instance.

Example:

  tenant PBRv6_ASA_HA_Mode
    access-list Contract_PBRv6_ASA_HA_Mode_Filter
      match ip
      exit

Step 3

Create a contract for PBR with the filter match IP protocol. Under the subject, specify the Layer 4 to Layer 7 service graph name.

The contract offered by the service appliance provider endpoint group cannot be configured with the allow-all setting.

Example:

    contract Contract_PBRv6_ASA_HA_Mode
      scope tenant
      subject Subject
        access-group Contract_PBRv6_ASA_HA_Mode_Filter both  
        l4l7 graph PBRv6_ASA_HA_Mode_Graph
        exit
      exit
    vrf context CTX1
      exit
    vrf context CTX2
      exit

Step 4

Create a bridge domain for the client and server endpoint group. Both the client and server are in the same VRF instance.

Example:

    bridge-domain BD1
      arp flooding
      l2-unknown-unicast flood
      vrf member CTX1
      exit
    bridge-domain BD2
      arp flooding
      l2-unknown-unicast flood
      vrf member CTX1
      exit

Step 5

Create a separate bridge domain for the external and internal leg of the firewall.

PBR requires the learning of the source VTEP on remote leaf switches to be disabled, which is done using the no ip learning command.

Example:

    bridge-domain External-BD3
      arp flooding
      no ip learning
      l2-unknown-unicast flood
      vrf member CTX1
      exit
    bridge-domain Internal-BD4
      arp flooding
      no ip learning
      l2-unknown-unicast flood
      vrf member CTX1
      exit

Step 6

Create the application profile and specify the endpoint groups.

Example:

    application AP1
      epg ClientEPG
        bridge-domain member BD1
        contract consumer Contract_PBRv6_ASA_HA_Mode
        exit
      epg ServerEPG
        bridge-domain member BD2
        contract provider Contract_PBRv6_ASA_HA_Mode
        exit
      exit

Step 7

Specify the default gateway for the bridge domains.

Example:

    interface bridge-domain BD1
      ipv6 address 89:1:1:1::64/64
      exit
    interface bridge-domain BD2
      ipv6 address 99:1:1:1::64/64
      exit

	interface bridge-domain External-BD3
      ipv6 address 10:1:1:1::64/64
      exit
    interface bridge-domain Internal-BD4
      ipv6 address 20:1:1:1::64/64
      exit

Step 8

Import the device from tenant T1.

Example:

l4l7 cluster import-from T1 device-cluster ifav-asa-vm-ha

Step 9

Create the service graph using the service redirect policy.

Example:

l4l7 graph PBRv6_ASA_HA_Mode_Graph contract Contract_PBRv6_ASA_HA_Mode
      service N2 device-cluster-tenant T1 device-cluster ifav-asa-vm-ha mode FW_ROUTED svcredir enable
      connector consumer cluster-interface consumer_PBRv6
          bridge-domain tenant PBRv6_ASA_HA_Mode name External-BD3
          svcredir-pol tenant PBRv6_ASA_HA_Mode name External_leg
          exit
      connector provider cluster-interface provider_PBRv6
          bridge-domain tenant PBRv6_ASA_HA_Mode name Internal-BD4
          svcredir-pol tenant PBRv6_ASA_HA_Mode name Internal_leg
          exit
        exit
    connection C1 terminal consumer service N2 connector consumer
    connection C2 terminal provider service N2 connector provider
    exit

Step 10

Create the service redirect policy for the external and internal legs. IPv6 addresses are used in this example; you can also specify IPv4 addresses using the same command.

Example:

svcredir-pol Internal_leg
    redir-dest 20:1:1:1::1 00:00:AB:CD:00:11
    exit
svcredir-pol External_leg
    redir-dest 10:1:1:1::1 00:00:AB:CD:00:09
    exit
exit

Verifying a Policy-Based Redirect Configuration Using the NX-OS-Style CLI

After you have configured policy-based redirect, you can verify the configuration using the NX-OS-style CLI.

Procedure


Step 1

Show the running configuration of the tenant.

Example:

apic1# show running-config tenant PBRv6_ASA_HA_Mode svcredir-pol
# Command: show running-config tenant PBRv6_ASA_HA_Mode svcredir-pol
# Time: Wed May 25 00:57:22 2016
  tenant PBRv6_ASA_HA_Mode
    svcredir-pol Internal_leg
      redir-dest 20:1:1:1::1/32 00:00:AB:CD:00:11
      exit
    svcredir-pol External_leg
      redir-dest 10:1:1:1::1/32 00:00:AB:CD:00:09
      exit
    exit

Step 2

Show the running configuration of the tenant and its service graph.

Example:

apic1# show running-config tenant PBRv6_ASA_HA_Mode l4l7 graph PBRv6_ASA_HA_Mode_Graph
# Command: show running-config tenant PBRv6_ASA_HA_Mode l4l7 graph PBRv6_ASA_HA_Mode_Graph     
# Time: Wed May 25 00:55:09 2016                                                               
  tenant PBRv6_ASA_HA_Mode                                                                     
    l4l7 graph PBRv6_ASA_HA_Mode_Graph contract Contract_PBRv6_ASA_HA_Mode                     
      service N2 device-cluster-tenant T1 device-cluster ifav-asa-vm-ha mode FW_ROUTED svcredir enable
        connector consumer cluster-interface consumer_PBRv6                                           
          bridge-domain tenant PBRv6_ASA_HA_Mode name External-BD3                                    
          svcredir-pol tenant PBRv6_ASA_HA_Mode name External_leg                                     
          exit                                                                                        
        connector provider cluster-interface provider_PBRv6                                           
          bridge-domain tenant PBRv6_ASA_HA_Mode name Internal-BD4
          svcredir-pol tenant PBRv6_ASA_HA_Mode name Internal_leg
          exit
        exit
      connection C1 terminal consumer service N2 connector consumer
      connection C2 terminal provider service N2 connector provider
      exit
    exit

Step 3

Show the service graph configuration.

Example:

apic1# show l4l7-graph graph PBRv6_ASA_HA_Mode_Graph
Graph           : PBRv6_ASA_HA_Mode-PBRv6_ASA_HA_Mode_Graph
Graph Instances : 1

Consumer EPg     : PBRv6_ASA_HA_Mode-ClientEPG
Provider EPg     : PBRv6_ASA_HA_Mode-ServerEPG
Contract Name    : PBRv6_ASA_HA_Mode-Contract_PBRv6_ASA_HA_Mode
Config status    : applied
Service Redirect : enabled

Function Node Name : N2
 Connector   Encap       Bridge-Domain  Device Interface      Service Redirect Policy
 ----------  ----------  ----------     --------------------  -----------------------
 consumer    vlan-241    PBRv6_ASA_HA_  consumer_PBRv6        External_leg
                         Mode-
                         External-BD3
 provider    vlan-105    PBRv6_ASA_HA_  provider_PBRv6        Internal_leg
                         Mode-
                         Internal-BD4

About Multi-Node Policy-Based Redirect

Multi-node policy-based redirect enhances PBR by supporting up to five function nodes in a service graph. You can configure which service node connector terminates the traffic and based on this configuration, the source and destination class IDs for the service chain are determined. In the multi-node PBR feature, policy-based redirection can be enabled on the consumer, provider, or both of the service node connectors. It can also be configured for the forward or reverse directions. If the PBR policy is configured on a service node connector, then that connector does not terminate traffic.

About Symmetric Policy-Based Redirect

Symmetric policy-based redirect (PBR) configurations enable provisioning a pool of service appliances so that the consumer and provider endpoint groups traffic is policy-based. The traffic is redirected to one of the service nodes in the pool, depending on the source and destination IP equal-cost multi-path routing (ECMP) prefix hashing.


Note


Symmetric PBR configurations require 9300-EX hardware.

Sample symmetric PBR REST posts are listed below:

Under fvTenant svcCont

<vnsSvcRedirectPol name=“LoadBalancer_pool”>
          <vnsRedirectDest name=“lb1” ip=“1.1.1.1” mac=“00:00:11:22:33:44”/> 
          <vnsRedirectDest name=“lb2” ip=“2.2.2.2” mac=“00:de:ad:be:ef:01”/> 
          <vnsRedirectDest name=“lb3” ip=“3.3.3.3” mac=“00:de:ad:be:ef:02”/> 
</vnsSvcRedirectPol>

<vnsLIfCtx name=“external”> 
          <vnsRsSvcRedirectPol tnVnsSvcRedirectPolName=“LoadBalancer_pool”/> 
          <vnsRsLIfCtxToBD tDn=“uni/tn-solar/bd-fwBD”>
</vnsLIfCtx>

<vnsAbsNode name=“FW” routingMode=“redirect”>

Sample symmetric PBR NX-OS-style CLI commands are listed below.

The following commands under the tenant scope create a service redirect policy:

apic1(config-tenant)# svcredir-pol fw-external
apic1(svcredir-pol)# redir-dest 2.2.2.2 00:11:22:33:44:56

The following commands enable PBR:

apic1(config-tenant)# l4l7 graph FWOnly contract default
apic1(config-graph)# service FW svcredir enable

The following commands set the redirect policy under the device selection policy connector:

apic1(config-service)# connector external
apic1(config-connector)# svcredir-pol tenant solar name fw-external

Policy Based Redirect and Hashing Algorithms


Note


This feature is available in the APIC Release 2.2(3x) release and going forward with APIC Release 3.1(1). It is not supported in APIC Release 3.0(x).


In Cisco APIC, Release 2.2(3x), Policy Based Redirect feature (PBR) supports the following hashing algorithms:

  • Source IP address

  • Destination IP address

  • Source IP address, Destination IP address, and Protocol number (default configuration).

Policy-Based Redirect Resilient Hashing

In symmetric PBR, incoming and return user traffic uses the same PBR node in an ECMP group. If, however, one of the PBR nodes goes down/fails, the existing traffic flows are rehashed to another node. This can cause issues such as existing traffic on the functioning node being load balanced to other PBR nodes that do not have current connection information. If the traffic is traversing a stateful firewall, it can also lead to the connection being reset.

Resilient hashing is the process of mapping traffic flows to physical nodes and avoiding the rehashing of any traffic other than the flows from the failed node. The traffic from the failed node is remapped to a "backup" node. The existing traffic on the "backup" node is not moved.

The image below shows the basic functionality of symmetric PBR with incoming and return user traffic using the same PBR nodes.

Figure 8. Symmetric PBR

The next image shows what occurs when one of the PBR nodes is disabled or fails. The traffic for IP1 is rehashed to the next node and IP2 and IP3's traffic is load balanced to another PBR node. As stated earlier, this could lead to connectivity interruptions or delays if the other PBR nodes do not have the current connection information for IP2 and IP3 traffic.

Figure 9. Disabled/Failed PBR node without resilient hashing

The final image shows how this same use case is addressed when resilient hashing is enabled. Only the user traffic from the disabled/failed node is moved. All other user traffic remains on their respective PBR nodes.

Figure 10. Disabled/Failed PBR node with resilient hashing

If the node returns to service, the traffic flows rehashed from the failed node to the active node are returned to the reactivated node.


Note


Adding or deleting PBR nodes from the ECMP group can cause all the traffic flows to be rehashed.


Enabling Resilient Hashing in L4-L7 Policy-Based Redirect

Before you begin

This task assumes that an L4-L7 Policy Based Redirect policy has been created.

Procedure


Step 1

On the menu bar, choose Tenants > All Tenants.

Step 2

In the Work pane, double-click the tenant's name.

Step 3

In the Navigation pane, choose Tenant tenant_name > Policies > Protocol > L4-L7 Policy Based Redirect > L4-L7_PBR_policy_name.

Step 4

In the Work pane, check the Resilient Hashing Enabled check box.

Step 5

Click Submit.


About PBR Backup Policy

Prior to Cisco APIC Release 4.2(1), all Policy-Based Redirect (PBR) destinations in a PBR policy are used as long as the PBR destination is functioning. If one of the PBR nodes fails, the existing traffic flows are rehashed. This could lead to the connection being reset if, for example, the data paths are traversing stateful firewalls. With Resilient Hash PBR, only the traffics that went through failed node is directed to one of the available nodes, which could cause an overload of traffic on the newly shared node. Instead of sharing one of the available nodes, a backup node in the group can be configured and used to absorb the traffic load. You can configure multiple backup PBR destinations per PBR backup policy.

Beginning with Cisco APIC Release 4.2(1), a new PBR Backup Policy option is available:

With resilient hash, only the traffic that went through the failed nodes gets rerouted to one of the available nodes. With resilient hash and PBR backup policy, the traffic that went through the failed primary node gets rerouted to one of the available backup nodes.

Backup Policy Guidelines and Limitations

Follow these guidelines and limitations for the PBR Backup Policy option:

  • The PBR backup policy option is supported only on new generation leaf switches, which are switch models with "-EX", "-FX" or "-FX2" at the end of the switch name.

  • Resilient hashing must be enabled.

  • Starting from Cisco APIC Release 5.0(1), Layer 1/ Layer 2 PBR also supports backup policy.

  • A destination can be used as a PBR destination or backup PBR destination, not both (a primary PBR destination can’t be used as a backup PBR destination in the same or different PBR policy).

  • One backup PBR policy can be used by only one PBR policy. If you attempt to add a second backup policy to a PBR policy, the configuration will be rejected.

    If you want to use same backup PBR destination for multiple PBR policies, create two different backup PBR policies using the same backup PBR destination. The destinations in both these policies must have the same health group configured.

  • With resilient hash and PBR backup policy:

    • The traffic that went through the failed nodes goes to a backup node in the PBR backup policy, in the order of IP address from lowest to highest. When multiple primary nodes fail and all the backup nodes are used then the traffic that went through the failed node is routed to one of the available nodes, including primary and backup nodes, in the order of IP address from lowest to highest. For example, assume there are four primary nodes (192.168.1.1 to 192.168.1.4) and two backup nodes (192.168.1.5 and 192.168.1.6):

      • When a primary node with IP address 192.168.1.1 failed, the traffic that went through this node is routed to an available backup node with the lowest IP address 192.168.1.5.

      • When two primary nodes with IP addresses 192.168.1.1 and 192.168.1.2 failed, the traffic that went through 192.168.1.1 is routed to the backup node 192.168.1.5 and the traffic that went through 192.168.1.2 is routed to the backup node 192.168.1.6.

      • When three primary nodes with IP addresses 192.168.1.1, 198.168.1.2, and 192.168.1.3 failed and only one backup node 192.168.1.5 is available, the traffic that went through the first failed node 192.168.1.1 is routed to the backup node 192.168.1.5.

        • For second failed primary node 192.168.1.2, compare the IP address (192.168.1.1) that the backup node is used for and the IP address of available primary node 192.168.1.4, since 192.168.1.1 is smaller than the first available primary node 192.168.1.4, the traffic that went through the failed node 192.168.1.2 is routed again to the backup node 192.168.1.5.

        • For third failed node 192.168.1.3, since the backup node is already in use, the traffic that went through the third failed node is routed to the available primary node 192.168.1.4.

    • When pod aware PBR is enabled, for a failed primary node, the traffic that went through the failed node first goes to an available local backup node. If a backup node is not available, then a local primary node is preferred. When all local primary nodes and local backup nodes failed and therefore no local node is available, then the traffic that went through the failed node goes to a remote primary node, and then to a remote backup node. For example:

      • When both primary nodes and backup nodes are in the same pod, and pod aware PBR is enabled, for a failed primary node in local pod, the traffic that went through the failed node goes to a backup node in the same local pod.

      • When there are local primary nodes and local backup nodes, and pod aware PBR is enabled, for a failed local primary node and failed local backup node, the traffic that went through the failed node goes to another primary node in different pod.

Creating a PBR Backup Policy

Procedure


Step 1

On the menu bar, choose Tenants > All Tenants.

Step 2

In the Work pane, double-click the tenant's name.

Step 3

In the Navigation pane, choose Tenant > tenant_name > Policies > Protocol > L4-L7 Policy Based Redirect Backup.

Step 4

Right-click L4-L7 Policy Based Redirect Backup, and then click Create L4-L7 Policy-Based Redirect Backup.

The Create PBR Backup Policy dialog appears.

Step 5

In the Name field, enter a unique name for the backup policy.

Step 6

In the L3 Destinations table, click +.

The Create Destinations of Redirected Traffic dialog appears.

  1. In the IP field, enter the IP address of the Layer 3 destination node.

  2. In the MAC field, enter the MAC address of the Layer 3 destination node.

  3. Optional: In the Second IP field, enter a secondary IP address for the Layer 3 destination node.

  4. In the Redirect Health Group field, select an existing health group or create a new one.

    For more information on creating a new redirect health group, see Configuring a Redirect Health Group Using the GUI.

  5. Click OK.

Optional: Repeat steps a through e to add more Layer 3 destinations.

Step 7

Click Submit.


Enabling a PBR Backup Policy

Before you begin

This task assumes that a Layer 4 to Layer 7 policy-based redirect (PBR) policy has been created.

Procedure


Step 1

On the menu bar, choose Tenants > All Tenants.

Step 2

In the Work pane, double-click the tenant's name.

Step 3

In the Navigation pane, choose Tenant > tenant_name > Policies > Protocol > L4-L7 Policy Based Redirect > L4-L7_PBR_policy_name.

Step 4

In the Destination Type field, choose L3.

Step 5

In the IP SLA Monitoring Policy field, select an existing policy or create a new IP SLA monitoring policy.

For more information on creating a new IP SLA monitoring policy, see the Cisco APIC Layer 3 Networking Configuration Guide.

Step 6

Check the Resilient Hashing Enabled box.

Step 7

In the Backup Policy field, choose an existing policy or create a new backup policy.

For more information on creating a new PBR backup policy, see Creating a PBR Backup Policy.

Step 8

Make sure at least one active PBR destination appears in the L3 Destinations table and is configured with a redirect health group.

For more information on creating a new redirect health group, see Configuring a Redirect Health Group Using the GUI.

Step 9

Click Submit.


About the Bypass Action

Prior to Cisco Application Policy Infrastructure Controller (APIC) release 4.1(2), when you choose Threshold Enable when creating a Layer 4 to Layer 7 services policy-based redirect, only two options were available: deny action or permit action.

With these two options, in a multi-node policy-based redirect graph, when one node crosses the low threshold, the following action would occur, depending on which of the two options you selected:

  • deny action: Traffic is dropped at this node.

  • permit action: Traffic is sent directly to the destination, and the rest of the service chain is skipped.

Beginning with Cisco APIC release 4.1(2), a new bypass action option is available. With this option, in a multi-node policy-based redirect graph, when one node crosses the low threshold, traffic is still able to proceed through the rest of the service chain that is either up or cannot be bypassed.

The following sections describe how traffic is handled for each of these three options using this example two-node policy-based redirect graph.

When both nodes are up, this two-node policy-based redirect behaves in the following manner:

Source EPG

Destination EPG

Action

100

300

PBR to n1-external

201

300

PBR to n2-external

302

300

permit

300

100

PBR to n2-internal

202

100

PBR to n1-internal

101

100

permit

The following sections describe how the two-node policy-based redirect behaves when the first node goes down, based on the option that you select in the Threshold Down Action field.

deny action

Using the example configuration described above, if you select deny action in the Threshold Down Action field and the first node goes down, the PBR policies that use the first node are updated to "Drop," and communication between the client EPG and the Web EPG will be dropped, as shown in the following table.

Source EPG

Destination EPG

Action

100

300

Drop

201

300

PBR to n2-external

302

300

permit

300

100

PBR to n2-internal

202

100

Drop

101

100

permit

permit action

Using the example configuration described above, if you select permit action in the Threshold Down Action field and the first node goes down, the PBR policies that use the first node are updated to "Permit." Traffic from the client EPG to the Web EPG (from 100 to 300) proceeds directly, without the service node. Return traffic from the Web EPG to the client EPG (from 300 to 100) is redirected to n2-internal, as shown in the following table; however, the second node might drop the packet because it is an asymmetric flow.

Source EPG

Destination EPG

Action

100

300

Permit

201

300

PBR to n2-external

302

300

permit

300

100

PBR to n2-internal

202

100

Permit

101

100

permit

bypass action

Beginning with Cisco APIC release 4.1(2), if you select the new bypass action option in the Threshold Down Action field and the first node goes down, the PBR policies that use the first node are updated to "PBR to next device". In this case, the following occurs:

  • Traffic from the Client EPG to the Web EPG (from 100 to 300) is redirected to n2-external.

  • Return traffic from the Web EPG to the Client EPG (from 300 to 100) is redirected to n2-internal.

  • Return traffic from n2-external to consumer is set to "Permit."

Source EPG

Destination EPG

Action

100

300

PBR to n2-external

201

300

PBR to n2-external

302

300

permit

300

100

PBR to n2-internal

202

100

Permit

101

100

permit

Guidelines and Limitations

Following are the guidelines and limitations for the bypass action option:

  • The bypass action option is supported only on new generation ToR switches, which are switch models with "EX," "FX," or "FX2" at the end of the switch name.

  • The bypass action option is not needed on a one-node service graph. If bypass is configured in such a case, forwarding behavior is the same as permit action.

  • L3Out EPGs and regular EPGs can be consumer or provider EPGs.

  • A service node that has NAT enabled cannot be bypassed, as that will break the traffic flow.

  • Beginning with the 5.0(1) release, Layer 1/Layer 2 PBR supports the bypass action.

  • The bypass action option is not supported in the following cases:

    • Layer 4 to Layer 7 devices in one-arm mode.

    • Remote leaf switches.

  • Do not use the same PBR policy in more than one service graph if bypass action is enabled. Cisco APIC will reject configurations if the same PBR policy with bypass action is used in multiple service graphs. To avoid this, configure different PBR policies that use the same PBR destination IP address, MAC address and Health Group.

Configuring the Threshold Down Action in Policy-Based Redirect

Before you begin

This task assumes that a Layer 4 to Layer 7 services policy-based redirect (PBR) policy has been created.

Procedure


Step 1

On the menu bar, choose Tenants > All Tenants.

Step 2

In the Work pane, double-click the tenant's name.

Step 3

In the Navigation pane, choose Tenant > tenant_name > Policies > Protocol > L4-L7 Policy Based Redirect > L4-L7_PBR_policy_name.

Step 4

In the Destination Type field, select L3.

Step 5

In the IP SLA Monitoring Policy field, select an existing policy or create a new IP SLA monitoring policy.

For more information on creating a new IP SLA monitoring policy, see the Cisco APIC Layer 3 Networking Configuration Guide.

Step 6

Check the Threshold Enable check box.

The following fields appear:

  • Min Threshold Percent (percentage)

  • Max Threshold Percent (percentage)

  • Threshold Down Action

Step 7

Select the minimum and maximum threshold percentage.

For more information on the minimum and maximum thresholds, see Policy-Based Redirect and Threshold Settings for Tracking Service Nodes.

Step 8

In the Threshold Down Action area, select the threshold down action.

The options are:

  • bypass action

  • deny action

  • permit action

Step 9

Click Submit.


Policy-Based Redirect with an L3Out

Beginning with Cisco Application Policy Infrastructure Controller (APIC) release 4.1(2), you can use an L3Out to connect a Layer 4 to Layer 7 services device that is part of a service graph. There are multiple ways to use an L3Out as part of a policy-based redirect (PBR) service graph:

  • Using PBR to redirect only to the consumer interface of the Layer 4 to Layer 7 services device, while the provider interface of the Layer 4 to Layer 7 services device is connected to an L3Out. This is referred to as "uni-directional" PBR, because PBR is done only for one direction of the traffic. This option was introduced in Cisco APIC release 4.1(2).

  • Using PBR to redirect only to the provider interface of the Layer 4 to Layer 7 services device, while the consumer interface of the Layer 4 to Layer 7 services device is connected to an L3Out. This option was introduced in Cisco APIC release 5.0(1), which is also a uni-directional PBR design, and it is the symmetric design of the one described in the previous bullet.

  • Using PBR to redirect a Layer 4 to Layer 7 services device interface that is connected to an L3Out. This option was introduced in Cisco APIC release 5.2(1).

These use cases are described in greater detail in the text that follows.

As mentioned in the first bullet, beginning with Cisco APIC release 4.1(2), you can configure unidirectional PBR to a consumer interface, and can connect the provider interface to an L3Out as shown in the following illustration:

In the example, PBR is enabled in the consumer connector in the bridge domain, but PBR is not enabled on the provider connector in the L3Out. This design is supported only when L3Out is the provider connector of the last service node. Prior to the Cisco APIC 4.1(2) release, if PBR was configured to redirect traffic to a node of a service graph, both the consumer and provider connectors of the Layer 4 to Layer 7 services device had to be in a bridge domain, even in the case of uni-directional PBR.

Beginning with Cisco APIC release 5.0(1), uni-directional PBR is supported with the other connector in an L3Out, regardless if the L3Out is the provider or consumer connector and regardless if the L3Out is the last node or not. This includes the case where the load balancer has a VIP address outside of the local subnet on the consumer side of the service node, as shown in the following illustration.

In the following illustration example, the incoming traffic from the consumer endpoint to the VIP address is forwarded to the load balancer that is connected to the L3Out, based on the routing table. Then, the traffic is forwarded to the provider endpoint. The return traffic from the provider endpoint to the consumer endpoint is redirected to the provider side of the service node because of PBR.

Beginning with Cisco APIC release 5.2(1), the Layer 4 to Layer 7 services device that is used as a destination of the PBR policy can have the interfaces in an L3Out. Prior to this release, a PBR policy's destination interface could only be in a bridge domain. Some common use cases include:

  • You can use the same firewall for both East-West and North-South traffic. In this case, the firewall internal leg is connected to the Cisco Application Centric Infrastructure (ACI) fabric, while the firewall external leg is outside of the Cisco ACI fabric.

  • You can have a one-arm load balancer with a VIP address that is outside of the local subnet. In this case, the VIP address is outside of the load balancer's self IP address subnet. The load balancer does not perform Source Network Address Translation (SNAT), and thus PBR is required for the return traffic.

  • You can redirct traffic to a device, such as an external firewall, that is not directly connected to Cisco ACI.

Guidelines and Limitations for Policy-Based Redirect with an L3Out

The following guidelines and limitations are for policy-based redirect (PBR) with an L3Out:

  • Both the one-arm and two-arm modes are supported.

  • You cannot mix PBR on a bridge domain and PBR on an L3Out on the same function node in the service graph. For example:

    • You cannot configure the consumer connector of N1 in BD1 (PBR is enabled) and the provider connector of N1 in an L3Out1 (PBR is enabled).

    • But, you can configure the consumer connector of N1 in BD1 (PBR is not enabled) and the provider connector of N1 in an L3Out1 (PBR is enabled).

  • An L3Out with a switch virtual interface (SVI), routed sub-interface, or routed interface is supported.

  • You cannot use an infra L3Out, GOLF L3Out, SDA L3Out, or L3Out using a floating SVI for the PBR destination.

  • Use a specific L3Out EPG subnet if there are other L3Out EPGs in the same VRF instance; otherwise, the other L3Outs might be used for EPG classification by mistake.

  • An L3Out EPG with 0.0.0.0/0 or 0::0 cannot be used for the L3Out EPG for PBR destinations. This is because east-to-west traffic must be classified with the automatically created service-EPG. Hence, if the L3Out EPG is configured with 0.0.0.0/0, east-to-west traffic would be classified as coming from the outside.

  • If the service device is in two-arm mode and one of the L3Outs for the service device connectors learns 0.0.0.0/0 or 0::0, both arms must be connected to the same leaf switch or the same vPC pair.

  • If the consumer/provider EPG is an L3Out EPG, it cannot be under the service leaf switch where the L3Out for the PBR destination resides. This is a hardware limitation.

    • The leaf switch cannot figure out if a packet is coming from the consumer/provider L3Out EPG or back from the service device even if they use specific L3Out EPG subnets.

      If the consumer/provider EPG is a regular EPG, not an L3Out EPG, the consumer, provider, and service device L3Outs can be under the same leaf switch.

  • When deploying PBR in the two-arm mode with the service device behind an L3Out and using the OSPF or EIGRP protocol for next-hop connectivity, deploying both arms on the same service leaf switch is not supported. Deploying each arm on different service leaf switch is supported.

  • When deploying PBR in the two-arm mode and the service node L3Out with the OSPF, EIGRP, or BGP protocol, you must control next-hop for the service device properly on each arm.

  • The following table shows the supported consumer/provider EPG type combinations:

    Table 1. Supported consumer/provider EPG type combinations

    Consumer/Provider

    EPG

    L3Out

    ESG

    EPG

    Supported

    Supported

    Not supported1

    L3Out

    Supported

    Supported

    Supported

    ESG

    Not supported

    Supported

    Supported

    1 An EPG-to-ESG contract is not supported even without a service graph.

  • An intra-EPG/ESG/L3Out EPG contract with PBR is supported.

    • Beginning with release 5.2(1), an intra-L3Out EPG contract is supported.

  • When using a service graph with PBR with a bridge domain, Cisco ACI automatically creates a hidden EPG called a service EPG. Cisco ACI configures contracts between the service EPG and user-created EPGs to allow the traffic path as defined by the service graph. When connecting a Layer 4 to Layer 7 services device interface to an L3Out and using this interface as a PBR destination for a service graph, Cisco ACI creates a service EPG automatically, but the administrator must also create the L3Out EPG in addition to the service EPG. Some of the traffic is forwarded to the Layer 4 to Layer 7 interface using PBR, while other traffic, such as keepalives with load balancers, must be sent using regular traffic forwarding (routing). To enable the communication between the L3Out EPG used by an Layer 4 to Layer 7 services device and an the EPG where the endpoints are, as you need to do in the case of a load balancer keepalives, you must configure Direct Connect and you must also configure a contract between the L3Out EPG and the EPG where the servers are.

  • Tracking is mandatory for PBR destinations in an L3Out for better convergence.

  • The bypass feature is not supported for one-arm mode, which is also applicable to a PBR destination on a bridge domain.

  • Multi-node PBR is supported.

  • Active-active​ symmetric PBR is supported.

  • Tracking, threshold down action is supported.

  • Resilient hashing​ is supported.

  • N+M redundancy is supported.

  • A single pod, Cisco ACI Multi-Pod, or remote leaf switch is supported.

  • Cisco ACI Multi-Site is not supported.

  • For inter-VRF contracts without an endpoint security group (ESG), if the PBR L3Out destination is in the provider VRF instance:

    • You must leak the L3Out EPG subnet used by the service device to the consumer VRF instance. If you do not, the consumer VRF instance does not have the route to the PBR destination and the provider VRF instance does not have a permit rule for the traffic from the PBR destination in the provider VRF instance to the consumer EPG. If the PBR destination is in a bridge domain, you do not need to leak the service bridge domain for the PBR destination to the consumer VRF instance.

  • For inter-VRF contracts with an ESG, for ESG-to-ESG or ESG-to-L3Out, with or without PBR:

    • You must leak the consumer ESG or L3Out subnet to the provider VRF instance, and you must leak the provider ESG or L3Out subnet to the consumer VRF instance. In addition, if you are using PBR:

      • If the PBR destination is in a bridge domain, you do not need to leak the service device subnet.

      • If the PBR destination in an L3Out, you must leak the L3Out EPG subnet used by the service device to the other VRF instance regardless if the L3Out EPG is in the consumer or provider VRF instance.

  • To leak the L3Out EPG subnet, modify the subnet's properties and enable Shared Route Control Subnet and Shared Security Import Subnet. If needed, also enable Aggregate Shared Routes.

  • Internal VRF instances will be created on a border leaf switch that has an L3Out toward the PBR destination (the VRF is created under the same tenant). An internal VRF instance is created per PBR destination in the PBR policy.

    • For example, if PBR-policy1 has 3 destinations, then 3 VRF instances are created in the PBR policy. If you reuse PBR-policy1 by multiple contracts, only 3 VRF instances are created.

    • There is no VRF scale impact on the consumer/provider leaf switches.

  • Ensure that the L3Out belongs either to the consumer or provider VRF instance.

Configuring Policy-Based Redirect with an L3Out Using the GUI

The configuration steps for policy-based redirect (PBR) with an L3Out are mostly the same as a typical policy-based redirect configuration, except for a few differences.

Before you begin

Create the necessary tenant, VRF instance, EPGs, bridge domains for the EPGs, and service bridge domains.

Procedure


Step 1

Create a Layer 4 to Layer 7 device. If the PBR destination is in an L3Out, then for the concrete interface, the path should match with the path used in the L3Out logical interface.

See Configuring a Layer 4 to Layer 7 Services Device Using the GUI.

When using PBR with an L3Out in conjunction with a Layer 4 to Layer 7 services virtual appliance that peers with the L3Out, you must configure the path of the virtualized host intefaces as part of the concrete device configuration. The path used in the Layer 4 to Layer 7 services concrete device configuration and by the L3Out configuration must match. This is because the floating L3Out feature is not yet integrated with the service graph, hence Cisco Application Centric Infrastructure (ACI) must be configured with the path information.

Step 2

Create a service graph template.

See Configuring a Service Graph Template Using the GUI.

Step 3

Configure an IP SLA monitoring policy.

See the chapter about IP SLAs in the Cisco APIC Layer 3 Networking Configuration Guide at the following site:

https://www.cisco.com/c/en/us/support/cloud-systems-management/application-policy-infrastructure-controller-apic/tsd-products-support-series-home.html

Step 4

Create a PBR policy.

See Configuring Policy-Based Redirect Using the GUI.

To enable tracking, you must configure a redirect health group. See Configuring a Redirect Health Group Using the GUI.

Step 5

Create an L3Out and an L3Out EPG (or external EPG).

Do not use 0.0.0.0/0 and make sure to include the subnet address of the firewall or the load balancer, as well as the subnets of the external traffic.

See the Cisco APIC Layer 3 Networking Configuration Guide at the following site:

https://www.cisco.com/c/en/us/support/cloud-systems-management/application-policy-infrastructure-controller-apic/tsd-products-support-series-home.html

Step 6

Create a device selection policy.

See Creating a Device Selection Policy Using the GUI.

While following the procedure, substitute the following substeps as appropriate:

  1. For the Associated Network buttons, choose Bridge Domain or L3Out.

    If the destination of the PBR policy is an interface in an L3Out, you must choose L3Out.

  2. If you chose Bridge Domain, then for the Bridge Domain drop-down list, choose the bridge domain of the target interface. If you chose L3Out, then for the L3Out drop-down list, choose the L3Out EPG of the target interface.

  3. If necessary, for the L4-L7 Policy-Based Redirect drop-down list, choose the appropriate PBR policy.

    If the destination of the PBR policy is an interface in an L3Out, you must choose a PBR policy.

  4. Configure the remainder of the device selection policy as necessary.

Step 7

Apply the service graph where you attached the service graph to the contract.

See Applying a Service Graph Template to Endpoint Groups Using the GUI.


PBR Support for Service Nodes in Consumer and Provider Bridge Domains

Starting with the Cisco APIC 3.1(1) release, bridge domains (BDs) that contain a consumer or provider also support service nodes. Therefore, you are not required to provision separate PBR bridge domains any longer.

The Cisco Nexus 9300-EX and 9300-FX platform leaf switches support this feature.

About Layer 1/Layer 2 Policy-Based Redirect

Using a Layer 1 device is typically referred to as inline mode or wire mode and is used for firewalls and intrusion prevention systems (IPS) if the service device is expected to perform security functions that are not participating in Layer 2 or Layer 3 forwarding.

Using a Layer 2 device is typically referred to as transparent mode or bridged mode and is used for firewalls and IPS.

Using a Layer 3 device is typically referred to as routed mode and is used for router firewalls and load balancers.

Prior to Cisco Application Policy Infrastructure Controller( APIC) release 4.1, PBR could be configured to redirect traffic to a Layer 4 to Layer 7 services device configured only in Layer 3 device (Go-To) mode. If the Layer 4 to Layer 7 services device is a Layer 1 or Layer 2 device, such as a transparent firewall, PBR could not be used. You could only deploy a Layer 4 to Layer 7 services device operating in Layer 1 or Layer 2 mode by using a service graph and defining the Layer 4 to Layer 7 services device in Go-Through mode.

Beginning with Cisco APIC release 4.1, PBR can be configured to redirect traffic to a Layer 4 to Layer 7 services device configured in the Layer 1/Layer 2 device mode as well. PBR can be used with inline IPS or a transparent firewall, in addition to a routed mode firewall.

As part of the Layer 1/Layer 2 PBR feature, the Cisco APIC can verify whether the Layer 4 to Layer 7 services device is forwarding traffic by using Layer 2 ping packets for link layer tracking.

Unlike the Go-Through mode, which can also forward non-IP address traffic, Layer 1/Layer 2 PBR is applicable only to IP address traffic.

The L2 Unknown Unicast option in the service bridge domains must be set to Hardware Proxy for L1/L2 PBR.

Layer 1/Layer 2 PBR Configuration Overview

The following list summarizes some of the key Layer 1/Layer 2 PBR configuration concepts:

  • Deploying a Layer 4 to Layer 7 services device with Layer 1/Layer 2 PBR requires the configuration of two service bridge domains, one for the consumer-side and one for the provider-side, unlike regular PBR, these bridge domains cannot be the same as the bridge domains where the endpoints (consumer or provider) are configured.

  • The service bridge domains must be unicast routing enabled.

  • The physical Layer 4 to Layer 7 services device can be connected with individual links or with VPC to the leaf switches.

  • With a Layer 1 device, the consumer side VLAN and the provider side VLAN are the same but on different bridge domains, hence the consumer and provider-side of the Layer 4 to Layer 7 services device must be connected to different physical leafs.

  • When the Layer 4 to Layer 7 services device is configured as a Layer 1 or Layer 2 device, it doesn’t have an IP address on the interface where it receives and sends traffic, hence the redirect policy is defined by entering the leaf/port and VLAN where it is connected to.

  • The redirect policy configuration requires only the definition of the leaf/port and VLAN, entering a MAC address is optional. If the MAC field is left empty, Cisco Application Centric Infrastructure (ACI) generates dynamically one MAC address that is used to rewrite the destination MAC address when sending to the Layer 4 to Layer 7 services device on the service bridge domain. These MAC addresses are not the Layer 4 to Layer 7 services device MAC addresses. They are virtual MAC addresses that Cisco ACI uses to rewrite the destination MAC address of the traffic.

  • If the Layer 4 to Layer 7 services device is deployed in Layer 2 mode, it must be configured statically to forward the MAC addresses that PBR uses to forward traffic to the Layer 4 to Layer 7 services device. One MAC address identifies the consumer-to-provider destination MAC address used on the service bridge domain and the other MAC address defines the provider-to-consumer destination MAC address used on the other service bridge domain.

    These MAC addresses can be entered manually by the user in APIC as part of the redirect policy definition, or they are auto-generated if the field is left empty. The admin has to add these MAC addresses to the MAC address table of the Layer 4 to Layer 7 services device and be associated with the provider-side port for the MAC address used in the consumer-to-provider direction and with the consumer-side port for the provider-to-consumer direction.

  • If an intermediate switch is in between leaf and the Layer 4 to Layer 7 services device deployed in Layer 1/Layer 2 mode, the intermediate switch also needs to forward the traffic destined to the rewritten destination MAC.

  • Layer 1/Layer 2 PBR is based on forwarding to a leaf/port/VLAN, hence it can only be deployed with physical domains not with VMM domains. If you need to deploy Layer 1/Layer 2 PBR with a virtual appliance, that must be configured with a physical domain.

  • From a high availability perspective, the Layer 4 to Layer 7 services device is deployed in active/standby mode and Cisco ACI has to perform tracking in order to verify which path (leaf/port) is active and which one is standby. Tracking is mandatory for multiple service devices in a Layer 4 to Layer 7 services logical device cluster.

  • For Layer 1/Layer 2 PBR tracking, Layer 2 ping is used. The IP SLA type is Layer 2 ping.

  • Layer 2 ping, ethertype 0x0721 is exchanged between leaf nodes, which is going through the service device. Thus, the Layer 1/Layer 2 device needs to permit ethertype 0x0721.

  • Layer 1/Layer 2 policy-based redirect is not supported from the CLI.

  • Layer 1/Layer 2 PBR active-active PBR destinations cannot be connected to a remote leaf switch, as flood in encapsulation is not supported on a remote leaf switch. Provider and consumer service nodes can still be connected to remote leaf switch.

  • Dynamic VLAN allocation is not supported.

Active/Standby Layer 1/Layer 2 PBR Design Overview

Beginning with Cisco Application Policy Infrastructure Controller (APIC) release 4.1, Layer 1/Layer 2 policy-based redirect (PBR) and active/standby PBR design is supported with tracking.

In the case of Layer 1/Layer 2 PBR, the source and destination MAC addresses of a Layer 2 ping are PBR destination MAC addresses. If the PBR node is up and carries the traffic, Layer 2 ping should successfully return to the Cisco Application Centric Infrastructure (ACI) fabric. Then, the Cisco ACI fabric knows that the PBR destination is available. If there are active and standby high availability Layer 1/Layer 2 service nodes that you want to insert using Layer 1/Layer 2 PBR and there are two PBR destinations where tracking is enabled, only one of the paths that is connected to an active node is up, because a standby device does not forward traffic. As a result, traffic is redirected to the interface that is connected to the active node.

If failover happens and standby takes over the active role, the tracking status changes and traffic gets redirected to the interface that is connected to the new active node.

Prior to Cisco APIC release 5.0(1), as shown in the following illustration, if there are multiple Layer 1/Layer 2 devices in the same service bridge domain pair with an active/standby design, even if traffic is flooded within a bridge domain and the traffic reaches the second Layer 4 to Layer 7 service device, a loop does not happen because this second Layer 4 to Layer 7 service device is in standby mode.

The reason why the active/active design is not supported with releases prior to the Cisco APIC release 5.0(1) is that if there are multiple Layer 1/Layer 2 devices in the same service bridge domain pair, with an active/active design, the second Layer 4 to Layer 7 service device would forward the traffic to the other interface in the other bridge domain and the traffic reaches the first device, thus causing a loop.

Active/Active Layer 1/Layer 2 Symmetric PBR Design Overview

Starting from Cisco APIC release 5.0(1), the Layer 1/ Layer 2 devices in the service chain can operate in active/active symmetric PBR design. Symmetric PBR is used to load balance traffic to individual devices based on hash.

This mode provides high availability and efficient distribution of traffic flows. Symmetric PBR related features such as threshold, down action, and backup PBR policy(N+M high availability) are also supported in APIC Release 5.0(1). For Layer 1 PBR active/active mode, consumer and provider connectors must be in different physical domains.

In order to deploy Layer 1/Layer 2 active/active design, you need to enable the active-active mode in the Layer 4 to Layer 7 Logical Device cluster. You need to provide encapsulation for each concrete device interface in the cluster.

For example: In the same bridge domain pair, by using different VLANs with flood in encap enabled, flooding is propagated within a VLAN and not propagated to the other VLANs. So that you can connect multiple active devices in the same bridge domain.

For Layer 1 active-active mode, the external and internal connectors have the same encap. The use of different VLAN for each active node with flood in encap enabled is not enough to prevent loop. To prevent this issue, both legs of the device should be associated to different physical domain and different VLAN namespace (the actual VLAN range can remain the same). This generates a different fabEncap for each leg and prevents a traffic loop.

Configuring a Layer 1/Layer 2 Device Using the GUI

Before you begin

  • Create a Layer 1/Layer 2 device using the Cisco APIC GUI and create the concrete device interface.

Procedure


Step 1

On the menu bar, choose Tenants > All Tenants.

Step 2

In the Navigation pane, choose Tenant tenant_name > Services > L4-L7.

Step 3

Right click Devices > Create L4-L7 Devices

Step 4

In the Create L4-L7 Devices dialog box, complete the following fields:

  1. In the Name field, provide a name for Layer 4 to Layer 7 device cluster.

  2. In the Service Type choose Other.

  3. In the Device Type choose Physical.

  4. In the Physical Domain choose a physical domain name.

  5. In the Context Aware choose Single.

  6. In the Function Type choose L1 or L2.

  7. Put a check in the box to enable Active-Active Mode.

Step 5

Create the concrete device interface: For Layer 1 or Layer 2 Active-Active Mode, click + on the Devices mode in the right work pane. The Create Concrete Deivce dialog appears.

  1. In the Name field, provide a device name.

  2. Click + to create an encapsulation on the concrete device interface. Enter the name and concrete interface name.

    Since Layer 1/Layer 2 PBR supports two-arm design only, click + again to create another concrete interface. Enter the name, interface path, and encapsulation. Click Update > OK.

    Repeat Step 5a and Step 5b to add more active devices.

  3. In the cluster, click + to create cluster interface for consumer, choose consumer concrete interfaces. For Layer 1 mode choose a physical domain.

    Click + again to create cluster interface for provider, select provider concrete interfaces. For Layer 1 mode, choose another physical domain.

    Note


    For Layer 1 Active-Active device, create two physical domain mapped to two different VLAN pools, but maintains same VLAN range. For a Layer 2 active-active device, the physical domain is chosen in Step 4e.

Step 6

Click Finish.


Configuring Layer 1/ Layer 2 PBR Using the APIC GUI

Before you begin

  • Create a L4-L7 device and service graph using the Layer 1/ Layer 2 function type, see configuration steps in Configuring Policy-Based Redirect Using the GUI.

Procedure


Step 1

On the menu bar, choose Tenants > All Tenants.

Step 2

In the Navigation pane, choose Tenant tenant_name > Policies > Protocol > L4-L7 Policy Based Redirect.

Step 3

In the Work pane, choose Action > Create L4-L7 Policy Based Redirect.

Step 4

In the Create L4-L7 Policy Based Redirect dialog box, complete the following fields:

  1. In the Name field, provide a name.

  2. In the Destination Type field, select L1 or L2.

  3. In the IP SLA Monioring Policy create the L2 ping monitoring policy.

    • In the Name field, provide a name.

    • In the SLA Type choose L2Ping.

      The SLA Frequency is optional.

  4. In the L1-L2 Destination click + to add a destination.

    Enter the name, redirect health group, and concrete interface. MAC address is optional configuration.

  5. Click OK.

    Note


    Do not enter an actual interface MAC address. Either leave it blank so the APIC generates MAC automatically or enter a dummy MAC address for external PBR policy MAC A and internal PBR policy MAC B. Remember these MAC addresses are used in firewall configuration.

Step 5

Click Submit.

Step 6

In the Navigation pane, choose Services > L4-L7 > Device Selection Policies > Logical Device Context_name.

Step 7

Expand the Logical Device and apply the Layer 1/ Layer 2 PBR policy in the L4-L7 Policy-Based Redirect field for the consumer or provider.

Step 8

Click Submit.


Configuring ASA for Layer 1/ Layer 2 PBR Using CLI

Before you begin

  • In a general configuration, the service device must be able to forward the Layer 2 ping tracking packet.

    Layer 2 ping, ethertype 0x0721 is used for tracking. Layer 2 ping is exchanged between leaf nodes, which is going through the service device. Thus, the Layer 1/Layer 2 device needs to permit ethertype 0x0721.

  • The static MAC configuration is required.

  • The following is an example for ASA configuration, where ASA is used as L4-L7 device in Layer 2 mode.

Procedure


Step 1

The ASA interfaces (service legs) need to be configured in the same bridge-group.

Example:

interface GigabitEthernet0/0
nameif externalIf
brdige-group 1

interface GigabitEthernet0/1
nameif internalIf
bridge-group 1

Step 2

The ASA learns source MAC address of the layer 2 ping traffic. It’s recommended to disable MAC learning to avoid conflicting entries getting created on the ASA as the layer 2 ping traffic uses the same source MAC to track consumer and provider directions.

In the following example, externalIf is the interface name on ASA, which is used as a consumer connector of the Layer 1 / Layer 2 service node. internalIf is the interface name on ASA, which is used as a provider connector of the Layer 1 / Layer 2 service node. Disable MAC learning on externalIf and internalIf. L2 ping uses the same source MAC when it tries to track both the external and internal legs.

MAC learning is disabled to avoid conflicting entries getting created on the ASA as Layer 2 ping uses the same source MAC to track external and internal.

Example:

mac-learn externalIf disable
mac-learn internalIf disable

Step 3

Configure ASA rules to permit L2 ping custom ethertype.

Example:

access-list Permit-Eth ethertype permit any
access-group Permit-Eth in interface externalIf
access-group Permit-Eth in interface internalIf

Step 4

The redirected traffic and Layer2 ping packet use PBR destination MAC, while ASA bridges consumer and provider interfaces. The ASA transparent mode would commonly flood unknown destination MACs, but with L2 PBR, this method cannot be used as PBR destination MACs do not actually exist in the network. Therefore, static MAC entries are recommended to allow Layer 2 ping and PBR traffic to be properly bridged for all cases by the ASA.

Example:

mac-address-table static externalIf (MAC B)
mac-address-table static internalIf (MAC A)

Note


Apart from the configuration of service device such as ASA, if there is an intermediate switch between leaf and the service device, the intermediate switch needs to be able to carry the traffic. You might need static MAC configuration or promiscuous mode configuration on the intermediate switch.


Verifying Layer 1/ Layer 2 PBR Policy On The Leafs Using CLI

The example commands in this procedure are for configuring Layer 1 and Layer 2 Policy-Based Redirect nodes.

Procedure


Step 1

Check whether PBR group and destination information are configured on the switch:

Example:

sdk74-leaf4# show service redir info 
GrpID Name                           destination                                   operSt         
===== ====                           ===========                                   ======         
1     destgrp-1                      dest-[50.50.50.1]-[vxlan-2719744]]            enabled        
2     destgrp-2                      dest-[20.20.20.1]-[vxlan-2719744]]            enabled        
Name                                bdVnid          ip              vMac                 vrf             vrfEncap        operSt         
====                                ======          ==              ====                 ===             =      
dest-[20.20.20.1]-[vxlan-2719744]   vxlan-16514958  20.20.20.1      00:00:14:00:00:01    coke1:cokectx1  vxlan-2719744   enabled        
dest-[50.50.50.1]-[vxlan-2719744]   vxlan-16711542  50.50.50.1      00:00:3C:00:00:01    coke1:cokectx1  vxlan-2719744   enabled

Step 2

Check whether zoning-rule is configured with correct action and group information:

Example:

sdk74-leaf4# show zoning-rule | grep redir
4103            49155           49154           18              enabled         2719744         redir(destgrp-2)      fully_qual(6)  
4106            49154           49155           17              enabled         2719744         redir(destgrp-1)      fully_qual(6)  

Step 3

Aclqos subcommand for PBR:

Example:

module-1# show system internal aclqos services redir ?
  <CR>   
  dest   Dest related info
  group  Group related info

module-1# show system internal aclqos services redir group 1

 Flag Legend :
 0x1: In SDK
 0x10: In local DB 
 0x20: Delete pending
 0x40: Dummy adj 

******* Service key redir-group(1) *******
 Service flags: 0x11
 Num of reference: 0x1
 Num of path: 1
 path 0 key: redir-dest-ipv4(vrf vnid vxlan-2719744 prefix-50.50.50.1) 

module-1# show system internal aclqos services redir dest 2719744 50.50.50.1
 Flag Legend :
 0x1: In SDK
 0x10: In local DB 
 0x20: Delete pending
 0x40: Dummy adj 
******* Service key redir-dest-ipv4(vrf vnid vxlan-2719744 prefix-50.50.50.1) *******
 Service flags: 0x10
 Num of reference: 0x1
 Num of path: 1
 Ifindx: 0x18010007
 Bd_vnid: 16711542
 Vmac: 00:00:3c:00:00:01

Step 4

Zoning-rule command:

Example:

module-1# show system internal aclqos zoning-rules 4106
 ASIC type is Sug 
=============================================================
Rule ID: 4106 Scope 3 Src EPG: 49154 Dst EPG: 49155 Filter 17
  Redir group: 1

  Curr TCAM resource:
  =============================
    unit_id: 0
    === Region priority: 1539 (rule prio: 6 entry: 3)===
        sw_index = 44 | hw_index = 44
    === SDK Info ===
        Result/Stats Idx: 81876
        30  
        Tcam Total Entries: 1         
        HW Stats: 0

Configuring Layer 1/ Layer 2 PBR Using the REST API

Procedure


Layer 1/ Layer 2 Policy-Based Redirect configuration:

Example:

<polUni>
    <fvTenant name="coke" >

        <!—If L1/L2 device in active-active mode -- >
        <vnsLDevVip name="N1"  activeActive="yes" funcType="L1" managed="no">
        </vnsLDevVip>
        <!—If L1/L2 device in active-standby mode -- >
        <vnsLDevVip name="N1"  activeActive="no" funcType="L1" managed="no">
        </vnsLDevVip>

        <vnsAbsGraph descr="" dn="uni/tn-coke/AbsGraph-WebGraph" name="WebGraph" ownerKey="" ownerTag="" uiTemplateType="UNSPECIFIED">

        <!—For L2 device -- >
        <vnsAbsNode descr="" funcTemplateType="OTHER" funcType="L2" isCopy="no" managed="no" name="N1" ownerKey="" ownerTag="" routingMode="Redirect" sequenceNumber="0" shareEncap="no">
    </vnsAbsNode>

       <!—For L1 device -- >
      <vnsAbsNode descr="" funcTemplateType="OTHER" funcType="L1" isCopy="no" managed="no" name="N1" ownerKey="" ownerTag="" routingMode="Redirect" sequenceNumber="0" shareEncap="no">
    </vnsAbsNode>

    </vnsAbsGraph>

    <fvIPSLAMonitoringPol name="Pol2" slaType="l2ping"/>
<vnsSvcCont>
<vnsRedirectHealthGroup name="2" />
             <vnsSvcRedirectPol name="N1Ext"  destType="L2">
                   <vnsRsIPSLAMonitoringPol tDn="uni/tn-coke/ipslaMonitoringPol-Pol2"/>      
     <vnsL1L2RedirectDest destName="1">
             	 	<vnsRsL1L2RedirectHealthGroup tDn="uni/tn-coke/svcCont/redirectHealthGroup-2"/>
		         	<vnsRsToCIf tDn="uni/tn-coke/lDevVip-N1/cDev-ASA1/cIf-[Gig0/0]"/>
		</vnsL1L2RedirectDest>
             </vnsSvcRedirectPol>

             <vnsSvcRedirectPol name="N1Int" destType="L2">
                   <vnsRsIPSLAMonitoringPol tDn="uni/tn-coke/ipslaMonitoringPol-Pol2"/>       
      <vnsL1L2RedirectDest destName="2">
             	 	<vnsRsL1L2RedirectHealthGroup tDn="uni/tn-coke/svcCont/redirectHealthGroup-2"/>
	         	<vnsRsToCIf tDn="uni/tn-coke/lDevVip-N1/cDev-ASA1/cIf-[Gig0/1]"/>
  	 	</vnsL1L2RedirectDest>
          </vnsSvcRedirectPol>
        </vnsSvcCont>
</fvTenant>
</polUni>

Policy-Based Redirect and Tracking Service Nodes

Beginning with the Cisco Application Policy Infrastructure Controller (APIC) 2.2(3) and 3.1(1) releases (but, excluding the 3.0 releases), the policy-based redirect feature (PBR) supports the ability to track service nodes. Tracking enables you to prevent redirection of traffic to a service node that is down. If a service node (PBR destination) is down, the PBR hashing can begin selecting an available PBR destination in a policy. This feature requires Cisco Nexus 9300-EX, -FX, or later platform leaf switches.

Service nodes can support dual IP address stacking. Therefore, this feature has the capability to track both IPv4 and IPv6 addresses at the same time. When both IPv4 and IPv6 addresses are "up," the PBR destination is marked as "up."

Switches internally use the Cisco IP SLA monitoring feature to support PBR tracking. The tracking feature marks a redirect destination node as "down" if the service node is not reachable. The tracking feature marks a redirect destination as node "up" if the service node resumes connectivity. When a service node is marked as "down," it will not be used to send or hash the traffic. Instead, the traffic will be sent or hashed to a different service node in the cluster of redirection destination nodes.

To avoid black holing of the traffic in one direction, you can associate a service node's ingress and egress redirect destination nodes with a redirection health policy. Doing so ensures that if either an ingress or egress redirection destination node is down, the other redirection destination node will also be marked as "down." Hence, both ingress and egress traffic gets hashed to a different service node in the cluster of the redirect destination nodes.

You can use the following protocols for tracking:

  • ICMP (for Layer 3 PBR)

  • TCP (for Layer 3 PBR)

  • L2ping (for Layer 1/2 PBR)

Policy-Based Redirect and Tracking Service Nodes with a Health Group

Policy-based redirect (PBR) service node tracking enables you to prevent the redirection of traffic to a failed PBR node. If the consumer or the provider connector of the PBR node is down, the traffic that went through the failed node may get black holed. To prevent the traffic from being black holed, Cisco Application Centric Infrastructure (ACI) avoids the use of the PBR node for traffic in both directions. Some Layer 4 to Layer services devices can bring down an interface if another interface is down, which you can use to prevent traffic from being black holed. If the PBR node does not have this capability, you should use the health group feature to disable PBR for the node if either the consumer or provider connector is down.

Each PBR destination IP and MAC address can be in a health group. For example, assume that you have two PBR node destinations. One has 172.16.1.1 as the consumer connector and 172.16.2.1 as the provider connector, and these are in Health-group1. The other has 172.16.1.2 as the consumer connector and 172.16.2.2 as the provider connector, and these are in Health-group2. If either of the PBR destinations in the same health group is down, that node will not be used for PBR.

Policy-Based Redirect and Threshold Settings for Tracking Service Nodes

The following threshold settings are available when configuring a policy-based redirect (PBR) policy for tracking service nodes:

  • Threshold enabled or disabled: When the threshold is enabled, you an specify the minimum and maximum threshold percentages. Threshold enabled is required when you want to disable the redirect destination group completely and prevent any redirection. When there is no redirection, the traffic is directly sent between the consumer and the provider.

  • Minimum threshold: The minimum threshold percentage specified. If the traffic goes below the minimum percentage, the packet is permitted instead of being redirected. The default value is 0.

  • Maximum threshold: The maximum threshold percentage specified. Once the minimum threshold is reached, to get back to operational state, the maximum percentage must first be reached. The default value is 0.

Let us assume as an example that there are three redirect destinations in a policy. The minimum threshold is specified at 70% and the maximum threshold is specified at 80%. If one of the three redirect destination policies goes down, the percentage of availability goes down by one of three (or 33%), which is less than the minimum threshold. As a result, the minimum threshold percentage of the redirect destination group is brought down and traffic begins to get permitted instead of being redirected. Continuing with the same example, if the maximum threshold is 80%, to bring the redirect policy destination group back to the operational state, a percentage greater than the maximum threshold percentage must be reached.

Guidelines and Limitations for Policy-Based Redirect With Tracking Service Nodes

Follow these guidelines and limitations when using policy-based redirect (PBR) tracking with service nodes:

  • Destination groups that share destinations must have same health group and IP SLA monitoring policies configured.

  • Beginning in release 4.0(1), remote leaf switch configurations support PBR tracking, but only if system-level global GIPo is enabled. See Configuring Global GIPo for Remote Leaf Using the GUI.

  • Beginning in release 4.0(1), remote leaf switch configurations support PBR resilient hashing.

  • A Cisco ACI Multi-Pod fabric setup is supported.

  • A Cisco ACI Multi-Site setup supported, but the PBR destinations cannot be in a different site.

  • An L3Out is supported for the consumer and provider EPGs.

  • PBR supports up to 100 trackable IP addresses in leaf switches and 1500 trackable IP addresses in the Cisco Application Centric Infrastructure (ACI) fabric.

  • For the maximum number of service graph instances in the Cisco ACI fabric, see the Verified Scalability Guide for Cisco APIC for your specific release.

  • For the maximum number of service graph instances per device, see the Verified Scalability Guide for Cisco APIC for your specific release.

  • You can configure up to 40 service nodes per PBR policy.

  • You can configure up to 5 service nodes per service chain.

  • Shared services are supported with PBR tracking.

  • The following threshold down actions are supported:

    • bypass action

    • deny action

    • permit action

  • If multiple PBR policies have the same PBR destination IP address in the same VRF instance, the policies must use the same IP SLA policy and health group for the PBR destination.

  • When using HTTP URI tracking, the following guidelines and limitations apply:

    • Tracking supports both IPv4 and IPv6.

    • Tracking supports only HTTP, not HTTPS.

    • Tracking supports only HTTP version 1.0 and 1.1.

    • The destination port must be 80.

    • You must configure the URI (not the URL). Domain resolution is not supported.

    • The URI must not be empty and must start with "/".

    • Tracking supports 100 probes per leaf switch and 1500 per fabric. The values are the total of ICMP, L2ping, TCP, and HTTP probes.

    • The minimum frequency should be 5 seconds. In standalone NX-OS, the minimum frequency is 60 seconds.

  • The Cisco Application Policy Infrastructure Controller (APIC) generates a fault when the same destination is tracked with two different tracking protocols. The fault is similar to the following example:

    Fault delegate: PBR service source on nodeid 106 fabric hostname apic1-leaf6 is in
    failed state. reason multiple tracking types configured.

Configuring PBR and Tracking Service Nodes Using the GUI

Procedure


Step 1

On the menu bar, click Tenant > tenant_name. In the navigation pane, click Policies > Protocol > L4-L7 Policy Based Redirect .

Step 2

Right-click L4 –L7 Policy Based Redirect, and click Create L4–L7 Policy Based Redirect.

Step 3

In the Create L4–L7 Policy Based Redirect dialog box, perform the following actions:

  1. In the Name field, enter a name for the policy-based redirect (PBR) policy.

  2. In the dialog box, choose the appropriate settings to configure the hashing algorithm, IP SLA monitoring policy, and other required values.

    Note


    Destination groups that share destinations must have same IP SLA monitoring policy configured.

  3. In the threshold setting fields, specify the settings as appropriate and if desired.

  4. For L3 Destinations, click + to display Create Destination of Redirected Traffic.

  5. In the Create Destination of Redirected Traffic dialog box, enter the appropriate values.

    The IP and Additional IPv4/IPv6 fields are provided where you can specify IPv4 or IPv6 addresses.

    Note


    The Additional IPv4/IPv6 field is not mandatory. Use the field if the Layer 4 to Layer 7 services device has multiple IP addresses and you want Cisco Application Centric Infrastructure (ACI) to verify both of them.

    If both the IP and Additional IPv4/IPv6 parameters are configured, both must be up in order to mark the PBR destination as "UP".

  6. In the Redirect Health Group field, associate an existing health group or create a new health group, as appropriate. Click OK.

    Note


    Destination groups that share destinations must have same health group configured.

  7. In the Create L4–L7 Policy Based Redirect dialog box, click Submit.

The Layer 4 to Layer 7 PBR and tracking of service nodes is configured after binding the redirect health group policy to the PBR policy and the settings to track the redirect destination group are enabled.

Configuring a Redirect Health Group Using the GUI

Procedure


Step 1

On the menu bar, click Tenant > tenant_name. In the navigation pane, click Policies > Protocol > L4-L7 Redirect Health Groups.

Step 2

Right-click L4 –L7 Redirect Health Groups, and choose Create L4–L7 Redirect Health Group.

Step 3

In the Create L4–L7 Redirect Health Group dialog box, perform the following actions:

  1. In the Name field, enter a name for the Redirect Health Group policy.

  2. In the Description field, enter additional information if appropriate, and click Submit.

The Layer 4 to Layer 7 services redirect health policy is configured.

Configuring Global GIPo for Remote Leaf Using the GUI

Performing this task allows PBR tracking to function in remote leaf configurations.

Note


This configuration must be performed for PBR tracking to function on a remote leaf. Without this configuration, PBR tracking will not work on the remote leaf, even when the main data center is reachable.

Procedure


Step 1

On the menu bar, click System > System Settings.

Step 2

In the System Settings navigation pane, click System Global GIPo.

Step 3

In the System Global GIPo Policy work pane, click Enabled.

Step 4

In the Policy Usage Warning dialog, review the nodes and policies that may be using the GIPo policy and, if appropriate, click Submit Changes.


Configuring PBR to Support Tracking Service Nodes Using the REST API

Procedure


Configure PBR to support tracking service nodes.

Example:

<polUni>
    <fvTenant name="t1" >
    <fvIPSLAMonitoringPol name="tcp_Freq60_Pol1" slaType="tcp" slaFrequency="60" slaPort="2222" />
    <vnsSvcCont>
        <vnsRedirectHealthGroup name="fwService1"/>
          <vnsSvcRedirectPol name="fwExt" hashingAlgorithm="sip" thresholdEnable="yes"
            minThresholdPercent="20" maxThresholdPercent="80">
            <vnsRedirectDest ip="40.40.40.100" mac="00:00:00:00:00:01">
               <vnsRsRedirectHealthGroup tDn="uni/tn-t1/svcCont/redirectHealthGroup-fwService1"/>
            </vnsRedirectDest>
            <vnsRsIPSLAMonitoringPol tDn="uni/tn-t1/ipslaMonitoringPol-tcp_Freq60_Pol1"/>
          </vnsSvcRedirectPol>
         <vnsSvcRedirectPol name="fwInt" hashingAlgorithm="sip" thresholdEnable="yes"
           minThresholdPercent="20" maxThresholdPercent="80">
             <vnsRedirectDest ip="30.30.30.100" mac="00:00:00:00:00:02">
                <vnsRsRedirectHealthGroup tDn="uni/tn-t1/svcCont/redirectHealthGroup-fwService1"/>
             </vnsRedirectDest>
             <vnsRsIPSLAMonitoringPol tDn="uni/tn-t1/ipslaMonitoringPol-tcp_Freq60_Pol1"/>
          </vnsSvcRedirectPol>
        </vnsSvcCont>
    </fvTenant>
</polUni>

About Location-Aware Policy Based Redirect

Location-Aware Policy Based Redirect (PBR) is now supported. This feature is useful in a multipod configuration scenario. Now there is pod-awareness support, and you can specify the preferred local PBR node. When you enable location-aware redirection, and Pod IDs are specified, all the redirect destinations in the Layer 4-Layer 7 PBR policy will have pod awareness. The redirect destination is programmed only in the leaf switches located in a specific pod.

The following image displays an example with two pods. PBR nodes A and B are in Pod 1 and PBR nodes C and D are in Pod 2. When you enable the location-aware PBR configuration, the leaf switches in Pod 1 prefer to use PBR nodes A and B, and the leaf switches in Pod 2 use PBR nodes in C and D. If PBR nodes A and B in Pod 1 are down, then the leaf switches in Pod 1 will start to use PBR nodes C and D. Similarly, if PBR nodes C and D in Pod 2 are down, the leaf switches in Pod 2 will start to use PBR nodes A and B.

Figure 11. An Example of Location Aware PBR Configuration with Two Pods

Guidelines for Location-Aware PBR

Follow these guidelines when using location-aware PBR:

  • The Cisco Nexus 9300 (except Cisco Nexus 9300–EX and 9300–FX) platform switches do not support the location-aware PBR feature.

  • Use location-aware PBR for north-south firewall integration with GOLF host advertisement.

    Use location-aware PBR for a contract that is enforced on the same leaf nodes for incoming and returning traffic, such as an intra-VRF contract for external-EPG-to-EPG and an inter-VRF contract for EPG-to-EPG traffic. Otherwise, there can be a loss of traffic symmetry.

  • If multiple PBR policies have the same PBR destination IP address in the same VRF, then all of the policies must either have Pod ID aware redirection enabled or Pod ID aware redirection disabled. The same (VRF, IP address) pair cannot be used in Pod ID aware redirection enabled and Pod ID aware redirection disabled policies at the same time. For example, the following configuration is not supported:

    • PBR-policy1 has PBR destination 192.168.1.1 in VRF A, Pod ID aware redirection enabled, and 192.168.1.1 is set to POD 1.

    • PBR-policy2 has PBR destination 192.168.1.1 in VRF A and Pod ID aware redirection disabled.

Configuring Location-Aware PBR Using the GUI

You must program two items for this feature to be enabled. Enable pod ID aware redirection and associate the Pod IDs with the preferred PBR nodes to program redirect destinations in the leaf switches located in the specific pods.

Procedure


Step 1

On the menu bar, click Tenant > tenant_name. In the Navigation pane, click Policies > Protocol > L4-L7 Policy Based Redirect .

Step 2

Right-click L4 –L7 Policy Based Redirect, and click Create L4–L7 Policy Based Redirect.

Step 3

In the Create L4–L7 Policy Based Redirect dialog box, perform the following actions:

  1. In the Name field, enter a name for the PBR policy.

  2. In the Enable Pod ID Aware Redirection check the check box.

  3. In the dialog box, choose the appropriate settings to configure the hashing algorithm, IP SLA Monitoring Policy, and other required values.

  4. In the threshold setting fields, specify the settings as appropriate and if desired.

  5. Expand Destinations to display Create Destination of Redirected Traffic.

  6. In the Create Destination of Redirected Traffic dialog box, enter the appropriate details including the IP address and the MAC address fields.

    The fields for IP address and Second IP address are provided where you can specify an IPv4 address and an IPv6 address.

  7. In the Pod ID field, enter the pod identification value.

  8. In the Redirect Health Group field, associate an existing health group or create a new health group, as appropriate. Click OK.

    Create additional destinations of redirected traffic with different Pod IDs as required.

  9. In the Create L4–L7 Policy Based Redirect dialog box, click Submit.

The L4-L7 location-aware PBR is configured.

Configuring Location-Aware PBR Using the REST API

You must configure two items to enable location-aware PBR and to program redirect destinations in the leaf switches located in the specific pods. The attributes that are configured to enable location-aware PBR in the following example are: programLocalPodOnly and podId.

Procedure


Configure location-aware PBR.

Example:


<polUni>
    <fvTenant name="coke" >
    <fvIPSLAMonitoringPol name="icmp_Freq60_Pol1" slaType="icmp" slaFrequency="60"/>
    <vnsSvcCont>
        <vnsRedirectHealthGroup name="fwService1"/>
          <vnsSvcRedirectPol name="fwExt" hashingAlgorithm="sip" thresholdEnable="yes" minThresholdPercent="20" maxThresholdPercent="80" programLocalPodOnly="yes">
            <vnsRedirectDest ip="40.40.40.100" mac="00:00:00:00:00:01" podId="2">
               <vnsRsRedirectHealthGroup tDn="uni/tn-coke/svcCont/redirectHealthGroup-fwService1"/>
            </vnsRedirectDest>
            <vnsRsIPSLAMonitoringPol tDn="uni/tn-coke/ipslaMonitoringPol-icmp_Freq60_Pol1"/>
          </vnsSvcRedirectPol>
          <vnsSvcRedirectPol name="fwInt" hashingAlgorithm="dip" thresholdEnable="yes" minThresholdPercent="20" maxThresholdPercent="80">
             <vnsRedirectDest ip="30.30.30.100" mac="00:00:00:00:00:02">
                <vnsRsRedirectHealthGroup tDn="uni/tn-coke/svcCont/redirectHealthGroup-fwService1"/>
             </vnsRedirectDest>
             <vnsRsIPSLAMonitoringPol tDn="uni/tn-coke/ipslaMonitoringPol-icmp_Freq60_Pol1"/>
          </vnsSvcRedirectPol>
        </vnsSvcCont>
    </fvTenant>
</polUni>

Policy-Based Redirect and Service Graphs to Redirect All EPG-to-EPG Traffic Within the Same VRF Instance

You can configure Cisco Application Centric Infrastructure (Cisco ACI) to forward all traffic from any endpoint group to any other endpoint group in the same VRF instance through a Layer 4 to Layer 7 device by configuring vzAny with service graph redirect. vzAny is a construct that represents all the endpoint groups under the same VRF instance. vzAny is sometimes referred to as "any EPG."

Figure 12. vzAny topology

Traffic between any endpoint group pair that is under the same VRF instance can be redirected to a Layer 4 to Layer 7 device, such as a firewall. You can also redirect traffic within the same bridge domain to a firewall. The firewall can filter traffic between any pair of endpoint groups, as illustrated in the following figure:

Figure 13. A firewall filtering traffic between any pair of EPGs

One use case of this functionality is to use Cisco ACI as a default gateway, but filter traffic through a firewall. With vzAny and a policy-based redirect policy, the security administrator manages the ACL rules and the network administrator manages routing and switching. Some of the benefits of this configuration include being able to use the Cisco Application Policy Infrastructure Controller's (Cisco APIC's) tools, such as endpoint tracking, first hop security with ARP inspection, or IP address source guard.

Applying a service graph with a policy-based redirect policy also enables the following functionality:

  • Firewall clustering

  • Firewall health tracking

  • Location-aware redirection

Figure 14. Firewall clustering

Prior to the Cisco APIC 3.2 release, you could use vzAny as the consumer of a contract. Starting in the Cisco APIC 3.2 release, you can also use vzAny as the provider of a contract. This enhancement enables the following configurations:

  • vzAny as the provider and vzAny as the consumer (policy-based redirect with one-arm only)

  • vzAny as the provider and a regular endpoint group as the consumer (policy-based redirect and non-policy-based redirect case)

After you have applied a service graph with a policy-based redirect policy that redirects traffic using vzAny, if you want some traffic to bypass the firewall, such as for data backup traffic between two servers, you can create a more specific contract between the endpoint groups. For example, two endpoint groups can transmit traffic to one another directly over a given port. More specific rules win over the "any EPG to any EPG" redirect rule.

Guidelines and Limitations for Configuring a Policy-Based Redirect Policy with a Service Graph to Redirect All EPG-to-EPG Traffic Within the Same VRF Instance

The following guidelines and limitations apply when configuring a policy-based redirect policy with a service graph to redirect all EPG-to-EPG traffic within the same VRF instance:

  • The Layer 4 to Layer 7 services device and vzAny must belong to the same VRF instance.

  • You must deploy the Layer 4 to Layer 7 services device in one-arm mode.

  • We generally recommend that you use a vzAny contract to enable PBR for many EPGs to many EPGs traffic instead of many EPGs consuming and providing the same contract. However, do not have a contract that has service graph attached as both the consumer and provider contract on the same EPG.

    This recommendation is due to a possible impact on changing a configuration on a contract that has many provider and consumer EPGs. If one configuration change on the Cisco Application Policy Infrastructure Controller (APIC) is related to multiple zoning-rule changes at the same time, the Cisco APIC needs time to finish programming the hardware of a given leaf node.

  • vzAny configured with a multinode service graph might work, but this configuration has not been tested and is unsupported; use at your own risk.

  • The use in conjunction with VRF leaking is not implemented. You cannot have vzAny of a VRF instance providing or consuming a vzAny contract of another VRF instance.

  • You can have a contract between endpoint groups and vzAny in different tenants as long as they belong to the same VRF instance, such as if the VRF instance is in tenant Common.

  • In a multipod environment, you can use vzAny as a provider and consumer.

  • In a Cisco ACI Multi-Site environment, you cannot use vzAny as a provider and consumer across sites.

Configuring a Policy-Based Redirect Policy with a Service Graph to Redirect All EPG-to-EPG Traffic Within the Same VRF Instance

The following procedure configures a policy-based redirect policy with service graphs to redirect all EPG-to-EPG traffic within the same VRF instance:

Procedure


Step 1

Create the service bridge domain that you will dedicate to the connectivity of the Layer 4 to Layer 7 device.

For information about creating a bridge domain, see the Cisco APIC Basic Configuration Guide.

On the STEP 1 > Main screen:

  1. In the VRF drop-down list, choose the VRF instance that contains the endpoint groups.

  2. In the Forwarding drop-down list, if you choose Custom, then in the L2 Unknown Unicast drop-down list, you can choose Flood if desired.

On the STEP 2 > L3 Configurations screen:

  1. Ensure that there is a check in the Unicast Routing check box.

  2. In the Subnets table, create a subnet.

    The Gateway IP address must be in the same subnet as the IP address that you will give to the Layer 4 to Layer 7 device interface.

  3. Remove the check from the Endpoint Dataplane Learning check box.

Step 2

Create the redirect policy.

  1. In the Navigation pane, choose Tenant tenant_name > Policies > Protocol > L4-L7 Policy Based Redirect.

  2. Right-click L4-L7 Policy Based Redirect and choose Create L4-L7 Policy Based Redirect.

  3. In the Name field, enter a name for the policy.

  4. In the L3 Destinations table, click +.

  5. In the Create Destination of Redirected Traffic dialog, enter the following information:

    • IP—Enter the IP address that you will assign to the Layer 4 to Layer 7 device. The IP address must be in the same subnet as the IP address that you have given to the bridge domain.

    • MAC—Optional. Enter the MAC address that you will assign to the Layer 4 to Layer 7 device. You should use a MAC address that is valid also upon failover of the Layer 4 to Layer 7 device. For example, in the case of a ASA firewall, this is called a virtual MAC. If you do not specify the MAC address, the address will be dynamically detected.

  6. Enter any other desired values, then click OK.

  7. In the Create L4-L7 Policy Based Redirect dialog, enter any other desired values, then click Submit.

Step 3

Create the Layer 4 to Layer 7 device with one concrete interface and one logical interface.

For information about creating a Layer 4 to Layer 7 device, see Configuring a Layer 4 to Layer 7 Services Device Using the GUI.

Step 4

Create the service graph template with route redirect enabled.

  1. In the Navigation pane, choose Tenant tenant_name > Services > L4-L7 > Service Graph Template.

  2. Right-click Service Graph Template and choose Create Service Graph Template.

  3. In the Name field, enter a name for the service graph.

  4. If you did not previously create the Layer 4 to Layer 7 device, in the Device Clusters pane, create the device.

  5. Drag and drop the Layer 4 to Layer 7 device from the Device Clusters pane to in-between the consumer EPG and provider EPG.

  6. For the L4L7 radio buttons, click Routed.

  7. Put a check in the Routed Redirect check box.

  8. Click Submit.

Step 5

Apply the service graph to the vzAny (AnyEPG) endpoint group.

On the STEP 1 > Contract screen:

  1. In the Navigation pane, choose Tenant tenant_name > Services > L4-L7 > Service Graph Template > service_graph_name.

    service_graph_name is the service graph template that you just created.

  2. Right-click the service graph template and choose Apply L4-L7 Service Graph Template.

  3. In the Consumer EPG / External Network drop-down list, choose the AnyEPG list item that corresponds to the tenant and VRF instance that you want to use for this use case.

    For example, if the tenant is "tenant1" and the VRF instance is "vrf1," choose tenant1/vrf1/AnyEPG.

  4. In the Provider EPG / Internal Network drop-down list, choose the same AnyEPG list item that you chose for the consumer EPG.

  5. In the Contract Name field, enter a name for the contract.

  6. Click Next.

On the STEP 2 > Graph screen:

  1. For both BD drop-down lists, choose the Layer 4 to Layer 7 service bridge domain that you created in step 1.

  2. For both Redirect Policy drop-down lists, choose the redirect policy that you created for this use case.

  3. For the Consumer Connector Cluster Interface drop-down list, choose the cluster interface (logical interface) that you created in step 3.

  4. For the Provider Connector Cluster Interface drop-down list, choose the same cluster interface (logical interface) that you created in step 3.

  5. Click Finish.


Dynamic MAC Address Detection for a Layer 3 Policy-Based Redirect Destination

Beginning in the Cisco Application Policy Infrastructure Controller (APIC) 5.2(1) release, you can configure any of the Layer 3 policy-based redirect (PBR) destinations without specifying a MAC address. An example of a PBR destination is a Layer 4 to Layer 7 device that is part of a service graph. By configuring this feature, the leaf switches use the Address Resolution Protocol (ARP) to determine the MAC address of the PBR next-hop. The benefit is that you do not need to check the MAC address of each PBR destination and an active-standby HA pair does not need to use a floating MAC address.

Guidelines and Limitations for Dynamic MAC Address Detection for a Layer 3 Policy-Based Redirect Destination

The following are guidelines and limitations for configuring dynamic MAC address detection for a Layer 3 policy-based redirect (PBR) destination:

  • You must enable tracking on the destinations for which you did not specify a MAC address.

  • You can use all Layer 3 PBR equal cost multipath (ECMP) features and IPv4 and IPv6 destinations.

  • In the same PBR policy, you can have destinations for which you did not configure the MAC address together with destinations for which you configured the MAC address.

  • When a MAC address is changed, detecting the new MAC address and updating the PBR destination MAC address on the consumer and provider leaf switches takes time, depending on the tracking interval.

  • You can have 100 destinations per leaf switch and 1500 destinations per fabric.

Configuring Dynamic MAC Address Detection for a Layer 3 Policy-Based Redirect Destination Using the GUI

The following procedure configures dynamic MAC address detection for a Layer 3 policy-based redirect (PBR) destination.

Procedure


Step 1

On the menu bar, choose Tenants > All Tenants.

Step 2

In the Work pane, double click the tenant's name.

Step 3

In the Navigation pane, choose Tenant tenant_name > Policies > Protocol > L4-L7 Policy-Based Redirect.

Step 4

Right-click L4-L7 Policy-Based Redirect and choose Create L4-L7 Policy-Based Redirect.

Step 5

In the Create L4-L7 Policy-Based Redirect dialog box, complete the fields as required, except as specified below:

  1. For Destination Type, choose L3 if it is not already chosen.

  2. In the IP SLA Monitoring Policy drop-down list, choose an existing IP SLA monitoring policy or create a new policy.

  3. In the L3 Destinations section, click +.

  4. In the Create Destination of redirected traffic dialog box, for the MAC field, enter 00:00:00:00:00:00 or leave the value empty.

    Either way enables dynamic MAC address detection. If you leave the value empty, the value becomes 00:00:00:00:00:00 when you finish creating the policy.

  5. For Redirect Health Group, choose an existing health group or create a new health group, as appropriate.

  6. Complete the remaining fields as required.

  7. Click OK.

  8. Click Submit.


Configuring Dynamic MAC Address Detection for a Layer 3 Policy-Based Redirect Destination Using the REST API

The following REST API example enables dynamic MAC address detection for a Layer 3 policy-based redirect destination by specifying 00:00:00:00:00:00 for the MAC address:

<vnsSvcRedirectPol AnycastEnabled="no" destType="L3"
  dn="uni/tn-t0/svcCont/svcRedirectPol-TEST-PBR-POL" hashingAlgorithm="sip-dip-prototype"
  maxThresholdPercent="0" minThresholdPercent="0" name="TEST-PBR-POL"
  programLocalPodOnly="no" resilientHashEnabled="no" srcMacRewriteEnabled="no"
  thresholdDownAction="permit" thresholdEnable="no" userdom=":all:common:">
    <vnsRsIPSLAMonitoringPol tDn="uni/tn-t0/ipslaMonitoringPol-l3ping"
      userdom=":all:common:"/>
    <vnsRedirectDest ip="11.2.2.100" ip2="0.0.0.0" mac="00:00:00:00:00:00" podId="1"
      userdom=":all:common:">
        <vnsRsRedirectHealthGroup tDn="uni/tn-t0/svcCont/redirectHealthGroup-Test-HG"
          userdom=":all:common:"/>
    </vnsRedirectDest>
</vnsSvcRedirectPol>

Alternately, you can specify an empty value for mac:

    <vnsRedirectDest ip="11.2.2.100" ip2="0.0.0.0" mac="" podId="1" userdom=":all:common:">