Microsegmentation with Cisco ACI
Microsegmentation with the Cisco Application Centric Infrastructure (ACI) enables you to automatically assign endpoints to logical security zones called endpoint groups (EPGs). These EPGs are based on various network-based or virtual machine (VM)-based attributes.
This chapter contains conceptual information about Microsegmentation with Cisco ACI and instructions for configuring microsegmented (uSeg) EPGs. We assume that you are familiar with EPGs, tenants, contracts, and other key concepts relating to Cisco ACI policies. For more information, see Cisco Application Centric Infrastructure Fundamentals.
Supported Endpoints
The Cisco Application Policy Infrastructure Controller (APIC) manages microsegmentation policies, and the Cisco ACI fabric enforces the policies. Microsegmentation with Cisco ACI supports virtual endpoints that are attached to the following:
-
Cisco ACI Virtual Edge
-
Microsoft Hyper-V Virtual Switch
-
VMware vSphere Distributed Switch (VDS)
Microsegmentation with network-based attributes also supports bare-metal environments. See the section "Using Microsegmentation with Network-based Attributes on Bare Metal" in the Cisco APIC Basic Configuration Guide, Release 3.x .
Microsegmentation with Cisco ACI also supports physical endpoints using EPGs with IP-based attributes.
 Note |
You can configure Microsegmentation with Cisco ACI for physical and virtual endpoints, and you can share the same EPGs for both physical and virtual endpoints. |
Layer 4 to Layer 7 service graphs are supported for contracts between microsegmented EPGs and between microsegmented EPGs and regular EPGs. See the Cisco APIC Layer 4 to Layer 7 Services Deployment Guide on Cisco.com for detailed information and configuration procedures.
Limitations
-
If you use Cisco ACI Virtual Edge or Microsoft Hyper-V Virtual Switch, note the following: If you want to use a MAC-based EPG and any attribute other than IP for virtual endpoints, do not configure any overlapping IP attribute filters for physical endpoints or virtual endpoints on a VDS VMM domain. If you do so, the Cisco ACI Virtual Edge or Microsoft Hyper-V Virtual Switch, microsegmentation EPG classification is overwritten.
-
Configuring a Layer 4 to Layer 7 virtual IP (VIP) address under microsegmented EPGs or their corresponding base EPGs is not supported.
-
A VMware distributed virtual switch (DVS) domain with EDM UCSM integration may fail. The domain fails if you configure microsegmentation on the endpoint group (EPG) attached to the domain and you use UCSM Mini 6324, which does not support private VLANs.
Benefits of Microsegmentation with Cisco ACI
Endpoint groups (EPGs) are used to group virtual machines (VMs) within a tenant and apply filtering and forwarding policies to them. Microsegmentation with Cisco ACI adds the ability to group endpoints in existing application EPGs into new microsegment (uSeg) EPGs and configure network or VM-based attributes for those uSeg EPGs. This enables you to filter with those attributes and apply more dynamic policies. Microsegmentation with Cisco ACI also allows you to apply policies to any endpoints within the tenant.
Example: Microsegmentation with Cisco ACI Within a Single EPG or Multiple EPGs in the Same Tenant
You might assign web servers to an EPG so that you can apply the similar policies. By default, all endpoints within an EPG can freely communicate with each other. However, if this web EPG contains a mix of production and development web servers, you might not want to allow communication between these different types of web servers. Microsegmentation with Cisco ACI allows you to create a new EPG and autoassign endpoints based on their VM name attribute, such as "Prod-xxxx" or "Dev-xxx".
Example: Microsegmentation for Endpoint Quarantine
You might have separate EPGs for web servers and database servers, and each one contains both Windows and Linux VMs. If a virus affecting only Windows threatens your network, you can isolate Windows VMs across all EPGs by creating a new EPG called, for example, "Windows-Quarantine" and applying the VM-based operating systems attribute to filter out all Windows-based endpoints. This quarantined EPG could have more restrictive communication policies, such as limiting allowed protocols or preventing communication to any other EPGs by not having any contract. A microsegment EPG can have a contract or not have a contract.
How Microsegmentation Using Cisco ACI Works
Microsegmentation using Cisco Application Centric Infrastructure (ACI) involves the Cisco Application Policy Infrastructure Controller (APIC), vCenter or Microsoft System Center Virtual Machine Manager (SCVMM), and leaf switches. This section describes the workflow for microsegmentation using Cisco ACI Virtual Edge, VMware VDS, or Microsoft Hyper-V Virtual Switch.
Cisco APIC
-
The user configures a VMM domain for Cisco ACI Virtual Edge, VMware VDS, or Microsoft Hyper-V Virtual Switch in the Cisco APIC.
-
The Cisco APIC connects to vCenter or SCVMM and does the following:
-
Creates an instance of Cisco ACI Virtual Edge, VMware VDS, or Microsoft Hyper-V Virtual Switch.
-
Pulls VM and hypervisor inventory information from the associated VMware vCenter or Microsoft SCVMM.
-
-
The user creates an application EPG and associates it with a vCenter/SCVMM domain. In each vCenter/SCVMM domain, a new encapsulation is allocated for this application EPG. The application EPG does not have any attributes.
The vCenter/SCVMM administrator assigns virtual endpoints to this application EPG—not to any microsegment (uSeg) EPGs. It is the application EPG that appears in vCenter/SCVMM as a port group.
-
The user creates an uSeg EPG and associates it with the VMM domain.
The uSeg EPG does not appear in vCenter/SCVMM as a port group; it has a special function: The uSeg EPG has VM-based attributes to match filter criteria. If a match occurs between the uSeg EPG VM attributes and VMs, the Cisco APIC dynamically assigns the VMs to the uSeg EPG.
The endpoints are transferred from the application EPG to the uSeg EPG. If the uSeg EPG is deleted, the endpoints are assigned back to the application EPG.
The uSeg EPG must be assigned to a VMM domain in order for it to take effect. When you associate an uSeg EPG to a VMM domain, its criteria is applied for that VMM domain only. If you have VMware VDS, you must also assign the uSeg EPG to the same bridge domain as the application EPG.
In the case of VMware VDS, its criteria is applied for that VMM domain and bridge domain.
Leaf Switch
-
The physical leaf switch pulls the attribute policies from the Cisco APIC.
-
The Cisco ACI Virtual Edge or Microsoft Hyper-V Virtual Switch sends a VM attach message to the physical leaf switch using the OpFlex protocol when a VM attaches to Cisco ACI Virtual Edge or Microsoft Hyper-V Virtual Switch.
VMware vSphere Distributed Switch (VDS) does not send a VM attach message using the OpFlex protocol.
In case of Microsoft Hyper-V Virtual Switch, endpoint information synchronization happens every 5 minutes. So it takes up to 5 minutes to get endpoints to move to the microsegmented EPG or move back from the microsegmented EPG.
-
The physical leaf switch matches the VM against the configured attribute policies for the tenant.
-
If the VM matches the configured VM attributes, the physical leaf switch pushes the uSeg EPG—along with the corresponding encapsulation—to the Cisco ACI Virtual Edge, or Microsoft Hyper-V Virtual Switch.
Note that this action does not change the original port-group assignment for the VM in vCenter/SCVMM.
For VMware VDS, the physical leaf switch does not push the microsegmented EGP. The leaf switch performs the attribute-based microsegmentation.
Packet Forwarding for Cisco ACI Virtual Edge or Microsoft Hyper-V Virtual Switch
-
When the VM sends the data packets, Cisco ACI Virtual Edge or Microsoft Hyper-V Virtual Switch tags the packets using encapsulation corresponding to the uSeg EPG, not the application EPG.
-
The physical leaf hardware sees an attribute-based encapsulated VM packet and matches it with the configured policy.
The VM is dynamically assigned to an uSeg EPG, and the packet is forwarded based on the policy defined for that particular uSeg EPG.
Packet Forwarding for VMware VDS
When you enable Microsegmentation with Cisco ACI, Cisco APIC allocates a pair of VLANs (PVLANs) and configures a PVLAN portgroup on VMware vCenter. Doing so forces traffic to go to the leaf switch even if two VMs in the same portgroup try to talk to each other.
You must configure a PVLAN on blade switches of ESXi servers are not directly connected to leaf switches.
Note |
If you configure Microsegmentation with Cisco ACI for EPGs associated with VMware VDS VMM domains, you may experience brief traffic disruption. |
Attributes for Microsegmentation with Cisco ACI
Applying attributes to uSeg EPGs enables you to apply forwarding and security policies with greater granularity than you can apply policies to EPGs without attributes. Attributes are unique within the tenant.
There are two types of attributes that you can apply to uSeg EPGs: network-based attributes and VM-based attributes.
Network-Based Attributes
The network-based attributes are IP (IP address filter) and MAC (MAC Address Filter). You can apply one or more MAC or IP addresses to a uSeg EPG. Both IPv4 and IPv6 addresses are supported.
For IP addresses, you simply specify the address or the subnet; for MAC addresses, you simply specify the address.
Note |
If you want to use a network-based attribute and classify IP addresses in the same subnet, you must use the MAC-based network attribute. IP-based microsegmented EPGs do not support classification for IP addresses in the same subnet. IP-based microsegmented EPGs are supported only when traffic requires Layer 3 routing. If the traffic is bridged, the microsegmentation policy cannot be enforced. |
VM-Based Attributes
You can apply multiple VM-based attributes to VMware VDS,or Cisco ACI Virtual Edge uSeg EPGs. The VM-based attributes are VMM Domain, Operating System, Hypervisor Identifier, Datacenter, VM Identifier, VM Name, VNic Dn (vNIC domain name), Custom Attribute, and Tag.
Note |
The attribute Datacenter corresponds to Cloud for Microsoft Hyper-V Virtual Switch. |
Note |
The attribute VM Folder also appears in the GUI. This feature is for beta testing only, and should not be deployed in production environments. |
When you create any VM-based attribute, in addition to naming the attribute, you must do the following:
-
Specify the attribute type, such as VM Name or Hypervisor Identifier.
-
Specify the operator, such as Equals, or Starts With.
-
Specify the value, such as a particular vNIC or name of the operating system.
Custom Attribute and Tag Attribute
The Custom Attribute and the Tag attribute allow you to define attributes based on criteria that are not used in other attributes. For example, you might want to define a Custom Attribute called "Security Zone" in VMware vCenter and then associate this attribute to one or more VMs with such values as "DMZ" or "Edge." The APIC administrator can then create an uSeg EPG based on that VM Custom Attribute.
The Custom Attribute and the Tag attribute appear in the APIC GUI as VM attributes:
-
Custom Attribute
-
Available for Cisco ACI Virtual Edge and VMware VDS as a VM attribute configured in VMware vCenter
-
Available for Microsoft Hyper-V Virtual Switch as a Custom Property configured in Microsoft SCVMM
-
-
Tag Attribute: Available for Cisco ACI Virtual Edge and VMware VDS only
If you want to use a Custom Attribute or a Tag attribute for Cisco ACI Virtual Edge or VMware VDS, must also add it in VMware vSphere Web Client. If you want to use a Custom Attribute for Microsoft Hyper-V Virtual Switch, you must also add it as a Custom Property in Microsoft SCVMM. We recommend doing so before configuring the uSeg EPG. That allows you to choose the Custom Attribute or Tag attribute in the drop-down list while configuring microsegmentation policy in Cisco APIC.
You can add the Custom Attribute or Tag attribute in vSphere Web Client or SCVMM after you configure the uSeg EPG in Cisco APIC. However, if you do so, you do not see the Custom Attribute or Tag attribute in the drop-down list in Cisco APIC, although you can type the name of the Custom Attribute or Tag attribute in the text box.
See VMware vSphere ESXi and VMware vCenter Server documentation for instructions for adding a Custom Attribute or Tag attribute in vSphere Web Client. See Microsoft documentation for instructions for adding a Custom Attribute in SCVMM.
Although similar to the Custom Attribute, the Tag attribute differs from in it several ways:
-
The Tag attribute can be applied to any object in VMware vCenter, such as a host or data center; the Custom Attribute can be applied only to VMs and ESXi hosts. However, only the Tag attribute for VMs is relevant to microsegmentation.
-
The Tag attribute does not have a name and value like the Custom Attribute. Tags are simply labels that get applied or not to objects.
-
To configure a Custom Attribute, you provide details about the controller and VM as well as an operator and a value. To configure the Tag attribute, you provide the attribute type, category, operator, and tag name.
Note |
|
Uniqueness of Attributes Within a Tenant
Attributes must be unique within a tenant. Uniqueness depends on the value of the attribute.
For example, for a network-based attribute, you can use the attribute IP Address Filter multiple times within a tenant. You can do so provided that the attribute has a different value for the IP address each time it is used. So you cannot use the IP Address Filter attribute with the address 192.168.33.77 more than once; however, you can use the IP Address Filter attribute a second time, provided that the IP address is different, for example 192.168.33.78.
Methods of Filtering VMs for uSeg EPGs
You can configure uSeg EPGs with multiple attributes. However, VMs can become part of only one uSeg EPG. When a VM has attributes matching more than one uSeg EPG in the tenant, Cisco APIC puts the VM into a uSeg EPG based on filtering rules.
Depending on how you define the attributes, you can use different filtering rules:
-
Matching any attribute—You can match any attribute, and Cisco APIC follows a the default precedence among attributes in deciding which uSeg EPG that a VM will join.
For more information, see the section VM Filtering when Matching Any Attributein this guide.
-
Matching all attributes—You can match all of the VM-based attributes defined for the uSeg EPG. You cannot match all for multiple network-based attributes.
For more information, see the section VM Filtering when Matching All Attributes in this guide.
-
Using simple or block statements—You can create multiple statements to filter for multiple attributes, or you can create block, or nested, statements to create precise filtering rules.
For more information, see the section VM Filtering when Using Simple or Block Statements in this guide.
-
Overriding existing rules—When you create a uSeg EPG, you can set its precedence, overriding other rules. You can set the precedence when you match any attribute or match all attributes. You need to set match precedence to break ties across EPGs in the tenant. You can match all attributes and not set match precedence; however, in such cases, if you have multiple uSeg EPGs with similar attributes, the VM can get matched to any of the uSeg EPGs arbitrarily.
For more information, see the section VM Filtering when Using EPG Match Precedence in this guide.
VM Filtering when Matching Any Attribute
Matching any attribute defined for a uSeg EPG is the default.
If you have multiple attributes and match any, Cisco APIC filters for VMs matching any of the attributes and—if VMs match other EPGs in the tenant—puts them into uSeg EPG based on the precedence of attributes.
How Rules for Attribute Precedence are Applied
The following table lists the attributes that can be specified for an uSeg EPG:
|
Attribute |
Type |
Precedence Order |
Example |
||
|---|---|---|---|---|---|
|
MAC |
Network |
1- Cisco ACI Virtual Edge/Microsoft Hyper-V Virtual Switch 2- VMware VDS |
5c:01:23:ab:cd:ef |
||
|
IP |
Network |
1- VMware VDS 2- Cisco ACI Virtual Edge/Microsoft Hyper-V Virtual Switch |
192.168.33.77 10.1.0.0/16 |
||
|
VNic Dn (vNIC domain name) |
VM |
3 |
a1:23:45:67:89:0b |
||
|
VM Identifier |
VM |
4 |
VM-598 |
||
|
VM Name |
VM |
5 |
HR_VDI_VM1 |
||
|
Hypervisor Identifier |
VM |
6 |
host-25 |
||
|
VMM Domain |
VM |
7 |
AVE-SJC-DC1 |
||
|
Datacenter |
VM |
8 |
SJC-DC1 |
||
|
Custom Attribute |
VM |
9 |
SG_DMZ |
||
|
Operating System |
VM |
10 |
Windows 2008 |
||
|
Tag (Cisco ACI Virtual Edge and VMware VDS only) |
VM |
11 |
Linux |
||
|
VM Folder (Cisco ACI Virtual Edge and VMware VDS only)
|
VM |
12 |
VM_Folder_1 |
Note |
Precedence of MAC-based and IP-based attributes differ for VMware VDS and Cisco ACI Virtual Edge and Microsoft Hyper-V Virtual Switch. |
Examples of how Rules for Precedence are Applied
You might have four uSeg EPGs containing attributes that match the same VM, and each uSeg EPG has a different network or VM attribute: Operating System, Hypervisor Identifier, IP; and another has MAC.
Rules for Microsoft Hyper-V Virtual Switch are applied in this order: MAC, IP, Hypervisor Identifier, and Operating System. The rule is applied to MAC, and the subsequent rules are skipped. However, if the uSeg EPG with the MAC attribute is deleted, the rule is applied to IP Address Filter, and the subsequent rules are skipped—and so on with the other attributes.
Rules for VMware VDS are applied in this order: IP Address Filter, MAC Address Filter, Hypervisor Identifier, and Operating System. The rule is applied to IP, and the subsequent rules are skipped. However, if the uSeg EPG with the IP attribute is deleted, the rule is applied to MAC and the subsequent rules are skipped—and so on with the other attributes.
In another case, you might have uSeg EPGs containing the same VM, and each uSeg EPG has a different VM attribute: VMM Domain, Datacenter, Custom Attribute, and VNic Dn. The rule is applied to VNic Dn, and the subsequent rules as skipped. However, if the uSeg EPG with the VNic Dn attribute is deleted, the rule is applied to VMM Domain, and the subsequent rules are skipped–and so on with the other attributes.
VM Filtering when Matching All Attributes
You can filter by matching all VM-based attributes defined for a uSeg EPG. You do so by choosing Match All from a drop-down list in the APIC GUI or specify matching in the NX-OS CLI or REST API.
If you match all attributes, Cisco APIC does not put any VM into the uSeg EPG unless it matches all the attributes defined for the uSeg EPG.
For example, you have a uSeg EPG with the following attributes: Hypervisor Identifier where the hypervisor is host-25, VM Name that contains "vm," and Operating System of Linux. Cisco APIC puts into the uSeg EPG only those VMs that have the hypervisor host-25, a VM Name containing "vm," and have the operating system Linux. It would not put into the uSeg EPG a VM that matches the first two attributes but has the operating system Microsoft.
Note |
Matching all attributes is supported for VM-based attributes only. You cannot choose Match All for network-based attributes. |
If you want to match all VM-based attributes, you might want to set the EPG match precedence when you create the uSeg EPG. Doing so allows you to decide which uSeg EPG should override other uSeg EPGs. However, you can set EPG match precedence whether you match any attribute or all attributes. For more information, see the section VM Filtering when Using EPG Match Precedence in this guide.
Note |
If you use Microsoft Hyper-V Virtual Switch and want to downgrade to APIC Release 2.3(1) from a later release, you first need to delete any uSegs configured with the Match All filter. The Match All filter is supported for Microsoft beginning with APIC Release 3.0(1). |
VM Filtering when Using Simple or Block Statements
When you define attributes for a uSeg EPG, you can define multiple attributes in simple statements or in block statements. You can combine simple and block statements to create complex filters for attributes.
Simple statements contain a single attribute. You can have as many simple statements as you want for each uSeg EPG. You can match any of the attributes or all of the attributes.
Block statements contain multiple attributes at different levels in a hierarchy. You can have only two sublevels within a block statement. You can match any of the attributes or all of the attributes for each level of the block statement.
Note |
You cannot put network-based attributes into sublevels of block statements. However, you can create sublevels for network-based attributes if the network-based attribute is at the top level of a block statement. |
When you have block statements, Cisco APIC first filters for attributes defined on the top level. It then filters on the next-highest level, and then the next-highest level.
You can create simple and block statements in the APIC GUI, the NX-OS CLI, and the REST API.
Example of Using Block Statements
You want to put some VMs into a uSeg EPG so you can update Linux on them. The VMs are within a single data center, but you want to limit the update to VMs within two VMM domains. You can use block statements to set up filtering for those VMs.
Because you are filtering for VMs that run Linux and are in a single data center, you create two simple statements: one for the Operating System attribute with the value Linux and one for the attribute Datacenter with the value of datacenter3. For these statements you choose Match All because you want to capture all VMs in the tenant that run Linux and belong to datacenter 3.
However, among VMs that run Linux and belong to datacenter3, you now want to capture VMs that belong only to the VMM domains mininet2 or mininet4. You create a block statement as a sublevel of the two simple statements. The blocks statement contains two attributes: one for the attribute VMM domain with the value of mininet 2 and one for the attribute VMM domain with the value of mininet 4. You choose match any for the block statement because you want to capture VMs that are in either VMM domain.
Once you define the attributes, Cisco APIC first filters for VMs that run Linux and also are in datacenter3. It then searches among those VMs for the ones that belong to either mininet2 or mininet4.
VM Filtering when Using EPG Match Precedence
EPG Match Precedence enables you to override default precedence rules for uSeg EPGs when filtering for VM-based attributes. You configure it when you create the uSeg EPG in the GUI, NX-OS CLI, or REST API.
EPG Match Precedence is optional when matching any attribute or matching all attributes. However, when you match all attributes—filtering on multiple attributes—setting precedence enables Cisco APIC to break ties between uSeg EPGs.
Note |
You cannot use EPG Match Precedence when filtering network-based attributes. If you try to do so, you see an error message. |
When you configure EPG Match Precedence, you give the uSeg EPG an integer value; the higher the number the higher the precedence. You can have nearly 4.3 billion (232) levels of precedence. The default is 0, which does not set any precedence.
For example, you might have two uSeg EPGs, each with only one attribute. One has the attribute VM Name, and the other has Operating System. A VM might match both uSeg EPGs. By default, Cisco APIC would assign the VM to the uSeg EPG with the VM Name attribute because that attribute has higher precedence than the attribute Operating System.
However, if you give the uSeg EPG with the attribute Operating System a precedence of 10 and give the uSeg EPG with the attribute VM Name a precedence of 7, Cisco APIC will give the VM matching both uSeg EPGs to the uSeg EPG with the Operating System attribute.
Precedence of Operators
In addition to applying filtering rules based on attributes of uSeg EPGs within a tenant, Cisco APIC applies filtering rules within VM-based attributes based on the operator type.
When you configure a microsegment with a VM-based attribute, you select one of four operators: Contains, Ends With, Equals, or Starts With. Each operators specifies the string or value match for the specific attribute.
For example, you might want to create a microsegment with the VM Name attribute and want to filter for VMs with names that start with "HR_VM" or VMs that contain "HR" anywhere in their name. Or you might want to configure a microsegment for a specific VM and filter for the name "HR_VM_01."
How Rules for Operator Precedence are Applied
The operators for a specific VM attribute within a tenant determine the order in which the VM-based attributes for microsegments are applied. They also determine which operator will have precedence among a group of microsegments that share the same attribute and overlapping values. The table below shows the default operator precedence for Cisco ACI Virtual Edge and Microsoft Hyper-V Virtual Switch:
|
Operator Type |
Precedence Order |
|---|---|
|
Equals |
1 |
|
Contains |
2 |
|
Starts With |
3 |
|
Ends With |
4 |
Examples of how Rules for Precedence are Applied
You have three Human Resources VM machines in a datacenter cluster under the same tenant: VM_01_HR_DEV, VM_01_HR_TEST, and VM_01_HR_PROD. You have created two microsegmented EPGs based on the VM Name attribute:
|
Criterion |
Microsegment CONTAIN-HR |
Microsegment HR-VM-01-PROD |
|---|---|---|
|
Attribute type |
VM Name |
VM Name |
|
Operator type |
Contains |
Equals |
|
Value |
VM_01_HR |
VM_01_HR_PROD |
Because the operator type Equals has precedence over the operator type Contains, the value VM_01_HR_PROD is matched before the value VM_01_HR. So the VM named VM_01_HR_PROD will be put into microsegment HR-VM-01-PROD because it is an exact criterion match and because the operator Equals has precedence over the operator Contains, even though the VM name matches both microsegments. The other two VMs will be put in the Microsegment CONTAIN-HR.
Scenarios for Using Microsegmentation with Cisco ACI
This section contains examples of circumstances in which you might find Microsegmentation useful in your network.
Using Microsegmentation with Cisco ACI with VMs Within a Single Application EPG
You can use Microsegmentation with Cisco ACI to create new, uSeg EPGs to contain VMs from a single application EPG. By default, VMs within an application EPG can communicate with each other; however, you might want to prevent communication between groups of VMs, if VRF is in enforced mode and there is no contract between uSeg EPGs.
For more information about Intra-EPG Isolation knob, that controls communication between VMs within the EPG, see Intra-EPG Isolation for VMware VDS or Microsoft Hyper-V Virtual Switch.
Example: Putting VMs from the Same Application EPG into a Microsegmented EPG
Your company deploys a virtual desktop infrastructure (VDI) for its Human Resources, Finance, and Operations departments. The VDI virtual desktop VMs are part of a single application EPG called EPG_VDI with identical access requirements to the rest of the application EPGs.
Service contracts are built in such a way such that the EPG-VDI has access to Internet resources and internal resources. But at the same time, the company must ensure that each of the VM groups—Human Resources, Finance, and Operations—cannot access the others even though they belong to the same application EPG, EPG_VDI.
To meet this requirement, you can create filters in the Cisco APIC that would check the names of the VMs in the application EPG, EPG_VDI. If you create a filter with the value "HR_VM," Cisco APIC creates a uSeg EPG—a microsegment—for all Human Resource VMs. Cisco APIC looks for matching values in all the EPGs in a tenant even though you want to group the matching VMs within one EPG. So when you create VMs, we recommend that you choose names unique within the tenant.
Similarly, you can create filters with the keyword "FIN_VMs" for Finance virtual desktops and "OPS_VMs" for Operations virtual desktops. These uSeg EPGs are represented as new EPGs within the Cisco APIC policy model. You can then apply contracts and filters to control access between the VM groups even though they belong to the same application EPG.
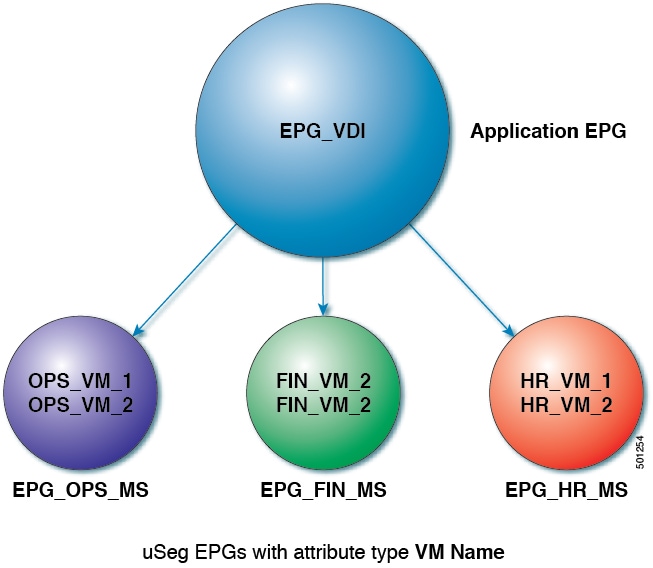
In the illustration above, all the virtual desktop VMs from the Human Resources, Finance, and Operations groups have been moved from the application EPG, EPG_VDI, to new, uSeg EPGs: EPG_OPS_MS, EP_FIN_MS, and EPG_HR_MS. Each uSeg EPG has the attribute type VM Name with a value to match key parts of the VM's name. EPG_OPS_MS has the value OPS_VM, so all VMs in the tenant containing OPS_VM in their names become part of EPG_OPS_MS. The other uSeg EPGs have corresponding values, resulting in the movement of VMs in the tenant with matching names to the uSeg EPGs.
Using Microsegmentation with Cisco ACI with VMs in Different Application EPGs
You can configure Microsegmentation with Cisco ACI to put VMs that belong to different application EPGs into a new uSeg EPG. You might want to do this to apply policy to VMs that share a certain characteristic although they belong to different application EPGs.
Example: Putting VMs in Different Application EPGs into a New uSeg EPG
Your company deploys a three-tier web application. The application is built on VMs that run different operating systems and different versions of the same operating system. For example, the VMs might run Linux, Windows 2008, and Windows 2008 R2. The application is distributed; the company has divided the VMs into three different EPGs: EPG_Web, EPG_App, and EPG_DB.
Because of a recent vulnerability in the Windows 2008 operating system, your company's security team decided to quarantine VMs running Windows 2008 in case those VMs are compromised. The security team also decided to upgrade all Windows 2008 VMs to Windows 2012. It also wants to microsegment all production VMs across all EPGs and restrict external connectivity to those VMs.
To meet this requirement, you can configure a uSeg EPG in the Cisco APIC. The attribute would be Operating System, and the value of the attribute would be Windows 2008.
You can now quarantine the VMs running Windows 2008 and upgrade them to Windows 2012. Once the upgrade is complete, the VMs will no longer be part of the uSeg EPG you created for VMs running Windows 2008. This change will be reflected dynamically to Cisco APIC, and those virtual machines revert to their original EPGs.
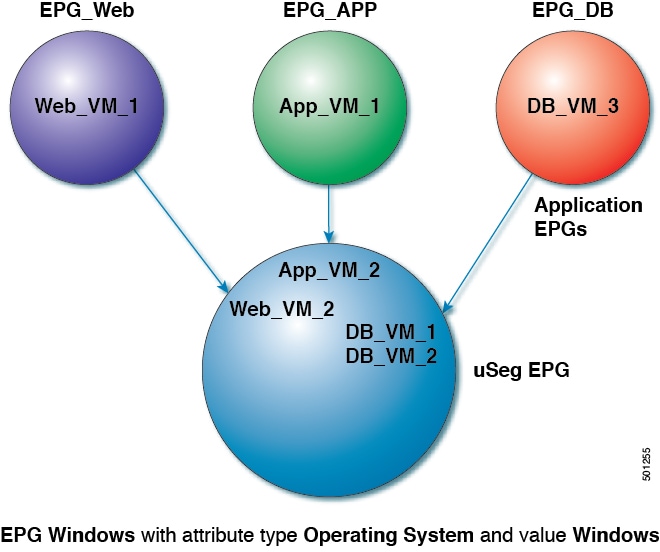
In the illustration above, the new uSeg EPG EPG_Windows has the attribute type Operating System and the value Windows. The VMs App_VM_2, DB_VM_1, DB_VM_2, and Web_VM_2, run Windows as their operating system—and so have been moved to the new uSeg EPG EPG_Windows. However, the VMs App_VM_1, DB_VM_3, and Web_VM_1 run Linux and so remain in their application EPGs.
Using Microsegmentation with Network-based Attributes
You can use Cisco APIC to configure Microsegmentation with Cisco ACI to create a new, uSeg EPG using a network-based attribute, a MAC address or one or more IP addresses. You can configure Microsegmentation with Cisco ACI using network-based attributes to isolate VMs within a single application EPG or VMs in different EPGs.
Using an IP-based Attribute
You can use an IP-based filter to isolate a single IP address, a subnet, or multiple of noncontiguous IP addresses. Isolating multiple IP addresses in a single microsegment can be more convenient that specifying VMs by name. You might want to isolate VMs based on IP addresses as a quick and simply way to create a security zone, similar to using a firewall.
Using a MAC-based Attribute
You can use a MAC-based filter to isolate a single MAC address or multiple MAC addresses. You might want to do this if you have a server sending bad traffic in he network; by creating a microsegment with a MAC-based filter, you can isolate the server.
Configuring Microsegmentation with Cisco ACI
The following sections contain instructions for configuring Microsegmentation with Cisco ACI Virtual Edge, VMware VDS, or Microsoft Hyper-V Virtual Switch using the Cisco APIC GUI and NX-OS style CLI. You can adapt the procedures for your network's specific needs.
Note |
If VXLAN load balancing is enabled in the VMware vCenter domain profile, Microsegmentation with Cisco ACI is not supported on the domain. |
Prerequisites for Configuring Microsegmentation with Cisco ACI
Before you can configure Microsegmentation with Cisco ACI for Cisco ACI Virtual Edge, VMware VDS or Microsoft Hyper-V Virtual Switch, you need to fulfill the following prerequisites:
-
Ensure you meet the microsegmentation hardware requirements. Cisco Nexus 9000 series switches are supported; however, Nexus 9000 series switches without a product ID suffix or with a suffix earlier than -EX are not supported.
-
You must already have VMs with names that can be used with the filters that you will use when creating the uSeg EPGs.
If you do not have VMs with names that can be used, you can go ahead and create the uSeg EPGs and then change the VM names that can be used with the filters. Cisco APIC will automatically make the VMs part of the new uSeg EPGs.
-
You must already have an application EPG.
-
The corresponding bridge domain must have an IP subnet defined. Otherwise, the VMs will not be able to communicate.
-
You must have chosen your own attributes, names, and values.
Attributes, names, and values used in the preceding scenarios were provided as examples.
-
You must create a contract before creating a microsegment with one or more attributes if you want to associate the EPG with a contract.
-
If you have Cisco ACI Virtual Edge or VMware VDS and want to use a VM Custom Attribute, you also need to add it in VMware vSphere Web Client. If you have Microsoft Hyper-V Virtual Switch and want to use a VM Custom Attribute, you also need to add it in Microsoft SCVMM.
We recommend adding the Custom Attribute in VMware vSphere Web Client or in Microsoft SCVMM before configuring Microsegmentation in Cisco APIC. This enables you to choose the Custom Attribute in the drop-down list while configuring the microsegment in he Cisco APIC GUI.
See VMware vSphere ESXi and vCenter Server documentation for instructions for adding a Custom Attribute in vSphere Web Client. See Microsoft documentation for instructions for adding a Custom Attribute in SCVMM.
-
For Microsoft Hyper-V Virtual Switch based microsegmentation, one of the following is required:
-
SCVMM 2012 R2 Build 3.2.8145.0 or newer
-
SCVMM 2016 Build 4.0.1662.0 or newer
These builds include a feature called "Enable Dynamic VLAN on the vNIC of a virtual machine," which will be automatically enabled by the Cisco SCVMM Agent to allow live migration of virtual machines that use Microsegmentation with ACI. For more information, see Microsoft's documentation: https://support.microsoft.com.
-
-
If you have VMware VDS or a bare-metal server, make sure to set the VRF policy-enforcement direction to "ingress." Otherwise, there will be a fault.
-
If you have VMware VDS, make sure the PVLANs are set up on the blade switch. Also make sure that static VLANs are deployed so that VLAN usage is consistent.
Workflow for Configuring Microsegmentation with Cisco ACI
This section provides a high-level description of the tasks that you need to perform in order to configure Microsegmentation with Cisco ACI.
|
1 |
Create the uSeg EPG: Specify a name and bridge domain for the new uSeg EPG and choose a network-based or VM-based attribute for the EPG.
|
||
|
2 |
Associate the new uSeg EPG with a VMM domain profile; you need to associate it with the same VMM domain profile used by the application EPG. |
||
|
3 |
Configure attributes for the uSeg EPG. |
||
|
4 |
Verify that the end points have moved from the application EPG to the uSeg EPG. |
Follow the instructions for these steps in the Configuring Microsegmentation with Cisco ACI section in this guide.
Configuring Microsegmentation with Cisco ACI Using the GUI
You can use Cisco APIC to configure Microsegmentation with Cisco ACI to put VMs that belong to different application EPGs or the same EPG into a new uSeg EPG. The task is essentially the same for Cisco ACI Virtual Edge, VMware VDS, and Microsoft Hyper-V Virtual Switch; the slight differences are noted in the procedure.
Procedure
|
Step 1 |
Log into the Cisco APIC. |
||||||||||||
|
Step 2 |
Choose Tenants and then choose the tenant where you want to create a microsegment. |
||||||||||||
|
Step 3 |
In the tenant navigation pane, expand the tenant folder, the Application Profiles folder, and the profile folder. |
||||||||||||
|
Step 4 |
Complete one of the following actions:
|
||||||||||||
|
Step 5 |
In the tenant navigation pane, right-click the uSeg EPGs folder, and then choose Create Useg EPG. |
||||||||||||
|
Step 6 |
In the Create USeg EPG Step 1 > Identity dialog box, complete the following steps to begin creation of an uSeg EPG for a group of VMs: |
||||||||||||
|
Step 7 |
In the Create USeg EPG Step 2 > Domains, complete the following steps to associate the uSeg EPG with a VMM domain. |
||||||||||||
|
Step 8 |
In the navigation page for the tenant, open the folder for the uSeg EPG that you just created. |
||||||||||||
|
Step 9 |
Click the uSeg Attributes folder. |
||||||||||||
|
Step 10 |
(Optional) If you will filter using VM-based attributes, in the uSeg Attributes work pane, from the match drop-down list, choose Match Any or Match All. The match feature enables you to use multiple attributes to filter VMs for the uSeg EPG. The default is Match Any. The match all feature is supported for VM-based attributes only. See the sections "VM Filtering when Matching Any Attribute" and "VM Filtering when Matching All Attributes" in the microsegmentation chapter of the Cisco ACI Virtualization Guide. |
||||||||||||
|
Step 11 |
Click the + or the +( icon to add a filtering statement. The + icon allows you to create a simple statement, one that creates a filter for a single attribute. You can add multiple simple statements to filter for multiple attributes. The +( icon allows you to create a block, or nested, statement, which allows you to set attributes in a hierarchy, which filters for the highest-level attribute first and then filters for lower-level attributes. See the section VM Filtering when Using Simple or Block Statements in this guide for more information. |
||||||||||||
|
Step 12 |
Complete one of the following series of steps to configure the filter.
|
||||||||||||
|
Step 13 |
Click the + or the +( icon to add additional attributes for the uSeg EPG. |
||||||||||||
|
Step 14 |
Repeat Step 2 through Step 13 to create additional uSeg EPGs. |
What to do next
Verify that the uSeg EPG was created correctly.
If you configured a VM-based attribute, complete the following steps:
-
In the Cisco APIC navigation pane, click the new microsegment.
-
In the work pane, click the Operational tab and then ensure that the Client End-Points tab is active.
-
In the work pane, verify that the VMs that you wanted to move from the application EPG appear as endpoints for the new uSeg EPG.
If you configured an IP- or MAC-based attribute, make sure that traffic is running on the VMs that you put into the new microsegments.
 Feedback