Configuring UCS B-Series

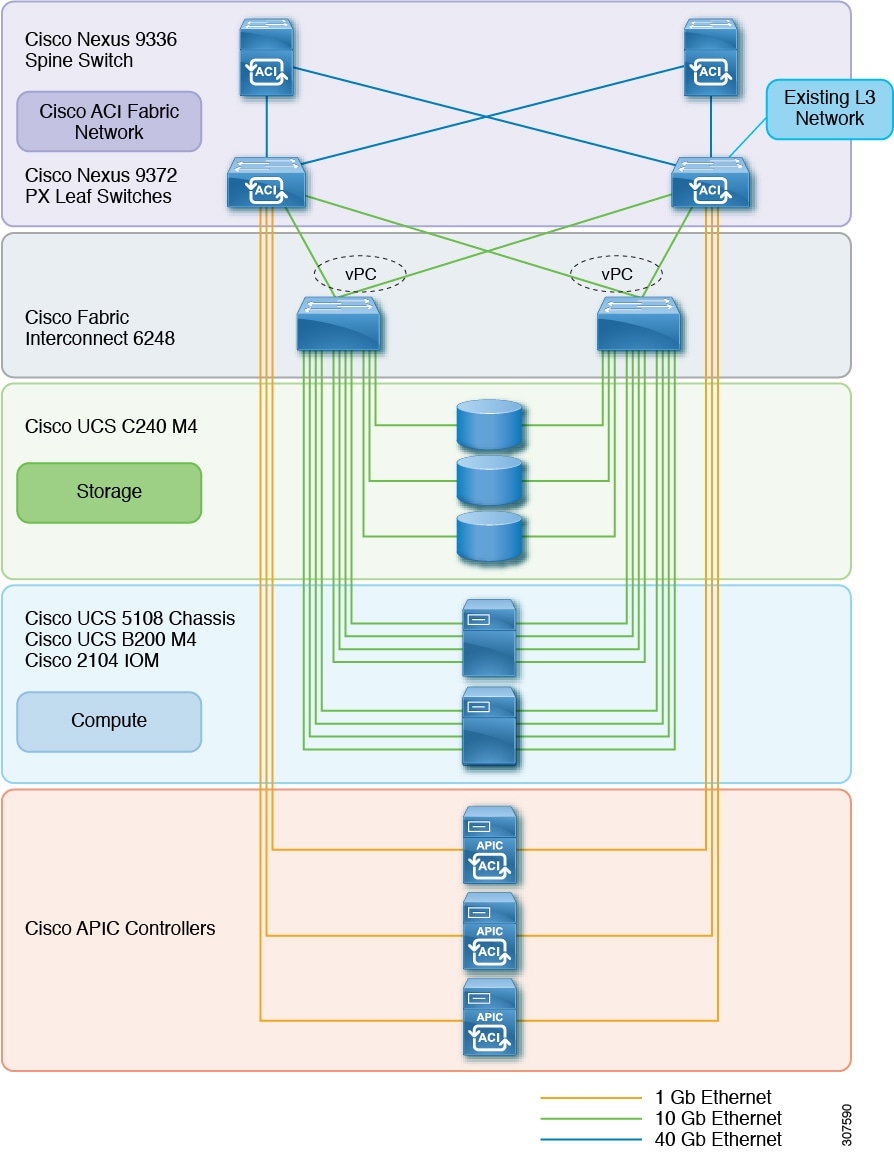
Configuring UCS B-Series for Cisco ACI and OpenStack Orchestration

You need three levels of configuration for Cisco Unified Computing System (UCS) B-Series to work with Cisco Application Centric Infrastructure (ACI) and OpenStack orchestration. The first layer is on Cisco UCS, the second on the host, and the third on the leaf switches.


Note


This document applies to the Cisco UCS B-Series and C-Series servers connected to Fabric Interconnects in UCS mode and provides additional configuration required to install OpenStack on Cisco UCS.

Configuration on Linux Hosts

Configuration on Linux hosts includes binding the NICs in Active Backup mode, running the BondWatch service, and setting the NIC maximum transmission unit (MTU).

Bind the NICs

Bind the NICs in Active Backup mode, which you can do by setting the appropriate configuration in your OSP network environment NIC templates.

Procedure


Set the appropriate configuration.

Example:

              type: linux_bond
              bonding_options: "mode=active-backup miimon=10"
              name: bond0
              mtu: 1600
              members:
               -
                type: interface
                name: nic2
                mtu: 1600
               -
                type: interface
                name: nic3
                primary: true
                mtu: 1600

Run the Bond Watch Service

The bond watch service (apic-bond-watch) detects failure of a NIC in the bond and sends gratuitous ARP requests to inform the fabric of the currently active NIC. We recommend that you run the bond watch service on the undercloud.

There are two ways you run the apic-bond-watch service, depending on which version of Cisco Application Policy Infrastructure Controller (APIC) that you use:

  • Cisco APIC Release 4.1(x) and earlier: You perform a short series of steps.

  • Cisco APIC Release 4.2(1) and later: You set a single parameter, and the apic-bond-watch is enabled and started. There are no manual steps that are required to set up, enable, or start the apic-bond-watch service.

The following is list of guidelines and recommendations for running the bond watch service:

  • Verify that you have installed /usr/bin/apic-bond-watch.

    The file is part of the apicapi package.

  • Add the OpFlex uplink device to /etc/environments (opflex_bondif=bond1)

    You must perform this step if the interface is other than default (bond0).

  • Enable the bond watch service: systemctl enable apic-bond-watch.

  • Start the bond watch service: systemctl start apic-bond-watch.


Note


In releases earlier than Cisco Cisco Application Policy Infrastructure Controller (APIC) 4.1(2), you may need to manually run apic-bond-watch because the service file may be missing. To manually start the binary, you can use nohup /usr/bin/apic-bond-watch <interface name>& as the root user. The default interface name is bond0. For example:

nohup /usr/bin/apic-bond-watch &          //To use bond0
nohup /usr/bin/apic-bond-watch bond1 &    //To use bond1

Procedure


Step 1

Complete one of the following actions, depending on your version of Cisco Application Policy Infrastructure Controller (APIC).

  • Cisco APIC 4.2(1) or later: Set the parameter ACIEnableBondWatchService to True. See the section "Installing Overcloud" in Cisco ACI Installation Guide for Red Hat OpenStack Using OpenStack Platform 10 Director or the section "Parameters for the Cisco ACI Environment" in Cisco ACI Installation Guide for Red Hat OpenStack Using the OpenStack Platform 13 Director. Do not complete the remaining steps of this procedure.
  • Cisco APIC 4.1(x) or earlier: Complete step 2 through step 4 in this procedure.

Step 2

Create an inventory of all compute node IP addresses.

Example:

source ~/stackrc
openstack server list --flavor compute -f value -c Networks|cut -d=  -f2 >~/compute-nodes
If necessary, you can create an inventory of all controllers:
openstack server list --flavor control -f value -c Networks|cut -d= -f2  >>~/compute-nodes

Step 3

Install and enable the service.

Example:

ansible --become --inventory=compute-nodes all -m shell -u heat-admin -a "yum -y install apicapi"

Step 4

Start the bond watch service.

Example:

ansible --become --inventory=compute-nodes all -m shell -u heat-admin -a "systemctl start apic-bond-watch"
ansible --become --inventory=compute-nodes all -m shell -u heat-admin -a "systemctl enable apic-bond-watch"

For versions that do not define bond watch, you can start the service manually:

ansible --become --inventory=compute-nodes all -m shell -u heat-admin -a 'nohup /usr/bin/apic-bond-watch&'

Identify Which NIC Is Active in the Bond

The bond0 file in the /proc/net/bonding directory shows which of the two NICs is active.

Procedure


Examine the bond0 to see which NIC is active.

Example:

[root@overcloud-compute-0 heat-admin]# cat /proc/net/bonding/bond0
Ethernet Channel Bonding Driver: v3.7.1 (April 27, 2011)

Bonding Mode: fault-tolerance (active-backup)
Primary Slave: None
Currently Active Slave: enp13s0
MII Status: up
MII Polling Interval (ms): 1
Up Delay (ms): 0
Down Delay (ms): 0

Slave Interface: enp13s0
MII Status: up
Speed: 10000 Mbps
Duplex: full
Link Failure Count: 3
Permanent HW addr: 00:25:b5:00:00:0f
Slave queue ID: 0

Slave Interface: enp14s0
MII Status: up
Speed: 10000 Mbps
Duplex: full
Link Failure Count: 3
Permanent HW addr: 00:25:b5:00:00:10
Slave queue ID: 0
[root@overcloud-compute-0 heat-admin]# 

Set the NIC MTU

Set and verify the maximum transmission unit (MTU) of the NICs. The MTU is based on settings that you specify in the Cisco Unified Computing System (UCS) Manager.

Procedure


Step 1

Set the MTU of the NICs to either 1600 or 9000.

Step 2

Verify the MTU setting by navigating to the UCS B-Series server, choosing the NIC, and then checking the value in the MTU field.


Verify MTU Settings for the NICs

Check the maximum transmission unit (MTU) setting on a NIC.

Procedure


Enter the following command:

ip link
You should see output similar to the following:
5: enp13s0: <BROADCAST,MULTICAST> mtu 9000 qdisc noop state DOWN mode DEFAULT qlen 1000
    link/ether 00:25:b5:00:00:03 brd ff:ff:ff:ff:ff:ff
6: enp14s0: <BROADCAST,MULTICAST> mtu 9000 qdisc noop state DOWN mode DEFAULT qlen 1000
    link/ether 00:25:b5:00:00:04 brd ff:ff:ff:ff:ff:ff

Configuration on Cisco UCS

Configure Cisco Unified Computing System (UCS) B-Series properly to integrate it with the Cisco Application Centric Infrastructure (ACI) and OpenStack. A supportable configuration must include the following:

  • Configuring the Cisco UCS service profile with two NICs. These NICs are used for OpFlex communication and VM data path.

  • Disabling fabric failover on these NICs.

  • Connecting the virtual NICs (vNICs) to different fabric interconnects.

  • Setting the maximum transmission unit (MTU) on the vNICs.

  • Ensuring that the VNICs allow the desired VLANs.

  • Turning multicast on for the fabric interconnects.

  • Configuring a port channel interface policy on the fabric interconnects.

Configuration on Leaf Switches

For path redundancy, configure a virtual port channel (vPC) interface policy across the two leaf switches. There are different ways to configure a virtual port channel (vPC), see the Cisco APIC Layer 2 Networking Configuration Guide for details.

Regardless of the method you choose to configure the UCS and vPCs, the configuration should resemble the following illustration:

Figure 1. Configuration on Leaf Switches
Configuration on leaf switches image