Smart Licensing Using Policy

Feature History for Smart Licensing Using Policy

This table provides release and related information for features that are explained in this module.

These features are available on all releases after the one they were introduced in, unless noted otherwise.

Release

Feature

Feature Information

Cisco MDS NX-OS Release 9.2(2)

Smart Licensing Using Policy (SLP)

This feature was introduced.

Use Cisco Feature Navigator to find information about platform and software image support. To access Cisco Feature Navigator, go to http://www.cisco.com/go/cfn.

Overview

Introduction to Smart Licensing Using Policy


Note


If you are purchasing licenses via third-party vendors or partners, check with your vendors or partners for instructions on implementing SLP.


Smart Licensing using Policy (SLP) is an enhanced version of Smart Licensing, the objective of which is to provide a cloud-based licensing solution that does not interrupt the operations of your network, rather enables a compliance relationship to account for the hardware and software licenses purchased and used.

SLP is supported starting with Cisco MDS NX-OS Release 9.2(2) and is the only licensing mechanism available.

The primary benefits of this enhanced licensing model are:

  • Seamless day-0 operations

    After a license is ordered, no preliminary steps, such as registration or generation of keys, are required unless an enforced license is used.

  • Visibility and manageability of licenses

    View and manage all your switch licenses at one place.

  • Flexible, time series reporting of licenses to remain compliant

    Easy reporting options are available, whether you are directly or indirectly connected to Cisco Smart Software Manager (CSSM) or are using an air-gapped approach.

This document provides conceptual, configuration, and troubleshooting information for SLP on Cisco MDS switches. For a more detailed overview on Cisco Licensing, go to cisco.com/go/licensingguide.

The conceptual information includes an overview of SLP, supported products, supported topologies, and explains how SLP interacts with other features. SLP is a software license management solution that provides a seamless experience for customers:

  • Purchase: Purchase licenses through the existing channels and use the Cisco Smart Software Manager (CSSM) portal to view switches and licenses.

    To simplify the implementation of SLP, we recommend that you provide your Smart Account and Virtual Account information when placing an order for new hardware or software. This allows Cisco to install applicable licenses on switches (terms explained in the Concepts section) and deposit entitlements to SA/VA at the time of manufacturing. Also, purchase information will be populated under the show license authorizations command.

  • License Types: Licenses on Cisco MDS switches are of two categories — enforced and unenforced.

    Enforced licensing prevents a feature from being used without first obtaining a license.

    Unenforced licensing does not need to complete any licensing-specific operations before using the feature. License usage is recorded on your switch with timestamps and the required workflows to report usage to Cisco can be completed later.

  • Report: License usage should be reported to CSSM. Multiple options are available for license usage reporting. You can use the Cisco Smart Licensing Utility (CSLU) or SSM On-Prem , or report usage information directly to CSSM. For air-gapped networks, a provision for offline reporting where usage information can be downloaded from switches and uploaded to CSSM is also available. The usage report is in plain text XML format.

Guidelines and Limitations

The SLP feature has the following guidelines and limitations:

  • CSLU-initiated pull mode is not supported in Cisco MDS NX-OS Release 9.2(2).

  • When upgrading to Cisco MDS NX-OS Release 9.2(2) for SL registered switches, the transport mode may go to CSLU instead of Call Home. We recommend configuring the transport mode to Call Home manually and establish the trust with CSSM.

  • During upgrade from earlier release with traditional licensing (PAK) to Cisco MDS NX-OS Release 9.2(2), reflection of RUM sync in the show command may take up to 24 hours after migration.

  • While using the transport mode as CSLU, if licenses do not get released from the SA/VA after write-erase and reload of a switch, it is recommended to delete the switch from SA/VA.

  • For SL registered switches with CSSM, when upgrading from pre-SLP releases to Cisco NX-OS MDS Release 9.2(2), duplicate entry may occur for the same switch on CSSM or SSM On-Prem. The duplicate entry will be deleted automatically within a day from CSSM, but needs to be deleted manually by users from SSM On-Prem.

  • Ports enabled in SL mode in pre-SLP releases will not be enabled if boot variables are used for migration instead of ISSU.

  • Syslogs will be printed on a weekly basis for port licenses that are not authorized. This scenario is specific to SL based migration.

  • For CSLU, single SA/VA is supported, but multitenant is not supported.

  • For autodiscovery (when only one IP is configured in CSLU local), only one CSLU can be used in the network.

  • SLP MIB is not supported.

  • Only CSLU mode of transport is supported with SSM On-Prem.

  • Authorization code cannot be returned to the SA/VA pool for enforced port licenses.

About Smart Licensing using Policy

Concepts

This section explains the key concepts of SLP.

License Enforcement Types

Cisco MDS 9000 Series switches support enforced and unenforced license types. Port licenses are enforced license and all other licenses are unenforced and do not require authorization before being used in air-gapped networks or in connected air-gapped deployment approach. The terms of use for such licenses are as per the end user license agreement (EULA).

License Duration

This refers to the duration or term for which a purchased license is valid. A given license may be enforced or unenforced and be valid for the following durations:

  • Perpetual: There is no expiration date for such a license.

    Port and Enterprise licenses are examples of perpetual licenses that are available on Cisco MDS switches.

  • Subscription: The license is valid only until a certain date.

    SAN Analytics is an example of subscription license and it is an unenforced license.

Policy

A policy provides the switch with these reporting instructions:

  • License usage report acknowledgment requirement (Reporting ACK required): The license usage report is known as a RUM Report and the acknowledgment is referred to as an ACK (See RUM Report and Report Acknowledgment). This is a yes or no value that specifies if the report for this switch requires CSSM acknowledgment. The default value is set to Yes.

  • First report requirement (days): The first report must be sent within the timeframe that is specified here. Cisco default value is 0 days.

  • Reporting frequency (days): The subsequent report must be sent within the timeframe that is specified here. Cisco default value is 0 days.

  • Report on change (days): If there is a change in license usage, a report must be sent within the timeframe that is specified here. Cisco default value is 0 days.

Understanding the Policy Selection

CSSM determines the policy that is applied to a switch. Only one policy is in use at a given point in time. The policy and its values are based on several factors, including the licenses being used.

CISCO default is the default policy that is always available in the switch. If no other policy is applied, the switch applies this default policy. Table 1 shows the CISCO default policy values.

While a new policy cannot be configured, user can request for a customized one by contacting the Cisco Global Licensing Operations team. Go to Support Case Manager. Click OPEN NEW CASE > Select Software Licensing. The licensing team will contact you to start the process or for any additional information. Customized policies will be made available through your Smart account in CSSM.


Note


To know which policy is applied (the policy in-use) and its reporting requirements, enter the show license status command in EXEC mode.


switch# show license status
Utility:
    Status: DISABLED

Smart Licensing using Policy:
    Status: ENABLED

Data Privacy:
    Sending Hostname: yes
    Callhome Hostname Privacy: DISABLED
        Smart Licensing Hostname Privacy: DISABLED
    Version Privacy: DISABLED

Transport:
    Type: CSLU
    Cslu address: cslu-local

Policy:
    Policy in use: Merged from multiple sources
    Reporting ACK required: Yes
    Unenforced/Non-Export:
        First report requirement (days): 90 (CISCO default)
        Ongoing reporting frequency (days): 365 (CISCO default)
        On change reporting (days): 90 (CISCO default)
    Enforced (Pepertual/Subscription):
        First report requirement (days): 0 (CISCO default)
        Ongoing reporting frequency (days): 0 (CISCO default)
        On change reporting (days): 0 (CISCO default)
    Export (Perpetual/Subscription):
        First report requirement (days): 0 (CISCO default)
        Ongoing reporting frequency (days): 0 (CISCO default)
        On change reporting (days): 0 (CISCO default)

Miscellaneous:
    Custom Id: <empty>

Usage reporting:
    Last ACK received: <none>
    Next ACK deadline: Jan 12 08:39:14 2022 UTC
    Reporting push interval: 30 days
    Next ACK push check: <none>
    Next report push: Oct 14 10:20:48 2021 UTC
    Last report push: <none>
    Last report file write: <none>

Trust Code installed: <none>


Table 1. Cisco Default Policy

Policy: CISCO default

Default Policy Values

Unenforced

Reporting ACK required: Yes

Unenforced/Non-Export:

First report requirement (days): 90 (CISCO default)

Ongoing reporting frequency (days): 365 (CISCO default)

On change reporting (days): 90 (CISCO default)

Enforced

Reporting ACK required: Yes

Enforced (Pepertual/Subscription):

First report requirement (days): 0 (CISCO default)

Ongoing reporting frequency (days): 0 (CISCO default)

On change reporting (days): 0 (CISCO default)

RUM Report and Report Acknowledgment

A Resource Utilization Measurement report (RUM report) is a license usage report, which the switch generates automatically at a periodic interval or can be generated manually before the interval expiry, to fulfill reporting requirements as specified by the policy.

An acknowledgment (ACK) is a response from CSSM and provides information about the status of a RUM report.

The policy that is applied to a switch determines the following reporting requirements:

  • Whether a RUM report should be sent to CSSM and the maximum number of days provided to meet this requirement.

  • Whether the RUM report requires an acknowledgment from CSSM or not.

  • The maximum number of days provided to report a change in license consumption.

A RUM report may be accompanied by other requests, such as a trust code request. In addition to the RUM report ID for the received report, an acknowledgment from CSSM may include trust codes and policy files as well.

Trust Code

Trust code is a UDI-tied public key with which the switch signs a RUM report. This prevents tampering and ensures data authenticity.

Architecture

This section explains the various components that can be part of your implementation of SLP.

Product Instance or Switch

A product instance or switch is a single instance of a Cisco product, identified by a Unique Device Identifier (UDI).

A switch records and reports license usage (Resource Utilization Measurement reports) and provides alerts and system messages about issues such as overdue reports and communication failures toward CSSM. Resource Utilization Measurement (RUM) reports and usage data are securely stored on the switch.

Throughout this document, the term product instance refers to all supported swtiches, unless noted otherwise.

CSSM

Cisco Smart Software Manager (CSSM) is a web portal that enables to manage all your Cisco software licenses from a centralized location. CSSM helps manage current requirements and review usage trends to plan for future license requirements.

Access the CSSM Web UI at https://software.cisco.com/software/smart-licensing/alerts.

CSSM supports the following features:

  • Create, manage, or view virtual accounts.

  • Create and manage switch registration tokens.

  • Transfer licenses between virtual accounts or view licenses.

  • Transfer, remove, or view switches.

  • Run reports against your virtual accounts.

  • Modify your email notification settings.

  • View overall account information.

CSLU

Cisco Smart License Utility (CSLU) is a reporting utility that is to be deployed on premises that provides aggregate licensing workflows. This utility performs the following key functions:

  • Provides options relating to how workflows are triggered. The workflows can be triggered by CSLU (Product Instance Initiated Only) or by the switch.

  • Collects usage reports from the switch and uploads these usage reports to the corresponding Smart Account or Virtual Account, online or offline, using files. Similarly, the RUM report ackowledge is collected online or offline and sent back to the switch.

  • Sends authorization code requests to CSSM and receives authorization codes from CSSM, if applicable.

CSLU can be part of your implementation in the following ways:

  • Install the Windows or Linux application to use CSLU as a standalone tool that is connected to CSSM.

  • Install the Windows or Linux application to use CSLU as a standalone tool that is disconnected from CSSM. With this option, the required usage information is downloaded to a file and then uploaded to CSSM. This is suited for an air-gapped deployment approach.

For more information, see New Deployment Method for Smart Licensing.

SSM On-Prem

Smart Software Manager On-Prem (SSM On-Prem) is an asset manager, which works in conjunction with CSSM. It enables administering products and licenses on your premises instead of having to directly connect to CSSM. It incorporates functionalities from CSLU.

Information about the required software versions to implement SLP with SSM On-Prem, is provided below:

Minimum Required SSM On-Prem Version for SLP

Minimum Required Cisco MDS NX-OS Version

Version 8, Release 202108

Cisco MDS NX-OS Release 9.2(2)

For more information about SSM On-Prem, see Smart Software Manager On-Prem on the Software Download page. Hover over the .iso image to display the documentation links to the following guides:

  • Installation Guide: SSM On-Prem Installation Guide

  • Release Notes: Cisco Smart Software Manager On-Prem Release Notes

  • User Guide: Smart Software Manager On-Prem User Guide

  • Console Guide: Smart Software Manager On-Prem Console Reference Guide

  • Quick Start Guide: Smart Software Manager On-Prem Quick Start Installation Guide

Supported Topologies

This section describes the various ways in which SLP can be implemented. For each topology, refer to the accompanying overview to know how the setup is designed to work and refer to the considerations and recommendations, if any.

After Topology Selection

After a topology is selected, you can configure the SLP as per the listed procedure. These workflows are only for new deployments. They provide the simplest and fastest way to implement a topology.

For migrating from an existing licensing model, see Migrating to Smart Licensing Using Policy.

To perform any additional configuration tasks, for instance, to configure a different license, use an add-on license, or to configure a narrower reporting interval, see the Common Tasks for Configuring Smart Licensing Using Policy.

Choosing a Topology

Table 1 allows you to choose a topoplogy depending on your network deployment.

Table 2. Choosing a Topology

Topology

Recommendations

Topology 1: Connected to CSSM Through CSLU

Use this topology when you do not want the switches to be directly connected to CSSM. This topology will support only one SA/VA combination. You cannot view license consumption locally.

Topology 2: Connected Directly to CSSM

Use this topology when you have switches that are already registered to CSSM and need to continue in the same mode. If you need to continue using this topology after upgrading to SLP, then Smart Transport is the preferred transport method.

Topology 3: Connected to CSSM Through SSM On-Prem

Use this topology when you need to manage or view license consumption locally. You can also use multiple VA.

Topology 4: CSLU Disconnected from CSSM

Use this topology when you want to collect licensing information from a single source and when there is no connectivity to CSSM. You cannot view license consumption locally. Also, only a single VA can be used.

Topology 5: No Connectivity to CSSM and No CSLU

Use this topology when you want to collect licensing information from each switch in the network and when there is no connectivity to CSSM.

Topology 6: SSM On-Prem Disconnected from CSSM

Use this topology when you want to manage or view licenses from a single source. You can view license consumption locally. You can also use multiple VA combinations.

Topology 1: Connected to CSSM Through CSLU

Here, switches in the network are connected to CSLU, and CSLU becomes the single point of interface with CSSM. A switch can be configured to push the required information to CSLU.

Switch-initiated communication (push): A switch initiates communication with CSLU by connecting to a REST endpoint in CSLU. Data that is sent is unsecure and includes RUM reports.

Configure the switch to automatically send RUM reports to CSLU at required intervals. CSLU is the default method for a switch.

Figure 1. Topology: Connected to CSSM Through CSLU

SLP Configuration - Connected to CSSM Through CSLU Topology

Procedure

Step 1

CSLU Installation

Where task is performed: ISO image that you would download and deploy it as a VM as per your orchestration environment.

Download the file from Smart Software Manager > Smart Licensing Utility.

Refer to the Cisco Smart License Utility Quick Start Setup Guide for help with installation and setup.

Step 2

CSLU Preference Settings

Where tasks are performed: CSLU Interface

  1. Logging into Cisco (CSLU Interface)

  2. Configuring a Smart Account and a Virtual Account (CSLU Interface)

  3. Adding a Product-Initiated Product Instance in CSLU (CSLU Interface)

Step 3

Switch Configuration

Where tasks are performed: MDS Switch

  1. Ensuring Network Reachability for Product Instance-Initiated Communication.

  2. Ensure that transport type is set to cslu .

    CSLU is the default transport type. If a different option is configured, enter the license smart transport cslu command in global configuration mode. Save any changes to the configuration file.

    
    switch(config)# license smart transport cslu
    switch(config)# exit
    switch# copy running-config startup-config
    
  3. No action is required beyond basic configuration. Name server does not need to be configured in the network. Enter the ip host cslu-localcslu_ip command in global configuration mode. For cslu_ip enter the IP address of Windows or Linux host where CSLU is installed.

  4. Specify how CSLU is to be discovered (choose one):

    • Option1:

      No action required beyond basic configuration. Name server configured for zero-touch DNS discovery of cslu-local.

      The assumption here is that the name server (DNS) IP address is configured on the switch and the DNS server has an entry where hostname cslu-local is mapped to the CSLU IP address, then no further action is required. The switch automatically discovers hostname cslu-local.

    • Option2:

      No action required beyond basic configuration. Name server and domain configured for zero-touch DNS discovery of cslu-local.<domain>.

      The assumption here is that the name server (DNS) IP address is configured on the switch and the DNS server has an entry where cslu-local.<domain> is mapped to the CSLU IP address, then no further action is required. The switch automatically discovers hostname cslu-local.

    • Option3:

      Configure a specific URL for CSLU.

      Enter the license smart url cslu http://<cslu_ip_or_host>:8182/cslu/v1/pi command in global configuration mode. For <cslu_ip_or_host>, enter the hostname or the IP address of the Windows or Linux host where CSLU is installed. 8182 is the TCP port number and it is the only port number that CSLU uses.

      
      switch(config)# license smart url cslu http://192.168.0.1:8182/cslu/v1/pi
      switch(config)# exit
      switch# copy running-config startup-config
      

As the switch initiates communication, it automatically sends out the first RUM report at the scheduled time as per the policy. To know when the switch will be sending this information, enter the show license status command in privileged EXEC mode and check the date in the Next report push: field in the output.


switch# show license status
Utility:
    Status: DISABLED

Smart Licensing using Policy:
    Status: ENABLED

Data Privacy:
    Sending Hostname: yes
    Callhome Hostname Privacy: DISABLED
        Smart Licensing Hostname Privacy: DISABLED
    Version Privacy: DISABLED

Transport:
    Type: CSLU
    Cslu address: cslu-local

Policy:
    Policy in use: Merged from multiple sources
    Reporting ACK required: Yes
    Unenforced/Non-Export:
        First report requirement (days): 90 (CISCO default)
        Ongoing reporting frequency (days): 365 (CISCO default)
        On change reporting (days): 90 (CISCO default)
    Enforced (Pepertual/Subscription):
        First report requirement (days): 0 (CISCO default)
        Ongoing reporting frequency (days): 0 (CISCO default)
        On change reporting (days): 0 (CISCO default)
    Export (Perpetual/Subscription):
        First report requirement (days): 0 (CISCO default)
        Ongoing reporting frequency (days): 0 (CISCO default)
        On change reporting (days): 0 (CISCO default)

Miscellaneous:
    Custom Id: <empty>

Usage reporting:
    Last ACK received: <none>
    Next ACK deadline: Jan 12 08:39:14 2022 UTC
    Reporting push interval: 30 days
    Next ACK push check: <none>
    Next report push: Oct 14 10:20:48 2021 UTC
    Last report push: <none>
    Last report file write: <none>

Trust Code installed: <none>

CSLU forwards the information to CSSM and returns the acknowledgment from CSSM to the switch.

Topology 2: Connected Directly to CSSM

This method was available in the earlier version of Smart Licensing and remains supported with SLP.

Here, establish a direct and trusted connection from a switch to CSSM. The direct connection requires network reachability to CSSM. For the switch to then exchange messages and communicate with CSSM, configure one of the transport options available with this topology. Lastly, the establishment of trust requires the generation of a token from the corresponding Smart Account and Virtual Account in CSSM and installation on the switch.

You can configure a switch to communicate with CSSM in the following ways:

  • Use smart transport to communicate with CSSM (recommended)

    Smart transport is a transport method where a Smart Licensing (JSON) message is contained within an HTTPs message and exchanged between a switch and CSSM to communicate.

    The following smart transport configuration options are available:

    • Smart transport: In this method, a switch uses a specific smart transport licensing server URL. This must be configured exactly as shown in the workflow section.

    • Smart transport through an HTTPs proxy: In this method, a switch uses a proxy server to communicate with the licensing server and CSSM.

  • Use Call Home to communicate with CSSM.

    Call Home provides email-based and web-based notification of critical system events. This method of connecting to CSSM was available in the earlier Smart Licensing environment and remains available with SLP.

    The following Call Home configuration options are available:

    • Direct cloud access: In this method, a switch sends usage information directly over the Internet to CSSM; no additional components are needed for the connection.

    • Cloud access through an HTTPs proxy: In this method, a switch sends usage information over the Internet through a proxy server — either a Call Home Transport Gateway or an off-the-shelf proxy (such as Apache) to CSSM.

Figure 2. Topology: Connected Directly to CSSM

SLP Configuration - Connected Directly to CSSM Topology

Procedure

Step 1

Switch Configuration

Where tasks are performed: MDS Switch

  1. Set up switch connection to CSSM: Setting Up a Connection to CSSM.

  2. Configure a connection method and transport type (choose one):

    • Option1:

      Smart transport: Set the transport type to smart using the license smart transport smart command. Save any changes to the configuration file.

      
      switch(config)# license smart transport smart 
      switch(config)# license smart url smart https://smartreceiver.cisco.com/licservice/license
      switch(config)# copy running-config startup-config
      
    • Option2:

      Configure smart transport through an HTTPs proxy. See Configuring Smart Transport Through an HTTPs Proxy.

    • Option3:

      Configure Call Home service for direct cloud access. See Configuring the Call Home Service for Direct Cloud Access.

Step 2

Establishment of Trust with CSSM

Where task is performed: CSSM Web UI and then switch

  1. Generate one token for each Virtual Account. Use the same token for all the switches that are part of one Virtual Account: Generating a New Token for a Trust Code from CSSM.

  2. Having downloaded the token, install the trust code on the switch: Installing a Trust Code.


After establishing trust, CSSM returns a policy. The policy is automatically installed on all switches of that Virtual Account. The policy specifies if and how often the switch reports usage.

To change the reporting interval to report more frequently: on the switch, configure the license smart usage interval command.


switch# show license status
Utility:
    Status: DISABLED

Smart Licensing using Policy:
    Status: ENABLED

Data Privacy:
    Sending Hostname: yes
    Callhome Hostname Privacy: DISABLED
        Smart Licensing Hostname Privacy: DISABLED
    Version Privacy: DISABLED

Transport:
    Type: Smart  >>>>>>Mode
    URL: https://smartreceiver.cisco.com/licservice/license
    Proxy:
        Not configured

Policy:
    Policy in use: Merged from multiple sources
    Reporting ACK required: Yes
    Unenforced/Non-Export:
        First report requirement (days): 90 (CISCO default)
        Ongoing reporting frequency (days): 365 (CISCO default)
        On change reporting (days): 90 (CISCO default)
    Enforced (Perpetual/Subscription):
        First report requirement (days): 0 (CISCO default)
        Ongoing reporting frequency (days): 0 (CISCO default)
        On change reporting (days): 0 (CISCO default)
    Export (Perpetual/Subscription):
        First report requirement (days): 0 (CISCO default)
        Ongoing reporting frequency (days): 0 (CISCO default)
        On change reporting (days): 0 (CISCO default)

Miscellaneous:
    Custom Id: <empty>

Usage reporting:
    Last ACK received: <none>
    Next ACK deadline: Sep  8 09:16:32 2023  EST
    Reporting push interval: 30 days
    Next ACK push check: Jun 14 11:55:56 2023  EST
    Next report push: Jul 14 11:50:59 2023  EST
    Last report push: Jun 14 11:50:59 2023  EST
    Last report file write: <none>

Trust Code installed : Jun 14 11:49:17 2023  EST >>>>Trust code for PID
    Active: PID: DS-C9706, SN: FXS2250Q299
        Jun 14 11:49:17 2023  EST
    Standby: PID: DS-C9706, SN: FXS2250Q299
        Jun 14 11:49:17 2023  EST

Topology 3: Connected to CSSM Through SSM On-Prem


Note


When the SSM On-Prem server is associated with virtual account in CSSM, it will be required that all product instance registration tokens to be generated from their Smart Software On-Prem management interface.


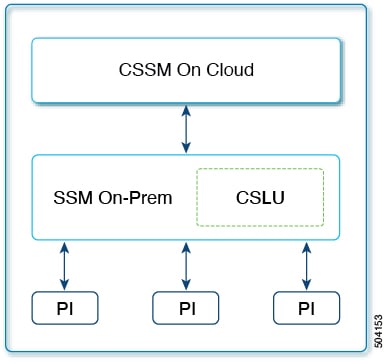
Here, switches in the network are connected to SSM On-Prem and SSM On-Prem becomes the single point of interface with CSSM. You can also configure the switch to push the required information to SSM On-Prem.

Switch-initiated communication (push): A switch initiates communication with CSSM by connecting to a REST endpoint in SSM On-Prem. Data that is sent includes RUM reports. Configure the switch to automatically send RUM reports to SSM On-Prem at required intervals.

Figure 3. Topology: Connected to SSM On-Prem Through CSSM

SLP Configuration - Connected to CSSM Through SSM On-Prem Topology


Note


If the switch is registered On-Prem with pre-SLP release, the transport mode will change to CSLU after the migration. Also, the CSLU URL will be populated on the switch from OnPrem CSLU tenant ID. Ensure that the configuration is saved using the copy running-config startup-config command.


Procedure

Step 1

SSM On-Prem Installation

Where task is performed: ISO image that you would download and deploy it as a VM as per your orchestration environment.

Download the file from Smart Software Manager > Smart Licensing Utility.

Refer to the Cisco Smart License Utility Quick Start Setup Guide for help with installation and setup.

Step 2

SSM On-Prem Preference Settings

Where tasks are performed: SSM On-Prem

  1. Logging into Cisco (SSM On-Prem Interface)

  2. Configuring a Smart Account and a Virtual Account

  3. Adding a Product Instances in CSLU

Step 3

Switch Configuration

Where tasks are performed: MDS Switch

  1. Ensure that transport type is set to cslu .

    CSLU is the default transport type. If a different option is configured, enter the license smart transport cslu command in global configuration mode. Save any changes to the configuration file.

    
    switch(config)# license smart transport cslu
    switch(config)# exit
    switch# copy running-config startup-config
    
  2. Specify how SSM On-Prem is to be discovered (choose one):

    Configure a specific URL for SSM On-Prem. If SSM On-Prem was previously configured, then the URL is automatically configured. Otherwise, copy the URL from SSM On-Prem and configure the URL.

    Enter the license smart url cslu http://<ssm_on_prem_ip_or_host>/cslu/v1/pi/<Tenant_ID> , command in global configuration mode. This command can be obtained by the following:

    • Log into SSM On-prem web interface.

    • Select the correct Account Name.

    • Go to Smart Licensing >> Inventory

    • Under the General tab, click on "CSLU Transport URL" and copy the URL

    For <ssm_on_prem_ip_or_host>, enter the hostname or the IP address of the Windows or Linux host where SSM On-Prem is installed.

    
    switch(config)# license smart url cslu http://192.168.0.1/cslu/v1/pi/<Tenant_ID>
    switch(config)# exit
    switch# copy running-config startup-config
    

Since the switch initiates communication, it automatically sends out the first RUM report at the scheduled time, as per the policy. To know when the switch will be sending this information, enter the show license all command in privileged EXEC mode and check the date in the Next report push: field in the output.

SSM On-Prem forwards the information to CSSM and returns acknowledgment from CSSM to the switch .


switch# show license status
Utility:
    Status: DISABLED

Smart Licensing using Policy:
    Status: ENABLED

Data Privacy:
    Sending Hostname: yes
    Callhome Hostname Privacy: DISABLED
        Smart Licensing Hostname Privacy: DISABLED
    Version Privacy: DISABLED

Transport:
    Type: CSLU
    Cslu address: https://Cisco_SSM_OnPrem/cslu/v1/pi/SSM-On-Prem-92-1

Policy:
    Policy in use: Merged from multiple sources
    Reporting ACK required: Yes
    Unenforced/Non-Export:
        First report requirement (days): 90 (CISCO default)
        Ongoing reporting frequency (days): 365 (CISCO default)
        On change reporting (days): 90 (CISCO default)
    Enforced (Pepertual/Subscription):
        First report requirement (days): 0 (CISCO default)
        Ongoing reporting frequency (days): 0 (CISCO default)
        On change reporting (days): 0 (CISCO default)
    Export (Perpetual/Subscription):
        First report requirement (days): 0 (CISCO default)
        Ongoing reporting frequency (days): 0 (CISCO default)
        On change reporting (days): 0 (CISCO default)

Miscellaneous:
    Custom Id: <empty>

Usage reporting:
    Last ACK received: <none>
    Next ACK deadline: Jul 5 13:17:21 2022 UTC
    Reporting push interval: 30 days
    Next ACK push check: <none>
    Next report push: May 6 13:24:44 2022 UTC
    Last report push: Apr 6 13:24:44 2022 UTC
    Last report file write: <none>

Trust Code installed: <none>

Topology 4: CSLU Disconnected from CSSM

The CSLU utility is installed on-premises and the switches communicate with it. The other side of the communication, between CSLU and CSSM, is offline. In fact, CSLU provides the option of working in a mode that is disconnected from CSSM.

Communication between CSLU and CSSM is sent and received in the form of signed files (xml) that are saved offline and then uploaded to or downloaded from CSLU or CSSM.

Figure 4. Topology: CSLU Disconnected from CSSM

SLP Configuration - CSLU Disconnected from CSSM Topology

Procedure

Step 1

CSLU Installation

Where task is performed: ISO image that you would download and deploy it as a VM as per your orchestration environment.

Download the file from Smart Software Manager > Smart Licensing Utility.

Refer to the Cisco Smart License Utility Quick Start Setup Guide for help with installation and setup.

Step 2

CSLU Preference Settings

Where tasks are performed: CSLU Interface

  1. In the CSLU Preferences tab, click the Cisco Connectivity toggle switch to off. The field switches to Cisco Is Not Available.

  2. Configuring a Smart Account and a Virtual Account

  3. Adding a Product Instances in CSLU

Step 3

Switch Configuration

Where tasks are performed: MDS Switch

  1. Ensuring Network Reachability for Product Instance Initiated Communication.

  2. Ensure that transport type is set to cslu .

    CSLU is the default transport type. If a different option is configured, enter the license smart transport cslu command in global configuration mode. Save any changes to the configuration file.

    
    switch(config)# license smart transport cslu
    switch(config)# exit
    switch# copy running-config startup-config
    
  3. Specify how CSLU is to be discovered (choose one):

    Configure a specific URL for CSLU.

    Enter the license smart url cslu http://<cslu_ip_or_host>:8182/cslu/v1/pi command in global configuration mode. For <cslu_ip_or_host>, enter the hostname or the IP address of the Windows or Linux host where CSLU is installed. 8182 is the port number and it is the only port number that CSLU uses.

    
    switch(config)# license smart url cslu http://192.168.0.1:8182/cslu/v1/pi
    switch(config)# exit
    switch# copy running-config startup-config
    

Step 4

Download and upload PIs from a file. You can also choose a single or multiple PIs.

Where tasks are performed: CSLU and CSSM

  1. Export CSV (CSLU Interface)

  2. Uploading Usage Data to CSSM and Downloading an ACK

  3. Import CSV (CSLU Interface)


As the switch initiates communication, it automatically sends out the first RUM report at the scheduled time, as per the policy. To know when the switch will be sending this information, enter the show license status command in EXEC mode and check the date in the Next report push: field in the output.


switch# show license status
Utility:
    Status: DISABLED

Smart Licensing using Policy:
    Status: ENABLED

Data Privacy:
    Sending Hostname: yes
    Callhome Hostname Privacy: DISABLED
        Smart Licensing Hostname Privacy: DISABLED
    Version Privacy: DISABLED

Transport:
    Type: CSLU
    Cslu address: cslu-local

Policy:
    Policy in use: Merged from multiple sources
    Reporting ACK required: Yes
    Unenforced/Non-Export:
        First report requirement (days): 90 (CISCO default)
        Ongoing reporting frequency (days): 365 (CISCO default)
        On change reporting (days): 90 (CISCO default)
    Enforced (Pepertual/Subscription):
        First report requirement (days): 0 (CISCO default)
        Ongoing reporting frequency (days): 0 (CISCO default)
        On change reporting (days): 0 (CISCO default)
    Export (Perpetual/Subscription):
        First report requirement (days): 0 (CISCO default)
        Ongoing reporting frequency (days): 0 (CISCO default)
        On change reporting (days): 0 (CISCO default)

Miscellaneous:
    Custom Id: <empty>

Usage reporting:
    Last ACK received: <none>
    Next ACK deadline: Jan 12 08:39:14 2022 UTC
    Reporting push interval: 30 days
    Next ACK push check: <none>
    Next report push: Oct 14 10:20:48 2021 UTC
    Last report push: <none>
    Last report file write: <none>

Trust Code installed: <none>

As the CSLU is disconnected from CSSM, save usage data which CSLU has collected from the switch to a file. Then, from a workstation that is connected to Cisco, upload it to CSSM. After this, download the acknowledgment from CSSM. In the workstation where CSLU is installed and connected to the switch, upload the file to CSLU which will then push the acknowledgment to all the switches.

Topology 5: No Connectivity to CSSM and No CSLU

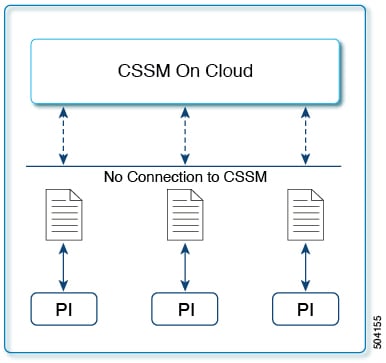
Here we have a switch and CSSM disconnected from each other without any other intermediary CSLU or components. All communication is in the form of uploaded and downloaded files.

Figure 5. Topology: No Connectivity to CSSM and No CSLU

SLP Configuration - No Connectivity to CSSM and No CSLU Topology

Procedure

Switch Configuration

Where task is performed: MDS Switch. Set transport type to off.

Enter the license smart transport off command in global configuration mode. Save any changes to the configuration file.


switch(config)# license smart transport off
switch(config)# exit
switch# copy running-config startup-config

All communication to and from the switch is disabled. To report license usage, save RUM reports to a file (on your switch ) and upload it to CSSM (from a workstation that has connectivity to the internet and Cisco):

  1. Generate and save RUM reports

    Enter the license smart save usage command in privileged EXEC mode if you have any features enabled. In the following example, all RUM reports are saved to the flash memory of the switch , in the all_rum.txt file. In the example, the file is first saved to the bootflash and then copied to a TFTP location:

    
    switch# license smart save usage all bootflash:all_rum.txt
    switch# copy bootflash:all_rum.txt tftp://10.8.0.6/all_rum.txt
    
  2. Upload usage data to CSSM: Uploading Usage Data to CSSM and Downloading an ACK.

  3. Install the acknowledgment on the switch: Installing a File on the Switch.

Topology 6: SSM On-Prem Disconnected from CSSM

Here, a switch communicates with SSM On-Prem and the switch-initiated communication must be implemented. The other side of the communication, between SSM On-Prem and CSSM, is offline. SSM On-Prem provides the option of working in a mode that is disconnected from CSSM.

Communication between SSM On-Prem and CSSM is sent and received in the form of signed files (xml) that are saved offline and then uploaded to or downloaded from SSM On-Prem or CSSM.

Figure 6. Topology: SSM On-Prem Disconnected from CSSM

SLP Configuration - SSM On-Prem Disconnected from CSSM Topology


Note


If the switch is registered On-Prem with pre-SLP release, the transport mode will change to CSLU after migration. Ensure to save the configuration using the copy running-config startup-config command.


Procedure

Step 1

SSM On-Prem Installation

Where task is performed: ISO image that you would download and deploy it as a VM as per your orchestration environment.

Download the file from Smart Software Manager > Smart Software Manager On-Prem.

Refer to the Smart Software Manager On-Prem Installation Guide for help with installation and setup.

Step 2

Switch Configuration

Where tasks are performed: MDS Switch

  1. Ensuring Network Reachability for Product Instance Initiated Communication.

  2. Ensure that transport type is set to cslu .

    CSLU is the default transport type. If a different option is configured, enter the license smart transport cslu command in global configuration mode. Save any changes to the configuration file.

    
    switch(config)# license smart transport cslu
    switch(config)# exit
    switch# copy running-config startup-config
    
  3. Configure the SSM On-Prem URL. Login to the SSM On-Prem. Click Inventory > General. Then, click CSLU Transport URL to copy the URL.

    Enter the license smart url cslu http://<ssm_on_prem_ip_or_host>/cslu/v1/pi/<Tenant_ID> command in global configuration mode. This command can be obtained by the following:

    • Log into SSM On-prem web interface.

    • Select the correct Account Name.

    • Go to Smart Licensing >> Inventory

    • Under the General tab, click on "CSLU Transport URL" and copy the URL

    For <ssm_on_prem_ip_or_host>, enter the hostname or the IP address of the Windows or Linux host where SSM On-Prem is installed.

    
    switch(config)# license smart url cslu http://192.168.0.1/cslu/v1/pi/<Tenant_ID>
    switch(config)# exit
    switch# copy running-config startup-config
    

Step 3

Download and upload PIs from a file. Login to the SSM On-Prem. Click Inventory > Product Instances > Export Usage to Cisco or Import From Cisco.

Where tasks are performed: CSLU and CSSM

  1. Export CSV (CSLU Interface)

  2. Uploading Usage Data to CSSM and Downloading an ACK


Since the switch initiates communication, it automatically sends out the first RUM report at the scheduled time, as per the policy. To know when the switch will be sending this information, enter the show license all command in privileged EXEC mode check the date in the Next report push: field in the output.

Since SSM On-Prem is disconnected from CSSM, save usage data which SSM On-Prem has collected from the switch to a file. Then, from a workstation that is connected to Cisco, upload it to CSSM. After this, download the acknowledgment from CSSM. In the workstation where SSM On-Prem is installed and connected to the switch, upload the file to SSM On-Prem.

Enforced Licensing (Port Licensing)

Enforced licensing prevents a feature from being used without first obtaining a license. Ports on Cisco MDS 9000 Series switches use enforced licensing and will require authorization before using them in SLP. Use the instructions in this section to migrate existing licenses to SLP. For more information about enforced licenses, see the "Licensing Cisco MDS 9000 Series NX-OS Software Features" chapter in Cisco MDS 9000 Series Licensing Guide, Release 9.x.

Port Licensing Verification

Port licensing is available for the ports used in Cisco MDS 9000 switches. The following table describes the default port licenses for the ports.

Table 3. Default Port License
Platform Default Port license

9396V

48

9124V

8

9148V

24

9148S

12

9250i

20

9220i

FC Port 4, IPS Port 2

9396S

48

9132T

8

9148T

24

9396T

48

Port licensing is verified using the following commands:
  • show license default

  • show license usage

  • show port-license

  • show license version

  • show license brief

Command Output
switch# show license default
Feature                               Default License Count
PORT_ACTIV_9396T_PKG                  48
switch# show license usage
License Authorization:
  Status: Not Applicable

(PORT_ACTIV_9396T_PKG):
  Description: MDS 9396T 32G 16 port-activation
  Count: 48
  Version: 1.0
  Status: IN USE
  Enforcement Type: ENFORCED
  License Type: Enforced
switch# show port-license
 Available port activation licenses are 0
-----------------------------------------------
  Interface   Cookie    Port Activation License
-----------------------------------------------
  fc1/1       16777216        acquired
  fc1/2       16781312        acquired
  fc1/3       16785408        acquired
  fc1/4       16789504        acquired
  fc1/5       16793600        acquired
  fc1/6       16797696        acquired
  fc1/7       16801792        acquired
  fc1/8       16805888        acquired
  fc1/9       16809984        acquired
  fc1/10      16814080        acquired
  fc1/11      16818176        acquired
  fc1/12      16822272        acquired
  fc1/13      16826368        acquired
  fc1/14      16830464        acquired
  fc1/15      16834560        acquired
  fc1/16      16838656        acquired
  fc1/17      16842752        acquired
  fc1/18      16846848        acquired
  fc1/19      16850944        acquired
  fc1/20      16855040        acquired
  fc1/21      16859136        acquired
  fc1/22      16863232        acquired
  fc1/23      16867328        acquired
  fc1/24      16871424        acquired
  fc1/25      16875520        acquired
  fc1/26      16879616        acquired
  fc1/27      16883712        acquired
  fc1/28      16887808        acquired
  fc1/29      16891904        acquired
  fc1/30      16896000        acquired
  fc1/31      16900096        acquired
  fc1/32      16904192        acquired
  fc1/33      16908288        acquired
  fc1/34      16912384        acquired
  fc1/35      16916480        acquired
  fc1/36      16920576        acquired
  fc1/37      16924672        acquired
  fc1/38      16928768        acquired
  fc1/39      16932864        acquired
  fc1/40      16936960        acquired
  fc1/41      16941056        acquired
  fc1/42      16945152        acquired
  fc1/43      16949248        acquired
  fc1/44      16953344        acquired
  fc1/45      16957440        acquired
  fc1/46      16961536        acquired
  fc1/47      16965632        acquired
  fc1/48      16969728        acquired
  fc1/49      16973824        acquired
  fc1/50      16977920        acquired
  fc1/51      16982016        acquired
  fc1/52      16986112        acquired
  fc1/53      16990208        acquired
  fc1/54      16994304        acquired
  fc1/55      16998400        acquired
  fc1/56      17002496        acquired
  fc1/57      17006592        acquired
  fc1/58      17010688        acquired
  fc1/59      17014784        acquired
  fc1/60      17018880        acquired
  fc1/61      17022976        acquired
  fc1/62      17027072        acquired
  fc1/63      17031168        acquired
  fc1/64      17035264        acquired
  fc1/65      17039360        acquired
  fc1/66      17043456        acquired
  fc1/67      17047552        acquired
  fc1/68      17051648        acquired
  fc1/69      17055744        acquired
  fc1/70      17059840        acquired
  fc1/71      17063936        acquired
  fc1/72      17068032        acquired
  fc1/73      17072128        acquired
  fc1/74      17076224        acquired
  fc1/75      17080320        acquired
  fc1/76      17084416        acquired
  fc1/77      17088512        acquired
  fc1/78      17092608        acquired
  fc1/79      17096704        acquired
  fc1/80      17100800        acquired
  fc1/81      17104896        acquired
  fc1/82      17108992        acquired
  fc1/83      17113088        acquired
  fc1/84      17117184        acquired
  fc1/85      17121280        acquired
  fc1/86      17125376        acquired
  fc1/87      17129472        acquired
  fc1/88      17133568        acquired
  fc1/89      17137664        acquired
  fc1/90      17141760        acquired
  fc1/91      17145856        acquired
  fc1/92      17149952        acquired
  fc1/93      17154048        acquired
  fc1/94      17158144        acquired
  fc1/95      17162240        acquired
  fc1/96      17166336        acquired
switch# show license version
Smart Agent for Licensing: 5.5.19_rel/83
switch# show license brief
Status Legend:
u - unenforced, 
e - enforced
d - platform default, 
f - factory installed SLP license,
p - converted from PAK, 
s - migrated from Smart Licensing,
a - installed using SLP, 
h - honored (pending SLP authorization)
General Legend:
NA - not applicable
-----------------------------------------------------------------------------------------
License Port
License Name Count Count Used Status
-----------------------------------------------------------------------------------------
DCNM SAN Adv. Features for MDS 9300 Switch based (FM-SERVER) 1 NA 0 pu
DCNM for SAN Adv License for MDS9300 (DCNM-SAN) 1 NA 1 u
MDS 9300 series Enterprise package 1 NA 1 pu
MDS 9396T 32G 16 port activation NA 48 48 d
MDS 9396T 32G 16 port activation 2 32 5 ae
SAN Analytics 1 NA 1 pu

Generating Authorization Code in Online Mode- CSLU/Smart Transport/Callhome

Authorization code for your license is generated in online mode and installed on your switch for use. You will need to request for the authorization code from a switch for a specific port license of a specific port-block size depending on the type of switch. Then, CSSM will receive the authorization request, generate the authorization code, and install the returned code on the switch automatically. You can use the show license authorizations command to verify the installation of the requested licenses and view the authorization code under the Last Confirmation code: field in the output.

Use the license smart authorization request {add | replace} port-feature {local | all} count port-range command to enable ports or replace the existing authorization code.


Note


  • Use the add option to install authorization code for the first time.

  • Use the replace option to increase authorization code to enable new ports.


The count port-range value will depend on the type of deployment:

  • Greenfield deployment: This value is the sum of installed authorization code and new ports that needs to be enabled.

  • PAK license: This value is the sum of PAK license count and new ports that needs to be enabled.

  • SL 1.0 license: This value is the sum of ports that are enabled without the authorization code and new ports that needs to be enabled.

Port count can only be in multiples of block size. Table 1 provide the block size for different MDS switches.

Table 4. Port Count for Switches

Switch

Block Size Count

Cisco MDS 9148V

8

Cisco MDS 9124V

8

Cisco MDS 9148S

12

Cisco MDS 9250i

20

Cisco MDS 9220i

12

Cisco MDS 9132T

8

Cisco MDS 9148T

8

Cisco MDS 9396S

12

Cisco MDS 9396T

16

Greenfield Deployment

Authorization code will be generated, and licenses will be factory-installed. Your switch will be shipped with the required licenses installed.

The following example displays how to request authorization code to activate 16 ports in greenfield deployment:


switch# configure t
Enter configuration commands, one per line.  End with CNTL/Z.
switch(config)# license smart authorization  request add PORT_ACTIV_9148T_PKG all count 9
Request is being sent for 16 ports(in multiples of 8)
Initiated authorization request with backend. run 'show license authorizations', for request status
switch(config)# show license authorizations
Overall status:
  Active: PID:DS-C9148T-K9,SN:JPG220700PY
      Status: SMART AUTHORIZATION INSTALLED on Jan 11 2022 10:15:31 UTC
      Last Confirmation code: 9d60e04c

Authorizations:
  MDS 9148T 32G FC switch 8-port upgrade license (MDS_9148T_8P):
    Description: MDS 9148T 32G FC switch 8-port upgrade license
    Total available count: 16
    Enforcement type: ENFORCED
    Term information:
      Active: PID:DS-C9148T-K9,SN:JPG220700PY
        Authorization type: SMART AUTHORIZATION INSTALLED 
        License type: PERPETUAL
          Term Count: 16

Purchased Licenses:
  No Purchase Information Available


Note


In this example, the port count is 9 but the request is sent for 16 ports. This is because the port count can only be in multiples of the block size.


Brownfield Deployment

Migrating from PAK Licenses

Previously installed license will continue to be usable. The PAK licenses will be automatically converted to Smart Licensing entitlement tags and will be added to your SA/VA. To enable more ports than the PAK based license, authorization code needs to be installed.

The following example displays how to request authorization code to activate 12 ports after migrating from PAK license:


switch# show license authorizations 

Overall status:
  Active: PID:DS-C9148T-K9,SN:XXX22020071
      Status: NOT INSTALLED
      Status:PAK

Legacy License Info:
  regid.2018-04.com.cisco.MDS_9148T_8P,1.0_c2a52df2-b5a0-49eb-896f-36a46c203d89: 
    DisplayName: PORT_ACTIV_9148T_PKG
    Description: MDS 9148T 32G FC switch 8-port upgrade license
    Total available count: 8
    Term information:
      Active: PID:DS-C9148T-K9,SN:XXX22020071
        License type: PERPETUAL
          Term Count: 8

Purchased Licenses:
  No Purchase Information Available

switch# configure t
switch(config)# license smart authorization request replace PORT_ACTIV_9148T_PKG all count 16
Request is being sent for 16 ports(in multiples of 8)
Initiated authorization request with backend. run 'show license authorizations', for request status
switch(config)# show license authorizations 

Overall status:
  Active: PID:DS-C9148T-K9,SN:XXX22020071
      Status: SMART AUTHORIZATION INSTALLED on Jan 11 2022 13:40:18 UTC
      Last Confirmation code: 13ff57a7
      Status:PAK

Authorizations:
  MDS 9148T 32G FC switch 8-port upgrade license (MDS_9148T_8P):
    Description: MDS 9148T 32G FC switch 8-port upgrade license
    Total available count: 16
    Enforcement type: ENFORCED
    Term information:
      Active: PID:DS-C9148T-K9,SN:XXX22020071
        Authorization type: SMART AUTHORIZATION INSTALLED 
        License type: PERPETUAL
          Term Count: 16

Legacy License Info:
  regid.2018-04.com.cisco.MDS_9148T_8P,1.0_c2a52df2-b5a0-49eb-896f-36a46c203d89: 
    DisplayName: PORT_ACTIV_9148T_PKG
    Description: MDS 9148T 32G FC switch 8-port upgrade license
    Total available count: 8
    Term information:
      Active: PID:DS-C9148T-K9,SN:XXX22020071
        License type: PERPETUAL
          Term Count: 8

Purchased Licenses:
  No Purchase Information Available


Migration from SL 1.0 License

The ports that were enabled in prior to the migration will continue to work. The request for authorization code will be sent for the existing enabled ports after 10 minutes of migration. If the authorization code is not installed for the existing enabled ports, a weekly syslog will be generated to alert the same.

The following example displays how to request authorization code to activate 16 ports after migrating from SL 1.0 license:


switch# show license authorizations 

Overall status:
  Active: PID:DS-C9148T-K9,SN:XXX22020071
      Status: SMART AUTHORIZATION INSTALLED on Jan 11 2022 15:13:27 UTC
      Last Confirmation code: 6b60deef

Authorizations:
  MDS 9148T 32G FC switch 8-port upgrade license (MDS_9148T_8P):
    Description: MDS 9148T 32G FC switch 8-port upgrade license
    Total available count: 8
    Enforcement type: ENFORCED
    Term information:
      Active: PID:DS-C9148T-K9,SN:XXX22020071
        Authorization type: SMART AUTHORIZATION INSTALLED 
        License type: PERPETUAL
          Term Count: 8

Purchased Licenses:
  No Purchase Information Available

switch# configure t
switch(config)# license smart authorization request replace PORT_ACTIV_9148T_PKG all count 16
Request is being sent for 16 ports(in multiples of 8)
Initiated authorization request with backend. run 'show license authorizations', for request status

switch(config)# show license authorizations 

Overall status:
  Active: PID:DS-C9148T-K9,SN:XXX22020071
      Status: SMART AUTHORIZATION INSTALLED on Jan 11 2022 15:18:17 UTC
      Last Confirmation code: bd3f5056

Authorizations:
  MDS 9148T 32G FC switch 8-port upgrade license (MDS_9148T_8P):
    Description: MDS 9148T 32G FC switch 8-port upgrade license
    Total available count: 16
    Enforcement type: ENFORCED
    Term information:
      Active: PID:DS-C9148T-K9,SN:XXX22020071
        Authorization type: SMART AUTHORIZATION INSTALLED 
        License type: PERPETUAL
          Term Count: 16

Purchased Licenses:
  No Purchase Information Available

Generating Authorization Code in Online Mode with SSM On-Prem

You need to first add the switch to product instance (PI) inventory on SSM On-Prem, if not already added earlier.

switch# license smart sync all

Run this command on the switch after the license URL is correctly configured for your SSM On-Prem. Perform the following steps to generate authorization code in online mode with SSM On-Prem.

  1. Generate authorization code on CSSM for the PI and required number of licenses Make sure that you always use the actual number of ports for which the license is needed. The port count can only be in multiples of block size. It will usually be the sum of existing authorized port count plus the new ports that needs to be enabled.

    switch# license smart authorization request {add | replace} port-feature {local | all} count port-range
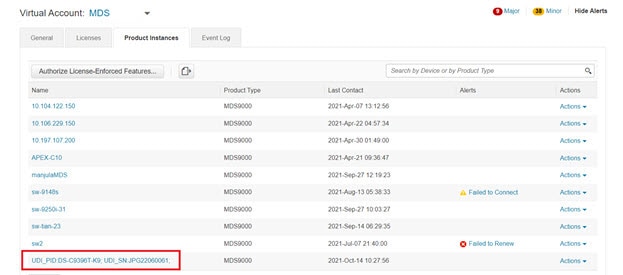
  2. Login to CSSM → Inventory → select VA → PI tab → Authorize License-Enforced Features

  3. Save the generated authorization code as a file.

  4. Import the generated authorization code to SSM On-Prem.

  5. Login to SSM On-Prem → Smart Licensing → Inventory → SL Using Policy → Export/Import All → Import from Cisco and import the file saved in step-3.

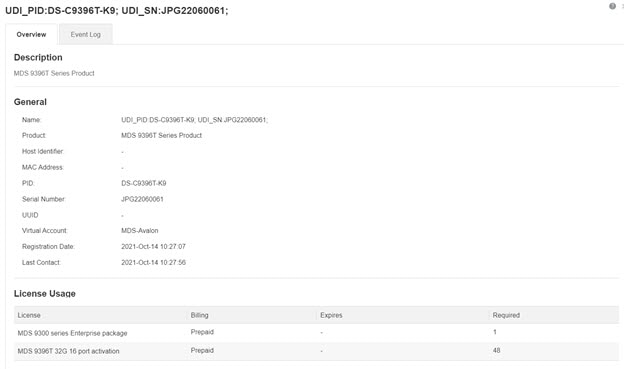
  6. Check that you received the code correctly (status for PI displays "Authorization message received from CSSM")

  7. Initiate authorization request from the switch. For example:

    license smart authorization request add PORT_ACTIV_9396T_PKG all count 16
  8. Verify that you have received the authorization using show license authorization command.

  9. Once the Authorization Code is installed, PI will send the authorization confirmation code (Last Confirmation code) to the SSM On-Prem to complete the reservation.

Generating Authorization Code in Offline Mode

Previously installed licenses will not be automatically converted. The license will be converted only after the first usage is reported manually to CSSM.

To generate authorization code in offline mode, perform these steps:

Procedure


Step 1

Log in to the CSSM Web UI at https://software.cisco.com/software/smart-licensing/alerts.

Step 2

Click Inventory > Product Instances > Authorize License-Enforced Features.

Step 3

In the Enter Request Code section, select the Single Device option from the drop-down option if it is not already selected.

Step 4

Enter the Serial Number and PID information of your switch and click Next. You will only need to provide the serial number and PID information and need not provide other information on this pane.

The Serial Number and PID information can be viewed using the show license udi command on your switch or PI.

Step 5

In the Selected Licenses section, enter the number of licenses (multiples of block size) under Reserve for the appropriate switch and click Next.

Step 6

Select a Device Type and click Continue.

Step 7

Click Generate Authorization Code.

Step 8

Click Download as File to save the code.

Step 9

Copy the authorization code to the bootflash of your switch.

Step 10

Use the license smart import command to import the authorization code on your switch.


switch# configure t
switch(config)# license smart import bootflash:authcode.txt
Done smart import.

switch(config)# show license authorizations 

Overall status:
  Active: PID:DS-C9148T-K9,SN:XXX253900X6
      Status: SMART AUTHORIZATION INSTALLED on Apr 18 2017 22:29:18 UTC
      Last Confirmation code: xxxxxxxx
      Status:PAK

Authorizations:
  MDS 9148T 32G FC 8 port activation (MDS_9148T_8P):
    Description: MDS 9148T 32G FC 8 port activation
    Total available count: 8
    Enforcement type: ENFORCED
    Term information:
      Active: PID:DS-C9148T-K9,SN:XXX253900X6
        Authorization type: SMART AUTHORIZATION INSTALLED 

Step 11

Get the confirmation code from previous step and update the CSSM portal under Inventory > Product Instances (click on the respective product instance) and then click Action > Enter Confirmation Code at the bottom.

Note


This step is necessary only if the portal indicates an incomplete registration.


Common Tasks for Configuring Smart Licensing Using Policy

This section includes the common tasks that are performed on a switch, on the CSLU interface, and on the CSSM Web UI when configuring SLP.

To implement a particular topology, refer to the corresponding workflow to know the sequential order of tasks that apply.

To perform any additional configuration tasks, for instance, to configure a different license, or use an add-on license, or to configure a narrower reporting interval, refer to the corresponding task. Check the Supported Topologies before you proceed.

Logging into Cisco (SSM On-Prem Interface)

Depending on your needs, when working in SSM On-Prem, either be in connected or disconnected mode. To work in the connected mode, perform these steps to connect to Cisco.

Procedure


Step 1

Go to https://software.cisco.com/download/home/286285506/type/286326948/release/.

Step 2

Click the appropriate release.

Step 3

Under the Related Links and Documentation section, click User Guide.

Step 4

View the "Logging into Cisco SSM On-Prem" section.


Configuring a Smart Account and a Virtual Account

Both the Smart Account and Virtual Account are configured through the Preferences tab. Complete the following steps to configure both the Smart and Virtual Accounts for connecting to Cisco.

Procedure


Step 1

Select the Preferences tab from the CSLU home screen.

Step 2

Perform the following steps for adding both a Smart Account and Virtual Account:

  1. In the Preferences window, navigate to the Smart Account field and add a Smart Account Name.

  2. Next, navigate to the Virtual Account field and add a Virtual Account Name.

    Note


    Virtual Account Name is case-sensitive.

If CSSM is connected (in the Preferences tab, Cisco is Available), select from the list of available Smart Accounts and Virtual Accounts.

If CSSM is not connected (in the Preferences tab, Cisco Is Not Available), enter the SAs/VAs manually.

Step 3

Click Save. The SA/VA accounts are saved to the system.

Only one SA/VA pair can reside on CSLU at a time. Multiple accounts cannot be added. To change to another SA/VA pair, repeat Steps 2a and 2b and then Save. A new SA/VA account pair replaces the previously saved pair.


Ensuring Network Reachability for Product Instance Initiated Communication

This task provides possible configurations that may be required to ensure network reachability for switch-initiated communication. Steps marked as (Required) are required for all switches and all other steps may be required or optional depending on the kind of switch and network requirements. Configure the applicable commands.

Before you begin

Supported topologies: Connected to CSSM Through CSLU (switch-initiated communication).

Procedure

Ensure that CSLU is reachable from switch. For more information, see SLP Configuration - Connected to CSSM Through CSLU Topology.

Configuring Smart Transport Through an HTTPs Proxy

To use a proxy server to communicate with CSSM when using the smart transport mode, perform these steps:


Note


Authenticated HTTPs proxy configurations are not supported.


Procedure


Step 1

Enter global configuration mode:

Device# configure terminal

Step 2

Enable smart transport mode:

switch(config)# license smart transport smart

Step 3

Perform this step only when HTTPS proxy is used in the network:

switch(config)# license smart proxy {address address_hostname | port port_num}

Configures a proxy for the smart transport mode. When a proxy is configured, licensing messages are sent to the proxy along with the final destination URL (CSSM). The proxy sends the message on to CSSM. Provide the address and port information:

  • address address_hostname : Specifies the proxy address. Enter the IP address or hostname of the proxy server.

  • port port_num : Specifies the proxy port. Enter the proxy port number.

Step 4

Exit global configuration mode and return to EXEC mode:

switch(config)# exit

Step 5

Save your entries in the configuration file:

switch# copy running-config startup-config


Configuring the Call Home Service for Direct Cloud Access

Make sure that Smart Call Home is enabled on the switch before configuring Smart Software Licensing.

Configuring a DNS Client

Before you begin

Make sure that the name server is reachable before configuring a DNS client.

Procedure


Step 1

Enter global configuration mode:

switch# configure terminal

Step 2

Enable DNS-based address translation:

switch(config)# ip domain-lookup

Step 3

Enable the default domain name feature used to complete unqualified host names:

switch(config)# ip domain-name name

Any IP host name that does not contain a domain name (that is, any name without a dot) will have the dot and the confoigured domain name appended to it before being added to the host table.

Step 4

Define a list of default domain names to complete unqualified host names:

switch(config)# ip domain-list domain-name

You can define up to 10 domain names in this list.

Step 5

Specify the first address as the primary server and the second address as the secondary server:

switch(config)# ip name-server ip-address

You can configure a maximum of six servers.


Viewing a Smart Call Home Profile

Procedure


Display the Smart Call Home profile:

switch# show running-config callhome


Removing the Switch from CSSM

To remove a switch and return all licenses to the license pool, perform these steps:

Before you begin

Supported topologies: all

Procedure


Step 1

Log in to the CSSM Web UI at https://software.cisco.com/software/smart-licensing/alerts.

Log in using the username and password provided by Cisco.

Step 2

Click the Inventory tab.

Step 3

From the Virtual Account drop-down list, choose your Virtual Account.

Step 4

Click the Product Instances tab.

The list of switches that are available is displayed.

Step 5

Locate the required switch from the switches list. Optionally, enter a name or product type string in the search tab to locate the switch.

Step 6

In the Actions column of the switch to be removed, click the Remove link.

Step 7

Click Remove Product Instance.

Step 8

The license is returned to the license pool and the switch is removed.


Generating a New Token for a Trust Code from CSSM

To generate a token to request a trust code, perform these steps.

Generate one token for each Virtual Account. Use the same token for all the switches that are part of one Virtual Account.

Before you begin

Supported topologies: Connected Directly to CSSM

Procedure


Step 1

Log in to the CSSM Web UI at https://software.cisco.com/software/smart-licensing/alerts.

Log in using the username and password that is provided by Cisco.

Step 2

Click the Inventory tab.

Step 3

From the Virtual Account drop-down list, choose the required virtual account.

Step 4

Click the General tab.

Step 5

Click New Token. The Create Registration Token window is displayed.

Step 6

In the Description field, enter the token description.

Step 7

In the Expire After field, enter the number of days the token must be active.

Step 8

(Optional) In the Max. Number of Uses field, enter the maximum number of uses allowed after which the token expires.

Step 9

Click Create Token.

Step 10

You will see your new token in the list. Click Actions and download the token as a .txt file.


Installing a Trust Code

To manually install a trust code, perform these steps.

Before you begin

Supported topologies: Connected Directly to CSSM

Procedure


Step 1

In case this task was not already completed, generate and download a trust code file from CSSM:

Generating a New Token for a Trust Code from CSSM

Step 2

Establish a trusted connection with CSSM:

switch# license smart trust idtoken id_token_value {local | all} [force]

For id_token_value , enter the token that was generated in CSSM.

Enter one of following options:

  • local : Submits the trust request only for the active supervisor is in a High Availability setup. This is the default option.

  • all : Submits the trust request for active and standby supervisors in a High Availability setup.

Enter the force keyword to submit the trust code request despite an existing trust code on the switch.

Trust codes are node-locked to the UDI of the switch. If a UDI is already registered, CSSM does not allow a new registration for the same UDI. Entering the force keyword sets a force flag in the message sent to CSSM to create a new trust code even if one exists.

Step 3

Display date and time if trust code is installed:

switch# show license status

Date and time are in the local time zone. See the Trust Code Installed: field.


Downloading a Policy File from CSSM

If a custom policy was requested or if a policy needs to be applied that is different from the default that is applied to the switch, perform these steps:

Before you begin

Supported topologies:

  • No Connectivity to CSSM and No CSLU

  • CSLU Disconnected from CSSM

  • SSM On-Prem disconnected from CSSM

Procedure


Step 1

Log in to the CSSM Web UI at https://software.cisco.com/software/smart-licensing/alerts.

Log in using the username and password provided by Cisco.

Step 2

Follow this directory path: Reports > Reporting Policy.

Step 3

Click Download, to save the .xml policy file.

You can now install the file on the switch. See Installing a File on the Switch.


Uploading Usage Data to CSSM and Downloading an ACK

To upload a RUM report to CSSM and download an ACK when the switch is not connected to CSSM or CSLU, perform these steps.

Before you begin

Supported topologies: No Connectivity to CSSM and No CSLU

Procedure


Step 1

Log in to the CSSM Web UI at https://software.cisco.com/software/smart-licensing/alerts.

Log in using the username and password that is provided by Cisco.

Step 2

Select Reports > Usage Data Files.

Step 3

Click Upload Usage Data. Browse to the file location (RUM report in .txt format), select, and click Upload Data.

You cannot delete a usage report in CSSM after it has been uploaded.

Step 4

From the Select Virtual Accounts pop up, select the Virtual Account that will receive the uploaded file. The file is uploaded to Cisco and is listed in the Usage Data Files table in the Reports screen showing the File Name, the time it was Reported, which Virtual Account it was uploaded to, the Reporting Status, the Number of Product Instances reported, and the Acknowledgment status.

Step 5

In the Acknowledgment column, click Download to save the tar.gz acknowledge file for the report that was uploaded.

Wait for the ACK (.txt format) to appear in the Acknowledgment column. If there are many RUM reports to process, CSSM may take a few minutes.

Now, install the file on the switch or transfer it to CSLU or SSM On-Prem.


Installing a File on the Switch

To install a policy or acknowledgment on the switch when the switch is not connected to CSSM, CSLU, or SSM On-Prem, perform these steps.

Before you begin

Supported topologies: No Connectivity to CSSM and No CSLU

You must have the corresponding file saved in a location that is accessible to the switch.

Procedure


Step 1

Copy file from its source location or directory to the flash memory of the switch:

switch# copy source bootflash:file-name

  • source : This is the location of the source file or directory to be copied. The source can be either local or remote.

  • bootflash: This is the destination for boot flash memory.

Step 2

Import and install the file on the switch:

switch# license smart import bootflash: file-name

After installation, a system message displays the status of installation.

Step 3

Display license authorization, policy, and reporting information for the switch:

switch# show license all


Setting the Transport Type, URL, and Reporting Interval

To configure the mode of transport for a switch, perform these steps.

Before you begin

Supported topologies: all

Procedure


Step 1

Enter global configuration mode:

switch# configure terminal

Step 2

Select the type of message transport that the switch will use:

switch(config)# license smart transport {callhome | cslu | off | smart}

Choose from the following options:

  • callhome : Enables Call Home as the transport mode.

  • cslu : Enables CSLU as the transport mode. This is the default transport mode.

  • off : Disables all communication from the switch.

  • smart : Enables smart transport.

Step 3

Set an URL for the configured transport mode (except Call Home, which is in the Call Home configuration):

switch(config)# license smart url {cslu cslu_url | smart smart_url}

Depending on the transport mode that was chosen to configure in the previous step, configure the corresponding URL here:

  • cslu cslu_url : The default value for cslu_url is set to cslu_local. To set a custom URL, follow below steps:

    If the transport mode is configured as cslu , configure this option. Enter the CSLU URL as follows:

    http://<cslu_ip_or_host>:8182/cslu/v1/pi

    Note


    When we use SSM On-Prem, the URL may be different and you must get it directly from SSM On-Prem.

    For <cslu_ip_or_host>, enter the host name or the IP address of the Windows host where CSLU is installed. 8182 is the port number and it is the only port number that CSLU uses.

    The no license smart url cslu cslu_url command reverts to cslu_local.

  • smart smart_url : If the transport type is configured as smart , then URL will be automatically configured to:

    https://smartreceiver.cisco.com/licservice/license

    The no license smart url smart smart_url command reverts to the default URL as above.

Step 4

(Optional) Set the reporting interval in days:

switch(config)# license smart usage interval interval_in_days

By default, the RUM report is sent every 30 days. The valid value range is 1 to 365 and default value is 30 days.

If a value that is greater than one is set and the transport type is set to off, then, between the interval_in_days and the policy value for Ongoing reporting frequency(days):, the lower of the two values is applied. For example, if interval_in_days is set to 100 and the value in the in the policy says Ongoing reporting frequency (days):90, RUM reports are sent every 90 days.

If no interval is set and the default is effective, the reporting interval is determined entirely by the policy value. For example, if the default value is effective and only unenforced licenses are in use, if the policy states that reporting is not required, then RUM reports are not sent.

Step 5

Exit global configuration mode and return to EXEC mode:

switch(config)# exit

Step 6

Save your entries in the configuration file:

switch# copy running-config startup-config


Interactions with Other Features

High Availability

High Availability refers to the MDS Director switches with dual supervisors installed. This section explains considerations that apply to a high availability configuration, when running a software version that supports SLP.

Trust Code Requirements in a High Availability Setup

In a dual supervisor setup, two trust codes are installed. The active switch can submit the requests for both the supervisors and install the trust codes that are returned in an ACK.

Policy Requirements in a High Availability Setup

There are no policy requirements that apply exclusively to a high availability setup. As in case of a standalone switch, only one policy exists in a high availability setup as well, and this is on the active supervisor. The policy on the active applies to the standby in the setup.

Switch Functions in a High Availability Setup

This section explains general switch functions in a high availability setup, as well as what the switch does when a standby is added.

For trust codes: The active switch can request and install trust codes for standby supervisor.

For policies: The active switch synchronizes with the standby supervisor.

For reporting: Only the active switch reports usage for standby supervisor in the High Availability set-up.

In addition to scheduled reporting, the following events trigger reporting:

  • The addition or removal of a standby supervisor. The RUM report includes information about the standby supervisor that was added or removed.

  • A switchover.

  • A reload.

For addition of a standby:

  • A switch that is connected to CSLU does not take any further action.

  • A switch that is directly connected to CSSM performs trust synchronization.

    Trust synchronization involves the following:

    • Installation of trust code on the standby, if not installed already.

    • Installation of policy and purchase information, if applicable.

    • Sending of a RUM report with current usage information.

Upgrades

This section describes how upgrade or migration to SLP is handled. It also clarifies how SLP handles all earlier licensing models including: the earlier version of Smart Licensing and how evaluation or expired licenses from any of the earlier licensing models are handled in SLP environment.

To migrate to SLP, upgrade to a software version that supports SLP. After upgrading, SLP is the only supported licensing model and the switch continues to operate without any licensing changes. The SLP section provides details and examples for migration scenarios that apply to Cisco MDS switches.


Note


When migrating from traditional licensing model to SLP, license conversion takes place automatically.


Identifying the Current Licensing Model Before Upgrade

Before upgrading to SLP, enter the show running-config license all command in privileged EXEC mode to know the current licensing model that is effective on the switch. This command displays information about the current licensing model for all except the RTU licensing model.

Cisco MDS NX-OS Release 9.2(1) and earlier

Cisco MDS NX-OS Release 9.2(2) and later

switch# show running-config license all

!Command: show running-config license all
!Running configuration last done at: Wed Dec 15 06:05:02 2021
!Time: Thu Dec 16 08:04:07 2021

version 9.1(1)
license grace-period
no feature license smart
switch# show running-config license all

!Command: show running-config license all
!No configuration change since last restart
!Time: Thu Dec 16 08:03:40 2021

version 9.2(2)
license grace-period
license smart transport smart
license smart url smart https://smartreceiver-stage.cisco.com/licservice/license
license smart url cslu cslu-local
license smart usage interval 30

How an Upgrade Affects Enforcement Types for Existing Licenses

An unenforced license that was being used before upgrade continues to be available after the upgrade. This includes licenses from the earlier licensing models as follows:

  • Traditional Licensing (PAK)

  • Smart Licensing

  • Evaluation or expired licenses from any of the above-mentioned licensing models

How an Upgrade Affects Reporting for Existing Licenses

When upgrading to a software version which supports SLP, reporting is based on the reporting requirements in the policy which can be displayed in the output of the show license status command for the following licenses:

  • Traditional Licenses (PAK)

  • Smart Licenses (Registered and Authorized licenses)

  • Evaluation or expired licenses

How an Upgrade Affects Transport Type for Existing Licenses

The transport type, if configured in your existing setup, is retained after upgrade to SLP.

When compared to the earlier version of Smart Licensing, additional transport types are available with SLP. There is also a change in the default transport mode.

The following table clarifies how this may affect upgrades:

Migration

Transport Type Before Upgrade

Transport Type After Upgrade

SL (Eval)

callhome

CSLU

SL (Registered)

callhome

PAK-based

CSLU

On-Prem

callhome

CSLU

How an Upgrade Affects the ID Token Registration Process

In the earlier version of Smart Licensing, an ID token was used to register and connect to CSSM. ID token registration is not required in SLP. The ID token generation feature is still available in CSSM and is used to establish trust when a switch is directly connected to CSSM. See Connected Directly to CSSM.

Downgrades

To downgrade, first downgrade the software version on the switch. This section provides information about downgrades for new deployments and existing deployments (you upgraded to SLP and now want to downgrade).

New Deployment Downgrade

This section applies when there is a newly purchased switch with a software version where SLP was already enabled by default and want to downgrade to a software version where SLP is not supported.

The outcome of the downgrade depends on whether a Trust Code was installed while the SLP environment was operating and further action may be required depending on the release to be downgraded to.

If the topology that was implemented while the SLP environment was connected directly to CSSM, then a trust code installation can be expected or assumed, because it is required as part of topology implementation. For any of the other topologies, trust establishment is not mandatory. Downgrading switches with one of these other topologies will therefore mean that licenses to a registered and authorized state must be restored by following the procedures that are applicable in the Smart Licensing environment. See Table 1.

Table 5. Outcome and Action for New Deployment Downgrade to Smart Licensing

In the SLP Environment

Downgrade to...

Outcome and Further Action

Switch, which is connected directly to CSSM, and trust established.

Cisco MDS NX-OS Release 9.2(1) or any lower version that supports Smart Licensing

Moves the switch back to the traditional licensing mode.

Action is required: Reregister the switch if the switch was using smart license prior to Cisco MDS NX-OS Release 9.2(2). Generate an ID token in the CSSM Web UI. On the switch, enable smart licensing using license smart enable and configure the license smart register idtoken idtoken command in global configuration mode.

High Availability setup, which is connected directly to CSSM, and trust established.

Cisco MDS NX-OS Release 9.2(1) or any lower version that supports Smart Licensing

Action is required: Reregister the switch.

Generate an ID token in the CSSM Web UI. On the switch, enable smart licensing using license smart enable and configure the license smart register idtoken idtoken all command in global configuration mode.

Any other topology. (Connected to CSSM Through CSLU, CSLU Disconnected from CSSM, No Connectivity to CSSM and No CSLU)

Cisco MDS NX-OS Release 9.2(1) or any lower version that supports Smart Licensing

Action is required.

Restore licenses to a registered and authorized state by following the procedures that are applicable in the Smart Licensing environment.

Upgrade and Then Downgrade

When upgrading to a software version that supports SLP and then downgrading to any of the earlier licensing models, license consumption does not change, and any product features that were configured on the switch are preserved — only the features and functions that are available with SLP are not available anymore. Earlier licensing model will be preserved.

Migrating to Smart Licensing Using Policy

To upgrade to SLP, upgrade the software version (image) on the switch to a supported version.

Before you Begin

Read the Upgrades section to understand how SLP handles various aspects of all earlier licensing models.

When migrating from traditional licensing model to SLP, license conversion takes place automatically.

Upgrading the Switch Software

See the corresponding release note for the upgrade procedure. If there are any general release-specific considerations, these are called-out in the corresponding release notes.

Also refer to the sample show command outputs of the migration scenarios provided below. Sample outputs are provided for before and after migration, for comparison.

Smart Licensing to Smart Licensing Using Policy

The following is an example of a Cisco MDS 9000 switch migrating from Smart Licensing to SLP. This is a High Availability setup with an active and standby.

The show command outputs below call-out key fields to check, before and after migration.

Smart Licensing to Smart Licensing Using Policy: show Commands

show license summary

Before Upgrade (Smart Licensing)


switch# show license summary
Smart Licensing is ENABLED

Registration:
  Status: REGISTERED
  Smart Account: BU Production Test
  Virtual Account: MDS-Avalon
  Export-Controlled Functionality: Allowed

License Authorization:
  Status: OUT OF COMPLIANCE on Oct 14 06:26:13 2021 UTC

  Last Communication Attempt: SUCCEEDED
  Next Communication Attempt: Oct 14 18:26:56 2021 UTC
  Communication Deadline: Jan 12 06:21:55 2022 UTC

Smart License Conversion:
  Automatic Conversion Enabled: False
  Status: Not started

License Usage:
License                    Entitlement tag                 Count   Status
-------------------------------------------------------------------------
MDS 9396T 32G 16 port a... (PORT_ACTIV_9396T_PKG)           48      OUT OF COMPL
IANCE
MDS 9300 series Enterpr... (ENTERPRISE_PKG)                 1       OUT OF COMPL
IANCE

After Upgrade (SLP)


switch# show license summary
License Usage:
License                    Entitlement tag                 Count   Status
-------------------------------------------------------------------------
MDS 9396T 32G 16 port-a... (PORT_ACTIV_9396T_PKG)           48      NOT AUTHORIZ
ED
MDS 9300 series Enterpr... (ENTERPRISE_PKG)                 1       IN USE

The Status field shows that the licenses are now IN USE instead of registered and authorized. The Count filed indicates the total number of ports that are consuming port licenses.

show license usage

Before Upgrade (Smart Licensing)


switch# show license usage
License Authorization:
  Status: OUT OF COMPLIANCE on Oct 14 06:26:13 2021 UTC

(PORT_ACTIV_9396T_PKG):
  Description: MDS 9396T 32G 16 port activation
  Count: 48
  Version: 1.0
  Status: OUT OF COMPLIANCE

(ENTERPRISE_PKG):
  Description: MDS 9300 series Enterprise package
  Count: 1
  Version: 1.0
  Status: OUT OF COMPLIANCE

After Upgrade (SLP)


switch# show license usage
License Authorization:
  Status: Not Applicable

(PORT_ACTIV_9396T_PKG):
  Description: MDS 9396T 32G 16 port-activation
  Count: 48
  Version: 1.0
  Status: NOT AUTHORIZED
  Enforcement Type: ENFORCED
  License Type: Enforced

(ENTERPRISE_PKG):
  Description: MDS 9300 series Enterprise package
  Count: 1
  Version: 1.0
  Status: IN USE
  Enforcement Type: NOT ENFORCED
  License Type: Generic

The license counts remain the same.

show license status

Before Upgrade (Smart Licensing)


switch# show license status
Smart Licensing is ENABLED

Registration:
  Status: REGISTERED
  Smart Account: BU Production Test
  Virtual Account: MDS-Avalon
  Export-Controlled Functionality: Allowed
  Initial Registration: SUCCEEDED on Oct 14 06:27:26 2021 UTC
  Last Renewal Attempt: None
  Next Renewal Attempt: Apr 12 06:27:26 2022 UTC
  Registration Expires: Oct 14 06:22:22 2022 UTC

License Authorization:
  Status: OUT OF COMPLIANCE on Oct 14 06:26:13 2021 UTC

  Last Communication Attempt: SUCCEEDED on Oct 14 06:27:57 2021 UTC
  Next Communication Attempt: Oct 14 18:27:56 2021 UTC
  Communication Deadline: Jan 12 06:22:54 2022 UTC

Smart License Conversion:
  Automatic Conversion Enabled: False
  Status: Not started

After Upgrade (SLP)


switch# show license status

Utility:
    Status: DISABLED

Smart Licensing using Policy:
    Status: ENABLED

Data Privacy:
    Sending Hostname: yes
    Callhome Hostname Privacy: DISABLED
        Smart Licensing Hostname Privacy: DISABLED
    Version Privacy: DISABLED

Transport:
    Type: CSLU
    Cslu address: cslu-local

Policy:
    Policy in use: Merged from multiple sources
    Reporting ACK required: Yes
    Unenforced/Non-Export:
        First report requirement (days): 90 (CISCO default)
        Ongoing reporting frequency (days): 365 (CISCO default)
        On change reporting (days): 90 (CISCO default)
    Enforced (Pepertual/Subscription):
        First report requirement (days): 0 (CISCO default)
        Ongoing reporting frequency (days): 0 (CISCO default)
        On change reporting (days): 0 (CISCO default)
    Export (Perpetual/Subscription):
        First report requirement (days): 0 (CISCO default)
        Ongoing reporting frequency (days): 0 (CISCO default)
        On change reporting (days): 0 (CISCO default)

Miscellaneous:
    Custom Id: <empty>

Usage reporting:
    Last ACK received: <none>
    Next ACK deadline: Jan 12 08:39:14 2022 UTC
    Reporting push interval: 30 days
    Next ACK push check: <none>
    Next report push: Oct 14 08:40:00 2021 UTC
    Last report push: <none>
    Last report file write: <none>

Trust Code installed: Jan 12 08:39:14 2022 UTC
Active: PID: DS-C9148T-K9, SN: JPG220700PY
Jan 12 08:39:14 2022 UTC 

The Transport:field:A transport type was configured and therefore retained after upgrade.

The Policy: header and details: A custom policy was available in the Smart Account or Virtual Account — this has also been automatically installed on the switch. (After establishing trust, CSSM returns a policy. The policy is then automatically installed.)

The Usage Reporting: header: The Nextreport push: field provides information about when the switch will send the next RUM report to CSSM.

The Trust Code Installed: field: The ID token is successfully converted and a trusted connection has been established with CSSM.

show license udi

Before Upgrade (Smart Licensing)


 switch# show license udi
 UDI: SN:JPG22060061

After Upgrade (SLP)


switch# show license udi 
UDI: PID:DS-C9396T-K9, SN:JPG22060061
HA UDI List:
    Active: PID:DS-C9396T-K9, SN:JPG22060061

This is a High Availability setup, and the command displays all UDIs in the setup.

The CSSM Web UI After Migration

Log in to the CSSM Web UI at https://software.cisco.com/software/smart-licensing/alerts. Under Inventory > Product Instances.

Registered licenses in the Smart Licensing environment were displayed with the hostname of the switch in the Name column. After upgrading to SLP, they are displayed with the UDI of the switch. All migrated UDIs are displayed. In this example, they are PID:C9500-16X,SN:FCW2233A5ZV and PID:C9500-16X,SN:FCW2233A5ZY.

Only the active switch reports usage. Therefore, PID:C9500-16X,SN:FCW2233A5ZV displays license consumption information under License Usage.

Figure 7. Smart Licensing to Smart Licensing Using Policy: Active and Standby Switches After Migration
Figure 8. Smart Licensing to Smart Licensing Using Policy: UDI and License Usage under Active Switch
Figure 9. Smart Licensing to Smart Licensing Using Policy: DCN NDB/RTU Licenses Showing up After Upgrade

Reporting After Migration

The switch sends the next RUM report to CSSM, based on the policy.

To change the reporting interval to report more frequently: on the switch, configure the license smart usage interval command.

Evaluation or Eval Expired to Smart Licensing Using Policy

The following is an example of a Cisco MDS 9000 switch with evaluation licenses (Smart Licensing) that were migrated to SLP.

The notion of evaluation licenses does not apply to SLP. When the software version is upgraded to one that supports SLP, all licenses are displayed as IN USE and the Cisco default policy is applied to the switch.

The following table calls out key changes or new fields to check for in the show command outputs, after upgrade to SLP.

Evaluation or Eval Expired to Smart Licensing Using Policy: show Commands

show license summary

Before Upgrade (Smart Licensing, Evaluation Mode)


switch# show license summary
Smart Licensing is ENABLED

Registration:
  Status: UNREGISTERED
  Export-Controlled Functionality: Not Allowed

License Authorization:
  Status: EVAL MODE
  Evaluation Period Remaining: 89 days, 21 hours, 13 minutes, 49 seconds

Smart License Conversion:
  Automatic Conversion Enabled: False
  Status: Not started

License Usage:
License                    Entitlement tag                 Count   Status
-------------------------------------------------------------------------
<empty>                    (ENTERPRISE_PKG)                 1       EVAL MODE
<empty>                    (PORT_ACTIV_9396T_PKG)           48      EVAL MODE

After Upgrade (SLP)


switch# show license summary
License Usage:
License                    Entitlement tag                 Count   Status
-------------------------------------------------------------------------
MDS 9396T 32G 16 port-a... (PORT_ACTIV_9396T_PKG)           48      NOT AUTHORIZED
MDS 9300 series Enterpr... (ENTERPRISE_PKG)                 1       IN USE

All licenses are migrated and IN USE.There are no EVAL MODE licenses.

show license usage

Before Upgrade (Smart Licensing, Evaluation Mode)


switch# show license usage
License Authorization:
  Status: EVAL MODE
  Evaluation Period Remaining: 89 days, 21 hours, 13 minutes, 10 seconds

(ENTERPRISE_PKG):
  Description: <empty>
  Count: 1
  Version: 1.0
  Status: EVAL MODE

(PORT_ACTIV_9396T_PKG):
  Description: <empty>
  Count: 48
  Version: 1.0
  Status: EVAL MODE

After Upgrade (SLP)


switch# show license usage
License Authorization:
  Status: Not Applicable

(PORT_ACTIV_9396T_PKG):
  Description: MDS 9396T 32G 16 port-activation
  Count: 48
  Version: 1.0
  Status: NOT AUTHORIZED
  Enforcement Type: ENFORCED
  License Type: Enforced

(ENTERPRISE_PKG):
  Description: MDS 9300 series Enterprise package
  Count: 1
  Version: 1.0
  Status: IN USE
  Enforcement Type: NOT ENFORCED
  License Type: Generic

show license status

Before Upgrade (Smart Licensing, Evaluation Mode)


switch# show license status

Smart Licensing is ENABLED

Registration:
  Status: UNREGISTERED
  Export-Controlled Functionality: Not Allowed

License Authorization:
  Status: EVAL MODE
  Evaluation Period Remaining: 89 days, 21 hours, 12 minutes, 51 seconds

Smart License Conversion:
  Automatic Conversion Enabled: False
  Status: Not started

After Upgrade (SLP)


switch# show license status

Utility:
    Status: DISABLED

Smart Licensing using Policy:
    Status: ENABLED

Data Privacy:
    Sending Hostname: yes
    Callhome Hostname Privacy: DISABLED
        Smart Licensing Hostname Privacy: DISABLED
    Version Privacy: DISABLED

Transport:
    Type: CSLU
    Cslu address: cslu-local

Policy:
    Policy in use: Merged from multiple sources
    Reporting ACK required: Yes
    Unenforced/Non-Export:
        First report requirement (days): 90 (CISCO default)
        Ongoing reporting frequency (days): 365 (CISCO default)
        On change reporting (days): 90 (CISCO default)
    Enforced (Pepertual/Subscription):
        First report requirement (days): 0 (CISCO default)
        Ongoing reporting frequency (days): 0 (CISCO default)
        On change reporting (days): 0 (CISCO default)
    Export (Perpetual/Subscription):
        First report requirement (days): 0 (CISCO default)
        Ongoing reporting frequency (days): 0 (CISCO default)
        On change reporting (days): 0 (CISCO default)

Miscellaneous:
    Custom Id: <empty>

Usage reporting:
    Last ACK received: <none>
    Next ACK deadline: Jan 12 08:39:14 2022 UTC
    Reporting push interval: 30 days
    Next ACK push check: <none>
    Next report push: Oct 14 08:40:00 2021 UTC
    Last report push: <none>
    Last report file write: <none>

Trust Code installed: <none>

The CSSM Web UI After Migration

No changes in the CSSM Web UI.

Reporting After Migration

Implement any one of the supported topologies and fulfill reporting requirements. See Supported Topologies. The reporting method depends on the implemented topology.

Migration Scenarios for Enforced Port Licenses

This section provides the different scenarios for migrating to SLP.

Table 6. Migration Scenarios for Enforced Port Licenses

Configuration

Greenfield

Traditional to SL

SL 1.0 to SLP

Traditional to SL 1.0 to SLP

Default port licenses

Default port licenses will work as usual. Any additional port that comes up will need authorization code to be installed.

Default and factory installed licenses

Default and factory installed port licenses will work as usual. Any additional port that comes up (over and above the purchase count) will need authorization code to be installed.

Default and PAK licenses

Default and PAK port licenses will work as usual. Any new port licenses will need authorization code to be installed. Automatic DLC will trigger on migration.

Default and PAK port licenses that were enabled in SL 1.0 will continue to work after upgrading to SLP. Any new port licenses will need authorization code to be installed. If DLC was not performed in SL 1.0, automatic DLC will not trigger in SLP. Contact Cisco TAC for migrating the licenses.

Default and port licenses in SL 1.0 (Evaluation only)

Default and extra port licenses will work as usual. Any new port will need authorization code to be installed. If DLC was not performed in SL 1.0, automatic DLC will not trigger in SLP. Contact Cisco TAC for migrating the licenses.

Default and port licenses in SL 1.0 (Registered or Out of Compliance (OOC))

Default and extra port licenses will work as usual. Any new port will need authorization code to be installed. If DLC was not performed in SL 1.0, automatic DLC will not trigger in SLP. Contact Cisco TAC for migrating the licenses.

Troubleshooting Smart Licensing Using Policy

This section provides the list of SLP-related system messages that maybe encountered, possible reasons for failure, and recommended action.

System Message Overview

The system software sends system messages to the console (and, optionally, to a logging server on another system). Not all system messages mean problems with your system. Some messages are informational, and others can help diagnose problems with communications lines, internal hardware, or the system software.

How to Read System Messages

System log messages can contain up to 80 characters. Each system message begins with a percent sign (%) and is structured as follows:


%FACILIY-SEVERITY-MNEMONIC: Message-text

%FACILITY

Two or more uppercase letters that show the facility to which the message refers. A facility can be a hardware switch, a protocol, or a module of the system software.

SEVERITY

A single-digit code from 0 to 7 that reflects the severity of the condition. The lower the number, the more serious the situation.

Table 7. Message Severity Levels

Severity Level

Description

0 - emergency

System is unusable.

1 - alert

Immediate action required.

2 - critical

Critical condition.

3 - error

Error condition.

4 - warning

Warning condition.

5 - notification

Normal but significant condition.

6 - informational

Informational message only.

7 - debugging

Message that appears during debugging only.

MNEMONIC

A code that uniquely identifies the message.

Message-text

Message-text is a text string describing the condition. This portion of the message sometimes contains detailed information about the event, including terminal port numbers, network addresses, or addresses that correspond to locations in the system memory address space. Because the information in these variable fields changes from message to message, it is represented here by short strings that are enclosed in square brackets ([ ]). A decimal number, for example, is represented as [dec].

Table 8. Variable Fields in Messages

Severity Level

Description

[char]

Single character

[chars]

Character string

[dec]

Decimal number

[enet]

Ethernet address (for example, 0000.FEED.00C0)

[hex]

Hexadecimal number

[inet]

Internet address (for example, 10.0.2.16)

[int]

Integer

[node]

Address or node name

[t-line]

Terminal line number in octal (or in decimal if the decimal-TTY service is enabled)

[clock]

Clock (for example, 01:20:08 UTC Tue Mar 2 1993

System Messages

This section provides the list of SLP-related system messages that maybe encountered, possible reasons for failure (in case it is a failure message), and recommended action (if action is required).

For all error messages, contact your Cisco technical support representative with the following information if you are unable to resolve it by yourself:

The message, exactly as it appears on the console or in the system log.

The output from the show license tech support and show license history message commands.

SLP-related system messages:

SMART_LIC-3-POLICY_INSTALL_FAILED


Error Message %SMART_LIC-3-POLICY_INSTALL_FAILED: The installation of a new licensing policy has failed: [chars].

Explanation

A policy was installed, but an error was detected while parsing the policy code and installation failed. [chars] is the error string with details of the failure.

Possible reasons for failure include:

  • A signature mismatch: This means that the system clock is not accurate.

  • A timestamp mismatch: This means that the system clock on the switch is not synchronized with CSSM.

Recommended Action

For both possible failure reasons, ensure that the system clock is accurate and synchronized with CSSM. Configure the ntp server command.

For example:


switch(config)# ntp server 1.1.1.1 prefer

If the above does not work and policy installation still fails, contact your Cisco technical support representative.

SMART_LIC-3-AUTHORIZATION_INSTALL_FAILED


Error Message %SMART_LIC-3-AUTHORIZATION_INSTALL_FAILED: The install of a new licensing authorization code has failed on [chars]: [chars].

Explanation

Authorization code installation has failed for enforced license.

Recommended Action

Use the license smart authorization request {add | replace} port-feature {local | all} count port-range command to enable ports or replace the existing authorization code.

SMART_LIC-3-COMM_FAILED


Error Message %SMART_LIC-3-COMM_FAILED: Communications failure with the [chars] : [chars]

Explanation

Smart Licensing communication either with CSSM or with CSLU failed. The first [chars] is the currently configured transport type, and the second [chars] is the error string with details of the failure. This message appears for every communication attempt that fails.

Possible reasons for failure include:

  • CSSM or CSLU is not reachable: This means that there is a network reachability problem.

  • 404 host not found: This means that the CSSM server is down.

For topologies where the switch initiates the sending of RUM reports (Connected to CSSM Through CSLU: Product Instance Initiated Only, Connected Directly to CSSM, and CSLU Disconnected from CSSM: Product Instance Initiated Only) if this communication failure message coincides with scheduled reporting (license smart usage interval interval_in_days ), the switch attempts to send out the RUM report for up to 4 hours after the scheduled time has expired. If it is still unable to send out the report (because the communication failure persists), the system resets the interval to 15 minutes. After the communication failure is resolved, the system reverts the reporting interval to the value that was last configured.

Recommended Action

Troubleshooting steps are provided for when CSSM is not reachable and when CSLU is not reachable.

If CSSM is not reachable and the configured transport type is smart:

  1. Check if the smart URL is configured correctly. Use the show license status command to check if the URL is exactly as follows: https://smartreceiver.cisco.com/licservice/license. If it is not, reconfigure the license smart url smart smart_URL command.

  2. Check DNS resolution. Verify that the switch can ping smartreceiver.cisco.com or the nslookup translated IP. The following example shows how to ping the translated IP:

    
    switch# ping 171.70.168.183 
    Type escape sequence to abort.
    Sending 5, 100-byte ICMP Echos to 171.70.168.183, timeout is 2 seconds:
    !!!!!
    Success rate is 100 percent (5/5), round-trip min/avg/max = 1/1/2 ms


If CSSM is not reachable and the configured transport type is callhome :

  1. Check if the URL is entered correctly. Use the show license status command to check if the URL is exactly as follows: https://tools.cisco.com/its/service/oddce/services/DDCEService.

  2. Check if Call Home profile CiscoTAC-1 is active and destination URL is correct. Use the show call-home smart-licensing command.

    
    switch# show callhome smart-licensing
    Current smart-licensing transport settings:
    Smart-license messages: enabled
    Profile: xml (status: ACTIVE)
    
    
  3. Check DNS Resolution. Verify that the switch can ping tools.cisco.com or the nslookup translated IP.

    
    switch# ping tools.cisco.com 
    Type escape sequence to abort.
    Sending 5, 100-byte ICMP Echos to 173.37.145.8, timeout is 2 seconds:
    !!!!!
    Success rate is 100 percent (5/5), round-trip min/avg/max = 41/41/42 ms


    If the above resolution does not work, check if the switch's mgmt0 interface is set with IP address and the management interface is up. To ensure that the network is up, configure the no shutdown command.

    Check if the switch is subnet masked with a subnet IP and if the DNS IP and default gateway are configured.

  4. Verify if the IP gateway is set.

    Use the show ip interface command to display the current configuration.

    In case the above resolution does not work, double-check your routing rules and firewall settings.

If CSLU is not reachable:

  • Check if CSLU discovery works.

    • Zero-touch DNS discovery of cslu-local or DNS discovery of your domain.

      In the show license all command output, check the Last ACK received: field. If this has a recent timestamp, it means that the switch has connectivity with CSLU. If not, check if the switch can ping cslu-local. A successful ping confirms that the switch is reachable.

      If the above resolution does not work, configure the name server with an entry where hostname cslu-local is mapped to the CSLU IP address (the Windows or Linux host where CSLU is installed). Configure the ip domain-lookup , ip domain-name domain-name , and ip name-server server-address commands. Here the CSLU IP is 192.168.0.1 and name-server creates entry cslu-local.example.com.

      
      switch(config)# ip domain-name example.com
      switch(config)# ip name-server 192.168.2.1
      
  • CSLU URL is configured.

    In the show license all command output, under the Transport: header check the following:

    The Type: must be cslu and Cslu address: must have the hostname or the IP address of the Windows or Linux host where CSLU is installed. Check if the rest of the address is configured as shown below and check if the port number is 8182.

    
    Transport:
    Type: CSLU
    Cslu address: http://192.168.0.1:8182/cslu/v1/pi
    

    If not, configure the license smart transport cslu and license smart url cslu http://<cslu_ip_or_host>:8182/cslu/v1/pi commands.

    If the above resolution does not work and policy installation still fails, contact your Cisco technical support representative.

SMART_LIC-3-COMM_RESTORED


Error Message %SMART_LIC-3-COMM_RESTORED: Communications with the [chars] restored. [chars] - depends on the transport type
-	Cisco Smart Software Manager (CSSM)
-	Cisco Smart License utility (CSLU)
Smart Agent communication with either the Cisco Smart Software Manager (CSSM) or the Cisco Smart License utility (CSLU) has been restored. No action required.

Explanation

Switch communicating with either the CSSM or CSLU is restored.

Recommended Action

No action required.

SMART_LIC-3-POLICY_REMOVED


Error Message %SMART_LIC-3-POLICY_REMOVED: The licensing policy has been removed.

Explanation

A previously installed licensing policy has been removed. The Cisco default policy is then automatically enabled. This may cause a change in the behavior of smart licensing.

Possible reasons for failure include:

If the license smart factory reset command is executed in EXEC mode, all licensing information including the policy is removed.


Note


The switch must be reloaded after using the license smart factory reset command.


Recommended Action

If the policy was removed intentionally, no further action is required.

If the policy was removed inadvertently, reapply the policy. Depending on the topology that is implemented, follow the corresponding method to retrieve the policy:

  • Connected Directly to CSSM:

    Enter the show license status command, and check the Trust Code installed: field. If trust is established, then CSSM will automatically return the policy. The policy is automatically reinstalled on switches of the corresponding Virtual Account.

    If trust has not been established, complete these tasks:

    Generating a New Token for a Trust Code from CSSM and Installing a Trust Code. When these tasks are completed, CSSM will automatically return the policy. The policy is then automatically installed on all switches of that Virtual Account.

  • Connected to CSSM Through CSLU:

    For switch-initiated communication, enter the license smart sync command in privileged EXEC mode. The synchronization request causes CSLU to push the missing information (a policy or authorization code) to the switch.

  • CSLU Disconnected from CSSM:

    For switch-initiated communication, enter the license smart sync command. The synchronization request causes CSLU to push the missing information (a policy or authorization code) to the switch. Then, complete these tasks in the given order: Export to CSSM > Uploading Usage Data to CSSM and Downloading an ACK > Import from CSSM.

  • No Connectivity to CSSM and No CSLU

    In an entirely air-gapped network, from a workstation that has connectivity to the Internet and CSSM complete this task: Downloading a Policy File from CSSM.

    Then, complete this task on the switch: Installing a File on the Switch.

  • SSM On-Prem Disconnected from CSSM

    For switch-initiated communication, enter the license smart sync command in privileged EXEC mode. The synchronization request causes CSLU on SSM On-Prem to push the missing information (a policy or authorization code) to the switch.

SMART_LIC-3-TRUST_CODE_INSTALL_FAILED


Error Message %SMART_LIC-3-TRUST_CODE_INSTALL_FAILED: The install of a new licensing trust code has failed on [chars]: [chars].

Explanation

Trust code installation has failed. The first [chars] is the UDI where trust code installation was attempted. The second [chars] is the error string with details of the failure.

Possible reasons for failure include:

  • A trust code is already installed: Trust codes are node-locked to the UDI of the switch. If the UDI is already registered and you try to install another one, installation fails.

  • Smart Account-Virtual Account mismatch: This means that the Smart Account or Virtual Account (for which the token ID was generated) does not include the switch on which the trust code was installed. The token that is generated in CSSM applies at the Smart Account or Virtual Account level and applies only to all switches in that account.

  • A signature mismatch: This means that the system clock is not accurate.

  • Timestamp mismatch: This means the switch time is not synchronized with CSSM and can cause installation to fail.

Recommended Action

  • A trust code is already installed: To install a trust code despite an existing trust code on the switch, reconfigure the license smart trust idtoken id_token_value {local | all}[force] command in privileged EXEC mode and ensure to include the force keyword. Using the force keyword sets a force flag in the message sent to CSSM to create a new trust code even if one exists.

  • Smart Account-Virtual Account mismatch: Login to the CSSM Web UI at https://software.cisco.com/software/smart-licensing/alerts. Click Inventory > Product Instances.

    Check if the switch on which the token is to be generated is listed in the selected Virtual Account. If it is, proceed to the next step. If not, check and select the correct Smart Account and Virtual Account. Then, complete these tasks again: Generating a New Token for a Trust Code from CSSM and Installing a Trust Code.

  • Timestamp mismatch and signature mismatch: Configure the ntp server command. For example:

    
    switch(config)# ntp server 1.1.1.1 prefer
    

SMART_LIC-4-REPORTING_NOT_SUPPORTED


Error Message %SMART_LIC-4-REPORTING_NOT_SUPPORTED: The CSSM OnPrem that this product instance is connected to is down rev and does not support the enhanced policy and usage reporting mode.

Explanation

The previous version of SSM On-Prem (formerly known as Cisco Smart Software Manager satellite) is not supported in the SLP environment. The switch will behave as follows:

  • Stop sending registration renewals and authorization renewals.

  • Start recording usage and saving RUM reports locally. The RUM reports are stored locally at <CSLU_Working_Directory>/data/default/rum/unsent.

Recommended Action

Refer to and implement one of the supported topologies instead. For more information, see Supported Topologies.

SMART_LIC-6-POLICY_INSTALL_SUCCESS


Error Message %SMART_LIC-6-POLICY_INSTALL_SUCCESS: A new licensing policy was successfully installed.

Explanation

A policy was installed as part of an ACK response.

Recommended Action

No action is required. To know which policy is applied (the policy in-use) and its reporting requirements, enter the show license all command.

SMART_LIC-6-AUTHORIZATION_INSTALL_SUCCESS


Error Message %SMART_LIC-6-AUTHORIZATION_INSTALL_SUCCESS: A new licensing authorization code was successfully installed on: [chars].

Explanation

A new licensing authorization code was installed.

Recommended Action

No action is required. To know installed license status, enter the show license all command.

SMART_LIC-6-AUTHORIZATION_REMOVED


Error Message %SMART_LIC-6-AUTHORIZATION_REMOVED: A licensing authorization code has been removed from [chars]

Explanation

[chars] is the UDI where the authorization code was removed. This removes the licenses from the switch and may cause a change in the behavior of smart licensing and the features using the licenses.

Recommended Action

No action is required. To see the current state of the license, enter the show license all command.

SMART_LIC-6-REPORTING_REQUIRED


Error Message %SMART_LIC-6-REPORTING_REQUIRED: A Usage report acknowledgement will be required in [dec] days.

Explanation

This is an alert which means that RUM reporting to Cisco is required. [dec] is the amount of time (in days) left to meet this reporting requirement.

Recommended Action

Ensure that RUM reports are sent within the requested time.

  • If the switch is directly connected to CSSM or to CSLU and the switch is configured to initiate communication, wait untill the next schedule time (use the show license all | grep "Next report push:" command) or manually trigger the sync using license smart sync command from EXEC mode.. The switch will automatically send usage information at the scheduled time.

    If it is not sent at the scheduled time because of technical difficulties, use the license smart sync command in EXEC mode.

  • If the switch is connected to CSLU but CSLU is disconnected from CSSM, complete these tasks: Export to CSSM > Uploading Usage Data to CSSM and Downloading an ACK > Import from CSSM.

  • If the switch is disconnected from CSSM and CSLU is not being used either, enter the license smart save usage command in EXEC mode to save the required usage information in a file. Then, from a workstation that is connected to CSSM, complete these tasks: Uploading Usage Data to CSSM and Downloading an ACK > Installing a File on the Switch.

SMART_LIC-6-TRUST_CODE_INSTALL_SUCCESS


Error Message %SMART_LIC-6-TRUST_CODE_INSTALL_SUCCESS: A new licensing trust code was successfully installed on [chars].

Explanation

[chars] is the UDI where the trust code was successfully installed.

Recommended Action

No action is required. To verify that the trust code is installed, enter the show license status command in EXEC mode. Look for the updated timestamp under the Trust Code installed: field in the output.

Glossary

The following list acronyms and definitions for terms used throughout this document:

  • SLP: Smart License using Policy. A Cisco NX-OS feature that allows a switch to integrate with the Cisco cloud-based licensing infrastructure.

  • CSLU: Cisco Smart License Utility. A software agent that collects license usage (RUM) reports from a switch and forwards them to the CSSM. If used, this agent runs on a customer premise server.

  • PI: Product Instance. An MDS switch running Cisco MDS NX-OS.

  • SA: Smart Account. The top level customer account in CSSM where purchased licenses are deposited by Cisco.

  • VA: Virtual Account. Represents an organization within a customer Smart Account, in agreement with customer preferences. There can be multiple VAs per customer Smart Account.

  • UDI: Unique Device Identifier. An identifier made of the Product ID (PI) and serial number. This is used by the PI to identify itself to the CSSM.

  • CSSM: Cisco Smart Software Manager. Cisco cloud portal where Cisco licenses can be activated and managed.

  • LCS: Licensing Crypto Services. When you initially register to CSSM, the SSM On-Prem license server sends a registration file that contains Certificate Signing Requests (CSRs) which will be signed by the Cisco License Crypto Service (LCS).

  • RUM : Resource Usage Measurement. A license usage report created by a PI and consumed by the CSSM.

  • Pull mode: A mode in which the CSLU uses netconf/restconf/grpc and YANG or REST to connect to the PI and exchange data.

  • Push mode: A mode in which the PI initiates communications with the CSLU by sending requests to a REST endpoint in the CSLU.

  • Enforced license: Enforced license represents a feature set that the product should not be allowed to use without authorization.

  • Unenforced license: An unenforced license (honor mode) represents a feature set that the MDS will allow to use without an active license. It remains true that a license should be purchased to stay in compliance.

  • Product Authorization Key (PAK): The PAK allows you to obtain a license key from one of the sites listed in the software license claim certificate document. After registering at the specified website, you will receive your license key file and installation instructions through email. From Cisco MDS NX-OS Release 9.2(2), PAK licenses are deprecated. Customers using PAK licenses should migrate to SLP at their earliest convenience.

  • Reported state: Occurs when the switch has reported its license usage to the CSSM and received an acknowledgment.

  • Un-Reported state: The switch has not yet reported its license usage to CSSM nor received an acknowledgment back from CSSM.

  • Greenfield deployment: A greenfield deployment is the installation and configuration of a network where none existed before, for example in a new data center.

  • Brownfield deployment: A brownfield deployment is an upgrade or addition to an existing network and uses some legacy components.