Performing Software Maintenance Upgrades (SMUs)

This chapter includes the following sections:

About SMUs

A software maintenance upgrade (SMU) is a package file that contains fixes for a specific defect. SMUs are created to respond to immediate issues and do not include new features. Typically, SMUs do not have a large impact on device operations. SMU versions are synchronized to the package major, minor, and maintenance versions they upgrade.

The effect of an SMU depends on its type:

  • Process restart SMU-Causes a process or group of processes to restart on activation.

  • Reload SMU-Causes a parallel reload of supervisors and line cards.

SMUs are not an alternative to maintenance releases. They provide a quick resolution of immediate issues. All defects fixed by SMUs are integrated into the maintenance releases.

For information on upgrading your device to a new feature or maintenance release, see the Cisco Nexus 3500 Series NX-OS Software Upgrade and Downgrade Guide.


Note


Activating an SMU does not cause any earlier SMUs, or the package to which the SMU applies, to be automatically deactivated.

Package Management

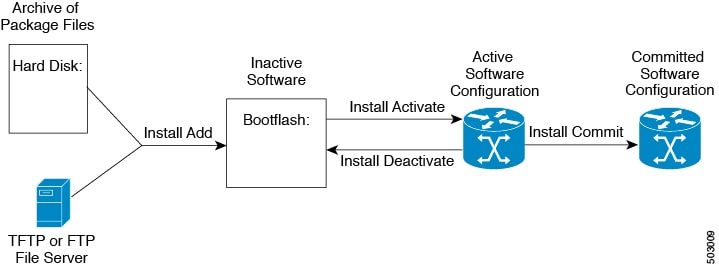
The general procedure for adding and activating SMU packages on the device is as follows:

  1. Copy the package file or files to a local storage device or file server.

  2. Add the package or packages on the device using the install add command.

  3. Activate the package or packages on the device using the install activate command.

  4. Commit the current set of packages using the install commit command.

  5. (Optional) Deactivate and remove the package, when desired.

The following figure illustrates the key steps in the package management process.

Figure 1. Process to Add, Activate, and Commit SMU Packages

Prerequisites for SMUs

These prerequisites must be met for a package to be activated or deactivated:

  • You must be in a user group associated with a task group that includes the proper task IDs. If you suspect a user group assignment is preventing you from using a command, contact your AAA administrator for assistance.

  • Verify that all line cards are installed and operating properly. For example, do not activate or deactivate packages while line cards are booting, while line cards are being upgraded or replaced, or when you anticipate an automatic switchover activity.

Guidelines and Limitations for SMUs

SMUs have the following guidelines and limitations:

  • Some packages require the activation or deactivation of other packages. If the SMUs have dependencies on each other, you cannot activate them without first activating the previous ones.

  • The package being activated must be compatible with the current active software set.

  • You cannot activate multiple SMUs in one command.

  • Activation is performed only after the package compatibility checks have been passed. If a conflict is found, an error message displays.

  • While a software package is being activated, other requests are not allowed to run on any of the impacted nodes. Package activation is completed when a message similar to this one appears:

    Install operation 1 completed successfully at Thu Jan 9 01:19:24 2014
  • Each CLI install request is assigned a request ID, which can be used later to review the events.

  • If you perform a software maintenance upgrade and later upgrade your device to a new Cisco Nexus 3500 software release, the new image will overwrite both the previous Cisco Nexus 3500 release and the SMU package file.

Performing a Software Maintenance Upgrade for Cisco NX-OS

Preparing for Package Installation

You should use several show commands to gather information in preparation for the SMU package installation.

Before you begin

Determine if a software change is required.

Verify that the new package is supported on your system. Some software packages require that other packages or package versions be activated, and some packages support only specific line cards.

Review the release notes for important information related to that release and to help determine the package compatibility with your device configuration.

Verify that the system is stable and prepared for the software changes.

SUMMARY STEPS

  1. show install active
  2. show module
  3. show clock

DETAILED STEPS

  Command or Action Purpose

Step 1

show install active

Example:

switch# show install active

Displays the active software on the device. Use this command to determine what software should be added on the device and to compare to the active software report after installation operations are complete.

Step 2

show module

Example:

switch# show module

Confirms that all modules are in the stable state.

Step 3

show clock

Example:

switch# show clock

Verifies that the system clock is correct. Software operations use certificates based on device clock times.

Example

This example shows how to display the active packages for the entire system. Use this information to determine if a software change is required.

switch# show install active
Active Packages:
Active Packages on Module #3:
 
Active Packages on Module #6:
 
Active Packages on Module #7:
Active Packages on Module #22:
 
Active Packages on Module #30:

This example shows how to display the current system clock setting:

switch# show clock
02:14:51.474 PST Wed Jan 04 2014

Copying the Package File to a Local Storage Device or Network Server

You must copy the SMU package file to a local storage device or a network file server to which the device has access. After this task is done, the package can be added and activated on the device.

If you need to store package files on the device, we recommend that you store the files on the hard disk. The boot device is the local disk from which the package is added and activated. The default boot device is bootflash:.


Tip


Before you copy package files to a local storage device, use the dir command to determine if the required package files are already on the device.

If the SMU package files are located on a remote TFTP, FTP, or SFTP server, you can copy the files to a local storage device. After the files are located on the local storage device, the package can be added and activated on the device from that storage device. The following server protocols are supported:

  • Trivial File Transfer Protocol—TFTP allows files to be transferred from one computer to another over a network, usually without the use of client authentication (for example, username and password). It is a simplified version of FTP.


    Note


    Some package files might be larger than 32 MB, and the TFTP services provided by some vendors might not support a file this large. If you do not have access to a TFTP server that supports files larger than 32 MB, download the file using FTP.
  • File Transfer Protocol—FTP is part of the TCP/IP protocol stack and requires a username and password.

  • SSH File Transfer Protocol—SFTP is part of the SSHv2 feature in the security package and provides for secure file transfers.

After the SMU package file has been transferred to a network file server or the local storage device, you are ready to add and activate the file.

Adding and Activating Packages

You can add SMU package files that are stored on a local storage device or on a remote TFTP, FTP, or SFTP server to your device.


Note


The SMU package being activated must be compatible with the currently active software to operate. When an activation is attempted, the system runs an automatic compatibility check to ensure that the package is compatible with the other active software on the device. If a conflict is found, an error message displays. The activation is performed only after all compatibility checks have been passed.

SUMMARY STEPS

  1. install add filename [activate]
  2. (Optional) show install inactive
  3. install activate filename [test]
  4. Repeat Step 3 until all packages are activated.
  5. (Optional) show install active

DETAILED STEPS

  Command or Action Purpose

Step 1

install add filename [activate]

Example:

switch# install add bootflash:
n3500-uk9.6.0.2.U6.0.1.CSCab00001.bin

Unpacks the package software files from the local storage device or network server and adds them to the bootflash: and all active and standby supervisors installed on the device.

The filename argument can take any of these formats:

  • bootflash:filename
  • tftp://hostname-or-ipaddress/directory-path/filename
  • ftp://username:password@ hostname-or-ipaddress/directory-path/filename
  • sftp://hostname-or-ipaddress/directory-path/filename

Step 2

(Optional) show install inactive

Example:

switch# show install inactive
(Optional)

Displays the inactive packages on the device. Verify that the package added in the previous step appears in the display.

Step 3

install activate filename [test]

Example:

switch# install activate
n3500-uk9.6.0.2.U6.0.1.CSCab00001.bin

Example:

switch# install activate
n3500-uk9.6.0.2.U6.0.1.CSCab00001.bin
Install operation 1 completed successfully at
Thu Jan 9 01:27:56 2014

Example:

switch# install activate
n3500-uk9.6.0.2.U6.0.1.CSCab00001.bin
Install operation 2 !!WARNING!! This patch will get
activated only after a reload of the switch. at
Sun Mar 9 00:42:12 2014

Activates a package that was added to the device. SMU packages remain inactive until activated. (Skip this step if the package was activated earlier with the install add activate command.)

Note


Press ? after a partial package name to display all possible matches available for activation. If there is only one match, press the Tab key to fill in the rest of the package name.

Step 4

Repeat Step 3 until all packages are activated.

Activates additional packages as required.

Step 5

(Optional) show install active

Example:

switch# show install active
(Optional)

Displays all active packages. Use this command to determine if the correct packages are active.

Committing the Active Package Set

When an SMU package is activated on the device, it becomes part of the current running configuration. To make the package activation persistent across system-wide reloads, you must commit the package on the device.

SUMMARY STEPS

  1. install commit filename
  2. (Optional) show install committed

DETAILED STEPS

  Command or Action Purpose

Step 1

install commit filename

Example:

switch# install commit n3500-uk9.6.0.2.U6.0.1.CSCab00001.bin

Commits the current set of packages so that these packages are used if the device is restarted.

Step 2

(Optional) show install committed

Example:

switch# show install committed
(Optional)

Displays which packages are committed.

Deactivating and Removing Packages

When a package is deactivated, it is no longer active on the device, but the package files remain on the boot disk. The package files can be reactivated later, or they can be removed from the disk.

SUMMARY STEPS

  1. install deactivate filename
  2. (Optional) show install inactive
  3. (Optional) install commit
  4. (Optional) install remove {filename | inactive}

DETAILED STEPS

  Command or Action Purpose

Step 1

install deactivate filename

Example:

switch# install deactivate n3500-uk9.6.0.2.U6.0.1.CSCab00001.bin

Deactivates a package that was added to the device and turns off the package features for the line card.

Note


Press ? after a partial package name to display all possible matches available for deactivation. If there is only one match, press the Tab key to fill in the rest of the package name.

Step 2

(Optional) show install inactive

Example:

switch# show install inactive
(Optional)

Displays the inactive packages on the device.

Step 3

(Optional) install commit

Example:

switch# install commit
(Optional)

Commits the current set of packages so that these packages are used if the device is restarted.

Note


Packages can be removed only if the deactivation operation is committed.

Step 4

(Optional) install remove {filename | inactive}

Example:

switch# install remove n3500-uk9.6.0.2.U6.0.1.CSCab00001.bin
Proceed with removing n3500-uk9.6.0.2.U6.0.1.CSCab00001.bin? (y/n)? [n] y

Example:

switch# install remove inactive
Proceed with removing? (y/n)? [n] y
(Optional)

Removes the inactive package.

  • Only inactive packages can be removed.
  • Packages can be removed only if they are deactivated from all line cards in the device.
  • The package deactivation must be committed.
  • To remove a specific inactive package from a storage device, use the install remove command with the filename argument.
  • To remove all inactive packages from all nodes in the system, use the install remove command with the inactive keyword.

Displaying Installation Log Information

The installation log provides information on the history of the installation operations. Each time an installation operation is run, a number is assigned to that operation.

  • Use the show install log command to display information about both successful and failed installation operations.

  • Use the show install log command with no arguments to display a summary of all installation operations. Specify the request-id argument to display information specific to an operation. Use the detail keyword to display details for a specific operation, including file changes, nodes that could not be reloaded, and any impact to processes.

This example shows how to display information for all installation requests:

switch# show install log
Thu Jan 9 01:26:09 2014 
Install operation 1 by user 'admin' at Thu Jan 9 01:19:19 2018
Install add bootflash: n3500-uk9.6.0.2.U6.0.1.CSCab00001.bin
Install operation 1 completed successfully at Thu Jan 9 01:19:24 2014
----------------------------------------
Install operation 2 by user 'admin' at Thu Jan 9 01:19:29 2018 
Install activate n3500-uk9.6.0.2.U6.0.1.CSCab00001.bin
Install operation 2 completed successfully at Thu Jan 9 01:19:45 2018
---------------------------------------- 
Install operation 3 by user 'admin' at Thu Jan 9 01:20:05 2018 
Install commit n3500-uk9.6.0.2.U6.0.1.CSCab00001.bin
Install operation 3 completed successfully at Thu Jan 9 01:20:08 2018
---------------------------------------- 
Install operation 4 by user 'admin' at Thu Jan 9 01:20:21 2018 
Install deactivate n3500-uk9.6.0.2.U6.0.1.CSCab00001.bin 
Install operation 4 completed successfully at Thu Jan 9 01:20:36 2018
---------------------------------------- 
Install operation 5 by user 'admin' at Thu Jan 9 01:20:43 2018 
Install commit n3500-uk9.6.0.2.U6.0.1.CSCab00001.bin 
Install operation 5 completed successfully at Thu Jan 9 01:20:46 2014 
---------------------------------------- 
Install operation 6 by user 'admin' at Thu Jan 9 01:20:55 2018 
Install remove n3500-uk9.6.0.2.U6.0.1.CSCab00001.bin
Install operation 6 completed successfully at Thu Jan 9 01:20:57 2018