Information About PowerOn Auto Provisioning
PowerOn Auto Provisioning (POAP) automates the process of upgrading software images and installing configuration files on Cisco Nexus switches that are being deployed in the network for the first time.
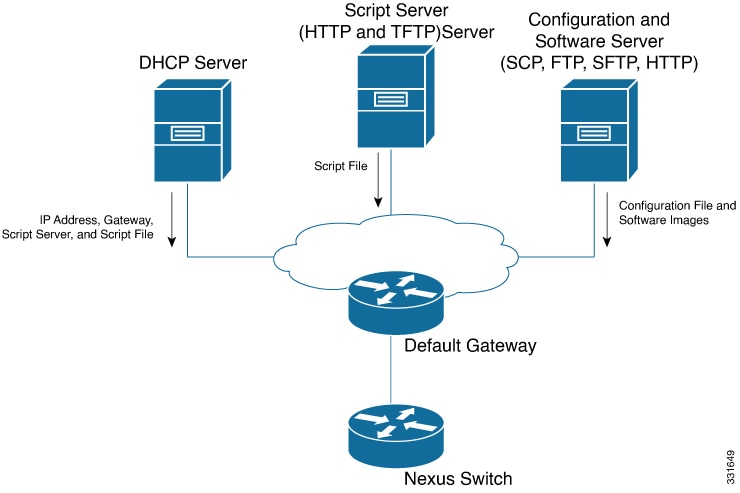
When a Cisco Nexus Series switch with the POAP feature boots and does not find the startup configuration, the switch enters POAP mode and checks for a USB device containing the configuration script file. If it finds one, it checks that device to see if it also contains the software image files and the switch configuration file.
If the switch does not find a USB device, or if the USB device does not contain the needed image files or switch configuration file, the switch also locates a DHCP server and bootstraps itself with its interface IP address, gateway, and DNS server IP addresses. The switch then obtains the IP address of a TFTP server or the URL of an HTTP server from which it downloads the necessary configuration files.
 Note |
The DHCP information is used only during the POAP process if any configuration files are unavailable on the USB device. |
Network Requirements for POAP
POAP requires the following network infrastructure:
-
A DHCP server to bootstrap the interface IP address, gateway address, DNS server, and log server
-
A TFTP or HTTP server containing the configuration script used to automate the software image installation and configuration process
-
One or more servers containing the desired software images and configuration files
POAP Configuration Script
The reference script supplied by Cisco supports the following functionality:
-
Downloads the software image (system and kickstart images) if the files do not already exist on the switch. The software image is installed on the switch and is used at the next reboot.
-
Schedules the downloaded configuration to be applied at the next switch reboot.
-
Stores the configuration as the startup-configuration.
We provide sample configuration scripts that were developed using the Python programming language and Tool Command Language (Tcl). You can customize one of these scripts to meet the requirements of your network environment.
For information about customizing this script using Python, see the Cisco NX-OS Python API Reference Guide for your platform.
POAP Process
The POAP process has the following phases:
-
Power up
-
USB discovery
-
DHCP discovery
-
Script execution
-
Post-installation reload
Within these phases, other process and decision points occur. The following illustration shows a flow diagram of the POAP process.

Power-Up Phase
When you power-up a switch for the first time, it loads the software image installed at manufacturing and tries to find a configuration file to apply after the switch boots. When no configuration file is found, POAP mode starts.
During startup, a prompt appears asking if you want to abort POAP and continue with normal setup. You can choose to exit or continue with POAP.
Note |
No user intervention is required for POAP to continue. The prompt that asks if you want to abort POAP remains available until the POAP process is complete. |
If you exit POAP mode, you enter the normal interactive setup script. If you continue in POAP mode, all the front-panel interfaces are set up in Layer 2 mode, which ensures that the device does not participate in any Layer 2 forwarding.
USB Discovery Phase
When POAP starts, the process searches the root directory of all accessible USB devices for the POAP configuration script file (either the Python script file, poap_script.py, or the Tcl script file, poap_script.tcl), configuration files, and system and kickstart images.
If the configuration script file is found on a USB device, POAP begins running the configuration script. If the configuration script file is not found on the USB device, POAP executes DHCP discovery. (When failures occur, the POAP process alternates between USB discovery and DHCP discovery, until POAP succeeds or you manually abort the POAP process.)
If the software image and switch configuration files specified in the configuration script are present, POAP uses those files to install the software and configure the switch. If the software image and switch configuration files are not on the USB device, POAP does some cleanup and starts DHCP phase from the beginning.
DHCP Discovery Phase
The switch sends out DHCP discover messages on all of the active interfaces (including the mgmt interface) soliciting DHCP offers from the DHCP server or servers. The DHCP client on the Cisco Nexus switch uses the switch serial number or its MAC address in the client-identifier option to identify itself to the DHCP server. The DHCP server can use this identifier to send information, such as the IP address and script file name, back to the DHCP client.
POAP requires a minimum DHCP lease period of 3600 seconds (1 hour). POAP checks the DHCP lease period. If the DHCP lease period is set to less than 3600 seconds (1 hour), POAP does not complete DHCP negotiation.
-
Option 66 ( TFTP server name) or Option 150 (TFTP server address)—The DHCP server relays the TFTP server name or TFTP server address to the DHCP client. The DHCP client uses this information to contact the TFTP server to obtain the script file.
-
IP address
-
Default gateway
-
Option 67 (Bootfile name)—The DHCP server relays the bootfile name to the DHCP client. The bootfile name includes the complete path to the bootfile on the TFTP server. The DHCP client uses this information to download the script file.
When multiple DHCP offers that meet the requirement are received, an offer is randomly chosen. The device completes the DHCP negotiation (request and acknowledgment) with the selected DHCP server, and the DHCP server assigns an IP address to the switch. If there is a failure in any of the subsequent steps in the POAP process, the IP address is released back to the DHCP server.
If no DHCP offers meet the requirements, the switch does not complete the DHCP negotiation (request and acknowledgment) and an IP address is not assigned. The POAP process is reinitiated until it succeeds or you manually abort the POAP process.

Script Execution Phase
Once the device has bootstrapped itself using the information in the DHCP acknowledgement, the switch downloads the script file from the TFTP server or the HTTP server.
The switch runs the configuration script, which downloads and installs the software image and downloads a switch-specific configuration file.
However, the configuration file is not applied to the switch at this point, because the software image currently running on the switch might not support all of the commands in the configuration file. After the switch reboots, it begins running the new software image, if one was installed. At that point, the configuration is applied to the switch.
Note |
If the switch loses connectivity, the script stops, and the switch reloads its original software images and bootup variables. |
Post-Installation Reload Phase
The switch restarts and applies (replays) the configuration on the upgraded software image. Afterward, the switch copies the running configuration to the startup configuration.
 Feedback