Configuring TACACS+

This chapter contains the following sections:

Information About Configuring TACACS+

The Terminal Access Controller Access Control System Plus (TACACS+) security protocol provides centralized validation of users attempting to gain access to a Cisco Nexus device. TACACS+ services are maintained in a database on a TACACS+ daemon typically running on a UNIX or Windows NT workstation. You must have access to and must configure a TACACS+ server before the configured TACACS+ features on your Cisco Nexus device are available.

TACACS+ provides for separate authentication, authorization, and accounting facilities. TACACS+ allows for a single access control server (the TACACS+ daemon) to provide each service (authentication, authorization, and accounting) independently. Each service is associated with its own database to take advantage of other services available on that server or on the network, depending on the capabilities of the daemon.

The TACACS+ client/server protocol uses TCP (TCP port 49) for transport requirements. The Cisco Nexus device provides centralized authentication using the TACACS+ protocol.

Beginning with Cisco NX-OS release 10.4(3)F, SSH based authorization of X.509 certificates using TACACS+ server can be done using the aaa authorization ssh-certificate default group command on the Cisco Nexus 3600 Series platform switches. For configuration details, see Configuring X.509 Certificate-Based SSH Authorization Using TACACS Server

TACACS+ Advantages

TACACS+ has the following advantages over RADIUS authentication:

  • Provides independent AAA facilities. For example, the Cisco Nexus device can authorize access without authenticating.

  • Uses the TCP transport protocol to send data between the AAA client and server, making reliable transfers with a connection-oriented protocol.

  • Encrypts the entire protocol payload between the switch and the AAA server to ensure higher data confidentiality. The RADIUS protocol only encrypts passwords.

User Login with TACACS+

When a user attempts a Password Authentication Protocol (PAP) login to a Cisco Nexus device using TACACS+, the following actions occur:

  1. When the Cisco Nexus device establishes a connection, it contacts the TACACS+ daemon to obtain the username and password.


    Note


    TACACS+ allows an arbitrary conversation between the daemon and the user until the daemon receives enough information to authenticate the user. This action is done by prompting for a username and password combination, but may include prompts for other items, such as the user’s mother’s maiden name.


  2. The Cisco Nexus device receives one of the following responses from the TACACS+ daemon:

    • ACCEPT—User authentication succeeds and service begins. If the Cisco Nexus device requires user authorization, authorization begins.

    • REJECT—User authentication failed. The TACACS+ daemon either denies further access to the user or prompts the user to retry the login sequence.

    • ERROR—An error occurred at some time during authentication dither at the daemon or in the network connection between the daemon and the Cisco Nexus device. If the Cisco Nexus device receives an ERROR response, the switch tries to use an alternative method for authenticating the user.

    The user also undergoes an additional authorization phase, if authorization has been enabled on the Cisco Nexus device. Users must first successfully complete TACACS+ authentication before proceeding to TACACS+ authorization.

  3. If TACACS+ authorization is required, the Cisco Nexus device again contacts the TACACS+ daemon and it returns an ACCEPT or REJECT authorization response. An ACCEPT response contains attributes that are used to direct the EXEC or NETWORK session for that user and determines the services that the user can access.

Services include the following:

  • Telnet, rlogin, Point-to-Point Protocol (PPP), Serial Line Internet Protocol (SLIP), or EXEC services

  • Connection parameters, including the host or client IP address (IPv4), access list, and user timeouts

Default TACACS+ Server Encryption Type and Preshared Key

You must configure the TACACS+ that is preshared key to authenticate the switch to the TACACS+ server. A preshared key is a secret text string shared between the Cisco Nexus device and the TACACS+ server host. The length of the key is restricted to 63 characters and can include any printable ASCII characters (white spaces are not allowed). You can configure a global preshared secret key for all TACACS+ server configurations on the Cisco Nexus device to use.

You can override the global preshared key assignment by using the key option when configuring an individual TACACS+ server.

TACACS+ Server Monitoring

An unresponsive TACACS+ server can delay the processing of AAA requests. A Cisco Nexus device can periodically monitor an TACACS+ server to check whether it is responding (or alive) to save time in processing AAA requests. The Cisco Nexus device marks unresponsive TACACS+ servers as dead and does not send AAA requests to any dead TACACS+ servers. The Cisco Nexus device periodically monitors dead TACACS+ servers and brings them to the alive state once they are responding. This process verifies that a TACACS+ server is in a working state before real AAA requests are sent to the server. Whenever an TACACS+ server changes to the dead or alive state, a Simple Network Management Protocol (SNMP) trap is generated and the Cisco Nexus device displays an error message that a failure is taking place before it can impact performance.

The following figure shows the different TACACS+ server states:
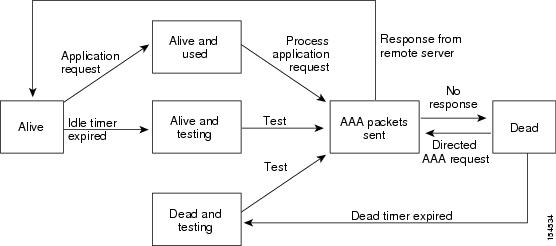
Figure 1. TACACS+ Server States

Note


The monitoring interval for alive servers and dead servers are different and can be configured by the user. The TACACS+ server monitoring is performed by sending a test authentication request to the TACACS+ server.


Prerequisites for TACACS+

TACACS+ has the following prerequisites:

  • You must obtain the IPv4 or IPv6 addresses or hostnames for the TACACS+ servers.

  • You must obtain the preshared keys from the TACACS+ servers, if any.

  • Ensure that the Cisco Nexus device is configured as a TACACS+ client of the AAA servers.

Guidelines and Limitations for TACACS+

TACACS+ has the following configuration guidelines and limitations:

  • You can configure a maximum of 64 TACACS+ servers on the Cisco Nexus device.

Configuring TACACS+

TACACS+ Server Configuration Process

This section describes how to configure TACACS+ servers.

SUMMARY STEPS

  1. Enable TACACS+.
  2. Establish the TACACS+ server connections to the Cisco Nexus device.
  3. Configure the preshared secret keys for the TACACS+ servers.
  4. If needed, configure TACACS+ server groups with subsets of the TACACS+ servers for AAA authentication methods.
  5. If needed, configure periodic TACACS+ server monitoring.

DETAILED STEPS


Step 1

Enable TACACS+.

See Enabling TACACS+.

Step 2

Establish the TACACS+ server connections to the Cisco Nexus device.

Configuring TACACS+ Server Hosts

Step 3

Configure the preshared secret keys for the TACACS+ servers.

Configuring TACACS+ Global Preshared Keys

Step 4

If needed, configure TACACS+ server groups with subsets of the TACACS+ servers for AAA authentication methods.

Configuring TACACS+ Server Groups

Step 5

If needed, configure periodic TACACS+ server monitoring.

Configuring Periodic TACACS+ Server Monitoring


Enabling TACACS+

Although by default, the TACACS+ feature is disabled on the Cisco Nexus device. You can enable the TACACS+ feature to access the configuration and verification commands for authentication.

SUMMARY STEPS

  1. switch# configure terminal
  2. switch(config)# feature tacacs+
  3. switch(config)# exit
  4. (Optional) switch# copy running-config startup-config

DETAILED STEPS

  Command or Action Purpose

Step 1

switch# configure terminal

Enters global configuration mode.

Step 2

switch(config)# feature tacacs+

Enables TACACS+.

Step 3

switch(config)# exit

Exits configuration mode.

Step 4

(Optional) switch# copy running-config startup-config

(Optional)

Copies the running configuration to the startup configuration.

Configuring TACACS+ Server Hosts

To access a remote TACACS+ server, you must configure the IPv4 or IPv6 address or the hostname for the TACACS+ server on the Cisco Nexus device. All TACACS+ server hosts are added to the default TACACS+ server group.You can configure up to 64 TACACS+ servers.

If a preshared key is not configured for a configured TACACS+ server, a warning message is issued if a global key is not configured. If a TACACS+ server key is not configured, the global key (if configured) is used for that server.

(See Configuring TACACS+ Global Preshared Keys and Configuring TACACS+ Server Preshared Keys sections for more details.)

Before you configure TACACS+ server hosts, you should do the following:

  • Enable TACACS+. See Enabling TACACS+ for more information.

  • Obtain the IPv4 or IPv6 addresses or the hostnames for the remote TACACS+ servers.

SUMMARY STEPS

  1. switch# configure terminal
  2. switch(config)# tacacs-server host {ipv4-address | ipv6-address | host-name}
  3. switch(config)# tacacs-server host {ipv4-address | host-name}
  4. switch(config)# exit
  5. (Optional) switch# show tacacs-server
  6. (Optional) switch# copy running-config startup-config

DETAILED STEPS

  Command or Action Purpose

Step 1

switch# configure terminal

Enters global configuration mode.

Step 2

switch(config)# tacacs-server host {ipv4-address | ipv6-address | host-name}

Specifies the IPv4 or IPv6 address or hostname for a TACACS+ server.

Step 3

switch(config)# tacacs-server host {ipv4-address | host-name}

Specifies the IPv4 address or hostname for a TACACS+ server.

Step 4

switch(config)# exit

Exits configuration mode.

Step 5

(Optional) switch# show tacacs-server

(Optional)

Displays the TACACS+ server configuration.

Step 6

(Optional) switch# copy running-config startup-config

(Optional)

Copies the running configuration to the startup configuration.

Example

You can delete a TACACS+ server host from a server group.

Configuring TACACS+ Global Preshared Keys

You can configure preshared keys at the global level for all servers used by the Cisco Nexus device. A preshared key is a shared secret text string between the Cisco Nexus device and the TACACS+ server hosts.

Before you configure preshared keys, you should do the following:

  • Enable TACACS+.
  • Obtain the preshared key values for the remote TACACS+ servers.

SUMMARY STEPS

  1. switch# configure terminal
  2. tacacs-server key [0 | 6 | 7] key-value
  3. switch(config)# exit
  4. (Optional) switch# show tacacs-server
  5. (Optional) switch# copy running-config startup-config

DETAILED STEPS

  Command or Action Purpose

Step 1

switch# configure terminal

Enters global configuration mode.

Step 2

tacacs-server key [0 | 6 | 7] key-value

Example:

switch(config)# tacacs-server key 0 QsEfThUkO

Example:

switch(config)# tacacs-server key 7 "fewhg”

Specifies a TACACS+ key for all TACACS+ server. You can specify that the key-value is in clear text format (0 ), is type-6 encrypted (6), or is type-7 encrypted (7 ). The Cisco NX-OS software encrypts a clear text key before saving it to the running configuration. The default format is clear text. The maximum length is 63 characters.

By default, no secret key is configured.

Note


If you already configured a shared secret using the generate type7_encrypted_secret command, enter it in quotation marks, as shown in the second example.

Step 3

switch(config)# exit

Exits configuration mode.

Step 4

(Optional) switch# show tacacs-server

(Optional)

Displays the TACACS+ server configuration.

Note


The preshared keys are saved in encrypted form in the running configuration. Use the show running-config command to display the encrypted preshared keys.

Step 5

(Optional) switch# copy running-config startup-config

(Optional)

Copies the running configuration to the startup configuration.

Example

The following example shows how to configure global preshared keys:


switch# configure terminal
switch(config)# tacacs-server key 0 QsEfThUkO
switch(config)# exit
switch# show tacacs-server
switch# copy running-config startup-config

Configuring TACACS+ Server Groups

You can specify one or more remote AAA servers to authenticate users using server groups. All members of a group must belong to the TACACS+ protocol. The servers are tried in the same order in which you configure them.

You can configure these server groups at any time but they only take effect when you apply them to an AAA service.

Before you begin

You must use the feature tacacs+ command to enable TACACS+ before you configure TACACS+.

SUMMARY STEPS

  1. switch# configure terminal
  2. switch(config)# aaa group server tacacs+ group-name
  3. (Optional) switch(config-tacacs+)# deadtime minutes
  4. (Optional) switch(config-tacacs+)# source-interface interface
  5. switch(config-tacacs+)# exit
  6. (Optional) switch(config)# show tacacs-server groups
  7. (Optional) switch(config)# copy running-config startup-config

DETAILED STEPS

  Command or Action Purpose

Step 1

switch# configure terminal

Enters global configuration mode.

Step 2

switch(config)# aaa group server tacacs+ group-name

Creates a TACACS+ server group and enters the TACACS+ server group configuration mode for that group.

Step 3

(Optional) switch(config-tacacs+)# deadtime minutes

(Optional)

Configures the monitoring dead time. The default is 0 minutes. The range is from 0 through 1440.

Note


If the dead-time interval for a TACACS+ server group is greater than zero (0), that value takes precedence over the global dead-time value.

Step 4

(Optional) switch(config-tacacs+)# source-interface interface

(Optional)

Assigns a source interface for a specific TACACS+ server group.

The supported interface types are management and VLAN.

Note


Use the source-interface command to override the global source interface assigned by the ip tacacs source-interface command.

Step 5

switch(config-tacacs+)# exit

Exits configuration mode.

Step 6

(Optional) switch(config)# show tacacs-server groups

(Optional)

Displays the TACACS+ server group configuration.

Step 7

(Optional) switch(config)# copy running-config startup-config

(Optional)

Copies the running configuration to the startup configuration.

Example

The following example shows how to configure a TACACS+ server group:

switch# configure terminal
switch(config)# aaa group server tacacs+ TacServer
switch(config-tacacs+)# server 10.10.2.2
switch(config-tacacs+)# deadtime 30
switch(config-tacacs+)# exit
switch(config)# show tacacs-server groups
switch(config)# copy running-config startup-config

Configuring the Global Source Interface for TACACS+ Server Groups

You can configure a global source interface for TACACS+ server groups to use when accessing TACACS+ servers. You can also configure a different source interface for a specific TACACS+ server group.

SUMMARY STEPS

  1. configure terminal
  2. ip tacacs source-interface interface
  3. exit
  4. (Optional) show tacacs-server
  5. (Optional) copy running-config startup config

DETAILED STEPS

  Command or Action Purpose

Step 1

configure terminal

Enters global configuration mode.

Step 2

ip tacacs source-interface interface

Example:

switch(config)# ip tacacs source-interface mgmt 0

Configures the global source interface for all TACACS+ server groups configured on the device. The source interface can be the management or the VLAN interface.

Step 3

exit

Example:

switch(config)# exit
switch#

Exits configuration mode.

Step 4

(Optional) show tacacs-server

Example:

switch# show tacacs-server
(Optional)

Displays the TACACS+ server configuration information.

Step 5

(Optional) copy running-config startup config

Example:

switch# copy running-config startup-config
(Optional)

Copies the running configuration to the startup configuration.

Configuring the Global TACACS+ Timeout Interval

You can set a global timeout interval that the Cisco Nexus device waits for responses from all TACACS+ servers before declaring a timeout failure. The timeout interval determines how long the switch waits for responses from TACACS+ servers before declaring a timeout failure.

SUMMARY STEPS

  1. switch# configure terminal
  2. switch(config)# tacacs-server timeout seconds
  3. switch(config)# exit
  4. (Optional) switch# show tacacs-server
  5. (Optional) switch# copy running-config startup-config

DETAILED STEPS

  Command or Action Purpose

Step 1

switch# configure terminal

Enters global configuration mode.

Step 2

switch(config)# tacacs-server timeout seconds

Specifies the timeout interval for TACACS+ servers. The default timeout interval is 5 second and the range is from 1 to 60 seconds.

Step 3

switch(config)# exit

Exits configuration mode.

Step 4

(Optional) switch# show tacacs-server

(Optional)

Displays the TACACS+ server configuration.

Step 5

(Optional) switch# copy running-config startup-config

(Optional)

Copies the running configuration to the startup configuration.

Configuring the Timeout Interval for a Server

You can set a timeout interval that the Cisco Nexus device waits for responses from a TACACS+ server before declaring a timeout failure. The timeout interval determines how long the switch waits for responses from a TACACS+ server before declaring a timeout failure.

SUMMARY STEPS

  1. switch# configure terminal
  2. switch(config)# exit
  3. (Optional) switch# show tacacs-server
  4. (Optional) switch# copy running-config startup-config

DETAILED STEPS

  Command or Action Purpose

Step 1

switch# configure terminal

Enters global configuration mode.

Step 2

switch(config)# exit

Exits configuration mode.

Step 3

(Optional) switch# show tacacs-server

(Optional)

Displays the TACACS+ server configuration.

Step 4

(Optional) switch# copy running-config startup-config

(Optional)

Copies the running configuration to the startup configuration.

Configuring TCP Ports

You can configure another TCP port for the TACACS+ servers if there are conflicts with another application. By default, the Cisco Nexus device uses port 49 for all TACACS+ requests.

SUMMARY STEPS

  1. switch# configure terminal
  2. switch(config)# exit
  3. (Optional) switch# show tacacs-server
  4. (Optional) switch# copy running-config startup-config

DETAILED STEPS

  Command or Action Purpose

Step 1

switch# configure terminal

Enters global configuration mode.

Step 2

switch(config)# exit

Exits configuration mode.

Step 3

(Optional) switch# show tacacs-server

(Optional)

Displays the TACACS+ server configuration.

Step 4

(Optional) switch# copy running-config startup-config

(Optional)

Copies the running configuration to the startup configuration.

Example

The following example shows how to configure TCP ports:


switch# configure terminal
switch(config)# tacacs-server host 10.10.1.1 port 2
switch(config)# exit
switch# show tacacs-server
switch# copy running-config startup-config

Configuring Periodic TACACS+ Server Monitoring

You can monitor the availability of TACACS+ servers. These parameters include the username and password to use for the server and an idle timer. The idle timer specifies the interval in which a TACACS+ server receives no requests before the Cisco Nexus device sends out a test packet.You can configure this option to test servers periodically, or you can run a one-time only test.


Note


To protect network security, we recommend that you use a username that is not the same as an existing username in the TACACS+ database.


The test idle timer specifies the interval in which a TACACS+ server receives no requests before the Cisco Nexus device sends out a test packet.


Note


The default idle timer value is 0 minutes. When the idle time interval is 0 minutes, periodic TACACS+ server monitoring is not performed.


SUMMARY STEPS

  1. switch# configure terminal
  2. switch(config)# tacacs-server dead-time minutes
  3. switch(config)# exit
  4. (Optional) switch# show tacacs-server
  5. (Optional) switch# copy running-config startup-config

DETAILED STEPS

  Command or Action Purpose

Step 1

switch# configure terminal

Enters global configuration mode.

Step 2

switch(config)# tacacs-server dead-time minutes

Specifies the number minutes before the Cisco Nexus device checks a TACACS+ server that was previously unresponsive. The default value is 0 minutes and the valid range is 0 to 1440 minutes.

Step 3

switch(config)# exit

Exits configuration mode.

Step 4

(Optional) switch# show tacacs-server

(Optional)

Displays the TACACS+ server configuration.

Step 5

(Optional) switch# copy running-config startup-config

(Optional)

Copies the running configuration to the startup configuration.

Example

The following example shows how to configure periodic TACACS+ server monitoring:


switch# configure terminal
switch(config)# tacacs-server host 10.10.1.1 test username user1 password Ur2Gd2BH idle-time 3
switch(config)# tacacs-server dead-time 5
switch(config)# exit
switch# show tacacs-server
switch# copy running-config startup-config

Configuring the Dead-Time Interval

You can configure the dead-time interval for all TACACS+ servers. The dead-time interval specifies the time that the Cisco Nexus device waits, after declaring a TACACS+ server is dead, before sending out a test packet to determine if the server is now alive.


Note


When the dead-time interval is 0 minutes, TACACS+ servers are not marked as dead even if they are not responding. You can configure the dead-time interval per group. See Configuring TACACS+ Server Groups


SUMMARY STEPS

  1. switch# configure terminal
  2. switch(config)# tacacs-server deadtime minutes
  3. switch(config)# exit
  4. (Optional) switch# show tacacs-server
  5. (Optional) switch# copy running-config startup-config

DETAILED STEPS

  Command or Action Purpose

Step 1

switch# configure terminal

Enters global configuration mode.

Step 2

switch(config)# tacacs-server deadtime minutes

Configures the global dead-time interval. The default value is 0 minutes. The range is from 1 to 1440 minutes.

Step 3

switch(config)# exit

Exits configuration mode.

Step 4

(Optional) switch# show tacacs-server

(Optional)

Displays the TACACS+ server configuration.

Step 5

(Optional) switch# copy running-config startup-config

(Optional)

Copies the running configuration to the startup configuration.

Configuring X.509 Certificate-Based SSH Authorization Using TACACS Server

Beginning with Cisco NX-OS release 10.4(3)F, you can configure SSH-based authorization of x509v3-certificates using a TACAC+ server on the Cisco Nexus switches.

To configure X.509 certificate-based SSH-authorization using a TACAC+ server, follow these steps:

SUMMARY STEPS

  1. configure terminal
  2. aaa authorization ssh-certificate default group tacacs-group-name
  3. exit
  4. (Optional) show aaa authorization [all]
  5. (Optional) copy running-config startup-config

DETAILED STEPS

  Command or Action Purpose

Step 1

configure terminal

Example:

switch# configure terminal
switch(config)#

Enters global configuration mode.

Step 2

aaa authorization ssh-certificate default group tacacs-group-name

Example:

switch(config)# aaa authorization ssh-certificate default group tac

Configures the default AAA authorization method for the TACAC+ servers.

The ssh-certificate keyword configures TACACS or local authorization with certificate authentication. The default authorization is local authorization, which is the list of authorized commands for the user’s assigned role.

Note

 
  • Ensure that the tacacs-group-name is configured under the TACACS-server configuration using the aaa group server tacacs+ tacacs-group-name command.

  • To support SSH certificate-based authentication, configure a crypto trustpoint and install the root CA. For more details, see the Configuring PKI section.

Step 3

exit

Example:

switch(config)# exit
switch#

Exits global configuration mode.

Step 4

(Optional) show aaa authorization [all]

Example:

switch# show aaa authorization
(Optional)

Displays the AAA authorization configuration. The all keyword displays the default values.

Step 5

(Optional) copy running-config startup-config

Example:

switch# copy running-config 
startup-config
(Optional)

Copies the running configuration to the startup configuration.

Manually Monitoring TACACS+ Servers or Groups

SUMMARY STEPS

  1. switch# test aaa server tacacs+ {ipv4-address | host-name} [vrf vrf-name] username password
  2. switch# test aaa group group-name username password

DETAILED STEPS

  Command or Action Purpose

Step 1

switch# test aaa server tacacs+ {ipv4-address | host-name} [vrf vrf-name] username password

Sends a test message to a TACACS+ server to confirm availability.

Step 2

switch# test aaa group group-name username password

Sends a test message to a TACACS+ server group to confirm availability.

Example

The following example shows how to manually issue a test message:


switch# test aaa server tacacs+ 10.10.1.1 user1 Ur2Gd2BH
switch# test aaa group TacGroup user2 As3He3CI

Disabling TACACS+

You can disable TACACS+.


Caution


When you disable TACACS+, all related configurations are automatically discarded.


SUMMARY STEPS

  1. switch# configure terminal
  2. switch(config)# no feature tacacs+
  3. switch(config)# exit
  4. (Optional) switch# copy running-config startup-config

DETAILED STEPS

  Command or Action Purpose

Step 1

switch# configure terminal

Enters global configuration mode.

Step 2

switch(config)# no feature tacacs+

Disables TACACS+.

Step 3

switch(config)# exit

Exits configuration mode.

Step 4

(Optional) switch# copy running-config startup-config

(Optional)

Copies the running configuration to the startup configuration.

Displaying TACACS+ Statistics

To display the statistics, the switch maintains for TACACS+ activity, perform this task:

SUMMARY STEPS

  1. switch# show tacacs-server statistics [hostname | ipv4-address | ipv6-address]

DETAILED STEPS

Command or Action Purpose

switch# show tacacs-server statistics [hostname | ipv4-address | ipv6-address]

Displays the TACACS+ statistics.

Note


ipv6-address parameter not supported on Nexus 3548.

Example

For detailed information about the fields in the output from this command, see the Command Reference for your Nexus switch.

Verifying the TACACS+ Configuration

To display TACACS+ information, perform one of the following tasks:

Command Purpose

show tacacs+ {status | pending | pending-diff}

Displays the TACACS+ Cisco Fabric Services distribution status and other details.

show running-config tacacs [all]

Displays the TACACS+ configuration in the running configuration.

show startup-config tacacs

Displays the TACACS+ configuration in the startup configuration.

show tacacs-serve [host-name | ipv4-address | ipv6-address] [directed-request | groups | sorted | statistics]

Displays all configured TACACS+ server parameters.

Configuration Examples for TACACS+

This example shows how to configure TACACS+:

switch# configure terminal
switch(config)# feature tacacs+
switch(config)# tacacs-server key 7 "ToIkLhPpG"
switch(config)# tacacs-server host 10.10.2.2 key 7 "ShMoMhTl"
switch(config)# aaa group server tacacs+ TacServer
switch(config-tacacs+)# server 10.10.2.2
switch(config-tacacs+)# use-vrf management

This example shows how to enable tacacs+ and how to configure the tacacs+ server preshared keys to specify remote AAA servers to authenticate server group TacServer1:

switch# configure terminal
switch(config)# feature tacacs+
switch(config)# tacacs-server key 7 "ikvhw10"
switch(config)# tacacs-server host 1.1.1.1 
switch(config)# tacacs-server host 1.1.1.2 
 
switch(config)# aaa group server tacacs+ TacServer1 
switch(config-tacacs+)#   server 1.1.1.1 
switch(config-tacacs+)#   server 1.1.1.2 

Default Settings for TACACS+

The following table lists the default settings for TACACS+ parameters.

Table 1. Default TACACS+ Parameters

Parameters

Default

TACACS+

Disabled

Dead-time interval

0 minutes

Timeout interval

5 seconds

Idle timer interval

0 minutes

Periodic server monitoring username

test

Periodic server monitoring password

test